


In my previous article, I shared my love of Docker with you. I really love Docker - it can be such a productivity boost. Although it does have a lot of applicability to my dev life, where it really shines is DevOps.
Find additional articles: On Azure or JavaScript
Microsoft has been busy with a product called VSTS, or Visual Studio Team Services. Perhaps the worst thing about that product was the name. “Visual Studio” led us to believe that this product was specific to Microsoft technologies, namely Visual Studio. Recently, Microsoft has renamed and restructured this product under the name “DevOps.”
The reality is that VSTS was fully cross-platform. Azure DevOps is certainly cross-platform. In this article, I intend to take completely non-Microsoft technologies and show an end-to-end process, using Azure DevOps.
What is DevOps
I won't spend a lot of time describing what DevOps is, I'm confident that you'll find a lot of resources on the Internet describing the definition. The practical upshot of all this is that over many years, developers and IT pros have been in separate camps. Developers neatly package something and IT pros blow it up; then they spend the rest of the day blaming each other. Developers are under the gun to deliver new functionality, IT pros have a vested interest in status quo, because if you don't change anything, nothing will break, right?
In today's fast-paced world, this mentality needs to change. We need to lower the cost of deployment, we need to move away from 50-page installation instructions, and we need to automate as much as possible. Organizations that automate end-to-end will win.
Study after study has shown that this equates to real savings and massive gains in productivity.
What Are We Going to Build?
At the center of the show, you'll find Azure DevOps. I intend to build:
- A simple Angular project using Angular CLI. (I won't dive into the details of Angular in this article.)
- Source control that uses Azure DevOps over a Git interface
- A process that converts my Angular CLI-based project into a deployable Docker image
- An Azure DevOps pipeline that runs every time I do a check in, builds my Angular project, and creates a Docker image from my Angular project
- A Docker image that automatically pushes to the Azure Container Registry in a published container that automatically deploys to an Azure website
The end result will be a developer that checks in code and automatically builds and deploys a Docker image that's live-deployed to an Azure website in a matter of seconds!
This must be hard, right? There's so much stuff to automate. Nope, it isn't. You'll be pleasantly surprised that by the end of this article, with zero background in Azure DevOps, you'll be able to build such automation for your projects very easily.
Let's get started!
Provision Resources
In order to follow along with this article, you'll need:
- A DevOps subscription, which you can get for free from here, https://azure.microsoft.com/en-us/services/DevOps/. If you have an MSDN subscription, you can use it for serious projects.
- An Azure subscription. You can sign up for free if you don't already have one. You'll need a valid credit card though. Although the costs for the resources required for this article are relatively low, be mindful of them. They are your responsibility.
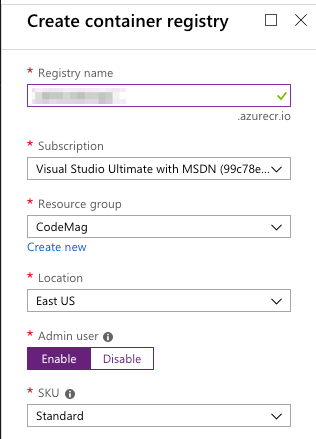
In your Azure subscription, go ahead and provision an instance of Azure Container Registry. When you create a container registry, ensure that you choose to enable the Admin user, as shown in Figure 1. The reason you're enabling the admin user is because later you'll use this admin user to create a Docker registry connection within Azure DevOps pipeline.
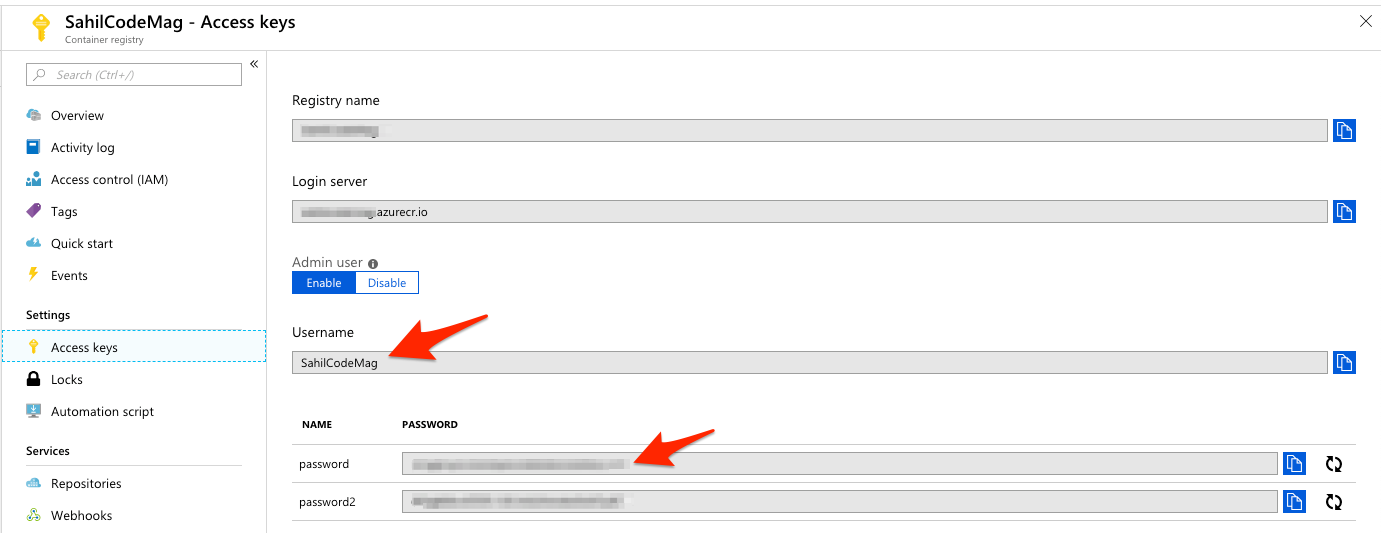
Once the Azure container registry is provisioned, go ahead and grab the username password, as shown in Figure 2. You'll need this shortly.
Create an Angular App
Now let's come to your dev computer. This could be Linux, Mac, or Windows. As long as it has NodeJS installed and can work with GIT, you're ready to go.
Install Angular CLI using the command:
npm install -g @angular/cli
Now, go ahead and create a new Angular app using the command:
ng new angularProject
This should ask you a couple of questions and create a simple Angular project with a Git repo initialized. I'm not going to dive into the depths of Angular here. Really the actual application doesn't matter, because this simple command gives you a sample Angular project. For the purposes of this article, you need to know just a few basic concepts, such as how you run this project, and how you build this project.
In order to run this project, you can issue the following command:
ng serve
Go ahead and try it! You'll see that Angular builds your project and serves it on localhost:4200.
The second thing you need to know is that when you're ready to ship the app, you issue the following command:
ng build --prod
When you run this, you'll notice that Angular builds the project and creates a dist folder in the root of your project. You don't usually check in this folder, and the generated gitignore files take care of that. It's the contents of this folder that run your Angular App.
In your package.json, locate the line shown next: below
"build": "ng build",
And change it to:
"build": "ng build --prod",
So now, if you run
npm run build
You should see a dist folder appear, which can be seen in Figure 3.

My Angular project is done! Now let's focus on the Docker image that will run this.
The Docker Image
As you can imagine, this Angular project yields a simple HTML page with a bunch of JavaScript and CSS files. To run this, all I need is a simple Web server.
What I intend to do next is build a Docker image that contains my application, deployed in a Web server. This is very simple to do. Simply add a file called Dockerfile in the root of your project with the following content in it:
FROM nginx:alpine
LABEL author="Sahil Malik"
COPY ./dist/angularProject/usr/share/nginx/html
EXPOSE 80 443
ENTRYPOINT [ "nginx", "-g", "daemon off;" ]
The Dockerfile file describes your Docker image. Let's slice and dice it line by line.
FROM nginx:alpine
We're starting from a base image; specifically, I chose to use NGINX, which is a very lightweight Web server. It can also act as a reverse proxy, load balancer, etc. My goal is to use it as a Web server, and that's it.
LABEL author="Sahil Malik"
That's just documentation, so you know who to complain to if this code fails.
COPY ./dist/angularProject/usr/share/nginx/html
This single line of code takes the contents of the dist/angularProject folder, and copies them into /usr/share/nginx/html. NGINX serves content from that folder. When your Docker image is created, your files will be ready to serve out of that folder.
EXPOSE 80 443
Docker doesn't expose any ports from the container by default; you have to specify what you'd like to have exposed. Here I'm saying that I wish to expose the container's port 80 on port 443 of the host computer. This makes it easy for you to test things out.
ENTRYPOINT [ "nginx", "-g", "daemon off;" ]
This final line of code is the ENTRYPOINT, which is a Docker concept. It sets the command and parameters that are run when the container is run. In other words, the container starts, and it starts nginx. Remember that the nginx:alpine image is so lightweight that, effectively, you should have a full-fledged Web server with the application running in a completely contained container that's mere kilobytes in size.
Let's try it out!
Run the Container Locally
Before I take things to the cloud, I want to make sure everything is done properly and that things are running. This makes sense, because I can iterate much faster locally, so I'll make sure things work fine before checking them in.
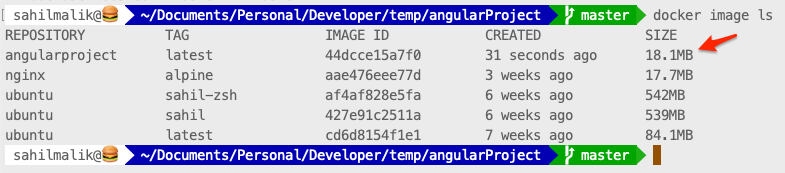
Assuming you have Docker and the VSCode Docker extension installed, in your project, press CMD_P (CTRL_P on PC), and choose to build a Docker image, as shown in Figure 4. It will ask you to tag the image; choose angularproject:latest as the tag.

Once you have built the image, verify that the Docker image shows up, as shown in Figure 5.
Choose to run this image and visit http://localhost. Verify that your Angular project loads, as shown in Figure 6.
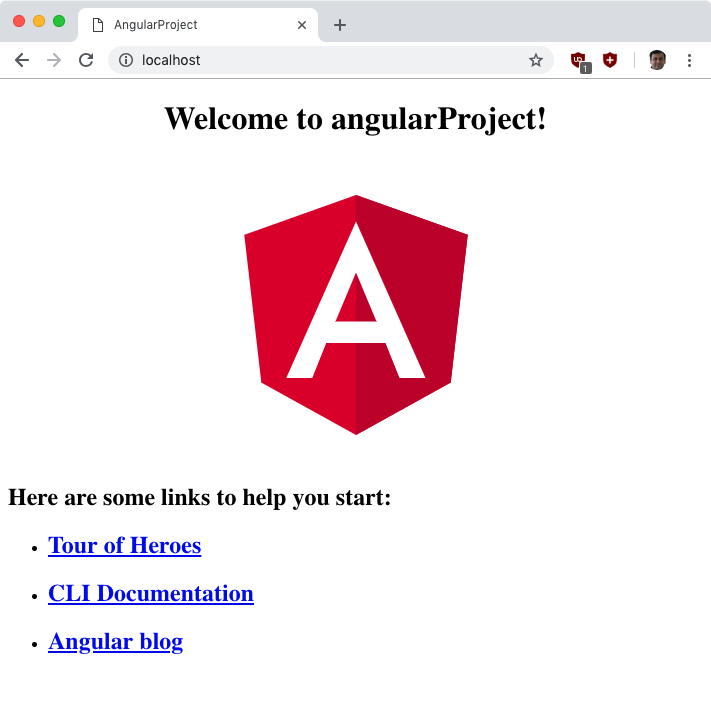
Great! Everything runs locally! It's now time to take things to the cloud.
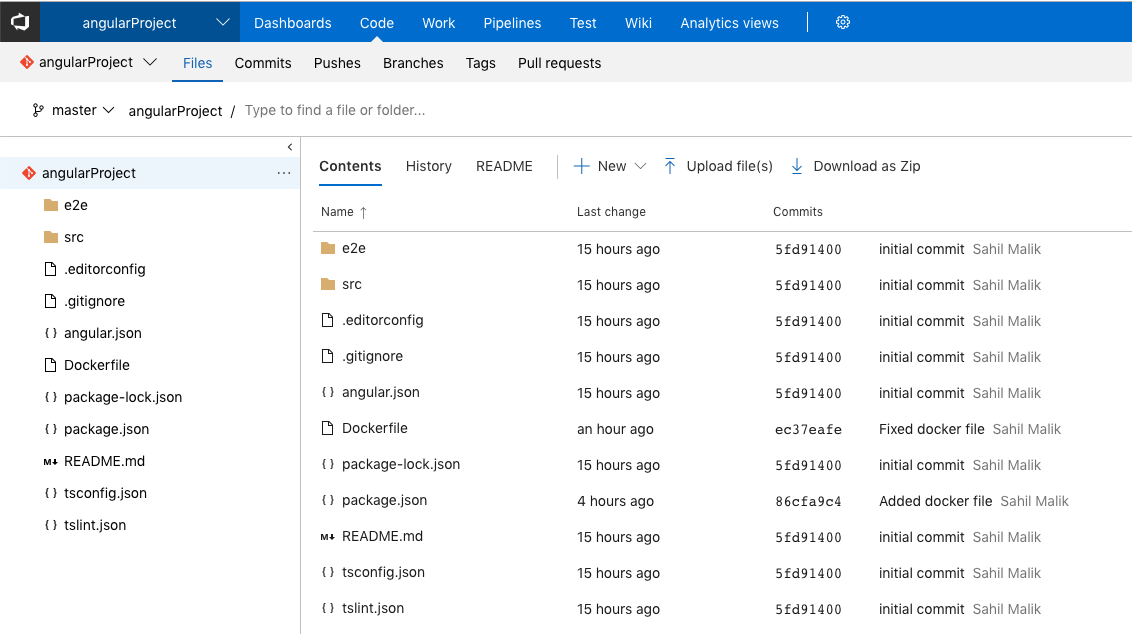
Provision a Code Repository
Log in to your Azure DevOps portal and choose to create a new project. Give it a project name of angularProject and for now, make it a Private repository. Under version control, ensure that you pick Git. Could you have picked Team Foundation Server? Absolutely, you can. But command line stuff like npm-based projects are a whole lot easier to work with in Git, so let's go with that.
Once your repository is provisioned, choose to check in your code. You'll need to create a username password in your Git repo, which you'll use to push changes. There are other ways also, but you need some way of authentication from the command line to Git. Go ahead and create a username password for yourself and remember it.
Next, in your terminal, check in and commit:
git add . && Git commit -m "initial commit"
Go ahead and push your changes into your cloud-based repo using the following commands:
git remote add origin <giturl>
git push -u origin –all
Remember to replace the <giturl> with the URL of your newly created repository.
At this time, verify that your code is available in the Git repo, as shown in Figure 7.
With the code checked in, you can start automating stuff. The process of taking your checked-in code, creating a Docker image out of it, and pushing that Docker image to a Docker registry is the job of a pipeline. Let's see that next.
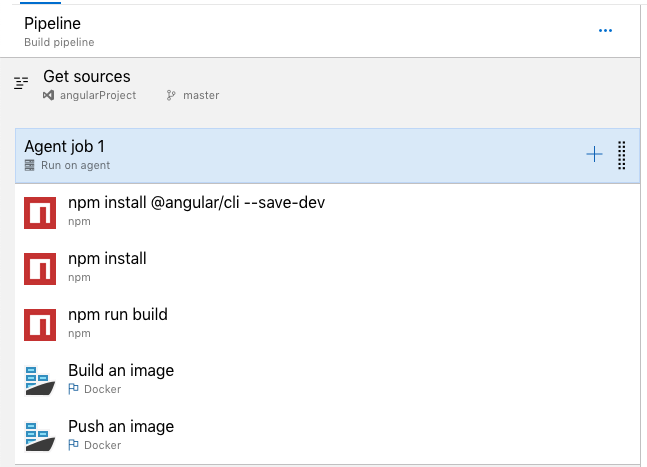
Create a Pipeline
The pipeline you create runs in an agent. An agent is an on-the-fly provisioned operating system image given to you, where you can perform actions, such as build your code. You can create your own agents, but I'll keep things simple. I'll stick with the Hosted Linux agent, which is free, and I'm cheap, so that works!
The pipeline you wish to create will do the following tasks:
- Download and install Angular CLI in dev mode within the project. The reason you do this is because the plain-vanilla hosted-Linux agent doesn't have Angular CLI installed.
- Run npm install because every node project needs this.
- Run npm run build because this creates a ./dist folder for you. Remember, you never checked in the dist folder. Effectively you can have multiple build pipelines, one building a debug version, another building a prod version, etc.
- Build a Docker image using the Dockerfile that's part of the source code.
- Push that Docker image to the container registry.
My pipeline looks like Figure 8. But don't worry, I'll explain each step.
First, choose to create a new pipeline, ensure that you pick the Docker Container template. You don't have to, but this simplifies a few things.
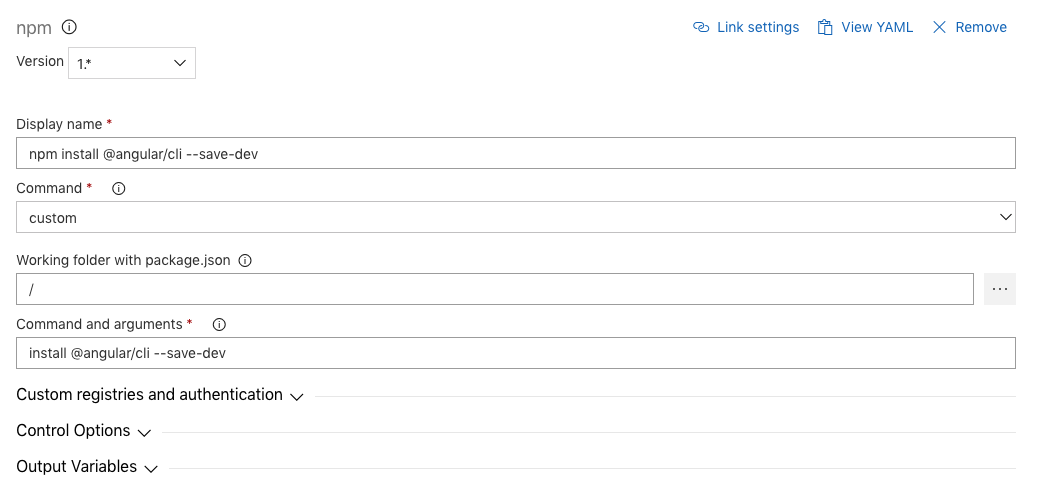
Install Angular CLI
The command to install angular CLI locally within your project is:
npm install @angular/cli --save-dev
To make this step of your build pipeline work, drag, drop, and NPM task at the top of your pipeline and configure it as shown in Figure 9.
NPM Install and NPM Run Build
Use the same approach as installing Angular CLI and add two more steps: First do an npm install, and then do an npm run build.
Build an Image
Next, you need to build the Docker image. Before you can build the image, you'll need a Docker Registry Service Connection. In the dropdown for the Docker Registry Service Connection, you'll see a Manage link. Go ahead and click on it. Choose to add a Docker Registry connection. Ensure that you pick Others and specify the connection values as shown in Figure 10.
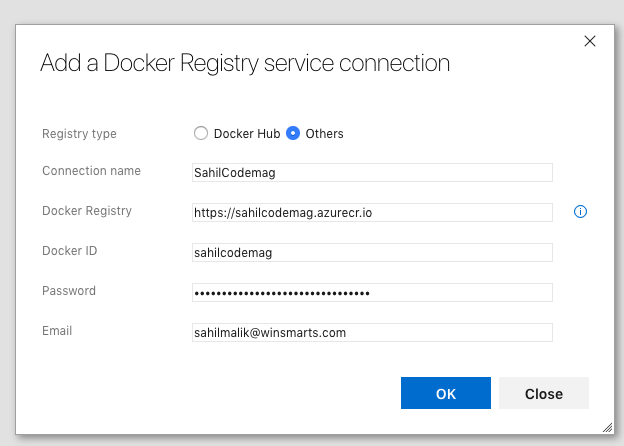
The Docker ID and Password you specify in Figure 10 is the Admin user ID and password you got from the Azure Container Registry you provisioned earlier.
When you build the image, accept all default values, except one: Specify your Docker registry service connection and the Image Name. Change the image name as below:
$(Build.Repository.Name):latest
The reason you're changing this image name is because by default, the image name has the build ID appended to it. Although that's a great idea, you wish to have end-to-end automation. You want your code check-in to trigger the whole process. The last leg of this process is deploying the Docker image to an Azure website. This is achieved by a webhook and webhooks are tied to a specific Docker image. So if the Docker image name keeps changing, I'll get a history of images, which is great! But I won't get the webhook firing, because the webhook was set up on an older image from a previous build.
Effectively, by removing build ID, you're overwriting the same image, and that image has a webhook tied to it. You haven't yet set up the webhook, but you will, shortly.
Push an Image
Again, in the Push an Image task, accept all default values, except specify your Docker registry service connection and the Image Name. Change the image name as below:
$(Build.Repository.Name):latest
In short, you're pushing the same image that the previous task created.
Run the Pipeline
With your pipeline built, go ahead and run your pipeline. You'll see a button called “Save and Queue” or just “Queue” at the top of your pipeline editor to do so. Once you queue a build, in a few moments, an agent becomes available and your pipeline executes, one by one. You can view the logs as shown in Figure 11.
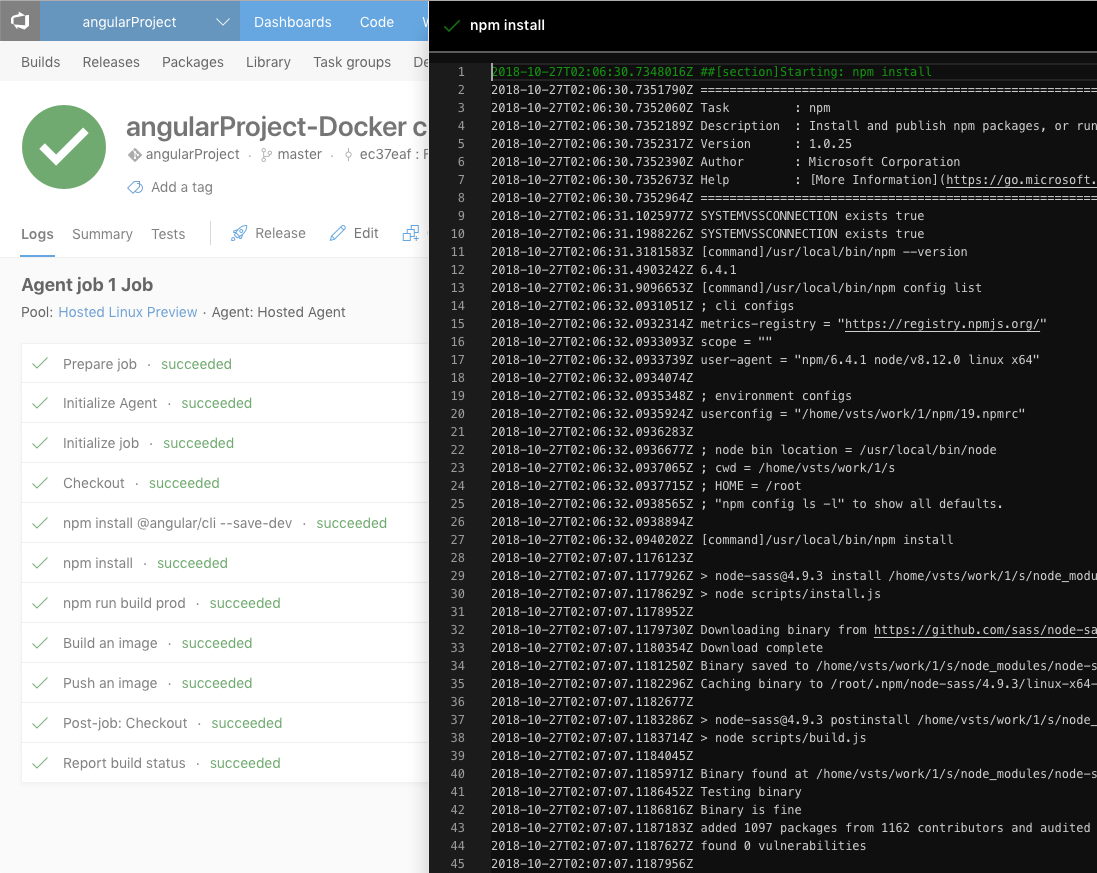
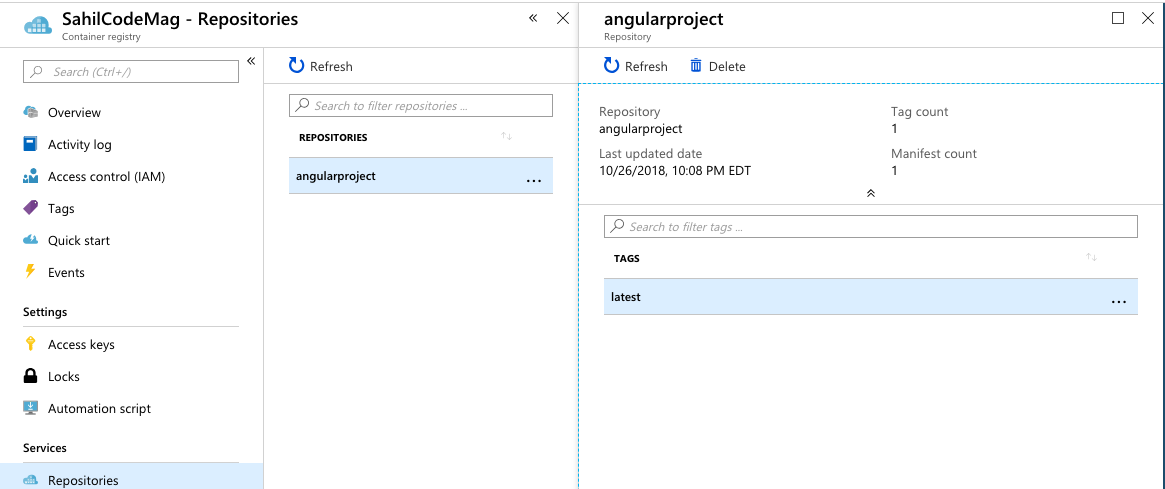
I think it's amazing that you can view the command line output, as if this was a local dev computer. This really makes it easy to diagnose errors. If you've done everything right, all the steps should run, and at the end of this execution, you should see the angularproject repository created with the latest tag under the SahilCodeMag Azure Container registry you created at the start of this article. This can be seen in Figure 12.
Set up a Webhook
The purpose of setting up a webhook is to trigger the deployment of the Docker image to an Azure website every time a build completes. On the latest tag, you'll see an ellipsis. Click on that and choose to Deploy to a Web app, as shown in Figure 13.
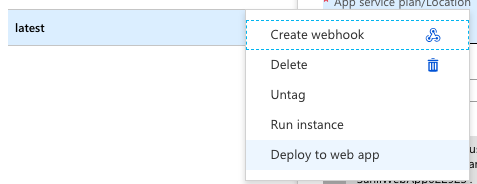
Choosing this option walks you through the process of creating an app service plan, an app service, and creating a webhook behind the scenes.
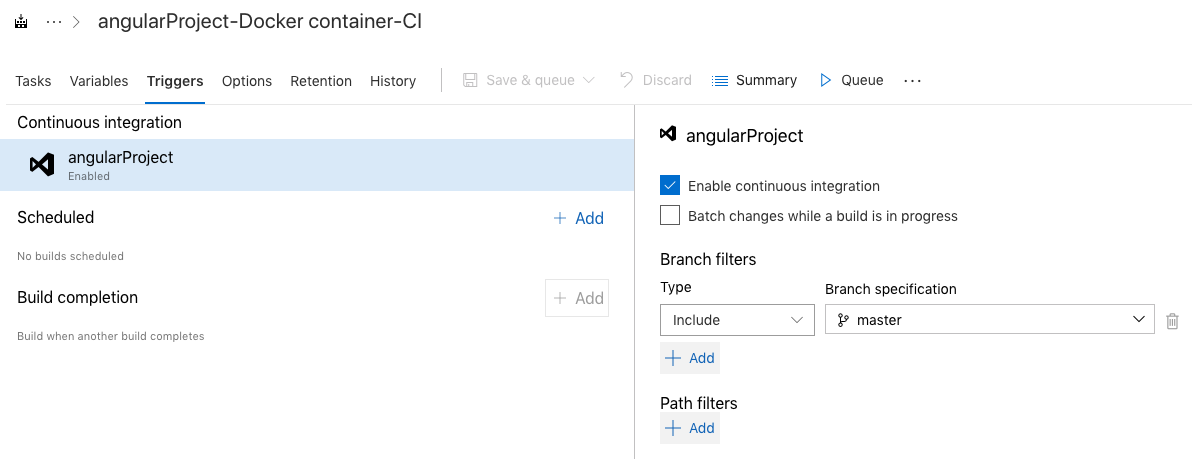
To trigger this whole process on a check-in, you need to enable continuous integration. This is a matter of checking a checkbox, as shown in Figure 14.
That's basically it! Let's see if all this works.
Testing It All Out
Back in your code, make a minor code change. Add the following line to the src/app.component.html file:
<h1> I love Azure DevOps </h1>
You can test this locally, but I'm confident it'll work. I went ahead and committed my change and pushed it.
git add .
git commit -m "A change"
git push
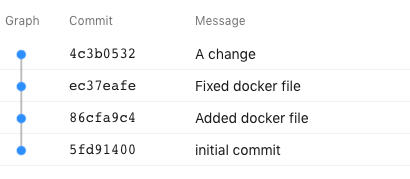
I can verify that this push appears in my commits in my repository, as can be seen in Figure 15
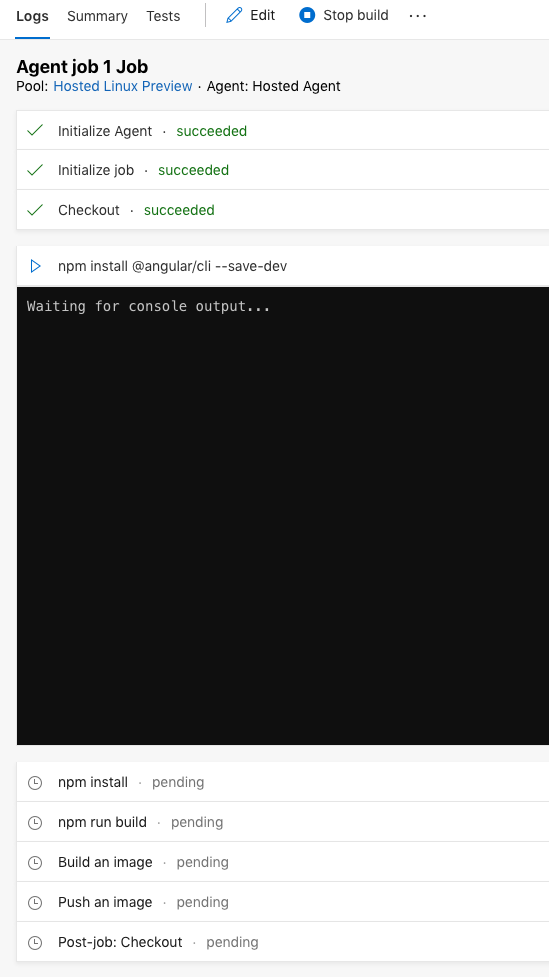
Under pipelines, you can see in Figure 16 that my “CI Build” has auto started.

If I'm quick enough, I can quickly see the progress of my build under logs. I can actually see when and how an npm install occurs in my agent. This can be seen in Figure 17.
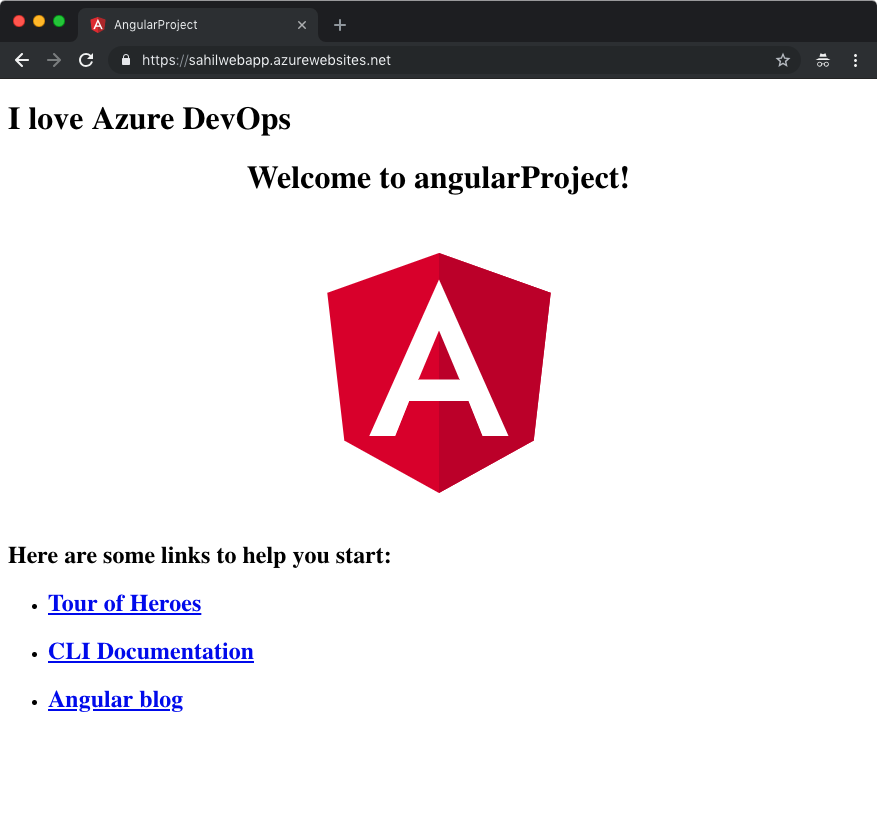
In a moment, I receive an email informing me of a successful build, which I can also verify from the site. And perhaps the best part, my site is deployed and updated for me, as can be seen in Figure 18.
Summary
A long time ago, a well-meaning person was career-advising me. I've found his advice to be very useful in the years since. He said that in IT, things will be commoditized. Is this the right line of work to build a career in?
I'm one of the lucky ones! If I were the President, I'd still come home and code every day. I picked this career because there isn't ever a boring day. And this was pretty much how I felt when posed that question.
The reality is that IT is the only field where, as one concept gets commoditized, we reinvent ourselves to stand on top of it. We exponentially make progress. Just a few years ago, we were busy ordering servers so we could run our websites. We had data centers. Now we're busy shaving milliseconds from an end-to-end auto-deployed process where a Docker image gets built, shipped, versioned, and deployed in a matter of seconds.
What's next? I don't know. But I know that in the future, there will be two jobs that will never go out of style. One will be IT and the other will be charging batteries.
There's so much more to explore, so stay tuned!
