


For client-side Web development, we've fully entered the “My Framework is Best” era. It feels like every conference I go to has a talk about why X is better than Y. This mentality isn't helping us as Web developers. It's just code that you have to support, and at the end of the day, most frameworks (or even without a framework) can do 90% of all jobs. Can't we all just get along?
Find additional: JavaScript Articles
With that in mind, I'm going to introduce you to a new framework called Vue.js. Vue.js came out of a small team at Google that were users (not authors) of Angular and wanted something lighter than Angular 2. Out of that experiment came Vue.js.
It would be easy to explain Vue.js as a new Single Page Application (SPA) framework, but I don't think that's right. You can certainly measure it up to Angular, React, and the others in the field. But for me, it's great for more than just SPAs. But first, let's talk about the term SPA.
What is a SPA?
A short aside about my relationship with that acronym, SPA. I've never liked the term Single Page Applications. It's the term that I think has caused a lot of headaches. Single Page Application was envisioned to encompass a new world of enterprise-y applications that were being built in the browser. Great. We needed a term for this. But unfortunately, I think the moniker of “Single Page Application” has led us down the road of monster, single page, monolithic applications. Instead, I've been preaching the “islands of functionality” approach.
An “Island of Functionality” is simply a way to build a set of functionalities that requires a lot of user interaction. Instead of using nested routing or other techniques, you use the nature of multi-page websites to add that functionality wherever you need it. Yes, that means you end up with one or more SPAs in an application, but that also means it's closer to single responsibility, easier to version/deploy, and easier to test. It might feel a little like you've taken the Visual Basic 5.0 monolithic app and just ported it to the Web.
Where Does Vue Come in?
One of the reasons SPAs are so prevalent is that having one giant code set is what we're used to, but it does have a drawback. Setting up a build for a single application can be cumbersome. In fact, the new approach of building entire command-line tools (e.g., CLIs) for these frameworks is an answer to this problem. If the complexity of a build system is causing friction, hiding the details inside the tooling is a great way to fix it. This has led people to not want to build more than one of these in a single project. And this is where I envision Vue doing some amazing things.
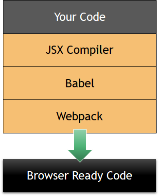
Let's look at how Vue works. In the case of React, in order to get to your first line of code, you need a build process. This build process looks like Figure 1. It requires the JSX Compiler (which may be part of TypeScript, if you're using that), Babel, and Webpack. This means that it's a lot of set up before you get browser-ready code.
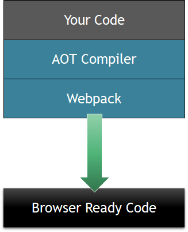
The same approach works with Angular. In Figure 2, you can see that it requires Webpack and the AOT Compiler (with TypeScript compilation included if you're using that language). Again, lots of set up before your first line of code.
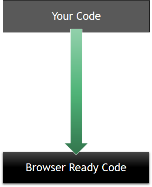
In Vue, this build process is optional. In fact, like in older libraries, you can simply use the JavaScript files included on a particular page. This means that you go from your code to browser-ready without a build step (as seen in Figure 3).
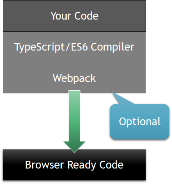
Of course, as a Vue project matures, you might gain the benefit of a build process, as shown in Figure 4. By adding compilation as you need it instead of as a starting requirement, it gives you options to use Vue in much smaller places.
To be clear, using a build process isn't an impediment in developing client-side code. Compilation steps are really useful in doing compile-time checks, minimizing the size of the payload of your code, and other benefits. The problem is that when you're trying to do something small or starting with a prototype, the build step gets in the way. That's one place where I think Vue can really help you get building for solution faster.
Getting Vue
To get started, you can go to https://vuejs.org and download the code, but usually you'll end up using a package manager. For my examples, I'll use Node Package Manager (NPM). You can add Vue to your project by typing:
npm -i vue@latest
Your package.json file should look like this now:
{
  "version": "1.0.0",
  "name": "mypackage",
  "private": true,
  "devDependencies": {
    "jquery": "3.3.1",
    "bootstrap": "4.2.1",
    "vue": "2.5.21"
  }
}
If you look in the ./node_modules/vue/dist, you'll see a series of JavaScript files. You're looking for vue.js to get started.
Add Vue to the Page
In the project, there's a simple contact page (in ./Pages/Contact.cshtml). Open that file and create an @section for Scripts:
@page
@model ContactModel
@{
  ViewData["Title"] = "Contact Page";
}
@section Scripts {
}
If you're using Visual Studio, you can just drag the file into the Scripts section; otherwise create a script tag that points to vue.js:
@section Scripts {
  <script src="~/node_modules/vue/dist/vue.js">
  </script>
}
Next, create a new file in the ./wwwroot/js folder called contact.js. Drag or write a script tag for this new file just after vue.js:
@section Scripts {
  <script src="~/node_modules/vue/dist/vue.js">
  </script>
  <script src="~/js/contact.js"></script>
}
Now that you have Vue installed, let's write some code.
Create the View
Back in the contact.js file, create a new variable called theView and assign it with a new Vue object:
// contact.js
var theView = new Vue();
The Vue object takes an anonymous object to configure it. In this new object, set a property called el to specify a selector to pick where the view lives. If you look at the Contact.cshtml file, you'll see the form element that's named theForm. Set the selector to #theForm to pick the element that represents the view.
// contact.js
var theView = new Vue({
  el: "#theForm"
});
At this point, you've created the view and told it what part of the page to be responsible for. You're ready to start making the page do something.
Binding to Data
One of the main reasons for using a library like Vue is to be able to separate the data and the markup. For Vue, it wants you to create a property on the Vue object called data that contains the properties that you might want to bind to the view. To do that, create another property on the Vue object called data and set it to an anonymous object:
var theView = new Vue({
  el: "#theForm",
  data: {}
});
The data object is everything you'll want to push to the view. Create a property in the data called title and set it to "Contact Form":
var theView = new Vue({
  el: "#theForm",
  data: {
    title: "Contact Form"
  }
});
Vue uses a couple of ways to bind data to the view. The first way is to simply use double curly-braces ({{}}). To show the title, add a div just inside the form element and use the double curly-braces to write out the title:
<div class="col-6 offset-3">
  <form method="post" id="theForm">
    <div>{{ title }}</div>
    ...
If you launch the contact page, you'll see title show up in the page automatically. You can bind to attributes, too. To do this you can simply add v-bind: to the beginning of the attribute:
<div v-bind:title="title">{{ title }}</div>
These Vue-only commands start with v- as a convention. You'll see more of this in a minute. If you find yourself using v-bind quite a lot, you can shorten it to just a colon as well:
<div :title="title">{{ title }}</div>
Now that you can push data to the view, let's look at how events work.
Responding to Events
In order to handle events, Vue supports a v-on: attribute that can handle any event supported by the DOM. For example, to handle the submit event on the form, just add it to the form element:
<form method="post"
      id="theForm"
      v-on:submit="onSubmit()">
Retrieving the contents of the event handler is just a call to the view itself. The Vue object supports a property called methods that contains callable events. To implement the onSubmit, add it to a method property on the Vue object like so:
var theView = new Vue({
  el: "#theForm",
  data: {
    title: "Contact Form"
  },
  methods: {
    onSubmit: function () {

    }
  }
});
I'm using the older function syntax, but you can use EC2015 if you prefer. This pointer on the function is set to the data object so all data is available in the function. For example, you can change the title in the onSubmit call like so:
  methods: {
    onSubmit: function () {
      this.title = "This is a new title";
    }
  }
If you view the page again and click submit, you'll see something odd. The title will flash quickly and then revert. The problem is that you're using a form and clicking on the submit button submits the form. Vue has support for decorators on the event handler to tell it to automatically do things like prevent the event bubbling. You can fix this by adding .prevent after the name of the event, like so:
<form method="post"
      id="theForm"
      v-on:submit.prevent="onSubmit()">
If you try it again, you'll see it change. But how does this work? That's what is called Reactivity. Let's explore that next.
Reactivity in Vue
If you've used other frameworks, the phrase “reactive” might make sense to you already, but if not, let's discuss how Vue.js does it. The idea of reactivity is to allow the view to react to changes in the Vue object (or the component or other code). You can see the cycle described in Figure 5.
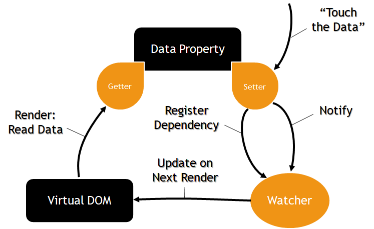
Let's walk through how it works. When you create a property on the data object, Vue creates a setter and getter to be able to intercept the changing of the property. Vue also creates a Watcher that's connected to the Virtual DOM. There's a message pump that launches a Render cycle occasionally so that your changes to properties can't block the user interface. When you set a property, it notifies the Watcher so that on the next Render cycle, the Virtual DOM can read from the property in rendering the change. This simplifies your code so you don't ever have to think about the render cycle. You just make changes to the underlying data and the UI reacts to your change.
Model Binding
So far, the changes to data you've seen has all happened in code. What about when you want the user to make changes? That's where Model Binding comes in. Let's see it in action.
Open the contact.js and add a new property on data called msg and assign it to an empty object with properties for each of the contact form controls:
  data: {
    title: "Contact Form",
    msg: {
      name: "",
      email: "",
      subject: "",
      body: ""
    }
  },
Go back to the form and add a v-model on the first input in the form and assign it to msg.name. This binds it to the input and supports two-way binding.
          <input type="text"
                 class="form-control"
                 name="name"
                 v-model="msg.name" />
Go back to the contact.js and change the onSubmit to alert you to the msg.name so you can see if it changes:
    onSubmit: function () {
      this.title = "This is a new title";
      alert(this.msg.name);
    }
If you run this and put a value into the name field and press submit, you'll see the name show up. That means that as the user enters in the form, the underlying Vue object is being changed by the user. Repeat this for the entire form, as shown in Listing 1.
Listing 1: Model Binding to the form
    <form method="post" id="theForm" v-on:submit.prevent="onSubmit()">
        <div :title="title">{{ title }}</div>
        <div class="form-group">
          <label>Name</label>
          <input type="text"
                 class="form-control"
                 name="name"
                 v-model="msg.name" />
        </div>
        <div class="form-group">
          <label for="">Email</label>
          <input type="email"
                 class="form-control"
                 name="email"
                 v-model="msg.email" />
        </div>
        <div class="form-group">
          <label for="">Subject</label>
          <input type="text" class="form-control"
                 name="subject"
                 v-model="msg.subject" />
        </div>
        <div class="form-group">
          <label for="">Message</label>
          <textarea row="4"
                    class="form-control"
                    name="body"
                    v-model="msg.body" ></textarea>
        </div>
        <div class="form-group">
          <input type="submit"
                 class="btn btn-success"
                 value="Send" />
        </div>
    </form>
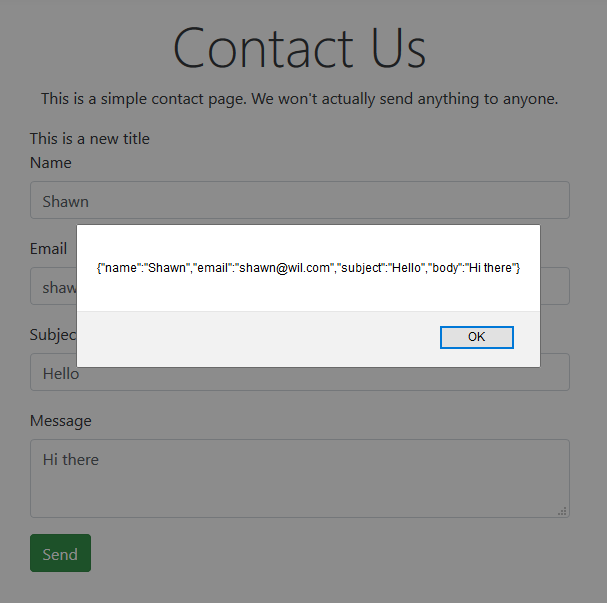
If you change the onSubmit to show you the entire msg object, you can see how each of these changes:
  methods: {
    onSubmit: function () {
      this.title = "This is a new title";
      alert(JSON.stringify(this.msg));
    }
  }
If you run it one last time, you can see all the properties in the alert, as seen in Figure 6.
You've looked at one- and two-way binding now but creating a large view with just one huge JavaScript file doesn't seem like a good idea. That's where components come in.
Adding a Component
Let's start by creating a new file in the ./wwwroot/js folder called wait-cursor.js. Inside this file, call Vue.component to create a new reusable component:
// wait-cursor.js
Vue.component("wait-cursor", {
});
This is similar to how you built the Vue component, but it doesn't have an element to attach to. This method of creating components is creating it globally so that all code including this file will be able to use this component. There are other ways of creating components, but for now, let's just do it this way.
As this is a component, let's start with a simple, inline template:
// wait-cursor.js
Vue.component("wait-cursor", {
  template: `<div class='alert alert-info'>
  Please wait...
</div>`
});
Now that you've created it, let's use it. First, go back to the view and add this new JavaScript file into the Scripts section:
@section Scripts {
  <script src="~/node_modules/vue/dist/vue.js">
  </script>
  <script src="~/js/wait-cursor.js"></script>
  <script src="~/js/contact.js"></script>
}
Next, go to the form and add this component by just adding it to the markup as an element with the name of wait-cursor:
<form method="post" id="theForm"
      v-on:submit.prevent="onSubmit()">
  <wait-cursor></wait-cursor>
  <div :title="title">{{ title }}</div>
If you view the form, you'll see the new wait cursor working. Like any other element, you could bind attributes, content, or events. But let's encapsulate some of the functionality. Go back to the wait-cursor.js and add a new property called props and add an empty object to it.
In order to use this wait cursor, I'd like to have a way to set the message and decide whether to show it. Let's create two properties that represent the types of data you can set. You'll set the values of the properties to be the data-types that are allowed (this is optional):
Vue.component("wait-cursor", {
  props: {
    message: String,
    shown: Boolean
  },
  template: `<div class='alert alert-info'>
        Please wait...
</div>`
});
Now that you have these properties, let's use them in the template:
Vue.component("wait-cursor", {
  props: {
    message: String,
    shown: Boolean
  },
  template: `<div class='alert alert-info'
                  v-show='shown'>
  {{ message }}
</div>`
});
The v-show attribute tells Vue whether to show or hide an element. If you try to show the form now, this element will be missing. That's because the shown value is False by default (and the string is empty). Let's go back to the contact.js and add a flag for showing the wait-cursor:
var theView = new Vue({
  el: "#theForm",
  data: {
    title: "Contact Form",
    busy: false,
With this value available, you can use it to data bind to the wait-cursor in the Contact.cshtml file:
        <wait-cursor :shown="busy"
                     message="Sending Mail...">
        </wait-cursor>
Because of the props, you can use the message attribute to "Sending Mail…". For the shown prop, you want the value to be reactive, so you need to use the colon (or v-bind: if you prefer) to say that it should react to this change.
Lastly, to see this work, you can change the busy flag in the onSubmit method:
  methods: {
    onSubmit: function () {
      this.busy = true;
      // Wait 2 seconds so we can see the flag
      setTimeout(() => this.busy = false, 2000);
    }
  }
This becomes a reusable component that you can use on any page or control. In many apps, most of the UI is built as components and the main Vue becomes a simple bootstrapping of the top-level container to hold components.
Where Are We?
If you've read this far, you might be thinking that Vue is about replacing small, discrete client-side code. Maybe it's even a better way to use something like jQuery instead of full-fledged SPAs. You'd be half right. Although you can start small with Vue and get a lot accomplished without building a large-sized SPA, you can build large SPAs too.
The scale-up mentality of Vue means that as you need large, complex applications, you can layer on things like Webpack, TypeScript/Babel, testing frameworks, etc. There's even a CLI for Vue (@vue/cli) that can scaffold large SPAs to get you up to speed quickly. Give it a try. It's not really a replacement for Angular or React, but a different approach that I think most client-side Web developers need to have in their tool box. Hopefully, I've given you a reason to try it out in your next prototype or personal project before you pitch it as a viable solution for your large applications. I'm a fan, and so might you be.
