


This article continues my series on how to enhance the user experience (UX) of your MVC applications, and how to make them faster. In the first three articles, entitled Enhance Your MVC Applications Using JavaScript and jQuery: Part 1, 2, and 3, you learned about the starting MVC application that was coded using all server-side C#. You then added JavaScript and jQuery to avoid post-backs and enhance the UX in various ways. If you haven't already read these articles, I highly recommend that you read them to learn about the application you're enhancing in this series of articles.
In this article, you continue learning how to add more Ajax to your MVC application to further speed up your Web pages.
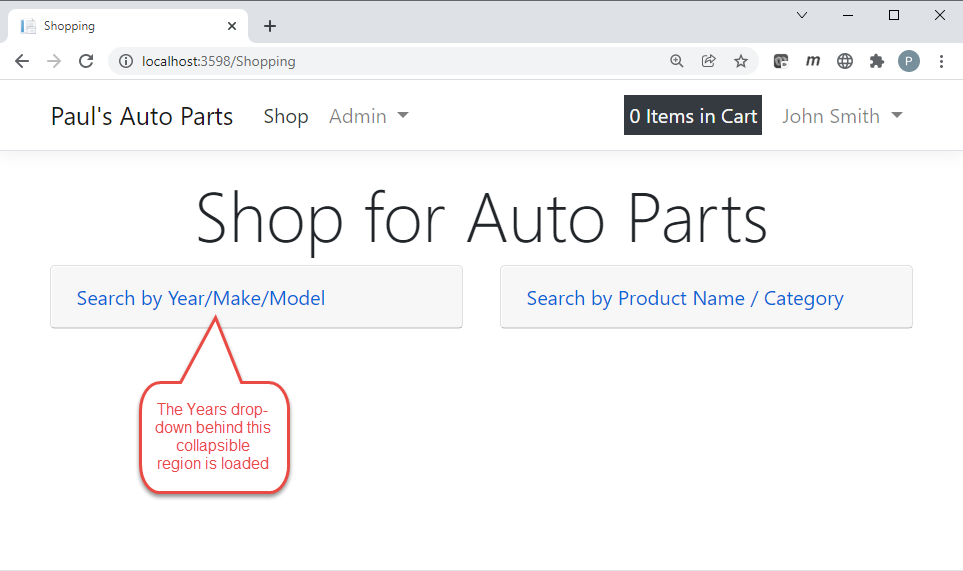
The Problem: Year Drop-Down is Pre-Filled on Shopping Page
When you click on the Shop menu, the shopping page is loaded (Figure 1) and with it, the Years drop-down is loaded even though the drop-down doesn't show because it's in a collapsed area on the page. If the user never opens this collapsed area, the years have been loaded for no reason. Instead of loading all the years right away, wait until the user expands the “Search by Year/Make/Model” collapsible area.
The Solution: Create Web API to Load Years
Open the ControllersApi\ShoppingApiController.cs file and add a new method named GetYears(), as shown in Listing 1. This API call is similar to the others you have already created. You create an instance of the ShoppingViewModel class passing in the Product and Vehicle repository classes plus the Shopping Cart object retrieved from Session. The GetYears() method is invoked on the ShoppingViewModel object to load the Years property. The Years property is returned as the payload from this API call.
Listing 1: Create a Web API to return a list of years for vehicles
[HttpGet(Name = "GetYears")]
public IActionResult GetYears()
{
    IActionResult ret;

    // Create view model
    ShoppingViewModel vm = new(_repo, _vehicleRepo, UserSession.Cart);

    // Get all years
    vm.GetYears();

    // Return all Years
    ret = StatusCode(StatusCodes.Status200OK, vm.Years);

    return ret;
}
Add Method to Page Controller
You now need to write the code to call this Web API method from the shopping cart page. Open the Views\Shopping\Index.cshtml file and add a new method to the pageController closure named getYears(), as shown in Listing 2. This method sets up a function to respond to the Bootstrap show.bs.collapse event. When a user expands the collapsible region, this function checks to see if the Year drop-down has any items in it. If it doesn't, a “Loading…” message is placed into the first item in the drop down temporarily. The message is set in an italic font so the user knows this is different from the data that eventually is loaded into this drop-down. Next, clear the Makes and Models drop-down lists if there are any loaded because these two drop-downs are dependent on the year selected. Call the GetYears() API method using the $.get() jQuery shorthand method. Once the data comes back, clear the Years drop-down, remove the italic style, and load the data into the drop-down.
Listing 2: Load the Years drop-down when the user expands the collapsible region
function getYears() {
    $("#yearMakeModel").on("show.bs.collapse", function () {
        // Check if years have already been loaded
        if ($("#SearchEntity_Year option").length === 0) {
            // Search for element just one time
            let elem = $("#SearchEntity_Year");

            // Set style on Year drop-down to italic
            elem.attr("style", "font-style: italic;");
            // Add option to drop-down to display Loading...
            elem.append("<option>Loading...</option>");

            // Clear makes drop-down
            $("#SearchEntity_Make").empty();
            // Clear models drop-down
            $("#SearchEntity_Model").empty();

            $.get("/api/ShoppingApi/GetYears", function (data) {
                // Clear "Loading..." from drop-down
                elem.empty();
                // Remove italic style
                elem.removeAttr("style");
                // Load the years into drop-down
                $(data).each(function () {
                    elem.append(`<option>${this}</option>`);
                });
            })
                .fail(function (error) {
                    console.error(error);
                });
        }
    });
}
Modify the return object to expose the new getYears() method from the closure.
return {
    "setSearchArea": setSearchArea,
    "modifyCart": modifyCart,
    "getMakes": getMakes,
    "getModels": getModels,
    "getYears": getYears
}
Call the new getYears() method from the $(document).ready() function, as shown in the following code snippet.
$(document).ready(function () {
    // Load years when search area expands
    pageController.getYears();

    // Should search area should be collapsed?
    pageController.setSearchArea();
});
Modify ShoppingController Class
Open the Controllers\Shopping\ShoppingController.cs file and remove the following line of code from the Index() method so the years aren't loaded automatically when the user goes into the Shopping page.
vm.GetYears();
Try It Out
Run the application and click on the Shop menu in the main navigation bar. Expand the “Search by Year/Make/Model” search area and, depending on how fast your browser is and how fast the API call is executed, you may see a “Loading…” message appear in the Year drop-down. Or you may just see that the years are now loaded once the area is expanded. If you want to verify that the years aren't being loaded when the page is loaded, use your browser's developer tools and check the DOM once the page is loaded and again after you expand the collapsible area. If you want to the see the “Loading…” message appear, go into the GetYears() API method call, and add the following line of code just before creating the instance of the view model class.
System.Threading.Thread.Sleep(2000);
Run the application again, and when you expand the collapsible area, you should now see the message in the Years drop-down. Be sure to remove this line of code after you've seen the message.
The Problem: Categories Drop-Down is Pre-Filled on Shopping Page
Just like you don't want to automatically load the years in the collapsible search region, you want the same treatment for the categories drop-down in the other collapsible area on the shopping page. If the user never opens the “Search by Product Name/Category” region, there's no reason to pre-load the categories upon entering the shopping page.
The Solution: Create Web API Method to Load Categories
Open the ControllersApi\ShoppingApiController.cs file and add a new method named GetCategories(), as shown in Listing 3. This method creates an instance of the ShoppingViewModel class passing in the Product and Vehicle repository classes plus the Shopping Cart object retrieved from Session. The GetCategories() method is invoked on the ShoppingViewModel object to load the Categories property. The Categories property is returned as the payload from this API call.
Listing 3: Create a method to load categories on-demand
[HttpGet(Name = "GetCategories")]
public IActionResult GetCategories()
{
    IActionResult ret;

    // Create view model
    ShoppingViewModel vm = new(_repo, _vehicleRepo, UserSession.Cart);

    // Get product categories
    vm.GetCategories();

    // Return all categories
    ret = StatusCode(StatusCodes.Status200OK, vm.Categories);

    return ret;
}
Modify ShoppingController Class
Open the Controllers\Shopping\ShoppingController.cs file and remove the following line of code from the Index() method so the categories aren't loaded automatically when the user goes into the Shopping page.
vm.GetCategories();
Modify the Page Controller Closure
Open the Views\Shopping\Index.cshtml file and add a new method named getCategories(), as shown in Listing 4, to the pageController closure. This method sets up a function to respond to the Bootstrap show.bs.collapse event. When a user expands the “Search by Product Name/Category” collapsible region, check to see if the Categories drop-down has any items in it. If it doesn't, load a string message “Loading…” as the first item in the drop down. Set the drop-down to an italic font so the user knows this is different from the data that will eventually be in this drop-down. Call the GetCategories() API method using the $.get() jQuery shorthand method. Once the data comes back, clear the categories drop-down, remove the italic style and load the category data into the drop-down.
Listing 4: Create a getCategories() method in your page controller to load categories
function getCategories() {
    $("#nameCategory").on("show.bs.collapse", function () {
        // Check if categories have already been loaded
        if ($("#SearchEntity_Category option").length === 0) {
            // Search for element just one time
            let elem = $("#SearchEntity_Category");

            // Set style on Category drop-down to italic
            elem.attr("style", "font-style: italic;");
            // Add option to drop-down to display Loading...
            elem.append("<option>Loading...</option>");

            $.get("/api/ShoppingApi/GetCategories",
            function (data) {
                // Clear "Loading..." from drop-down
                elem.empty();
                // Remove italic style
                elem.removeAttr("style");
                // Load the categories into drop-down
                $(data).each(function () {
                    elem.append(`<option>${this}</option>`);
                });
            })
                .fail(function (error) {
                    console.error(error);
                });
        }
    });
}
Modify the return object to expose this new getCategories() method from the closure.
return {
    "setSearchArea": setSearchArea,
    "modifyCart": modifyCart,
    "getMakes": getMakes,
    "getModels": getModels,
    "getYears": getYears,
    "getCategories": getCategories
}
Call the getCategories() method from the $(document).ready() function, as shown in the following code snippet.
$(document).ready(function () {
    // Load years when search area expands
    pageController.getYears();

    // Load categories when search area expands
    pageController.getCategories();

    // Should search area should be collapsed?
    pageController.setSearchArea();
});
Try It Out
Run the application and click on the Shop menu in the main navigation bar. Expand the “Search by Product Name/Category” collapsible region and, depending on how fast your browser is and how fast the API call is executed, you may see a “Loading…” message appear in the category drop-down. Or you may just see that the categories are now loaded once the area is expanded.
The Problem: Don't Allow Duplicate Promo Codes
On the Promotional Code maintenance page, a user is allowed to add, edit, and delete a promotional code. When adding a new code, ensure that a duplicate code isn't accidentally entered. Checking for a duplicate can be accomplished from the client side using a Web API call and creating a custom rule using the jQuery Validation library.
The Solution: Add Functionality to Check for Duplicate Promo Codes
Open the RepositoryClasses\PromoCodeRespository.cs file in the PaulsAutoParts.DataLayer project. Add a new method named DoesCodeExist(), shown in the following code snippet, that uses the Entity Framework to check whether the code passed in already exists in the PromoCode table.
public bool DoesCodeExist(string code)
{
    // Does Promo Code exist in table?
    return _DbContext.PromoCodes.Any(p => p.PromotionalCode == code);
}
Modify the View Model Class
Open the PromoCodeViewModel.cs file in the PaulsAutoParts.ViewModelLayer project and add a new Using statement at the top of the file.
using PaulsAutoParts.DataLayer;
Add a new method named DoesCodeExist() that calls the method you created in the PromoCodeRepository class. This method checks to ensure that the Repository property has been set in the view model object. If the PromoCodeRepository class isn't set into the Repository property, you won't be able to call the DoesCodeExist() method. Otherwise, the DoesCodeExist() method is called on the Repository object and a true or false value is returned.
public bool DoesCodeExist(string code) {
    bool ret;
    if (Repository == null) {
        throw new ApplicationException(
            "Must set the Repository property.");
     }
     else {
         ret = ((PromoCodeRepository)Repository).DoesCodeExist(code);
     }
return ret;
}
Create New Promo Code API Controller
Just like you created a ShoppingApiController class with Web API calls to work with the shopping cart page, you should also create a new API class to work with promotional codes. Right mouse-click on the ControllersApi folder and add an empty controller named PromoCodeApiController.cs. Replace all the code in the default class with the code shown in Listing 5.
Listing 5: Create a new Web API controller to work with promotional codes
using Microsoft.AspNetCore.Mvc;
using PaulsAutoParts.AppClasses;
using PaulsAutoParts.Common;
using PaulsAutoParts.EntityLayer;
using PaulsAutoParts.ViewModelLayer;

namespace PaulsAutoParts.ControllersApi
{
    [ApiController]
    [Route("api/[controller]/[action]")]
    public class PromoCodeApiController : AppController
    {
        #region Constructor
        public PromoCodeApiController(AppSession session, IRepository<PromoCode, PromoCodeSearch> repo) : base(session)
        {
            _repo = repo;
        }
        #endregion

        #region Private Fields
        private readonly IRepository<PromoCode, PromoCodeSearch> _repo;
        #endregion

        #region DoesCodeExist Method
        [HttpGet("{code}", Name = "DoesCodeExist")]
        public JsonResult DoesCodeExist(string code)
        {
            JsonResult ret;

            PromoCodeViewModel vm = new(_repo);

            if (string.IsNullOrEmpty(code)) {
                // Return a false value
                ret = new JsonResult(false);
            }
            else {
                // See if Code exists
                ret = new JsonResult(!vm.DoesCodeExist(code));
            }

            return ret;
        }
        #endregion
    }
}
Just like the other API controller classes you've created so far, an instance of the AppSession class is injected into the constructor along with an instance of the PromoCode repository class. There's a single Web API call in this class named DoesCodeExist(). This method accepts the promotional code from the client side and then calls the DoesCodeExist() method on the PromoCodeViewModel class. This method returns true if the code passed in exists and false if it doesn't. When using the jQuery Validation library, it expects to get results back from a Web API call as JSON. This is why the DoesCodeExists() Web API method call returns a JsonResult as opposed to the more common IActionResult.
Add to the pageController Closure
Open the Views\PromoCode\PromoCodeIndex.cshtml file. In the pageController closure, create a new method named addValidationRules(), as shown in Listing 6. In this method, set up the validate() method on the <form> element on this page. For the PromotionalCode input element, add a custom rule using the remote property. The remote property allows you to make a Web API call by returning a literal object from the function defined in the remote property. The literal object returned needs to have a url and a type property. The Web API method called must return a true or false value in JSON format. If the return value is false, the message in the remote property under the messages property is displayed.
Listing 6: Create a custom jQuery Validation rule to check for duplicate promotional codes
function addValidationRules() {
    $("form").validate({
        // The properties in the rules and messages
        // objects are based on the name= attribute
        // in the HTML, not the id attribute
        rules: {
            "SelectedEntity.PromotionalCode": {
                required: true,
                remote: function () {
                    return {
                        url: "/api/PromoCodeApi/DoesCodeExist/" +
                            $("#SelectedEntity_PromotionalCode").val(),
                        type: "get"
                    };
                }
            }
        },
        messages: {
            "SelectedEntity.PromotionalCode": {
                required: "Promotional Code must be filled in.",
                remote: "Promotional Code already exists.
                         Please use a new Code"

            }
        }
    });
}
Modify the return object in this pageController closure to expose the addValidationRules() method from the closure, as shown in the following code snippet.
return {
    "formSubmit": formSubmit,
    "setSearchValues": setSearchValues,
    "setSearchArea": mainController.setSearchArea,
    "isSearchFilledIn": mainController.isSearchFilledIn,
    "addValidationRules": addValidationRules
}
Add the call to this new method within the $(document).ready() function, as shown in the following code snippet.
$(document).ready(function () {
    // Setup the form submit
    pageController.formSubmit();

    // Add jQuery validation rules
    pageController.addValidationRules();

    // Collapse search area or not?
    pageController.setSearchValues();
    pageController.setSearchArea();
});
Try It Out
Run the application and select Admin > Promotional Codes from the top menu. Click on the Add button and in the Promotional Code input field, enter TENPERCENT and tab off the field. You should see the validation message appear just below the input field.
The Problem: Must Post-Back to Delete a Row in an HTML Table
On all of the HTML tables in this application, there's a Delete button in each row to remove the data from the table in SQL Server. These buttons all perform a post-back to do the removal and redisplay of the table on the page. Let's modify one of these to use a Web API call to avoid the post-back.
The Solution: Create a Web API to Perform the Delete
You're now going to modify the Customer Maintenance page to call a Web API to delete a customer. You're then going to write JavaScript code to remove the deleted row from the HTML table. After you've completed this one page, you can write all the other delete APIs needed for all other tables in this application.
Create a Customer Maintenance Web API Controller
Right mouse-click on the ControllersApi folder and add a new controller named CustomerMaintApiController.cs. Wipe out all the default template code and add the code shown in Listing 7 to this new file.
Listing 7: Create a Web API controller for deleting customers
using Microsoft.AspNetCore.Http;
using Microsoft.AspNetCore.Mvc;
using PaulsAutoParts.AppClasses;
using PaulsAutoParts.Common;
using PaulsAutoParts.EntityLayer;
using PaulsAutoParts.ViewModelLayer;

namespace PaulsAutoParts.Controllers
{
    [ApiController]
    [Route("api/[controller]/[action]")]
    public class CustomerMaintApiController : AppController
    {
        #region Constructor
        public CustomerMaintApiController(AppSession session, IRepository<Customer, CustomerSearch> repo) : base(session)
        {
            _repo = repo;
        }
        #endregion

        #region Private Fields
        private readonly IRepository<Customer, CustomerSearch> _repo;
        #endregion

        #region Delete Method
        [HttpDelete("{id}", Name = "Delete")]
        public IActionResult Delete(int id)
        {
            // Create view model and pass in repository
            CustomerViewModel vm = new(_repo);

            // Set Common View Model Properties from Session
            base.SetViewModelFromSession(vm, UserSession);

            // Call method to delete a record
            vm.Delete(id);

            return StatusCode(StatusCodes.Status200OK, true);
        }
        #endregion
    }
}
Just like the other API controller classes you've created so far, an instance of the AppSession class is injected into the constructor along with an instance of the Customer repository class. There's a single Web API call in this class named Delete(). This method accepts an integer that's the customer ID to delete. An instance of the CustomerViewModel class is created and the Delete() method on this object is called to delete the customer. A status code of 200 is returned to signify that the call was successful.
Modify the Customer Maintenance Page Controller
Open the Views\CustomerMaint\CustomerMaintIndex.cshtml file. Add a new method to the pageController closure named deleteCustomer(), as shown in Listing 8, to make a $.ajax() call to delete the ID passed into this method.
Listing 8: The deleteCustomer() function calls a Web API to delete a customer
function deleteCustomer(id) {
    if (confirm('Delete this Customer?')) {
        $.ajax({
            url: "/api/CustomerMaintApi/Delete/" + id,
            type: "DELETE"
        })
        .done(function (data) {
            if (data) {
                // Remove the row from the table
                $("#" + id).remove();
            }
        })
        .fail(function (error) {
            console.error(error);
        });
    }
}
Modify the return object to expose the new deleteCustomer() method from the closure.
return {
    "formSubmit": formSubmit,
    "setSearchValues": setSearchValues,
    "setSearchArea": mainController.setSearchArea,
    "isSearchFilledIn": mainController.isSearchFilledIn,
    "addValidationRules": addValidationRules,
    "deleteCustomer": deleteCustomer
}
Modify the Customer List Partial Page
Open the Views\CustomerMaint\_CustomerMaintList.cshtml file. Delete the last <td> element in which the @Html.ActionLink("Delete", "Delete", ...) method is located. Add a new <td> element, shown in the following code snippet, where you deleted the old one. This new <td> contains an <a> tag that calls the pageController.deleteCustomer() method you just created, passing in the value contained in the CustomerId property.
<td>
    <a class="btn btn-danger"
       onclick="pageController.deleteCustomer(@item.CustomerId)">
      Delete
    </a>
</td>
The deleteCustomer() method makes the Web API call and deletes the customer from the Customer table, however you still need to delete the row in the HTML table. To make this easy to do, modify the <tr> within the @foreach() loop and add an id attribute to the row set to the CustomerId, as shown in the following code.
@foreach (Customer item in Model.DataCollection) {
    <tr id="@item.CustomerId">
    // REST OF THE CODE HERE
    </tr>
}
If you look at the code within the .done() function in the deleteCustomer() method, you can see if the data returned from the Web API is a true value. If so, use jQuery to locate the row with the id=CustomerId and remove that row from the HTML table.
Try It Out
Run the application and select the Admin > Customers > Orders menu. Add a new Customer and click the Save button. Click on the Delete button next to your new customer and click the OK button when prompted. The customer should now be removed from the database and the row where the customer was located is also removed. Notice that you didn't see a page refresh as the delete was now accomplished without a post-back. If you want, you could duplicate this process with the other maintenance pages in this application.
The Problem: Delete Row from the Shopping Cart Table without Post-Back
Deleting a row from the shopping cart is just like deleting the row in the customer maintenance page, however you must also calculate a new total price for all the items left in the shopping cart.
The Solution: Delete Row and Recalculate Total
Open the Views\Cart\Index.cshtml file and at the bottom of the page, you need to reorganize the code within the <script> tag. First, add a pageController closure and create an empty setCountdown() method, as shown in the following code.
let pageController = (function () {
    function setCountdown() {
    }

    // Expose public functions from closure
    return {
       "setCountdown": setCountdown
    }
})();
Next, take all of the code from within the $(document).ready() function and move it into the setCountdown() method. Modify the $(document).ready() function so it calls the setCountdown() method in the pageController closure.
$(document).ready(function () {
    pageController.setCountdown();
});
Add Method to Delete a Cart Item
Add two new methods to the pageController closure, as shown in Listing 9. The first one is named deleteCartItem() and the second is named calculateNewTotal(). The deleteCartItem() method asks the user if they wish to delete the product from the cart. If the user answers OK, the RemoveFromCart() method located in the ShoppingApiController class is called. This method was created earlier in the article series. If the call is successful, the .done() function is called. In this function, remove the row from the HTML table, update the menu link “n Items in Cart”, and call the calculateNewTotal() method. The calculateNewTotal() method is not written yet, but first, just try out deleting a shopping cart item.
Listing 9: Create two methods to help you delete a shopping cart item and recalculate the total
function deleteCartItem(id) {
    if (confirm('Delete this Product from Cart?')) {
        $.ajax({
            url: "/api/ShoppingApi/RemoveFromCart/" + id,
            type: "DELETE"
        })
            .done(function (data) {
                if (data) {
                    // Remove the row from the table
                    $("#" + id).remove();
                    // Update menu link text
                    mainController.modifyItemsInCartText(false);
                    // Calculate New Total
                    calculateNewTotal();
                }
            })
            .fail(function (error) {
                console.error(error);
            });
    }
}

function calculateNewTotal() {
}
Modify the return object to expose the deleteCartItem() method from the closure.
return {
    "setCountdown": setCountdown,
    "deleteCartItem": deleteCartItem
}
In the .done() function in the deleteCartItem() method, if the data returned from the Web API is a true value, use jQuery to locate the row set to the id=ProductId and remove that row from the HTML table. To make this work, modify the <tr> within the @foreach() loop and add an id attribute to the row to set the ProductId, as shown in the following line of code.
@foreach (ShoppingCartItem item in Model.Cart.Items) {
    <tr id="@item.ProductId">
    // REST OF THE CODE HERE
}
Update the Razor Page
Delete the last <td> element in which the @Html.ActionLink("Delete", "Delete", ...) method is located. Add a new <td> element, shown in the code below, where you deleted the old one. This new <td> contains an <a> element that calls a method named pageController.deleteCartItem(), passing in the value in the ProductId property.
<td>
    <a class="btn btn-danger"
       onclick="pageController.deleteCartItem(@item.ProductId)">
      Delete
    </a>
</td>
Remove Server-Side Code
Because you're no longer performing a post-back to remove a shopping cart item, you can remove a method on the server-side code. Open the Controllers\Shopping\CartController.cs file and remove the Delete() method.
Try It Out
Run the application and add a few items to the shopping cart. Click the Delete button on one of the items in the cart and watch it disappear from the table. Notice that the total value of items in the cart did not get updated. Delete all of the items you added to the shopping cart and notice that the blank table with the Total Price is still visible. If you delete all the rows from the shopping cart, the table should completely disappear.
Working with Currency Values in JavaScript
When the shopping cart page is displayed, the price and the total price are formatted as currency values via server-side code. To update the total price at the bottom of the table after deleting a row, loop through all the rows in the table, get the total price of an item, such as $1,999.99, and strip out the symbols, such as commas and dollar signs ($), that aren't valid for a number in JavaScript. Add up each of these prices to get the new total value, and then you need to convert that number back into a U.S. currency format to be displayed at the bottom of the shopping cart table.
Open the wwwroot\js\site.js file and add two methods to the mainController closure. The first method, fromUSCurrency(), is the one used to strip the commas and dollar signs from a string. Add the method shown in the following code snippet to the mainController closure.
function fromUSCurrency(value) {
    return value.replace(/[^0-9\.-]+/g, "");
}
Next, add the method to take a number value and return it as a string in a U.S. currency format. Add the method toUSCurrency() to the mainController closure.
function toUSCurrency(value) {
    value = parseFloat(value);
    return value.toLocaleString('en-US', {
        style: 'currency',
        currency: 'USD',
    });
}
Modify the return object on the mainController closure to expose both those new methods.
return {
    "pleaseWait": pleaseWait,
    "disableAllClicks": disableAllClicks,
    "setSearchValues": setSearchValues,
    "isSearchFilledIn": isSearchFilledIn,
    "setSearchArea": setSearchArea,
    "formSubmit": formSubmit,
    "modifyItemsInCartText": modifyItemsInCartText,
    "toUSCurrency": toUSCurrency,
    "fromUSCurrency": fromUSCurrency
}
Calculate New Total After Deleting from Cart
After deleting a row from the shopping cart table, update the total price of all items at the bottom of the table. Open the Views\Cart\Index.cshtml file and within the <tbody> element locate the <td> bound to item.Price and add a name attribute.
<td name="itemPrice" class="text-right">
    @Html.DisplayFor(m => item.Price)
</td>
Locate the <td> element bound to item.TotalPrice and add a name attribute on that element as well.
<td name="itemTotalPrice" class="text-right">
    @Html.DisplayFor(m => item.TotalPrice)
</td>
Within the <tfoot> element, locate the <td> bound to the Model.Cart.TotalCart and add an id attribute to the <strong> element.
<td class="text-right">
    <strong id="cartTotal">
        @Html.DisplayFor(Model => Model.Cart.TotalCart)
    </strong>
</td>
Write the CalculateNewTotal() Method
It's now time to write the method named calculateNewTotal() (Listing 10) that you created previously as an empty method. This method gathers all those <td> elements with the name attribute set to “itemTotalPrice”. Loop through all elements using the each() method, retrieve each <td> element from the list, and convert the text from a currency value like $1,789.99 to simply 1789.99 using the fromUSCurrency() method you wrote earlier. Add that value to the total variable to keep a running total.
Listing 10: Get all elements marked as the total price and calculate the new total from all of those elements
function calculateNewTotal() {
    let total = 0;
    // Get all <td> elements
    // that contain the total price
    let list = $("table tbody tr
                 td[name='itemTotalPrice']");

    // Loop through all rows
    $(list).each(function () {
        // Get the currency amount and
        // strip out anything not a number
        let text = mainController.fromUSCurrency($(this).text());

        // Add dollar amount to total
        total += parseFloat(text);
    });

    if (total === 0) {
        // Redirect to this same window
        // This clears the shopping cart
        window.location.assign(window.location.href);
    }
    else {
        // Display the new total
        $("#cartTotal").text(mainController.toUSCurrency(total));
    }
}
After all the looping is complete, if the total variable is equal to zero, post back to the current page to have the server display a blank page with the message that tells the user that there are no items in the cart. If the total variable is greater than zero, display the total into the <strong> element with the id attribute of “cartTotal” as a currency value using the toUSCurrency() method.
Try It Out
Run the application and add a few items to the shopping cart. Delete an item and watch the total update. Next, remove all items in the cart and watch the page post-back. You should now be notified that you don't have any items in the cart.
The Problem: Updating the Quantity on the Cart Causes a Post-Back
If you change the quantity for a product on the shopping cart, you need to update the cart item on the server. You also need to update the total price for that line item and then update the total of all items in the cart. Currently, if you update a quantity, a button must be clicked to post-back and update the shopping cart page. Let's now change this functionality by writing a Web API and some jQuery to avoid that post-back.
Let's change the functionality by writing a Web API and some jQuery to avoid the post-back.
The Solution: Add New API Controller
Right mouse-click on the ControllersApi folder and add a new class named CartApiController.cs. Remove the default code in the new file and insert the code shown in Listing 11. Just like the other API controller classes you've created so far, an instance of the AppSession class is injected into the constructor. There's a single Web API call in this class named Delete(). This method accepts an integer that is the customer ID to delete. An instance of the CustomerViewModel class is created and the Delete() method on this object is called to delete the customer. A status code of 200 is returned signifying that this call was successful.
Listing 11: The Cart API controller helps us update the item quantities in the shopping cart
using Microsoft.AspNetCore.Http;
using Microsoft.AspNetCore.Mvc;
using PaulsAutoParts.AppClasses;
using PaulsAutoParts.Common;
using PaulsAutoParts.EntityLayer;
using PaulsAutoParts.ViewModelLayer;

namespace PaulsAutoParts.Controllers
{
    [ApiController]
    [Route("api/[controller]/[action]")]
    public class CartApiController : AppController
    {
        public CartApiController(AppSession session): base(session)
        {
        }

    [HttpPost(Name = "UpdateItemQuantity")]
    public IActionResult UpdateItemQuantity([FromBody] ShoppingCartItem item)
        {
            // Set Cart from Session
            ShoppingViewModel vm = new(null, null, UserSession.Cart);

            // Set "Common" View Model Properties
            // from Session
            base.SetViewModelFromSession(vm, UserSession);

            // Update item
            vm.UpdateQuantity(item);

            // Set updated cart back into session
            UserSession.Cart = vm.Cart;

            return StatusCode(StatusCodes.Status200OK, true);
        }
    }
}
Update the Shopping Cart Page
Open the Views\Cart\Index.cshtml file and within the <tbody> element locate the <td> that has the <form method="post" asp-action="UpdateQuantity"> and remove the entire <td> element and everything within it. Add the following <td> where you removed the <td> element. The input field for the Quantity calls a method named updateQuantity() on the pageController class as soon as the user tabs off the Quantity field.
<td>
    <input class="form-control"
           asp-for="@item.Quantity"
           onchange="pageController.updateQuantity(@item.ProductId,this)"/>
</td>
Add an updateQuantity Method
Add a new method to the pageController closure named updateQuantity(), as shown in Listing 12. Two arguments are passed to the updateQuantity() method; the product ID, and a reference to the control that triggered the call to this method. Retrieve the value from the control using the $(ctl).val() jQuery method. Parse that value into an integer and put it into a variable named qty. Next, build a literal object with two properties: productId and quantity. This literal object is posted to the UpdateItemQuantity() method you created in the CartApiController class.
Listing 12: The updateQuantity() method updates the server with the new quantity information and recalculates the new shopping cart total
function updateQuantity(id, ctl) {
    // Get the new quantity value
    let qty = parseInt($(ctl).val());
    // Create shopping cart item to send to server
    let item = {
        "productId": id,
        "quantity": qty
    }
    // Call UpdateItemQuantity Web API Method
    $.ajax({
        url: "/api/CartApi/UpdateItemQuantity",
        type: "POST",
        contentType: "application/json",
        data: JSON.stringify(item)
    })
    .done(function (data) {
        if (data) {
            // Update this row of data
            updateRow(ctl, qty);

            / Calculate New Total
            calculateNewTotal();
        }
    })
    .fail(function (error) {
        console.error(error);
    });
}
This JavaScript object is mapped onto a ShoppingCartItem object that has those two property names created in C#. If the call is successful, a method named updateRow() is called, passing in the control reference and the quantity. This method updates the total price for the row on which the quantity was updated. Finally, the calculateNewTotal() method is called to calculate the total shopping cart value.
Add an updateRow Method
Add a new method named updateRow() to the pageController closure as shown in the following code snippet.
function updateRow(ctl, qty) {
    // Get row where quantity was updated
    let row = $(ctl).parents("tr")[0];

    // Get <td> with itemPrice
    let td = $(row).find("td[name='itemPrice']")[0];

    // Get price in the current row
    let price = parseFloat(mainController.fromUSCurrency($(td).text()));

    // Get <td> with itemTotalPrice
    td = $(row).find("td[name='itemTotalPrice']")[0];

    // Update total price
    $(td).text(mainController.toUSCurrency(qty * price));
}
The updateRow() method uses jQuery to locate the parent <tr> for the current control. From that row variable, you can then get the <td> element that contains the item price. Get the price contained in that <td> and strip the U.S. currency symbols so you have a price variable as a JavaScript number. Next, the <td> with the item's total price is located. This <td> elements' text property is set with the result of the quantity times the price, formatted as U.S. currency.
Modify the return object to expose the updateQuantity() method so it can be called from the onchange event on the quantity input field.
return {
    "setCountdown": setCountdown,
    "deleteCartItem": deleteCartItem,
    "updateQuantity": updateQuantity
}
Remove Server-Side Code
Because you're no longer performing a post-back to update the quantity, you can remove a method on the server-side code. Open the Controllers\Shopping\CartController.cs file and remove the UpdateQuantity() method.
Try It Out
Run the application and put some items into the shopping cart. Go into the Shopping Cart page and type in the number 2 into one of the Quantity input fields. Tab off the input field and you should see that the total price on that row updates, and the shopping cart total updates, all without any post-backs.
The Problem: Applying a Promo Code to the Shopping Cart Requires a Post-Back
If the user fills in a valid promo code and clicks on the Apply Promo Code button, a certain percentage discount is applied to the unit price on each line item in the cart. Clicking on this button causes a post-back, but you can once again solve this with a Web API call and some jQuery.
The Solution: Add a New Method to the CartApiController
In the CartController class, a method named ApplyPromoCode() is currently being called when the user clicks on the Apply Promo Code button from the front-end. The functionality in this method needs to be recreated in a new method in the CartApiController class. Open the ControllersApi\CartApiController.cs file and modify the constructor to have a promotional code repository object injected and assign that to a private field.
public CartApiController(AppSession session, IRepository<PromoCode, PromoCodeSearch> repo): base(session)
{
    _repo = repo
}
private readonly IRepository<PromoCode, PromoCodeSearch> _repo;
Add a new method named GetPromoCode() to this class, as shown in Listing 13. This method accepts the promotional code input by the user and calls the ApplyPromoCode() method on the ShoppingViewModel class. This method on the server updates all the items in Session with the discount to be applied. The promotional code object used for this discount is returned so the data already being displayed on the HTML table can have the same discount applied, as has been done on the server.
Listing 13: Add a new method to apply a promotional code to the shopping cart items
[HttpGet("{code}", Name = "GetPromoCode")]
public ActionResult GetPromoCode(string code)
{
    ShoppingViewModel vm = new();
    vm.PromoCodeRepository = _repo;

    // Set promo code to apply from code passed in
    vm.PromoCodeToApply = code;

    // Set Common View Model Properties from Session
    base.SetViewModelFromSession(vm, UserSession);

    // Set Cart from Session
    vm.Cart = UserSession.Cart;

    // Apply Promo Code if it exists,
    // and make sure another one has
    // not already been applied
    vm.ApplyPromoCode();

    // Set cart into session
    UserSession.Cart = vm.Cart;

    // Return the promotional code object
    return StatusCode(StatusCodes.Status200OK, vm.Cart.PromotionCode);
}
Modify the Cart Index Page
You now need to modify the Shopping Cart page, so it doesn't perform a post-back when the user clicks on the Apply Promo Code button. Open the Views\Cart\Index.cshtml file, locate the <tfoot> element, and find the <td> that contains the following <form> element.
<form method="post" asp-action="ApplyPromoCode">
Remove this <form ...> line and remove the </form> line as well. Modify the Apply Promo Code button to call a method you're going to create in the pageController closure. Add the type=“button” attribute, as well as the onclick event shown in the following code snippet.
<button type="button"
        onclick="pageController.applyPromoCode();"
        class="btn btn-success">
    Apply Promo Code
</button>
Add a method to pageController closure named applyPromoCode() as shown in Listing 14. This method calls the Web API GetPromoCode() method you just created and passes in the code input by the user. What's returned is the promotional code object with the discount percentage to apply to the values displayed in the HTML table.
Listing 14: Write a method to make the call to the GetPromoCode() Web API method
function applyPromoCode() {
    // Get Promo Code to apply
    let code = $("#PromoCodeToApply").val();
    if (code) {
        $.get("/api/CartApi/GetPromoCode/" + code,
            function (data) {
            if (data && data.promoCodeId) {
                // Clear any previous error messages
                $("#errorMsg").text("");

                // Apply discount
                applyDiscount(data.discountPercent);

                // Calculate total price on each row
                updateTotalPrice();

                // Calculate total of all items in cart
                calculateNewTotal();

                // Disable promo code field
                $("#PromoCodeToApply").prop("readonly", true);
            }
            else {
                $("#errorMsg").text(
                    "No Promo Code found, or it has expired.");
            }
        })
        .fail(function (error) {
            console.error(error);
        });
    }
}
A new method named applyDiscount() is going to be created to perform these calculations. After this calculation runs, a method named updateTotalPrice() is called to update the total price for each item in the shopping cart table, and finally the new shopping cart total is calculated and displayed by calling calculateNewTotal(). Once everything has been recalculated, the Apply Promo Code button is disabled.
If the object returned is null, or if the promoCodeId property in this object is null, display a message into an element with the id attribute set to errorMsg. However, there's no element with this id attribute set. Locate the following HTML on this page and add the id property to the <strong> element, as shown in the following code snippet.
<div class="row">
    <div class="col text-center">
        <span>
            <strong id="errorMsg">
                @Model.Message
            </strong>
        </span>
    </div>
</div>
The discounts have been applied on the items in the Session variable on the server. It's now time to apply those discounts to the values displayed in the HTML table. Add a method named applyDiscount() to the pageController closure as shown in Listing 15.
Listing 15: Apply the promotional code discount to the values in the HTML table
function applyDiscount(discount) {
    let newTotal = 0;
    discount = parseFloat(discount);

    // Get all <tr> elements in <tbody>
    // that contain the itemPrice
    let list = $("table tbody tr td[name='itemPrice']");

    // Loop through all rows
    $(list).each(function () {

        // Get the currency amount and
        // strip out anything not a number
        let unitPrice = mainController.fromUSCurrency($(this).text());

        // Apply discount to unit price
        newTotal = parseFloat(unitPrice) * (1 - discount);
        $(this).text(mainController.toUSCurrency(newTotal));
    });
}
In the applyDiscount() method, the discount is passed in that needs to be applied to each row in the table. The list of <td> elements that contain the price of each item is created using a jQuery selector. That list is then iterated over, the unit price is extracted and converted to a number, the new unit price total is calculated by applying the discount, and then it's put back into the <td> element.
The next method called is responsible for getting the quantity and unit price from each row in the shopping cart table and calculating the new total price for that row of data. Add a new method named updateTotalPrice() to the pageController closure as shown in Listing 16.
Listing 16: Calculate the new total price for each item using the updateTotalPrice() method
function updateTotalPrice() {
    // Get all <tr> elements in <tbody>
    let list = $("table tbody tr");

    // Loop through all rows
    $(list).each(function () {

        // Get quantity for this row
        let qty = parseInt($(this)
            .find("input[name='item.Quantity']").val());

        // Get unit price for this row
        let unitPrice = parseFloat(
            mainController.fromUSCurrency($(this)
                .find("td[name='itemPrice']").text()));

        // Calculate new total price
        let totalPrice = qty * unitPrice;

        // Set new total price
        $(this).find("td[name='itemTotalPrice']")
            .text(mainController.toUSCurrency(totalPrice));
    });
}
Modify the return object to expose the applyPromoCode() method so it can be called by clicking on the Apply Promo Code button.
return {
    "setCountdown": setCountdown,
    "deleteCartItem": deleteCartItem,
    "updateQuantity": updateQuantity,
    "applyPromoCode": applyPromoCode
}
Remove Server-Side Code
Now that you've eliminated the post-back for applying a promotional code, you can delete a method in the CartController class. Open the Controllers\ShoppingCart\CartController.cs file and remove the ApplyPromoCode() method.
Try It Out
Run the application and add some items to the shopping cart. Click on the n Items in Cart menu link to go to the shopping cart page. Click into the Promotional Code input field and enter TWENTYPERCENT. Click the Apply Promo Code button and you should see all of the data updated. Next, try entering an invalid promo code and see if the error message appears.
Summary
This article concludes this series on enhancing your MVC application with JavaScript and jQuery. As you've seen throughout this series, adding just a little JavaScript and jQuery goes a long way toward making your MVC applications more user-friendly and efficient. Throughout this series, you learned how to display messages, disable buttons, and show the user some feedback while running long operations. You learned to avoid post-backs by doing more in JavaScript, and by adding Web API calls and update the UI using JavaScript and jQuery. With all the techniques shown in this series, you should be able to apply many of them to your MVC applications to enhance your users' UI experience.
