


In this first of a multi-part article series, I'm presenting an MVC application written with all server-side code to which you are going to add client-side code to make the user experience better and to make the application more efficient. Some of the things you'll learn in this article display a “Please Wait…” message for any long operations, complete with a spinner from Font Awesome. You're going to disable all buttons and links, and gray the background, while long operations take place so the user can't accidentally click on something else. You're going to learn how to use Bootstrap events to toggle collapsible areas so only one is open at a time. In addition, you'll learn to use the setInterval() function to display a countdown until the user's shopping cart is cleared.
Overview of the MVC Application
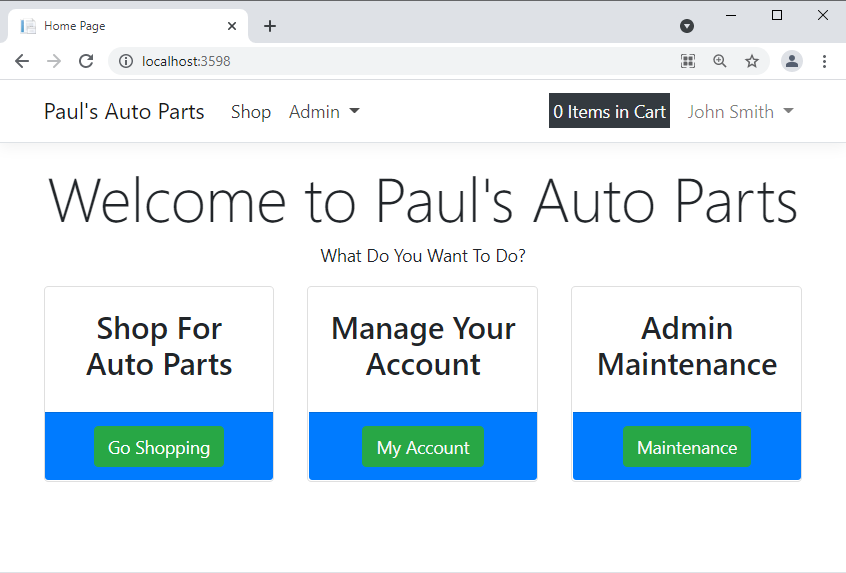
The sample application is called Paul's Auto Parts (Figure 1) and contains pages to look up products, add and remove products from a shopping cart, input credit card information, and print a receipt. The user can see their profile information as well as their previous orders. There are maintenance pages for the administrator of the site to input products, vehicles, and customers, and set promotional codes.
In making the starting sample, I purposefully kept all code on the server-side to show the dramatic differences that just a little JavaScript/jQuery can make. Many developers know basic JavaScript and wouldn't code things all server-side as I've done in this article, however, some of the JavaScript techniques presented in this article may help you with some common troublesome scenarios that you may encounter in your applications. I'm going to present many common UI challenges and the solutions using JavaScript, jQuery, and CSS. Whether you are new(ish) to JavaScript or an old pro, I'm sure you're going to find lots of little goodies in these articles.
The Application Database
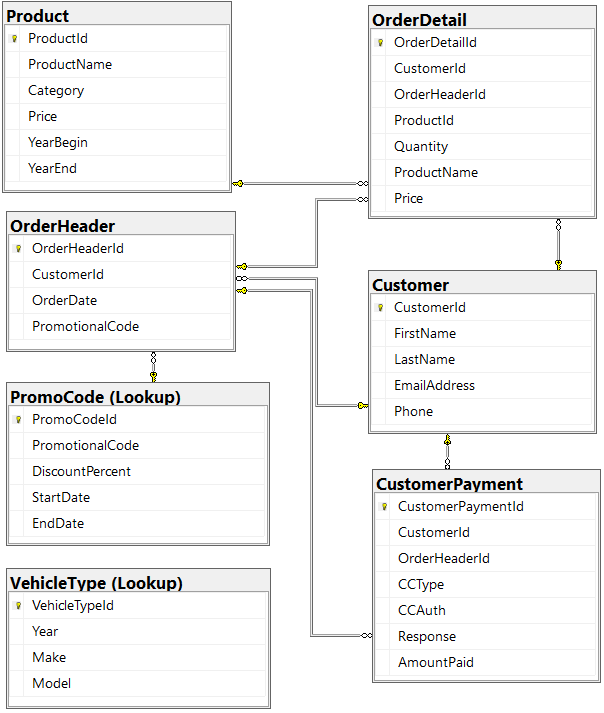
Seven tables (Figure 2) are needed for the sample application. The tables are kept as simple as possible for this demo application, but they have enough functionality that the application works. The Product table contains the list of auto parts that can be purchased from the site. The OrderHeader table contains one record for each order, and the OrderDetail table contains the individual products ordered. A promotional code can be applied to an order that lowers the prices of all the products by a certain percentage for that one order. The Customer table contains basic information about the customer. The CustomerPayment table contains the credit card information about the payment submitted for an order.
The last table is the VehicleType table, which is used for looking up the year, make, and model of vehicles. In a real site, the products would be tied to which year/make/model of vehicle that product is valid for. I didn't want to make the site complicated, so I just used this table to illustrate dependent drop-down lists. For example, the user is asked to first select a year for the vehicle they are shopping for. Once the year is selected, the make of vehicles available in that year are displayed in the next drop-down list. Finally, the third drop-down list is filled with the models available for the make of vehicle selected.
Getting and Running the Sample Application
To get the most out of this article, download the MVC sample application so you can follow along with the code as I present it. You can download the samples for this article by referencing the instructions at the end of this article or by visiting my web page at https://www.pdsa.com/Download. Once you download the ZIP file, unzip into a folder on your hard drive. To run this sample, you must have the following tools at your disposal.
- Visual Studio 2019 or later
- .NET 5 or later
- SQL Server 2019 or later
In the \Database folder within the ZIP file, there is a PaulsAutoParts.bak and a PaulsAutoParts.sql file that you can use to create the tables and install the data into SQL Server. If you use the PaulsAutoParts.sql file, create a database called PaulsAutoParts in an instance of SQL Server. Load the PaulsAutoParts.sql file into a query window for the PaulsAutoParts database and run the script to create the tables and data. If you know you have an instance of SQL Server 2019 or later, you should be able to restore the PaulsAutoParts.bak file in SQL Server Management Studio to create the PaulAutoParts database.
In the \Starting-Sample folder is a Visual Studio solution that contains the MVC application that you can use to follow along with this article. Open the PaulsAutoParts.sln file in Visual Studio. Open the appsettings.Development.json file in the \PaulAutoParts project and modify the connection string to point to the SQL Server in which you installed the tables. The appsettings.Development.json file is found by expanding the appsettings.json file in the Solution Explorer window.
Try It Out
Run the application from Visual Studio. Once the main page is displayed, click on the Admin > Products menu, and if you have installed the application correctly, you should see a list of products from the Product table. Now that you have it all working, let's start adding code to make it a much better application.
The Problem: Avoid a Post-Back Just to Toggle Menus
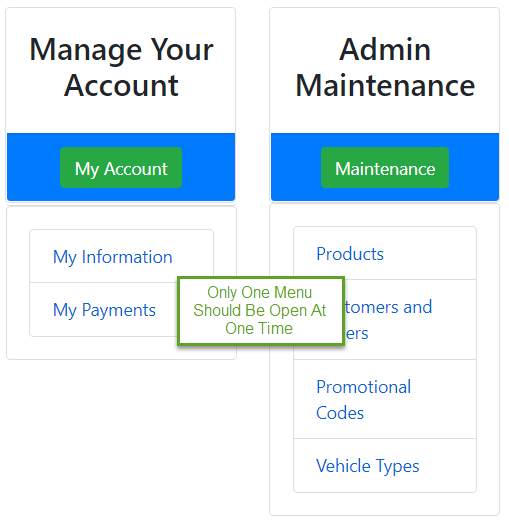
Sometimes, on a page, you need to display a single menu of multiple menus on the page to the user. To illustrate this scenario, I created two menus on the home page that show up when you click on the “My Account” button, or the “Maintenance” button, as shown in Figure 3. Click on the “My Account” button and you should notice that a post-back happens and the menu underneath the button appears. Click on the “Maintenance” button and you should see another post-back occur, and when the page reappears, the previous menu disappears and the menu under the maintenance button is now visible. This functionality is accomplished using an @if() statement on the \Home\Index.cshtml page, C# code in the HomeController class, and a property and enumeration in the HomeViewModel class for this page. Once you use JavaScript, you eliminate the @if(), the property and the enumeration from your server-side code. In addition, your user no longer sees the page flash when they click on one button or the other.
The Solution: Toggle Menus Using jQuery and CSS
Not only are you going to eliminate a post-back, but you're also eliminating several lines of C# code. Open the Home\Index.cshtml file and locate the @if() around the My Account menu, as shown in the following code snippet:
@if (Model.MenuToDisplay == PaulsAutoParts
    .ViewModelLayer.HomeViewModel
    .Menus.MyAccount) {
  <div class="card">
 // REST OF THE CODE HERE
  </div>
}
Remove the @if() and the closing curly brace from around this <div> element. Add a Bootstrap CSS class named d-none to the <div> element to make this menu invisible. Add an id attribute to the <div> element so you can reference this <div> using JavaScript. Your new <div> element should look like the following:
<div class="card d-none" id="myAccountMenu">
Locate the @if() around the admin Maintenance menu and remove the @if() and the closing curly brace from around this <div> element.
@if (Model.MenuToDisplay == PaulsAutoParts
    .ViewModelLayer.HomeViewModel
    .Menus.Maintenance) {
  <div class="card">
  // REST OF THE CODE HERE
  </div>
}
Add the same Bootstrap CSS class and an id attribute to this <div> element just like you did with the previous one. Your new <div> element should look like the following.
<div class="card d-none" id="maintenanceMenu">
At the bottom of this page add a “Scripts” section into which you can add your own <script> tag. Within this <script> tag, create a closure (Listing 1) to encapsulate all the functionality you need for this page. Assign the closure to a variable named pageController. Inside this closure, create two private functions used to make one menu item or the other visible. Expose these two private functions in the return object for this closure.
Listing 1: Add a closure on each page to keep all your page functionality encapsulated
@section Scripts {
    <script>
    'use strict';

    // ************************************
    // Create a closure
    // ************************************
    let pageController = (function () {
        // ************************************
        // Private Functions
        // ************************************
        function toggleMyAccountMenu() {
            $("#myAccountMenu").toggleClass("d-none");
            $("#maintenanceMenu").addClass("d-none");
        }

        function toggleMaintenanceMenu() {
            $("#maintenanceMenu").toggleClass("d-none");
            $("#myAccountMenu").addClass("d-none");
        }

        // ************************************
        // Public Functions
        // ************************************
        return {
            "toggleMyAccountMenu": toggleMyAccountMenu,
            "toggleMaintenanceMenu": toggleMaintenanceMenu
        }
    })();
    </script>
}
Once you have the closure created for this page, modify the <a> tag on the My Account link to call the toggleMyAccountMenu() method on the pageController. Remove the asp-action="MyAccountMenu" from the <a> tag and add an onclick event, as shown in the following code snippet.
<a class="btn btn-success"
   onclick="pageController.toggleMyAccountMenu();">
       My Account
</a>
Modify the <a> tag on the Maintenance link to call the toggleMaintenanceMenu() method on the pageController. Remove the asp-action="MaintenanceMenu" from the <a> tag and add an onclick event, as shown in the following code snippet.
<a class="btn btn-success"
   onclick="pageController.toggleMaintenanceMenu();">
       Maintenance
</a>
Now that you've eliminated the calls to the MyAccountMenu() and MaintenanceMenu() methods on the HomeController, you can eliminate these methods from that class. Open the HomeController.cs file in the PaulsAutoParts project and remove the MyAccountMenu() and the MaintenanceMenu() methods.
The property used in the @if() statement in the Home page to hold the enumeration of the menu to display should also be eliminated. You can also eliminate the public declaration of the Menus enumeration. Open the HomeViewModel.cs file located in the PaulsAutoParts.ViewModelLayer project and remove all the code. The complete code in the HomeViewModel class should now look like the following code snippet.
namespace PaulsAutoParts.ViewModelLayer
{
    public class HomeViewModel : AppViewModelBase
    {
    }
}
Try It Out
Run the application and you can now click on the My Account and Maintenance menus without a post-back.
The Problem: Display A Single Collapsible Area at One Time
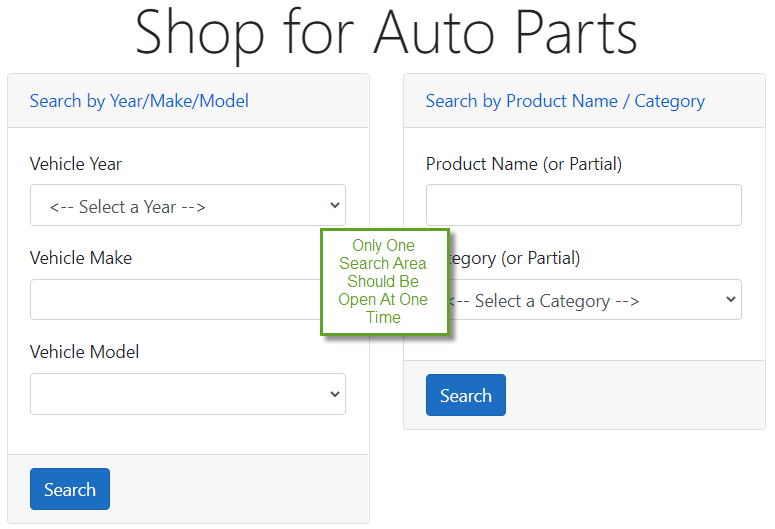
Run the application, and on the main page, select the Shop menu or the “Go Shopping” button to get to the Shopping page. When you first come into the page, the “Search by Year/Make/Model” search area is open. If you click on the “Search by Product Name/Category” link, this search area also opens, as shown in Figure 4. The problem is that this UI is confusing for a user as they're now confronted with two search buttons. Which one do they click? If they select a Vehicle Year and a Category and they click either of the search buttons, does the resulting search include both the year and category? A better user experience is when the user expands one search area, the other search area automatically closes. This leaves no ambiguity as to what the search button does within that search area.
The Solution: Respond to Bootstrap Events
Twitter's Bootstrap framework is used by default on all MVC applications created using Visual Studio. The Bootstrap framework includes some events you can connect to their collapsible classes. You can detect when a collapsible area is being displayed or being hidden, as well as invoke a method to show or hide a collapsible area. Open the Shopping\Index.cshtml file and add the following code at the bottom of the page.
@section Scripts {
    <script>
        'use strict';
         $(document).ready(function () {
             // Make collapsible regions
             // mutually exclusive
             $("#yearMakeModel")
                 .on("shown.bs.collapse", function () {
                 $("#nameCategory").collapse("hide");
             });
             $("#nameCategory")
             .on("shown.bs.collapse", function () {
                 $("#yearMakeModel").collapse("hide");
             });
        });
    </script>
}
The code presented above first checks to make sure the document is fully loaded. The first function connects to the shown.bs.collapse event on the id="yearMakeModel" element. When this event fires, call the collapse(“hide”) method on the id="nameCategory" element to force that collapsible area to hide itself. The second function does the same thing, but in reverse.
Try It Out
Run the application and click on the Shop menu or the “Go Shopping” button. Try clicking back and forth between the two collapsible areas to ensure that when one is opened, the other is closed.
The Problem: No Visual Feedback When Server Runs a Long Operation
One of the biggest problems with a browser is that there's extraordinarily little feedback to the user when they click on a link, and it takes a long time for the server to respond. Sure, you have the little spinner on the browser, but unless the user knows to look for that, they may think they didn't click on the link and they may click on it again. A better user experience is when, immediately after clicking on a link, a message appears informing the user that their request is being sent to the server (Figure 5).
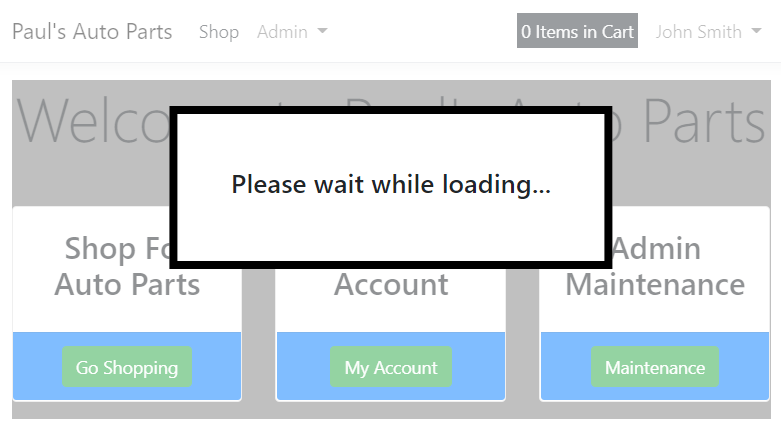
To illustrate this, click on the Admin > Vehicle Types menu. The call to the VehicleTypesController class instantiates an instance of the VehicleTypesViewModel class and makes a call to the Search() method on that object. The VehicleType table has over 9,000 records in it, so it takes several seconds to retrieve those records and generate the HTML table to be displayed.
As you can see in Figure 5, two UI features are used to tell the user that something has happened. First, a large “Please Wait While Loading…” message is displayed over the top of the page surrounded by a large border. In addition to the message, the background of all other HTML elements on the page appears to be disabled. This is accomplished with a little CSS magic by setting the transparency of all HTML elements to a value of 50% and setting their background color to gray.
By setting these two things to happen right when a user clicks on a link/button, and before the server request is sent, the user gets immediate feedback that something has happened. This type of feedback cannot be accomplished with server-side code: You must use JavaScript and CSS for this.
The Solution: Display Please Wait Message, Gray Out Background Using CSS, jQuery, and HTML
Start by creating a new CSS rule named pleaseWaitArea to set the background and opacity for the background elements. Next, add a CSS rule named pleaseWaitMessage to control the styling of the “Please Wait While Loading…” message area. Open the wwwroot\css\site.css file and add the CSS rules shown in Listing 2 at the top of this file.
Listing 2: Add two CSS rules to let the user know something is happening
.pleaseWaitArea {
    background: gray;
    opacity: .5;
}

.pleaseWaitMessage {
    border: black solid .5em;
    opacity: 1;
    text-align: center;
    background: white;
    z-index: 99;
    padding: 3em;
    position: absolute;
    left: 50%;
    top: 6em;
    transform: translate(-50%, 0);
}
Open the _Layout.cshtml file and locate the <div class="container"> element and add a new <div> just after this element. Your new <div> area should look like the following code snippet.
<div class="container">
    <div id="pleaseWait"
         class="pleaseWaitMessage d-none">
        <h4>
            <span id="theWaitMessage">
             Please wait while loading...
            </span>
        </h4>
    </div>
    <main role="main" class="pb-3">
        @RenderBody()
    </main>
</div>
When the user clicks on a hyperlink or a button, call a function to display the message and to set the background. Because you could use this function anywhere in your application, it's best to place it into the wwwroot\js\site.js file. Add a closure named mainController that has the function pleaseWait() in it, as shown in Listing 3.
Listing 3: Add a pleaseWait() function to the global site.js file so it can be used anywhere in your application
'use strict';

// ************************************
// Create a Closure
// ************************************
var mainController = (function () {
    // ************************************
    // Private Functions
    // ************************************
    function pleaseWait() {
        $("#pleaseWait").removeClass("d-none");
        $("header").addClass("pleaseWaitArea");
        $("main").addClass("pleaseWaitArea");
        $("footer").addClass("pleaseWaitArea");
    }

    // ************************************
    // Public Functions
    // ************************************
    return {
        "pleaseWait": pleaseWait
    }
})();
The pleaseWait() function first removes the class d-none from the <div id="pleaseWait"> element that contains the message. Next, it adds the pleaseWaitArea class to the <header>, the <main>, and the <footer> elements on the _Layout page. Each of these areas are now transparent by 50% and their background color is gray. This gives them each the appearance of being disabled. However, because the <div id="pleaseWait"> element is outside of each of these, it won't have this gray color or transparency applied to it, as you can see in Figure 5. Locate the Products menu item in the _Layout page and add an onclick event to the menu as shown in the following code snippet.
<a asp-action="ProductIndex"
   asp-controller="Product"
   onclick="mainController.pleaseWait();
   class="dropdown-item">
      Products
</a>
Locate the Vehicle Types menu and add the same onclick event you added above to this <a> element as well.
<a asp-action="VehicleTypeIndex"
   asp-controller="VehicleType"
   onclick="mainController.pleaseWait();
   class="dropdown-item">
       Vehicle Types
</a>
Try It Out
Run the application and click on either the Products menu or the Vehicle Types menu and you should see the “Please wait while loading…” message until the page is ready to be displayed.
Add an Animated Cog
To add an even better user experience to this wait message, add a spinning cog wheel after the message. One method to accomplish this is to use Font Awesome, a popular icon set that you can download from https://tinyurl.com/28m9vvjm. After you download the ZIP that contains the fonts, unzip the file to a folder on your hard drive. Copy the \css and \webfonts folders to your MVC project under the wwwroot folder. Open the _Layout.cshtml file and in the <head> section add a <link> element to the all.css file used by Font Awesome, as shown in the code in bold below.
<head>
    // REST OF THE CODE HERE

    <link rel="stylesheet"
          href="~/css/all.css" />
    <link rel="stylesheet"
          href="~/css/site.css" />

    @RenderSection("HeadStyles", required: false)
</head>
Go back to the <div id="pleaseWait"> element you just added, and after the <span> element within the <h4> you created, add a non-breaking space and an <i> element with the class attribute set to use the spinning cog from Font Awesome.
<h4>
<span id="theWaitMessage">
Please wait while loading...
</span>
<i class="fas fa-cog fa-spin"
style="z-index: 99">
</i>
</h4>
Try It Out
Run the application and click on either the Products menu or the Vehicle Types menu. You should now see the please wait message plus the spinning cog.
The Problem: Please Wait Message is Too Generic
Now that you have the problem of visual feedback for long-running operations solved, it's time to tweak this a little further. Instead of always displaying the same exact message each time the user must wait for an operation to complete, it's better to make each message custom. For example, “Please Wait While Loading Products…” and “Please Wait While Loading Vehicle Types…” are much more effective than just "Please Wait While Loading…". This lets the user know that they clicked on the correct link.
The Solution: Use the data- Attribute to Pass a Custom Message
Instead of passing the custom message directly to the pleaseWait() method in the mainController closure, pass in the object that invoked the call to the pleaseWait() method using the this keyword, as shown in the following code snippet.
onclick="mainController.pleaseWait(this);"
I prefer to pass in a control to a method so I can add many different data- attributes to the control that can then be read from the method. I find that this keeps the onclick event cleaner and gives me much more flexibility in the future.
Open the wwwroot\js\site.js file and add a parameter to the pleaseWait() method called ctl, as shown in Listing 4. As with most parameters, you should always check to make sure something was passed. If the ctl parameter is valid, attempt to get the data-waitmsg attribute from the control passed in. If you retrieve a message, replace the text in the <span> element that contains the “Please Wait…” message with the message from the data- attribute.
Listing 4: Modify the pleaseWait() method to accept a control
function pleaseWait(ctl) {
    // Was a control passed in?
    if (ctl) {
        // Look for a data-waitmsg="message"
        // on the control clicked on
        let msg = $(ctl).data("waitmsg");
        if (msg) {
            $("#theWaitMessage").html(msg);
        }
    }

    $("#pleaseWait").removeClass("d-none");
    $("header").addClass("pleaseWaitArea");
    $("main").addClass("pleaseWaitArea");
    $("footer").addClass("pleaseWaitArea");
}
Now go back to the two menu items in the _Layout.cshtml file and change each one to pass in this.
onclick="mainController.pleaseWait(this);"
Locate the Products menu in the _Layout.cshtml file and add the following data- attribute.
data-waitmsg="Please wait while loading Products..."
Locate the Vehicle Types menu in the _Layout.cshtml file and add the following data- attribute.
data-waitmsg="Please wait while loading Vehicle Types..."
Try It Out
Run the application and click on either the Products or Vehicle Types menus from the Admin menu to see the new custom messages appear.
Other Places to Add Please Wait Messages
There are a few other places you should add these “Please Wait…” messages. Open the Home\Index.cshtml file and locate the Products <a> tag and add the onclick event.
<a asp-action="ProductIndex"
   asp-controller="Product"
   data-waitmsg="Please wait while loading Products..."
   onclick="mainController.pleaseWait(this);"
   class="list-group-item">
       Products
</a>
Also locate the Vehicle Types link and add the same onclick event.
<a asp-action="VehicleTypeIndex"
   asp-controller="VehicleType"
   data-waitmsg="Please wait while loading Vehicle Types..."
   onclick="mainController.pleaseWait(this);"
   class="list-group-item">
       Vehicle Types
</a>
Add a Message While Checking Out
Open the CheckOut\Index.cshtml file and locate the <form> element and add a data- attribute.
<form method="post"
    asp-action="ProcessCreditCard"
    data-waitmsg="Please wait while processing credit card...<br />
    Please don't refresh this page or click on the back button.<br />"
>
When you're posting a form, you can't use the onclick event. Instead, hook into the submit event and add the call to the mainController.pleaseWait() method within this event. Go to the bottom of the page and add a “Scripts” section, as shown in the code below.
@section Scripts
{
    <script>
        'use strict';

        $(document).ready(function () {
            $("form").submit(function () {
                mainController.pleaseWait(this);
            });
        });
    </script>
}
Once the document has been loaded, add your own function to respond to the submit event on the <form>. Call the mainController.pleaseWait(this) passing in the <form> control so you can retrieve the data-waitmsg attribute and display the long message to the user. Notice that you can use a <br /> element within the message to help break the message across two lines in the message box.
Add a Message to Reset Buttons
On several of the maintenance pages such as the customer, product, promotional codes, and vehicle types, there are Reset buttons. When the user clicks on the Reset button, a request is sent to the server to refresh all the data on the page from the database. On each of these buttons, it's a good idea to add a “Please Wait…” message. Open the CustomerMaint\_CustomerMaintSearch.cshtml file and add the onclick event and the data-waitmsg attribute, as shown in the code below.
<a class="btn btn-primary"
   asp-action="CustomerMaintIndex"
   onclick="mainController.pleaseWait(this);"
   data-waitmsg="Please wait while getting all customers...">
       Reset
</a>
Open the Product\_ProductSearch.cshtml file and add the onclick event and the data-waitmsg attribute, as shown in the code below.
<a class="btn btn-primary"
   asp-action="ProductIndex"
   onclick="mainController.pleaseWait(this);"
   data-waitmsg="Please wait while getting all products...">
       Reset
</a>
Open the PromoCode\_PromoCodeSearch.cshtml file and add the onclick event and the data-waitmsg attribute, as shown in the code below.
<a class="btn btn-primary"
   asp-action="PromoCodeIndex"
   onclick="mainController.pleaseWait(this);"
   data-waitmsg="Please wait while getting all promo codes...">
       Reset
</a>
Open the VehicleType\_VehicleTypeSearch.cshtml file and add the onclick event and the data-waitmsg attribute, as shown in the code below.
<a class="btn btn-primary"
   asp-action="VehicleTypeIndex"
   onclick="mainController.pleaseWait(this);"
   data-waitmsg="Please wait while getting all vehicle types...">
       Reset
</a>
Add a Message to Search Buttons
On those same pages with the Reset buttons, there are Search buttons that submit the search data on the page to search for that specific criterion in the database. If the search takes a while to perform, you should add the “Please Wait…” message to those buttons. Open the CustomerMaint\CustomerMaintIndex.cshtml file and within the “Scripts” section, add the <script> tag and all the code shown in the following code snippet.
@section Scripts
{
    <script>
    'use strict';

    $(document).ready(function () {
        $("form").submit(function () {
            mainController.pleaseWait(this);
        });
    });
    </script>

    <partial name="_ValidationScriptsPartial" />
}
The <form> element for the search is located on the partial page included on the CustomerMaintIndex.cshtml file. Open the CustomerMaint\_CustomerMaintSearch.cshtml file and add the appropriate data-waitmsg attribute to the <form> element.
<form method="get"
      asp-action="Search"
      data-waitmsg="Please wait while searching for specified customers...">
Open the Product\ProductIndex.cshtml file and within the “Scripts” section add the <script> tag and all the code shown in the following code snippet.
@section Scripts
{
    <script>
    'use strict';

    $(document).ready(function () {
        $("form").submit(function () {
            mainController.pleaseWait(this);
        });
    });
    </script>

    <partial name="_ValidationScriptsPartial" />
}
Open the Product\_ProductSearch.cshtml file and add the appropriate data-waitmsg attribute to the <form> element.
<form method="get"
      asp-action="Search"
      data-waitmsg="Please wait while searching for specified products...">
Open the PromoCode\PromoCodeIndex.cshtml file and within the “Scripts” section add the <script> tag and all the code shown in the following code snippet.
@section Scripts
{
    <script>
    'use strict';

    $(document).ready(function () {
        $("form").submit(function () {
            mainController.pleaseWait(this);
        });
    });
    </script>

    <partial name="_ValidationScriptsPartial" />
}
Open the PromoCode\_PromoCodeSearch.cshtml file and add the appropriate data-waitmsg attribute to the <form> element.
<form method="get"
      asp-action="Search"
      data-waitmsg="Please wait while searching for
          specified promotional codes...">
Open the VehicleType\VehicleTypeIndex.cshtml file and within the “Scripts” section, add the <script> tag and all the code shown in the following code snippet.
@section Scripts
{
    <script>
    'use strict';

    $(document).ready(function () {
        $("form").submit(function () {
            mainController.pleaseWait(this);
        });
    });
    </script>

    <partial name="_ValidationScriptsPartial" />
}
Open the VehicleType\_VehicleTypeSearch.cshtml file and add the appropriate data-waitmsg attribute to the <form> element.
<form method="get"
      asp-action="Search"
      data-waitmsg="Please wait while searching
          for specified vehicle types...">
Try It Out
Run the application and try out each of these buttons and links to ensure that the “Please Wait…” messages are being displayed.
The Problem: The User Can Still Click on Buttons and Links During a Long Operation
Another problem with the user waiting for the server to respond is that they may still click on any buttons or links in the background (as you saw in Figure 5). In addition to displaying the “Please Wait…” message, you should disable all other buttons and links on the page that the user could accidentally, or purposefully, click upon.
The Solution: Disable Links and Buttons Using jQuery
Open the wwwroot\js\site.js file and add a new function named disableAllClicks() to the mainController closure in the file.
function disableAllClicks() {
    $("a").css("cursor", "arrow").click(false);
    $("input[type='button']")
        .attr("disabled", "disabled");
    $("button").attr("disabled", "disabled");
}
This function first sets all <a> elements cursors to be a normal arrow instead of showing the normal cursor that a user identifies with clicking upon something. The click() method is chained to the css() method to disable all <a> element click events by setting them to false. The disableAllClicks() method then sets all <input type="button"> and <button> elements to disabled. Locate the pleaseWait() function and immediately before the end of the method, call this new disableAllClicks() function.
function pleaseWait(ctl) {
    // REST OF THE CODE HERE
    disableAllClicks();
}
Expose this function publicly in case you need to use it yourself somewhere in your application by adding it to the return object in this closure.
return {
    "pleaseWait": pleaseWait,
    "disableAllClicks": disableAllClicks
}
Try It Out
Run the application and click on the Admin > Vehicle Types menu. Immediately try to click on any other button or hyperlink on the page. You shouldn't be able to run any other operation while it's loading the Vehicle Types page.
The Problem: You Must Refresh the Page to See How Long Until Your Shopping Cart Expires
Click on the Shop menu and search for products. Click on the Add to Cart button on one or more of the products. You should see the number of items added to the cart displayed next to the customer's name. The items in the cart are held in a Session variable for the current user. The number of items in the cart are set on the page by taking the number of items in the cart and setting them into a ViewBag object for display in the _Layout.cshtml template page.
Click on the “n Items in Cart” menu and you are taken to the Shopping Cart page. The CartController class creates an instance of the ShoppingCartViewModel class and displays the data from the shopping cart, as shown in Figure 6. Notice that the number of minutes and seconds at the top of the page is not counting down. To see how much time until your cart expires, you must refresh the whole Web page, forcing a post-back so the server-side code can calculate how much time is left.
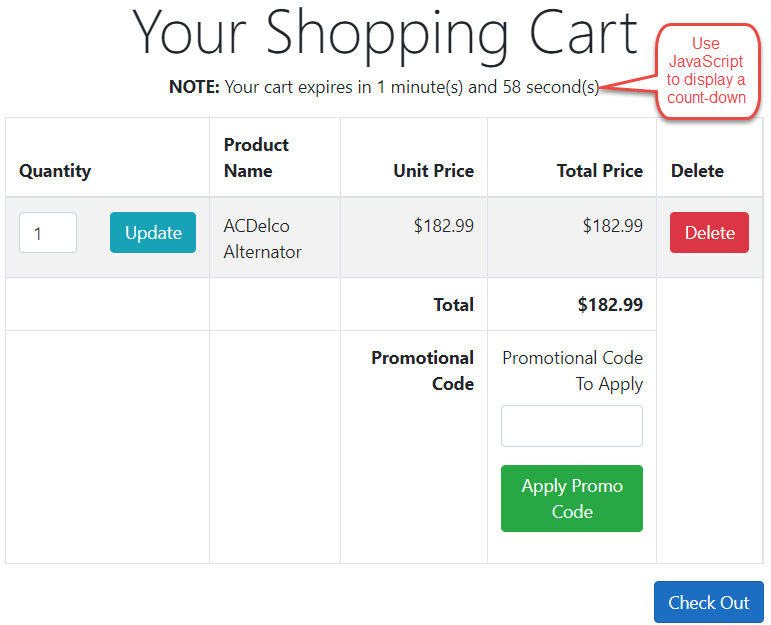
The Solution: Use the setInterval() Function to Display Countdown with No Post-Back
Create a new file in the wwwroot\js folder called cart.js into which you're going to add a new closure named cartController, as shown in Listing 5. There's one private variable in this closure named dateExpires. This variable is set from the shopping cart expiration date from the server, which is stored in a hidden input field and passed into this closure using the setExpiration() method. This variable can also be cleared using the clearExpiration() method.
Listing 5: Create a cartController closure to help with the shopping cart countdown
'use strict';

// ************************************
// Create a Closure for Cart Expiration
// ************************************
var cartController = (function () {
    // ************************************
    // Private Variables
    // ************************************
    let dateExpires;

    // ************************************
    // Private Functions
    // ************************************
    function setExpiration(expires) {
        dateExpires = new Date(expires);
    }

    function clearExpiration() {
        dateExpires = null;
    }

    function getLength() {
        if (dateExpires) {
            // Find the length between now
            // and the count down date
            return dateExpires.getTime() -
                   new Date().getTime();
        }
        else {
            return 0;
        }
    }

    function isExpired() {
        if (getLength() <= 0) {
            clearExpiration();
        }

        return (dateExpires === null);
    }

    function getMessage() {
        // Get milliseconds until cart expires
        let length = getLength();

        // Is cart still valid?
        if (length <= 0) {
            clearExpiration();
            return "Your cart has expired";
        }
        else {
            // Calculate minutes and seconds
            let minutes = Math.floor(
                (length % (1000 * 60 * 60)) / (1000 * 60));
            let seconds = Math.floor(
                (length % (1000 * 60)) / 1000);

            return `Your cart expires in ${minutes}
            minute(s) and  ${seconds}  second(s)`;
        }
    }

    // ************************************
    // Public Functions
    // ************************************
    return {
        "setExpiration": setExpiration,
        "clearExpiration": clearExpiration,
        "isExpired": isExpired,
        "getMessage": getMessage
    }
})();
To determine if there is still time left until the cart expires, the getLength() method is called to find the length of time remaining between the current time and the time in the dateExpires variable. If the time is zero, or less, the cart should be expired. There is a method named isExpired() that calls the getLength() method and if a zero is returned, the clearExpiration() method is called. The return value from the isExpired() method is a true or false value.
The last method in this closure is getMessage(). This method returns a string “Your cart has expired” if the getLength() method returns a zero. If there's still time remaining in the cart, the current length variable is broken into minutes and seconds and a string with the number or minutes and seconds is returned from this method.
Open the Cart\Index.cshtml file and add a “Scripts” section to the bottom of the file, as shown in Listing 6. Notice the <script src="~/js/cart.js"> element includes the cart.js file you just created with the cartController closure. The first thing you do after the document is loaded is grab the expiration date/time from the hidden field named cartExpires that was set on the server. Next, check to ensure the cart has not expired. If it hasn't, call setInterval() and have it run the function defined in its first parameter every one second.
Listing 6: Use the cartController closure on the shopping cart page
@section Scripts
{
    <script src="~/js/cart.js"></script>
    <script>
    'use strict';

    $(document).ready(function () {
        // Set expiration into cartController
        cartController.setExpiration(
            $("#cartExpires").text());
        // Make sure the cart has not expired
        if (!cartController.isExpired()) {
            // Start a loop every 1 second
            let int = setInterval(function () {
                // Set the text for the countdown
                $("#cartExpirationMsg").text(cartController.getMessage());
                // Has the cart expired?
                if (cartController.isExpired()) {
                    // Stop the interval
                    clearInterval(int);
                    // Redirect to this same window
                    // This clears the shopping cart
                    window.location.assign(window.location.href);
                }
            }, 1000);
        }
    });
    </script>
}
In this function, call the getMessage() method to retrieve the string to display on the top of this page. Check again if the cart has expired, and once it does, call clearInterval() to stop this function from running. Use the JavaScript window.location.assign() method to refresh this page by going back to the server. The server will see that the cart has expired and remove all shopping cart items from the Session variable. When the page is redisplayed, no items are shown on this page.
Try It Out
Run the application and add some items to the shopping cart. Click on the “n Items in Cart” menu to view the countdown. Let the page sit there until the cart expires. Once this happens, you'll see a post-back and the page now displays a message that there are no items in the shopping cart.
Summary
In this article, you learned to apply CSS, JavaScript, and jQuery to your MVC application to create a more effective user experience. You added some immediate feedback with a “Please Wait…” message when a long-running operation is happening on the server. You added the ability to customize the “Please Wait…” message using data- attributes. You also learned to disable and gray out the background elements while a long-running process occurs. In the next article, you're going to continue using JavaScript and jQuery to ensure that search areas are open when appropriate, learn to hide elements when printing, and find out how to use jQuery validation to create custom validation rules on the client-side to avoid a post-back.
