


During the cold war, both American and Russian spies were trying to outdo each other. In 1980, FBI agents recorded a phone call in which a man had secretly arranged to meet with the soviet embassy in Washington DC. Alas, they could not pinpoint who the person was on the phone call.
Find additional: Artifical Intelligence Articles
By 1985, the NSA were able to identify the specific person by using a technology that could identify people by the sound of their voices.
I don't know how true this story is (https://theintercept.com/2018/01/19/voice-recognition-technology-nsa/). I wasn't there. It doesn't sound implausible. It makes me wonder what technologies they have today!
Microsoft Cognitive Services, or as I like to call it, AI for the common folk, allows your applications to hear, see, and understand just as you would. In my previous article (CODE Magazine May/June 2018), I showed you how Cognitive Services can recognize people by simply submitting their photograph. It sounds like science fiction, but it was actually quite easy.
In this article, I'll demonstrate how you can build a library of voices associated with speakers. All I need is a 30 second audio sample of the person talking. Then I can submit an audio clip, something that the computer has never heard before. And the computer will recognize (hopefully) who that voice belongs to. This is possible because our voices are like fingerprints. They are unique, enough so that a computer can recognize a person from their voice with a very high degree of accuracy.
This is built purely using Microsoft Cognitive Services, which means that it's easy! If you can call a REST service, you can build a speaker recognition system by recognizing their voice.
In other words, something that only the NSA could do in 1985, you will be able to do by the end of this article.
Let's get started!
The Concepts
As the name suggests, speaker recognition is the ability of a computer to listen to a voice and identify who the voice belongs to. There are two parts to this. They are very similar.
The first part is called identification where you pass in a sample audio of spoken text and the computer tells you who that speaker is. Samples don't need to have identical text. The second part is where you use the voice for authentication or verification. The spoken phrase and the identity of the speaker need to be correct for an authentication to be performed.
In this article, I will focus only on speaker identification.
Before we dive into the nitty-gritty of code, you need to understand exactly what I intend to do. The process of speaker recognition first involves enrolling a speaker. This means that you create an identification profile and you enroll at least 30 seconds of audio of that person, not including silence, on their profile. You can do so using multiple files; if you upload a single file of 15 seconds in length, the computer will tell you that it needs an additional 15 seconds to complete the enrolling of a speaker.
You repeat this process for all speakers that you wish to enroll. You create an identification profile and enroll 30 seconds of audio for each one of the speakers. At the end of this, you'll have a collection of identification profiles.
Once you have some identification profiles, you supply a sample audio clip of any one of those speakers. This has to be spoken text but it doesn't have to exactly match the file that has been used to create the identification profile.
Because each voice is as distinctive as a thumbprint, the computer examines the sample of the voice and compares it against a list of identification profiles. The computer tells you who it thinks this person's voice belongs to.
And all of this is made possible using the speaker recognition API in Azure. In order to use it, you provision it in Azure, get the access keys, and call the necessary functionality over REST APIs.
The Source Code
I want to keep this article pertinent to the important bits. If you're interested in a full working example of the code used in this article, you may download it from the following github repo.
https://github.com/maliksahil/speakerrecognition
Just remember to use your own API keys.
That code sample is in both C# written in dotnetcore, so you can run it on any platform, and Typescript. Whichever you prefer. The logic is identical, this article only shows Typescript code for brevity.
With that behind us, let's dive into code.
Set up the Speaker Recognition API
Just like most other Cognitive Services APIs, before you can run speaker recognition API, you need to register it in Azure. To do that, sign into the Azure portal. Once signed in, click on the create resource link and search for speaker recognition. Azure prompts you with a speaker recognition API choice; choose to create it.
You'll need to give it a name and place it in a location. Not all APIs are available in every data center; I put mine in West US. For the purposes of this article, you can go with the free tier. You'll also have to put this newly created API in a resource group. You can create a new one or put it in an existing resource group. Just remember to delete this API once you're done with it.
Remember to delete the API once you've finished using it.
Once you click the Create button, the instance of the speaker recognition API is created. With the newly created resource, visit it on the All Resources link and copy a few things out of this newly provisioned speaker recognition API.
From the Overview tab, copy the endpoint. Under the Keys tab, copy the access keys.
Place both the endpoint and the access keys in the provided source code's config.ts file, as can be seen in Listing 1. I've removed the access keys from the listing because they were from my Azure subscription. You need to use yours.
Listing 1: The config.ts file with the endpoint and access keys
export let config = {
    speakerRecognitionAPI: {
        endPoint: "https://westus.api.cognitive.microsoft.com/spid/v1.0",
        key1: "<removed>",
        key2: "<removed>"
    }
};
Authentication
All of the requests you make to the speaker identification API need to be authenticated. You need to use the authentication keys to perform this authentication. These authentication keys are passed in a special header called Ocp-Apim-Subscription-Key. Because every method needs to pass in this header, I chose to externalize the creation of this header in its own function, as can be seen in Listing 2.
Listing 2: The authentication method
function getRequestOptions(): request.CoreOptions {
    return {
        headers: {
            "Content-Type": "application/octet-stream",
            "Ocp-Apim-Subscription-Key": config.speech.speakerRecognitionAPI.key1
        }
    };
}
Create the Identification Profile
Next, you need to create the identification profile for a single user. Remember, you need to create identification profiles for each of the users from among whom you wish to recognize the spoken voice.
Creating the identification profile is a matter of calling the speaker recognition API endpoint + “/identificationProfiles”. You make a REST call, and in the body of that message, you specify the locale, such as en-us. You also need to authenticate, for which you'll use the method shown in Listing 2.
The result of this POST method is a GUID, which is the identificationProfileId. This ID is your unique identifier per user; the idea is that when you ask the computer to recognize the speaker in an input audio file, you pass in a number of identification profile IDs, among which is the speaker who needs to be recognized. The full implementation of the createIdentificationProfile method can be seen in Listing 3. Note that it returns a Promise<string>, which is the identification profile ID GUID.
Listing 3: The createIdentificationProfile method
export function createIdentificationProfile(): Promise<string> {
    const promise = new Promise<string>((resolve, reject) => {
        const requestOptions = getRequestOptions();
        requestOptions.headers['Content-Type'] = 'application/json';
        requestOptions.body = JSON.stringify({
            'locale': 'en-us'
        });

        request.post(
            config.speech.speakerRecognitionAPI.endPoint + '/identificationProfiles',
            requestOptions,
            (err, response, body) => {
                if (err) { reject(err); }
                else { resolve((JSON.parse(body).identificationProfileId)); }
            }
        );
    });
    return promise;
}
You can similarly delete an identification profile by using a DELETE request to the following URI:
config.speech.speakerRecognitionAPI.endPoint + '/identificationprofiles/' + identificationProfileId
Remember to authenticate using the method in Listing 2.
Perform an Enrollment
Once you've registered a speaker by creating their identification profile, you need to enroll them. Enrolling the speaker means supplying 30 seconds of audio as spoken by the speaker. You can choose to supply a number of audio files, as long as they add up to 30 seconds, you're good to go.
In order to enroll a speaker in an identification profile, you need 30 seconds of speaking, minus all silences.
When you supply an audio file for enrollment, you need to specify which identification profile ID this enrollment is for. In response, you will be informed if the enrollment is complete or incomplete. The enrollment is incomplete if you have less than 30 seconds of audio, in which case you'll also be informed how much more audio Cognitive Services needs to complete the enrollment.
In order to perform the enrollment, you need to issue a POST request to the following URI:
config.speech.speakerRecognitionAPI.endPoint +
  '/identificationProfiles/' +
  identificationProfileId +
  '/enroll';
As usual, remember to authenticate using the method shown in Listing 2.
In the body of your authentication POST message, include the audio file that you wish to enroll. The method used for reading this file can be seen in Listing 4.
Listing 4: The readFile method
function readFile(filePath: string) {
    const fileData = fs.readFileSync(filePath).toString("hex");
    const result = [];
    for (let i = 0; i < fileData.length; i += 2) {
        result.push(parseInt(fileData[i] + "" + fileData[i + 1], 16))
    }
    return new Buffer(result);
}
Performing the enrollment is an asynchronous process. This means that you don't immediately receive a response for a successful or unsuccessful enrollment. Instead, you communicate through a URL to which you can periodically make a GET request to check the status of your enrollment. Remember not to make this request too often or you will get a HTTP 429 error. When you do receive a response, the response will be a JSON object with the property on it called status. If the value succeeds, your request has been accepted.
This doesn't mean that enrollment has finished. To check for that, you need to check the enrollmentStatus property and if that property says Enrolling, you need to supply more audio. The response also contains how much more audio you need to supply among its properties.
The full implementation of the createEnrollment method can be seen in Listing 5.
Listing 5: The createEnrollment method
export function createEnrollment(
    fileName: string, identificationProfileId: string): Promise<RequestStatus> {
        const promise = new Promise<RequestStatus>((resolve, reject) => {
            const requestOptions = getRequestOptions();
            requestOptions.body = readFile(__dirname + "/" + fileName)
            const uri = config.speakerRecognitionAPI.endPoint +
                '/identificationProfiles/' + identificationProfileId +
                '/enroll';
            request.post(
                uri,
                requestOptions,
                (err, response, body) => {
                    if (err) { reject(false); }
                    else {
                        const requestUrl = response.headers['operation-location'].toString();
                        console.log(requestUrl);
                        const timer = setInterval(() => {
                            request.get(requestUrl, requestOptions,
                            (err, response, body) => {
                                const enrollmentStatus = new RequestStatus(JSON.parse(body));
                                if (enrollmentStatus.status === 'succeeded') {
                                    clearInterval(timer);
                                    if (enrollmentStatus.processingResult.enrollmentStatus ===
                                        "Enrolling") {
                                            console.log(
                                            'Supply a little more audio, atleast 30 seconds. Currently at: '
                                                + enrollmentStatus.processingResult.speechTime);
                                        }
                                        resolve(enrollmentStatus);
                                }   else {
                                    console.log('Waiting for enrollment to finish');
                                }
                            });
                        }, 1000);
                    }
                }
            )
    });
    return promise;
}
Perform Identification
With the identification profiles set up and enrolled, the next thing you need to do is to identify the speaker who's given an input audio sample. The way this works is that you issue a POST request to the following URL:
config.speakerRecognitionAPI.endPoint +
'/identify?identificationProfileIds=' +
identificationProfileIds
The identificationProfileIds parameter is a comma-separated list of all the currently enrolled profile IDs.
As usual, remember to authenticate using the method shown in Listing 2.
When you do issue this POST request, in response, you receive a URL that you are supposed to check using a periodic GET request. The result of that GET request is a JSON object. On the return JSON object, you check for a property called status. If the value of status is succeeded, you should also see the identification profile ID along with a confidence level that the computer thinks this audio belongs to a specific speaker.
Let's see all of this in action.
Run the Code
Now that all of the code is written, let's create two identification profiles. I'm trying to identify two speakers. One is me, the second is former-president Obama.
For myself, I don't have a single 30-second audio sample, so I'll need multiple calls be able to enroll myself. Let's see how.
First, I need to create an identification profile. The following code snippet allows me to do that.
identification.createIdentificationProfile().then(
    identificationProfile => {
        console.log(identificationProfile);
});
Running this code snippet gives me a GUID of 537fa705-e576-4844-b0a8-be6e9d6f50b9. Okay so, identificationProfileId for speaker Sahil is 537fa705-e576-4844-b0a8-be6e9d6f50b9.
Next, let's enroll my 30-second audio sample using the code snippet below:
identification.createEnrollment('/Data/Sahil/1.wav', sahilIdentificationProfile).then(
    (result: RequestStatus) => {
        console.log('1.wav enrolled');
});
The output of the above call can be seen in Figure 1.

As you can see, I need to supply a little more audio. I went ahead and supplied another few seconds of my audio, and the output now changes to this:
2.wav enrolled
Great! Now let's enroll former-president Obama. I ran the same code again and created an identificationProfile ID with the following GUID:
7043adc1-f9ef-4b47-8fa9-2b898c348869
I also went ahead and created an enrollment for our former president. This audio sample was > 30 seconds, so I was able to perform the enrollment in a single call. You can find all of the audio files I used in the associated code download.
Great! Now let's perform the final test: identifying the speaker. The call to identify the speaker can be seen in Listing 6. You might note that Obama_input.wav isn't part of my enrollment.
Listing 6: Identify the speaker
identification.identifySpeaker('obama_input.wav', sahilIdentificationProfile + ',' +
    obamaIdentificationProfile).then(
        result => {console.log(`Identified profile is: ${result.processingResult.identifiedProfileId}
        and the confidence is: ${result.processingResult.confidence}`)
        });
When I run the code in Listing 6, I get the output as seen in Figure 2.
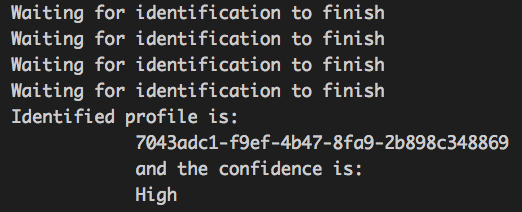
It correctly recognized the speaker as the former president. If that doesn't impress you, I don't know what will.
Conclusion
As I write this article, Google, Microsoft, and Facebook just concluded their annual flagship conferences. It almost seems like all the speakers on the stage have lost the ability to make a full sentence without using the term AI.
It is a buzzword and it's overused. Don't get desensitized to it because it holds tremendous value.
So far, I've covered what you could do with AI capabilities right out of the box using Microsoft Cognitive Services. It was easy! If you can call a REST service, your apps can now see, hear, speak, and understand the world around them, just like you do.
What if I told you that I wrote majority of this article using speech recognition? I did. My editor is pulling her hair right now (sorry Melanie), but it's true. I have limited keystrokes in my fingers and I wish to use them wisely. I have written 20+ books and thousands of articles, and I wrote many of them with speech recognition. I'll let you in on a secret, I use Google's Cognitive Services to do that, and over the years, I've built a profile for myself. The speech recognition has gotten so good and personalized to me, that it frankly leaves me amazed. Don't believe me? Go to docs.google.com and go to
tools\voice typing. Try it, you'll be amazed! And it gets better the more you use it.
Voice recognition gets better the more you use it.
I see applications for AI everywhere. I'm amazed at how little this field is tapped yet, and how much potential there is. Can you sense the excitement? Every time you pick up your smart phone and take your friend's picture, the phone recognizes faces and adjusts the contrast, focus, and brightness accordingly. How do you think it's recognizing faces? Artificial intelligence.
In my subsequent articles, I hope to open this Pandora's box a little more.
I'll leave you with one thought. In 1985, NSA was using AI to do speaker recognition. They were so accurate and confident of their capabilities across millions of users that this became a reliable tool for thwarting espionage, or perhaps for committing espionage. What technology do think the NSA uses today? What technology does Azure, or AWS, or Google have in their data centers? Here's the good news: With the advent of the cloud, you have all that computing power at your fingertips, all of that power in your hands. Use it wisely!
Until next time, happy and responsible AI programming!
