


Artificial intelligence (AI) is an area of computer science that emphasizes the creation of intelligent machines that work and react like humans. And AI (and machine learning) is all the rage these days. However, unless you have a PhD in Mathematics and Computer Science, AI programming remains an elusive field to many developers. But this shouldn't be the case. What most developers want is the ability to integrate AI capabilities into their applications without knowing the nuts and bolts of how AI works.
Find additional: Artifical Intelligence Articles
The Microsoft Cognitive Services is a suite of AI services and APIs to help developers integrate AI capabilities into their applications without building the AI services from scratch. Developers simply need to choose the relevant APIs from the Cognitive Services for their needs and requirements.
The various services in the Microsoft Cognitive Services allows you to:
- Analyze images and provide a description of their content
- Perform language translations
- Use machine vision to recognize users and emotions
- Perform image recognition
- And much more
In this article, I'll walk you through some of the capabilities of the Microsoft Cognitive Services. You'll learn how to use the various APIs and services and integrate them into your Python, iOS, and Android applications. You'll also learn how to build a custom learning model to recognize the thorny (and to some people, smelly) fruit known as durians!
Getting Started
To get started with the Microsoft Cognitive Services, use a Web browser and go to https://azure.microsoft.com/en-us/services/cognitive-services/. Click the Start Free button. You'll now be able to select the Cognitive Services that you want to use (see Figure 1).
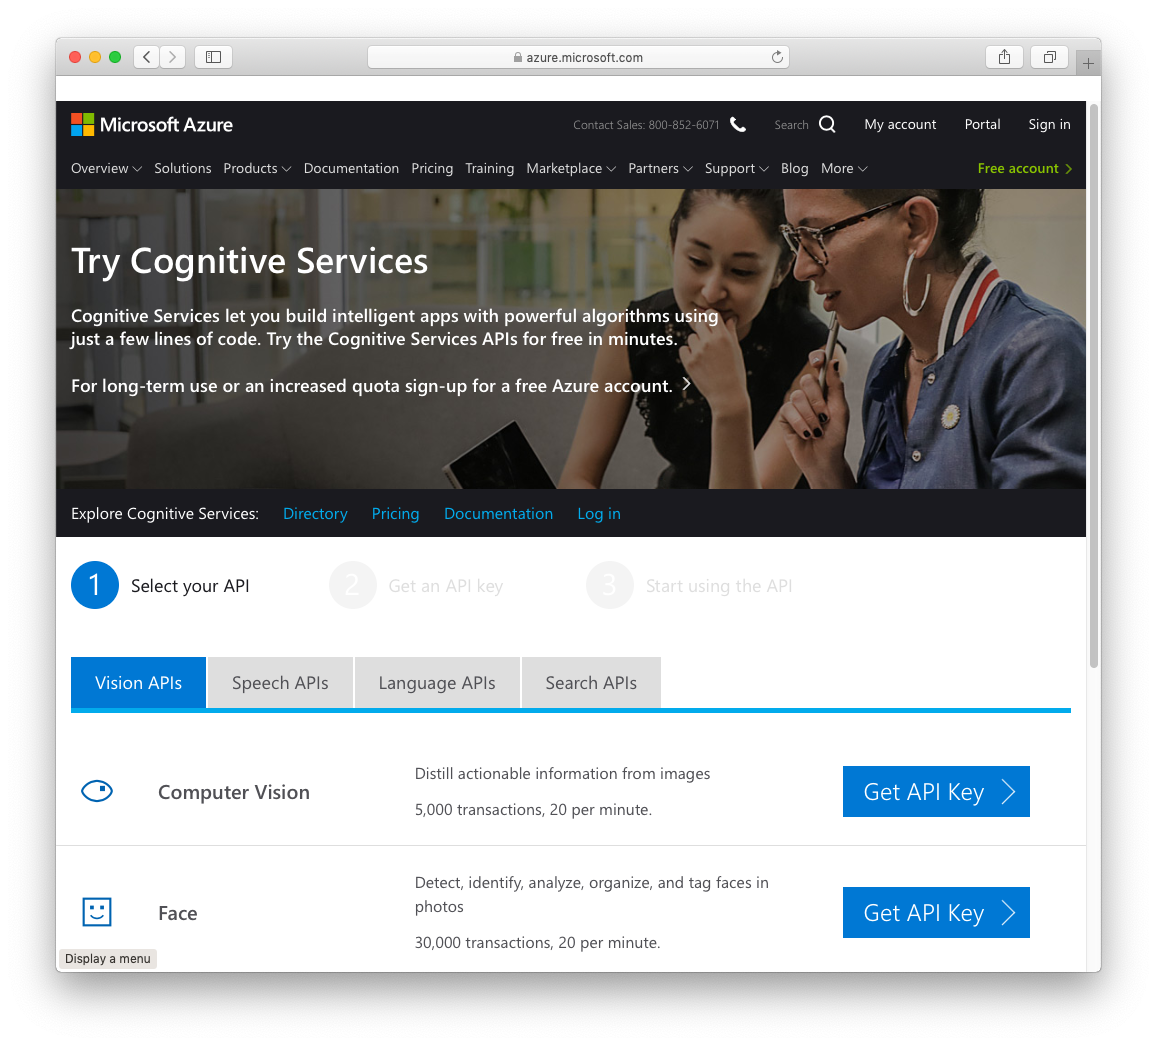
Click on the first GET API Key button. This allows you to get the Computer Vision API key. You should see the options shown in Figure 2.
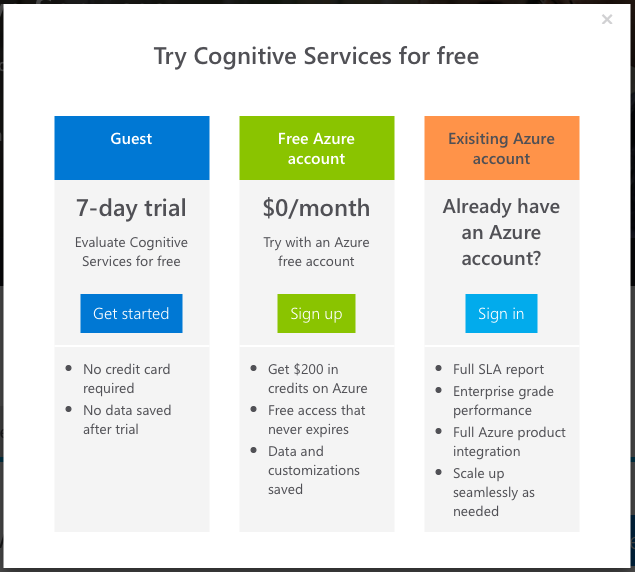
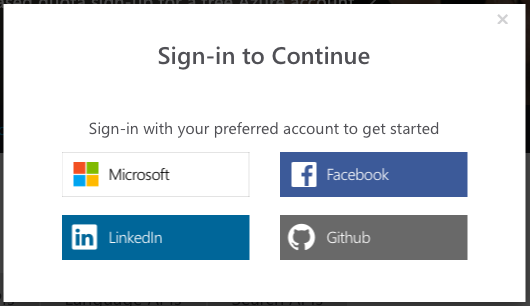
For readers without an Azure account, click the Get started button under the Guest section. In the next screen, accept the terms and conditions and click Next. You need to select one of the ways to log in (see Figure 3).
Once you've successfully logged in, you'll be able to get your trial API keys for the Computer Vision API (see Figure 4).
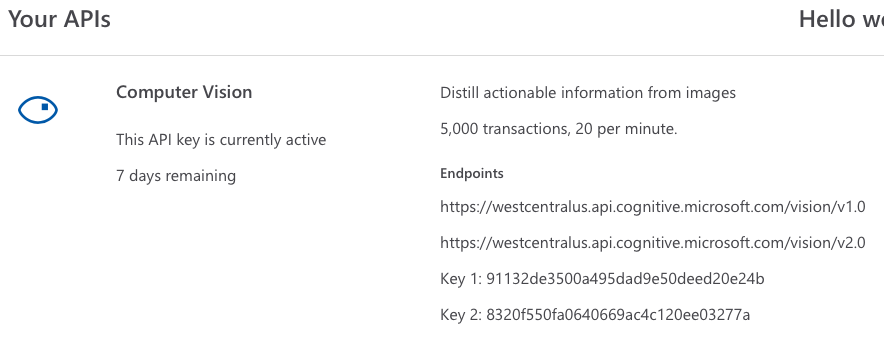
It's important that you take note of the following for each API:
- The endpoints. This is the URL for you to access the APIs. For the Computer Vision API, the 2 endpoints are:
https://westcentralus.api.cognitive.microsoft.com/vision/v1.0andhttps://westcentralus.api.cognitive.microsoft.com/vision/v2.0. The westcentralus domain is usually used for trial accounts. - The API keys. Also, known as the subscription key, this is the key that allows your app to access the services. Make sure you save them in a secure location. Remember that these trial keys only last for seven days, so you need to reapply for them when they expire.
The endpoint of each service uniquely identifies the types of service you are using, such as Face API, Vision API, etc.
You can repeat the process to apply for the trial API keys for other services, such as Face API, etc.
Testing the APIs Using CURL
The best way to test out the various services provided by the Microsoft Cognitive Services is to use the cURL utility.
For macOS users, cURL is already installed right out of the box. For Windows users, you can obtain and install cURL from https://curl.haxx.se/download.html.
Using the Vision API
Let's get started with the Vision API, which is a lot of fun to test out. The Vision API includes the following services:
- Analyze: The Analyze service helps to detect and provide insight about the visual features and characteristics of your images.
- Describe: The Describe service analyzes the content in an image and the description summarizes what is found in the image.
- Generate Thumbnail: The Generate Thumbnail service generates a high-quality thumbnail and then analyzes the objects within the image to identify the region of interest (ROI).
- Tag: The Tag service returns tags based on more than 2000 recognizable objects, living beings, scenery, and actions.
Let's see how each of these services work with examples.
Analyze Service
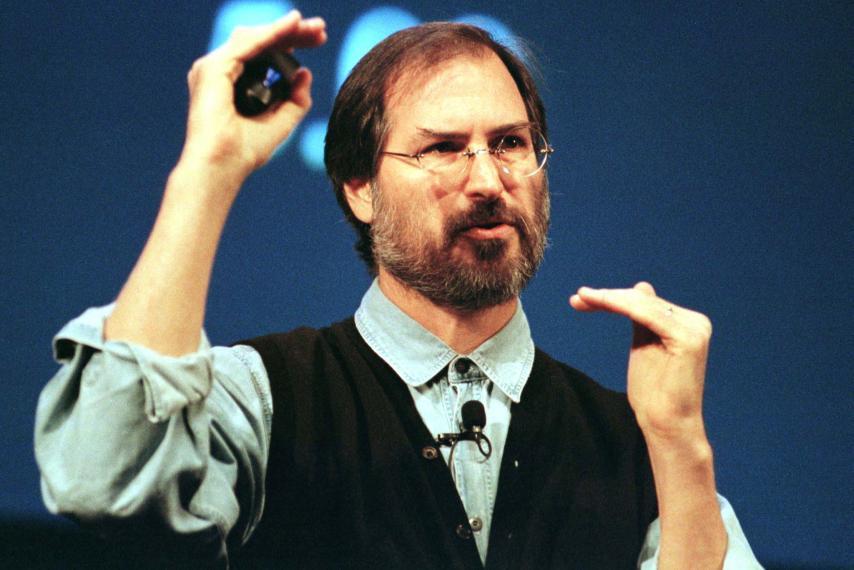
The Analyze service helps to detect and provide insight about the visual features and characteristics of your images. For this feature, I'm going to use the image (see Figure 5) located at https://bit.ly/2CI9I53.
In Terminal, type the following command (all in a single-line; formatted here to aid readability):
$ curl -H 'Ocp-Apim-Subscription-Key: <Subscription_Key>'
-H 'Content-Type: application/json'
-d '{"url":"https://bit.ly/2CI9I53"}'
'<a href="https://westcentralus.api.cognitive.microsoft.com/">https://westcentralus.api.cognitive.microsoft.com/</a>
vision/v1.0/analyze?visualFeatures=Categories,Tags,Description,Faces,ImageType,Color,Adult&
details=Celebrities,Landmarks&language=en'
In the preceding command:
- Replace the
<Subscription_Key>with your own subscription key. - Specify the image you want to analyze using a JSON string containing the URL of the image and submit it through the -d option.
- The Base URL of the service is that of your endpoint, plus the service you are assessing:
https://westcentralus.api.cognitive.microsoft.com/vision/v1.0/analyze. The options for the service are then passed through key-value pairs after the base URL. Here, vision indicates theComputer Vision API, and analyze is the service within theVision API. - You want the result to contain the following information: Categories, Tags, Description, Faces, ImageType, Color, and Adult, and you pass in all these options through key-value pairs in the URL. The details of the image contain Celebrities and Landmarks.
- You want the result to be returned in in English (language=en).
The result returned from the service looks like Listing 1 (formatted for readability).
Listing 1: The result returned from the Analyze service
{
  "categories": [{
    "name": "people_",
    "score": 0.5234375,
    "detail": {
      "celebrities": [{
        "name": "Steve Jobs",
        "confidence": 0.99999821186065674,
        "faceRectangle": {
          "left": 397,
          "top": 100,
          "width": 170,
          "height": 170
        }
      }]
    }
  }, {
    "name": "people_portrait",
    "score": 0.3984375,
    "detail": {
      "celebrities": [{
        "name": "Steve Jobs",
        "confidence": 0.99999821186065674,
        "faceRectangle": {
          "left": 397,
          "top": 100,
          "width": 170,
          "height": 170
        }
      }]
    }
  }],
  "adult": {
    "isAdultContent": false,
    "isRacyContent": false,
    "adultScore": 0.1824040561914444,
    "racyScore": 0.18311712145805359
  },
  "color": {
    "dominantColorForeground": "Black",
    "dominantColorBackground": "Black",
    "dominantColors": ["Black"],
    "accentColor": "2D949E",
    "isBwImg": false,
    "isBWImg": false
  },
  "imageType": {
    "clipArtType": 0,
    "lineDrawingType": 0
  },
  "tags": [{
    "name": "person",
    "confidence": 0.99992716312408447
  }, {
    "name": "man",
    "confidence": 0.99678182601928711
  }, {
    "name": "necktie",
    "confidence": 0.28407412767410278
  }, {
    "name": "concert",
    "confidence": 0.030748603664156535
  }, {
    "name": "music",
    "confidence": 0.023170323008648616
  }],
  "description": {
    "tags": ["person", "man", "holding", "phone", "outdoor", "cellphone", "wearing", "looking", "suit", "standing", "camera", "hand", "photo", "front", "posing", "glasses", "talking", "black", "face", "mirror", "sunglasses", "street", "hat", "court", "blue"],
    "captions": [{
      "text": "Steve Jobs wearing a suit and tie talking on a cell phone",
      "confidence": 0.76812406805206646
    }]
  },
  "faces": [{
    "age": 48,
    "gender": "Male",
    "faceRectangle": {
      "left": 397,
      "top": 100,
      "width": 170,
      "height": 170
    }
  }],
  "requestId":
    "604422d8-2ed8-414f-8691-d9dafd7d78b0",
  "metadata": {
    "width": 854,
    "height": 570,
    "format": "Jpeg"
  }
}
Observe that:
- The categories key contains the main result of the image
- It can identify the person in the image (Steve Jobs) with a confidence level of 99.99%.
- It can detect the subject's age (48; via the Age attribute).
- It can locate the position of the face (faceRectangle attribute).
- It also identified a number of other features in the image – man, person, necktie, concert, etc.
- It returned a caption that says, “Steve Jobs was wearing a suit and tie talking on the cell phone”.
Not all of the results were accurate, but it's quite impressive that the service got a number of things correct.
If you want the result to be returned in other languages, such as Chinese, replace the value of the language key with the language code, such as “zh”:
$ curl -H 'Ocp-Apim-Subscription-Key: <Subscription_Key>'
-H 'Content-Type: application/json'
-d '{"url":"https://bit.ly/2CI9I53"}'
'https://westcentralus.api.
<a href="http://cognitive.microsoft.com/vision/v1.0/">cognitive.microsoft.com/vision/v1.0/</a>
analyze?visualFeatures=Categories,Tags,Description,Faces,ImageType,Color,Adult&
details=Celebrities,Landmarks&language=zh'
I'll let you try this out and see the result for yourself.
Sometimes, the image you want to analyze is not on the Web, but local, on your computer. In this case, how do you pass the image to the Vision API? You can use the following command:
$ curl -H 'Ocp-Apim-Subscription-Key: <Subscription_Key>'
-H 'Content-Type: application/octet-stream'
--data-binary @stevejobs.jpg
'https://westcentralus.api.
<a href="http://cognitive.microsoft.com/vision/v1.0/">cognitive.microsoft.com/vision/v1.0/</a>
analyze?visualFeatures=Categories,Tags,Description,Faces,ImageType,Color,Adult&
details=Celebrities,Landmarks&language=en'
In this case, you're uploading the binary image (named stevejobs.jpg and saved in the current directory) instead of specifying the URL for the image. Specifically, note the –data-binary option and the value of the Content-Type in the header.
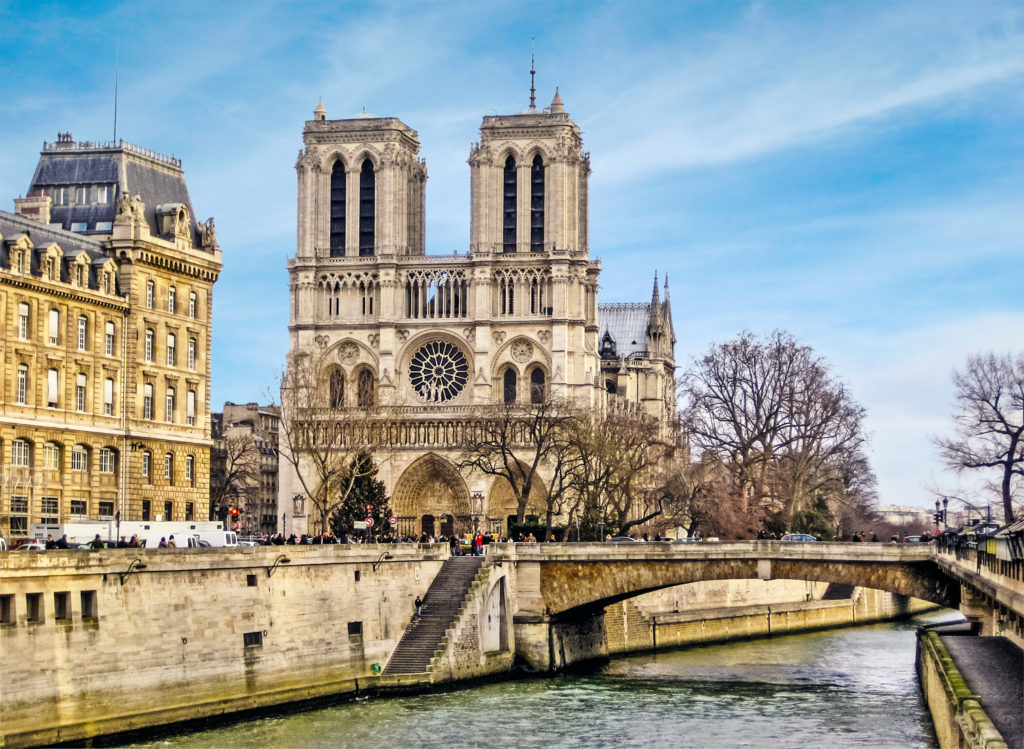
The Analyze service of the Vision API not only recognizes people; it also recognizes landmarks. Let's try it using the image (see Figure 6) located at https://bit.ly/2Q8qy4n.
Instead of viewing the entire JSON result, you can extract only the result of interest to you using the jq processor.
The following command sends the image to the Vision API's Analyze service, obtains the result, and extracts the value of the categories key:
$ curl -H 'Ocp-Apim-Subscription-Key: <Subscription_Key>'
-H 'Content-Type: application/json'
-d '{"url":"https://bit.ly/2Q8qy4n"}'
'https://westcentralus.api.
<a href="http://cognitive.microsoft.com/vision/v1.0/">cognitive.microsoft.com/vision/v1.0/</a>
analyze?visualFeatures=Categories,Tags,Description,Faces,ImageType,Color,Adult&
details=Celebrities,Landmarks&language=en' |
jq '.categories'
The result is as follows:
[
  {
    "name": "building_",
    "score": 0.6171875,
    "detail": {
      "landmarks": [
        {
          "name": "Notre Dame de Paris",
          "confidence": 0.966315507888794
        }
      ]
    }
  },
  {
    "name": "outdoor_",
    "score": 0.0078125,
    "detail": {
      "landmarks": [
        {
          "name": "Notre Dame de Paris",
          "confidence": 0.966315507888794
        }
      ]
    }
  }
]
The result shows that the service has recognized the image as that of “Notre Dame de Paris”.
Describe Service
The next service in the Vision API is the Describe service. The Describe service analyzes the content in an image and the returning description summarizes what is found in the image. Each description is evaluated and a confidence score is generated. A list is then returned, ordered from highest confidence score to lowest.
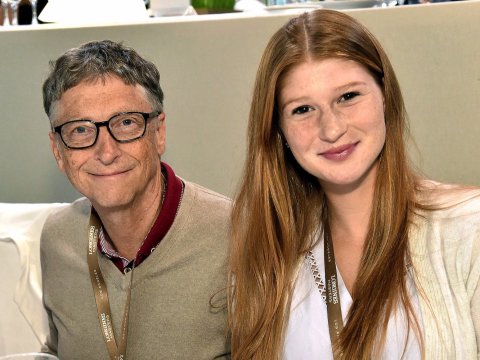
For this example, you will make use of the image (see Figure 7) located at https://bit.ly/2ELp9MD.
To get a description for this image, type the following command in Terminal:
$ curl -H 'Ocp-Apim-Subscription-Key: <Subscription_Key>'
-H 'Content-Type: application/json'
-d '{"url":"https://read.bi/2ELp9MD"}'
'https://westcentralus.api.
<a href="http://cognitive.microsoft.com/">cognitive.microsoft.com/</a>
vision/v1.0/describe'
You should get the following result:
{
  "description": {
    "tags": ["person", "indoor", "man", "photo", "posing", "standing", "couple",
             "people", "sitting", "table", "front", "holding", "group", "woman", "food", "cake", "large", "suit", "white", "shirt", "kitchen"],
    "captions": [{
      "text": "Bill Gates et al. posing for the camera",
      "confidence": 0.98106487648114582
    }]
  },
  "requestId":
    "1a8d818b-41fd-4d5f-8ddc-e3bbd883c5c6",
  "metadata": {
    "width": 480,
    "height": 360,
    "format": "Jpeg"
  }
}
Interestingly, the service could recognize Bill Gates but not his daughter. Also, the tags key contains irrelevant items like “cake” and “kitchen,” which aren't found in the image.
Generate Thumbnail Service
The next service of the Vision API is the Generate Thumbnail service. The Generate Thumbnail service generates a high-quality thumbnail and then analyzes the objects within the image to identify the region of interest (ROI). It can optionally crop the image to fit the requirements of the ROI.
For this section, you'll make use of the following image (see Figure 8) located at https://bit.ly/2AxcAjR.

To use the Generate Thumbnail service, you pass in the URL of the image and use the –output option to specify a filename to save the thumbnail returned by the API:
$ curl -H 'Ocp-Apim-Subscription-Key:
<Subscription_Key>'
-H 'Content-Type: application/json'
-d '{"url":"https://bit.ly/2AxcAjR"}'
'https://westcentralus.api.
<a href="http://cognitive.microsoft.com/vision/v1.0/">cognitive.microsoft.com/vision/v1.0/</a>
generateThumbnail?width=303&height=303'
--output billgates.jpg
Figure 9 shows the result of the output, saved in the file named billgates.jpg, and located in the current directory.

Here are some sample images for you to try:
Tag Service
The Tag service returns tags based on more than 2000 recognizable objects, living beings, scenery, and actions. For this feature, you're going to use the image (Figure 10) located at https://bit.ly/2Obj9vW.

Type the following command in Terminal:
$ curl -H 'Ocp-Apim-Subscription-Key: <Subscription_Key>'
-H 'Content-Type: application/json'
-d '{"url":"https://bit.ly/2Obj9vW"}'
'https://westcentralus.api.
<a href="http://cognitive.microsoft.com/vision/v1.0/tag'">cognitive.microsoft.com/vision/v1.0/tag'</a>
The result is as shown in Listing 2.
Listing 2: The result returned from the Tag service
{
  "tags": [{
    "name": "train",
    "confidence": 0.99972409009933472
  }, {
    "name": "track",
    "confidence": 0.99791616201400757,
    "hint": "sport"
  }, {
    "name": "outdoor",
    "confidence": 0.99774926900863647
  }, {
    "name": "transport",
    "confidence": 0.98162382841110229
  }, {
    "name": "yellow",
    "confidence": 0.81481581926345825
  }, {
    "name": "platform",
    "confidence": 0.66632789373397827
  }, {
    "name": "traveling",
    "confidence": 0.48101967573165894
  }, {
    "name": "pulling",
    "confidence": 0.388392835855484
  }, {
    "name": "railroad",
    "confidence": 0.33330151438713074
  }, {
    "name": "day",
    "confidence": 0.18677715957164764
  }, {
    "name": "rail",
    "confidence": 0.09175156561009834
  }, {
    "name": "snow",
    "confidence": 0.030824975966616926
  }, {
    "name": "station",
    "confidence": 0.026948144704649526
  }],
  "requestId": "ef3bc18d-dc4b-4e40-8768-979808d7cbba",
  "metadata": {
    "width": 630,
    "height": 461,
    "format": "Jpeg"
  }
}
The result contains a series of tags describing the image.
OCR
One very interesting service in the Vision API is the OCR service. The OCR service in the Vision API allows you to detect printed text in images, as well as handwritten text.
Let's first try to detect printed text in the image shown in Figure 11.

Type the following command in Terminal:
$ curl -H 'Ocp-Apim-Subscription-Key: <Subscription_Key>'
-H 'Content-Type: application/json'
-d '{"url":"https://bit.ly/2SD9u4u"}'
'https://westcentralus.api.
<a href="http://cognitive.microsoft.com/vision/v1.0/ocr">cognitive.microsoft.com/vision/v1.0/ocr</a>?language=en&detectOrientation=true'
You should get the result shown in Listing 3.
Listing 3: The result returned from the OCR service
{
  "language": "en",
  "textAngle": 0.0,
  "orientation": "Up",
  "regions": [{
    "boundingBox": "48,109,321,220",
    "lines": [{
      "boundingBox": "74,109,275,64",
      "words": [{
        "boundingBox": "74,109,275,64",
        "text": "CAUTION"
      }]
    }, {
      "boundingBox": "88,195,247,39",
      "words": [{
        "boundingBox": "88,195,247,39",
        "text": "HAZARDOUS"
      }]
    }, {
      "boundingBox": "82,247,260,40",
      "words": [{
        "boundingBox": "82,247,138,40",
        "text": "WASTE"
      }, {
        "boundingBox": "231,248,111,38",
        "text": "AREA"
      }]
    }, {
      "boundingBox": "48,299,321,30",
      "words": [{
        "boundingBox": "48,299,132,30",
        "text": "LABELED"
      }, {
        "boundingBox": "190,299,97,28",
        "text": "DRUMS"
      }, {
        "boundingBox": "297,299,72,28",
        "text": "ONLY"
      }]
    }]
  }]
}
You can also use the OCR service to recognize handwritten text. However, unlike the ocr method in the URL (https://westcentralus.api.cognitive.microsoft.com/vision/v1.0/ocr?...), you now need to use the recognizeText method. Also, this method runs asynchronously, and it doesn't return the result directly. Instead, it returns an URI in the response header field: Operation-Content. Using this value, you need to make a query to the API again to extract the result.
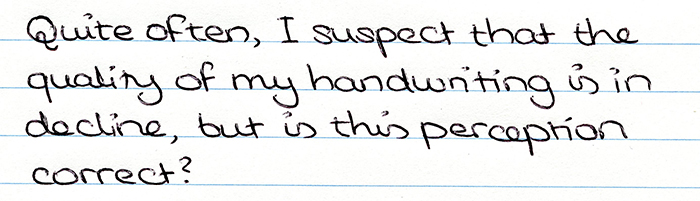
Let's see how this is done using the image (see Figure 12) located at https://bit.ly/2EGZ40Y.
As usual, use cURL to query the recognizeText method. This time around, you need to use the -v option (for verbose) so that you can get the returning response header:
$ curl -H 'Ocp-Apim-Subscription-Key: <Subscription_Key>'
-H 'Content-Type: application/json'
-d '{"url":"https://bit.ly/2EGZ40Y"}'
'https://westcentralus.api.
<a href="http://cognitive.microsoft.com/vision/v1.0/">cognitive.microsoft.com/vision/v1.0/</a>
recognizeText?mode=handwritten' -v
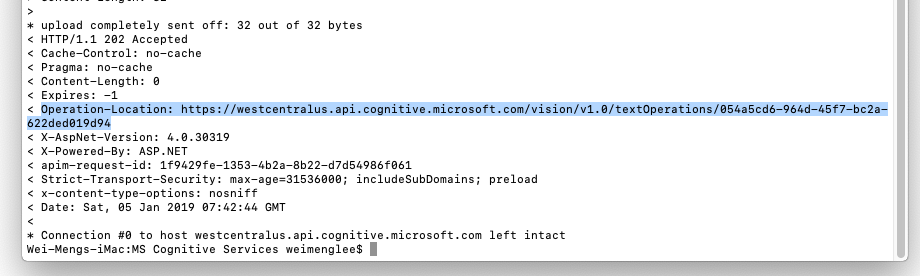
You'll see a whole bunch of text upon success. In particular, look for the value of the Operation-Content field (see Figure 13). Copy the URL.
Then issue another cURL command, this time around to extract the result (using the URL that you have just copied):
$ curl -H 'Ocp-Apim-Subscription-Key: <Subscription_Key>'
https://westcentralus.api.
<a href="http://cognitive.microsoft.com/vision/v1.0/">cognitive.microsoft.com/vision/v1.0/</a>
textOperations/054a5cd6-964d-45f7-bc2a-622ded019d94
You'll now get the result shown in Listing 4.
Listing 4: The result returned from the OCR Handwriting service
{
  "status": "Succeeded",
  "recognitionResult": {
    "lines": [{
      "boundingBox": [54, 12, 637, 18, 636,
                      59, 53, 54],
      "text": "quite often , I suspect that the",
      "words": [{
        "boundingBox": [33, 12, 132, 13, 133,
                        55, 34, 54],
        "text": "quite"
      }, {
        "boundingBox": [132, 13, 244, 14, 245,
                        56, 133, 55],
        "text": "often"
      }, {
        "boundingBox": [238, 14, 270, 14, 271,
                        56, 239, 56],
        "text": ","
      }, {
        "boundingBox": [267, 14, 299, 14, 300,
                        56, 268, 56],
        "text": "I"
      }, {
        "boundingBox": [299, 14, 459, 15, 460,
                        57, 300, 56],
        "text": "suspect"
      }, {
        "boundingBox": [455, 15, 558, 16, 559,
                        58, 457, 57],
        "text": "that"
      }, {
        "boundingBox": [558, 16, 635, 16, 636,
                        58, 559, 58],
        "text": "the"
      }]
    }, {
      "boundingBox": [28, 60, 650, 63, 649, 109,
                      27, 106],
      "text": "quality of my handwriting s in",
      "words": [{
        "boundingBox": [15, 59, 165, 59, 165,
                        107, 15, 107],
        "text": "quality"
      }, {
        "boundingBox": [162, 59, 216, 60, 216,
                        108, 162, 107],
        "text": "of"
      }, {
        "boundingBox": [216, 60, 300, 60, 299,
                        108, 216, 108],
        "text": "my"
      }, {
        "boundingBox": [293, 60, 549, 62, 549,
                        110, 293, 108],
        "text": "handwriting"
      }, {
        "boundingBox": [552, 62, 584, 62, 584,
                        110, 552, 110],
        "text": "s"
      }, {
        "boundingBox": [597, 62, 642, 62, 642,
                        110, 597, 110],
        "text": "in"
      }]
    }, {
      "boundingBox": [26, 106, 627, 112, 626,
                      155, 25, 150],
      "text": "decline , but is this perception",
      "words": [{
        "boundingBox": [22, 106, 164, 107, 166,
                        151, 23, 150],
        "text": "decline"
      }, {
        "boundingBox": [154, 107, 188, 107, 189,
                        151, 155, 151],
        "text": ","
      }, {
        "boundingBox": [181, 107, 266, 108, 268,
                        152, 183, 151],
        "text": "but"
      }, {
        "boundingBox": [266, 108, 317, 108, 319,
                        152, 268, 152],
        "text": "is"
      }, {
        "boundingBox": [317, 108, 409, 109, 410,
                        153, 319, 152],
        "text": "this"
      }, {
        "boundingBox": [402, 109, 617, 111, 618,
                        155, 404, 153],
        "text": "perception"
      }]
    }, {
      "boundingBox": [31, 163, 173, 162, 174,
                      183, 32, 185],
      "text": "correct",
      "words": [{
        "boundingBox": [22, 166, 171, 161, 173,
                        184, 23, 189],
        "text": "correct"
      }]
    }]
  }
}
Besides returning the words, you also get the coordinates of each recognized word in the image. Something fun to do: write a Python application to display the image and overlay it with rectangles showing each of the words that have been found by the OCR service.
Using the Face API
So far, you've been looking at the Vision API. Let's also take a look at the Face API. The Face API allows you to:
- Detect and compare human faces
- Organize images into groups
- Identify previously tagged people in images
For this example, let's use the image (see Figure 14) located at https://bit.ly/2VyAnIv.

You can use the following command (remember that for this you have to use the key for the Face API, and not the Vision API):
$ curl -H 'Ocp-Apim-Subscription-Key: <Subscription_Key>'
-H 'Content-Type: application/json'
-d '{"url":"https://bit.ly/2VyAnIv" }'
'https://westcentralus.api.
<a href="http://cognitive.microsoft.com/face/v1.0/detect">cognitive.microsoft.com/face/v1.0/detect</a>?
returnFaceLandmarks=true&returnFaceAttributes'
It returns the result shown in Listing 5.
Listing 5: The result returned from the Face API
[{
  "faceId": "0289d1e4-a211-4dc1-9027-ecadf4f70afd",
  "faceRectangle": { "top": 246, "left": 364,
                     "width": 250, "height": 250 },
  "faceLandmarks": {
    "pupilLeft": { "x": 433.1, "y": 316.6 },
    "pupilRight": { "x": 546.5, "y": 314.5 },
    "noseTip": { "x": 486.3, "y": 392.6 },
    "mouthLeft": { "x": 429.0, "y": 422.2 },
    "mouthRight": { "x": 548.1, "y": 423.1 },
    "eyebrowLeftOuter": { "x": 396.5, "y": 300.7 },
    "eyebrowLeftInner": { "x": 472.8, "y": 302.8 },
    "eyeLeftOuter": { "x": 417.5, "y": 318.0 },
    "eyeLeftTop": { "x": 433.9, "y": 310.2 },
    "eyeLeftBottom": { "x": 433.6, "y": 322.5 },
    "eyeLeftInner": { "x": 450.5, "y": 318.2 },
    "eyebrowRightInner": { "x": 505.9, "y": 299.8 },
    "eyebrowRightOuter": { "x": 595.9, "y": 303.1 },
    "eyeRightInner": { "x": 527.4, "y": 315.7 },
    "eyeRightTop": { "x": 543.4, "y": 309.8 },
    "eyeRightBottom": { "x": 542.7, "y": 319.5 },
    "eyeRightOuter": { "x": 560.9, "y": 314.6 },
    "noseRootLeft": { "x": 475.5, "y": 318.7 },
    "noseRootRight": { "x": 504.8, "y": 319.6 },
    "noseLeftAlarTop": { "x": 462.4, "y": 363.6 },
    "noseRightAlarTop": { "x": 512.3, "y": 363.8 },
    "noseLeftAlarOutTip": { "x": 452.3, "y": 385.2 },
    "noseRightAlarOutTip": { "x": 529.2, "y": 382.5 },
    "upperLipTop": { "x": 494.2, "y": 423.9 },
    "upperLipBottom": { "x": 495.1, "y": 430.6 },
    "underLipTop": { "x": 489.8, "y": 448.5 },
    "underLipBottom": { "x": 488.9, "y": 458.9 }
  }
}]
Using this result, you can know the location of each of the features of the face, such as the eyes, nose, lips, and eyebrows.
Using the Vision API in Python
Up until this point, you've been playing with the Vision and Face APIs through the command line using cURL. Of course, developer, cURL is simply not for the end user – it's a development tool. So in the following sections, I'm going to show you how to use the various APIs in the various platforms: Python, iOS, and Android.
Let's get started with Python first. Create a file named visionapi.py and populate it with the code shown in Listing 6.
Listing 6: Python code to access the Vision API's Analyze service
import requests
import matplotlib.pyplot as plt
import json

from PIL import Image
from io import BytesIO

subscription_key = "<Subscription_Key>"
vision_api_url = "<a href="https://westcentralus.api.cognitive.microsoft.com/vision/v1.0/">https://westcentralus.api.cognitive.microsoft.com/vision/v1.0/</a>"
analyze_url = vision_api_url + "analyze"

image_url = "https://bit.ly/2apR8in"

headers = { 'Ocp-Apim-Subscription-Key': subscription_key }
params  = { 'visualFeatures': 'Categories,Description,Color' }
data    = { 'url': image_url }

response = requests.post(analyze_url, headers=headers, params=params, json=data)
           response.raise_for_status()  # raise exception for error codes
analysis = response.json()
           print(json.dumps(response.json()))

image_caption = analysis["description"]["captions"][0]["text"].capitalize()
image_subcaption = "Keywords: " + ",".join(analysis["description"]["tags"])

#---download the image---
image = Image.open(BytesIO(requests.get(image_url).content))

#---display the image---
plt.imshow(image)

#---don't show the x and y-axis---
plt.axis("off")

#---show the description---
plt.suptitle(image_caption, fontsize = 18)

#---show the tags---
plt.title(image_subcaption,  fontsize = 8)
plt.show()
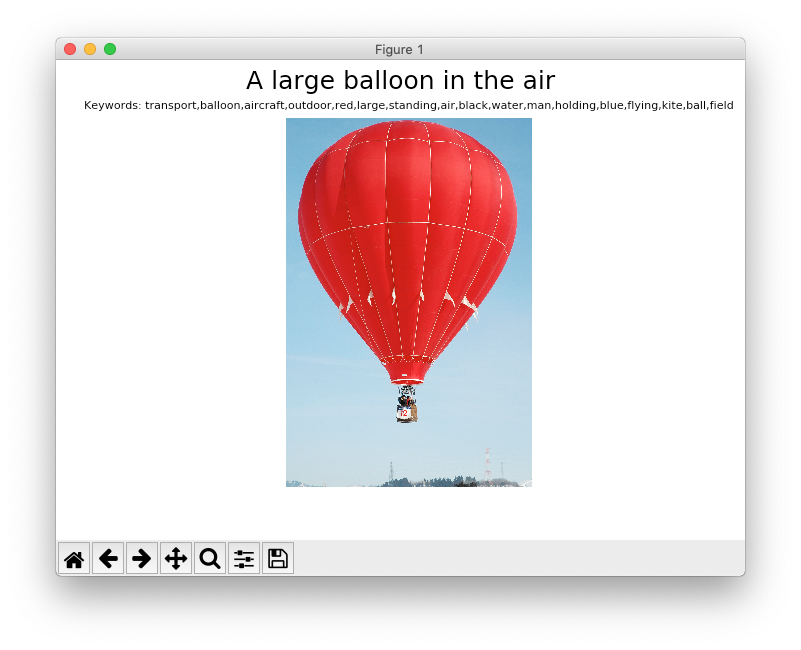
Listing 6 shows how you can use the Vision API's Analyze service to get a description of an online image (located at https://bit.ly/2apR8in) containing a hot air balloon. Once the description is obtained, you'll use the matplotlib library to display the image, as well as the description and tags associated with the image.
To run the Python code, type the following command in Terminal:
$ python visionapi.py
Figure 15 shows the output of the Python code.
What if the image is located locally and not online? Listing 7 shows the modified Python code with a bit more addition).
Listing 7: Modified Python code for an image that is located locally
import requests
import matplotlib.pyplot as plt
import matplotlib.image as mpimg
import json

subscription_key = "<Subscription_Key>"
vision_api_url = "<a href="https://westcentralus.api.cognitive.microsoft.com/vision/v1.0/">https://westcentralus.api.cognitive.microsoft.com/vision/v1.0/</a>"
analyze_url = vision_api_url + "analyze"

#---name of image---
filename = "balloon.jpg"

#---read the image---
image = open(filename,'rb').read()

#---specify the type of data you are sending---
headers = { 'Content-Type': 'application/octet-stream', 'Ocp-Apim-Subscription-Key': subscription_key }
params  = { 'visualFeatures': 'Categories,Description,Color' }

response = requests.post(analyze_url, headers=headers, params=params, data=image)
           response.raise_for_status()  # raise exception for error codes
analysis = response.json()
print(json.dumps(response.json()))

image_caption = analysis["description"]["captions"][0]["text"].capitalize()
image_subcaption = "Keywords: " + ",".join(analysis["description"]["tags"])

#---read the image locally---
plt.imshow(mpimg.imread(filename))
plt.axis("off")  # don't show the x and y-axis
plt.suptitle(image_caption, fontsize = 18)
plt.title(image_subcaption,  fontsize = 8)
plt.show()
You'll now be able to load the image locally, send it to the Vision API and get the response.
Using the Vision API in iOS
In the previous section, you saw how to use the Vision API in Python. Let's now use the Vision API in a mobile app. Let's start with iOS first.
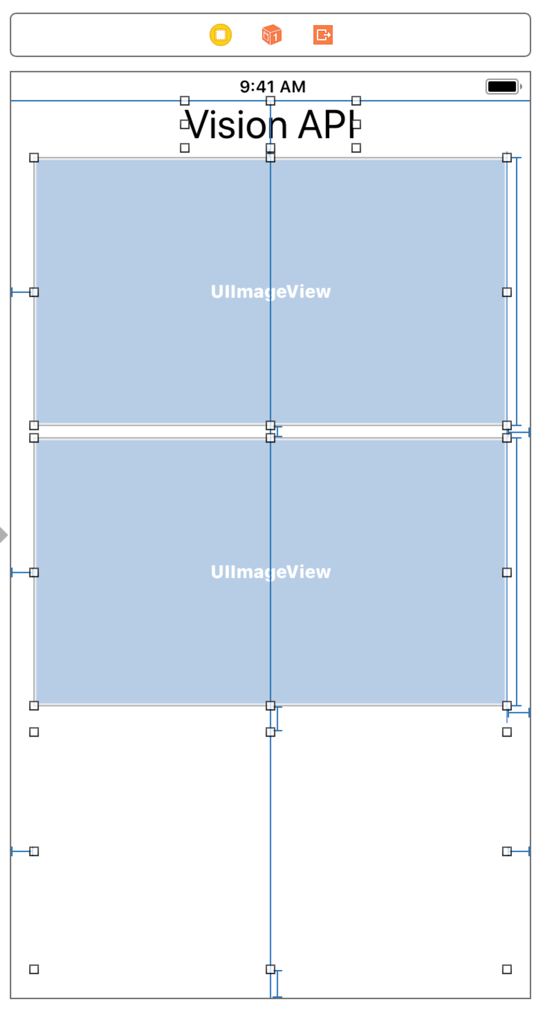
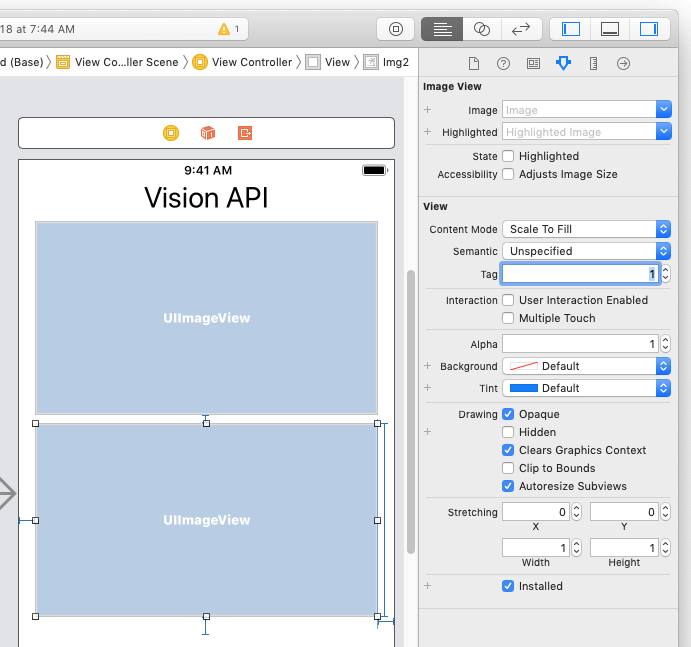
Using Xcode, create a new Single View Application project and name it VisionAPI. In Main.Storyboard, add the following views to the View window (see Figure 16):
- Label
- ImageView
- TextView
Create outlets for the ImageView and TextView views in ViewController.swift (be sure to visually connect them to the views on the View window):
import UIKit
class ViewController: UIViewController {
    @IBOutlet weak var lblResult: UITextView!
    @IBOutlet weak var img1: UIImageView!
    @IBOutlet weak var img2: UIImageView!
Add the statements in Listing 8 to the ViewController.swift file.
Listing 8: Adding the code to access the Vision API in iOS
import UIKit

class ViewController: UIViewController, URLSessionDelegate {

    @IBOutlet weak var lblResult: UITextView!
    @IBOutlet weak var img1: UIImageView!
    @IBOutlet weak var img2: UIImageView!

    var subscriptionKey = "<Subscription_Key>"

    var baseURL = "<a href="https://westcentralus.api.cognitive.microsoft.com/">https://westcentralus.api.cognitive.microsoft.com/</a>"
        + "vision/v1.0/describe?maxCandidates=1"

    //---billgates---
    var image1URL = "https://bit.ly/2EHM3o8"

    //---steve jobs and mark zuckerberg---
    var image2URL = "https://bit.ly/2JeKfBB"

    let activityView = UIActivityIndicatorView(activityIndicatorStyle: .whiteLarge)

    func connectREST(method:String, apiUrl:String,
                     imageURL:String){
        let config = URLSessionConfiguration.default
        let url = URL(string:apiUrl)
        let request = NSMutableURLRequest(url: url!)

        //---method---
        request.httpMethod = method

        //---headers---
        request.addValue("application/json", forHTTPHeaderField: "Content-Type")
        request.addValue("\(subscriptionKey)", forHTTPHeaderField: "Ocp-Apim-Subscription-Key")

        //---data---
        let bodyData = "{'url':'\(imageURL)'}"
        request.httpBody = bodyData.data(using: String.Encoding.utf8);

        let session = Foundation.URLSession(
            configuration: config,
            delegate: self,
            delegateQueue: nil)
        session.dataTask(with: request as URLRequest,
          completionHandler: {
            (data, response, error) -> Void in
              if error == nil {
                let result = NSString(data: data!, encoding: String.Encoding.utf8.rawValue)
                let statusCode =
                  (response as! HTTPURLResponse).statusCode
                print("Status Code: \(statusCode) - " + (result! as String))
                DispatchQueue.main.async {
                  self.lblResult.text = (result! as String)
                  self.activityView.stopAnimating()
                }
              } else {
                    print(error.debugDescription)
              }
        }).resume()
    }

    //---fired when user taps on an image---
    @objc func imageTapped(tapGestureRecognizer: UITapGestureRecognizer)
    {
        let tappedImage = tapGestureRecognizer.view as! UIImageView
        activityView.center = tappedImage.center
        self.view.addSubview(activityView)
        activityView.startAnimating()
        if (tappedImage.tag == 0 ) {
          connectREST(method: "POST", apiUrl: baseURL, imageURL: image1URL)
        } else {
          connectREST(method: "POST", apiUrl: baseURL, imageURL: image2URL)
        }
    }
In the Main.Storyboard file, set the Tag attribute of the second ImageView to 1 (see Figure 17). This is to allow the code to be able to differentiate between the two ImageView views.
Add the following statements to the viewDidLoad() function in ViewController.swift:
    override func viewDidLoad() {
        super.viewDidLoad()

        var url = URL(string: image1URL)
        var data = try? Data(contentsOf: url!)
        img1.image = UIImage(data: data!)

        url = URL(string: image2URL)
        data = try? Data(contentsOf: url!)
        img2.image = UIImage(data: data!)

        //---make the images tappable---
        let tapGestureRecognizer1 =
            UITapGestureRecognizer(
              target: self,
              action: #selector(
          imageTapped(tapGestureRecognizer:)))
        img1.isUserInteractionEnabled = true
        img1.addGestureRecognizer(
            tapGestureRecognizer1)

        let tapGestureRecognizer2 =
            UITapGestureRecognizer(
              target: self,
              action: #selector(
          imageTapped(tapGestureRecognizer:)))
        img2.isUserInteractionEnabled = true
        img2.addGestureRecognizer(
            tapGestureRecognizer2)
    }
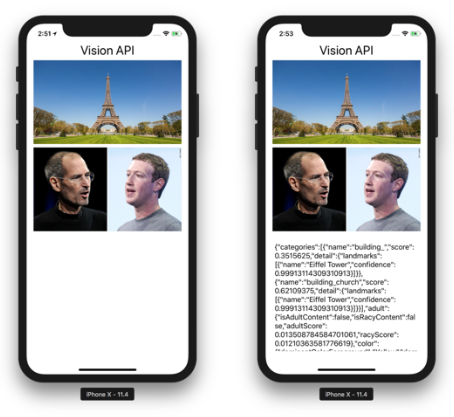
Press Cmd-R to deploy the application onto the iPhone Simulator. Tap one of the images and observe the message displayed on the screen (see Figure 18).
Using the Vision API in Android
Let's now work on a similar app, but this time for Android.
Using Android Studio, create a new project and name it UseMSCognitive. Add the following statement in bold to the AndroidManifest.xml file:
<?xml version="1.0" encoding="utf-8"?>
<manifest xmlns:android=<a href="http://schemas.android.com/apk/res/android">http://schemas.android.com/apk/res/android</a>
    package= "com.example.weimenglee.usemscognitive">
    <uses-permission android:name="android.permission.INTERNET"/>
    <application android:allowBackup="true"
        android:icon="@mipmap/ic_launcher
        android:label="@string/app_name"
        android:roundIcon="@mipmap/ic_launcher_round"
        android:supportsRtl="true"
        android:theme="@style/AppTheme">
        <activity android:name=".MainActivity">
            <intent-filter>
                <action android:name="android.intent.action.MAIN" />
                <category android:name="android.intent.category.LAUNCHER" />
            </intent-filter>
        </activity>
    </application>
</manifest>
This addition is needed because you need Internet access to access the Vision API service. Add the statements in bold to the activity_main.xml file as shown in Listing 9. The additions are to build the UI for the Android app.
Listing 9: Creating the UI for the Android app
<?xml version="1.0" encoding="utf-8"?>
<android.support.constraint.ConstraintLayout
  xmlns:android="<a href="http://schemas.android.com/apk/res/android">http://schemas.android.com/apk/res/android</a>"
  xmlns:app="<a href="http://schemas.android.com/apk/res-auto">http://schemas.android.com/apk/res-auto</a>"
  xmlns:tools="<a href="http://schemas.android.com/tools">http://schemas.android.com/tools</a>"
  android:layout_width="match_parent"
  android:layout_height="match_parent"
  tools:context="com.example.wml.usemscognitive.MainActivity">

    <LinearLayout
        android:layout_width="fill_parent"
        android:layout_height="fill_parent"
        android:layout_marginEnd="8dp"
        android:layout_marginStart="8dp"
        android:layout_marginTop="16dp"
        android:orientation="vertical"
        app:layout_constraintEnd_toEndOf="parent"
        app:layout_constraintStart_toStartOf="parent"
        app:layout_constraintTop_toTopOf="parent">

        <ImageView
            android:id="@+id/image1"
            android:layout_width="fill_parent"
            android:layout_height="200dp"
            android:layout_marginBottom="8dp"
            android:layout_marginEnd="8dp"
            android:layout_marginStart="8dp"
            android:layout_marginTop="8dp"
            android:scaleType="centerCrop" />

        <ImageView
            android:id="@+id/image2"
            android:layout_width="fill_parent"
            android:layout_height="200dp"
            android:layout_marginBottom="8dp"
            android:layout_marginEnd="8dp"
            android:layout_marginStart="8dp"
            android:layout_marginTop="8dp"
            android:scaleType="centerCrop" />

        <ProgressBar
            style="?android:attr/progressBarStyle"
            android:id="@+id/progressBar"
            android:layout_width="match_parent"
            android:layout_height="wrap_content" />

        <TextView
            android:id="@+id/result"
            android:layout_width="match_parent"
            android:layout_height="wrap_content"
            android:textSize="20sp"
            android:text="" />

    </LinearLayout>

</android.support.constraint.ConstraintLayout>
Finally, add the statements to the MainActivity.java file, as shown in Listing 10.
Listing 10: Additions to the MainActivity.java file
package com.example.weimenglee.usemscognitive;

import android.graphics.Bitmap;
import android.graphics.BitmapFactory;
import android.os.AsyncTask;
import android.os.Handler;
import android.os.Looper;
import android.support.v7.app.AppCompatActivity;
import android.os.Bundle;
import android.util.Log;
import android.view.View;
import android.widget.ImageView;
import android.widget.ProgressBar;
import android.widget.TextView;
import android.widget.Toast;

import org.json.JSONObject;

import java.io.BufferedWriter;
import java.io.IOException;
import java.io.InputStream;
import java.io.InputStreamReader;
import java.io.OutputStreamWriter;
import java.net.HttpURLConnection;
import java.net.MalformedURLException;
import java.net.URL;
import java.net.URLConnection;

import javax.net.ssl.HttpsURLConnection;

public class MainActivity extends AppCompatActivity {
    VisionAPI api;

    String baseURL =
        "<a href="https://westcentralus.api.cognitive.microsoft.com/">https://westcentralus.api.cognitive.microsoft.com/</a>" + "vision/v1.0/describe?" + "maxCandidates=1";

    String subscriptionKey = "<Subscription_Key>";
    String imageURL;

    String image1URL = "https://bit.ly/2JgzZbQ";
    String image2URL = "https://cnb.cx/2RbEOWY";

    ImageView imageView1;
    ImageView imageView2;
    TextView txtResult;
    ProgressBar progressBar;

    //---down the photos from web and display on screen---
    private class DownloadImageTask extends
    AsyncTask<String, Void, Bitmap> {
        ImageView bmImage;

        public DownloadImageTask(ImageView bmImage) {
            this.bmImage = bmImage;
        }

        protected Bitmap doInBackground(String... urls) {
            String urldisplay = urls[0];
            Bitmap mIcon11 = null;
            try {
                InputStream in = new
                    java.net.URL(urldisplay).openStream();
                mIcon11 = BitmapFactory.decodeStream(in);
            } catch (Exception e) {
                Log.e("Error", e.getMessage());
                e.printStackTrace();
            }
            return mIcon11;
        }

        protected void onPostExecute(Bitmap result) {
            bmImage.setImageBitmap(result);
        }
    }

    //---access the Vision API---
    private class VisionAPI extends AsyncTask
    <Void, String, String> {
        public String url;
        public String method;
        public int response = -1;

        @Override
        protected String doInBackground(Void... params) {
            String urlString = this.url;
            int BUFFER_SIZE = 2000;
            InputStream in;
            try {
                URL url = new URL(urlString);
                URLConnection conn = url.openConnection();
                try {
                    HttpsURLConnection httpConn =
                        (HttpsURLConnection) conn;
                    httpConn.setAllowUserInteraction(false);
                    httpConn.setInstanceFollowRedirects(true);
                    httpConn.setRequestMethod(this.method);
                    httpConn.setRequestProperty("Content-Type",
                        "application/json");
                    httpConn.setRequestProperty(
                        "Ocp-Apim-Subscription-Key",
                        subscriptionKey);
                    if (this.method == "POST") {
                        httpConn.setDoOutput(true);
                        JSONObject jsonObj = new JSONObject(
                            "{'url':'" + imageURL + "'}");
                        BufferedWriter wr =
                            new BufferedWriter(new
                              OutputStreamWriter(
                                  httpConn.getOutputStream()));
                        wr.write(jsonObj.toString());
                        wr.flush();
                    }
                    httpConn.connect();
                    this.response = httpConn.getResponseCode();
                    in = httpConn.getInputStream();
                } catch (Exception ex) {
                    throw new IOException("Error connecting");
                }
            } catch (IOException e) {
                Log.d("REST Service", e.getLocalizedMessage());
                return "";
            }

            InputStreamReader isr = new InputStreamReader(in);
            int charRead;
            String str = "";
            char[] inputBuffer = new char[BUFFER_SIZE];
            try {
                while ((charRead = isr.read(inputBuffer)) > 0) {
                    //---convert the chars to a String---
                    String readString =
                        String.copyValueOf(inputBuffer, 0,
                        charRead);
                    str += readString;
                    inputBuffer = new char[BUFFER_SIZE];
                }
                in.close();
            } catch (IOException e) {
                Log.d("REST Service", e.getLocalizedMessage());
                return "";
            }
            return str;
        }

        protected void onPostExecute(String result) {
            if (result != "") {
                txtResult.setText(result);
                progressBar.setVisibility(View.GONE);
            }
        }
    }

    @Override
    protected void onCreate(Bundle savedInstanceState) {
        super.onCreate(savedInstanceState);
        setContentView(R.layout.activity_main);

        imageView1  = findViewById(R.id.image1);
        imageView2  = findViewById(R.id.image2);
        txtResult   = findViewById(R.id.result);
        progressBar = findViewById(R.id.progressBar);

        new DownloadImageTask(imageView1).execute(image1URL);
        new DownloadImageTask(imageView2).execute(image2URL);

        progressBar.setVisibility(View.GONE);

        imageView1.setOnClickListener(new View.OnClickListener()
        {
            public void onClick(View v) {
                api = new VisionAPI();
                api.url = baseURL;
                api.method = "POST";
                imageURL = image1URL;
                progressBar.setVisibility(View.VISIBLE);
                api.execute();
            }
        });

        imageView2.setOnClickListener(new View.OnClickListener()
        {
            public void onClick(View v) {
                api = new VisionAPI();
                api.url = baseURL;
                api.method = "POST";
                imageURL = image2URL;
                progressBar.setVisibility(View.VISIBLE);
                api.execute();
            }
        });
    }
}
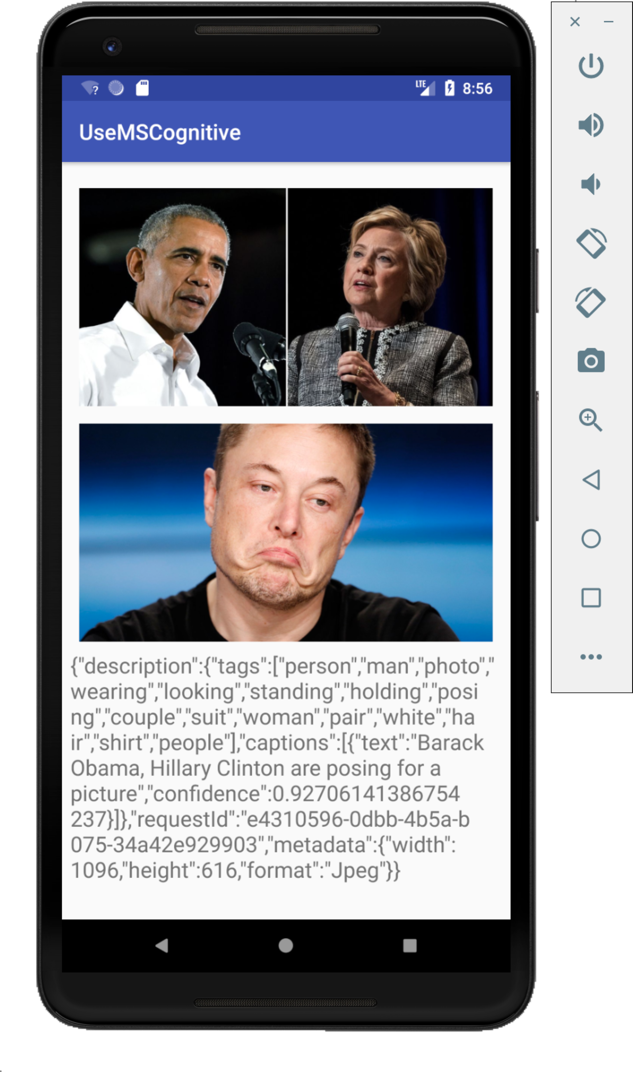
Run the application on the Android emulator. Clicking on either image will display the result shown in Figure 19.
Custom Vision
Phew! You've seen quite a lot in action. But I saved the coolest for last. One of my favorite features in the Microsoft Cognitive Services is the Custom Vision Service. The Custom Vision Service allows you to train learning models to recognize your own custom images. For example, you can use the Custom Vision Service to build a learning model to recognize images of durians. Best of all, the learning model that you've trained can be exported as a CoreML or TensorFlow model for use in mobile applications. The best way to learn more about this is to try it out. So let the fun begin!
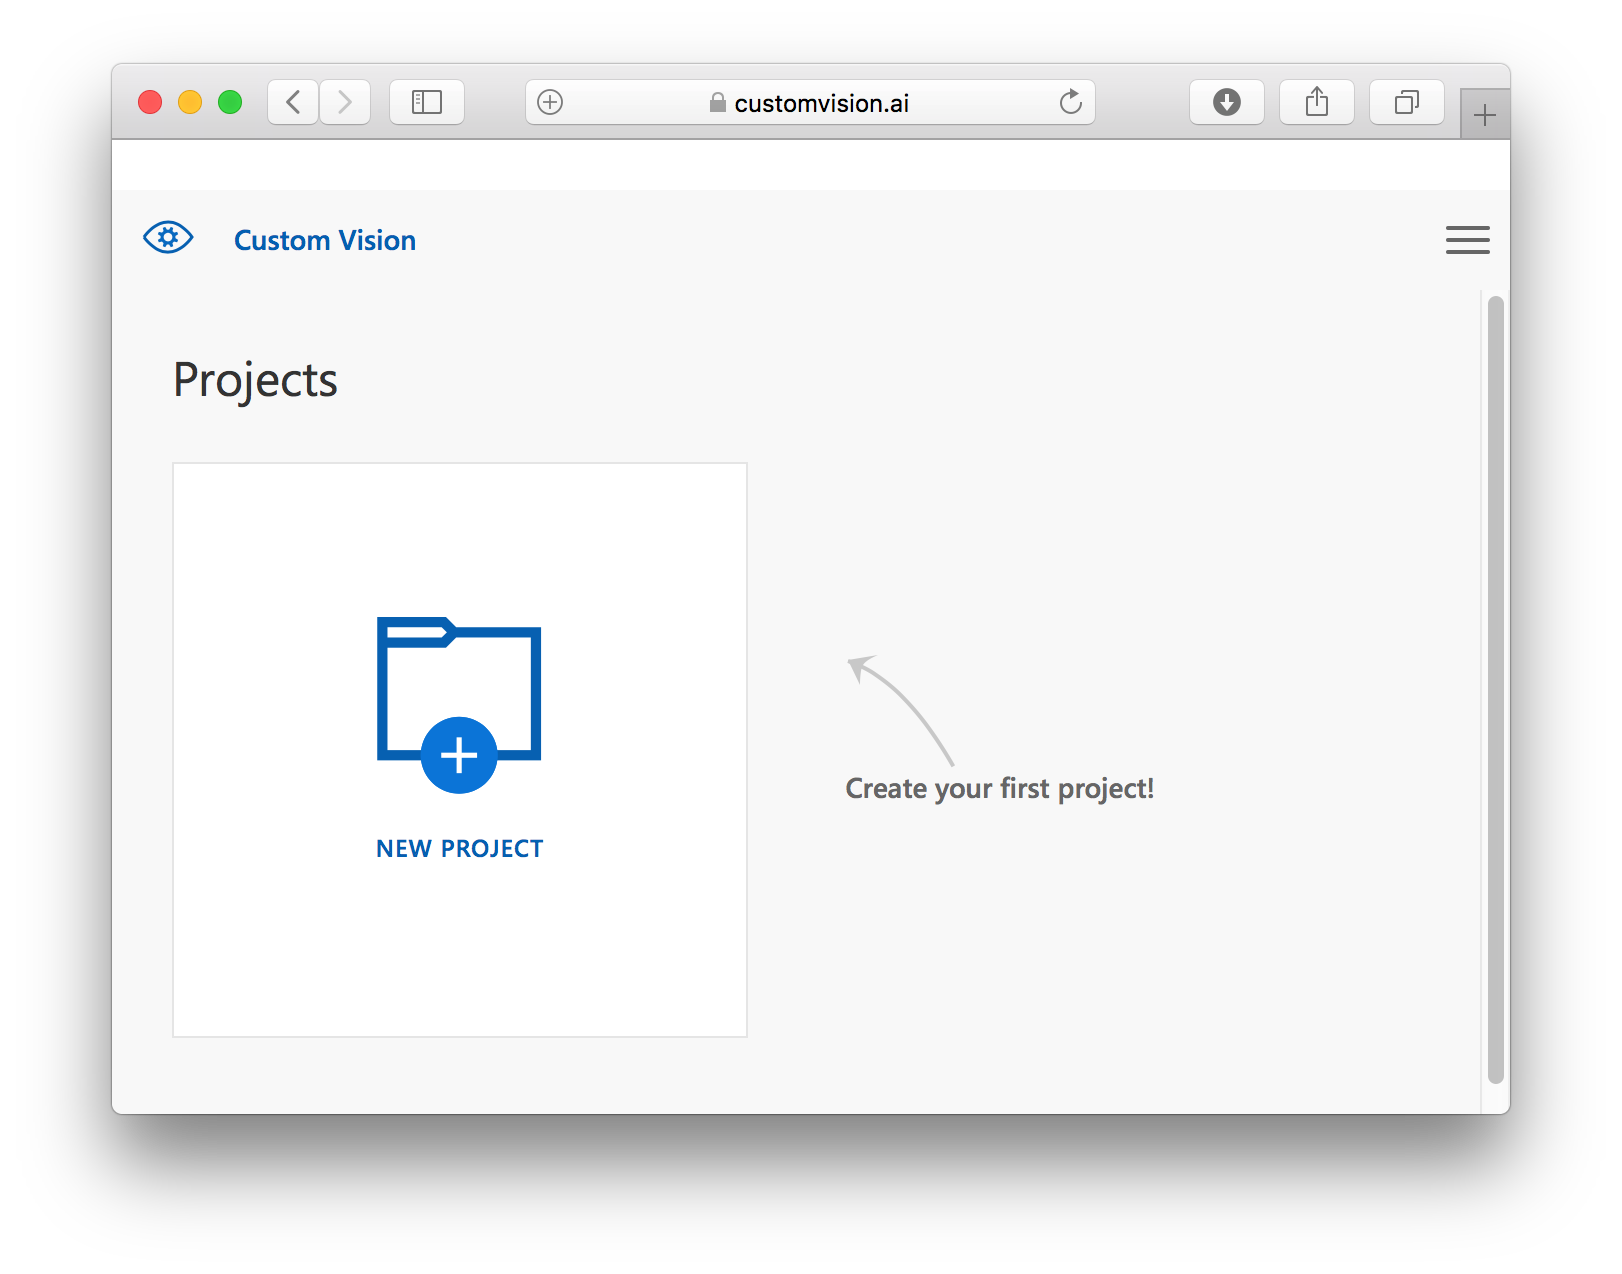
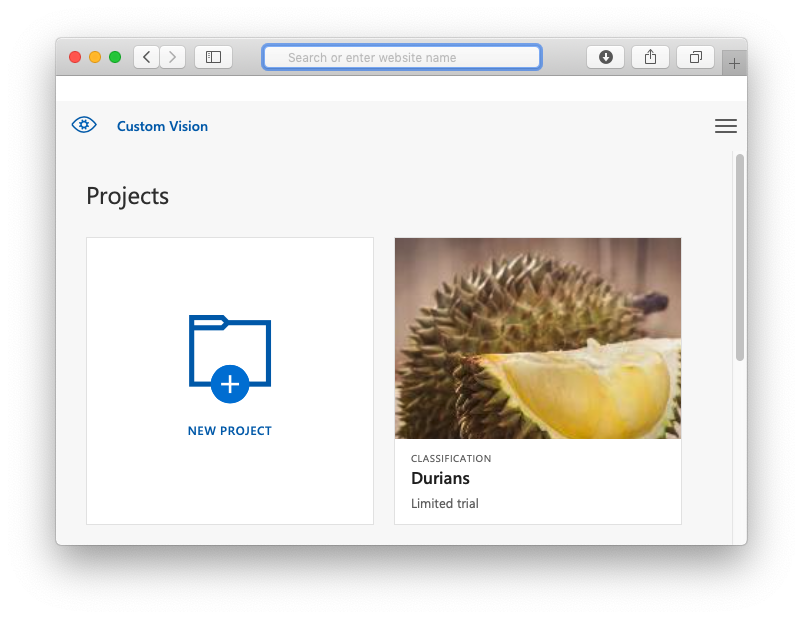
Using your Web browser, go to https://www.customvision.ai/ and sign in. Click NEW PROJECT (see Figure 20).
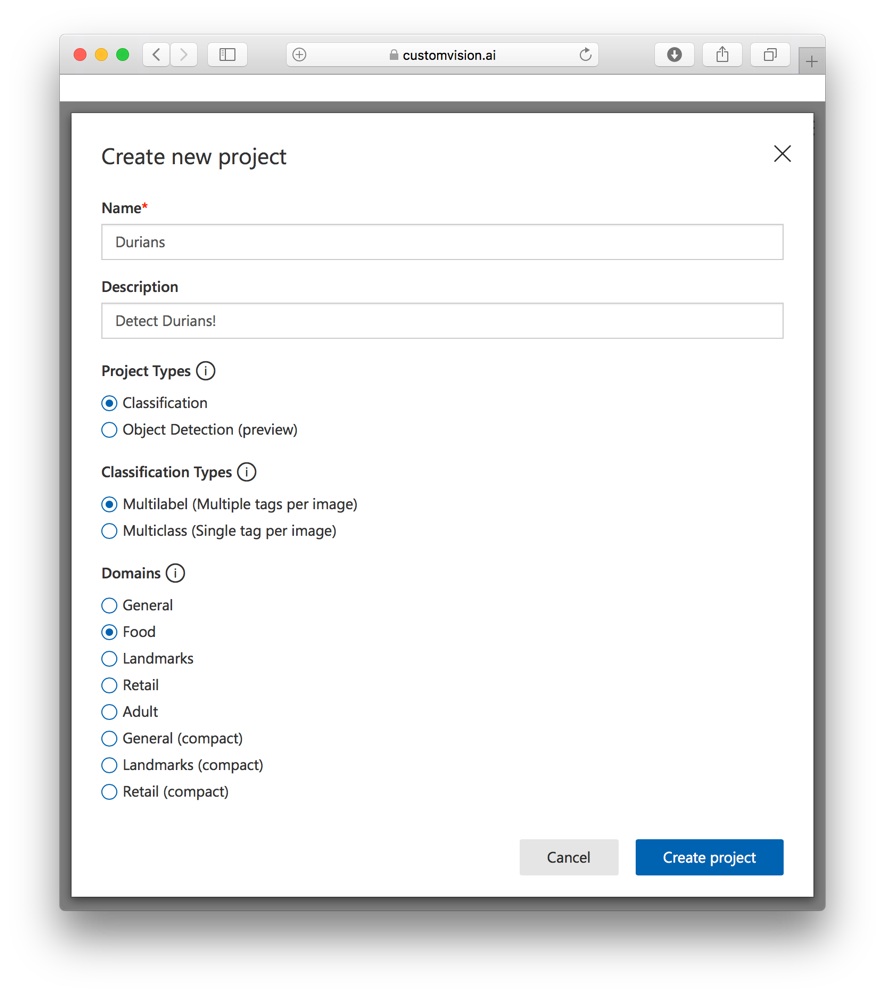
Enter the following details and then click Create project (see Figure 21).
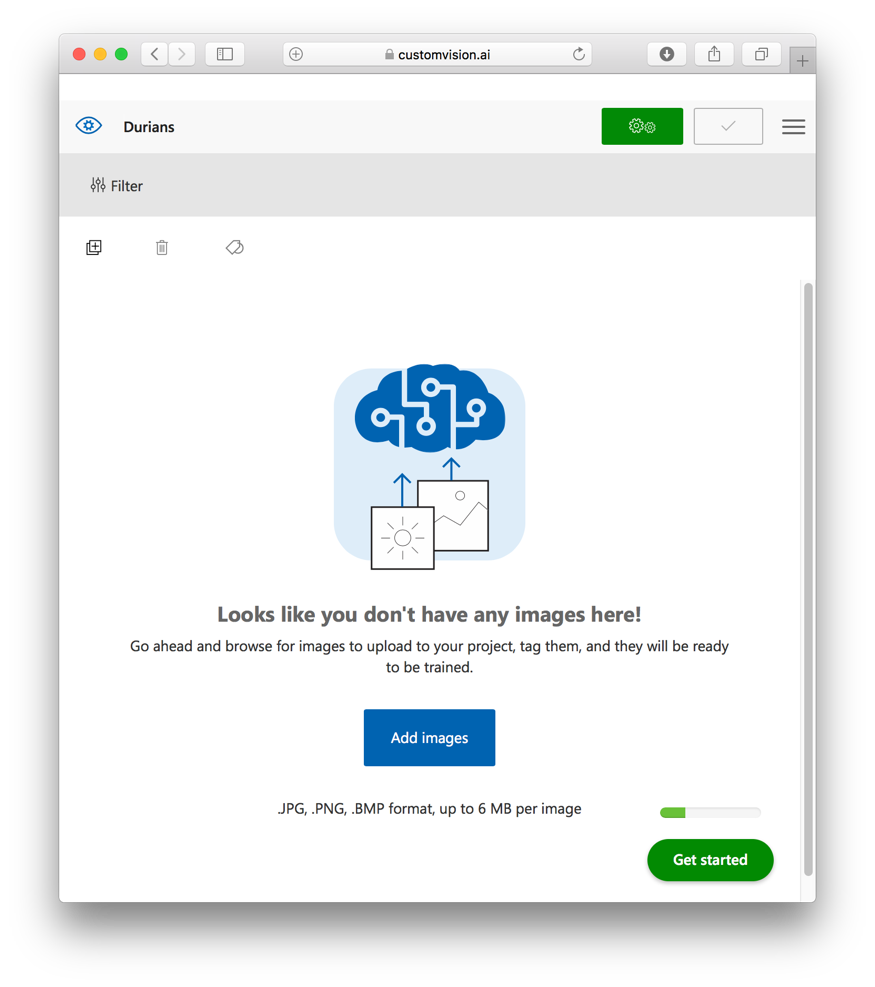
Click Add images (see Figure 22). Select the series of durian images that you have prepared beforehand (you can always use Google to find a series of durian images).
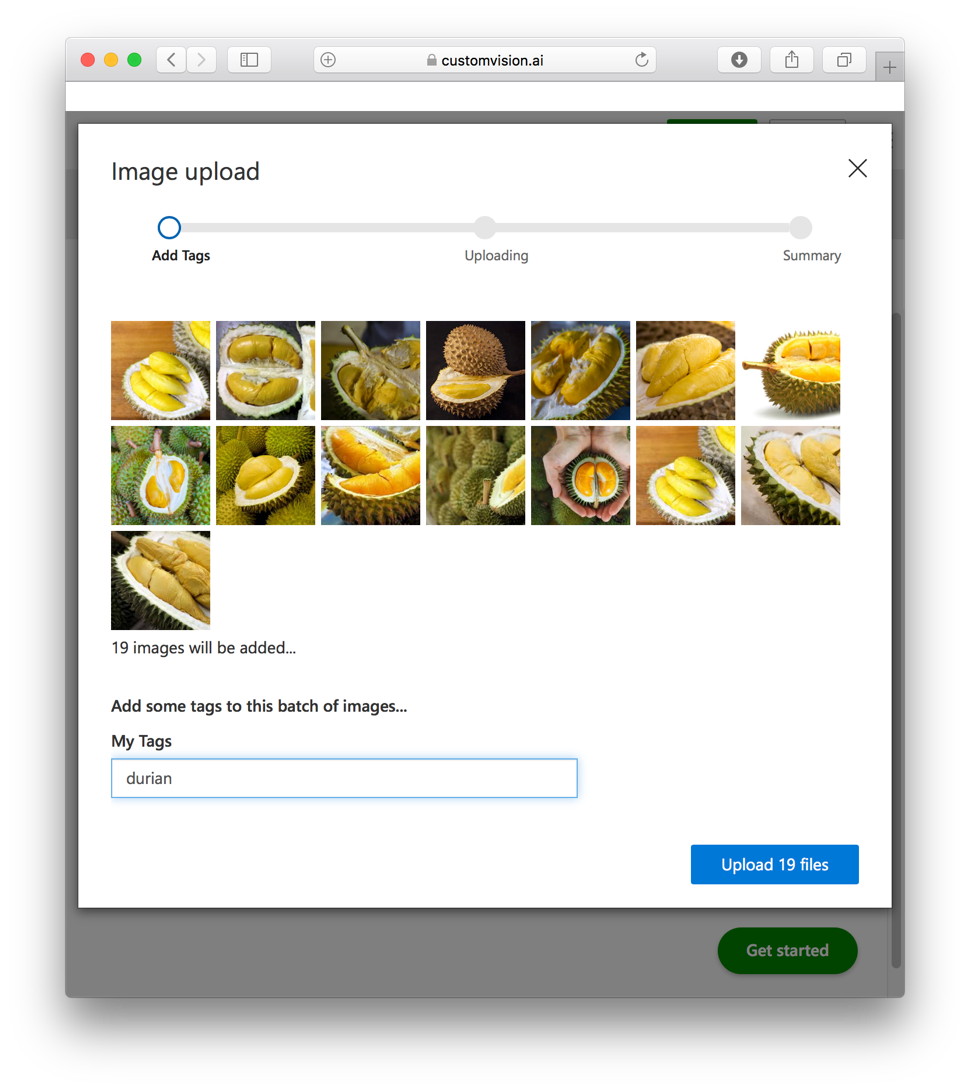
Assign the tag of “durian” and click the Upload 19 images button (see Figure 23):
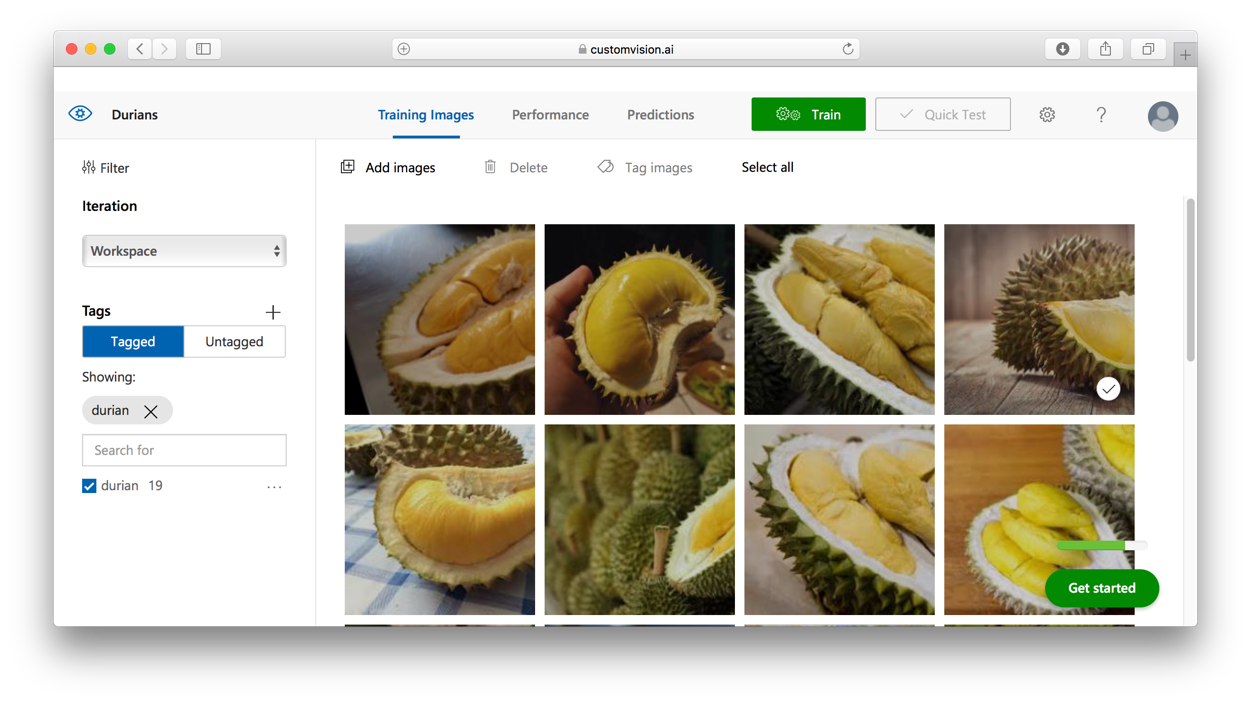
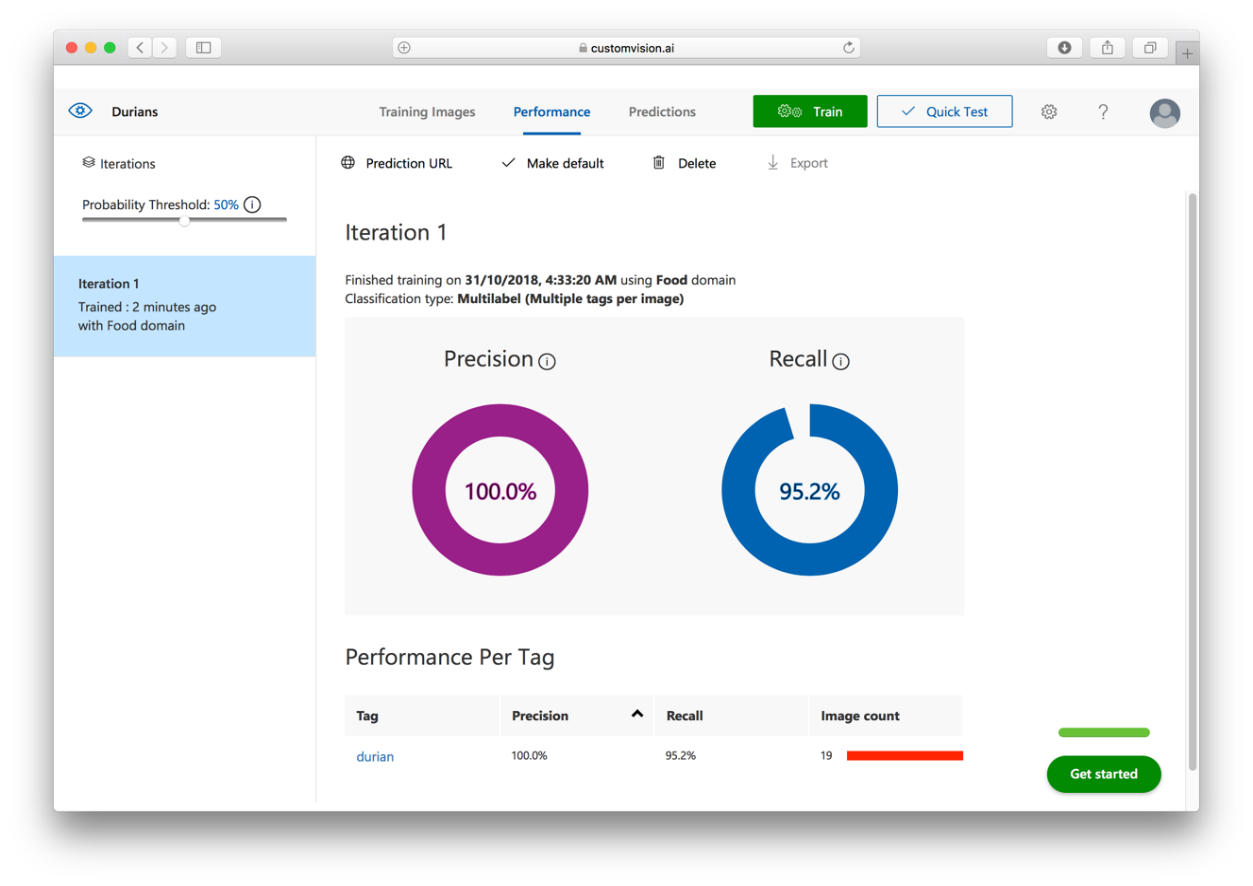
Once the images are uploaded, click the Train button (see Figure 24):
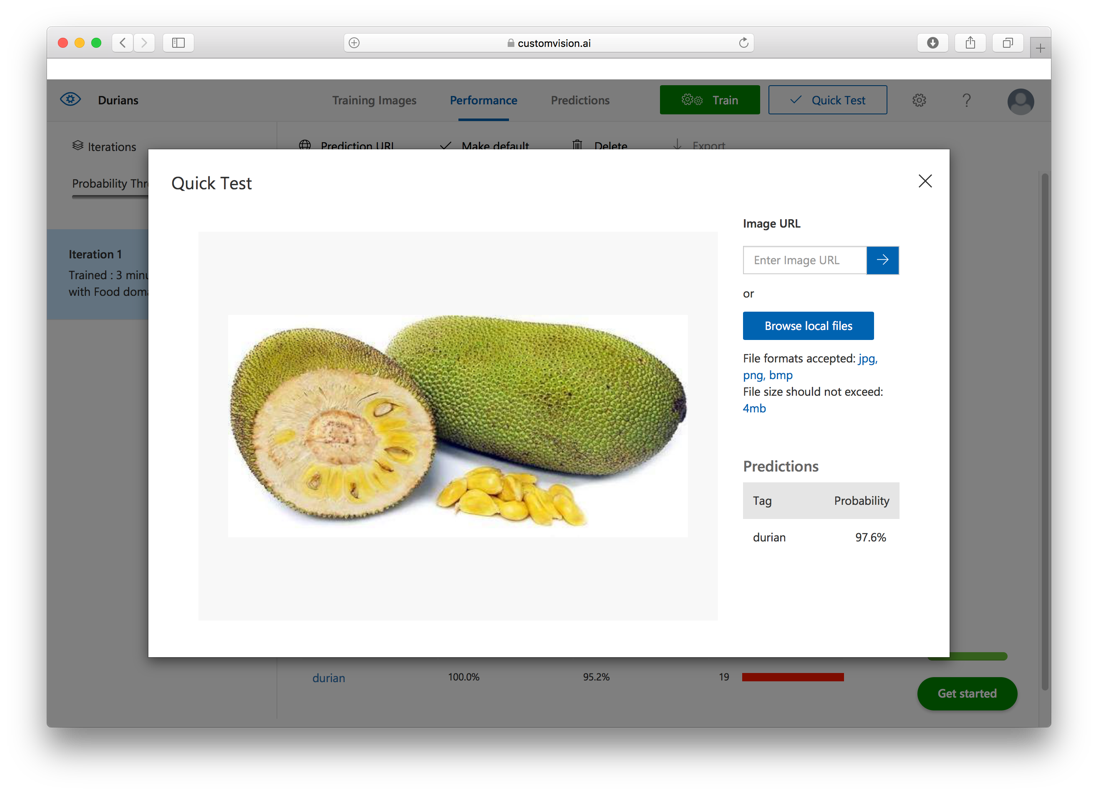
Once the training is done, click the Quick Test button (see Figure 25):
Click the Browse local files (see Figure 26) button and select a test image.
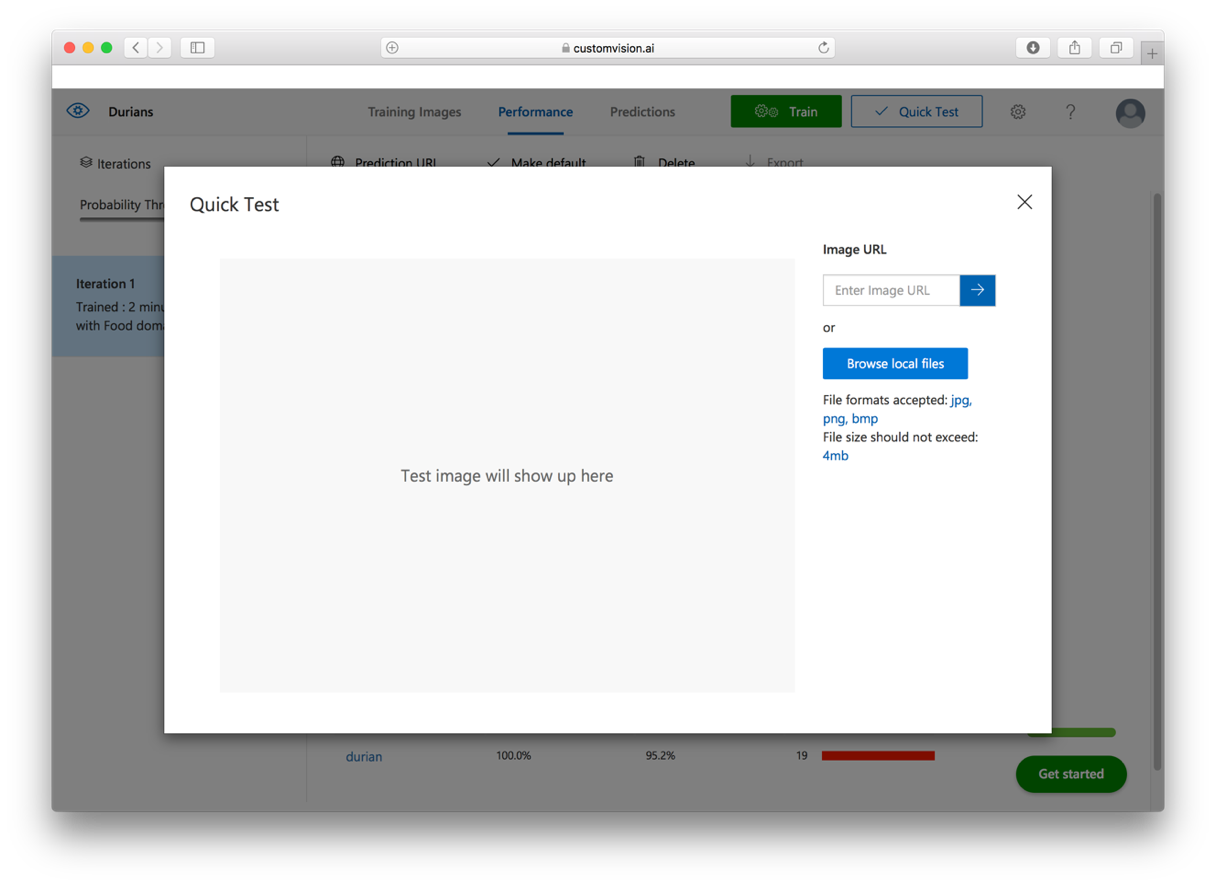
Figure 27 shows the result of the test. I've uploaded an image containing a soursop and the model predicted that it is only 3.3% confident that it's a durian.
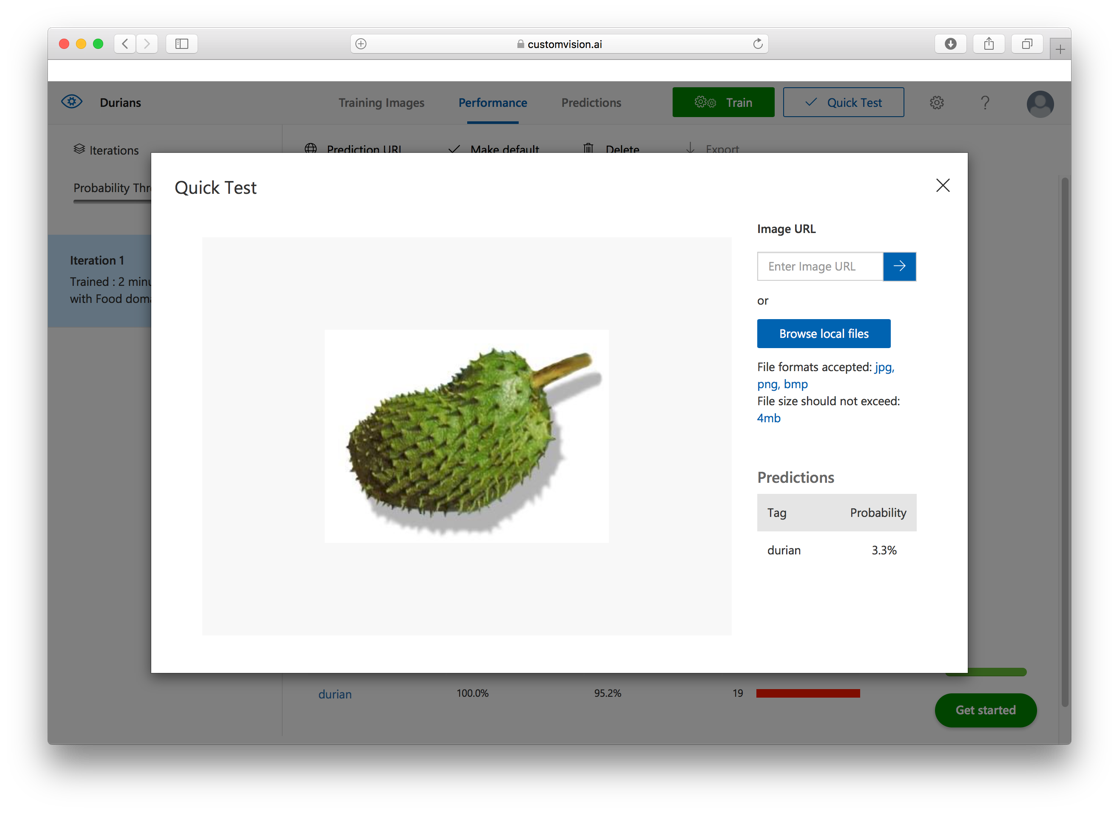
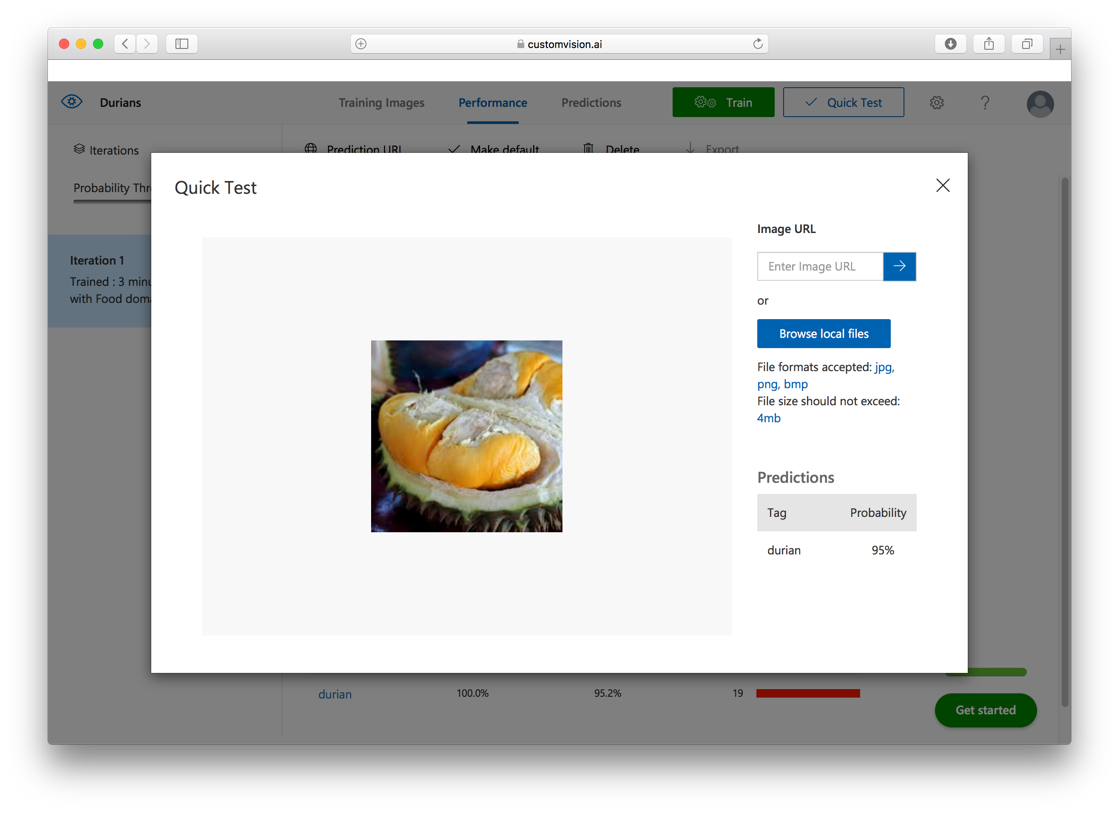
Figure 28 shows another test image. This time the model predicted that it is 95% confident that it is a durian!
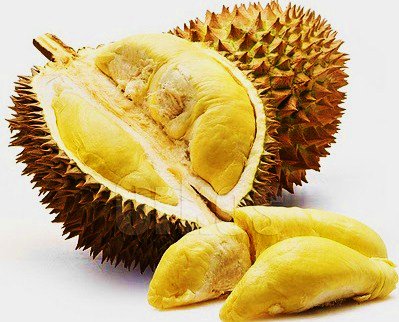
Interestingly, when I used a test image of a jackfruit (see Figure 29), the model predicted that it is 97.6% confident that it is a durian. This is because I've only used 19 images for training. If I used more images containing different parts of the durian, I'd get a more accurate prediction.
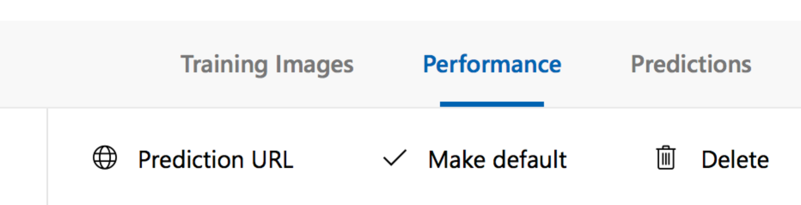
Obtaining the Prediction API
Once the model is trained, you want it to be published it so that it's available programmatically. To do so, click the Performance tab (see Figure 30) and then click the Prediction URL link.
You will see the information as shown in Figure 31.
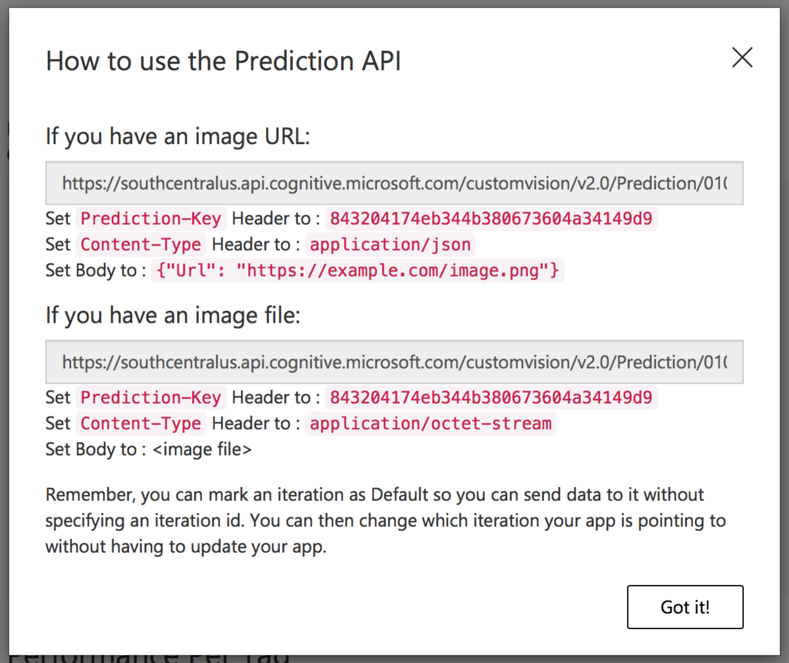
Take note of the two URLs and the Prediction-Key.
Using cURL to Access the Prediction API
Now that the learning model is published publicly, you can test it using cURL. For this, you'll make use of the image (see Figure 32) located at: https://bit.ly/2yKVhdE.
In Terminal, type the following command (the <Prediction_Image_URL> refers to the first URL that you saw in Figure 31):
$ curl -H 'Prediction-Key:
<Prediction_Key>'
-H 'Content-Type: application/json'
-d '{"url":"https://bit.ly/2yKVhdE"}'
'<Prediction_Image_URL>'
You should see the following output:
{
  "id": "380fa20b-e483-442f-ae16-f5b12e484858",
  "project": "0104d173-00b2-453d-926c-0d78b74edf42",
  "iteration": "048cde7d-ceee-4dc8-9687-0aefb5fce986",
  "created": "2018-10-31T04:17:06.8759444Z",
  "predictions": [{
    "probability": 0.9991205,
    "tagId": "78439faa-4e37-461c-9ed7-e9a0f7a60501",
    "tagName": "durian"
  }]
}
The result indicates that the model is 99.91% confident that the image is a durian.
Exporting the Model to CoreML (iOS)
With the model tested to work correctly, let's now export the model so that you can use it in your iOS and Android apps.
Using your Web browser, go to: https://www.customvision.ai/projects. Select the Durians project (see Figure 33).
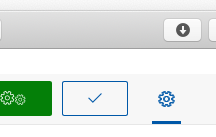
Click on the gear icon, as shown in Figure 34.
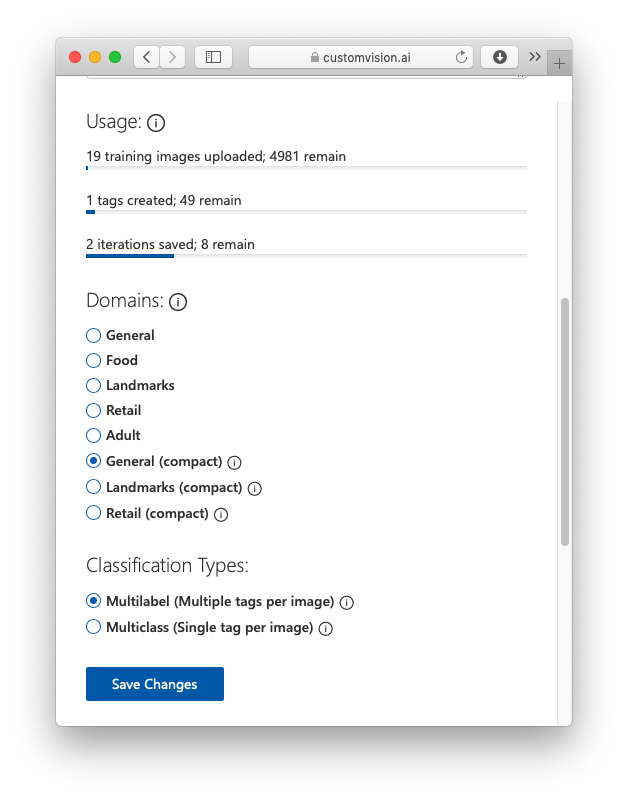
Scroll down the page and select General (compact) and then click Save Changes (see Figure 35).
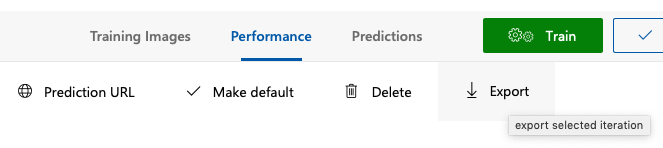
Click the Train button located at the top of the page. Then, click the Performance tab and then click Export (see Figure 36).
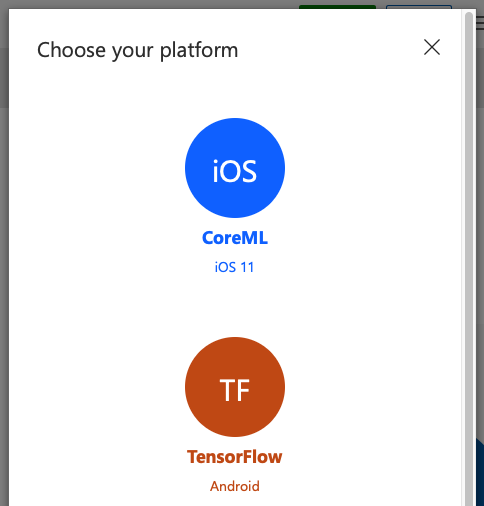
Select the iOS platform (see Figure 37). You will download the Tensorflow (TF) model later to use on the Android platform.
Click Export and then Download. A file named something like 0bbfed18d17a43258828d3a710b8b9e8.mlmodel will now be downloaded onto your computer. Rename it Durians.mlmodel.
To make it really easy to test your iOS app, Microsoft has a sample app already written for you. Download the sample code for iOS at: https://github.com/Azure-Samples/cognitive-services-ios-customvision-sample.
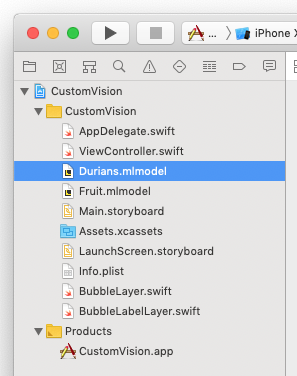
Launch the sample code using Xcode. Drag and drop the Durians.mlmodel file that you have downloaded earlier into the project (see Figure 38).
In the ViewController.swift file, locate the following block of code and make the following changes in bold:
  let targetImageSize = CGSize(width: 227, height: 227)
   // must match model data input

  lazy var classificationRequest: [VNRequest] =
  {
    do {
      // Load the Custom Vision model.
      // To add a new model, drag it to the
      // Xcode project browser making sure
      // that the "Target Membership" is
      // checked.
      // Then update the following line with
      // the name of your new model.
      let model = try VNCoreMLModel(for:
          Durians().model)
      let classificationRequest =
          VNCoreMLRequest(model: model,
          completionHandler: self.handleClassification)
      return [ classificationRequest ]
    } catch {
      fatalError(
       "Can't load Vision ML model: \(error)")
    }
  }()
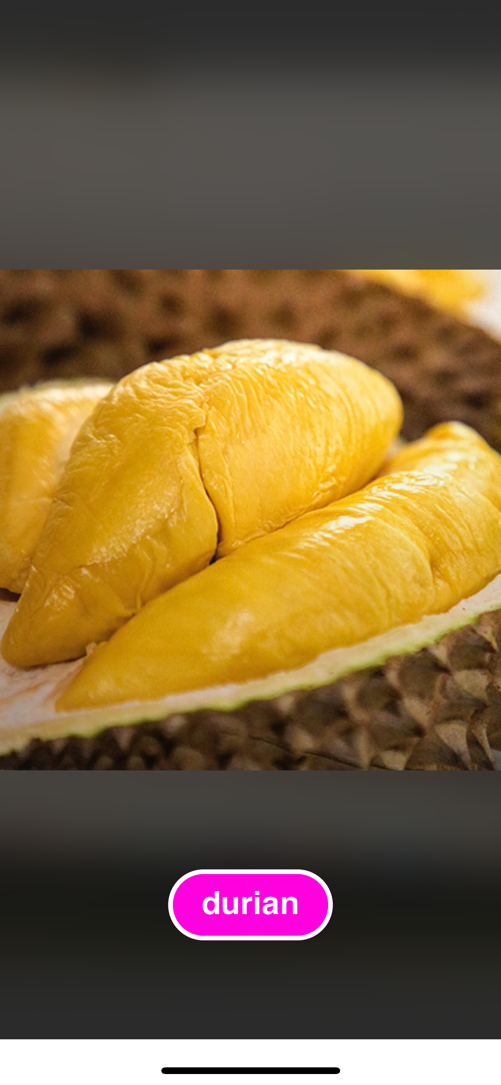
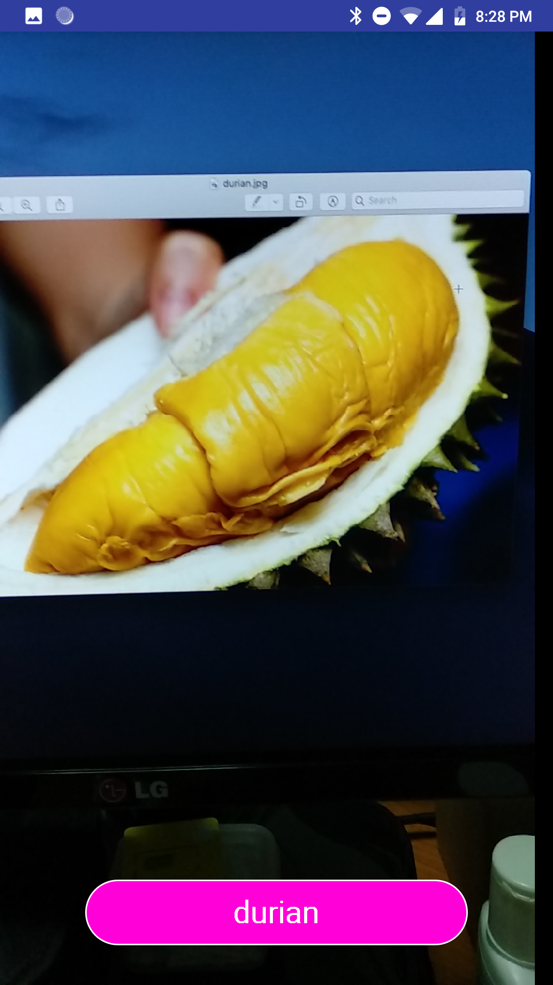
Deploy the application onto an iOS device. Point the camera at the picture of a durian and observe that the app will display a pop up displaying the word “durian” (see Figure 39).
Exporting the Model to TensorFlow (Android)
Finally, let's see how to use the trained model on Android. Back in the Export page, click TF to download the model for Tensorflow. Click Export and then Download.
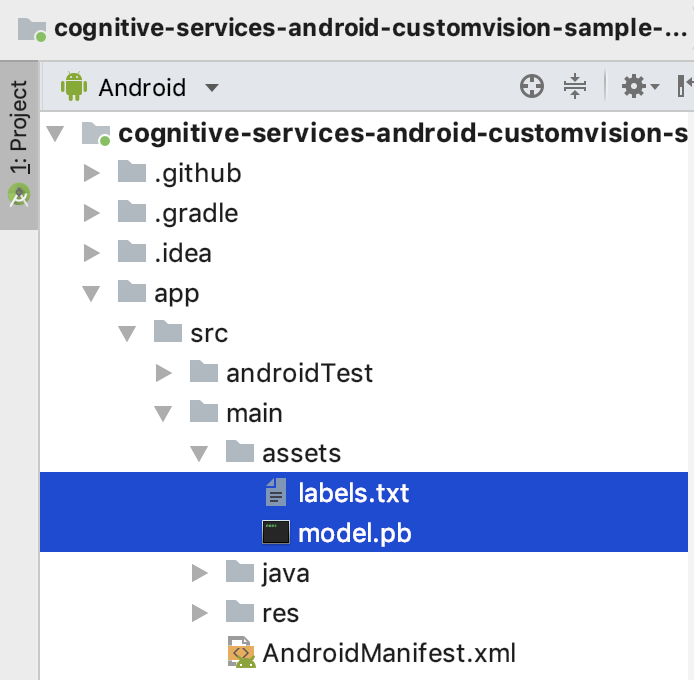
Once the zip file is downloaded, unzip it and it should contain two files:
- labels.txt
- model.pb
Like its iOS counterpart, Microsoft has also written a sample Android app for you to quickly test your model. Download the sample Android app from: https://github.com/Azure-Samples/cognitive-services-android-customvision-sample. Once the project is downloaded, open it in Android studio.
Replace the two files in the assets folder with the ones that you have just downloaded (see Figure 40).
Deploy the application on an Android device. Point the camera at the picture of a durian and observe that the app displays a pop up displaying the word “durian” (see Figure 41).
Summary
In this article, I've walked you through some of the services in the Face and Vision APIs available in the Microsoft Cognitive Services. At the same time, I've showed you how to integrate them into your Python, iOS, and Android apps. The final section of this article talked about custom vision, and this is something that is very interesting and hopefully that has given you some good ideas about the types of applications you can build using the Microsoft Cognitive Services.
