


When a user clicks on a button or link on a Web page, there can be a delay between posting to the server and the next action that happens on the screen. The problem with this delay is that the user may not know that they already clicked on the button and they might t hit the button again. It's important to give immediate feedback to the user so they know that the application is doing something.
This article presents a few different methods of providing the user with immediate feedback prior to the post-back. You'll learn to disable the button and change the message on that button. You'll see how to pop-up a message over the rest of the screen. You'll also learn how to gray out the complete background of the page. And finally, you'll see how to use spinning glyphs from Font Awesome to provide feedback to the user that something is happening.
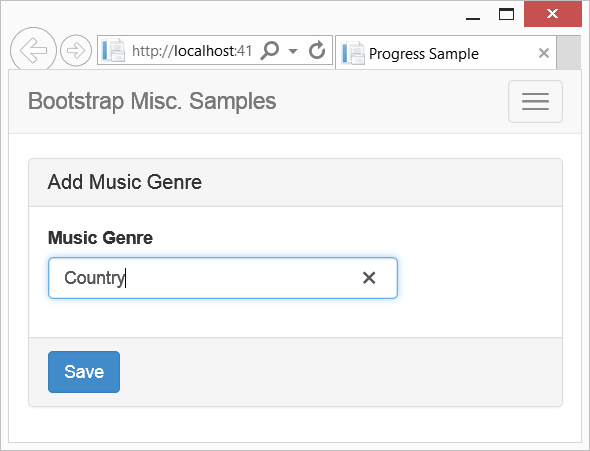
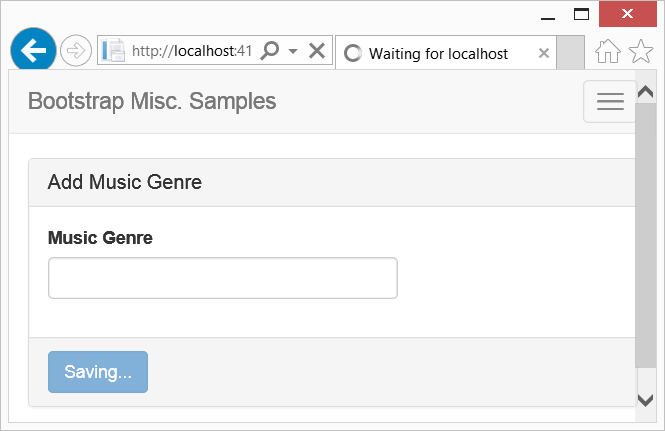
A Sample Input Screen
Figure 1 shows a sample screen where the user fills in some data and then clicks a button to post that data to the server. I'm only going to use a single field for this screen, but the technique presented works on any input screen. When the user clicks on a button that posts data to the server, your job is to give the user some immediate feedback that something has happened so that they don't click on the button (or any other button) again until the process has completed.
There are many ways that you can provide feedback to the user that you've begun to process their request. Here's a list of just some of the things you can do.
- Redirect the user to another page with a message that their request is being processed.
- Disable all the buttons on the screen so they can't click anything else.
- Hide all of the buttons on the screen so they can't click any of them.
- Change the text on the button they just clicked on.
- Disable the button they just clicked on.
- Pop-up a message over the screen.
- Gray out the page they're on.
- Any combination of the above items.
In this article, you'll learn how to do a few of these items.
To create the screen shown in Figure 1, use Visual Studio to create a new MVC application. Create a folder under \Views called \ProgressSamples. Create a new view in this folder called ProgressSample.cshtml. Create a new controller called ProgressSamplesController that can call this new page. The code to create this view is shown in Listing 1.
Listing 1: Create the input screen using Bootstrap
@model ProgressSamples.MusicGenre

@{
    ViewBag.Title = "Progress Sample";
}

@using (Html.BeginForm())
{
    <div class="row">
        <div class="col-sm-6 center-block">
            <div class="panel panel-default">
                <div class="panel-heading">
                    <h3 class="panel-title">Add Music Genre</h3>
                </div>
                <div class="panel-body">
                    <div class="form-group">
                    <label>Music Genre</label>
                    @Html.TextBoxFor(m => m.Genre, new { @class = "form-control" })
                    </div>
                </div>
                <div class="panel-footer">
                    <button type="submit"
                        id="submitButton"
                        class="btn btn-primary">
                        Save
                    </button>
                </div>
            </div>
        </div>
    </div>
}
A Class to Hold the Input
For the sample screen, you'll be entering a music genre such as Rock, Country, Jazz, etc. That means you need a class to use as a model for the input screen. The class shown in the following code snippet called MusicGenre will be used in this article for data binding on the form.
public class MusicGenre
{
    public MusicGenre()
    {
        GenreId = 0;
        Genre = string.Empty;
    }
    public int GenreId { get; set; }
    public string Genre { get; set; }
}
The Controller
In the controller, you need two methods (as shown in Listing 2): one displays the screen and one handles posting data from that screen. The first method, ProgressSample, is very simple in that it creates an instance of the MusicGenre class, passes that to the ActionResult returned from this method, and then is passed on to the view. The second method handles the post-back from the page. To simulate a long-running process, just add a call to the Thread.Sleep() method and pass in 3000 to simulate a three-second operation. Return the model back from this method so the data stays in place on the page when this operation is complete.
Listing 2: Simulate a long-running process using Thread.Sleep
public class ProgressSamplesController : Controller
{
    public ActionResult ProgressSample()
    {
        MusicGenre model = new MusicGenre();

        return View(model);
    }

    [HttpPost]
    public ActionResult ProgressSample(MusicGenre model)
    {
        System.Threading.Thread.Sleep(3000);

        return View(model);
    }
}
Change the Button When Clicked
The first example is very simple. You change the text of the button and disable it (Figure 2) so that the user doesn't click on the button again. These two steps are accomplished by writing a very simple JavaScript function, as shown in the following code snippet.
<script>
    function DisplayProgressMessage(ctl, msg) {
        $(ctl).prop("disabled", true);
        $(ctl).text(msg);
    return true;
    }
</script>
Pass a reference to the button that was clicked to the DisplayProgressMessage function, and a message to change the text of the button. Use a jQuery selector to set the button's disabled property to true. This causes the button to become disabled. Use the text method to set the text of the button to the message passed in.
After creating this function, modify the submit button to call the DisplayProgressMessage function. Add an onclick event procedure to the submit button, as shown in the code snippet below. Pass a reference to the button itself using the keyword this, and the text Saving… which is displayed on the button.
<button type="submit"
        id="submitButton"
        class="btn btn-primary"
        onclick="return
        DisplayProgressMessage(this, 'Saving...');">
    Save
</button>
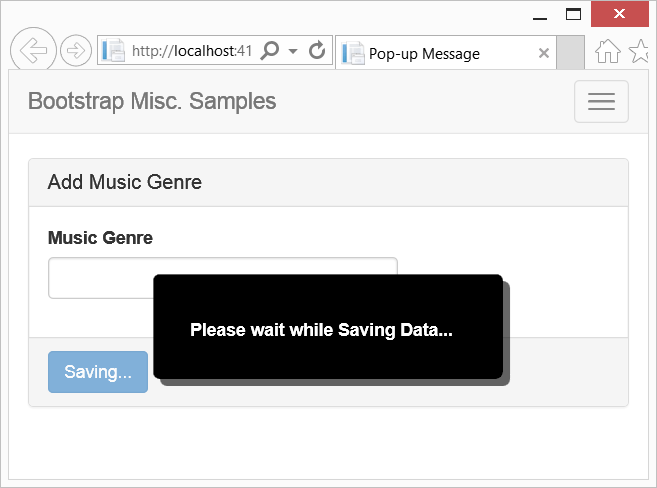
Add Pop-Up Message
Let's now enhance this sample by adding a pop-up message (Figure 3) in addition to changing the text of the button. Create a <div> with a <label> in it, and within the label, place the text you wish to display. Add a CSS class called .submit-progress to style the pop-up message. Set this <div> as hidden using the Bootstrap class Hidden so it won't show up until you want it to display. Here's the HTML you'll use for this pop-up message:
<div class="submit-progress hidden">
    <label>Please wait while Saving Data...</label>
</div>
Create the submit-progress style using a fixed position on the screen. Set the top and left to 50% to place this <div> in the middle of the page. Set some padding, width, and margins that are appropriate for the message you're displaying. Select a background and foreground color for this message. Finally, set a border radius and a drop-shadow so the pop-up looks like it's sitting on top of the rest of the page.
To make this pop-up appear when clicking on the button, update the DisplayProgressMessage function, as shown in the following code snippet:
<script>
    function DisplayProgressMessage(ctl, msg) {
        $(ctl).prop("disabled", true).text(msg);
        $(".submit-progress").removeClass("hidden");
        return true;
    }
</script>
Notice that I changed this function a little. I chained together the setting of the disabled property and the setting of the text on the button. This isn't absolutely necessary, but it's a little more efficient as the selector only needs to be called one time. Next, remove the hidden class from the <div> tag to have the pop-up message appear on the page.
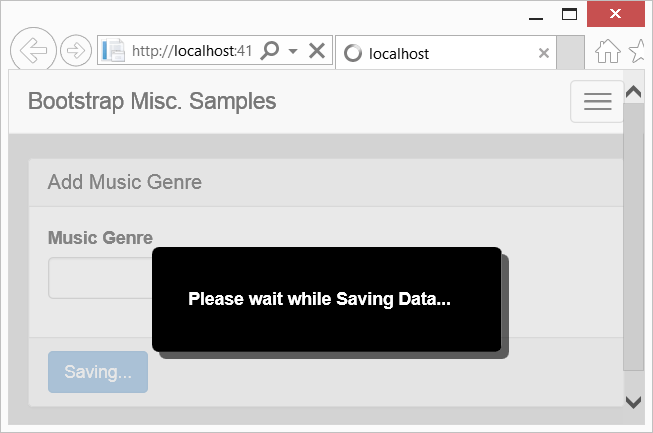
Gray Out the Background
To provide even more feedback to the user when they click on the button, you might “gray out” the whole Web page (Figure 4). This is accomplished by applying a background color of lightgray and an opacity of 50% to the <body> element. Create a style named .submit-progress-bg to your page that you can apply to the <body> element using jQuery.
<style>
    .submit-progress-bg {
        background-color: lightgray;
        opacity: .5;
    }
</style>
Change the DisplayProgressMessage to add this class to the <body> tag when the button is clicked, as shown in the code snippet below:
function DisplayProgressMessage(ctl, msg) {
    $(ctl).prop("disabled", true).text(msg);
    $(".submit-progress").removeClass("hidden");
    $("body").addClass("submit-progress-bg");
    return true;
}
Listing 3: Style the progress message pop-up
.submit-progress {
    position: fixed;
    top: 50%;
    left: 50%;
    height: 6em;
    padding-top: 2.3em;
    /* The following rules are the
    ones most likely to change */
    width: 20em;
    /* Set 'margin-left' to a negative number
    that is 1/2 of 'width' */
    margin-left: -10em;
    padding-left: 2.1em;
    background-color: black;
    color: white;
    -webkit-border-radius: 0.4em;
    -moz-border-radius: 0.4em;
    border-radius: 0.4em;
    box-shadow: 0.4em 0.4em rgba(0,0,0,0.6);
    -webkit-box-shadow: 0.4em 0.4em rgba(0,0,0,0.6);
    -moz-box-shadow: 0.4em 0.4em rgba(0,0,0,0.6);
}
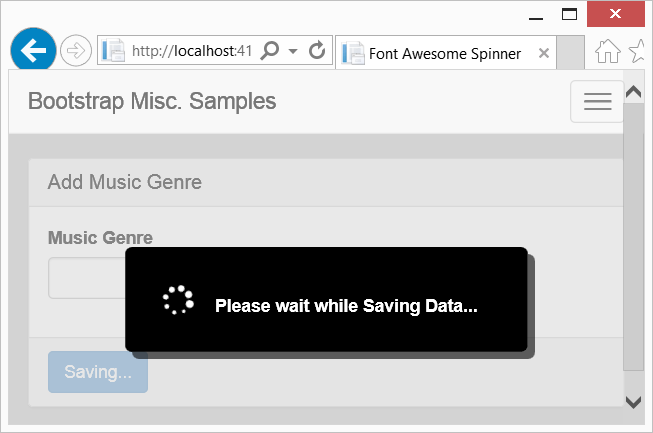
Add a Font Awesome Spinner
Another way to inform a user that something's happening is to add some animation. Luckily, you don't need to build any animation yourself; you can use Font Awesome (<a href="http://fortawesome.github.io/Font-Awesome/">http://fortawesome.github.io/Font-Awesome/ target="_blank"">http://fortawesome.github.io/Font-Awesome/">http://fortawesome.github.io/Font-Awesome/) for this purpose. Add Font Awesome to your project using the NuGet Package Manager within Visual Studio. Font Awesome has many nice glyphs to which you can add a “spin” effect (Figure 5).
Add an <i> tag to the submit progress pop-up <div> that you added before and set the CSS class to “fa fa-2x fa-spinner fa-spin”. The first class name fa simply identifies that you wish to use the Font Awesome fonts. The second class name fa-2x says you want it to be two times the normal size of the glyph. The third class name fa-spinner is the actual glyph to use, which, as shown in Figure 5, has different-sized white circles arranged in a circle. The fourth class name fa-spin causes the glyph to spin continuously. Adding that <i> tag with those classes set to spin causes your pop-up message to display that glyph next to your text.
<div class="submit-progress hidden">
     <i class="fa fa-2x fa-spinner fa-spin"></i>
    <label>Please wait while Saving Data...</label>
</div>
Of course, you do need to change the .submit-progress style a little bit in order to fit both the glyph and the text within the message area and to make them look good side-by-side. You can add the following styles just below the other .submit-progress you created before to override the original styles. This makes the glyph appear in the right place in your message. You also add an additional style for the <i> tag to put a little bit of space between the glyph and the text.
.submit-progress {
    padding-top: 2em;
    width: 23em;
    margin-left: -11.5em;
}
.submit-progress i {
    margin-right: 0.5em;
}
If you were to run the page right now without making any changes, you'll either not see the glyph at all, or you'll see it but it won't be animated. The problem is that when the JavaScript function is running, it runs on a single execution context and then immediately returns to the browser, which then executes the form post to the server. The animated glyph needs to have its own execution context in which to run. To accomplish this, you need to use the JavaScript setTimeout function around the code that un-hides the <div> tag with your spinning glyphs. You can set any amount of time that you want on the setTimeout, but usually just a single micro-second will do, as shown in the code below.
function DisplayProgressMessage(ctl, msg) {
    $(ctl).prop("disabled", true).text(msg);
    $("body").addClass("submit-progress-bg");
    // Wrap in setTimeout so the UI
    // can update the spinners
    setTimeout(function () {
        $(".submit-progress").removeClass("hidden");
    }, 1);
    return true;
}
Summary
In this article, you learned how to provide some feedback to your users when they're about to call a long operation on the server. It's important to provide the feedback so that they don't try to click on the same button again, or try to navigate somewhere else while you're finishing a process. I'm sure that you can expand upon the ideas presented in this article and apply it to your specific use cases. Remember to run any animations in a different execution context using the setTimeout function.
Sample Code
You can download the sample code for this article by visiting my website at http://www.pdsa.com/downloads. Select PDSA Articles, then select “CODE Magazine - Progress Messages” from the drop-down list.
