


In my previous article (www.codemag.com/Article/2001021/Azure-CLI), I introduced you to a very valuable tool called Azure CLI. Azure CLI allows you to interact with your Azure subscription using terminal. Because it can run on a lightweight operating system like Linux, this really opens up lots of opportunities for you. You can now author complicated scripts that deploy complicated Azure infrastructure and run them easily and predictably from anywhere. This means that you can run them from a developer’s computer, the scripts can be shared with your IT pros, they can run inside of a container, or they can run as a part of the DevOps process. You can also pair the power of Azure CLI with Bash and write some very compelling scripts.
At the end of the day, this means that you have more free time and more predictability when it comes to defining and managing complex Azure infrastructure.
Last time, I introduced various tips and tricks around Azure CLI. The focus of this article is looking at the options around how to automate the deployment of complicated Azure infrastructure. Sure, you can use point-and-click to set up everything, but do you have confidence that you can tear it all down and bring it all back up together predictably every time?
When we talk of infrastructure as code, we all know that code can get very complex very quickly.
In this article, I’m going to pick some simple canonical examples, target the Azure cloud, and walk you through some options and how you can manage, create, and destroy complex infrastructures easily. Throughout this article, I’ll discuss some real-world challenges you’re going to run into. And I’ll explain how I intend to solve them. I’ll first show you how to do this using Azure CLI, and then explain how you can do so using Terraform, along with the advantages Terraform brings.
Azure CLI
Azure CLI is amazing. It’s built using the Python SDK for Azure, and lets you automate nearly everything Azure has. It abstracts many details away from you, and has a simple programming paradigm, but I find it to be an essential tool in my toolbox.
For the purposes of this article, I’ll create a resource group, and in that resource group I’ll create a storage account.
First, let’s create the resource group. You can create a resource group using the command:
az group create -n sahil-resource -l eastus
Easy isn’t it? Not so fast. What if such a resource group already exists? You can issue a command like the following to check whether such a resource group exists or not.
az group exists -n sahil-resource
You can run this command and capture its output in a variable, and write conditional logic around this in a shell script.
But then we have that idiot friend who tries to run a fragile shell script on a Windows environment. And when it fails, that friend will send an angry email and CC your manager. We all know how cute it is to watch managers code, much less understand such details.
Frustrating isn’t it? But this is what real world brings us. For now, let’s not worry about these complications. Let’s assume that my resource group has been created, and inside this resource group I’m about to create a storage account.
Creating a storage account using Azure CLI is quite simple. Simply issue the command:
az storage account create
 -n sahilstorage
 -g sahil-resource
 -l eastus
Again, the real world comes and bites us. What if such a storage account already exists? What if this DNS name has been taken by somebody else in the universe? What if now I need to make changes to the storage account?
You see, the scripts are getting more and more complicated now.
Terraform
I’m thankful that there is a feature such as Azure CLI. But it’s quite evident that we hit the limits of scripting very quickly. Real-world problems have many other dimensions. Here are some of the issues you’ll run into when programming with bare-bones Azure CLI.
Some larger organizations might be in multiple clouds. Additionally, they may want to move resources from one cloud to another. They would appreciate having a single paradigm to manage infrastructure among multiple clouds.
Infrastructure is never provision-and-forget. Infrastructure needs to grow iteratively over time. Anytime a change request comes in, administrators want to understand what would happen if a script is run before they run the script.
The entire goal of all this automation is infrastructure as code. Ask your developer friends if code is a complicated concept. Sure, all this automation allows you to manage more complicated infrastructure. But with complicated infrastructure comes more code. And with more code, you need to introduce concepts such as version control, automated tasks and tests, good development practices, code sharing, publishing/consuming packages, etc.
Now, you might be thinking that all of this is achievable with shell scripts and Azure CLI. You’re not wrong. But let me take you through one of the issues I mentioned above, which is that with more automation comes more code, which requires that real world development practices apply to infrastructure.
Imagine that you are a developer, and you’re writing some shell scripts to provision some simple Azure infrastructure. For the sake of argument, let’s say a couple of virtual machines inside a VNET. Sounds easy enough. I’m sure you could write this up in less than an hour and the script would be no more than 25 lines long.
Now that you’ve written such a script, you need to hand it over to your IT pro friends. What concerns would they have in their minds? Is this going to conflict with any existing infrastructure? Does this follow the best practices that you’ve established with experience? Is there a rollback mechanism if the script fails? How well-tested is the script?
I’m sure you could come up with numerous additional concerns. The solution here is to be diligent when you write the script. And to be diligent when you test the script. Then you should have a bunch of meetings to ensure that everything is communicated well. And then you should remain available during production deployment. Because we all know that the first phone that rings is the IT pro’s, who’ll simply forward the call to you with a bunch of curse words.
Now let’s add some real dimensions to this problem. Requirements have changed, and now suddenly you need to add a DNS and a CDN. And you know that this isn’t the first or last time you’ll receive a change request. Now you need to worry about versioning your scripts. And applying them in the right sequence. Oh, and don’t forget that changes are not just additions. Frequently, changes will be modifications to existing infrastructure and deletions of some of the existing infrastructure, many of which have a very particular sequence in which they must be executed.
Sweating yet?
Wait. I have more. You work in a team, and your teammates are writing scripts just like you are. How do you ensure that your script doesn’t conflict with theirs? Although concepts such as version control help ensure that changes in multiple files don’t conflict with each other, version control itself is pretty much blind to what’s inside the file. That’s a job for compilation, tests, etc.
Then there’s the issue that your organization may have multiple clouds, possibly some on-premises infrastructure. I’m sure there’s a desire to keep things consistent between these environments and therefore manageable.
And let’s complicate things further with the concept of multiple environments, because why not?
Terraform Basics
I’m sure that a capable programmer like yourself will figure all this out. But all of these problems aren’t unique to you, and therefore solutions for problems like this already exist. One such solution is Terraform (https://www.terraform.io).
Terraform, at its heart, is a tool that lets you manage your infrastructure through its lifecycle. You describe your infrastructure as a config file, the config file is written in JSON and leverages providers to talk to various cloud providers, and manages provisioning, deprovisioning, maintenance, etc.
Terraform can be invoked via a CLI and there are three main commands involved:
- Refresh
- Plan
- Apply
Refresh reconciles what Terraform thinks the real world looks like and reconciles it with the actual real world. In other words, Terraform gets an actual view of what the infrastructure currently looks like.
Plan is your “what if” equivalent. In other words, it understands the differences between what Terraform’s configuration specifies the world should look like versus what the world actually looks like.
Apply is making changes to the real world based on what the Terraform’s configuration specifies. In doing so, Terraform figures out the right sequence in which changes need to be applied. For example, various infrastructure artifacts may have interdependencies. Terraform automatically figures out which change should be done first, which next, which can be done in parallel, which must be done serially, etc.
There are many other commands that Terraform supports. For the purposes of this article, let’s stick with these three.
Performing Updates with Terraform
In this entire refresh, plan, apply circle, the guiding scroll is the Terraform configuration that you author.
When it comes to making changes for the next deployment, be it additions, deletions, or modifications, it’s just a matter of editing the configuration and re-running this refresh, plan, apply cycle. Terraform automatically understands what needs to be left untouched, what needs changes, what needs to be removed, and what needs to be created—and in the right sequence.
Finally, if you wish to tear down all of this infrastructure, you can simply issue the delete command. This is great for managing temporary environments across dev, QA, production, etc.
What’s even more interesting is that Terraform works through the concept of providers. There are many providers, but there’s a provider for AWS, a provider for Azure, and a provider for VMware. So, theoretically, you can use the same workflow across environments. I’ll admit, the real work goes in authoring the configuration file for your environment, and that’s pretty much a rewrite for different providers. So don’t just magically expect your AWS environment to port over to Azure or vice versa.
Install Terraform
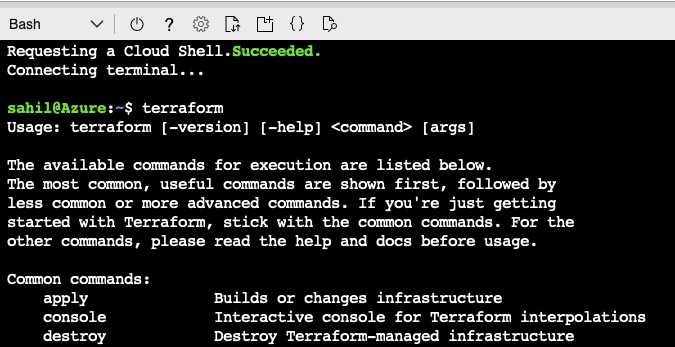
The easiest way to use Terraform is to simply invoke Azure Cloud Shell.
As can be seen in Figure 1, Terraform is already pre-installed in Azure Cloud Shell.
You can also install Terraform locally using Chocolatey for Windows or Homebrew on Mac. To install Terraform on Mac, for instance, you simply issue the command:
brew install terraform
Create a Configuration
Terraform configuration is one or more files that describe the desired infrastructure to Terraform. The idea is that you declaratively describe the desired state of your infrastructure.
The configuration files can be in either HCL or JSON. Because Terraform can work across multiple clouds using providers, a single configuration can have both Azure and AWS, or other providers.
You can specify which provider to work with using the following syntax in a configuration:
provider "azurerm" { version = "~>1.32.0" }
You may be wondering: When you run Terraform to apply changes to your Azure subscription, how do you authenticate to your Azure subscription? By default, Terraform piggybacks on the same authentication as Azure CLI. As I described in my previous article on Azure CLI, Azure CLI saves a refresh token in its configuration files after you perform a login. It’s using that refresh token that it gains an access token on behalf of the user to whom you’d issued the az login command.
In various automation scenarios, you may want to run Terraform as a service principal. Even in those scenarios, Azure CLI has concepts to allow you to login as a service principal.
Also, if you don’t wish to piggyback on the Azure CLI authentication mechanism, Terraform configuration allows you to pass in credentials via variables as well.
But what if you wanted to run under a managed identity? Then you simply use the code snippet in your configuration as shown here:
provider "azurerm" { version = "~>1.32.0" use_msi = true subscription_id = "" tenant_id = ""}
The main thing you wish to accomplish is to create resources in your Azure subscription. Terraform can be used to provision nearly any kind of resource in Azure. To do so, use the Azure provider. It’s worth mentioning that the resources specific to Azure Active Directory live in their own Azure Active Directory provider.
For the purposes of this article, let’s go ahead and create a storage account. The full configuration for this can be seen in Listing 1. Save this file as “main.tf”. I’d suggest that you create a fresh folder for it.
Listing 1: The Terraform configuration file
resource "azurerm_resource_group" "sahil" { name = "sahil-resources"  location = "eastus" }
resource "azurerm_storage_account" "sahil" {
    name = "sahilstorage"
    resource_group_name = azurerm_resource_group.sahil.name
    location = azurerm_resource_group.sahil.location
    account_tier = "Standard"  account_replication_type = "GRS"
    tags = { environment = "codemag" }
}
Now open Terminal, navigate to the folder where you’d saved this configuration file, and run the following command:
terraform init
The init command initializes a new or existing Terraform working directory by creating initial files, loading any remote state, downloading modules, etc. This is the first command that you should run.
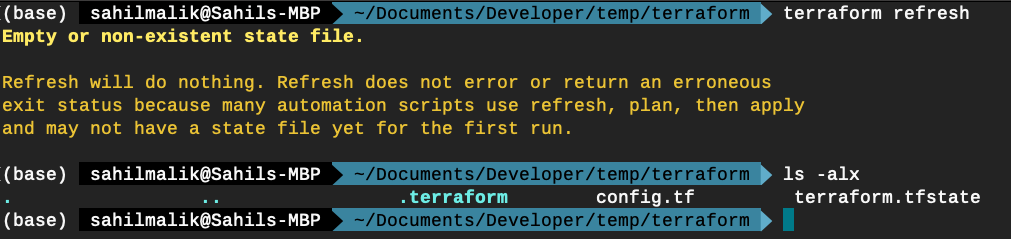
Once you’ve run this command, note that you get a new folder called “.terraform”. You can find the hidden folders by running the command:
ls -alx
It’s in this folder that the init command has downloaded and stored the required modules. As you proceed, feel free to explore the contents of this folder.
Now, let’s run refresh. As I mentioned earlier, running the refresh command updates the state file of your infrastructure with metadata that matched the physical resources they’re tracking. This command won’t modify any infrastructure.
Because this is the first time you’ve run Terraform refresh, it simply creates an empty tfstate file, as can be seen in Figure 2.
Performing Changes
At this point, Terraform understands the environment. Now it’s time to perform changes and reach the desired state.
Let’s run the plan. As I mentioned earlier, the purpose of the plan command is to allow Terraform to generate an execution plan. The execution plan specifies what actions Terraform will take to achieve the desired state as defined in your configuration file, and also the specific sequence in which those actions will occur.
Additionally, the plan command also checks the syntax of your configuration file and the connection to Azure, and it refreshes the state prior to checking for differences with the current configuration.
Let’s run the plan command:
terraform plan
Running the plan spews out a lot of text on the screen. This is the execution plan. Terraform is telling you exactly what it will do to achieve your desired state for the infrastructure.
At the very bottom of all that text, you can see a curious note, like that seen in Figure 3.

Generally speaking, you should always save the results of your plan as an out file. Then you can pass this file is an input parameter to the Apply command. Not only does this ensure that the execution plan is saved and perhaps version controlled, it also ensures consistency between multiple runs.
For the simple example, I’ll simply go with in-memory usage and I won’t bother saving this execution plan.
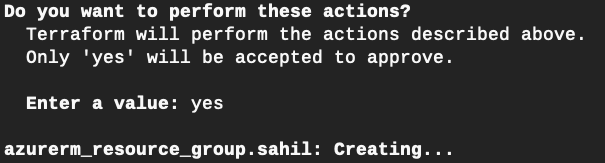
Once you know what the execution plan is, let’s go ahead and apply it. To do so, simply issue the command below:
terraform apply
Issuing this command clearly tells you what changes Terraform will perform. If you agree with the changes, say “yes” to the prompt that Terraform offers.
Once you enter “yes,” Terraform begins applying changes, as can be seen in Figure 4.
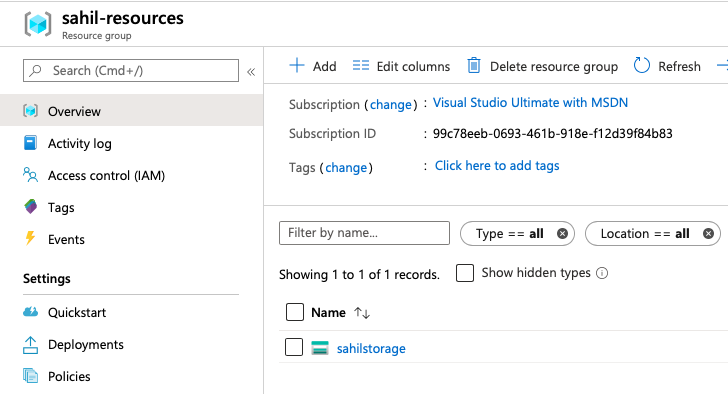
Once the changes are finished applying, visit your Azure portal and verify that a storage account, as shown in Figure 5, has been created.
Day 2 Changes
Congratulations. You just created a storage account. The storage account has served you well, but notice that its replication kind has been set to GRS. This isn’t unexpected because this is exactly what I asked for in Listing 1.
Now I wish to make a change. I’d like to change the LRS, or locally redundant storage. To do so, simply change line 11 from Listing 1 to this:
account_replication_type = "LRS"
Once you’ve saved this change, come back to Terminal and simply issue the plan command again.
terraform plan
As expected, plan issues a refresh and it gives you a summary of exactly what changes will be performed when you run the apply command. Specifically, the changes can be seen in Figure 6.

Once you’ve confirmed that this is a change you’d like to have made, go ahead and issue the apply command.
terraform apply
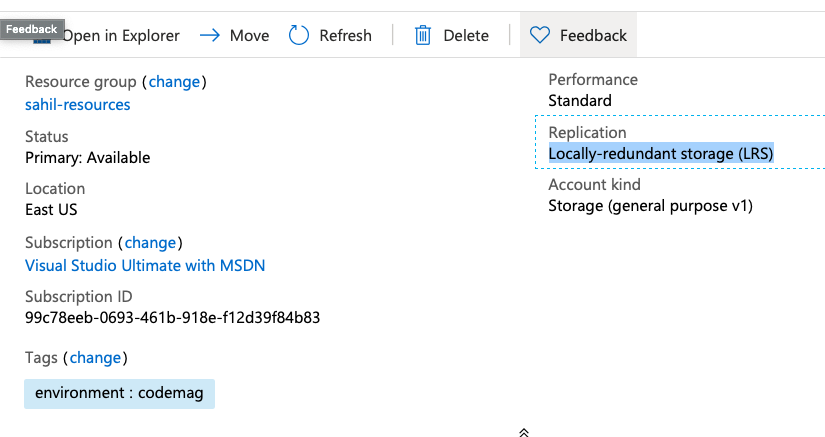
Once the apply command is finished executing, visit the Azure portal again and verify that your storage application has changed to locally redundant storage. This can be seen in Figure 7.
Deleting Resources
Terraform not only helps you manage the lifecycle of environments, it also helps do cleanups very easily. In the example I showed you, it was very simple. You’re welcome to complicate the example further and provision any number of virtual machines, networks, CDNs, or any other as a resource you wish. It’s just a matter of creating a more complex configuration file.
Once you’re finished playing with Terraform, Terraform can also assist you in cleaning it all up. To clean up everything, simply issue the destroy command as shown below:
terraform destroy
Once this command is finished executing, visit the Azure portal again and verify that the storage account, or for that matter everything specified in your configuration file, is now gone.
Summary
The cloud is very powerful. It’s amazing that with just a little code, you have the ability to provision some very complicated infrastructure very quickly. Of course, with great power comes great responsibility. Infrastructure growth unchecked will probably mean that your bill gets pretty big too. Not only that, large complex infrastructures are now possible and, for that matter, even desirable, when we talk about serverless architectures.
But as this infrastructure has become increasingly complex, it raises new concerns. Concerns such as maintainability, reliability, ability to replicate behavior on repeat runs, etc.
Although it’s possible to script around everything, it’s a bit like cleaning the gym floor with a toothbrush. Being able to script is amazing, it’s wonderful. It certainly beats plugging in cables and lifting heavy servers. But with utilities such as Terraform, this task becomes so much easier.
I’m sure with a combination of shell scripting, version control, Azure CLI, and Terraform, you’ll be able to master some very complex infrastructure monsters and bring them under control.
You go do that. Until next time, happy coding.
