


Native mobile development has a unique set of challenges that require specific practices and skillsets in order to execute effectively. These challenges often mean that developing for mobile devices requires additional overhead compared to something like traditional Web development. For starters, you need different engineering talents to execute on iOS and Android platforms respectively, often resulting in multiple disjointed technology stacks. Because those platforms don't play nicely together, development for both platforms creates the need for continued oversight to ensure consistency between both sides.
Furthermore, in contrast to developing on the Web, native mobile development usually has a slower development cycle and slower iteration time. Testing even the smallest change requires the project to be recompiled, and depending on the size of the code base, that can prove cumbersome. Deploying changes to a production mobile application often requires a submission and review process, which also limits your release frequency.
So why would you build native to begin with? Usually, you build native because it allows you to create a better user experience and deliver a product that's consistent with each respective platform, more so than a Web application or hybrid application could be. In the past, technologies that tried to compete with native development came up short in terms of performance and flexibility. However, with the introduction of React Native, the paradigm has started to shift and the perspective that great mobile development is limited to native-only has weakened.
React Native, an open-source framework from Facebook, builds on the popular React JavaScript framework, allowing developers to create cross-platform iOS and Android applications using JavaScript. This lowers the barrier to entry by removing the need for many of the specific skillsets required for traditional native development and, in turn, opens the process up to many developers currently working with React and JavaScript in the browser.
React Native removes the need for specific skillsets in traditional native development and opens the process up to developers working with React and JavaScript in the browser.
React Native
React Native brings the power of the React programming model to mobile development. How does it do this? Basically, it does it in the browser: React is abstracted as a wrapper around the DOM (Document Object Model). The DOM is a programming interface for HTML and allows you to manipulate HTML elements. It's essentially what you use to build Web views. Because React is wrapped around that interface instead of being tied directly to it, it's flexible enough to wrap around other view systems as well.
React Native does just that, creating a bridge to wrap React around the native user interface component libraries for both iOS and Android respectively. As a result, you build an actual native application using the same components that you would in standard native development, thus making it visually indistinguishable from a purely native counterpart. This makes React Native very different than other frameworks that let you write mobile applications using traditional Web languages like HTML and JavaScript because it doesn't rely on any browser or Web views to render its interfaces. This means you get to spend more time focusing on your actual app and less time worrying about performance optimization like you might if you were using a Web view.
With React Native, you build a native application using the same components that you'd use in standard native development, thus making it visually indistinguishable from a purely native counterpart.
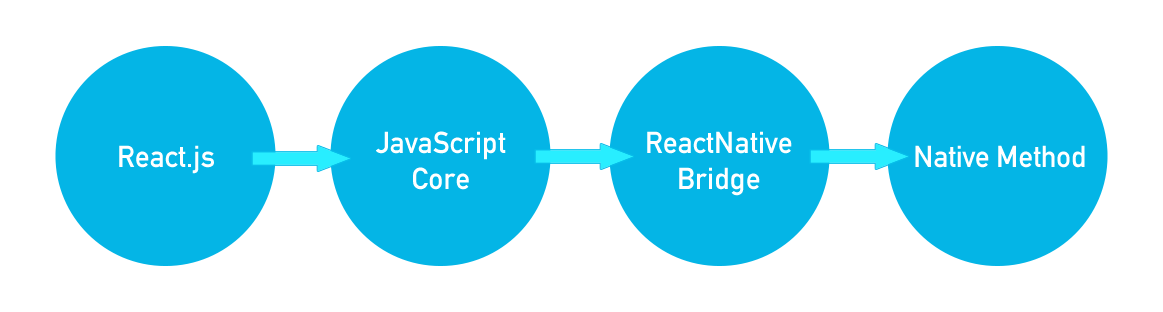
Traditional React runs in a browser, rendering divs and spans. However, React Native runs in an embedded instance of the JavaScriptCore, which then renders native platform-specific UI components. Take a look at Figure 1 to get a better idea of how this works. As you can see, React Native acts as a bridge between the React framework and the corresponding native counterparts. That bridge is smart enough to call the respective native method for both iOS and Android. At a high-level, this means you can write code once and deploy it on both platforms.
Setting Cross-Platform Expectations
At the core, as previously mentioned, React Native lets you write JavaScript to execute on both iOS and Android devices. From the outside looking in, this leads to the natural assumption that React Native is a cross-platform mobile development framework. Technically, this isn't incorrect, but you should understand that there are caveats. Facebook doesn't advertise React Native as a build-once-deploy-everywhere framework, but more as a learn-once-write-everywhere solution. The overarching goal is to create a knowledgebase and toolset that developers can apply across multiple platforms. This empowers non-native mobile developers to write native mobile applications without having to learn all of the subtleties of Swift or Java.
If you look at the React Native documentation (https://reactnavigation.org/docs/getting-started), you'll notice that the framework has a set of components for you to use. These represent a subset of shared functionality between iOS and Android; things like buttons, images, modals, and text that aren't unique to each platform. React can map to both mobile platforms when the component you're attempting to use has an equivalent option on both sides. What happens when you want to access a component or some system API that's unique to the respective platform? Some of these already have React Native platform specific bridges, but others don't.
It's unlikely that React Native encompasses everything you need to build a 100% cross-platform application. There's an expectation that you'll need to write custom platform-specific code to accommodate both iOS and Android. This is further implied by the inclusion of separate iOS and Android index files, which serve as the entry points for the application. Going into the process, it's important to understand that even when shared components do exist, you'll likely have to write custom React code to style those components differently for iOS and Android. The ecosystems vary substantially and, as a result, it's unrealistic to expect all CSS or positioning customization to be interpreted the same way. In scenarios like this, you could use shared classes and simply apply different CSS styling to the respective class based on the OS that the code is bridged over to.
Additionally, when you simply can't achieve some desired feature or functionality from the React Native framework, you'll need to write custom native code within the respective platform's IDE and then tie those pieces back into the JavaScript base.
Each application is different, and the complexity of the feature set and design can impact the amount of platform-independent development you'll need, but it isn't unreasonable to expect an 85% code-share rate for simpler applications. You can further optimize the percentage of shared code by understanding the offering of React Native out-of-the-box and limiting your design decisions by the bounds of those capabilities. For instance, using components that React Native already supports on both platforms, where applicable, limits your need to write custom native code.
The complexity of the feature set and design can impact the amount of platform-independent development you'll need, but it isn't unreasonable to expect an 85% code-share rate between platforms.
The technology is robust enough that you don't need to limit yourself. Native code can be seamlessly woven right into a React Native view, and as long as you don't mind getting your feet wet with Swift or Java, the possibilities are nearly endless.
Getting Started
If you already have experience with iOS or Android development, getting a React Native environment spun up should be relatively easy. For the sake of this example, you'll look at setting up a React Native environment for compiling an iOS application using Mac OS and Xcode. Check the sidebar for a link to equivalent instructions for setting up the project to also build on Android. To start, you'll need to install some dependencies
- Homebrew: used as the installer for Node and Watchman
- Node.js: comes with Node Package Manager (npm) needed to install React Native command line interface
- Watchman: a tool by Facebook for watching changes in the file system. Recommended for performance.
- React Native command line interface: used to generate, compile, and run projects
- Xcode: needed for iOS simulator and build tools
Start by installing Homebrew. If you don't already have it installed, you can install it by opening Terminal and executing the following command.
/usr/bin/ruby -e "$(curl -fsSL https://raw.githubusercontent.com/Homebrew/install/master/install)"
After Homebrew has finished installing, run the commands to install Node and Watchman.
brew install node
brew install watchman
Once that's done, you can use npm to install the React Native command line interface by executing the command in the next snippet in Terminal. If you run into any permission errors, try preceding the command with sudo. If you get an error complaining about the npm module not being found, you may have to install npm directly (more information is in the sidebar).
npm install -g react-native-cli
Now you need to install Xcode. For easiest access, download it from the Mac App Store. Installing Xcode also installs the needed build tools and simulators to run your React Native application. Once that's in place, you have everything you need to create your first React Native project. To initialize a base React Native project, execute a terminal command, which creates the starting project structure for you within the directory from which you ran the command. For this example, create an application called FlixSearch using the following command.
react-native init FlixSearch
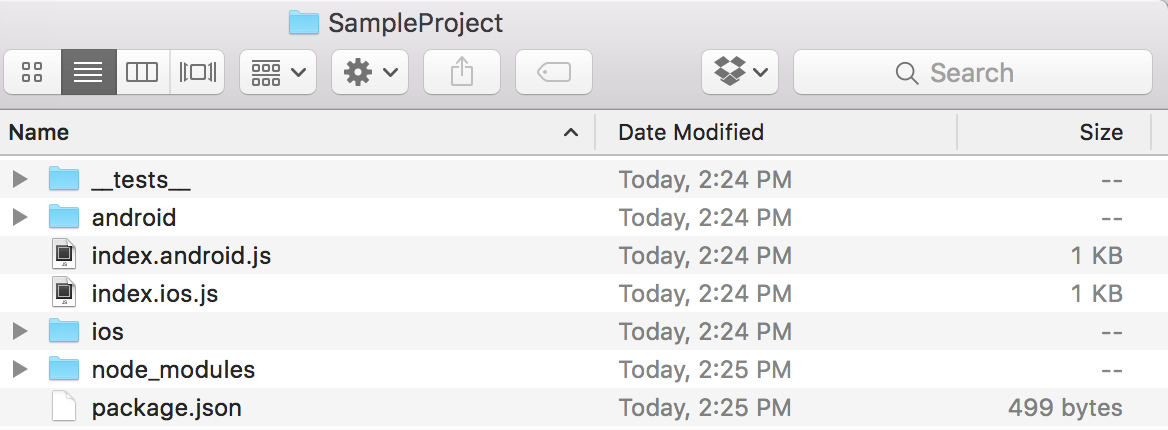
After you run that command, npm installs a React Native package within a new folder called FlixSearch. If it worked properly, the contents of the folder should resemble Figure 2. Notice two index files. These act as your entry point for iOS and Android respectively. It's important to note that when you need to write platform-specific code, you can use the .android and .ios extension prefixes. When you call on or import that specific code into another component, React Native decides which file to use at build time based on which OS you're currently compiling for. Furthermore, if you click into the iOS and Android folders, you'll notice standard native projects structures. You'll use these projects if you decide to write custom native integrations and also when you go to compile/provision final builds for App Store submission.
In this example, you'll also take advantage of some useful third-party libraries, so you need to install them. The first is NativeBase (nativebase.io), a collection of UI components that work on both iOS and Android. The second is React Navigation, a popular community-driven navigation library. Let's start with NativeBase. Go back to the terminal window and cd into that new React Native directory that resulted from the previous init command. From here, you need to execute the NativeBase install command. Note that this is a two-part process. After you run the install command, you need to set up the peer dependencies that NativeBase relies on. The following commands handle both the installation of the library and the linking of the peer dependencies.
npm install native-base –save
react-native link
Once that completes, run the command to install React Navigation.
npm install --save react-navigation
Now let's compile the project to make sure everything works as expected. Run the following React Native command in Terminal to compile the project, open the iOS simulator, and run the application.
react-native run-ios
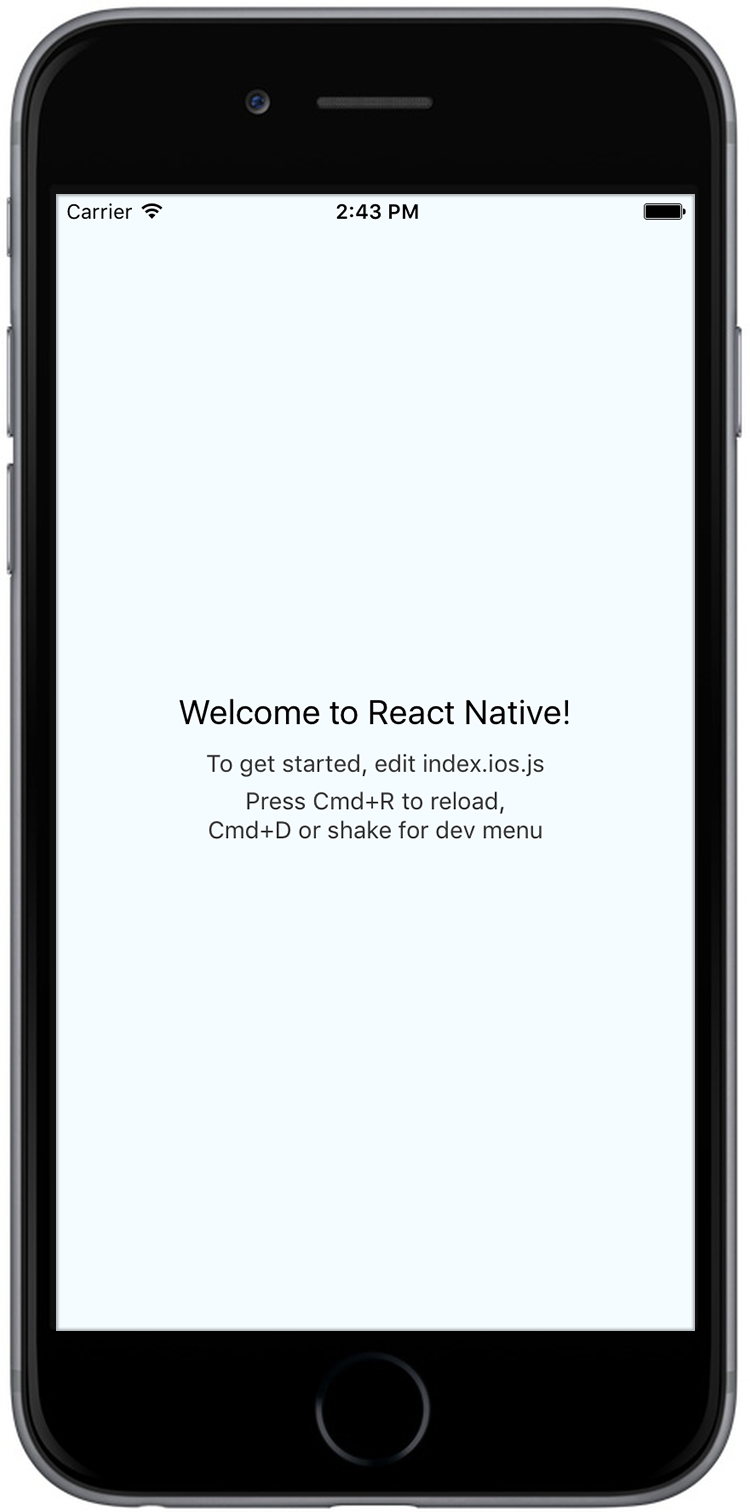
Figure 3 demonstrates what you'll see in your simulator if all worked properly.
Hot Keys
Notice in Figure 3 that the sample app screen points out you can press Cmd+R to reload. With React Native, you can refresh the application in the simulator without needing to recompile it. You can make changes to your React components, click over to the simulator, press Cmd+R, and then watch the application refresh to show those changes in real time. In addition, you can use Cmd+D to pull up a developer menu for additional options, including a remote debug option that attaches the Chrome browser debug tools to the running application.
With React Native, you can refresh your application in the simulator without needing to recompile it.
Implementation
You've configured the environment and you've generated and run the base project installation, but you probably still aren't sure what's happening. Let's take a closer look at the source. If you navigate to your index.ios.js file and open it, Listing 1 demonstrates what you'll see.
Listing 1: index.ios.js base file contents
/**
* index.ios.js - Sample React Native App
*/

import React, { Component } from 'react';
import {
    AppRegistry,
    StyleSheet,
    Text,
    View
} from 'react-native';

export default class FlixSearch extends Component {
    render() {
        return (
            /** JSX for view contents */
            <View style={styles.container}>
                <Text style={styles.welcome}>
                     Welcome to React Native!
                 </Text>
                 <Text style={styles.instructions}>
                     To get started, edit index.ios.js
                 </Text>
                 <Text style={styles.instructions}>
                     Press Cmd+R to reload,{'\n'}
                     Cmd+D or shake for dev menu
                 </Text>
            </View>
        );
    }
}

/** array of style props */
const styles = StyleSheet.create({
    container: {
        flex: 1,
        justifyContent: 'center',
        alignItems: 'center',
        backgroundColor: '#F5FCFF',
    },
    welcome: {
        fontSize: 20,
        textAlign: 'center',
        margin: 10,
    },
    instructions: {
        textAlign: 'center',
        color: '#333333',
        marginBottom: 5,
    },
});

/** tells React Native what root component is */
AppRegistry.registerComponent('FlixSearch', () => FlixSearch);
The first thing you might notice is that aspects of the code don't resemble traditional JavaScript. React Native supports ES2015 (or ES6), which is a newer iteration of JavaScript that has become part of the official standard but isn't yet supported by most Web browsers. The use of import, class, extends, from, and the ()-> notation are all ES2015 features. Check the sidebar for more information on ES2015.
You'll also notice that the view construction doesn't use traditional HTML or div tags. What you see is JSX, which embeds XML in JavaScript, allowing you to write markup language inside your code. There are a number of components you can use to construct a view using JSX. You can refer to the documentation for a full list.
The import statements at the top of the file bring in the base React and React Native dependencies that you'll need. Eventually, you'll add similar imports for the third-party libraries that you installed earlier. Below the imports, a class is created and acts as the main component that represents the initial screen shown when the application launches. It has a render function that returns a view. The view is constructed using several text components. Notice that those components have a style parameter (called a prop). This style prop is assigned using a styles constant that's declared after the FlixSearch class. Notice that the style code closely resembles traditional CSS, except that instead of the dash notation, it uses camel case.
If you look at the styling code, you'll see the flex keyword. React Native uses a CSS layout style called FlexBox (see the sidebar for additional details). It uses the FlexBox algorithm, allowing you to define the layout of a component's children using a combination of:
- flex: a number that defines the proportional size of the component. A component with flex = 2 takes twice the space as a component with flex = 1.
- flexDirection: determines the primary axis of the component's layout. Should the component's children be organized horizontally or should they get stacked vertically?
- justifyContent: sets alignment of children on the primary axis. You can use this to distribute the child elements at the start, end, center, or have them spaced evenly within the parent component.
- alignItems: sets alignment of children on the secondary axis.
You'll also notice a call to registerComponent at the end of the file. The AppRegistry tells React Native which component is the root for the whole application. Once the root gets established, you can navigate between components without needing to make additional calls to the AppRegistry.
To further dive into the details of basic composition, the React Native website has extensive documentation that covers each of the above concepts in further detail. Once you grasp the general approach, it becomes relatively easy to start composing native views with JavaScript. The next section walks you through a practical example to help you get a better idea of the framework's capabilities.
Practical Example
Often the best way to learn a new technology is by getting hands-on and actually building something. The rest of the article focuses on just that. You'll build an application that lets users search for TV shows and movies by entering the name of an actor. The entered name gets used as a parameter to an API call that pulls back TV shows and movies currently a part of the Netflix library. Netflix is no longer handing out API keys, so there's a good chance that the public API you use in this example contains out-of-date information. However, what's important here is the concept of querying an API, receiving data, parsing data, and displaying results. These concepts translate to virtually any network-driven application you could attempt to build.
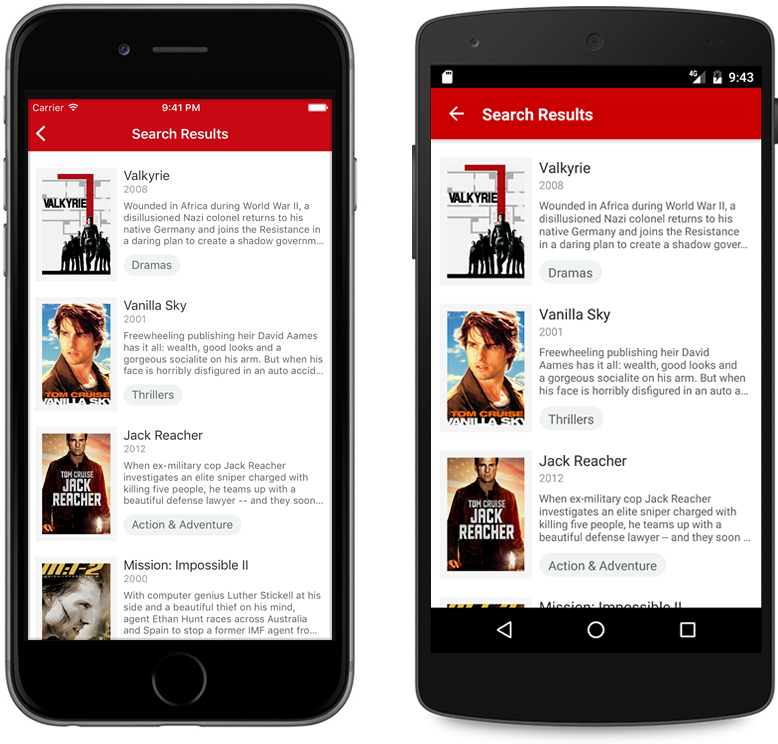
Figure 4 and Figure 5 (shown later) depict what the end result of the following exercise should look like. I also compiled the project for Android so that you can see how similar they look using 100% of the same source code.

You'll start by modifying the index file to create the first view, as illustrated by Figure 4. This view consists of a logo image, a search field, and a search button. You use NativeBase components for the text field and the button because they come with stock options that allow you to achieve the same look and feel as the screenshot without needing to customize the components manually. For instance, instead of a default native text field element, NativeBase has a built-in option to render the underlined text field with the preceding icon. It even packages in the icon font so you don't have to add the image manually.
The first thing to do is set up the import dependencies inside the index file that you'll need to build this initial view. You need to modify what you import from react-native to include the UI component types that you'll use. Additionally, you need to import the StackNavigator from React Navigation and the button component from NativeBase. To do this, change the imports at the top of the index file to resemble the following:
import React, {Component} from 'react';
import {
    AppRegistry,
    StyleSheet,
    Text,
    View,
    Image,
    StatusBar
} from 'react-native';
import {StackNavigator}
from 'react-navigation';
import {Button} from 'native-base'
This code imports each of the individual component types you need to build this respective class. The StatusBar component gets used to customize the format of the default native status bar, the Image component is used to display the logo, the View component is used as a formatting container, the Text component allows you to add text to the button, and the StyleSheet is how you style and position everything you add to the screen.
Now let's build the initial view for the project that displays when the app launches. By default, the class that shows on launch is named after the project name. Let's go ahead and rename it to something more descriptive. Change the class name to “HomeScreen” and then modify the class name in the AppRegistry at the bottom of the file as well. Those changes should look like this:
class HomeScreen extends Component {
   ...
}
AppRegistry.registerComponent('FlixSearch', () => HomeScreen);
Now modify the HomeScreen class by using JSX to compose the view that it returns in the render method. Additionally, create styles to apply to those components so they match the screenshots from Figure 4. Listing 2 shows what the first iteration looks like.
Listing 2: First iteration of index.ios.js
import React, {Component} from 'react';
import {
    AppRegistry,
    StyleSheet,
    Text,
    View,
    Image,
    StatusBar
} from 'react-native';
import {StackNavigator} from 'react-navigation';
import {Button} from 'native-base'

class HomeScreen extends Component {
    render() {
        return (
            <View style={styles.container}>
                <StatusBar barStyle='light-content' />
                <View style={styles.header}>
                    <Image source=
                        {require('FlixSearch/images/search-logo.png')}
                     style={styles.header_img}/>
                </View>
                <View style={styles.search}>
                    {/* we need a text field here */}
                </View>
                <View style={styles.btnContainer}>
                    <Button light block
                        style={StyleSheet.flatten(styles.searchBtn)}>
                        <Text>Search</Text>
                    </Button>
                </View>
            </View>
        );
    }
}

const styles = StyleSheet.create({
    container: {
        flex: 1,
        justifyContent: 'center',
        alignItems: 'center',
        backgroundColor: '#CA0000',
    },
    header: {
        height: 170
    },
    header_img: {
        resizeMode: 'contain',
        height:170
    },
    search: {
        height: 100,
        padding: 40,
        flexDirection: 'row'
    },
    instructions: {
        marginTop: 30,
        color: '#FFFFFF'
    },
    btnContainer: {
        flexDirection: 'row'
    },
    searchBtn: {
        flex: 1,
        margin:40
    }
});

AppRegistry.registerComponent('FlixSearch', () => HomeScreen);
Let's break down what's happening here. First, notice that the components have a style property like the following:
<View style={styles.container}>
You can also use inline styles but that's not the preferred way to do it because it makes the code base messier. Notice that there's a styles constant declared at the bottom of the file. This contains the various style classes available to any component within the HomeScreen. The next component you see is called StatusBar. This affects the top area of the mobile device containing the time, battery level, and network strength. Here, you set the bar style to the light setting, resulting in the white status bar on iOS instead of the default black text. On Android, the result is a black top bar with white text, as opposed to the standard gray bar.
Following that, there's an Image component displaying the logo. If you look at the style applied to the image component, you'll notice resizeMode: contain. This tells the image to resize itself, maintaining its aspect ratio, until it fits within the containing component. This helps the image to fill out the screen on various-sized devices without cropping or clipping.
You'll notice a comment in the code that references the need for a text field. It isn't there currently because in order to achieve the desired style, you need to compose and style multiple components. Instead of doing all of that within the index file, let's make a new custom component. Start by navigating to your project folder and creating a new folder called components. Save any custom components you write into this folder. Next, create a new file and call it UnderlineTextEntry.js. You use a series of NativeBase components to construct this portion of the view.
Before using NativeBase, it's important to understand some best practices as dictated by the framework. For instance, NativeBase has its own frame component called a Container. A container is structured to take three components: header, content, and footer. Think of the content section like a in traditional HTML development. Taking that into consideration, creating the underline text field class resembles Listing 3.
Listing 3: Search field text entry component from UnderlineTextEntry.js
import React, {Component} from 'react';
import {StyleSheet} from 'react-native';
import {Container, Content, InputGroup, Input,
Icon, Item} from 'native-base';

export default class UnderlineTextEntry
extends Component {
    render () {
        return (
            <Container>
                <Content>
                    <Item underline>
                        <Icon active name='search'/>
                        <Input
                         placeholder='Search by actor...'
                         placeholderTextColor='#FFFFFF'
                         style={StyleSheet.flatten
                         (styles.searchEntry)}/>
                    </Item>
                </Content>
            </Container>
        );
    }
}

const styles = StyleSheet.create({
    searchEntry: {
        color: '#FFFFFF',
        fontSize: 14
    }
});
In Listing 3, notice the construction of a new class that returns a NativeBase container. That container has an underline item composed of an icon and a text input. Together these make up the text field. It's important to note that NativeBase components currently only accept inline styling. By calling StyleSheet.flatten on the style, you can trick the component into thinking the style is inline, which helps you avoid run-time errors. Now you can switch back to the index file and import the new component like this:
import UnderlineTextEntry from './components/UnderlineTextEntry';
Once you've imported it, you can use it like you would a standard React Native component. Simply replace the comment from Listing 2 with:
<UnderlineTextEntry/>
At this point, if you go back to your simulator and press Cmd+R, your application should look like the screenshots from Figure 4. However, you're not done yet. You still need to consider several things. How does the HomeScreen class know what gets typed into the UnderlineTextEntry class, how do you submit the search, where do you load the results, and how do you navigate from the search screen to the results screen? Continue to the next section to answer these questions.
Passing Functions as Props
Before you look at building a screen to showcase the results of the search, you need to make sure the data entered into the search field is stored and accessible. In this scenario, the actual data entry happens within the UnderlineTextEntry component. You need a way to communicate the entered characters back to the HomeScreen class because the search button that triggers the search action resides there. Start by setting up a function that takes a search term parameter and stores it so the class always has a reference to it. After the opening bracket from the HomeScreen class declaration, add the following code:
storeSearchQuery(searchTerm) {
    this.state = {searchTerm: searchTerm}
}
This creates a function called storeSearchQuery, which takes an input parameter called searchTerm. When called, it saves the data passed by storing it within the current state of the class. Each class has two types of data that define its context: props and state. Props are passed from the parent and are fixed for the lifespan of the object. State, however, can change over time to reflect the current context of the class at any given moment (check the sidebar to learn more about state). By adding the search term to the state, you can call this.state.searchTerm anywhere in the class to access the search query. You'll find this useful in a minute when you want to pass the user's search query to the search results screen.
Props are passed from the parent and are fixed for the lifespan of the object. State can change over time to reflect the current context of the class at any given moment.
Now you have a function to receive the query but you don't yet have anything that calls this function. You want the text entry from the text field class to trigger the function but because the function is within the index file, the UnderlineTextEntry class has no knowledge of its existence. You need to pass a reference to the function as a property to the text entry class. Then, in turn, it can use that reference to call the function and pass the needed data back. To pass a reference of the function to the underline text entry class, you could do the following:
<UnderlineTextEntry search={this.storeSearchQuery.bind(this)}/>
The call to bind essentially provides context to which “this” it should refer to when calling the function. By binding it to the HomeScreen class, you tell the system where to look for the function when it's called. However, binding within the render method isn't the most efficient way to do this. It can hurt performance because a new function is essentially created each time render is called. Instead, binding the function within the class constructor makes more sense, because the constructor is only ever executed once. Above the storeSeachQuery function you added earlier, add the following.
constructor(props) {
    super(props);
    this.storeSearchQuery = this.storeSearchQuery.bind(this);
}
This creates the bind when the class is initialized and now, any time you pass the function as a parameter, that bind applies. In turn, this means that passing the function now looks like this:
<UnderlineTextEntry search={this.storeSearchQuery}/>
The next step is to call the function from the UnderlineTextEntry class to pass back the search term using the function reference. Navigate back to the UnderlineTextEntry.js file. Find the <Input> component. This component represents the actual field that takes the text input from the user. One issue you have to solve is how to know when the user is finished with their input. The first inclination is to use the search button press event as the trigger to get the data from the field. However, the UnderlineTextEntry class currently has no way to know when the button is pressed, which presents another challenge to solve. Instead of figuring out how to send the button event to the text entry class and then, in turn, send the query back to the parent class, you can simply notify the parent class of any change to the field. The Input component has an onChangeText event handler that triggers each time the field updates. You could modify it to look like the following:
<Input onChangeText={(searchTerm) =>
    this.props.search(searchTerm)}
    placeholder='Search by actor...'
    placeholderTextColor='#FFFFFF' style=
        {StyleSheet.flatten(styles.searchEntry)}/>
This results in the execution of the storeSearchQuery function from HomeScreen each time the field updates. On each update, the current content of the field gets communicated back to the parent and the state of the parent screen is updated to the most recent value. This way when the user eventually clicks the search button, the state variable within HomeScreen holds the current value of the field.
To recap, now you have a one-screen application that resembles Figure 4. This screen takes in user input and stores it. Next, you need to set up the results screen to display the items found and you also need a way to navigate to that screen when the user taps the search button.
Navigation
Now that the home screen is complete, you need to set up the search results screen. You first need a way to get from one screen to the other. To do this, you'll use a StackNavigator from the React Navigation library that you installed earlier. Essentially, you'll change the root of the application to a StackNavigator component instead of the HomeScreen component. Then, you configure the StackNavigator and tell it to load the home screen by default. Before doing that, let's create the results view that you'll eventually navigate to. Create a new folder called screens within your project directory. Inside that folder, create a new file called SearchResults.js. Let's leave that blank for now and head back to the index file.
Within the index file, import the new screen you just created. Go to the top of the file and under the last import statement, add the following.
import SearchResults from './screens/SearchResults';
You need to import this file so that you have a reference to that class when it comes time to send the user there. Next you need to configure the StackNavigator that you can use as the application root. To do this, go to the end of the HomeScreen class implementation and create the object.
const FlixSearchNav = StackNavigator({
    Home: {screen: HomeScreen},
    Results: {screen: SearchResults},
});
When you configure the StackNavigator you initialize routes. The first item you define in the list loads by default. Every item you list maps a key to a screen. You can use those keys to trigger navigation to the screen that corresponds to the key. You can also configure additional parameters at this point, but it isn't necessary for this example. Refer to the sidebar for more configuration options.
Now you need to replace the existing root passed to the AppRegistry with your newly created StackNavigator. Scroll to the bottom of the file and change the AppRegistry call to look like this:
AppRegistry.registerComponent('FlixSearch', () => FlixSearchNav);
The last step is to link the button press with a navigation event. When the user finishes typing a search term, the expectation is that the user presses the search button, some network interaction occurs, the application transitions to a new screen, and the corresponding results display. To start this process, you can modify the button component from Listing 2 to resemble the following:
<Button light block
    style={StyleSheet.flatten(styles.searchBtn)}
    onPress={() =>
        this.props.navigation.navigate('Results',
        {searchTerm: this.state.searchTerm})}>
    <Text>Search</Text>
</Button>
Notice the addition of the onPress event handler. You've told the program that when the user presses the button, you want to execute a function. The function you told it to execute is this.props.navigation.navigate(), which is a standard function you can use with this navigation library to transition screens. Notice that the first argument passed to the function call is Results. This is the key you defined previously when setting up the StackNavigator. It tells the application which new screen to send the user to. The second argument is an array of data. This is optional but for this example, you need to send the searchTerm to the results view for inclusion in the API call. At this point, your index file is completely finished. However, if you refresh your application in the simulator, you get an error. This is because SearchResults.js is an empty file and the application expects a React component. You'll configure that component in this next section.
Fetching Data Over the Network
Figure 5 depicts the search results view that you build in this section. This view takes in the search term, queries an API to find programming that features the actor the user searched for, and then formats them for display using a React Native ListView component. First, you'll set up the SearchResults.js file you created earlier. Initially, this class just contains the navigation bar at the top, the view title, and an empty container. Once you set up this base view and confirm that you can navigate from the HomeScreen to the SearchResults screen, you'll then build a custom ListView component to add to that view. Listing 4 illustrates how you should initially set up SearchResults.js for this example.
Listing 4: First iteration of SearchResults.js
import React, { Component } from 'react';
import {
    AppRegistry,
    StyleSheet,
    View
} from 'react-native';
import {StackNavigator} from 'react-navigation';

/** Need to import list view eventually */

export default class SearchResults extends Component {
    static navigationOptions = {
        title: 'Search Results',
        headerTitleStyle: {
            color: '#FFFFFF'
        },
        headerStyle: {
            backgroundColor: '#CA0000'
        },
        headerTintColor: '#FFFFFF'
    };

    render() {
        return (
            <View style={styles.container}>
                {/* Need a list view component here */}
            </View>
        );
    }
}

const styles = StyleSheet.create({
    container: {
        flex: 1,
        flexDirection: 'row',
        backgroundColor: '#FFFFFF',
    }
});
Let's take a closer look at Listing 4. First, notice the comment placeholders that refer to the list view. You replace these with the actual list view component after you construct it. Next, notice something new that you didn't see when working on the HomeScreen; a static variable called navigationOptions within the SearchResults class. This is a standard variable that comes packaged with the StackNavigator and is used explicitly for customizing the navigation bar for the current view. Notice that within the variable, you configure the view title, the color of the bar, the text color, and the tint of the back button. More customization options exist beyond what is shown here. Refer to the sidebar for more details.
At this point, the SearchResults class should contain a red navigation bar and a white view beneath it. Reload the application in the simulator, enter a search term, and press the search button. The application navigates to your newly created empty view. Now you're ready for the last piece of the puzzle: loading and displaying the results.
Create a new file within your components directory and name it SearchResultsList.js. Let's consider the requirements for this component before you dive into the code.
- Loading state: You want the view to have an initial loading state to indicate that it's currently fetching data over the network.
- ListView state: Once the API call has returned data, you want to transition from the loading state to a state that showcases the results in a list view.
- Function to fetch data: You need a function that formulates the API call by appending the search term to the base URL and then executes the call and retrieves the results.
- Data source: You need to maintain the data source for the list view within the class state so that when it changes, the list view sees the changes and renders on screen to display the results.
Listing 5 shows what the completed class setup looks like.
Listing 5: SearchResultsList.js
import React, { Component } from 'react';
import {
    AppRegistry,
    StyleSheet,
    ListView,
    Text,
    View,
    Image
} from 'react-native';

export default class SearchResultsList
extends Component {
    constructor(props) {
        super(props);
        this.state = {
            dataSource: new ListView.DataSource({
                rowHasChanged: (row1, row2) => row1 !== row2,
            }),
            loaded: false,
        };
    }

    componentDidMount() {
        this.fetchData();
    }

    /** function to query API and get results */
    fetchData() {
        /** API base URL with user search appended */
        var REQUEST_URL = 'http://netflixroulette.net/api/api.php?actor='
        + encodeURIComponent(this.props.searchTerm);

        fetch(REQUEST_URL)
            .then((response) => response.json())
            .then((responseData) => {
                /** update list view data source */
                this.setState({
                    dataSource: this.state.dataSource.cloneWithRows(responseData),
                    loaded: true,
                });
            })
        .done();
    }

    render() {
        /** load state determines view to render */
        if (!this.state.loaded) {
            return this.renderLoadingView();
        }

        /** if loading is false, show list */
        return (
            <ListView
                dataSource={this.state.dataSource}
                renderRow={this.renderRow}
                style={styles.listView}
             />
        );
    }

    /** view to display during network call */
    renderLoadingView() {
        return (
            <View style={styles.container}>
                <Text>
                    Loading entries...
                </Text>
            </View>
        );
    }

    /** function called per row in the list */
        renderRow(rowData) {
            return (
                /** UI code for one row in the list view */
                <View style={styles.container}>
                    <Image
                        source={{uri: rowData.poster}}
                        style={styles.thumbnail}
                    />
                <View style={styles.rightContainer}>
                    <Text style={styles.title}>
                        {rowData.show_title}
                    </Text>
                    <Text style={styles.year}>
                        {rowData.release_year}
                    </Text>
                    <Text numberOfLines={4}
                        style={styles.summary}>
                    {rowData.summary}</Text>
                <View style={styles.tagContainer}>
                    <View style={styles.categoryBubble}>
                        <Text style={styles.category}>
                            {rowData.category}
                        </Text>
                    </View>
                </View>
            </View>
        </View>
        );
    }
}

var styles = StyleSheet.create({
    container: {
        flex: 1,
        flexDirection: 'row',
        marginTop: 20,
        backgroundColor: '#FFFFFF',
    },
    rightContainer: {
        flex: 1,
        flexDirection: 'column',
        marginLeft: 8
    },
    title: {
        fontSize: 16,
        color: '#333333'
    },
    year: {
        fontSize: 12,
        color: '#999999',
        marginTop: 0
    },
    summary: {
        fontSize: 12,
        color: '#666666',
        marginTop: 6,
        marginRight:10
    },
    tagContainer: {
        flex: 1,
        flexDirection: 'row',
        marginTop: 10
    },
    categoryBubble: {
        height: 26,
        backgroundColor: '#EFF3F1',
        borderRadius: 20
    },
    category: {
        flex: -1,
        fontSize: 14,
        color: '#666666',
        margin:4,
        marginLeft:10,
        marginRight:10
    },
    thumbnail: {
        flex:-1,
        width: 100,
        height: 140,
        marginLeft: 10,
        resizeMode: 'contain',
        borderWidth:8,
        borderRadius:4,
        borderColor: '#F5F5F5'
    },
    listView: {
        backgroundColor: '#FFFFFF'
    },
});
Let's break it down from top to bottom. Take a look at the constructor for the class. Here, you initialize the class's default state. If you ever plan on changing the state of a class, it's always a good idea to set the default state within the constructor. Note that the default state contains two properties: dataSource and a Boolean called loaded. The dataSource property is assigned to a default ListView data source. Loaded tells the class whether the network request has concluded or not. In the initialization of that data source, notice a rowHasChanged function definition. This function tells the list view how to identify whether or not the row has changed. For the sake of this example, a row has changed if the current row is not the same as the previous row. In more complex projects, you may want to refresh the view if only a portion of the row data changes.
Next, notice a function called componentDidMount. This is a standard React Native lifecycle method that gets triggered as soon as the corresponding component is mounted. Updating the state within this method triggers a re-rendering. That's precisely what you want to do. By default, the loaded state of the component is false, meaning that the loading state view is displayed. Once the data is loaded, re-render the view to display the list view state. Because you trigger the data fetch within componentDidMount and that fetch, in-turn, updates the component's state, the desired affect is achieved.
The
componentDidMountis a standard React Native lifecycle method that gets triggered as a component is mounted. Updating the state within this method triggers a re-rendering of the corresponding view.
The next function is the data fetch method. You start by composing the URL that you query. The search term you passed to this view earlier now comes into play. You need to encode it and append it to the URL. Once ready, use the React Native Fetch API to execute the request. Once you receive a response, grab the data as JSON and then update the application state. In order to update the data source for the list view, you call cloneWithRows. By default, the data in the data source is immutable, so you can't modify it directly. The clone method takes in the new data and computes a diff for each row using the rowHasChanged method, so the ListView knows whether to re-render it or not. Additionally, at this point, you want to set the loaded state to true so that the render method shows the list view when it's triggered again.
In the render method, you have two different paths depending on the loading state. The renderLoadingView method adds a text component to the screen informing the user that the network call is in progress. If that method isn't called, the default return is executed and the list view displays. The list view has a property called renderRow, which points to a function also called renderRow. This function takes in data from the data source for a single row and returns the UI for that row. You essentially set up a row template that's dynamically populated based on the corresponding data for the row currently being constructed. If you want to have the movie title in the row's view, for instance, and the corresponding JSON field for that title is called show_title, you merely have to say {rowData.show_title} and the information displays. This is the crux of the setup for each row. The only thing not mentioned is the styling at the bottom of the file. These styles are an important part of the process and the views would be quite different from the depictions of Figure 5 without them. To learn more about the styles in React Native, refer to the sidebar.
You're almost done. Let's go back to the SearchResults.js file and add the list view component to the view. At the top of the file where the first comment is, import the file as follows:
import SearchResultsList from '../components/SearchResultsList';
Next, go into the render method, find the second comment, and add the following line:
<SearchResultsList searchTerm=
    {this.props.navigation.state.params.searchTerm}/>
At this point, you can refresh the application in your simulator, enter an actor's name, and hit the search button to see results. Keep in mind that you didn't handle fringe cases in this example. For instance, what happens if the API call returns no results? What happens if some of the data is missing for a show? What happens if the user doesn't fill in the search field before hitting search? These are all cases that could cause errors or crashes in the application. In a real-world application, you want to take special care in handling these situations.
Wrapping Up
Over the course of this article, you were able to get a glimpse of the potential of React Native. As it continues to gain popularity, I can see many developers and agencies adopting it into their toolset, opting for a more efficient and unified stack. To learn more about the technology and to get access to additional examples, be sure to visit the React Native website for full API documentation. The sidebars for this article have links to additional resources as well.
