


In my previous article (CODE Magazine, May/June 2017), I talked about how Microsoft is embracing open standards and technologies when it comes to Office development. This is a very welcome change. It means that our skills are portable and that developers new to Office development have an easier ramp to climb. I talked of one such open technology, connectors, in my previous article.
Connectors allow you to push information into Office 365. WebHooks, the focus of this article, are the reverse. They allow Office 365 to push information to you.
What Are WebHooks?
WebHooks are user-defined HTTP callbacks. The problem they intend to solve is “pushing” information to your custom applications. Push is an unusually complex problem to solve. We are used to server-based applications, such as Office 365 resources, to expose a REST API that you “pull” information from. In the pull situation, your application makes an HTTP call to find out if there is anything new. Pull works but has some distinct disadvantages. It's not responsive enough for real-time operations, such as chat. And more importantly, it puts a very high load on both your application and the server.
Push, on the other hand, would be nice, except Office 365 (or any other server-based resource) doesn't know where or who to push to. WebHook is an architectural pattern that aims to solve this issue.
Think of it this way: Rather than you circling your mailbox every 15 minutes, now your mailbox lets you know when a new mail has been dropped. That is quite an improvement.
Think of it this way, Rather than you circling your mailbox every 15 minutes, now your mailbox lets you know when a new mail has been dropped.
How Do WebHooks Work?
WebHooks push information to you. Specifically, WebHooks push to a REST endpoint that accepts a POST request. First you must specify your interest in receiving such information.
A WebHook starts with subscribing to an endpoint, where you express interest in learning about a specific notification and that you'd like to be informed at a specified endpoint that the server-based resource can push to. For instance, before Office 365 can send you a push, it needs to know where to send the push. If you want SharePoint to inform you that a list has changed, that means an HTTP POST from Office 365 will go to an endpoint that you expose.
Before this subscription is considered valid, the server-based resource verifies that there is indeed an endpoint listening. And if an endpoint is there, the subscription is created. In the future when the event occurs, this endpoint is called.
Of course, there are many other nuances to be considered. How long should such a notification subscription last? If the listener isn't around to receive a push request, should there be any retry logic? How quickly should the endpoint respond? Should secure information be sent in a push? How do you ensure that the server you created a subscription to is the one pushing the information?
Every platform implements things differently. In Office 365, the behavior is as follows:
- The subscription lasts for a maximum of six months.
- There's a retry logic that retires every five minutes.
- The endpoint is expected to respond with five seconds. This time is intentionally short to reduce load on Office 365 server resources and prevent DDoS scenarios.
- No secure information is sent. The WebHook notifies you that “something has changed.” You're expected to call back and get the nature of changes. This is a good implementation because you want the WebHook to be responsive, and you can only make it responsive if the request size is predictable. Also, not sending sensitive information on a push notification is more secure.
- The recipient of a push can be certain that the push came from the server subscribed to by providing a validation code during the subscription. This validation code is your shared secret between Office 365 and the service.
WebHooks Versus Remote Event Receivers
For those of you who've been developing in Office 365 for some time, you might be asking yourself: We already had a push-based mechanism called remote event receivers. How are WebHooks different? Well, there are some key differences.
- WebHooks have an inbuilt retry mechanism. This means that if your endpoint was down when a change happened, the WebHook tries to deliver the message again. Remote event receivers, on the other hand, ran the real risk of losing your messages. They weren't reliable.
- WebHooks don't call your endpoint immediately. Changes are batched, and the payload is small and predictable in size. There's less risk of your endpoint getting an HTTP overflow or simply being too busy to respond to a lot of changes. It allows you to offload heavy lifting to a queue, etc.
- WebHooks are more secure because no secure data is sent on the POST request. The actual request to get data is protected via standard SharePoint security.
- WebHooks cannot be synchronous/real-time. They don't allow cancel operations either.
- WebHooks is an open standard. Remote event receivers were extremely specific to SharePoint. In fact, WebHooks are already available on non-SharePoint resources in Office 365. You can check out WebHooks in SharePoint, OneDrive, and Outlook.
In short, WebHooks are the future of eventing on the Office dev platform.
The Subscription Sequence
Subscribing to push notifications, or WebHooks, can be achieved using the sequence covered in this next section.
First, send a POST request to the specific list you intend to receive push notifications from. The POST request must be sent to a URL such as /_api/web/lists('list-id')/subscriptions, and the payload looks like this:
{
    "resource": "https://xx.sharepoint.com/_api/web/lists('id')",
        "notificationUrl":"https://yourservice"
        "expirationDateTime":"max-6months-from-today"
}
The notificationUrl above is your way of saying: “If something happens to this list, please notify me at this URL.” Also note that you can't specify an expiration date and time greater than six months. You could, of course, write logic that checks your subscriptions and automatically renews them as necessary.
Second, SharePoint Online responds back with an HTTP POST back to your notificationUrl. This reply looks like this:
https://yourserviceurl/?validationToken={randomString}
Third, note that there's a validation token in this reply. This validation token is a GUID, and you're expected to reply to the request with the validation token within five seconds.
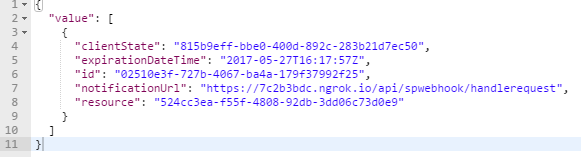
Fourth, once SharePoint online receives this validation token, it responds with an HTTP 201 created message that looks like this:
{
    "id":guid,
    "expirationDateTime": ".."
    "notificationUrl":"https://yourservice"
    "resource":guid
}
At this time, your WebHook subscription is created.
Checking and Deleting Subscriptions
You can check for existing WebHook subscriptions using simple REST API calls also.
To check for subscriptions on any list, issue a GET request to the /_api/web/lists('list-guid')/subscriptions URL. It responds back with an array that represents the existing subscriptions on that list. Note that, as usual, such a request must be accompanied by an access token in the header.
An example of this array can be seen in Figure 1.
In order to delete the subscription, issue a delete request to the following URL:
/_api/web/lists('list-guid')/subscriptions('subscription-guid')
Show Me Some Code
Before you dive into code, you need three things:
- An Office 365 subscription where you have tenant admin access
- Postman (https://www.getpostman.com) must be installed. You'll use postman to craft REST requests.
- Install ngrok (https://ngrok.com). In production scenarios, your WebHook endpoint should be callable by Office 365, that is, exposed to the Internet. This may not be very convenient for dev scenarios. Ngrok allows you to expose a REST URL on your dev computer to the Internet, temporarily using some duplex TCP channel magic.
There are two parts to the code example. One is Postman from where you'll make all the POST requests. The second is a listener WebAPI that acts as the notification URL.
Setting Up Postman in AzureAD
Let's start with the Postman portion. The Postman app needs to act as an AzureAD App. Go ahead and register it in AzureAD with the following details:
- Register as a WebApp.
- Set the redirect URI to
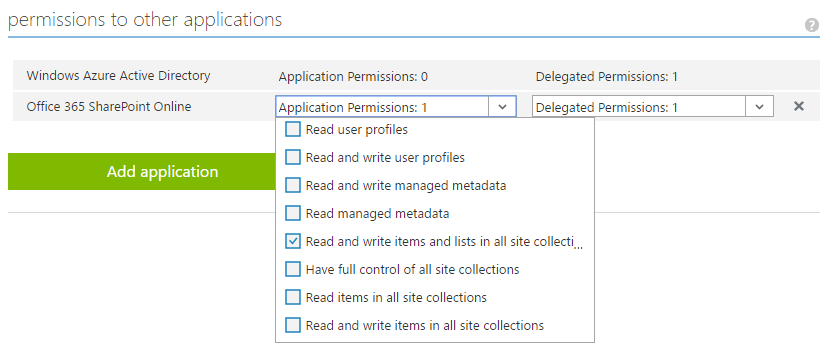
https://www.getpostman.com/oauth2/callback. - Grant permissions, as shown in Figure 2.
- Generate an
App Key/Secretfor one or two years, and keep it in Notepad for use afterward.
Authoring the WebHook Listener
Next, let's focus on the WebHook that listens to POST requests from a created subscription in Office 365. This is a matter of creating a simple ASPNET WebAPI and exposing it to the Internet using ngrok.
Create a new ASPNET 4.x WebAPI project with the options shown in Figure 3.
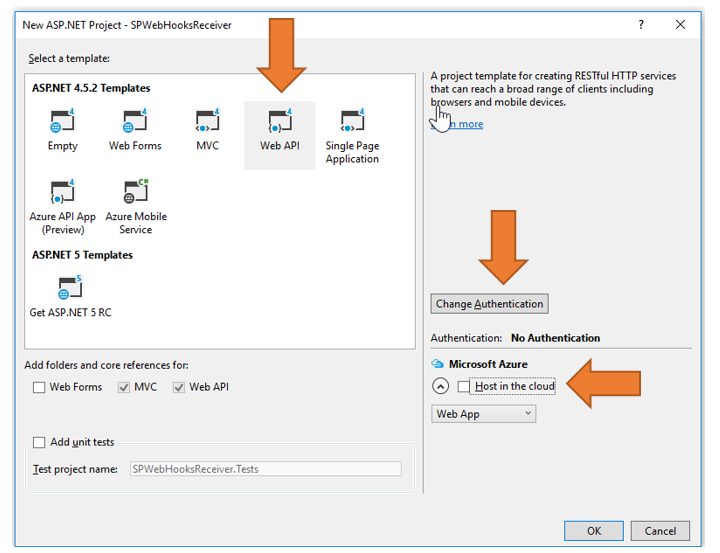
I called my project PWebHooksReceiver. In this project, add the Microsoft.Aspnet.WebApi.Tracing nuget package, and add two models representing SPWebHookNotification: the notification and the SPWebHookContent, which is the actual content of the notification. These can be seen in Listing 1 and Listing 2.
Listing 1: The SPWebHookNotification model
public class SPWebHookNotification
{
    public string SubscriptionId { get; set; }
    public string ClientState { get; set; }
    public string ExpirationDateTime { get; set; }
    public string Resource { get; set; }
    public string TenantId { get; set; }
    public string SiteUrl { get; set; }
    public string WebId { get; set; }
}
Listing 2: The SPWebHookContent model
public class SPWebHookContent
{
    public List<SPWebHookNotification> Value { get; set; }
}
In your web.config, make two changes, as shown in Figure 4.

The reason you're making these changes is twofold:
- The
WebHookclientstateis a secret that you share between Office365 and the API. This way, when you receive a POST request, you know where it came from. - The
trace enabled = "true"entry is for the diagnostic logs you'll push when you receive any notification from Office 365.
To support tracing, in your App_start\WebAPIConfig.cs class, in the Register method, add the following line of code:
config.EnableSystemDiagnosticsTracing();
Next, you're going to add a controller that handles of the logic and requests. Add a controller called SPWebHookController.cs. This is a WebAPI controller. In this controller, add a method decorated with the HttpPost attribute and call it HandleRequest. I've shown this method in Listing 3 with a lot of details omitted for now.
Listing 3: The SPWebHookController HandleRequest method (incomplete)
[HttpPost]
public HttpResponseMessage HandleRequest()
{
    HttpResponseMessage httpResponse =
        new HttpResponseMessage(HttpStatusCode.BadRequest);
    var traceWriter = Configuration.Services.GetTraceWriter();
    string validationToken = string.Empty;
    IEnumerable<string> clientStateHeader = new List<string>();
    string WebHookClientState =
        ConfigurationManager.AppSettings["WebHookclientstate"].ToString();

    if (Request.Headers.TryGetValues("ClientState", out clientStateHeader))
    {
        // details removed
    }

    return httpResponse;
}
As you can see, the code so far simply receives the request, reads the WebHookClientState that you'll use for validation subsequently, and initializes the trace writer.
All subsequent code will now go in the area marked // details removed portion of Listing 3.
First, make sure that this is a request you trust. This can be seen in the next code snippet.
string clientStateHeaderValue =
    clientStateHeader.FirstOrDefault() ?? string.Empty;
if (!string.IsNullOrEmpty(clientStateHeaderValue) &&
clientStateHeaderValue.Equals(WebHookClientState))
{
    // process message
}
else httpResponse = new HttpResponseMessage(HttpStatusCode.Forbidden);
In short, what you're doing here is looking at the clientStateHeaderValue variable, and if it doesn't match what you expect, you flag it as a forbidden request. This is the secret you'll send to Office 365 when you create a subscription.
Now that you have a valid message, let's process it. There can be two kinds of messages. There are those that are subscription messages, i.e., Office 365 telling you that the subscription was created. And there are those messages that are notification messages, telling you that something changed!
You can get the POST request body using the following code snippet:
var requestContent = Request.Content.ReadAsStringAsync().Result;
You can easily turn this into an object via JSON deserialization using the following lines of code:
var objNotification =
    JsonConvert.DeserializeObject<SPWebHookContent>(requestContent);
notification = objNotification.Value[0];
All that's left now is to write out trace messages informing you, during debugging, so you know what kind of message was received and when. These trace messages, plus some more diagnostic checks and the full listing for the HandleRequest method, can be seen in Listing 4.
Listing 4: The SPWebHookController HandleRequest method (complete)
[HttpPost]
public HttpResponseMessage HandleRequest()
{
    HttpResponseMessage httpResponse =
        new HttpResponseMessage(HttpStatusCode.BadRequest);
    var traceWriter = Configuration.Services.GetTraceWriter();
    string validationToken = string.Empty;
    IEnumerable<string> clientStateHeader = new List<string>();
    string WebHookClientState =
        ConfigurationManager.AppSettings["WebHookclientstate"].ToString();
    if (Request.Headers.TryGetValues("ClientState", out clientStateHeader))
    {
        string clientStateHeaderValue =
            clientStateHeader.FirstOrDefault() ?? string.Empty;

        if (!string.IsNullOrEmpty(clientStateHeaderValue) &&
        clientStateHeaderValue.Equals(WebHookClientState))
        {
            traceWriter.Trace(Request, "SPWebHooks", TraceLevel.Info,
            string.Format("Received client state: {0}", clientStateHeaderValue));

            var queryStringParams =
                HttpUtility.ParseQueryString(Request.RequestUri.Query);

            if (queryStringParams.AllKeys.Contains("validationtoken"))
            {
                httpResponse = new HttpResponseMessage(HttpStatusCode.OK);
                validationToken =
                    queryStringParams.GetValues("validationtoken")[0].ToString();
                httpResponse.Content = new StringContent(validationToken);
                traceWriter.Trace(Request, "SPWebHooks", TraceLevel.Info,
                    string.Format("Received validation token: {0}",
                        validationToken));
                return httpResponse;
            }
            else
            {
                var requestContent = Request.Content.ReadAsStringAsync().Result;

                if (!string.IsNullOrEmpty(requestContent))
                {
                    SPWebHookNotification notification = null;

                    try
                    {
                        var objNotification =
                        JsonConvert.DeserializeObject<SPWebHookContent>(requestContent);
                        notification = objNotification.Value[0];
                    }
                    catch (JsonException ex)
                    {
                        traceWriter.Trace(Request, "SPWebHooks", TraceLevel.Error,
                        string.Format(
                            "JSON deserialization error: {0}",
                                ex.InnerException));
                         return httpResponse;
                     }

                     if (notification != null)
                     {
                         Task.Factory.StartNew(() =>
                         {
                             traceWriter.Trace(Request, "SPWebHook Notification",
                                 TraceLevel.Info, string.Format(
                                     "Resource: {0}", notification.Resource));
                             traceWriter.Trace(Request, "SPWebHook Notification",
                                 TraceLevel.Info, string.Format("SubscriptionId: {0}",
                                     notification.SubscriptionId));
                             traceWriter.Trace(Request, "SPWebHook Notification",
                                 TraceLevel.Info, string.Format(
                                     "TenantId: {0}", notification.TenantId));
                             traceWriter.Trace(Request, "SPWebHook Notification",
                                 TraceLevel.Info, string.Format(
                                     "SiteUrl: {0}", notification.SiteUrl));
                             traceWriter.Trace(Request, "SPWebHook Notification",
                                 TraceLevel.Info, string.Format(
                                     "WebId: {0}", notification.WebId));
                             traceWriter.Trace(Request, "SPWebHook Notification",
                                 TraceLevel.Info,
                                 string.Format("ExpirationDateTime: {0}",
                                 notification.ExpirationDateTime));
                         });

                         httpResponse = new HttpResponseMessage(HttpStatusCode.OK);
                     }
                }
            }
        }
        else
        {
            httpResponse = new HttpResponseMessage(HttpStatusCode.Forbidden);
        }
    }
    return httpResponse;
}
Go ahead and start the project. Once the project's running, run the following on-command prompt to expose the local HTTP port 2233 (your port may be different) on the Internet using the command in the next snippet:
ngrok http2233 –host-header=localhost:2233
This should produce an output like that shown in Figure 5.
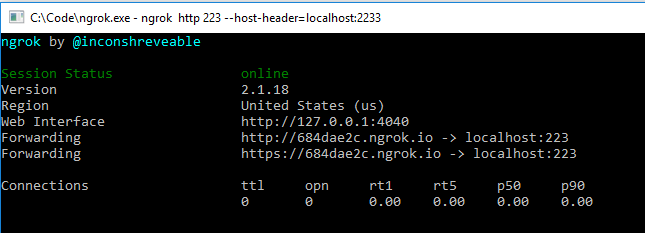
Ensure that ngrok and your project are running for the rest of the project in this article.
Using Postman to Create a Subscription
Earlier, you set up Postman as an application in Azure AD. It's now time to start using that application. You'll get an access token, get the List ID, and then start making POST requests to Office 365 endpoints to create the subscription.
First let's get the access token. Start Postman and under the Authorization tab, click on the Get New Access Token button, and fill in the details as shown in Figure 6.
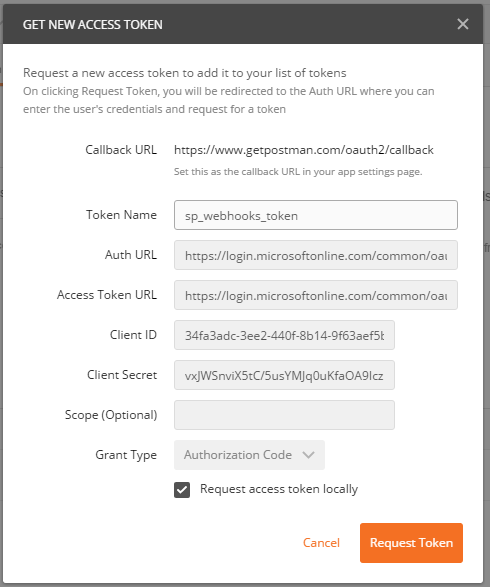
The specific details are unique to your app and tenant, but here's what you need to provide:
- CallBackURL:
https://www.getpostman.com/oauth2/callback - Token Name: sp_WebHooks_token
- AuthURL: (remember to replace the tenant name with your tenant name)
https://login.microsoftonline.com/common/oauth2/authorize?resource=https%3A%2F%2F[tenant].sharepoint.com - Client ID and Client Secret: This is per your Azure AD app registration
- Access Token URL:
https://login.microsoftonline.com/common/oauth2/token
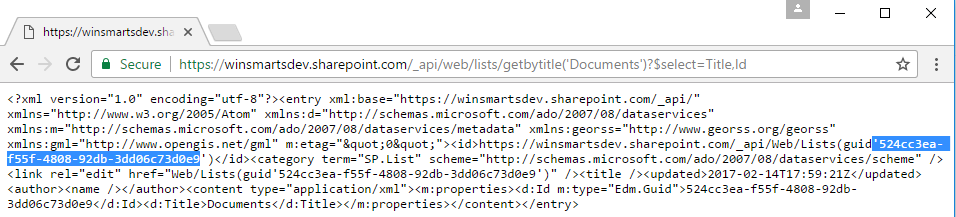
Next, let's get the List ID. This is quite simple. Create a list in a site collection that you'd like to set up subscriptions on, and visit the https://[tenant].sharepoint.com/_api/web/lists/getbytitle('Documents')?$select=Title,Id URL in the browser. This writes out a bunch of XML from which you can grab the List ID, as shown in Figure 7.
You're all set to make a WebHook subscription. Start Postman, and issue a POST request to https://[tenant].sharepoint.com/_api/web/lists('list-guid')/subscriptions.
Ensure that in Postman, you include the access token you got earlier while making the request, and also ensure that when you make the request, your WebAPI and ngrok are running.
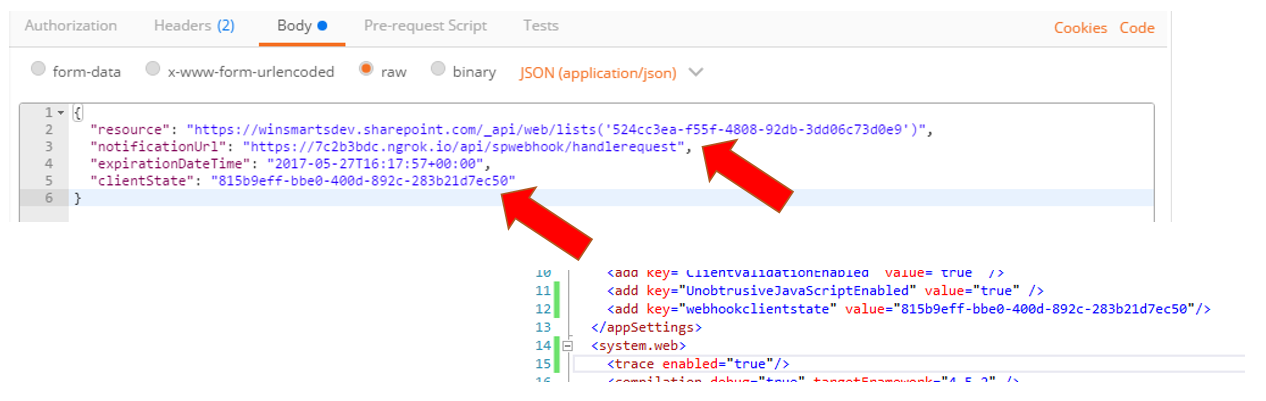
Your Postman headers should look similar to Figure 8.

Also, the body of the WebHook subscription should look like Figure 9. I've shown Figure 9 with the web.config because I want to illustrate that the clientState sent in the subscription request is the same as the WebHookclientState app setting you created in the web.config earlier. Also notice that the notificationURL is your ngrok Internet-exposed URL.
Go ahead and make this request. It should produce a response, as shown in Figure 10.
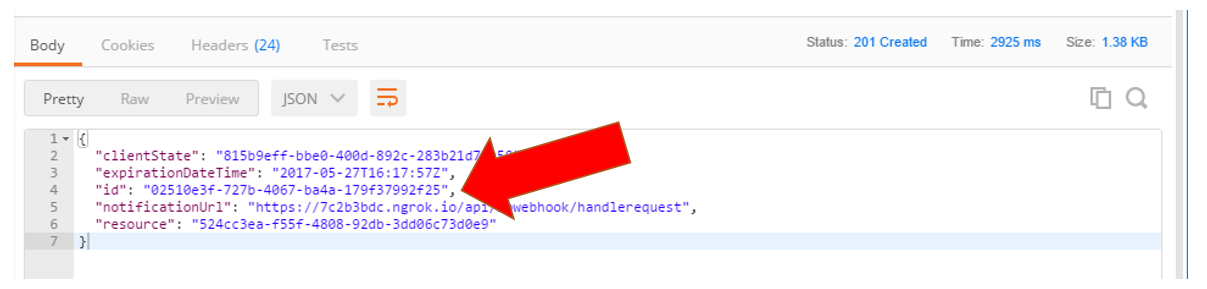
Note the big red arrow in Figure 10. That's your subscription ID. You're supposed to store that if you intend to delete or modify the subscription later.
Using the WebHook
At this point, your WebHook is set up. Your WebAPI and ngrok should still be running.
Now go ahead and setup a breakpoint in the HandleRequest method of your WebAPI as shown in Figure 11.

With the breakpoint set and the subscription created, go ahead and upload a document in the same document library you created the subscription in. It goes without saying that ngrok and your Web project must still be running.
Wait about five minutes and then verify that the breakpoint is hit, as shown in Figure 12.

This proves that SharePoint has successfully called the notification end point and that the WebHook is working successfully.
There are some interesting things you can play with now:
- Try taking more than five seconds to respond to this request. You can simulate this by letting the breakpoint sit for five seconds before continuing to debug. Verify that the same WebHook is called in a few minutes.
- Go ahead and delete the WebHook using the DELETE request, as described earlier in this article. Verify that you no longer get notifications.
Summary
WebHooks and Connectors are incredible. I always like to think of Office 365 applications as the difference between developing in Office 365, and developing with Office 365. WebHooks and Connectors are the system-level glue that allow my applications, whether they're inside Office 365 or work with Office 365, to act and behave as if they were written by Microsoft. It all feels like one unified product.
Best of all, it's all based on well-documented open standards. You too can call your skills portable, and your friends can play with Office 365 also. I'll talk of some more exciting developments in the Office 365 dev landscape in subsequent articles.
Until then, happy coding!
