


Let's be honest: The developer story from SharePoint on-premises to Office 365 hasn't been a straight line. There have been diversions into sandbox solutions, and we've dealt with the demons of add-ins and the marketplace. On this journey, we've gone from a poor dev story to a pretty compelling dev story today. And if you'd grown tired of keeping up with the changes, now is a very good time to give things a good second look.
The Office 365 dev story these days is a combination of many choices. You have to examine the problem as, “Do I want to integrate Office 365 into my application?” or “Do I want to integrate my application into Office 365?”
Both scenarios are equally valid.
If you wish to integrate Office 365 into your application, you have Microsoft Graph, Azure AD graph, and a deep understanding of Azure AD from a developer point of view to master. Those, paired with your existing skills, on any platform, allow you to integrate Office 365 into your application. For example, let's say that you have a website that sells services to consumers. You require that this website follow your corporate branding guidelines. You don't want to show the waffle menu on the top, or perhaps you don't care about any SharePoint functionality. However, you do care about showing calendars of the employees on your website. Using Microsoft Graph, you can easily tap into calendar information of the employees in your organization and display them on whatever form you consider appropriate on your highly branded website.
On the other hand, perhaps you want to surface your applications in various well-designated places in Office 365. For instance, you may want to surface up a bot or a tab in a team. Or maybe you want to surface up your application as a WebPart on a SharePoint site. Maybe you want to push information into a team.
Increasingly, I see these two camps as the defining paradigm of developing for Office 365. And both of these paradigms, thankfully, are being driven by well-accepted standards. There's a new propensity at Microsoft now to leverage community standards and open source. This means that your skills are portable. If you invest your time in Office 365, those skills are not worthless when you need to develop for something other than Office 365. And if you invest your time in other technologies, those skills are quite useful in Office 365.
There's a new propensity at Microsoft now to leverage community standards and open source. This means that your skills are portable.
In this article, I'll introduce one such open standard called WebHooks, followed by how Office365 can listen to your WebHooks via connectors. In Part 2 of this article, I'll talk about how you can subscribe to WebHooks that Office 365 exposes.
Think of it this way: Office 365 connectors are how your application can integrate into Office 365. And WebHooks exposed by Office 365 is how you can integrate Office 365 into your applications. Both techniques use the standard WebHooks technique. As I mentioned, WebHooks is an open standard tool, and Office 365 currently supports WebHooks only on lists, OneDrive, and mail, but this list will most likely grow.
What Are WebHooks?
WebHooks are user-defined HTTP callbacks. The problem they intend to solve is “pushing” information to you. Pushing is an unusually complex problem to solve. We've gotten so used to server-based applications, such as Office 365 resources, to expose a REST API that you “pull” information from. Your application makes an HTTP call to find out if there is anything new. Pull works, but has some distinct disadvantages. It's certainly not responsive enough for real-time operations, such as chat. And more importantly, it puts an undue load on both your application and the server.
Push, on the other hand would be nice, except, that Office 365 (or any server-based resource) doesn't know where or who to push to. WebHook is an architectural pattern that aims to solve this issue.
Put simply, if you want SharePoint to inform you that a list has changed, you need to get an HTTP POST from Office365 to an endpoint that you expose. Before Office365 can send you a push, it needs to know where to send the push. A WebHook starts with subscribing to an endpoint where you express that you're interested in learning about a specific notification, and that you'd like to be informed at such-and-such endpoint, which that server-based resource can push information or notifications to.
Before this subscription is considered valid, the server-based resource verifies that there's an endpoint listening. And if an endpoint is indeed there, the subscription is created. In the future when the event occurs, this endpoint is called.
Of course, there are many other nuances to be considered, such as how long should such a notification subscription last? If the listener isn't around to receive a push request, should there be any retry logic? How quickly should your endpoint respond? Should you send secure information in a push? How do you ensure that the server you created a subscription to is the one pushing the information?
Every platform implements things differently. In Office 365, the behavior is as follows:
- The subscription lasts for a maximum of six months.
- There is a retry logic built that retires every five minutes.
- Your endpoint is expected to respond within five seconds. This time is intentionally short to reduce load on Office 365 server resources and prevent DDoS scenarios.
- No secure information is sent and you're expected to call back and get the nature of changes. The WebHook simply notifies you that “something has changed.” This is a good implementation because you want the WebHook to be responsive, and you can only make it responsive if the request size is predictable. Also, not sending sensitive information on a push notification is more secure.
- You can be sure, as a recipient of a push, that the push came from who you subscribed to, by providing a validation code during your subscription. This validation code is your shared secret between Office 365 and your service.
Office 365 Connectors
At its heart, Office365 facilitates collaboration. Sure, there are tools like Word, Excel, etc. But the bottom line is that Office365 helps you manage information, and it helps you do so between teams. With that in mind, Microsoft introduced the concept of Office 365 Groups. A group is exactly what it sounds like: a number of people, a group, who want to work together. You create this group, and “hang” different things on the group.
For instance, a group can have a team site. In fact, modern team sites are backed by a group. The groups can have an email address and a shared inbox. But why stop there? They can also have a shared calendar, a shared OneNote notebook, planner etc. In fact, if you create a new group in Office 365 and you examine the top tab bar, you'll see these various things “hanging off” of the group. This can be seen in Figure 1.

Many useful and common tabs are already present. You can add more tabs, too, which is one way to surface up your applications inside Office 365, specifically applications targeted toward a particular group. Notice that a rather interesting tab is already present: Connectors.
Connectors is Office365's mechanism of allowing numerous third-party services to push information into an Office365 team. The idea is that the team sets up a subscription to a connector. There's so much information to stay on top of these days, such as tracking search results, Twitter feeds, news headlines, and so much more. Whenever the third-party has anything of value to contribute, it can push it into the team's user interface via this connector.
Setting Up the Out-of-the-Box Connector
Because connectors are aimed toward business users, setting one up is easy. It doesn't require you to write any code; a connector can be set up using point-and-click. Just visit the team within your Outlook site, and on the tab, look for the Connectors link. This can be seen in Figure 1.
When you click on the Connectors tab, you'll see a number of connectors to pick from. If any connectors are already configured, you'll see the configuration details of those specific connectors. One of the simplest connectors is the “Bing News” connector. Go ahead and click on it and configure it. You can see the dialog box in Figure 2.
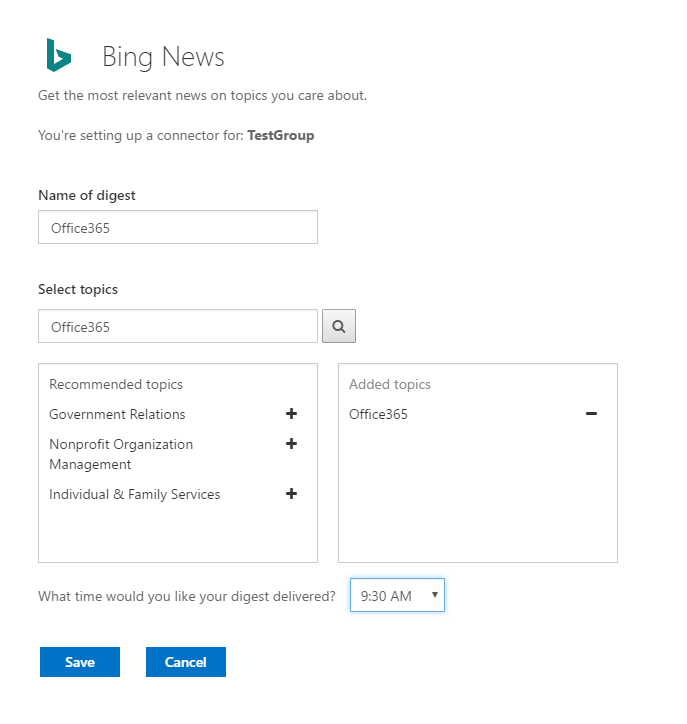
That's it. Hit Save and assuming that you have the permissions, the connector is set up. You'll start seeing the information pushed by this connector inside the team's inbox right away.
How Does It Work?
How does any connector work? Let's think of connectors generically. The overall flow of the application can be seen in Figure 3.

As you can see from Figure 3, when a user wishes to access any connector, they're presented with a simple HTML UI, usually a “Connect to Office 365” button. It doesn't have to look exactly like that, but consistency is good, so users know what to expect. The user clicks on that button and is prompted to grant access to the connector. Assuming the user has the rights, your app now gets a URL to which it can push information. These pushes are done using HTTP POST requests, and are sent as JSON objects in a specific schema. Office 365 connectors likes to call them JSON cards.
You may be thinking that this sounds pretty straightforward. Can you write your own connector? Yup. It's easy!
Using the Incoming WebHook Connector
Writing Office 365 connectors can be accomplished in two ways. If you wish to have a connector that pushes information into a single team, you can use the Incoming WebHook connector. This greatly simplifies the task of writing connectors. If you wish to have your connector reused across multiple teams, then you might as well write a “real” connector.
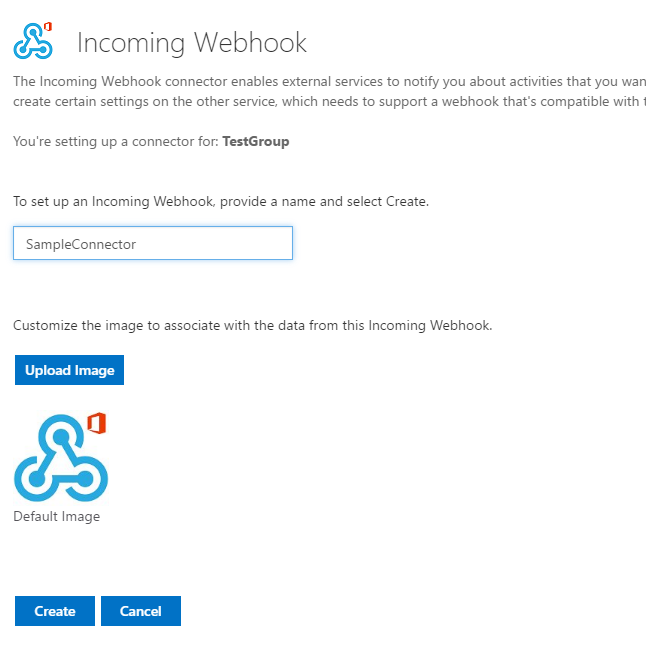
Let's first look at the process of using the Incoming WebHook connector. Creating an incoming WebHook is really easy. Just click on the Connectors tab under your team as shown in Figure 1, and look for Incoming WebHook. Click on it, and configure it, as shown in Figure 4.
When you click the “Create” button, you're given a long and complex URL, as shown in Figure 5.
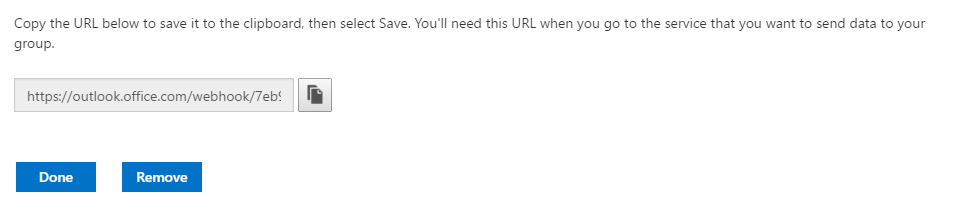
This URL is your key to pushing information out to the specified team. Copy and paste it into Notepad because you'll need it soon. Now to send a JSON card to your team via this newly configured incoming WebHook, all you need to do is send an HTTP POST message to the URL you got in the Incoming WebHook screen shown in Figure 5. You can do so using Fiddler, as can be seen in Figure 6.
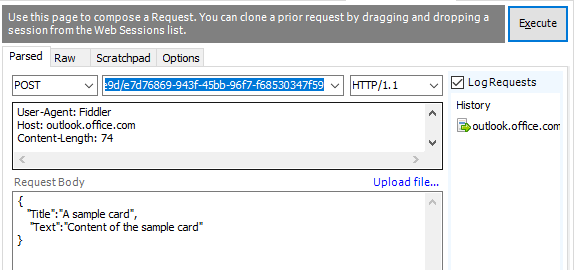
When you hit Execute on the request composing screen shown in Figure 6, Fiddler informs you that you were successful by sending an HTTP 200 status code. You'll see the information pop up in your team's page, as can be seen in Figure 7.

That was quite easy, wasn't it? Now all you need is some sort of process that sends a POST request to this endpoint whenever you want to inform the team of anything. Imagine a team of developers that gets a push notification on a successful build? Or a marketing team that gets informed of a new product release? Or a sales staff that gets informed of marketing leads ready to close and that are tied to your CRM system? You now have the power of keeping people informed. And it wasn't difficult at all.
But there is one small problem. Trying to re-use the same connector in multiple teams and having to set it up manually everywhere could mean a lot of manual work.
Writing a Real Connector
The Incoming WebHook connector works great if you're okay with setting up a connector manually in a team interested in the connector and then updating the service with the provided URLs. It doesn't work so well if you wish to scale to multiple teams. You want to write a “real” connector, one that can scale with minimal attention and effort. Perhaps you want to create something that you could even offer for sale in the marketplace. Or, at the very least, you want to create your Connect to Office 365 button, which the user can click on and be guided through a simple set up process.
It turns out that it's not very difficult to do. First, you need to register your connector at this URL: http://go.microsoft.com/fwlink/?linkid=780623. This page asks you to sign in using your Office 365 credentials and provides a simple user interface where you can register one or more connectors.
The form asks for a number of things. Most of them, such as name, logo etc., are self-explanatory, but the important ones are these:
- List the events supported by your connector. This is what the user will see. A single connector can support multiple events. For instance, your source control connector may have a separate event for successful or failed build. Perhaps the failed build could be set up differently, so it's obviously different from a successful build. Maybe you want all developers to see a failed build notification but a successful build notification could be ignored.
- Landing page for your users. This is where users will see the Connect to Office 365 button. Of course, you can choose to have a different user experience, but the general idea here is that users will have a choice about using your connector. Clicking on that link within the Office 365 teams/connectors tab takes the user to this landing page. On this page, the user is expected to configure the connector. For instance, a Twitter connector may ask for search terms or a connector for your garage door may ask you for the events you're interested in, such as “Garage door left open for > 15 minutes,” etc.
- Redirect URL: Once the connector is set up, Office 365 needs to communicate the endpoint to which you can push JSON cards. This endpoint URL is communicated to the Redirect URL. Your connector is expected to save this URL in a secure place.
Filling out this form and clicking the Save button gives you the HTML for the Connect to Office 365 button, as shown in Figure 8.
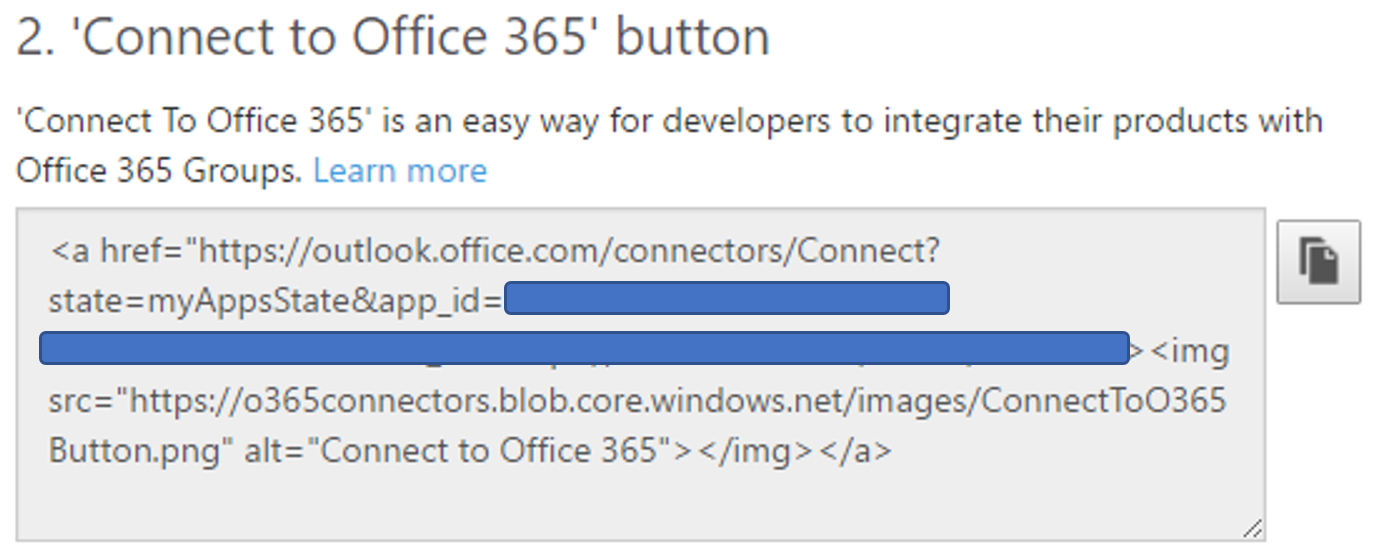
Copy and paste the HTML shown in Figure 8 onto the landing page URL within your application. For dev purposes, you can use localhost. However, if you choose to use the “Publish to store” option, which is a matter of clicking a button on your app registration page, you'll need to use a real URL.
The Connect to Office 365 Button
I've mentioned this button a few times. But what exactly does this button do? Clicking on this button asks the end user to authorize your connector to the Office 365 group. It does so by redirecting the user to the Redirect URL of the connector registration page that you set up in the last section. And when it does so, it passes the following information:
- state: An optional parameter that provides custom state information to the Redirect URL
- app_id: The identifier GUID for your application
- callback_url: The HTTPS Redirect URL for your connector registration
The Redirect URL, as I mentioned above, is a URL that your connector exposes. It receives the WebHook URL, which is the URL that you send JSON cards to. In addition to the Redirect URL, it can also get the state information, the group name to which you are connecting the connector, and any errors that may have occurred during the registration. For instance, if the user decides not to grant access to the connector, you'll get an access denied error, and you can then show the user an appropriate message.
Sending JSON Cards
Assuming that you've registered the connector, created a website with the Connect to Office 365 button and a website (or perhaps the same website), that serves as the HTTP Redirect URL, all you need to do next is to send the JSON cards to the WebHook URL.
The JSON card you need to send has to follow a specific schema. You can use the connect playground at https://connectplayground.azurewebsites.net to create JSON cards. You must follow this schema and you must send the JSON cards as HTTP POST requests. Also, if you wish to send any HTML, you have to encode it as markdown. Your post requests to the WebHook URL will be answered by numerous HTTP codes, such as these:
- 200: The request was successfully received and the update was posted.
- 400: Bad request, usually because the JSON schema was not followed.
- 404: Not found, the WebHook does not exist.
- 413: Payload too large (maximum size 5MB.)
- 429: Too many requests and you are being throttled.
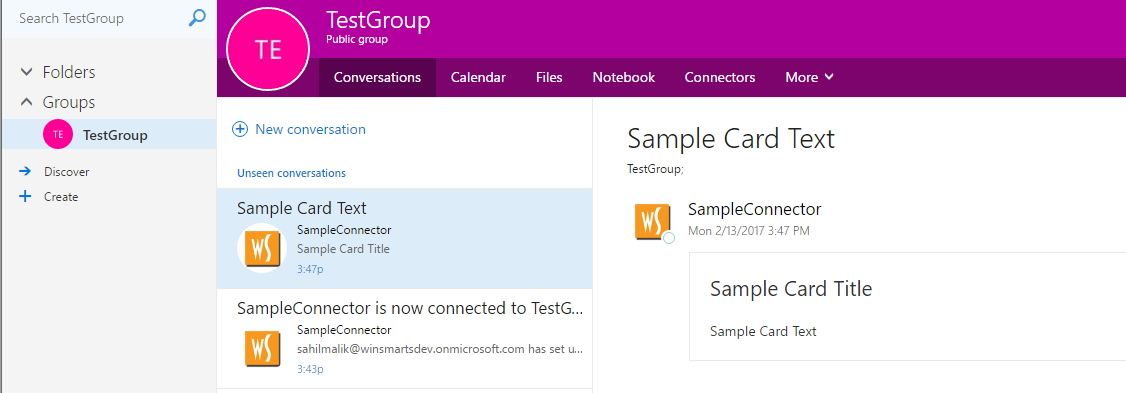
And that's basically it! As long as you send the request to the correct WebHook URL, along with a properly formatted JSON schema, you should see the cards appearing in the team's inbox, as can be seen in Figure 9. Effectively, the team is now “listening” to your push requests.
Summary
There are so many ways to develop for Office 365! Luckily, for the last couple of years, Microsoft has been on the path of open standards and open source. WebHooks is a technology that gained acceptance outside of Office 365 before Office 365 offered it as an option. You can use this technique to both listen to Office 365 WebHooks and be notified by Office365. Or, you can provide Office 365 with notifications at appropriate places via connectors.
In this article, I talked about pushing notifications into an Office 365 team via connectors. In this set up, you wrote a WebHook. In my next article, I'll demonstrate how Office 365 can push notifications to you, where Office 365 is the WebHook and you are the listener.
Until then, happy coding!
