


If you haven't already read the prior article, you should go back and do so. This article is going to add to the project created there. In the last article, you built a new Visual Studio project, added the files from the Angular Quick Start, and added a Product service to retrieve product data from a SQL Server table. This data was then displayed in an HTML table.
In this article, you'll add the appropriate HTML, Angular code, and Web API methods to allow the user to add, edit and, delete product data. To the Web API, you'll add POST, PUT, and DELETE methods, as well as a GET method to retrieve a single product. To the Angular product service, you'll add code to call each of these methods in response to user input.
Related Articles
Angular 4 Update
When I wrote the last article, the current version was Angular 2. Since then, Angular 4 has released. I included both the Angular 2 and 4 versions of this application in the download for the last article but I'll continue in this article using only the Angular 4 version. There aren't too many changes that must be made to upgrade from Angular 2 to Angular 4. Here are the changes I made:
- Installed TypeScript 2.2
- Created the project from scratch and downloaded the Angular Quick Start from http://bit.ly/29y5J9i.
- Followed the instructions for using Angular in Visual Studio located at https://angular.io/guide/visual-studio-2015.
- All files are now located under the
\srcfolder from the root of the Visual Studio project. - Eliminated the
moduleId: module.idfrom all components.
That's all the changes that had to be made. Everything else works just as I explained in the last article.
Add an Add Button to the Product List Page
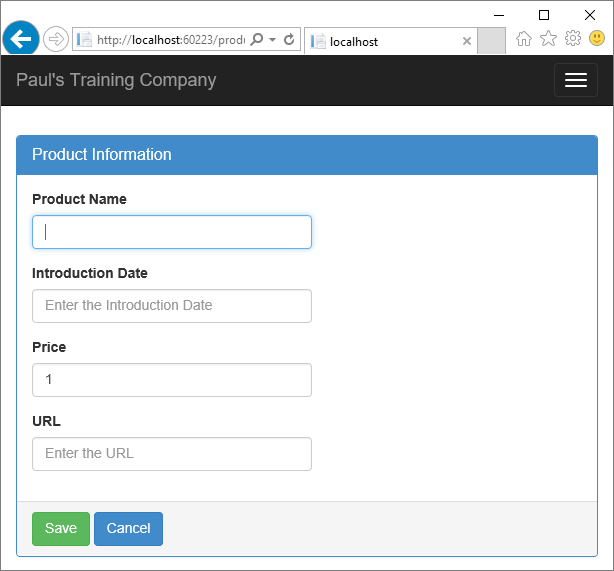
You need a way to get into an “add” mode in which a user may enter the data necessary to create a new product. You'll create the appropriate HTML (Figure 1) for this page soon, but first, let's create an Add button on the main product listing page to get to the product detail page.
Open the product-list.component.html file, and add the following HTML at the top of the page.
<div class="row">
  <div class="col-xs-12">
    <button class="btn btn-primary" (click)="add()">Add New Product</button>
  </div>
</div>
When you click on the Add New Product button, you want to route to the product detail page shown in Figure 1. In the click event for this button, a method in your Angular controller named Add is called. The Add function is going to use the Angular routing engine to redirect to the product detail page.
Update the Product List Component
Let's update the ProductListComponent class to perform this Add functionality. Open the product-list.component.ts file and add an import to allow you to use the routing service.
import { Router } from '@angular/router';
Locate the constructor in your ProductListComponent and add a second parameter to this constructor. This second parameter tells Angular to inject the Router service into the ProductListComponent.
constructor(
  private productService: ProductService,
  private router: Router) {
}
Create a new function named Add in your ProductListComponent class. This function calls the Navigate method of the injected router service. You pass an array to this Navigate function. The first array element is the route, which must match a route you create in your routing component. The second parameter is the value you wish to pass to the next component. Later in this article, you use this product detail page to display an existing product, so you will pass a real product ID as the second element. For now, because you're just adding a new product, pass a minus one (-1).
add() {
  this.router.navigate(['/productDetail', -1]);
}
Create Detail HTML
Create the product detail page shown in Figure 1. This detail page is used to both add and edit product data. Right mouse-click on the \src\app\product folder and select the Add > HTML page menu. Set the name to product-detail.component.html and click the OK button. The various input fields, shown in Figure 1, are placed into a bootstrap panel. Create the panel by first deleting all of the HTML in the new page you just added, and then typing in the following HTML.
<div class="panel panel-primary" *ngIf="product">
  <div class="panel-heading">
    <h1 class="panel-title">Product Information</h1>
  </div>
  <div class="panel-body">
  </div>
  <div class="panel-footer">
  </div>
</div>
The HTML above creates the panel control. Use the *ngIf directive to only display this panel once there's a valid product object. Now you just need to add a few more pieces of HTML within the body and the footer of the panel. Within the footer, add the Save and Cancel buttons. You haven't created the controller class to respond to the click events yet, but go ahead and add the appropriate method calls anyway.
<button class="btn btn-success" (click)="saveProduct()">Save</button>
<button class="btn btn-primary" (click)="goBack()">Cancel</button>
It's possible that the user won't enter the correct data. Therefore, you need to display error messages to the user. Add an area just below the <div class="panel-body"> to display error messages. No validation is going to be created in this article - you'll learn how to do that in the next article.
<div class="row" *ngIf="messages && messages.length">
  <div class="col-xs-12">
    <div class="alert alert-warning">
      <ul>
        <li *ngFor="let msg of messages">{{msg}}</li>
      </ul>
    </div>
  </div>
</div>
Within the <div> above is an unordered list that's used to display error messages. This whole row is only displayed if the Messages property is not null and the length of the Messages array is greater than zero. If there are messages in this Message array, they are each displayed as a single item in the list.
It's finally time to create the product input fields. Just below the error message area, add the various input fields, as shown in Listing 1. Each input field is bound to a product property in the controller for this page. Use the ngModel directive to bind each property of the product object to each input field.
Listing 1: Create the input fields and bind them to properties using the ngModel directive.
<div class="form-group">
  <label for="productName">Product Name</label>
  <input id="productName"
         type="text"
         class="form-control"
         autofocus="autofocus"
         placeholder="Enter the Product Name"
         title="Enter the Product Name" [(ngModel)]="product.productName" />
</div>
<div class="form-group">
  <label for="introductionDate">Introduction Date</label>
  <input id="introductionDate"
         type="text"
         class="form-control"
         placeholder="Enter the Introduction Date"
         title="Enter the Introduction Date" [(ngModel)]="product.introductionDate" />
</div>
<div class="form-group">
  <label for="price">Price</label>
  <input id="price"
         type="number"
         class="form-control"
         placeholder="Enter the Price"
         title="Enter the Price" [(ngModel)]="product.price" />
</div>
<div class="form-group">
  <label for="url">URL</label>
  <input id="url"
         type="url"
         class="form-control"
         placeholder="Enter the URL"
         title="Enter the URL" [(ngModel)]="product.url" />
</div>
Create Product Detail Component
Now that you have the product detail page created, you need a component to go along with it. Right mouse-click on the \src\app\product folder and select Add > TypeScript file. Set the name to product-detail.component.ts. Add the code shown in Listing 2. Remember from the HTML you created that you need a product object and an array of messages. Because you wish to have a valid product object when the HTML is rendered, you implement the OnInit interface. In the ngOnInit method, you create a new instance of a Product class and fill in a couple of the properties with default values. You are going to add more code to this class later in this article.
Listing 2: The start of the product detail component.
import { Component, OnInit } from "@angular/core";
import { Product } from "./product";

@Component({ templateUrl: "./product-detail.component.html" })

export class ProductDetailComponent implements OnInit {
  product: Product;
  messages: string[] = [];

  ngOnInit() {
    this.product = new Product();
    this.product.price = 1;
    this.product.url = "www.pdsa.com";
  }
}
Update Routing
Before you can navigate to the new product detail page, you need to inform the Angular routing service about this new detail component. Open the app-routing.module.ts file and add this new import statement at the top of this file:
import { ProductDetailComponent } from "./product/product-detail.component";
Add a new route object after the other routes you previously created. This new route object references the ProductDetailComponent. The path property is a little different because you want to pass a parameter named id to the ProductDetailComponent class. When you wish to add a new product, you aren't going to do anything with the value you're passing in, so just pass in a minus one. However, for editing, you'll pass in a valid product ID in order to retrieve the product record to edit.
const routes: Routes = [
  {
    path: 'productList',
    component: ProductListComponent
  },
  {
    path: 'productDetail/:id',
    component: ProductDetailComponent
  }
];
Update AppModule
In each input field in the product detail page, you reference the ngModel directive. However, you haven't told your Angular application that you need to use this directive. To register this directive, open the app.module.ts file and add an import statement for the FormsModule package. This package includes the ngModel directive.
import { FormsModule } from '@angular/forms';
While you are in this file, also add an import for your new ProductDetailComponent class you added.
import { ProductDetailComponent } from "./product/product-detail.component";
Add the FormsModule to the imports property on your NgModule decorator. Add the ProductDetailComponent to the declarations property on your NgModule decorator. Your NgModule decorator should now look like the following code.
@NgModule({
  imports: [BrowserModule, AppRoutingModule, HttpModule, FormsModule],
  declarations: [AppComponent, ProductListComponent, ProductDetailComponent],
  bootstrap: [AppComponent],
  providers: [ProductService]
})
Run the application, click on the Add New Product button, and the detail page appears. Nothing else works at this point, but verify that you can get to the detail page.
Handling Validation Exceptions on the Server
When you attempt to add or update a product, business rules can fail because the user didn't fill out the fields correctly. For instance, the product name is a required field, but if the user doesn't fill in a product name, the ProductName property gets passed to the server as a blank string. If you attempt to add this product to the database table, the code generated by the Entity Framework will raise a DbEntityValidationException exception.
If this type of exception is thrown, take the validation errors and bundle them into a ModelStateDictionary object. This dictionary object is passed back to the client by returning the BadRequest method with the dictionary object as the payload. To build the ModelStateDictionary object, you must iterate over the collection of validation errors contained in the DbEntityValidationException object.
Open the ProductController.cs file and add a using statement at the top of the file. One note on this using statement: The ModelStateDictionary used by the Web API is different from the one used by MVC controllers. Make sure you're using the ModelStateDictionary class from this namespace and not the one used by MVC.
using System.Web.Http.ModelBinding;
Next, add the method shown in Listing 3 to your ProductController class. This method is called from both the POST and PUT methods if any validation errors occur when adding or updating the product data.
Listing 3: Add a method to convert validation errors into a Model State Dictionary.
protected ModelStateDictionary ValidationErrorsToMessages(DbEntityValidationException ex)
{
    ModelStateDictionary ret = new ModelStateDictionary();

    foreach (DbEntityValidationResult result in ex.EntityValidationErrors)
    {
        foreach (DbValidationError item in result.ValidationErrors)
        {
            ret.AddModelError(item.PropertyName, item.ErrorMessage);
        }
    }

    return ret;
}
Add a POST Method in the Controller
An HTTP POST verb is used to inform the server that the data sent from the client is to be added to your underlying data store. In the POST method, you're going to write in your ProductController class attempts to add the product data. However, either a validation exception or a database exception can be thrown. Therefore, it's important to wrap calls to the Entity Framework within a C# try/catch structure. Before writing the POST method, add a using statement so you can use the Product class from the Entity Framework.
using ProductApp.Models;
Write the POST method, shown in Listing 4, to accept a Product object from your Angular client code. The POST method creates a new instance of the Entity Framework's DbContext object, called ProductDB. The new product object is added to the Products collection, then the SaveChanges method is invoked. If the product is successfully added to the SQL Server table, return a status code of 201 by calling the Created method. If a validation exception occurs, then a status code of 400 is returned by calling BadRequest and passing in the ModelStateDictionary object created with the call to the ValidationErrorsToMessages method. If any other exception occurs, a status of 500 is returned to the client.
Listing 4: The Post method adds a new product or returns a set of validation errors.
[HttpPost]
public IHttpActionResult Post(Product product)
{
    IHttpActionResult ret = null;
    ProductDB db = null;

    try
    {
        db = new ProductDB();

        // Insert the new entity
        db.Products.Add(product);
        db.SaveChanges();

        ret = Created<Product>(Request.RequestUri + product.ProductId.ToString(), product);
    }
    catch (DbEntityValidationException ex)
    {
        ret = BadRequest(ValidationErrorsToMessages(ex));
    }
    catch (Exception ex)
    {
        ret = InternalServerError(ex);
    }

    return ret;
}
Modify the Product Service to Add a Product
Now that you have a POST Web API method to which you can send new product data, write the code in the ProductService class to call this POST method. Open the product.service.ts file and import two new classes; Headers and RequestOptions from the @angular/http library that you already have at the top of this file. These two new classes are needed to call the Web API method.
import { Http, Response, Headers, RequestOptions } from '@angular/http';
Add an addProduct method to this class to pass a new product object from the client to the POST method of the ProductController class. When you post data, as opposed to getting data, set the content type as JSON data. You do this by creating a new Headers object and setting the Content-Type property to application/json. Create a RequestOptions object and set the headers property to this new Headers object you created. Next, call the POST method on the HTTP service passing in the product object and the RequestOptions object.
addProduct(product: Product):
  Observable<Product> {
    let headers = new Headers({'Content-Type': 'application/json'});
    let options = new RequestOptions({headers: headers});
    return this.http.post(this.url, product, options)
      .map(this.extractData)
      .catch(this.handleError);
}
Check for Validation Errors
One of three things can happen when you call the POST method: one, the data will be successfully added to the back-end database table; two, a set of validation errors is returned via a 400 error; or three, you may get a general exception, in which case, a 500 error is sent back. When you wrote the handleError method, you handled a 404 and a 500 error, but you didn't account for a 400. Add a new case statement to handle a 400 in the handleError method.
case 400:  // Model State Error
  let valErrors = error.json().modelState;
  for (var key in valErrors) {
    for (var i = 0; i < valErrors[key].length; i++) {
      errors.push(valErrors[key][i]);
    }
  }
  break;
In this new case statement, retrieve the modelState property and loop through all the key values and retrieve the message from the properties returned. Each of these messages is pushed onto the errors array, which is then sent back to the caller via the Observable.throw method.
Modify Product Detail Component
It's now time to call the addProduct method in the product service class by writing code in the ProductDetailComponent class. Add three new import statements at the top of the product-detail.component.ts file.
import { ActivatedRoute, Params } from '@angular/router';
import { Location } from '@angular/common';
import { ProductService } from "./product.service";
The ActivatedRoute and Params services are needed to work with the ID parameter you passed in to this component. The parameter is not used for the add method, but will be used shortly for updating a product. The Location service is used to navigate back from the detail page to the list page.
Add a constructor to the ProductDetailComponent class. This constructor is injected with the ProductService class you wrote. The ActivatedRoute and the Location services are injected by Angular as well.
constructor(
  private productService: ProductService,
  private route: ActivatedRoute,
  private location: Location
) { }
Add a method to allow the user to go back to the previous page if they click on the cancel button. This method is also going to be called if a product is successfully added.
goBack() {
  this.location.back();
}
Add a method to your class named handleErrors. This method is called if the call to the addProduct in the Product Service fails. In this method, you loop through the string array of errors and add them to the messages property.
private handleErrors(errors: any) {
  this.messages = [];
  for (let msg of errors) {
    this.messages.push(msg);
  }
}
There are three methods you're eventually going to need in this component: saveProduct, addProduct, and updateProduct. You're going to write the updateProduct method soon in this article, but for now, go ahead and add a stub for the function.
private updateProduct(product: Product) {
}
The addProduct method is responsible for calling the addProduct method you just created in the ProductService class. As you can see, if this call is successful, the goBack method is called in order to return to the product list page so you can see that the new product has been added.
private addProduct(product: Product) {
  this.productService.addProduct(product).subscribe(() => this.goBack(),
  errors => this.handleErrors(errors));
}
The saveProduct method is called from the HTML button you added earlier on the product detail page. This method checks to see if the productId property of the product object is null or not. If this value is not null, then the updateProduct method is called. If this value is null, then call the addProduct method.
saveProduct() {
  if (this.product) {
    if (this.product.productId) {
      this.updateProduct(this.product);
    }
    else {
      this.addProduct(this.product);
    }
  }
}
See the Validation Errors
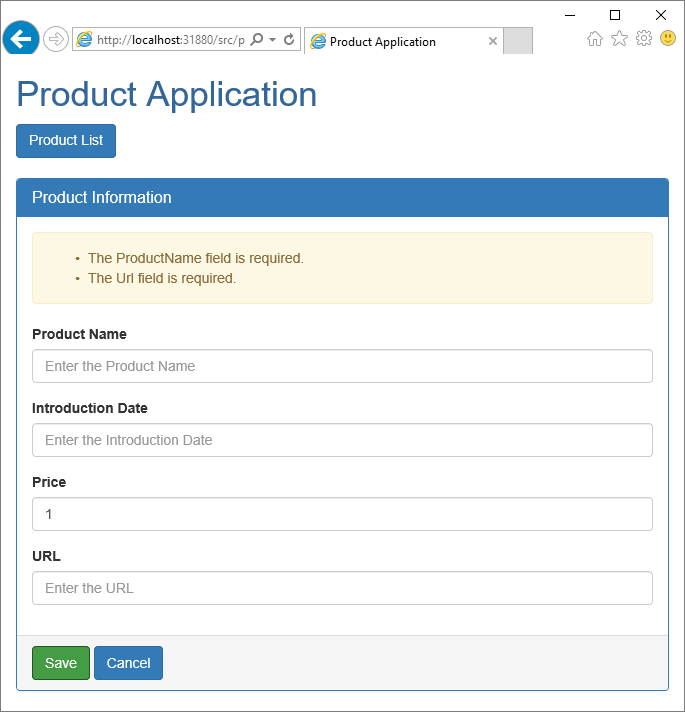
Run the application and click on the Add New Product button. Immediately click on the Save button and you should see a set of validation errors appear on the screen, as shown in Figure 2. NOTE: Since I wrote the last article, I decided it would be better to have all fields on the Product table defined as NOT NULL instead of just the ProductName field. Please make the appropriate adjustments on your Product table.
Add a New Product
Now, go ahead and add some good data for the product. Click the Save button and you should be redirected back to the list page where you'll see the new product you just added within the list.
Get a Single Product
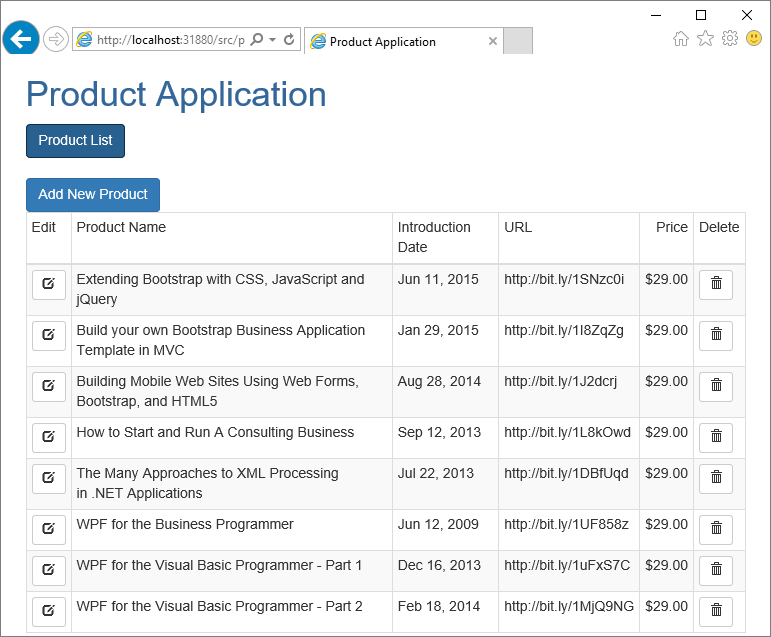
Now that the add functionality is working, you'll add the ability for the user to update a product. To update a product, you must first retrieve all of the product data from the server. Add an Edit button on each row of the product HTML table, as shown in Figure 3. When the user clicks on this Edit button, call the Web API on the server to retrieve the full product record for editing. This ensures that you're getting the latest product data.
Add GET to Controller
To retrieve a single product, add a GET method to your ProductController class. This GET method is different from the other one in this class in that it accepts a product ID of the product you wish to retrieve. Open your ProductController.cs file and add the new GET method shown in Listing 5.
Listing 5: Use the Find method to locate a specific product based on the primary key passed into the Get method.
[HttpGet]
public IHttpActionResult Get(int id)
{
    IHttpActionResult ret;
    ProductDB db = new ProductDB();
    Product product = new Product();

    product = db.Products.Find(id);
    if (product != null)
    {
        ret = Ok(product);
    }
    else
    {
        ret = NotFound();
    }

    return ret;
}
Add GET to Angular Product Service
Now that you have the Web API method created, write a getProduct method in the ProductService component. Open the product.service.ts file and add the following method.
getProduct(id: number): Observable<Product> {
  let url = this.url + "/" + id;
  return this.http.get(url)
    .map(response => response.json() as Product)
    .catch(this.handleError);
}
This method builds a URL that looks like the following: api/productApi/2. The number 2 on the end is what gets passed to the ID parameter in the GET method in your ProductController.
Add a Select Button to HTML Table
As you saw in Figure 3, you need an Edit column on your HTML table. Open the product-list.component.html file and insert a new <td> element within the <thead> element.
<td>Edit</td>
Move down to the <tbody> element and insert a new <td> element in the same position.
<td>
  <button class="btn btn-default btn-sm" (click)="selectProduct(product.productId)">
    <i class="glyphicon glyphicon-edit"></i>
  </button>
</td>
Modify the Product List Component
The click event on this button calls a method named selectProduct. Code in the product ID to the call of this method to pass the ID's value to the detail page so it can load the product data associated with that ID. Add the selectProduct function to the ProductListComponent class by writing the code below. This function calls the navigate function and passes the ID to the product detail page.
selectProduct(id: number) {
  this.router.navigate(['/productDetail', id]);
}
Retrieve a Passed Parameter
Modify the ngOnInit method in the ProductDetailComponent to handle an ID parameter being passed to this controller. When you created the add functionality earlier, you didn't do anything with the parameter that was passed. Now, because you're passing an ID to be edited, use that ID to call the getProduct method in the product service to retrieve the product. Open the product-detail.component.ts file and modify the ngOnInit function to look like Listing 6.
Listing 6: Modify the ngOnInit method to retrieve a specific product from the server.
ngOnInit() {
  this.route.params.forEach((params: Params) => {
    if (params['id'] !== undefined) {
      if (params['id'] != "-1") {
        this.productService.getProduct(params['id']).subscribe(
          product => this.product = product,
          errors => this.handleErrors(errors));
      }
      else {
        this.product = new Product();
        this.product.price = 1;
        this.product.url = "www.pdsa.com";
      }
    }
  });
}
The ngOnInit method loops through the route.params array and retrieves a Params object. Check to see if the id parameter is defined on that Params object. If the id value exists, check that value to see if it's equal to a -1. If so, then you're adding a product. If the value is anything else, then it's a valid product ID. Call the getProduct method on the product service to retrieve a single product object. Run the application and click on the Edit button. If you did everything correctly, you should see product data in all the input fields.
Update a Product
Now that you have the current product data displayed in the input fields, the user may update them. To update a product, you must write a few more pieces of code. First, create a PUT method in the Web API controller. Second, add an updateProduct method in the ProductService class. Third, modify the updateProduct method in the ProductDetailComponent to call the product service.
Add a PUT Method in Controller
Open the ProductController.cs file and add the code shown in Listing 7. This method is very similar to the POST method in that it uses the Entity Framework to modify the Product table. If the product data is able to be updated successfully, a status code of 200 is returned by calling the OK method. If an exception occurs, then either a 400 or a 500 status code is returned based on what type of exception is thrown when attempting to update the table.
Listing 7: The Put method allows you to update a product.
[HttpPut()]
public IHttpActionResult Put(int id, Product product)
{
    IHttpActionResult ret = null;
    ProductDB db = null;

    try
    {
        db = new ProductDB();

        // Update the entity
        db.Entry(product).State = EntityState.Modified;
        db.SaveChanges();

        ret = Ok(product);
    }
    catch (DbEntityValidationException ex)
    {
        ret = BadRequest(ValidationErrorsToMessages(ex));
    }
    catch (Exception ex)
    {
        ret = InternalServerError(ex);
    }

    return ret;
}
Add an Update Method to Product Service
Add a method named updateProduct to your Angular product service class. This method is similar to the addProduct method in that you must set the headers to pass to the PUT method. The URL passed to the http.put method is different from the POST method, as you add the productId value to the URL.
updateProduct(product: Product): Observable<Product> {
  let headers = new Headers({'Content-Type': 'application/json'});
  let options = new RequestOptions({headers: headers});
  return this.http.put(this.url + "/" + product.productId, product, options)
    .map(this.extractData)
    .catch(this.handleError);
}
Modify the Update Method in the Product Detail Component
Open the product-detail.component.ts file and modify the updateProduct method to call the updateProduct method in the product service. As you did in the addProduct method, if the call is successful, call the goBack() method to return to the HTML product list to show that the updates have taken place.
updateProduct(product: Product) {
  this.productService.updateProduct(product).subscribe(() => this.goBack(),
  errors => this.handleErrors(errors));
}
Delete a Product
The last piece of functionality to add to your product page is the ability to delete a product. To add this functionality, you need to perform a few steps. First, add a DELETE method to the Web API controller. Second, add a deleteProduct method to the Angular product service. Third, add a Delete button to each row of the product HTML table. Lastly, add a deleteProduct method in the product list component to call the deleteProduct method in the product service class.
Add a DELETE Method to the Web API Controller
Add a DELETE method to your ProductController to which you pass in the product ID to delete. Open the ProductController.cs file and add the DELETE method shown in Listing 8.
Listing 8: The Delete method first locates the product to delete, then removes it from the database.
[HttpDelete()]
public IHttpActionResult Delete(int id)
{
    IHttpActionResult ret = null;
    ProductDB db = null;

    try
    {
        db = new ProductDB();

        // Get the product
        Product product = db.Products.Find(id);

        // Delete the product
        db.Products.Remove(product);
        db.SaveChanges();

        ret = Ok(product);
    }
    catch (Exception ex)
    {
        ret = InternalServerError(ex);

    }

    return ret;
}
Add a DELETE Method to the Product Service
Add a method to your Angular product service to call the DELETE method in the Web API. Open the product.service.ts file and add the deleteProduct method shown below. The http.delete method expects you to pass a URL with a single ID parameter that's the primary key of the record you wish to delete.
deleteProduct(id: number): Observable<Product> {
  return this.http.delete(this.url + "/" + id)
    .map(() => null)
    .catch(this.handleError);
}
Add a Delete Button to the HTML Table
As you saw in Figure 3, you need to add a Delete column to your HTML table. Open the product-list.component.html file and insert a new <td> element within the <thead> element. Make this the last element in the <thead> element.
<td>Delete</td>
Add a <td> as the very last element in the <tbody> tag as well. Add a button with a click event that calls a method in your ProductListComponent class. Pass the current product ID in the table to this method.
<td>
  <button class="btn btn-default btn-sm" (click)="deleteProduct(product.productId)">
    <i class="glyphicon glyphicon-trash"></i>
  </button>
</td>
Add a DELETE Method in the List Component
Now that you have a button to call a deleteProduct method, go ahead and add that method. Open the product-list.component.ts file and add the code shown below.
deleteProduct(id: number) {
  if (confirm("Delete this product?")) {
    this.productService.deleteProduct(id).subscribe(() => this.getProducts(),
    errors => this.handleErrors(errors));
  }
}
This method first confirms with the user that they really wish to delete this product. If they respond affirmatively, the deleteProduct method on the Angular product service is called. If the deletion is successful, the getProducts method is called to refresh the collection of products from the server and redisplay the list of products.
Summary
In this article, you added a detail page to add new, or modify existing, product data. A new route was added to navigate to this detail page. A new component was created to handle the processing of new and existing product data. You also created POST, PUT, and DELETE methods in your Web API controller. The appropriate code to handle all this modification of product data was added to the Angular product service and component classes. You also saw how to handle validation errors returned from the server. In the next article, you'll learn to validate product data on the client-side using Angular.
