


In the eighteen years that I've been doing Web development, a lot has changed. We started out creating HTML pages to present static information to our users. We then used classic ASP to get database data and incorporate that into our pages. To use both of these technologies, we had to know a lot about HTML, CSS, and JavaScript. Along came .NET and we started rendering everything on the server-side. We forgot a lot about HTML, CSS, and JavaScript as Web Forms wrapped up a lot of that for us. Web Forms' architecture closely mimicked the way developers created desktop applications. This was great for helping developers move to the Web, but unfortunately hid a lot of the power of the Web, and also tended to be a little slow.
Related Articles
Web developers were demanding that Microsoft get back to the roots of HTTP and HTML, and thus MVC was invented. This technology was very different from Web Forms, but was more closely aligned with how the Web worked. In order to use MVC, you had to get back to your roots of HTML, CSS, JavaScript, and jQuery. Most developers using MVC were still doing a lot of server-side rendering and this meant a lot of post backs, which also still slowed down the user experience.
In my last three articles for CODE Magazine, I introduced you to a pure HTML page that allowed you to list, add, edit, and delete data using the Web API, jQuery, and JavaScript. As you have seen from these articles, this page is very fast, much faster than either Web Forms or MVC's server-side rendering. Unfortunately, the code we've written leaves a little bit to be desired. There are a couple of things we can do to make our code better; namely, JavaScript closures and HTML templating. These two technologies are used extensively in AngularJS, which is a client-side framework that is very popular for Web development today.
In this article, you'll learn to wrap your JavaScript functions and variables into a JavaScript closure. In addition, you'll learn to use mustache.js to create HTML templates and eliminate the coding of HTML in JavaScript. By learning these techniques, you will be that much closer to moving to Angular. When you begin to use Angular you will see a performance gain in your Web pages. This is due to less post-backs and less bytes transferred across the network. There are many other benefits as well, and I will explore these in the next articles.
Introduction to JavaScript Closures
The first step in getting to Angular is to learn about JavaScript closures. Think of a JavaScript closure like a class in an OOP language. Within this closure, you can have private variables, private functions and public functions. To illustrate, let's take the HTML page shown in Figure 1 and the JavaScript to load the HTML table shown in Listing 1 and wrap that up into a closure.
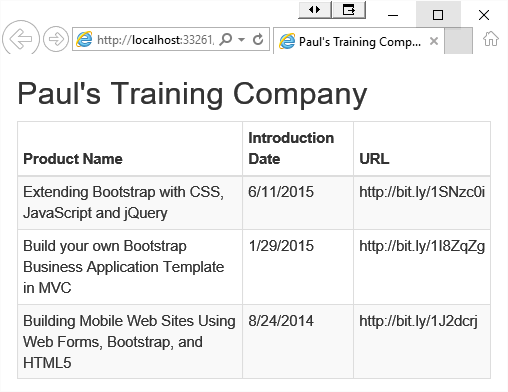
The portion of this page you'll be interacting with is the <table> element. This element is shown below.
<table id="productTable"
       class="table table-bordered
              table-condensed table-striped">
    <thead>
        <tr>
            <th>Product Name</th>
            <th>Introduction Date</th>
            <th>URL</th>
        </tr>
    </thead>
    <tbody></tbody>
</table>
In Listing 1 there are three main components.
Listing 1: A normal JavaScript function to load a table
<script>
    $(document).ready(function () {
        productList();
    });

    var products = [];

    function productTableBuild() {
        for (var i = 0; i < products.length; i++) {
            $("#productTable tbody").append(
                "<tr>" +
                    "<td>" +
                        products[i].ProductName +
                    "</td>" +
                    "<td>" +
                        products[i].IntroductionDate +
                    "</td>" +
                    "<td>" +
                        products[i].Url +
                    "</td>" +
                "</tr>");
        }
    }

    function productList() {
        // Add data to products variable
        products = [
            {
                ProductId: 1,
                ProductName: 'Extending Bootstrap with
                    CSS, JavaScript and jQuery',
                IntroductionDate: "6/11/2015",
                Url: 'http://bit.ly/1SNzc0i'
            },
            {
                ProductId: 2,
                ProductName: 'Build your own Bootstrap
                    Business Application Template in MVC',
                IntroductionDate: "1/29/2015",
                Url: 'http://bit.ly/1I8ZqZg'
            },
            {
                ProductId: 3,
                ProductName: 'Building Mobile Web Sites
                    Using Web Forms, Bootstrap, and HTML5',
                IntroductionDate: "8/24/2014",
                Url: 'http://bit.ly/1J2dcrj'
            }
        ];

        productTableBuild();
    }
</script>
There's a variable called products that holds the collection of product data and there's a function called productTableBuild() and a function called productList(). Of these three things, only productList() needs to be public. The other items should be hidden from the global scope of the page. This is where a closure works well. To create a closure, wrap all your variables and functions contained within the <script> tags into another function, as shown in the code snippet below.
var controller = (function () {
    // Add your private functions & variables
})();
The wrapper that you're creating is called an Immediately-Invoked Function Expression, commonly known as an IIFE. An IIFE is a design pattern that creates a scope where you can create private variables and functions and expose public functions. It does all of this while not polluting the global environment. If you take the code from Listing 1 and wrap it into a closure, all three components become private. This means that you can't reference any of them from the new controller variable. The variable products and the productBuildTable() function are fine, but you need to make productList() a public function. To do this, add a return statement around productList() and move the name of the function in front of the function statement. The code below shows the complete closure without the all of the code in the functions.
var controller = (function () {
    var products = [];

    function productTableBuild() {
    }

    return {
        productList: function () {
        }
    };
})();
When the HTML document is loaded, the $(document).ready function is called, which, in turn, calls the productList() function in your closure. Because this function now only has scope within the closure, you need to add the variable name controller in front of the call to productList(), as shown below.
$(document).ready(function () {
    controller.productList();
});
The complete JavaScript code in your page should now look like Listing 2.
Listing 2: A JavaScript closure eliminates functions and variables from the global namespace
$(document).ready(function () {
    controller.productList();
});

var controller = (function () {
    var products = [];

    function productTableBuild() {
        for (var i = 0; i < products.length; i++) {
            $("#productTable tbody").append(
                "<tr>" +
                    "<td>" +
                        products[i].ProductName +
                    "</td>" +
                    "<td>" +
                        products[i].IntroductionDate +
                    "</td>" +
                    "<td>" +
                        products[i].Url +
                    "</td>" +
                "</tr>");
        }
    }

    return {
        productList: function () {
            // Add data to products variable
            products = [
                {
                    ProductId: 1,
                    ProductName: 'Extending Bootstrap with
                        CSS, JavaScript and jQuery',
                    IntroductionDate: "6/11/2015",
                    Url: 'http://bit.ly/1SNzc0i'
                },
                {
                    ProductId: 2,
                    ProductName: 'Build your own Bootstrap
                        Business Application Template in MVC',
                    IntroductionDate: "1/29/2015",
                    Url: 'http://bit.ly/1I8ZqZg'
                },
                {
                    ProductId: 3,
                    ProductName: 'Building Mobile Web Sites
                        Using Web Forms, Bootstrap, and HTML5',
                    IntroductionDate: "8/24/2014",
                    Url: 'http://bit.ly/1J2dcrj'
                }
            ];

            productTableBuild();
        }
    };
})();
JavaScript Closure for Product Add, Edit, Delete Page
If you've been reading my last few articles, you'll remember that you wrote a lot of functions. If you're not familiar with the last article, that's not a problem, as you can probably get a good idea from the code in Listing 3 of what it does. You're not interested in creating the whole project in this article, just how to wrap up the different functions into the closure.
Listing 3: Wrapping all your functions into a closure
$(document).ready(function () {
    // Get all product data
    controller.productList();
});

// ****************************
// Closure for page
// ****************************
var controller = (function () {
    // ****************************
    // Private variables
    // ****************************
    var Product = {
        ProductId: 0,
        ProductName: "",
        IntroductionDate: "",
        Url: ""
    }

    // Constants
    const BASE_URL = "/api/Product/";

    // ****************************
    // Private Functions
    // ****************************
    // Call Web API to add a product
    function productAdd(product) {
    }
    // Add Web API call was successful
    function productAddSuccess(product) {
    }
    // Display all Products
    function productListSuccess(products) {
    }
    // Add Product row to <table>
    function productAddRow(product) {
    }
    // Build a <tr> for a row of table data
    function productBuildTableRow(product) {
    }
    // Clear form fields
    function formClear() {
    }
    // Delete product from <table>
    function productDelete(ctl) {
    }
    // Call Web API to update a product
    function productUpdate(product) {
    }
    // Update Web API call was successful
    function productUpdateSuccess(product) {
    }
    // Update product in <table>
    function productUpdateInTable(product) {
    }
    // Get a product from Web API
    function productGet(ctl) {
    }
    // Move product data to input fields
    function productToFields(product) {
    }
    // Handle exceptions from AJAX calls
    function handleException(request, message, error) {
    }
    // Get error messages from ModelState
    function getModelStateErrors(errorText) {
    }

    // ****************************
    // Public Functions
    // ****************************
    return {
        deleteClick: function (ctl) {
        },
        editClick: function (ctl) {
        },
        addClick: function () {
        },
        updateClick: function () {
        },
        // Get all Products to display
        productList: function () {
        }
    };
})();
The HTML page from the last articles lists, adds, edits, and deletes product data. This page contains 19 functions within the <script> tags. Of these 19 functions, only five need to be made public. There's also one global variable called Product. This variable becomes a private variable within the closure, as that's the only place it needs to be referenced. Listing 3 is what your closure looks like for all 19 functions. I removed all of the code from within the functions so you can just see how everything is enclosed within the IIFE.
Remember that after wrapping your functions into a closure, you need to reference the closure variable in front of your functions. This includes your event handlers. If you added your event handlers into your closure, you need to make sure they are made public. You also need to change the HTML that calls these event handlers. Add the name of your closure variable in front of the calls to the event handlers, as shown in the next code snippet. Notice the controller. that was added prior to the updateClick() function name.
<button type="button"
        id="updateButton"
        class="btn btn-primary"
        onclick="controller.updateClick();">
    Add
</button>
Creating closures is not that hard and really, just requires a little bit of refactoring of your code. Think about what functions need to be exposed as public functions on your page and just change the format of those to match what's presented in this article.
Templating with Mustache
Concatenating strings in JavaScript as I did in the productTableBuild() function is a horrible way to generate HTML. It's very difficult to read, hard to debug, and leads to runtime errors. Instead, let's employ a technique called templating by bringing an open-source library called Mustache into the project. You can download this very small library at https://github.com/mustache/mustache.github.com. Once you download it, add the mustache.min.js file to your project and reference the library in your HTML page using the following tag:
<script src="/Scripts/mustache.min.js"></script>
In Listing 2, the function productTableBuild() is used to build HTML table rows in JavaScript. You're now going to eliminate the code in that function and replace it with code to process a template. To do this, you need to do three things. First, add a public function in the closure to expose the collection of product objects contained in the products variable.
productCollection: function () {
    return productList;
}
Second, add a <script> tag with an ID attribute and a type of “text/html”. Within this tag, you create template data binding code using curly braces. Anything you see within two open curly braces and two closing curly braces refers to a function or property name of a JSON object.
<script id="productTableTmpl" type="text/html">
    {{#productCollection}}
    <tr>
        <td>{{ProductName}}</td>
        <td>{{IntroductionDate}}</td>
        <td>{{Url}}</td>
    </tr>
    {{/productCollection}}
</script>
In the template code, you see {{#productCollection}}. This refers to the function name productCollection in the closure that returns the array of JSON product objects. Think of this token as a “for” loop. At the end of this template code is {{/productCollection}}. This signifies the end of the “for” loop.
Within these two tokens are the <tr> and <td> elements and within each <td> elements are more data binding tokens with the names of each property in the product object that you wish to display in each column of the table.
The third thing you need to do is to write the code to process this template using the Mustache library. In the productTableBuild() function, replace the old code with the code shown here:
function productTableBuild() {
    var template = $("#productTableTmpl").html();

    var html = Mustache.to_html(template, controller);

    $('#productTable tbody').html(html);
}
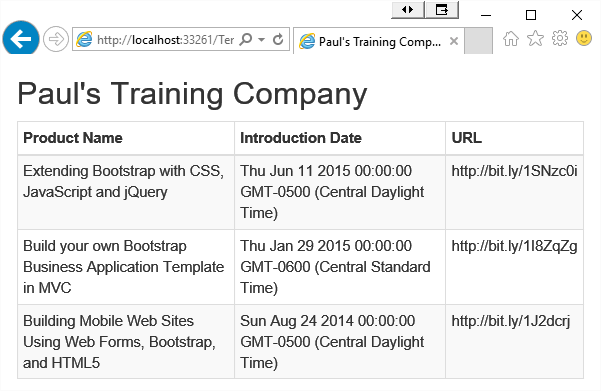
The first line of code returns the HTML for the template code in the <script> tag. The second line of code passes that HTML and the variable named controller (the JavaScript closure) to the to_html() function of the Mustache library. The Mustache library now accesses the productCollection() function in the closure, iterates over the collection of product objects, and renders each <tr> element between the {{#productCollection}} and the {{/productCollection}} tokens. The to_html() function returns the raw HTML to which you pass that HTML to the html() function of the selector, which returns the DOM object <tbody> in the “productTable” <table>. In this way, the table now has rows and columns and can display the product data. Listing 4 contains the complete JavaScript code to generate the page that looks like Figure 2.
Listing 4: Wrapping all your functions into a closure
var controller = (function () {
    // ************************************
    // Private Variables
    // ************************************
    var productList = [];

    // ************************************
    // Private Functions
    // ************************************
    function productTableBuild() {
        // Get template from script
        var template = $("#productTableTmpl").html();
        // Pass Mustache the template and the object
        // with the collection of product data
        var html = Mustache.to_html(template, controller);
        // Insert the rendered HTML into the DOM
        $('#productTable tbody').html(html);
    }

    // ************************************
    // Public Functions
    // ************************************
    return {
        productList: function () {
            // Add data to productList variable
            productList = [
                {
                    ProductId: 1,
                    ProductName: 'Extending Bootstrap with
                        CSS, JavaScript and jQuery',
                    IntroductionDate: new Date(2015, 5, 11),
                    Url: 'http://bit.ly/1SNzc0i'
                },
                ...
            ];

            productTableBuild();
        },
        productCollection: function () {
            return productList;
        }
    };
})();
Formatting Data in a Template
Displaying a UTC date in your HTML table is probably not what you want for your users. Mustache has some limited formatting capabilities, but it's often easier to create a public function that returns the data formatted the way you want. For example, if you want to display the date in your locale's format, you can add a public function named toLocalDate() in your closure, as shown here:
toLocalDate: function () {
    return this.IntroductionDate.toLocaleDateString();
},
Modify your template to use this new function instead of the IntroductionDate property.
<script id="productTableTmpl" type="text/html">
    {{#productCollection}}
    <tr>
        <td>{{ProductName}}</td>
        <td>{{toLocalDate}}</td>
        <td>{{Url}}</td>
    </tr>
    {{/productCollection}}
</script>
When you run the page now, you should see the date displayed in your local format.
Get Data from Web API
So far in this article, you used hard-coded data for the product list. A more realistic use is to retrieve data from a Web API call. Add a Web API controller to return a collection of product objects with the same property names as the ones used in this article. Add a new private function to your closure called getProducts(). This function makes an Ajax call to your Web API and upon successful return of the data, assigns the collection returned to the productList variable in your closure.
function getProducts() {
    return $.ajax({
        url: BASE_URL,
        type: 'GET',
        contentType: "application/json;
                      charset=utf-8",
        dataType: 'json',
        success: function (products) {
            productList = products;
        },
        error: function(request,message,error) {
            handleException(request,message,error);
        }
    });
}
In the getProducts() function notice, this function returns the call to the $.ajax() function. A “Promise” is returned from the jQuery $.ajax() call. This allows us to call the getProducts() function from the productList() function and chain to the Promise's done() function. This allows the $.ajax() call to be processed asynchronously, and when it's done, call the productTableBuild() function in order to process the Mustache template.
productList: function () {
    getProducts().done(function () {
        productTableBuild();
    });
},
The alternative to creating a new function and returning the $.ajax() promise is to use the newer syntax for $.ajax(). For this syntax (valid after jQuery 1.5), you take advantage of the promise right in the productList() function. Notice how you now only set parameters of the Ajax call in the first parameter and eliminate the success and error functions. Instead you use done() and fail() functions. The end result is the same; it's just two different methods for making the call.
productList: function () {
    $.ajax({
        url: BASE_URL,
        type: 'GET',
        contentType: "application/json;
                      charset=utf-8",
        dataType: 'json'
    }).done(function (data) {
        products = data;
        productTableBuild();
    }).fail(function (error, textStatus) {
        handleException(error,textStatus,null)
    });
},
If you have a date property being returned from the Web API like IntroductionDate, you need to remember that this value comes across as a string. You need to convert it into a valid JavaScript date prior to attempting to use the toLocaleDateString() function on it. Modify your toLocalDate() function to do the conversion, as shown in the following code snippet:
toLocalDate: function () {
    return new Date(this.IntroductionDate).toLocaleDateString();
},
Summary
In this article, you learned how to wrap your JavaScript code into a closure. A closure ensures that your JavaScript doesn't pollute the global environment with unnecessary variables that can cause hard-to-find bugs. You also learned how to use templating with the open source library called Mustache. Templating is used extensively in Angular, so starting to get familiar with this technique will help you to move to Angular. In the next article, I'll introduce you to Angular and you will see how to apply what you learned in this article.
