


With the increasing popularity of wearable technology both for hardware and software, mobile developers must start thinking beyond the phone. Smart watches, smart clothing, fitness trackers, smart glasses, wearable cameras, and personal healthcare devices represent just a few examples of a rapidly growing wearable industry.
Apple's first foray into this industry, the Apple Watch, has made quite a splash. Although Apple hasn't yet released official numbers, independent analysts estimate pre-orders to be near one million units in the U.S. In comparison, Pebble, another popular smartwatch, has sold one million units since its launch in 2013 (data as of Feb 2015) and Android Wear sold just over 720,000 devices in all of 2014 (TechCrunch).
As these devices continue to gain popularity, companies and app builders alike will need to take notice and start developing software solutions to please users. In turn, developers need to take the time to learn the subtleties of coding for such devices so that as the demand trickles in, they can meet it. Throughout the course of this article, you'll develop an application for the Apple Watch and visit the specifics of WatchKit including glances, notifications, and watch-to-phone communication.
Apple Watch Specs
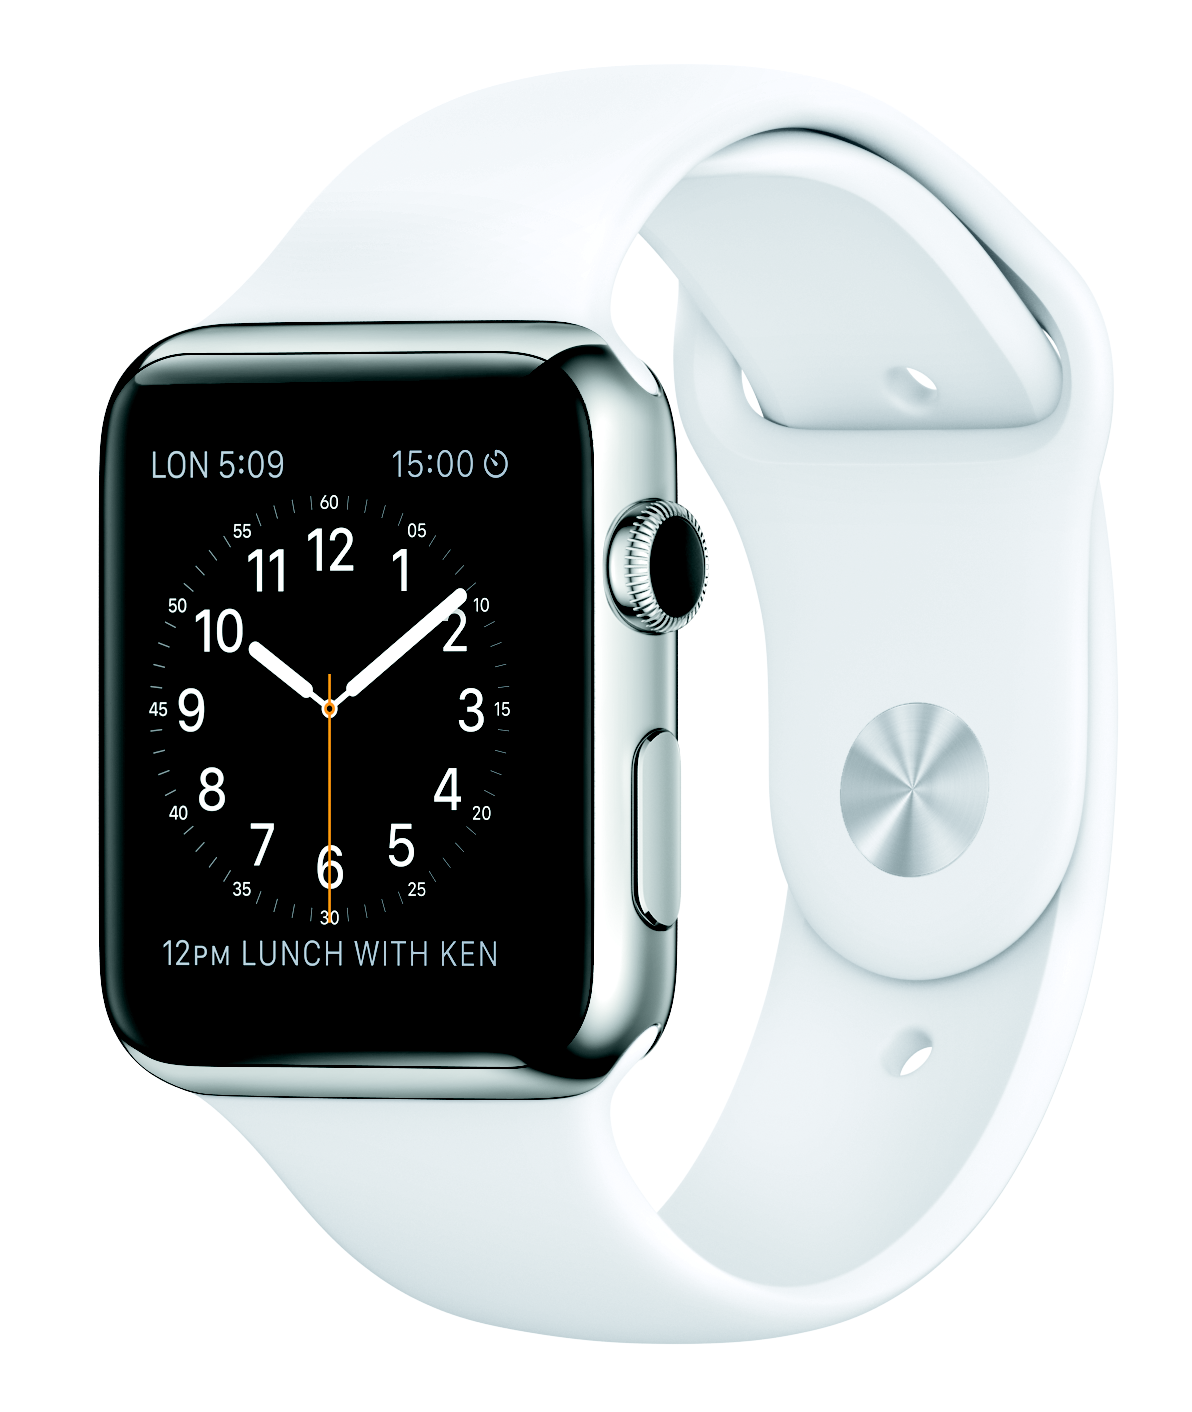
The Apple Watch comes in three flavors: Apple Watch Sport, Apple Watch, and Apple Watch Edition (as seen in Figure 1). Prices range from $349 for the Sport model all the way up to $17k for the 18-karat gold Edition model. Each of the three models consists of the same hardware specs. The difference in price results from the varying quality of material used to construct each model (aluminum versus stainless steel versus gold), in combination with the band selection. Bands are interchangeable and their prices differ, so each watch face/band combination has a different price point. Within each model, buyers can choose one of two face sizes: 38mm or the slightly bigger and more expensive 42mm.
The watch also introduces a unique input device, which Apple calls the Digital Crown. Pictured in Figure 2, the Digital Crown is a knob that can rotate in either direction. The knob enables the user to interact with the device without having their fingers obstruct the screen. Scrolling tables, zooming into maps, launching apps, and reading lengthy text no longer requires finger swipes or pinches. Furthermore, pressing the knob inward returns users to their app's home screen or watch face, and pressing and holding gives the user direct access to Siri.
Force Touch
Apple also introduces a new watch-specific gesture called Force Touch. The watch has the ability to sense the force applied to its flexible Retina display. Applying the proper amount of force to a view, rather than simply tapping it, can trigger a context menu relative to the current screen. This enables developers to take buttons and actions that would otherwise clutter the view-space, and move them into their own overlay. Force Touch context menus:
- Are optional for each view
- Can display between one and four menu options, each consisting of an image icon and a title
- Appear over the current view and cannot scroll
- Display actions in the order they're added to the menu
- Apply to the entire view and cannot be triggered by portions of the view or specific buttons
- Cannot be used for navigation, only for actions pertaining to the current view
Glances
Glances offer a quick way to see the most relevant data an application has to offer. Much like swiping down to get the notification screen, swiping up on the watch face launches the glance's view. Once opened, a user can swipe left or right to pan between all the available glances. Each application can have a maximum of one glance, but not every app needs to include one. Users also have the ability to customize which glances they see and they can hide the less relevant ones.
Glances cannot include interactivity or controls such as buttons, switches, or menus. Rather, a glance should display a quick look at the app's most important information at the point in time when the glance loads. Whenever you access a glance, a call to the watch app triggers, giving it a chance to refresh the glance data to its current values, thus making the glance real-time. Tapping on a glance launches the corresponding watch application and you can act on that launch event, using the glance to open a specific section of the app. For instance, a to-do reminder app might have a glance that shows the next item due. Tapping that glance might direct the user to that to-do's details in the application itself.
Notifications
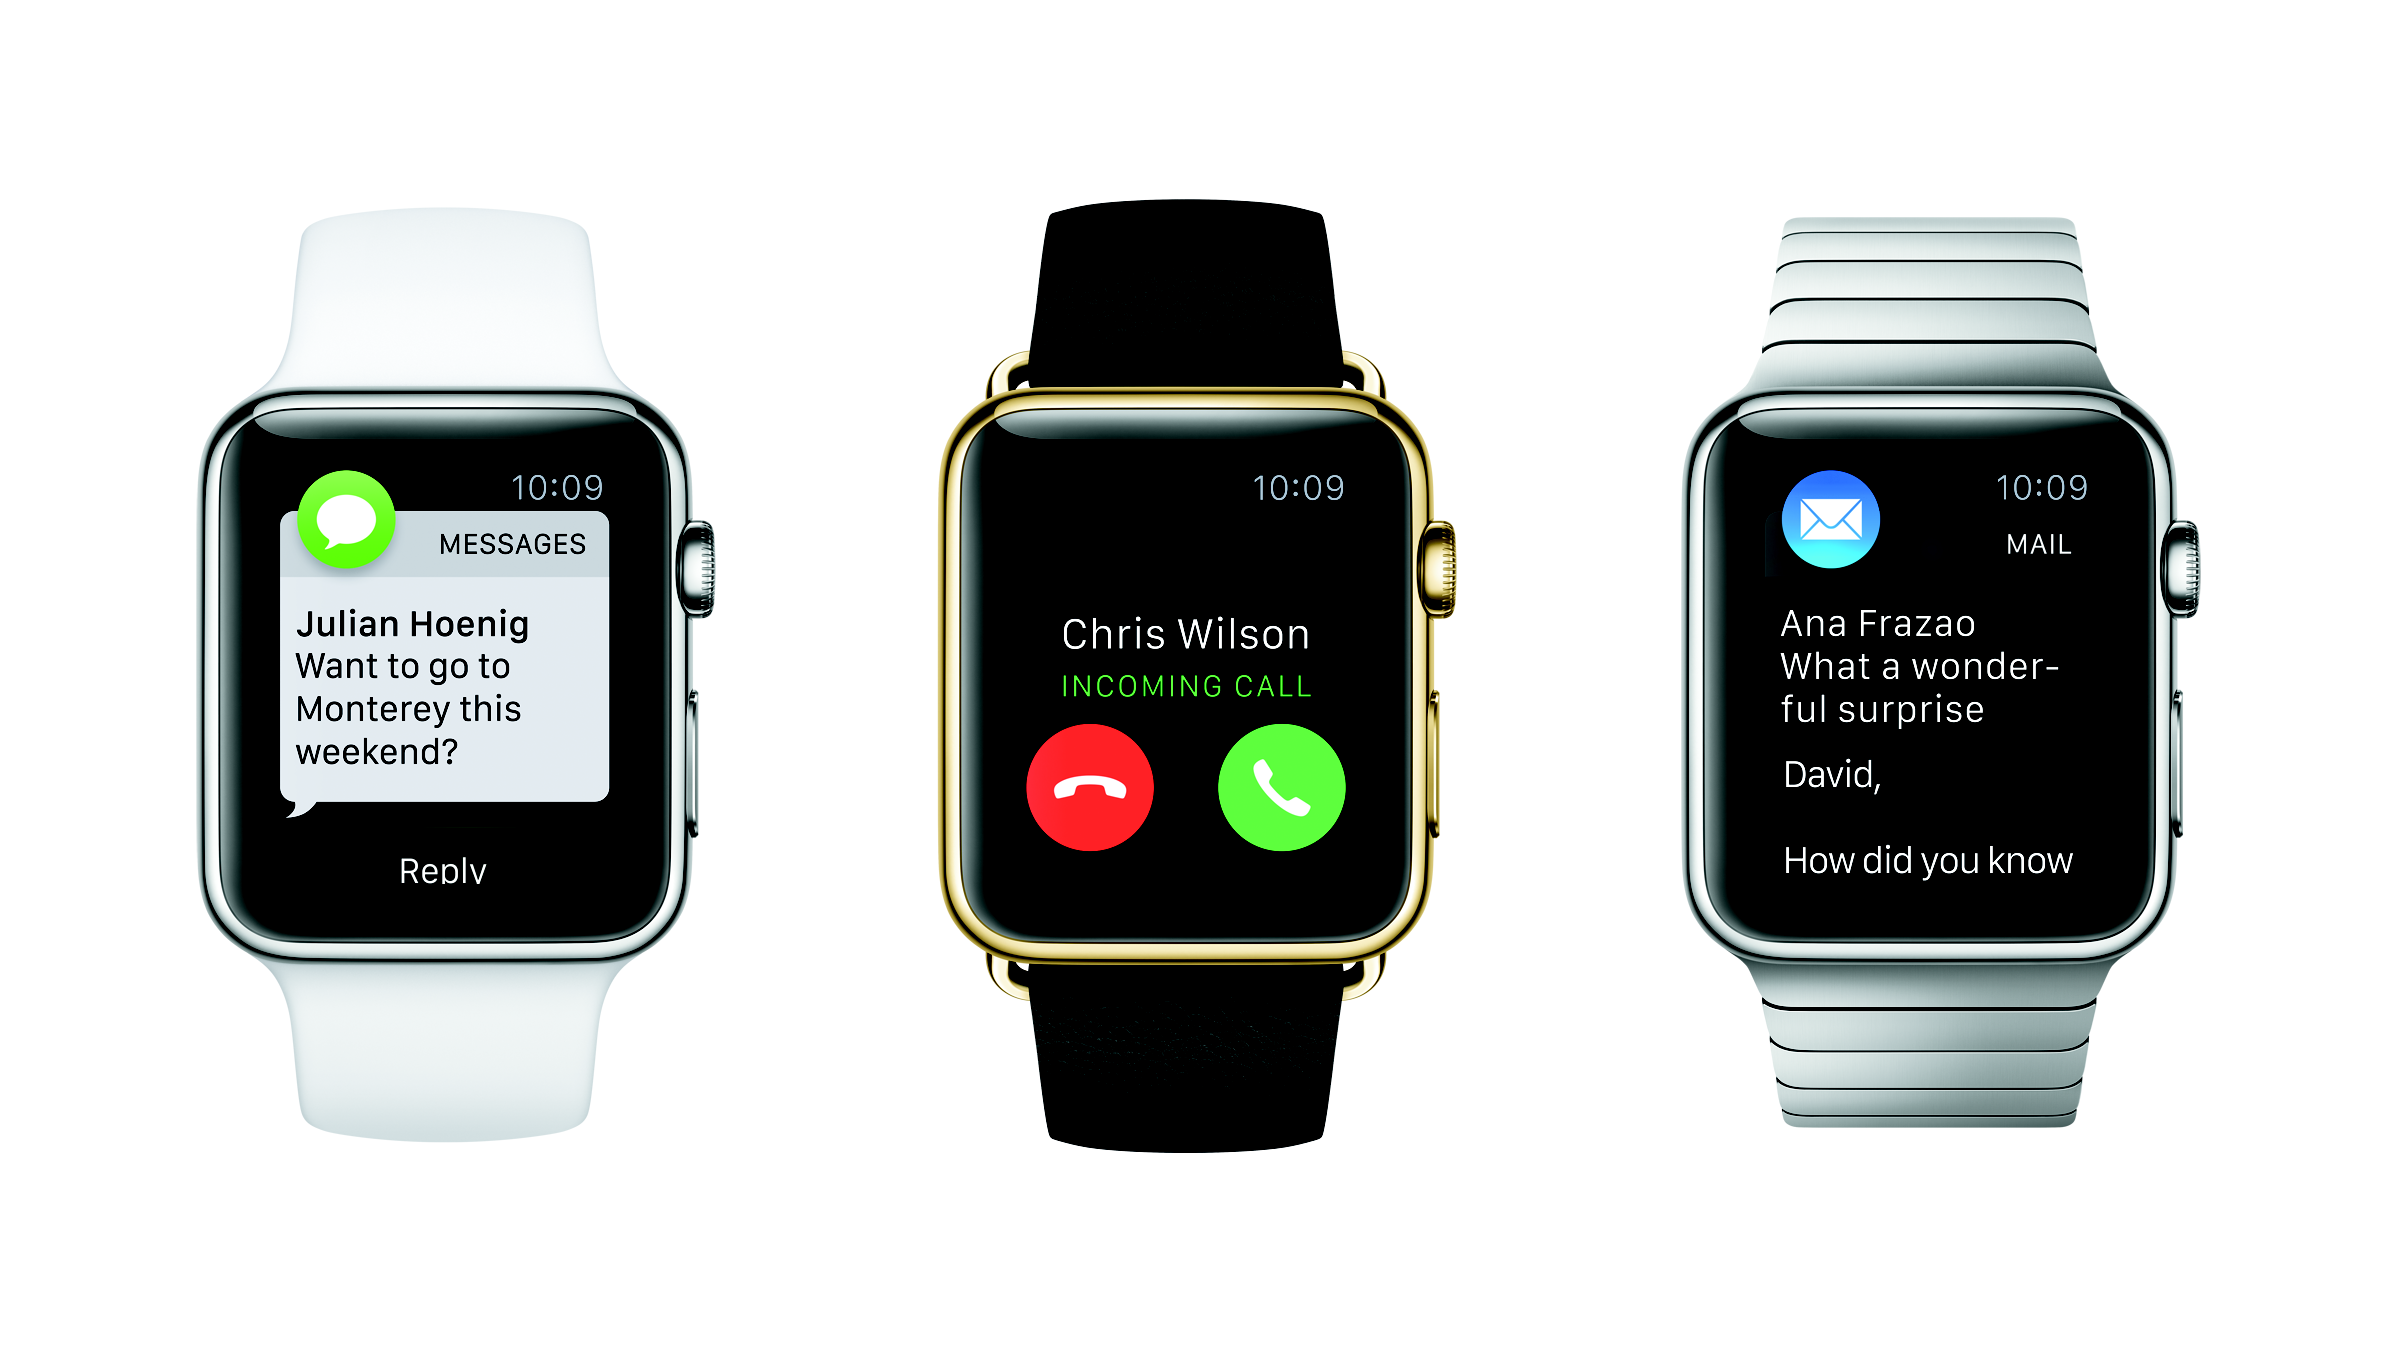
Push notifications on Apple Watch extend the functionality of standard iOS notifications. Traditionally, developers could only tweak a notification's body content. The native OS controlled the remainder of the notification's display format unless the app currently appeared in the foreground. With WatchKit, developers can customize a push notification's display on the watch and also add actionable functionality within the notification itself. For instance, in a to-do app, when notified that an item is due, the user now has a series of options within the notification such as “remind me again in 15 minutes,” “mark as complete,” or “dismiss.” Tapping an actionable item within the notification can trigger an action within the application, either opening the app to the foreground or completing the action in the background and dismissing the notification altogether.
When creating a notification type in WatchKit, developers can opt not to include a custom version of the notification, allowing them to take advantage of the standard notification structure that's included by default. Additionally, the watch doesn't receive notifications directly. A paired phone receives the notification and then decides whether to display it or forward it to the watch to display. If the watch is paired but not on the user's wrist, the notification won't forward. If the notification does forward, the watch receives it and the phone doesn't display it.
WatchKit
In order to code an Apple Watch application, developers must take advantage of WatchKit, which is a framework and the associated technologies released by Apple specifically for coding on the watch. XCode 6.2+ includes WatchKit by default so no additional set up or download is required once you're running the latest version of XCode. The remainder of this article aims to cover the fundamentals of WatchKit while building a sample Apple Watch application from start to finish and assumes that you have an up-to-date version of XCode.
Architecture
WatchKit applications don't stand-alone; rather, they extend the functionality of existing iOS applications. Therefore, building a WatchKit app takes on the same form as coding a native app extension, where all the source code and resources for the watch portion of the application get bundled in with the main iOS application. To set this up, you create a separate Apple Watch target within an existing iOS app project structure. This target consists of two main pieces:
- The WatchKit Group: contains a storyboard and image assets but no code
- The WatchKit Extension: contains all coding logic for the watch application
The WatchKit Group contains all the visuals for the application and lives on the watch. The extension holds all of the application logic and lives on the paired phone. It acts as a middleman, communicating between the watch and corresponding iOS app when needed. Figure 3 further demonstrates this structure.
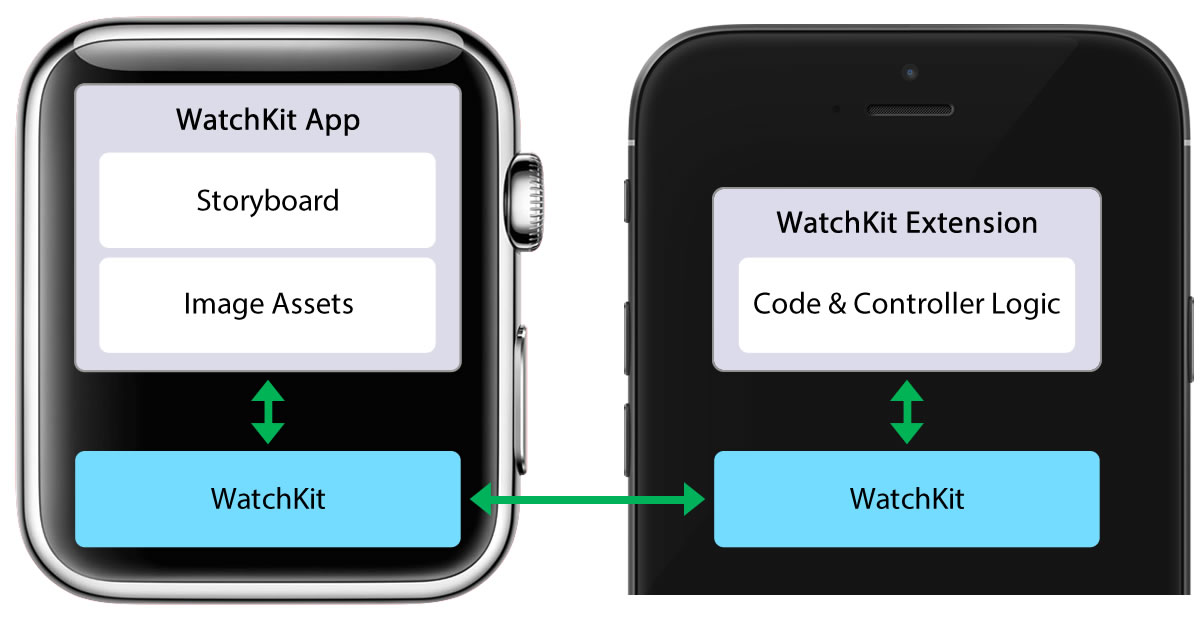
Looking at the diagram in Figure 3, if a developer has a button in the storyboard, the IBAction for the button is written in the controller's source within the extension on the phone. Therefore the button tap triggers the WatchKit framework to communicate to the extension that the action should fire. The extension then completes any related logic and communicates UI updates back to the watch to reflect any changes resulting from the initial press. You can update UI components in the WatchKit Group by referring to them directly from the extension, letting WatchKit automatically handle the communication procedures between the watch and the phone. Essentially, the watch acts as an interactive external display attached to the phone that has the ability to reformat the phone's data visually.
In addition, when building a watch application, you'll most likely replicate functionality from the original iOS application. In this scenario, re-writing or copying code from the phone application into the watch extension results in duplicated code and inefficiencies. Instead, you can communicate to the main iOS application via included WatchKit protocols, allowing you to tap into existing functionality. How to do this is covered in code examples later in this article.
The Interface Controller and Navigation
WatchKit introduces a new class for managing storyboard scenes called WKInterfaceController. Comparable in functionality to a standard view controller in iOS, a WKInterfaceController presents and manages the content on the screen while handling any touch events or interface interactions with that content. Unlike the standard view controller, an interface controller doesn't manage its views directly and therefore cannot create views dynamically. Instead, WatchKit handles this management automatically in the background. As a result, you must add all you sub-view content via the storyboard.
You can navigate between interface controllers in a number of different ways. Much like traditional iOS applications, you can push an interface controller into view by either using a segue or by manually calling pushControllerWithName:context:. This method transitions the view in from the right, much like on iOS, adding it to the navigation stack. Calling popController dismisses the interface controller and returns the user to the previous screen. You can also present a controller modally using presentControllerWithName:context:. This slides the view up from the bottom of the screen, covering the currently displayed controller. WatchKit automatically adds a cancel button to the top left hand of this view so the user can dismiss the modal when they finish. You can change the cancel button's title by accessing the title attribute of the controller.
Last, you can forgo the hierarchal approach to navigation and use a page-based layout instead. A page-based layout consists of two or more controllers that a user can swipe between. At launch, the first controller displays. Users navigate to the remaining controllers by swiping left/right on the watch face. WatchKit automatically adds dots to the bottom of each controller's view to represent the current page being displayed as well as how many total pages exist. Note that choosing a page-based layout means that you can't use hierarchal navigation within the watch application, as the two can't mix. If you wish to have a controller navigate to an additional controller in a page-based layout, you'll have to use presentViewControllerWithName:context: to show the controller on top of the current page.
Note that choosing a page-based layout means that you can't use hierarchal navigation within your watch application; the two can't mix.
Getting Hands On
As noted earlier, WatchKit applications extend the functionality of an existing iOS app. Included with this article is a simple iOS application that allows a user to create a to-do list and schedule local notifications to remind them of the items they need to complete. That application will serve as the basis for the watch application created in the following coding examples. To get the most from this section, download that project from the CODE Magazine website and follow along.
Apple Watch App Outline
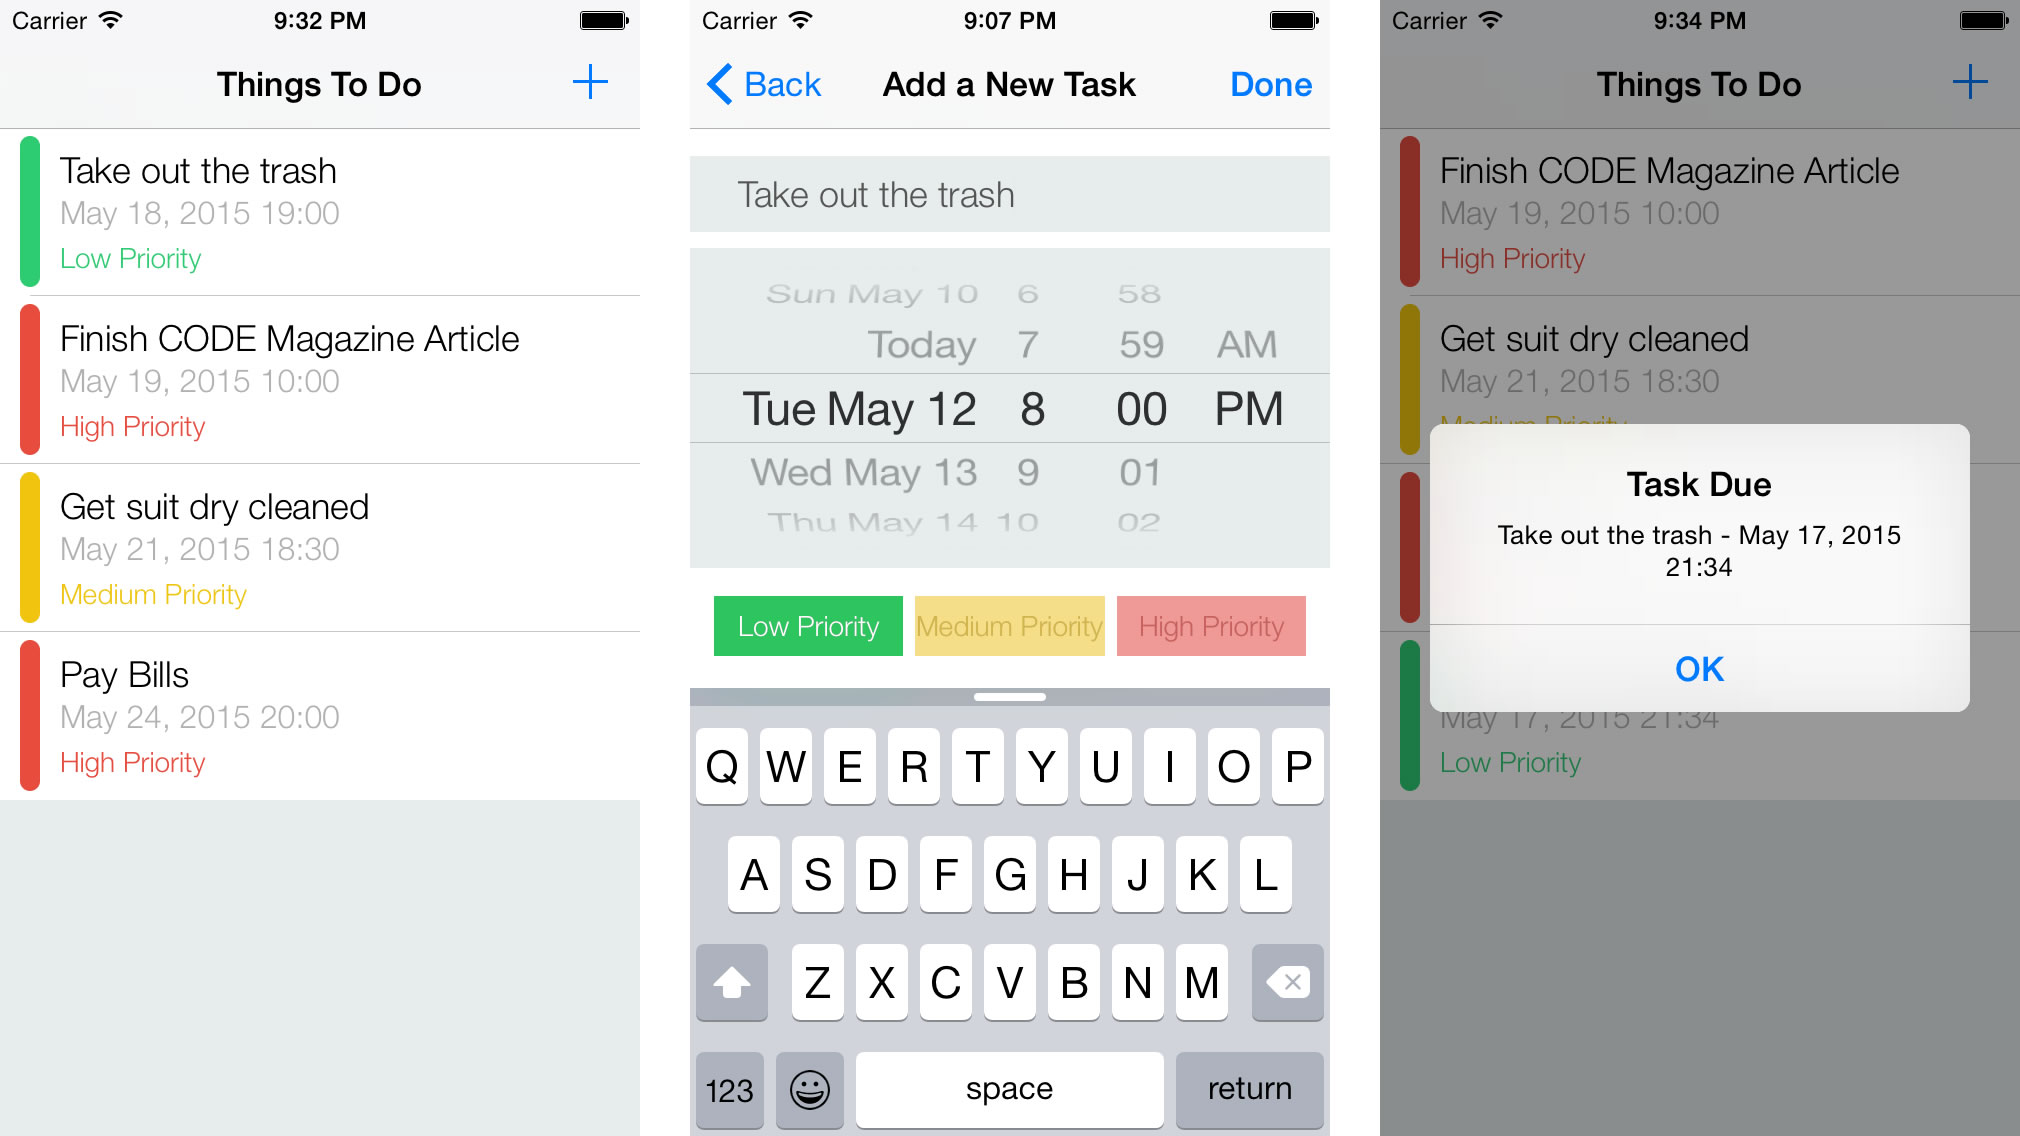
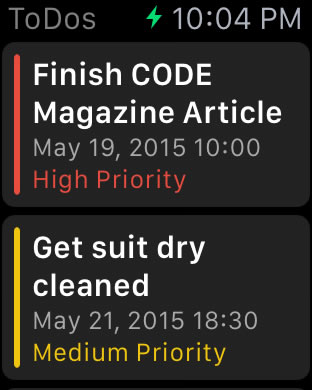
The included sample iOS application consists of two main screens: a table view listing of the currently active to-dos and a view that lets users create a new to-do item. Creating an item automatically schedules a local notification for the time chosen. Figure 4 demonstrates what the application looks like. Note that each item can have a priority level attached, which for the sake of this simple example, merely color-codes the item differently.
In the following coding example, you'll create a watch partner application for this to-do list. The watch version of the application displays the to-do list items similar to the display of the left-most screenshot in Figure 4. Additionally, you'll configure a custom notification format to remind the watch wearer when a to-do is due.
Adding WatchKit to an Existing iOS Application
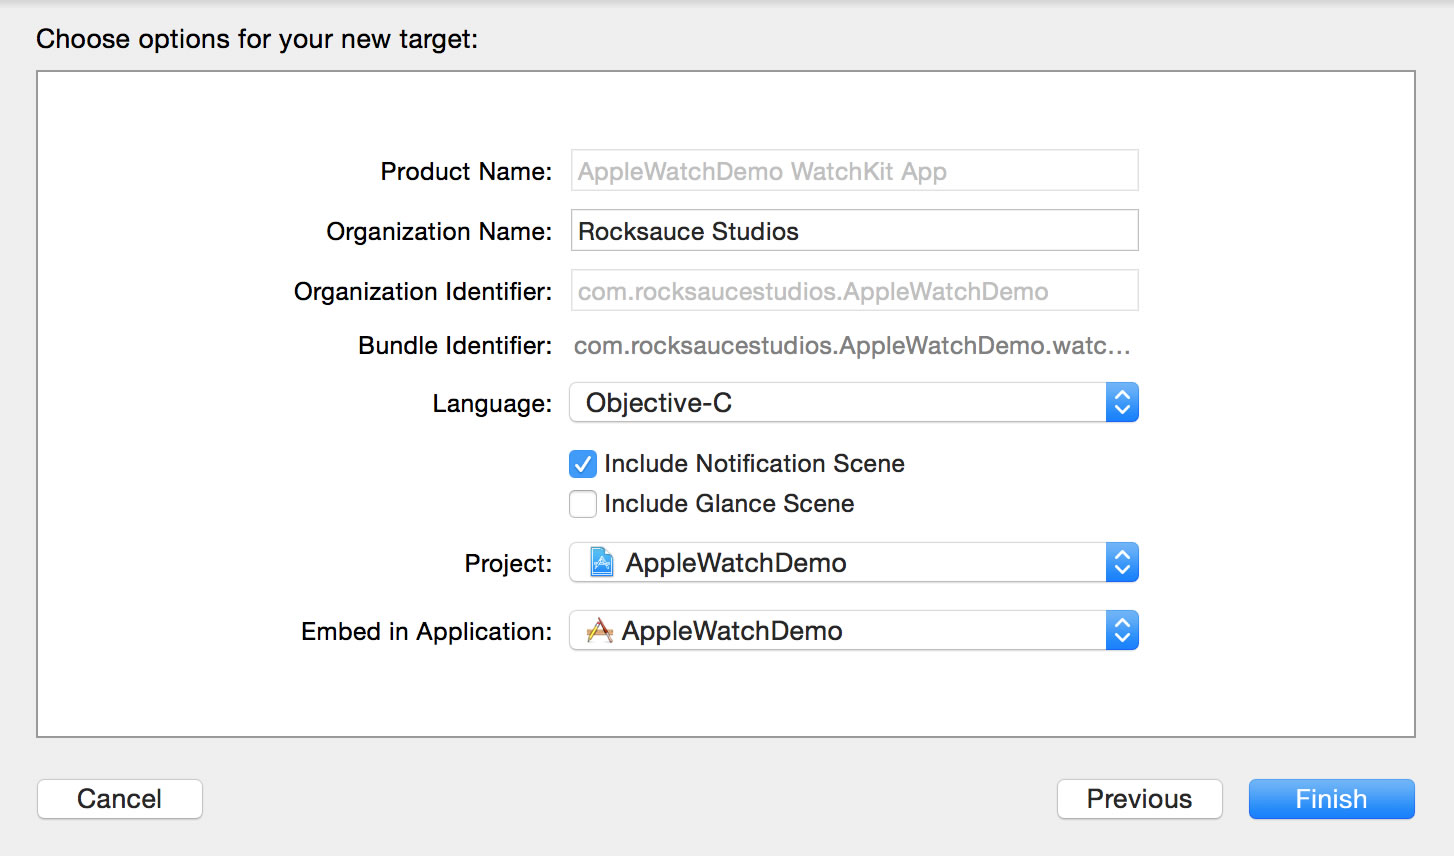
Adding a WatchKit target to your existing iOS application is always the first step for creating an Apple Watch app. Open up the included sample project in XCode, navigate to File > New > Target and when the option dialogue appears, choose the iOS > Apple Watch > WatchKit App template, as shown in Figure 5.

Once you've made the appropriate selection, an additional dialogue appears. This dialogue prompts you to choose Objective-C or Swift as the coding language and also asks if you want a glance or notification view included by default. You can always add these views later if you choose not to check them now. However, go ahead and check Include Notification Scene, which you'll need later in this example. Figure 6 demonstrates what the choices look like. Once entered correctly, select Finish.
After you select Finish, you'll notice two new folders added to the project called AppleWatchDemo WatchKit Extension and AppleWatchDemo WatchKit App. These folders correspond to the components described earlier in the architecture diagram from Figure 3. If you expand the extension folder, you'll notice two controllers: one for the main interface controller that loads by default and one for customizing a notification. Additionally, if you expand the WatchKit app folder, you'll notice a storyboard containing scenes corresponding to each of those controllers.
To-Do List Controller: The Storyboard
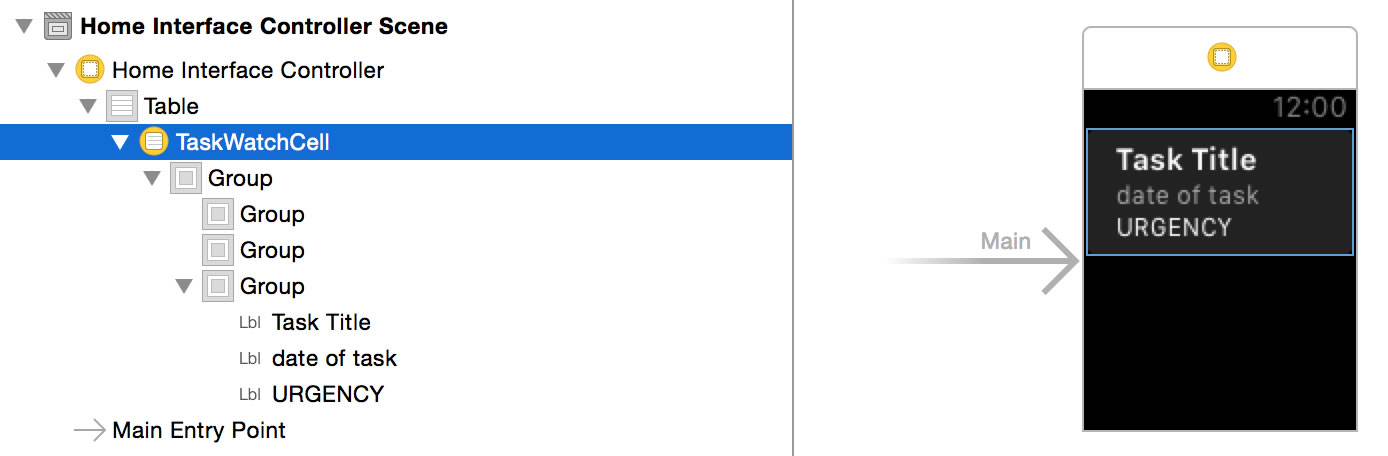
The main interface controller for the to-do application displays all of the currently scheduled to-dos. When you first add the WatchKit target to your application, an InterfaceController.h/.m is created by default and linked to the main scene in the storyboard. This gets used to build the main table display for the to-do items. In the sample project, I renamed this controller to HomeInterfaceController by right-clicking on the controller name in the source and selecting Refactor > Rename.
Go ahead and open the Interface.storyboard file contained in the WatchKit App folder. Notice the similarity between this storyboard and a standard iOS storyboard. They share many of the same functionality and capabilities. Locate the main scene, currently linked to the HomeInterfaceController file in the extension, notated by the arrow labeled Main. Using the object library on the right-hand side of XCode, you can drag various UI elements onto this scene to customize it.
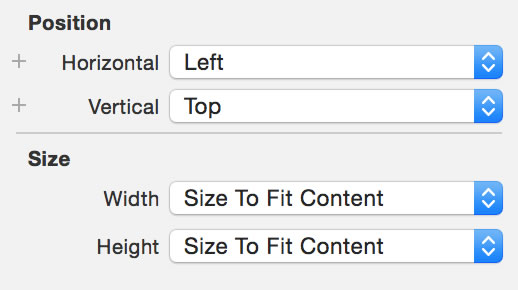
The layout of elements in a WatchKit scene varies from the layout of elements in an iOS scene. Rather than using AutoLayout, WatchKit uses its own proprietary positioning and layout system. In an iOS scene, you can drag an element onto a view and then freely drag it anywhere within the view to position it. However, in WatchKit, you'll notice that objects snap to each other vertically as you drag them onto the scene. If you were to drag a label onto the scene and then open the Attributes inspector panel on the right-hand side of XCode, you'd notice that there's no way to set a custom (x,y) coordinate for the object. However, take notice of the bottom two sections in the Attributes inspector window, as shown in Figure 7. These positioning and sizing attributes comprise the two primary methods for controlling where and how big/small an object appears. For instance, if I drag two labels onto the scene, they will stack on top of one another by default. Selecting the bottom label and changing its vertical position to the bottom aligns it with the bottom of the scene rather than beneath the first label at the top of the screen.
The layout of elements in a WatchKit scene varies from the layout of elements in an iOS scene. Rather than using AutoLayout, WatchKit uses its own proprietary positioning and layout system.
So how do you get more finite with your object positioning? What if you want two objects to be next to each other instead of stacked on top of one another? WatchKit introduces a new UI object called a group. Groups can contain multiple UI objects and each group can have its own layout parameters. Let's say, for example, that you wanted to have two labels side by side and a third label underneath those two, spanning the length of both of the above labels combined (as pictured in Figure 8).
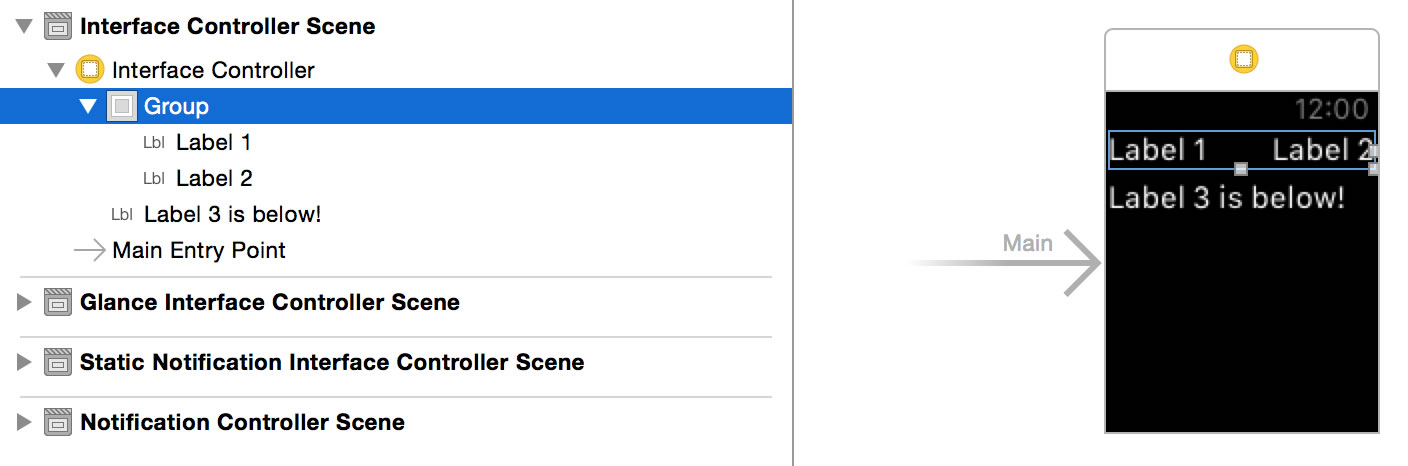
To do this, you first drag a group onto the scene and then drag a label beneath the group so it snaps underneath. Next, you make sure the group's layout is set to horizontal (in the Attributes inspector), which will cause the objects it contains to snap side-by-side rather than on top of one another. Drag two labels into this group. Notice that the second label snapped to the right edge of the first. Select the second label and change its horizontal positioning to the right in order to mirror the layout in Figure 8. Last, select the label beneath the group and set its width in the attributes panel to equal “Relative to Container” and it'll span the full width of the controller. The layout you just created demonstrates a simple use case for groups. However, as you use groups more frequently, you'll notice how groups can construct more complex layouts as well. Keep in mind that you can add groups as sub-objects to other groups and doing so opens up the layout possibilities exponentially.
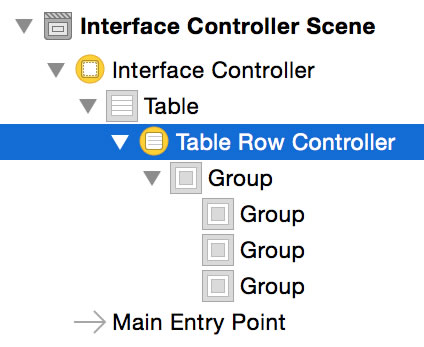
Getting back to the to-do example, go ahead and delete those labels and the containing group from the scene. Then drag a table onto the scene from the object library on the right. This eventually displays the to-dos that are currently scheduled. When you drag the table onto the scene, it has a single row labeled Table Row. This represents the format of each of the rows that eventually displays on the watch face. For instance, if I had an application that had two different row types, one that displayed an image and one that was just text, I'd need to set the rows parameter in the inspector window equal to 2 and then customize the view style for each of the two row types respectively. However, for this example, all rows use the same format so that one row is suitable.
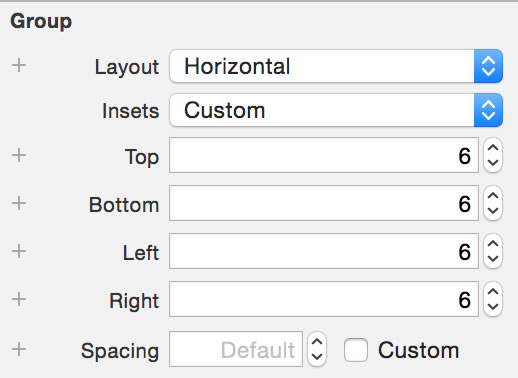
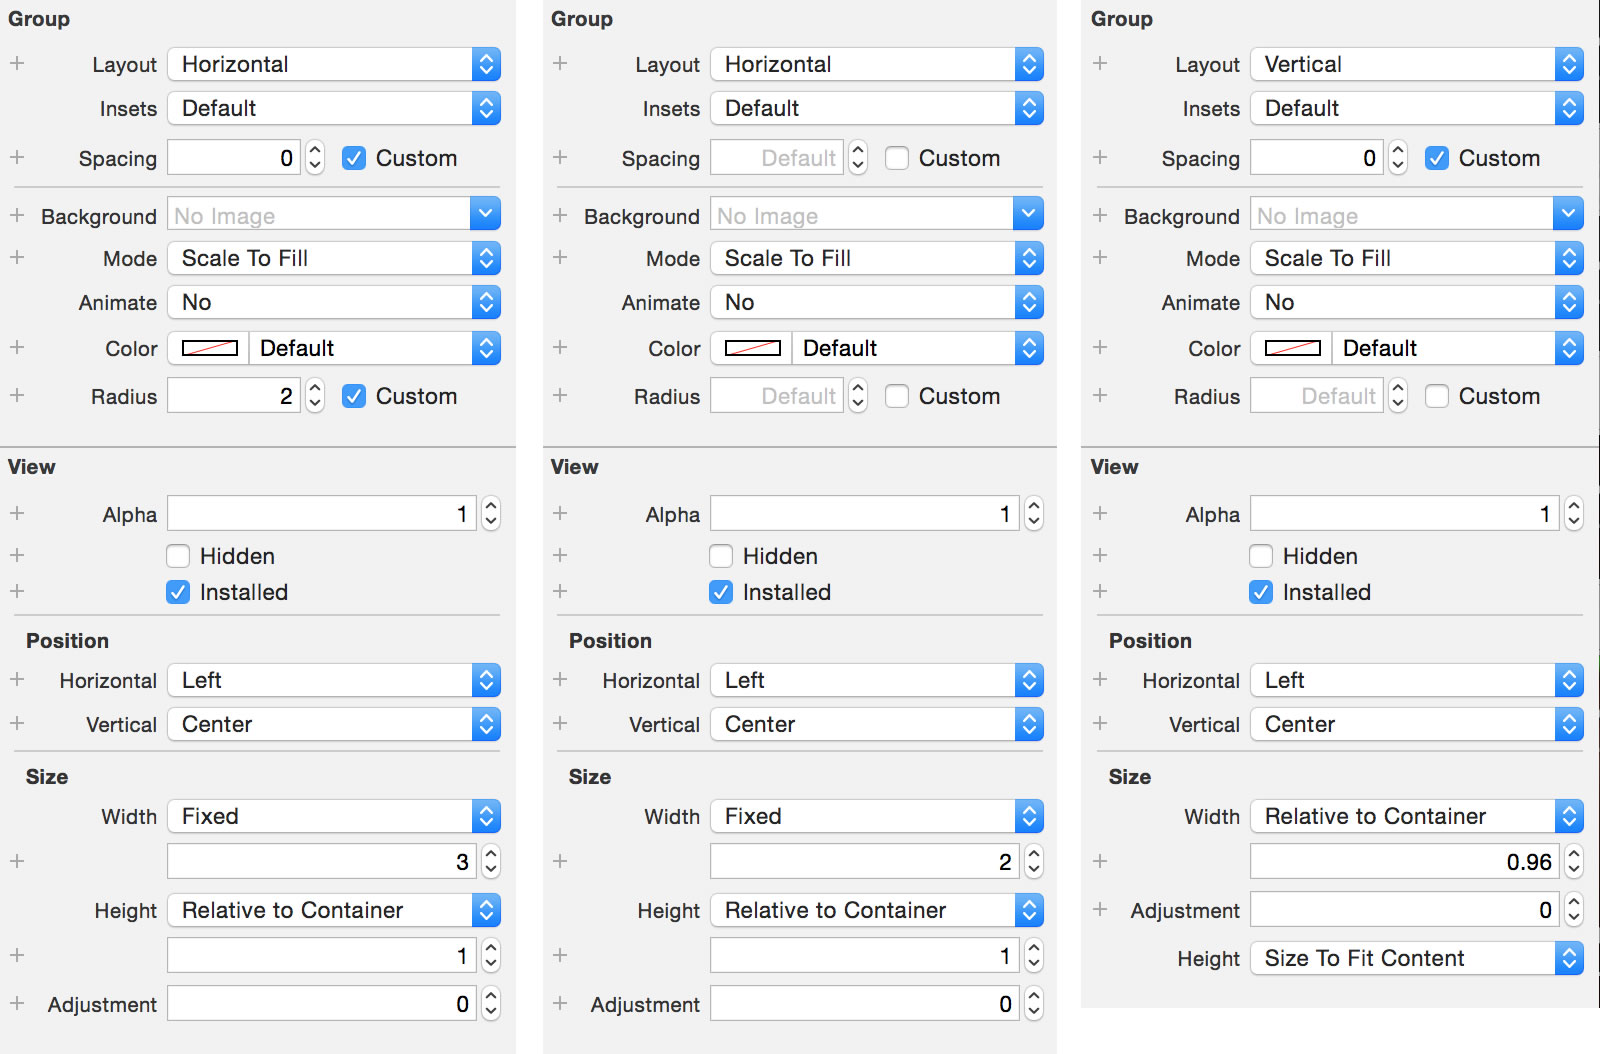
Notice that if you expand the table row controller in the storyboard document outline on the left-hand side panel, the row already contains a single group. This group holds all of the UI objects added to this row. The first thing I did was select this group, find the Insets property in the Attributes inspector, change it to custom, and set all insets to a value of six, as shown in Figure 9. This gives some padding between the edges of the row and the interface elements. Finally, with this group still selected, change the height property to Size to Fit Content. This ensures that the row automatically grows to the height of the objects it contains.
The visual format of the table row objects mimics the format used by the iOS application shown in Figure 4. A colored bar occupies the left side of the row and the to-do textual content aligns to the right of that bar. To set this up, use three groups within the main group that you just finished customizing: one for the colored bar, one as a spacer between the colored bar and the text, and the third group to contain the textual content. Drag three group objects into the existing group. Notice that they stack side-by-side and run off the edge of the scene.
Each group currently has their widths set to Relative to Container by default, resulting in their widths spanning the entire table. Select the group furthest to the left and change the width setting to Fixed and then change the width value to 3. This represents the colored bar for the to-do item. In the same Attributes inspector panel, check the custom box next to radius and change the value to 2. This gives the colored bar a nice rounded edge. Next, select the second group, the spacer, and change the width to Fixed with a value of 2.
Last, select the third group and change the width selection to be Relative to Container. By default, this sets the width to 100% of the container width, which causes the group to run off the screen. However, by changing the value from 1 to 0.96, the group only occupies 96% of the screen width, leaving the remaining 4% for the colored bar and spacer groups. When complete, the Attributes inspector for each of the three groups (from left to right) should mimic Figure 10 respectively. Note the height values for each of the three groups as well: Relative to the Container for the colored bar and the spacer, but Size to Fit Content for the group that contains the text content.
Three groups now exist side-by-side in the table row. You need to add the text content to the appropriate group in order to complete the table row layout. The third group, the one you set the width to equal 96% of the container width, holds the text content. Highlight that group and set the layout in the Attributes inspector to vertical, as previously shown in the far right section of Figure 10. This causes the labels to stack on top of one another, matching the iOS layout. Now drag three labels into this group. Set all three of their widths to Relative to Container. You can also adjust the font for each. I have it set to Headline for the top label that serves as the task title and Footnote for the other two. I've also changed the color of the middle label, which is the time, to light gray. The end result of the table row layout should mimic Figure 11.
To-Do List Controller: The Code
Now that you've customized the structure of the scene in the storyboard, let's transition back to the HomeInterfaceController and take a look at the code needed to populate this view. To start, initialize the properties needed to manage the table and the table's data in HomeInterfaceController.m by replacing the current interface declaration with the one below.
@interface HomeInterfaceController()

/// the main table that will display tasks
@property (nonatomic, weak) IBOutlet
WKInterfaceTable *taskTable;

/// the tasks data that will populate the table
@property (nonatomic, strong) NSMutableArray
*taskData;

@end
Now you have an outlet for the table that displays the to-dos, so open the storyboard file and, using the Connections inspector panel, connect that outlet to the table. Before you can write a function that formats the table, tell it how many rows it should have and what visual style it should use for each row. To do this, you need to create an NSObject that corresponds to each row type that you created in the storyboard. This project only uses one row type, so go to File > New > File and select Cocoa Touch Class, make it a subclass of NSObject, and give it a class name of TaskWatchCell (making sure to add it to the WatchKit extension and not the iOS application). You'll use this class to control any customization for the table row.
Each table row has several items requiring customization including the task title, time, urgency, and priority color. You'll need direct access to tweak these objects from the TaskWatchCell class you just created. Thus you need to create properties corresponding to each of those objects by adding the following code to the top of the TaskWatchCell.m file beneath the #import statement. If you notice errors or warnings, make sure that you have @import WatchKit; at the top of the file.
@interface TaskWatchCell()

/// row header indicating task title
@property (nonatomic, weak) IBOutlet
WKInterfaceLabel *taskTitle;

/// scheduled time for the task
@property (nonatomic, weak) IBOutlet
WKInterfaceLabel *taskTime;

/// textual representation of the task urgency
@property (nonatomic, weak) IBOutlet
WKInterfaceLabel *taskUrgencyLvl;

/// color bar representation of the task urgency
@property (nonatomic, weak) IBOutlet
WKInterfaceGroup *taskUrgencyColorGroup;

@end
Again, once you create the outlets, you then have to link them to their corresponding objects in the storyboard file. To do this, first find the Table Row Controller in the document outline tree on the left-hand side of XCode, as shown in Figure 12. Once highlighted, navigate to the identity inspector on the right-hand side and set the class to be TaskWatchCell. This lets the storyboard know that the corresponding row is of type TaskWatchCell. Then navigate to the Attributes inspector and set the identifier to also equal TaskWatchCell. Failing to assign either of those values causes the table not to display. Now move to the Connections inspector and link up the outlets you previously created to their counterparts on the scene.
Now you need a method so that the TaskWatchCell can update the data for the outlets you just linked. Open the TaskWatchCell.h file and define the following method.
/**
*  Adds the task information to the table row
*
*  @param taskData The task data used to populate this row
*/
- (void)configureTask:(NSDictionary*)taskData;
Next, transition to TaskWatchCell.m where you can fill in the method logic. For each row created in the table, configureTask gets called. A dictionary of task details gets passed so that the row object can use that information to populate the row appropriately. Therefore the method must set the title and time for the task as well as customize the color bar and priority label based on the urgency level of the corresponding task. Listing 1 shows the completed method. Add it to TaskWatchCell.m and take note that URGENCY_LOW, URGENCY_MED, and URGENCY_HIGH are #define constants set to 0, 1, and 2 respectively and will need to be defined as well.
Listing 1: TaskWatchCell.m - method to configure a row in the taskTable
- (void)configureTask:(NSDictionary *)taskData {
    // set the title and time of the current task
    [_taskTitle setText:[taskData objectForKey:@"taskTitle"]];
    [_taskTime setText:[taskData objectForKey:@"taskTimePlainText"]];

    // get the urgency level for the task
    int urgency = [[taskData objectForKey:@"urgencyLvl"] intValue];

    // customize the color bar and priority label based on the level of urgency
    if (urgency == URGENCY_LOW){
        [_taskUrgencyColorGroup setBackgroundColor:
            [UIColor colorWithRed:.18 green:.8 blue:.44 alpha:1]];
        [_taskUrgencyLvl setTextColor:
            [UIColor colorWithRed:.18 green:.8 blue:.44 alpha:1]];
        [_taskUrgencyLvl setText:@"Low Priority"];
    }
    else if (urgency == URGENCY_MED){
        [_taskUrgencyColorGroup setBackgroundColor:
            [UIColor colorWithRed:.95 green:.77 blue:.06 alpha:1]];
        [_taskUrgencyLvl setTextColor:
            [UIColor colorWithRed:.95 green:.77 blue:.06 alpha:1]];
        [_taskUrgencyLvl setText:@"Medium Priority"];
    }
    else if (urgency == URGENCY_HIGH){
        [_taskUrgencyColorGroup setBackgroundColor:
            [UIColor colorWithRed:.91 green:.30 blue:.24 alpha:1]];
        [_taskUrgencyLvl setTextColor:
            [UIColor colorWithRed:.91 green:.30 blue:.24 alpha:1]];
        [_taskUrgencyLvl setText:@"High Priority"];
    }
}
The last piece of this puzzle involves setting up and populating the to-do list table via the HomeInterfaceController. There are two steps to do this:
- Collect the currently scheduled to-dos: To-do tasks are scheduled in the parent iOS application. The WatchKit extension must retrieve that data from the iOS application using the WatchKit method
openParentApplication. - Populate the
taskTablewith the to-do data: Once the data returns from the iOS application, it will get used to populate the table.
Navigate to HomeInterfaceController.m and add the code from Listing 2 in order to complete the above two steps.
Listing 2: HomeInterfaceController.m – populating the to-do table
// Make sure to import the TaskWatchCell at the top of the file
#import "TaskWatchCell.h"

...

- (void)willActivate {
    // called when controller is about to be visible to user
    [super willActivate];

    // set the title of the watch view
    [self setTitle: @"ToDos"];

    [self getDataForTable:^(NSMutableArray * tasks) {
        _taskData = tasks;
        // set up the table with the appropriate data
        [self setupTable];
    }];
}

//////////////////////////////////////////////////
#pragma mark - Parent App Communication
//////////////////////////////////////////////////

/**
*  Queries the parent iOS application to retreive the task data
*  so we can show it watchside
*/
- (void)getDataForTable:(void(^)(NSMutableArray*))completionBlock {
    // the tasks to return / populate table with
    NSMutableArray *tasks = [NSMutableArray array];

    // params to instruct parent iOS app of the function to perform
    NSDictionary *applicationData = [[NSDictionary alloc]
        initWithObjects:@[@"loadTasks"] forKeys:@[@"action"]];

    // call the parent application, passing the instructions along
    [WKInterfaceController openParentApplication:applicationData
        reply:^(NSDictionary *replyInfo, NSError *error) {
            // get results back from parent iOS app
            NSArray *taskData = (NSArray*)[replyInfo objectForKey:@"results"];

            // loop through return, add each task to table datasource
            for (NSDictionary *taskDetail in taskData) {
                [tasks addObject:taskDetail];
            }

            // return data
            completionBlock(tasks);
        }];
}

//////////////////////////////////////////////////
#pragma mark - WKInterfaceTable
//////////////////////////////////////////////////

/**
*  Configures taskTable with data in taskData array
*/
- (void)setupTable {
    // this will hold indicators that will dictate which row
    // type/format to use for each task
    NSMutableArray *rowTypesList = [NSMutableArray array];

    // for each task, assign a row type
    for (int i = 0; i < [_taskData count]; i++) {
        [rowTypesList addObject:@"TaskWatchCell"];
    }

    // make sure the table adheres to the determined row types
    [_taskTable setRowTypes:rowTypesList];

    // build the table's rows using the class that corresponds to
    // their respective row type
    for (NSInteger i = 0; i < _taskTable.numberOfRows; i++) {
        // references to the current row and task
        NSObject *row = [_taskTable rowControllerAtIndex:i];

        TaskWatchCell *taskRow = (TaskWatchCell *)row;
        // build the row using the corrsponding task data
        [taskRow configureTask:_taskData[i]];
    }
}
Here are a few things notice in Listing 2:
- Make sure to import
TaskWatchCell.hat the top of theHomeInterfaceController.mfile. - Retrieval of the to-do data occurs before the table setup is initiated.
- The function
openParentApplicationtakes anNSDictionaryparameter, which you have to use to instruct the iOS application on the function you need performed. The iOS receiver for this call should get declared in theAppDelegate.mfile and can be found in Listing 3. - Notice in
setupTablethat you need to set the row type for each row. In this example, all row types are the same but you could use this to assign separate row types to each row if a project called for it. - You must loop through each row and construct it manually, as seen near the end of
setupTable. Watchkit does not have acellForRowAtIndexPathequivalent.
Listing 3: AppDelegate.m - iOS receiver for openParentApplication call
/**
*  Called from the watch extension when the watch app needs the
*  parent iOS application to perform some action
*
*  @param application
*  @param userInfo    Directions from watch of action to take
*  @param reply       Passes back data to the watch
*/
- (void)application:(UIApplication *)application
    handleWatchKitExtensionRequest:(NSDictionary *)userInfo
    reply:(void(^)(NSDictionary *replyInfo))reply {

        // get the required action from the user info dictionary
        NSString *action = [userInfo objectForKey:@"action"];

        // based on the requested direction, perform the required task
        if ([action isEqualToString:@"loadTasks"]){
            // get the tasks from user defaults
            NSMutableArray* tasks = [[[NSUserDefaults
                standardUserDefaults] objectForKey:TASKS_KEY] mutableCopy];

            // send tasks back to watch under key "results"
            reply([[NSDictionary alloc] initWithObjects:@[tasks]
                                            forKeys:@[@"results"]]);
        }
    }
Building the Project to the Simulator
At this point, you've completed the first stage of the watch application and can test your work using XCode's simulator. To do so, start off by running the iOS version. This installs the watch companion application. If you attempt to build the watch app without having previously run and installed the iOS version, it will fail.
Next up, you want to change the active scheme from the iOS app to the WatchKit app. Notice that when selecting the WatchKit app scheme, you may also choose the iOS device to run it with. Once selected, press the build and run button.
You will most likely notice that a phone simulator appears without a watch face. You need to enable the external watch display in order for it to appear. With the simulator active, navigate to Hardware > External Displays > Apple Watch – 42mm for the larger face or 38mm for the smaller one. If done correctly, the application should resemble Figure 13.
Local Notifications
When the user creates a to-do in the iOS application, the app schedules a local notification to trigger at the time selected. The watch application receives these local notifications by default using the standard static notification interface. However, in order to customize the notification format, some set up is required in both iOS and WatchKit. Remember, when you added the WatchKit target to the application, the option to add a notification screen was checked. Checking that box resulted in the addition of a NotificationController of type WKUserNotificationInterfaceController to your extension. That controller already connects to the dynamic portion of the notification controller scene that currently exists in the storyboard. If you open the storyboard and select the notification scene from the document tree on the left, you'll notice two scenes: a static interface and a dynamic interface. The dynamic interface represents the custom notification that you have the ability to tweak to your liking.
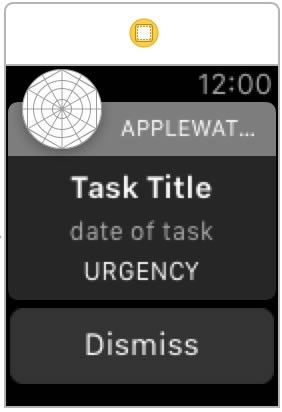
Add three labels to the dynamic interface. By default, they stack on top of one another. Set their widths to Relative to Container and center the text for each label. Select the top label, the Task Title, and set the lines property to 5, which allows the title to wrap, if needed. Last, set the label's style to match the format you used in the table row: headline font for the top label, footnote for the other two, and light gray for the middle label's color. You can also tweak the top and bottom insets on the notification controller object to create some padding between the labels and the header and footer. If done correctly, the notification should resemble Figure 14. Note that the header of the notification reflects the Bundle Display Name set in the Info.plist within the AppleWatchDemo Watchkit App folder. You can change it to something shorter to avoid truncating the text.
Next, you need to create outlets that correspond to each of those three labels by declaring properties in NotificationController.h, as shown in the following code snippet. Link those properties with the labels in the storyboard.
/// header indicating the title of the task
@property (nonatomic, weak) IBOutlet WKInterfaceLabel *taskTitle;

/// Scheduled time for the task
@property (nonatomic, weak) IBOutlet WKInterfaceLabel *taskTime;

/// Indicates the urgency lvl for the task
@property (nonatomic, weak) IBOutlet WKInterfaceLabel *taskUrgencyLvl;
Now you need to work on the method that populates these labels with information when a notification triggers. Open NotificationController.m and take a look at the commented out functions near the bottom of the controller. Notice the one called didReceiveLocalNotification. Uncomment this function. Listing 4 shows what the completed function should look like. Looking at Listing 4, you can see that the function receives a dictionary of information and uses that info to populate the dynamic notification interface. Where does that information come from? When the iOS application schedules the local notification, it embeds this information into the notification itself. You can look at the scheduleTask function in Task.m, within the iOS source for the completed project included with this article, for a better understanding of how this occurs.
Listing 4: NotificationController.m - populating the dynamic notification
- (void)didReceiveLocalNotification:(UILocalNotification*)
    localNotification withCompletion:( void (^)
    (WKUserNotificationInterfaceType))completionHandler {
        // called when a local notification needs to be presented
        // implement it if you use a dynamic notification interface

        // the information attached to the notification
        NSDictionary* taskInfo = localNotification.userInfo;

        // populate the notification with the received date
        [_taskTitle setText:[taskInfo objectForKey:@"taskTitle"]];
        [_taskTime setText:[taskInfo objectForKey:@"taskTime"]];
        [_taskUrgencyLvl setText:[taskInfo objectForKey:@"taskUrgencyLvl"]];

        // after populating your notification call the completion block
        completionHandler(WKUserNotificationInterfaceTypeCustom);
    }
The dynamic notification is configured and ready to receive the notification for the iOS application, but the process still requires an additional step to work. When the iOS application receives the local notification and forwards it to the watch, it currently doesn't know where exactly to forward it. You need to inform the iOS application that any notification of this specific type should forward directly to the custom NotificationController you configured. To do this, you have to register the notification category in the AppDelegate.m file within the main iOS application, as shown in Listing 5 (the code in Listing 5 can be added to the didFinishLaunchingWithOptions method).
Listing 5: AppDelegate.m - register the custom notification category
// register the notification types
NSMutableSet* categories = [[NSMutableSet alloc] init];

// set up a category for the custom notification
UIMutableUserNotificationCategory* taskDueCateogry =
[[UIMutableUserNotificationCategory alloc] init];

// set the identifier that will be used to link the incoming
// notification with the custom NotificationController
taskDueCateogry.identifier = @"TaskNotification";

// add the created category to the set
[categories addObject:taskDueCateogry];

// we need to ask the users permission to send local notifications
// pass the custom categories so they are registered
[[UIApplication sharedApplication]
   registerUserNotificationSettings:[UIUserNotificationSettings
   settingsForTypes:UIUserNotificationTypeAlert|
   UIUserNotificationTypeSound categories:categories]];
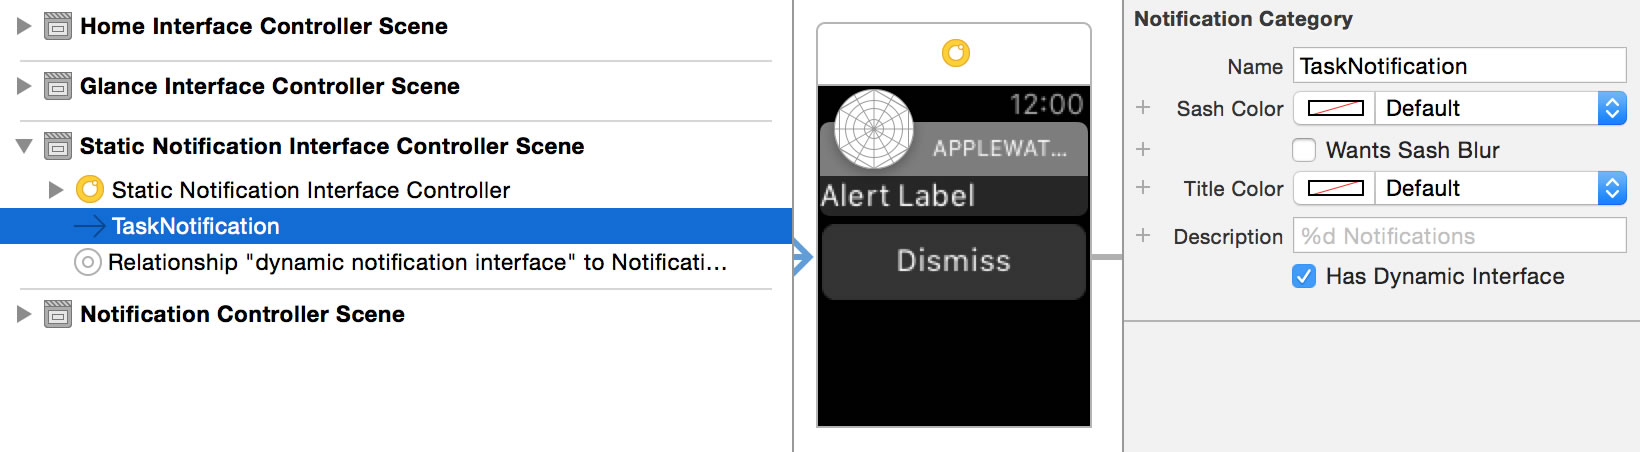
Notice that, in Listing 5, you register a notification category with an ID equal to TaskNotification. To complete the link from the iOS application to the custom NotificationController, set the notification category name in the storyboard file to TaskNotification. To do this, open the storyboard and find the static notification interface controller scene linked to your dynamic scene. If you expand the document outline on the left, you'll notice an item called myCategory. Select this item, navigate to the Attributes inspector on the right-hand panel and change the name to TaskNotification, as shown in Figure 15.
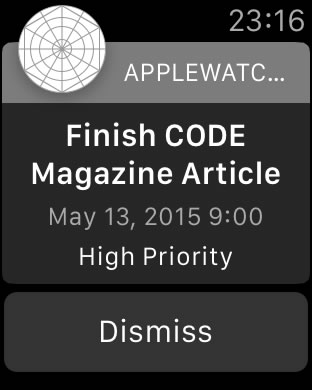
Finally, you can test the notification and see what it looks like. How do you test a notification on a simulator? When you created the WatchKit target within the iOS application and instructed the target to include a NotificationController, it also created a PushNotificationPayload.apns file. You can find this file in the Supporting Files folder. This file has an associated scheme linked to it that you can select, build, and run to show how your dynamic notification reacts to the mock payload. There's one caveat to this setup: the mock payload only simulates a push notification and can't simulate a local notification. However, you can work around this limitation. Go back to your NotificationController.m file and uncomment the didReceiveRemoteNotification method. You can use this method to test the mock payload because push and local notification have few differences. Populate this method with the following code:
// populate notification with received data
[_taskTitle setText:[remoteNotification objectForKey:@"taskTitle"]];

[_taskTime setText:[remoteNotification objectForKey:@"taskTime"]];

[_taskUrgencyLvl setText:[remoteNotification objectForKey:@"taskUrgencyLvl"]];
Next, open the PushNotificationPayload.apns file and change it to look like the following:
{
    "aps": {
        "category": "TaskNotification"
    },

    "taskTitle":"Finish CODE Magazine Article",
    "taskTime": "May 13, 2015 9:00",
    "taskUrgencyLvl":"High Priority"
}
Now change the active scheme to Notification - AppleWatchDemo WatchKit App and hit the build and run button. If done correctly, the result should mirror Figure 16.
The Possibilities are Endless
By this point, you should have a working WatchKit application. However, you have just scratched the surface of what WatchKit offers. Challenge yourself to take this example further. For instance, add a segue when you tap on a to-do item that transitions to a new interface controller with details about the task selected. Add a force touch context menu to that new interface with a delete option for the to-do (the delete method has already been written in the Task.m file for the iOS application). Last, add a Glance to show the next task due. Refer to the sidebar for links to additional tutorials on force touch and glances to help guide you through this process.
The source code for all the examples shown here has been included on the CODE Magazine download page. That source contains two projects: the completed iOS/WatchKit application and a starter project that contains only the iOS application. Additional resources can be found in the sidebar.
