


The .NET Framework is huge. There's often more than one way to accomplish the same programming task, and knowing which way to go can sometimes make the difference between code that is slow or fast, flexible or rigid, and either maintainable or a maintenance nightmare. In this article, you will learn several tips and tricks for developing code that is flexible, extensible, maintainable, and testable. Some techniques in this article may be familiar to you, while others you may not have thought of.
Use Coding Standards
Before beginning any application development, consider implementing programming and database standards with your team. Using development standards allows all programmers to know what is expected of them and how to create new applications from scratch. Standards help developers move from one project to another without having to learn a different style of programming because it was created by another programmer.
There are many reasons for using programming standards. Years ago, when mainframes were in vogue, every shop had programming standards. In fact, they used to teach programming standards in college. These days, standards are all but forgotten or never learned by the younger generation of programmers. Microsoft has published a set of programming standards for C# and Visual Basic. These are an excellent place to start, and I would like to encourage all programmers to adopt some sort of standards as an important first step in application development.
Creating standards doesn't limit your creativity, as many programmers seem to think. Programming standards help you focus your creativity where it is really needed. You can concentrate on the business problem you are trying to solve, instead of always having to think about what name to give a method or variable. As a corollary, consider the Windows and Mac operating environments, where most programs written have a consistent look and feel. This is why users like using Windows or Macs, because they don't have to learn everything about how a new program works. They already know how to use most of the features in each program. Using standards in your programming keeps the programmer's “look and feel” consistent. You spend less time figuring out what the variables are or how many indents a programmer used and focus on the logic of the program.
The use of standards leads to reduced maintenance costs due to consistency in each program. You can move from one project to another very easily, even one someone else wrote, and immediately read and understand the code. Programming standards help programmers create a consistent structure, code style, variable names, and method names within all applications. Standards create code that is unambiguous, easy to read, and easy to maintain by other developers.
The standards documents you should have in place at your shop are Visual Studio Setup, C# or Visual Basic Programming Standards, SQL Server Object Naming Standards, and Database Development Standards. The rules set forth in these documents are guidelines, so feel free to modify these to suit your own organization's needs.
The Visual Studio Setup document ensures that each programmer configures his or her Visual Studio the same as everyone else in the shop. Especially important is the Tab setting, which forces everyone to use the same tab indent. Consider what happens if you have your tab stops set at three spaces and you check a file into your source control system. Then your co-worker sets her tab stop at two spaces, checks out your file, reformats the document to two spaces, and checks that version into source control. If you want to see the changes made by your co-worker, the source control system shows that every line has been changed because reformatting changes every line to use two spaces instead of the three spaces that you'd set.
The C# or Visual Basic Programming Standards document sets forth variable and method naming, class naming, file naming, and control naming. Naming each of these items consistently greatly aids readability between all programmers in your shop.
The SQL Server Object Naming Standards document describes how to name tables, stored procedures, views, and other database objects. You should also describe how SQL keywords and functions in your SQL statements are cased.
The Database Development Standards document describes your database design approach. Your approach may include things such as how you create primary keys, the use of clustered indexes, standard fields for each table, how to handle concurrency, and whether or not to use dynamic SQL or stored procedures.
Extension Methods
Extension methods allow you to add your own custom method to an existing type. Although this seems like a cool feature, there are a few reasons to use extension methods sparingly, such as:
- Adding too many extension methods to an existing type, which clutters the API.
- Naming your extension method the same as a built-in method; yours will never be called.
- Naming your extension method the same as another extension method; your method shadows the other extension method.
Because of the above points, you might consider inheriting from the existing type and adding your own additional methods to this new class. But, with these disclaimers in place, let's learn how to create extension methods, because there are cases where using them is perfectly acceptable.
To create extension methods, you define a static class with any name you like. Listing 1 shows a class named StringExtensions. This listing shows a couple of the available methods such as ReverseString and ToBoolean. All extension methods must also use the static keyword. The first parameter passed to an extension method is the same as the type you are extending and must be prefixed with the keyword “this”. Creating classes and methods using these rules informs the compiler to add these methods to the type specified in the first parameter.
Listing 1: The StringExtensions class extends the string class with additional methods.
public static class StringExtensions
{
    public static string Reverse(this string value)
    {
        char[] charArray = null;
        string ret = string.Empty;

        if (value != null)
        {
            charArray = value.ToCharArray();
            Array.Reverse(charArray);

            ret = new string(charArray);
        }

         return ret;
    }

    public static bool ToBoolean(this string value)
    {
        bool ret = false;

        switch (value.ToLower())
        {
            case "true":
            case "t":
            case "yes":
            case "y":
            case "1":
            case "-1":
                ret = true;
                break;
            case "false":
            case "f":
            case "no":
            case "n":
            case "0":
                ret = false;
                break;
        default:
            ret = false;
            break;
         }

         return ret;
    }
}
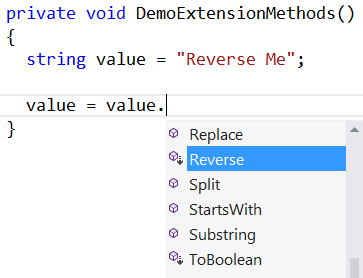
To use the methods shown in Listing 1, create an instance of type you're extending. After your new variable, type a dot (.) and your extension methods show up in the IntelliSense, as shown in Figure 1.
In the listings included with this article (and on my website: http://www.pdsa.com/downloads), you will find another class that works with the DateTime type.
The Right Way to Use Reflection
Yes, we all know reflection is slow, but sometimes it's necessary to use it to satisfy a business requirement in your application. Just like anything else, there's a right way and a wrong way to use reflection. Microsoft has made a significant improvement in performance for getting and setting properties. Make sure you are using this new way. Before I show you the new way to get/set properties, let's first learn about reflection and the old way of using it.
First, let's say you've created a Product class that has a property named ProductName. If you wish to set the value of ProductName to a string, you write code like the following:
Product entity = new Product();
entity.ProductName = "A New Product";
Instead of hard-coding the name of the property you're setting, you might want to create a generic routine that you can pass a property name to and the value to set that property to. This can be accomplished using reflection, as shown in the following code:
Product entity = new Product();
typeof(Product).InvokeMember("ProductName",
    BindingFlags.SetProperty,
        Type.DefaultBinder, entity,
            new Object[] { "A New Product" });
InvokeMember is a method of the System.Type class. The typeof() method returns an instance of the Type class, which contains meta-data about the Product class. You pass five parameters to the InvokeMember method. The first parameter is the name of the property to set. The second parameter is the name of the property or method to invoke; in this case, it's the Set property. The third parameter specifies to use the default binder. The fourth parameter is the variable with a reference to the instance of the class specified by the type (in this case, the Product object). The last parameter is an object array of whatever you need to pass to the method or property you're invoking. For setting the ProductName property, you only need a single object array of the string you're setting.
A Better Way to Set Property Values
Although the InvokeMember method works for setting a property, it's actually quite slow. There's a more efficient way to set a property using reflection. There's a GetProperty method on the Type class that you use to retrieve a PropertyInfo object. This PropertyInfo object has a SetValue method that you use to set the value on that property. Here's an example of calling the SetValue method.
Product entity = new Product();

typeof(Product).GetProperty("ProductName").SetValue(entity, "A New Product", null);

MessageBox.Show(entity.ProductName);
That code is easier to understand than the InvokeMember method and is over 100% faster! That's a big difference and you should take advantage of it when you need to use reflection to set properties.
String Handling
When working with strings, you should take advantage of certain classes and methods to avoid performance and memory problems. A key item to remember about .NET strings is that they are immutable. Immutable means that strings are read-only and the value cannot be changed after it is created. If you add more data to the original string, a new instance of a string class is created to hold the new string and the old memory is marked for garbage collection. Thus, if you are doing a lot of string manipulation, you can create performance and memory issues in your application.
The StringBuilder Class for Concatenating
One way to avoid these issues is to use the StringBuilder class. The StringBuilder class is mutable so manipulations on strings are much quicker. You may pre-allocate space when creating an instance of the StringBuilder class. If you know you will be concatenating a lot of strings together, pre-allocating space allows for growth without having to move memory blocks around. Use the methods Append, AppendLine, and AppendFormat to append new data into the StringBuilder object as shown here:
StringBuilder sb = new StringBuilder(1024);

sb.Append("Adding a new String without a line break.");
sb.AppendLine("Adding onto the previous line and adding a line break");
sb.AppendFormat("Hello {0}", "Tom");

tbResult.Text = sb.ToString();
Additional String Class Methods
A couple of other very useful techniques for working with strings are methods of the string class. The IsNullOrEmpty method helps you check to see if a string is a null value or an empty string. The use of this method is much better than using an “if” statement to check both. The next snippet shows the use of the IsNullOrEmpty method to check various values contained within a string variable.
1.string value = null;
2.Debug.WriteLine(string.IsNullOrEmpty(value));
3.
4.value = "";
5.Debug.WriteLine(string.IsNullOrEmpty(value));
6.
7.value = " ";
8.Debug.WriteLine(string.IsNullOrEmpty(value));
9.
10.value = "Some Text";
11.Debug.WriteLine(string.IsNullOrEmpty(value));
The results of running the above code are “True,” “True,” “False,” and “False.” Notice that an empty space on line 7 is not an empty string. If you want to check for all white space within a string, use the IsNullOrWhiteSpace, as shown in this code snippet:
string value = null;
Debug.WriteLine(string.IsNullOrWhiteSpace(value));

value = "";
Debug.WriteLine(string.IsNullOrWhiteSpace(value));

value = " ";
Debug.WriteLine(string.IsNullOrWhiteSpace(value));

value = "    ";
Debug.WriteLine(string.IsNullOrWhiteSpace(value));
The results of running the above code are “True,” “True,” “True,” and “True.” Regardless of whether you have an empty string, a string with one space, or a string with several spaces, the IsNullOrWhiteSpace method is perfect for checking user input. Some users may try to enter a lot of spaces to get around entering text into a required field. Using this method can help you ensure that spaces won't get by your requirement for a field that has data in it.
Generics Eliminate Duplicate Code
Prior to .NET 2.0, when you needed a single method to work with different data types, the only way to accomplish this was to pass an “object” data type to that method. Working with the object data type introduces performance problems and bugs that can occur at runtime. The alternative is to create a new method for each data type that you wish to work with. This introduces a maintenance nightmare and leads to a larger API for programmers to learn. An example of using individual methods is shown in the next code snippet. Notice the calls to two different “ConvertTo” methods; ConvertToInt and ConvertToDateTime. The only difference between these two methods is the data types being passed in as parameters.
private void HardCodedNonGenericsSample()
{
    object value = "1";

    int i = ConvertToInt(value, default(int));

    value = "1/1/2014";
    DateTime dt = ConvertToDateTime(value, default(DateTime));
}
The ConvertToInt method shown in the following code snippet accepts two “object” parameters and returns an “int” data type.
public int ConvertToInt(object value, object defaultValue)
{
    if (value == null || value.Equals(DBNull.Value))
        return Convert.ToInt32(defaultValue);
    else
        return Convert.ToInt32(value);
}
Now look at the ConvertToDateTime method in the next snippet. It's almost the exact same code, except the return value is different and it uses the Convert.ToDateTime method instead of the Convert.ToInt32 method.
public DateTime ConvertToDateTime(object value, object defaultValue)
{
    if (value == null || value.Equals(DBNull.Value))
        return Convert.ToDateTime(defaultValue);
    else
        return Convert.ToDateTime(value);
}
Create One Generic Method
The two methods shown above can be rewritten in one method by using generics. To convert the above two methods into one, look at the data types in the two methods that are different. Substitute these differences with a “T,” which stands for type parameter. Here's the result:
public T ConvertTo<T>(object value, object defaultValue)
{
    if (value == null || value.Equals(DBNull.Value))
        return (T)Convert.ChangeType(defaultValue, typeof(T));
    else
        return (T)Convert.ChangeType(value, typeof(T));
}
The code “public T” means that you have a public method that passes back the type specified in the <T> that comes after the method name. For the return type, you cast either the defaultValue or the value to the type that was passed in.
To use this new ConvertTo method, you pass in the data type you are converting into with a less-than sign and a greater-than sign, as shown in the following code snippet:
private void HardCodedGenericsSample()
{
    object value = "1";

    int i = ConvertTo<int>(value, default(int));

    value = "1/1/2014";

    DateTime dt = ConvertTo<DateTime>(value, default(DateTime));
}
Generic Lists
Prior to .NET 2.0, you were required to create your own collection classes to provide type-safety. Type safety means that you create a class that only allows you to pass in one type of object. For example, you may have a collection of string, int, or Product objects. You can't pass an int to a string collection or a Product object to an int collection. To create a type-safe collection, you inherit from the CollectionBase class and override many properties and methods. Listing 2 shows some of the code that you're required to write for each unique collection class you wish to create. As you can see, this is quite a bit of code.
Listing 2: An example of using the old CollectionBase class
public class Int16Collection : CollectionBase
{
    public Int16 this[int index]
    {
        get
        {
            return ((Int16)List[index]);
        }
        set
        {
            List[index] = value;
        }
    }

    public int Add(Int16 value)
    {
        return (List.Add(value));
    }

    public int IndexOf(Int16 value)
    {
        return (List.IndexOf(value));
    }

    public void Insert(int index, Int16 value)
    {
        List.Insert(index, value);
    }

    public void Remove(Int16 value)
    {
        List.Remove(value);
    }

    public bool Contains(Int16 value)
    {
        return (List.Contains(value));
    }

// Additional methods...
}
Instead of writing all of the code shown in Listing 2, use one of the Generic collection classes instead. For example, you can replace all of the code in Listing 2 with just the following three lines of code!
public class IntCollection : List<int>
{
}
The class IntCollection class created in the previous code snippet is type-safe and will only accept an int data type. You can't add a string or a decimal type to this collection. You get all of the same features you get with CollectionBase, such as the ability to add, remove, insert, and check to see if a value is contained within the collection, but you don't have to write all of the code for it.
The generic List<T> class is just one example of the many list classes available to you in the System.Collections.Generic namespace. Another generic class is Dictionary<TKey, TValue>, which allows you to store key/value pairs generically. You also have stacks, queues and linked lists implemented, all using generics. All of these save a ton of code and a ton of time.
Use XML Instead of a Database Table
Most programmers automatically store data in a database such as SQL Server. However, XML files are very handy for storing data without the overhead of a database. Use XML files to cache often-used but seldom-changed data, such as US state codes, country codes, and other validation data. Keeping this data in an XML file on the local storage area in your application avoids network round-trips and may speed up your application. As an example, the next snippet is some XML to represent US state codes:
<USStates>
    <USState>
        <StateCode>AK</StateCode>
        <StateName>Alaska</StateName>
        <Capital>Juneau</Capital>
    </USState>
    <USState>
        <StateCode>AL</StateCode>
        <StateName>Alabama</StateName>
        <Capital>Montgomery</Capital>
    </USState>
... More Here
<USStates>
Just as you would create an entity class to represent each column in a table, you create an entity class to represent each node in this XML file. Use the class USState shown below to represent each node in the XML file.
public partial class USState
{
    public string StateCode { get; set; }
    public string StateName { get; set; }
    public string Capital { get; set; }
}
In the USStateLoad procedure (Listing 3), you use the Load method of the XElement class to load the XML file into memory. Once loaded, you write a LINQ query to iterate over the “USState” descendants in the XML file. In this query, you use an orderby clause to sort the resulting collection by StateCode.
Listing 3: Use LINQ to XML to load XML data into a list.
private void USStateLoad()
{
    XElement xelem;

    xelem = XElement.Load("USStates.xml");

    // Fill a list of Product objects
    IEnumerable<USState> nodes =
        from node in xelem.Elements("USState")
        orderby node.Element("StateCode").Value
        select new USState
        {
            StateCode = node.Element("StateCode").GetAs<string>(),
            StateName = node.Element("StateName").GetAs<string>(),
            Capital = node.Element("Capital").GetAs<string>()
        };

    lstData.DisplayMemberPath = "StateCode";
    lstData.DataContext = nodes;
}
The select part of the LINQ query creates a new USState object for each row in the XML file. You retrieve each element by passing the name of the element to the Element method of the XElement object. An extension method called GetAs<T> is used to return either a default value if there is no data, or return the string value of the element.
As mentioned, an extension method called GetAs<T> is used to retrieve the data from the Element method in Listing 3. You use this extension method to ensure that there is no missing data from one of the elements, and to return the correct data if there's incorrect data or the data is missing. This method is contained in a class called XmlExtensions. The GetAs<T> method is shown in the code below:
public static class XmlExtensions {
    public static T GetAs<T>(this XElement elem, T defaultValue = default(T)) {
        T ret = defaultValue;

        if (elem != null && !string.IsNullOrEmpty(elem.Value))
            ret = (T)Convert.ChangeType(elem.Value, typeof(T));

        return ret;
    }
}
Notice the use of the optional parameter called defaultValue. If no value is passed to this parameter, it's automatically set to the default value for the type parameter T. In the case of a string, an empty string is returned if a null is found in one of the elements. If you have a numeric value, such as an int, a zero is returned if a null was found in the numeric element.
Override the ToString() Method
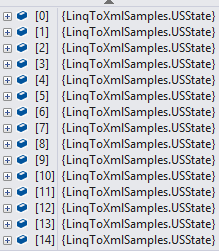
If you hover over a collection of your objects in your debugger, you probably see something that looks like Figure 2. By default, the debugger calls the ToString() method to display this data. Instead of just taking this default, you should override the ToString() method in your class in order to display better data.
Override the ToString() method and use some property or properties in your class to return some meaningful data. For example, return the StateCode property plus the StateName property enclosed in parentheses from ToString() as shown below.
public partial class USState
{
    public string StateCode { get; set; }
    public string StateName { get; set; }
    public string Capital { get; set; }

    public override string ToString()
    {
        return StateCode + " (" + StateName + ")";
    }
}
After you add this override of the ToString() method, when you run the application and look at the collection of states in the debugger, you now see real data, as shown in Figure 3.

Another place the ToString() override comes in handy is if you forget to use a DisplayMemberPath in your WPF ListBox or ComboBox, or the DisplayTextField in WebForms. The ToString() method is called automatically when a class is bound to a list control and you forget to fill in the appropriate display property.
Wrap Up Things That Change
Although .NET is very object oriented, and you use classes for everything you do in .NET, there are times where you still want to create your own wrapper classes around the .NET classes and methods. The following list should help you decide on whether or not to create your own wrapper class:
- Microsoft might change to a new class for doing the same thing within the .NET Framework.
- An example of this is the
ConfigurationSettingsclass in .NET 1.0 that was deprecated in favor of theConfigurationManagerclass.
- An example of this is the
- Your customer may want to store data in a new way.
- They change from MySQL to SQL Server or from SQL Server to Oracle.
- You may want to store data in a different location.
- You may want to take your global settings and store them in a database table instead of in the .config file of your application.
- There are too many lines of code to remember to perform what should be a simple function.
- Encrypting and decrypting data takes many lines of code and requires you to work with a few different classes and interfaces.
- Selecting and modifying data in a database using ADO.NET takes quite a few lines of code.
- You wish to centralize code that you use in many locations.
- You wish to call one method in all your catch blocks to publish exceptions.
If you think the implementation of some functionality in your application could possibly change, it's a good idea to create your own wrapper class. Looking at the list above, you should create your own class to retrieve global settings, a class to wrap up ADO.NET, a class to perform encryption and decryption and a class to help you publish exceptions.
You want to write code in your wrapper classes such that if you need to change the underlying implementation, the code that uses your wrapper class doesn't have to change. If you can accomplish this, your code will be very flexible in the long run.
As an example, let's create a class that wraps up the ConfigurationManager class to retrieve configuration settings. If you store data in the <appSettings> element in the .config file of your application, you're most likely retrieving those settings using the ConfigurationManager class. Below is a sample of a configuration file where a default state code value is stored.
<configuration>
    <appSettings>
        <add key="DefaultStateCode" value="IA" />
    </appSettings>
</configuration>
To retrieve the value IA from the DefaultStateCode key, you pass the key to the indexed property AppSettings, as shown below.
public string GetStateCode()
{
    return ConfigurationManager.AppSettings["DefaultStateCode"];
}
The problem with using the ConfigurationManager class is that the only place you can store the default state code is within a configuration file. So, if you use the ConfigurationManager class in 100 places within your application, and you wish to move these settings into a database table, you have to change your application code in 100 places.
A better approach is to recognize that things like the storage location of configuration settings could change in the future and you shouldn't hard-code a class and method name to retrieve those settings. Instead, create a class to retrieve configuration settings and your own method to wrap up the call to the ConfigurationManager class. Use this class and method in those 100 places in your code. Then, when you wish to change to storing your configuration settings in a table, you only have to change your code in one place. The next snippet is a simple example of a class called PDSAConfigurationManager with a GetSetting method.
public class PDSAConfigurationManager
{
    public string GetSetting(string key, string defaultValue)
    {
        string ret = string.Empty;

        ret = ConfigurationManager.AppSettings[key];
        if (string.IsNullOrEmpty(ret))
            ret = defaultValue;

        return ret;
    }
}
To use this class in your code, you create an instance of the PDSAConfigurationManager class, then call the GetSetting method as shown below.
private void GetValue()
{
    PDSAConfigurationManager mgr = new PDSAConfigurationManager();

    MessageBox.Show(mgr.GetSetting("DefaultStateCode","CA"));
}
Calling ConfigurationManager.AppSettings is a little simpler because AppSettings is a static method and thus no instantiation of the ConfigurationManager class is required. However, using instance methods gives you much more flexibility because you could modify properties of the class prior to calling a method, or even use dependency injection to completely change the implementation of the class. But, if you wish to have a static way of accessing the GetSetting method, you can use a Singleton pattern to accomplish this, as discussed in the next section of this article.
Using instance methods gives you great flexibility because you can modify properties of the class prior to calling a method, or even use dependency injection to completely change the implementation of the class.
Singleton Pattern
Many developers, including the ones at Microsoft, like creating classes with static methods and properties. Although these methods and properties are easy to use because you don't have to instantiate a class in order to call them, there are some potential problems with this approach.
- The ability to create an instance, modify a property, and then call a method cannot be done with a static method.
- You can't inherit from the class and override the functionality of a static method.
- If you need to add additional functionality to your static method, you end up with a lot of overloads of the method or a lot of optional parameters. It's easier to create a class with properties that you can set prior to calling an instance method.
- In an ASP.NET application, you forget that a property is static and you try to use it for per-user data, only to realize that the last user to change the data “wins.”
- Static methods cannot be defined in an interface and thus you can't pass these objects around by an interface. These classes cannot be used in a strategy pattern.
- Developers think instantiation takes too long. Modern compilers, such as .NET, have made object instantiation a very quick operation.
- Developers don't want to write an extra line of code.
- A static method or property could have problems in a multi-threaded application.
There are both pros and cons to using or not using static properties and methods. Like anything in programming, use them in moderation.
If you decide that you would like the flexibility of instance properties and methods but the convenience of static properties and methods, one option is to use a Singleton pattern. This design pattern gives you the benefits of a class that has all instance methods and properties, but also allows you to create a single instance when that's all you require.
The code in Listing 4 shows the PDSAConfigurationManager with the GetSetting method you learned about in the previous section of this article. A property called Instance defined as a static is added to this class. There's a private static field called _Instance that is initially assigned to null. In the getter of the Instance property, you check to see if the field _Instance is equal to null, and if so, you create a new instance of the PDSAConfigurationManager class and assign it to the _Instance field. You then return this single instance from the getter.
Listing 4: Using a Singleton pattern gives you the flexibility of creating multiple instances or using a single instance.
public class PDSAConfigurationManager
{
    private static PDSAConfigurationManager _Instance = null;

    public static PDSAConfigurationManager Instance
    {
        get
        {
            if (_Instance == null)
                _Instance = new PDSAConfigurationManager();

            return _Instance;
        }
        set { _Instance = value; }
    }


    public string GetSetting(string key, string defaultValue)
    {
        string ret = string.Empty;

        ret = ConfigurationManager.AppSettings[key];
        if (string.IsNullOrEmpty(ret))
          ret = defaultValue;

        return ret;
    }
}
To call the GetSetting() method on this PDSAConfigurationManager class, you now can use a simpler version as shown below:
private void GetValue()
{
    MessageBox.Show(PDSAConfigurationManager.Instance.
            GetSetting("DefaultStateCode", "CA"));
}
By using the Instance property, you avoid having to create an instance of the PDSAConfigurationManager because a single instance is available for you to use. However, you could inherit from the PDSAConfigurationManager class and override the GetSetting() method to modify how this method works. This would not work if you had defined GetSetting() as a static method.
Summary
There are so many little tips and tricks that help you develop code that can be reused and keep your code maintainable, testable and flexible over the life of your software. Many of the techniques presented in this article are object-oriented programming 101. Others are particular to .NET, and still others apply to almost any programming language. Striving to create flexible and maintainable code is always a good idea. You should also try to keep your code so it performs well too. Sometimes you may have to sacrifice one for the other. You'll have to make the decision on what code to write, but hopefully, you found a few gems in this article that you can take advantage of right away.
NOTE: You can download the complete sample code at my website. http://www.pdsa.com/downloads. Choose “PDSA Articles”, then “Code Magazine -Tips and Tricks for Flexible Code” from the list.
