


JavaScript isn't the language it once was. In many ways it's the poster child for how standards bodies can improve products over time. For many people, JavaScript is a bad memory, but with the changes to JavaScript and the ecosystem around JavaScript, it's time to come back to this now ubiquitous language.
JavaScript in the Browser
Some great percentage of the Internet is running on JavaScript that has served us well for the past couple of decades. A typical example (using jQuery) looks something like this:
$(document).ready(function () {
    var $form = $("#listForm");

    var validator = new Pristine($form.get(0));
    $form.on("submit", function (e) {e.preventDefault();
        if (validator.validate()) {
            // Submit the form
            $form.trigger("reset");
            $("#listSignupResult").text("Sent...");
        } else {
            $("#listSignupResult").text("Please correct errors...");
        }
    })

});
This worked well and continues to work. This style of JavaScript is certainly a product of the technology at the time. The early versions of JavaScript (e.g., ECMAScript) weren't trying to innovate in the language but work well across different browsers and operating systems. This style also predates many important software ideologies, like unit testing. This means that the style of coding didn't take some of the ideas into account. Much of this was driven by the fact that we thought we were writing small amounts of JavaScript, but over time, that grew and grew into more complex and harder to maintain codebases. Something had to change.
What Is “Modern JavaScript?”
When we talk about modern JavaScript, we must dig a little deeper into what that means. Nearly a year after Sun Microsystems and Netscape announced the release of JavaScript (and support for it in the browser), they formalized the language by announcing a meeting to standardize the language.
This standardization allowed for versioning of the language and attempted to come to agreement about what features would be supported by all browsers. Of course, this only worked as much as the companies involved could cooperate and how much adoption there was for newer versions of browsers (I'm looking at you, Internet Explorer). This left the language stuck at ECMAScript 3 for almost two decades. Browser companies continued to add newer features - they just weren't agreed on. The big change was supposed to happen with version 4 of ECMAScript, but it was shelved and never released due to infighting on the ECMAScript board. When ECMAScript 5 (or ES5) was released, it ushered in the real beginning of what I call “Modern JavaScript.”
Since then, the releases of the language have been on a pretty consistent release schedule and the browsers fairly consistently kept up with new features. This means, for the most part, that we can move on from the browser wars and work with JavaScript in a more mature way.
Enough history! On to the modern usage of JavaScript.
ECMAScript 6 and Beyond
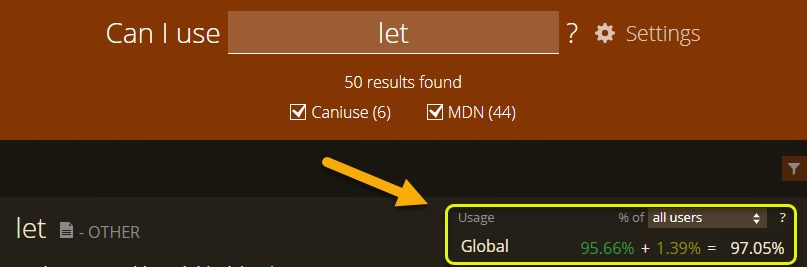
After finally releasing ECMAScript 5, JavaScript standardization got complicated. The sands are moving faster than you might imagine in the specs because they're coming on a somewhat yearly basis. Because of that, we sometimes need to have a way to see whether a feature in modern JavaScript is supported by browsers. One useful tool in this is https://caniuse.com. For example, if I want to see if the let feature works, I can go to that site and put in that feature, as seen in Figure 1.

Although looking at the specific browsers is interesting, I'm mostly looking for the global usage (as shown in Figure 2). Once this number is over 95% or so, I know that I can use it natively in the browser.
Of course, the numbers might never be 100% covered. Browsers don't die; they slowly fade away. With this in mind, there are times when you'll need to transpile your JavaScript code for older browsers. Tools like Babel do this transpiling for support in a wide number of languages. They essentially write the JavaScript in a way that works in all browsers.
Browsers don't die; they slowly fade away.
Whether you end up transpiling for older browsers or just use certain features because you know that your users are using modern browsers, there are a set of features that exemplify modern JavaScript including classes, arrow functions, transpilation and more. These features make JavaScript easier to write and easier to maintain. No longer is JavaScript a simple scripting language, but now it's a modern language because of these features and the tooling that allows you to transpile your larger projects into applications. Let's talk about the main features you should think about using in your own projects.
Var, Let, and Const
If you've written any JavaScript in the past twenty years, you're probably familiar with the simple var statement. It's the way to declare variables, but it's problematic. The issue is that var in the global scope creates a global object. Consider this code:
var x = 0; // it is global
if (this.x === 0) console.log("x is 0");
Using var creates a globally available object. That's why they introduced let. As an alternative, let defines a variable that is scoped:
let y = 1; // scoped
// this.y is undefined
if (this.y === 1) console.log("y is 1");
In this case, the y variable is scoped to the file, not into the global scope. Inside any real scope (e.g., function, block, etc.), your code is never leaked into other scopes accidently.
Along with let, a new way to define a variable is by using the const keyword:
const name = "Shawn";
name = 'Bob'; // error
In this example, you're specifying that the value can't be changed. In many cases, within a scope, you'll want to have as many of your variables use const as much as possible. This forces you to think about whether a variable is changed or not. In many cases, you aren't creating a variable to change, but just to hold a result. For example:
const someDiv = document.getElementById("someDiv");
You can see, if you've gotten some value, that you're never going to reassign this value but use it as starting point to some code. What's important here is that the someDiv isn't immutable but the variable is. So, you can set or change values on someDiv, but you can't reassign someDiv.
Unless you have a specific use for var, you should switch to using let and const for all variable construction in modern JavaScript.
Classes
Many of us came to JavaScript after working with more typical object-oriented languages (e.g., Java, C#, etc.). Modern JavaScript enables class structures that are similar (although not the same) as these other languages. The big difference is that classes shouldn't be considered the central object container like they are in Java and C#. Instead, continue using array and object syntax when a class isn't necessary. Now that I'm off my soapbox, let's see how classes work in JavaScript.
Classes are defined with the class keyword:
class ListForm {
}
The names of classes are generally Pascal-cased because objects from classes need to use the new operator to create a new instance:
const form = new ListForm();
Classes can also have member variables:
class ListForm {
    form = document.getElementById ("listForm");
    msg = document.getElementById ("listSignupResult");
}
In addition, you can have methods (e.g., functions). Member methods are defined by just creating the shape of functions as members of the class (the function keyword isn't necessary):
class ListForm {
    form = document.getElementById("listForm");
    msg = document.getElementById("listSignupResult");
    validateForm() {
        this.form.reset();
        this.msg.innerText = "Sent...";
    }
}
Notice that to access members, you must use the this keyword. You can also parameterize construction by using a constructor:
class ListForm {
    constructor(form, msg) {
        this.form = form;
        this.msg = msg;
    }
    ...
Note that by defining the form and msg (in this example) using the this keyword, you're adding them as fields on the class. Therefore, the method in the class can still use them:
validateForm() {
    this.form.reset();
    this.msg.innerText = "Sent...";
}
In practice, you'll want to define the fields and initialize them to better document classes:
class ListForm {
    form = null;
    msg = null;
    constructor(form, msg) {
        this.form = form;
        this.msg = msg;
    }
    ...
In this form, the fields are defined as publicly available, but initializing them in the constructor. This is functionally equivalent to not defining them, but I think it makes the class much more obvious what are fields and what aren't fields.
Classes also support properties by defining functions that return or set properties:
set theForm(value) {
    this.form = value;
}

get theMessage() {
    return this.msg.innerText;
}
This allows you to have property accessors for reading and writing of fields on the class. If you're using accessors, you may want to hide the underlying fields. You can do this with private fields (although not supported in all newer browsers) by prefixing them with the #.
class ListForm {

    #form = null;
    #msg = null;

    constructor(form, msg) {
        this.#form = form;
        this.#msg = msg;
        this.validator = new Pristine(this.#form)
    }

    set theForm(value) {
        this.#form = value;
    }
Note that the # becomes part of the name of the variable, but this way, the fields aren't accessible outside the class.
I could write an entire article just on the class structure, but instead I'll just point out that the class supports other typical object-oriented features like:
- Inheritance (via
extendsandsuperkeywords) - Type information (via
isInstanceOfkeyword) - Static fields and properties (via adding them to the type instead of the class)
Again, unless you need this type of object creation, information hiding, or polymorphism, I wouldn't replace every object or function in your code base with classes.
Arrow Functions
Before I can talk about what arrow functions are, let's talk about regular functions. Functions are defined by the function keyword:
function show(msg) {
    console.info(msg);
}
In this example, it's named, has an argument (e.g., data passed in), and has some body that contains some code to be executed. Pretty simple. Functions don't need to be named, but can be anonymous. For example, they're often used anonymously for callbacks or promises:
form.addEventListener("submit", function(e) {
    console.info(e);
});
Here, we're using it to have the event listener execute the function once someone submits the form. The function structure is essentially the same (adding parameters and a body), but just not named (e.g., anonymous).
Functions have a secret though; they create a scope. That scope is important so that data inside functions doesn't leak into the parent (or global) scope:
form.addEventListener("submit", function(e) {
    let x = 0;
    console.info(e);
});

console.info(x); // fails, because x is not defined
So what does this have to do with arrow functions? Well, arrow functions are a way to more discreetly define functions. The form is to just have the parameters and the code block separated by => (which is why they're called arrow functions). These are similar to lambdas in other languages. For example:
form.addEventListener("submit", (e) => {
    console.info(e);
});
Arrow functions can omit the curly braces for a more concise format too:
form.addEventListener("submit", (e) => console.info(e))
In some ways, the arrow function is to provide conciseness in the code. You can also assign the function to a variable (like you can do with anonymous functions):
const showInfo = (msg) => console.info(msg);
showInfo("Hello World");
There is one big difference between arrow functions and normal functions: Arrow functions do not create a scope. They're lighter than standard functions. You can think of it as arrow functions adopting their parent scope. But remember, anything created in the arrow function is valid outside the function:
form.addEventListener("submit",  (e) => {
    let x = 0;
    console.info(e);
});

console.info(x); // succeeds, x is now defined in this scope
I now use arrow functions in most cases when I need an anonymous function. This is especially true for callbacks or promises.
Destructuring
Another important feature that you'll want to get used is destructuring objects and arrays. The term comes from the idea of getting at parts of a structure by accessing individual components without needing to reference the original object. Let's start with object destructuring to explain what's going on. Let's assume that you have an object like so:
let user = {
    name: "Shawn",
    email: "shawn@aol.com",
    birthday: "1999-05-05"
};
Destructuring allows you to pull values out into their own variables. It does this by using curly braces to describe what properties come out. For example:
let { name, email, birthday } = user;
console.log(name);
This is equivalent to:
let name = user.name;
let email = user.email;
let birthday = user.birthday;
Although breaking out an object into individual properties might not be that interesting, it's really powerful when you don't need many of the properties:
let { name, email } = user;
It matches these by name, not position. You'll use these later when you look at Modular JavaScript.
Arrays are similar, but are destructed by position, not name (obviously):
let colors = ["blue", "red", "green"];
let [first] = colors;
console.log(first);
You're still creating a variable (called first in this example) but automatically putting the value from the ordinal position (e.g., blue).
Ultimately, destructuring is about flattening structures into simple values. Although you wouldn't use this in place of creating variables using property accessors or array indexes, it provides a new way to think about accessing parts of objects.
Spread Operator
In some ways, the spread operator represents the opposite of destructuring. The spread operator (...) allows you to take any properties or array elements and spread them into another object. For example:
let user = {
    name: "Shawn",
    email: "shawn@aol.com",
    birthday: "1999-05-05"
};
let authInfo = {
    token: "12345",
    ...user
};
// becomes { token, name, email, birthday }
Effectively, the spread operator tells the interpreter to destructure the user object and assign each of the properties onto the authInfo object. It works the same way with arrays too:
let primaryColors = [ "blue", "red", "green" ];
let colors = [
    ...primaryColors,
    "yellow",
    "orange",
    "purple"
];
// colors[0] = "blue"
Although you could do this by merging the arrays, this can be a powerful way to combine data using this simple syntax.
Array Methods
While we're talking a about arrays, let's talk about methods added to the Array type. I'm not going to cover all of them, but for me, the real power is in some of the array manipulation that you've needed to use underscore or lodash to accomplish. They're now built-into the language.
First, let's see how Array.find works:
let primaryColors = [ "blue", "red", "green" ];
let red = primaryColors.find(val => val.length === 3);
The Find method takes a function (or arrow function as you're seeing here) to find a single element. The first one that's matched by the function is returned. In this case, it returns red because it's the first element whose length is 3. The val variable is the value of each element of the array. This function is called for every member of the array until it returns a true. This is the same as this (more verbose) version:
let red = primaryColors.find(function (val) {
    return val.length === 3 ? true : false;
});
I'm showing this version to be really clear about what it's doing, but using an arrow function makes this a lot shorter and clearer.
The next method is filter. It's similar to find, but instead returns all the matching elements. Here's how it works:
let colors = primaryColors.filter(val => val.length >= 4);
// [ 'blue', 'green' ]
A key difference here is that filter returns an array and find returns an element of that array.
Another interesting method is called every. This method returns whether all the members of the array satisfy some test. For example:
if (primaryColors.every(val => val.length > 0)) {
    console.log("No empty colors");
}
The inverse of every is some (it's not new, but lots of developers seem to have missed it):
if (primaryColors.some(val => val.length === 3)) {
    console.log("At least one is three chars long");
}
Again, all of these methods take a callback where you can do a small amount of computation or large. They really empower you as a developer to manipulate arrays without resorting to third-party libraries.
Modular JavaScript
Although most of the features I've talked about in modern JavaScript have been new objects or syntax, modular JavaScript is a big change in the way you think about JavaScript development. Before modular JavaScript, you wrote one or more JavaScript files, included them all on the page, and hoped that they were loaded early enough to make it all work:
<script src="jquery.min.js"></script>
<script src="bootstrap.min.js"></script>
<script src="pristine.js"></script>
<script src="index.js"></script>
By writing some of the code in index.js, you'd have to wait for the browser to load the first three scripts to be sure that the objects you needed in the global scope were available (e.g., $, jQuery, Pristine, etc.). The problem here was that we weren't clear about what the script did and didn't need. We'd just throw everything into the global scope and live with the bloat.
There were several approaches to solve this, but the two that are most prevalent are Node's CommonJS and JavaScript modules. Because the browsers are going to support the JavaScript import/export, let's see how that works.
Instead of depending on the global scope, in modular JavaScript, you just use import statements to bring in the libraries/code that you need. For example, let's say that you wanted to load a library to do:
import Pristine from "pristinejs";
This brings in an object called Pristine that you could use in the code. The code is self-documenting, as you know where all the objects are coming from, rather than depending on the global scope. You could then use the Pristine object like so:
const form = document.getElementById("listForm");
const validator = new Pristine(form);
The reverse of this is exporting from a script. For example,
export function validateForm() {
    ...
}
Then in another script, you could load this function to use it:
import { validateForm } from "./validateForm.js";
validateForm();
The form of import is to point at a relative JavaScript file that you're loading (called validateForm.js). In the early import, Pristine is an NPM package that you've loaded, so you're retrieving it by name.
You'll notice, in this import, that you're using the destructuring syntax to get the function called validateForm. That's necessary, as you could export multiple things out of a single file. If you change that export to default, it allows you to import it without a name (like you did for Pristine). For example:
export default function() {
    ...
}
In that case, you can call the function whatever you want as, when you import it, it just imports the default object (e.g., function, object, array, class, etc.):
import validateForm from "./validateForm.js";
validateForm();
By using imports and exports, you could see that a single import of some top-level object (like the main function of JavaScript), could walk through the code and know all the dependencies. In that way, modular JavaScript doesn't need to load every script, but know that it needs to load them as they walk the chain of files.
To make this work, you need to use the script tag's support for modules:
<script type="module" src="./main.js">
</script>
This tells the browser to load the main.js as a module (which can start the process) but then any import becomes a request to the server. In this way, the page doesn't need to know about each piece of code that's necessary. But it comes at the cost of higher network activity. This is great for development (see my article on Vite in the September/October 2021 issue of CODE Magazine/), but can be problematic for production. In addition, script modules aren't well supported as of the writing of this article. To get around both of these issues, packaging your projects for the browser is a common way to handle this. Let's see how that works.
Packaging for the Browser
All of these features come together by packaging your projects for the browser. What do I mean by packaging? Essentially, leveraging the modular JavaScript to build a single (or usually a small number) of JavaScript files that are loaded by the browser. The essential idea here is to have a startup script (e.g., main.js) that loads and executes your JavaScript. What happens is shown in Figure 3.
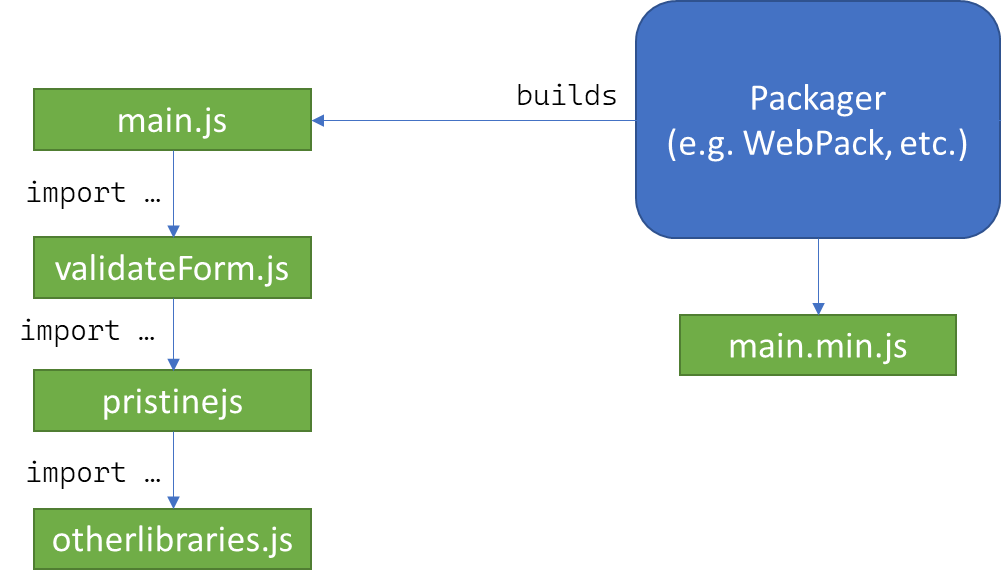
Figure 3 shows how the packager is being asked to package main.js. It walks through the different imports to get a full list of required scripts and then packages them together in a resulting JavaScript file. This one file contains all the code necessary to run the code in main.js. Your production page just refers to the main.min.js (or whatever it's called) and it can run the project.
Although the packagers attempt to be concise for production builds, sometimes there's a lot of code in a project. Packagers allow you to do code splitting by implementing dynamic imports. Dynamic imports are simply a way of telling the packager to break up the project into multiple files that are loaded as necessary.
Other benefit of using packagers is that they often transpile your project down to ECMAScript 3 so that the code you're writing with the latest and greatest features of JavaScript will work with the maximum number of browsers. In this way, you can get the best of both worlds.
Lastly, packagers usually support something called “Tree Shaking” for production builds. Tree shaking is simply walking through the files that're imported, and only including the parts of any project that are necessary for your project. Consider my example, where you might use our validateForm.js file. If that project exported several different objects, but the code only uses one of them, the tree shaker just eliminates the code in validateForm.js that's not called. In this way, the size of the resulting built JavaScript should be significantly smaller when using generalized libraries (e.g., lodash or momentjs) where you might be calling one or two code paths in a larger project.
Let's see how that works. In a simple project like this one, where you want to just perform some validation on a form, you could write the main.js like so:
// main.js
import validateForm from "./validateForm.js";
validateForm();
This then requires you to have written the validateForm like so:
import Pristine from "pristinejs";
export default function() {
    const form = document.getElementById("listForm");
    const msg = document.getElementById("listSignupResult");
    const validator = new Pristine(form);
    form.addEventListener("submit", (e) => {
        e.preventDefault();
        if (validator.validate()) {
            form.reset();
            msg.innerText = "Sent...";
        } else {
            msg.innerText = "Failed to validate";
        }
    });
}
Notice that you're using a library called pristinejs. In this case, you'd get this library from Node Package Manager (NPM). If you haven't used Node.js before, this may a little overwhelming, but let's stick to the pieces. If you don't have Node.js installed, go to https://nodejs.org/ and install it first.
Next, you can just go to the project's directory and initialize a package file:
> npm init -y
This initializes a package.json file where you can install dependencies. You only need two. First, you can install the pristinejs package by calling:
> npm install pristinejs -save
You end up with a simple package.json with the pristinejs installed:
{
    "name": "Example",
    "version": "1.0.0",
    "description": "",
    "keywords": [],
    "author": "",
    "license": "ISC",
    "dependencies": {
        "pristinejs": "^0.1.9"
    }
}
In this example, you're going to use the most common packager: WebPack. There are others (e.g., Browserify, Rollup, etc.), but WebPack is pretty simple. You can just run it using the Node Package Executer (npx):
> npx webpack ./main.js
By default, this builds in a ./dist folder and uses a production build (it gives you a warning about this), as seen in Figure 4.
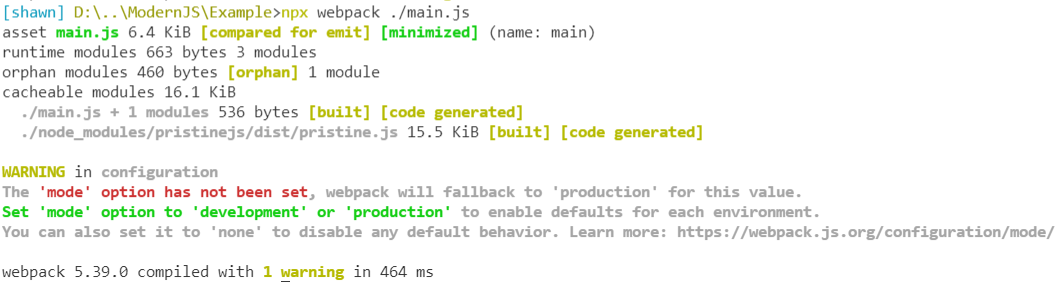
Webpack supports changing a lot of this behavior, but in this smallest case, you can now use that compiled version of your project by simply pointing the HTML to use the single main.js in the ./dist folder:
<script src="./dist/main.js"></script>
Although this doesn't teach you all about packaging for the Web, you should have the basic idea of why you package for the Web at all.
Where Are We?
Whew! JavaScript has been through a number of small and large changes in the way we write modern JavaScript these days. If you've been using frameworks out there, like Angular, Vue, or React; you can see many of these changes reflected in how those projects work. My sincere hope is that you can adapt to these new tools in your JavaScript toolbox and see that, today, you can write large, powerful projects using JavaScript in the browser. By leveraging these techniques and features, you can write, test, and deploy more reliable and maintainable code.
