


Asynchronous JavaScript and XML (Ajax) is the cornerstone of communication between client-side and server-side code. Regardless of whether you use JavaScript, jQuery, Angular, React, or any other client-side language, they all use Ajax under the hood to send and receive data from a Web server. Using Ajax, you can read data from, or send data to, a Web server all without reloading the current Web page. In other words, you can manipulate the DOM and the data for the Web page without having to perform a post-back to the Web server that hosts the Web page. Ajax gives you a huge speed benefit because there is less data going back and forth across the internet. Once you learn how to interact with Ajax, you'll find the concepts apply to whatever front-end language you use.
Because more mobile applications are being demanded by consumers, you're probably going to have to provide a way for consumers to get at data within your organization. A consumer of your data may be a programmer of a mobile application, a desktop application, or even an HTML page being served from a Web server. You don't want to expose your entire database; instead, create an Application Programming Interface (API) in which you decide how and what to expose to these consumers. A Web API, also called a REST API, is a standard mechanism these days to expose your data to consumers outside your organization.
This is the first in a series of articles where you'll learn to use Ajax and REST APIs to create efficient front-end applications. In this article, you create a .NET 5 Web server to service Web API calls coming from any Ajax front-end. You also learn to create an MVC Web application and a Node server to serve up Web pages from which you make Ajax calls to the .NET 5 Web server. In future articles, I'll show you how to use the XMLHttpRequest object, the Fetch API, and jQuery to communicate efficiently with a .NET 5 Web API project.
Ajax Defined
Although Ajax stands for Asynchronous JavaScript and XML, the data transmitted can be JSON, XML, HTML, JavaScript, plain text, etc. Regardless of the type of data, Ajax can send and receive it. Ajax uses a built-in object of all modern browsers called XMLHttpRequest. This object is used to exchange data back and forth between your Web page and a Web server, as shown in Figure 1.
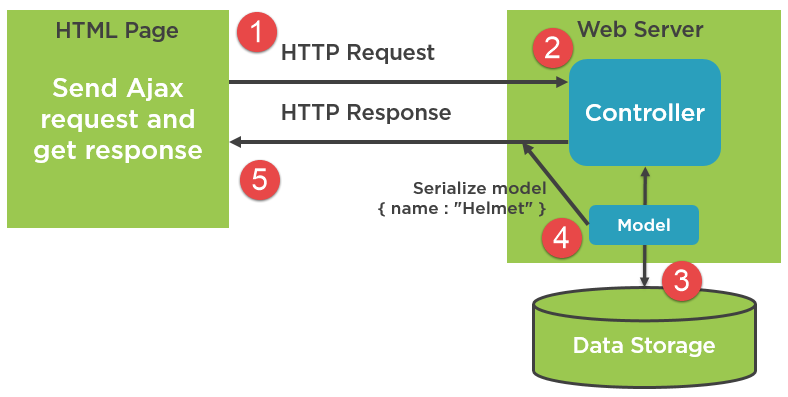
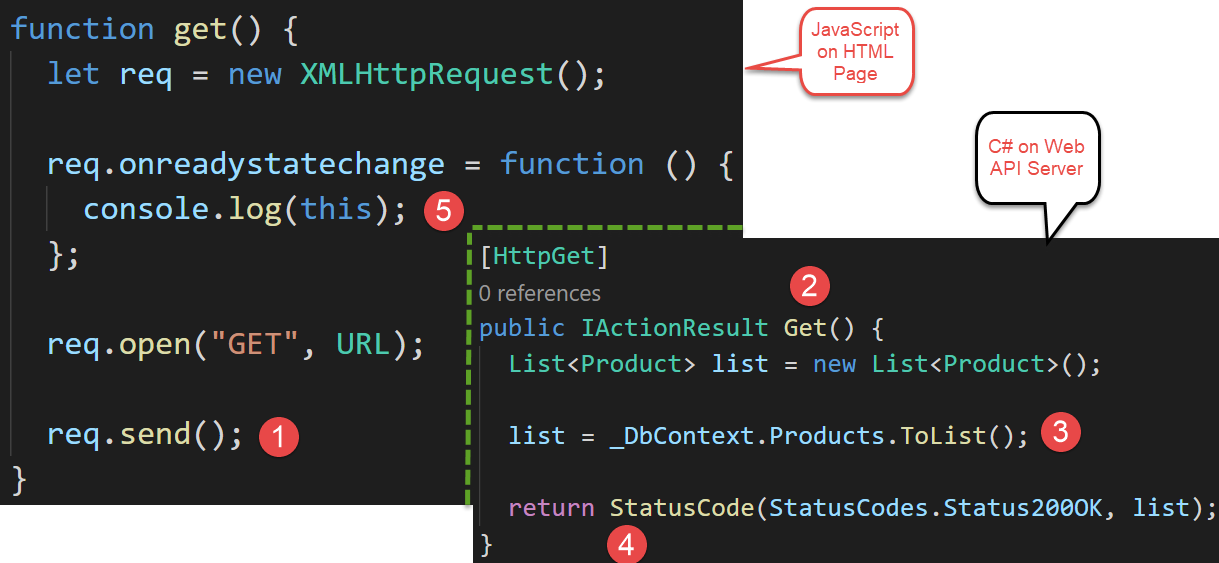
Looking at Figure 1, you can see that an HTML page sends a request for data (1) to a controller in the Web server (2). The controller gets that data from the data storage medium (3) and from the data model that serializes that data as JSON (4) and sends the response back to the HTML page (5). If you look at Figure 2, you can see both the JavaScript and C# code on the client and the server that corresponds to each of the numbers on Figure 1. Don't worry too much about the code in Figure 2, you're going to learn how to build it in this article.
Methods of Communication
Although the XMLHttpRequest object is the basis for all Ajax calls, there are actually a few different ways you can use this object. Table 1 provides a list of the common methods in use today.
If you're unfamiliar with the terms callbacks and promises, the two sections that follow provide you with a definition and some links to learn more about each.
Callbacks
A callback is the object reference (the name) of a function that's passed to another function. That function can then determine if and when to invoke (callback) that function. It may call that function after some variable changes state, or maybe after some task is performed. For a nice definition and an example of a callback, check out this article: https://www.freecodecamp.org/news/javascript-callback-functions-what-are-callbacks-in-js-and-how-to-use-them.
Promises
A promise is the result of the completion of an asynchronous operation. The operation may succeed, fail, or be cancelled. Whatever the result, the promise allows access to the result and any data returned by the operation. For more information, see this post: https://developer.mozilla.org/en-US/docs/Web/JavaScript/Reference/Global_Objects/Promise. Another great article compares callbacks and promises: https://itnext.io/javascript-promises-vs-rxjs-observables-de5309583ca2.
Tools You Need
I suggest you follow along step-by-step with this article to build a C# .NET Web API project to retrieve data from a SQL Server table. You also build a MVC application and a Node server to host Web pages for communicating to the Web API project. For this article, I'm going to use the technologies listed below.
- Visual Studio Code v1.52.1 or higher
- .NET v5.x or higher
- Entity Framework
- SQL Server 2019 Developer Edition or higher
- SQL Server AdventureWorksLT Sample Database
- JavaScript ECMAScript 2015 or higher
- jQuery v3.5 or higher
If you wish to follow along, download these tools and install them on your computer. At the time of the writing of this article, these tools can be retrieved from the following locations.
- VS Code: code.visualstudio.com
- .NET 5: dotnet.microsoft.com/download
- SQL Server: www.microsoft.com/en-us/sql-server/sql-server-downloads
- AdventureWorksLT Sample Database: https://github.com/PaulDSheriff/AdventureWorksLT
Create a Web (REST) API Server
To retrieve data from an Ajax call, you must have a Web server running that has a series of endpoints (methods) to call. This Web server can be created with a variety of tools, including Node and .NET 5. I'm going to use .NET 5 in this series of articles, but Node works just as well. If you want to learn to use Node to build a REST API, check out my Pluralsight video entitled JavaScript REST APIs: Getting Started at https://bit.ly/2XT1lgD.
In this section of this article, you'll create the .NET 5 Web API project to retrieve the data from the SQL Server AdventureWorksLT database and send it back to a Web page. Open an instance of VS Code and open a terminal window. Navigate to your normal development folder. Create a .NET Web API app using the following dotnet command.
dotnet new webapi -n WebAPI
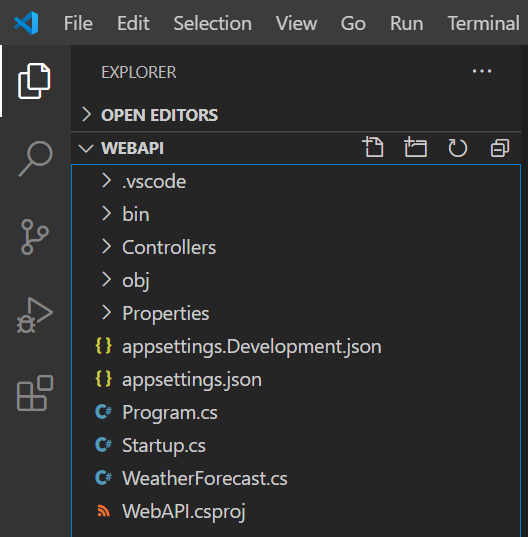
Once the dotnet command finishes, select File > Open Folder… from the menu and select the WebAPI folder you created. Your VS Code will look like that shown in Figure 3.
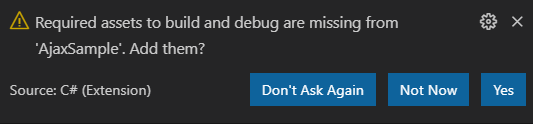
Add Required Assets
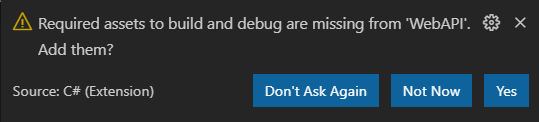
At the bottom right-hand corner of VS Code, a dialog appears (Figure 4) asking you to add some required assets. Click the Yes button to allow VS Code to load the various packages to support C# and Web API programming. If, for some reason, you don't see this dialog, exit VS Code and restart it.
Try It Out
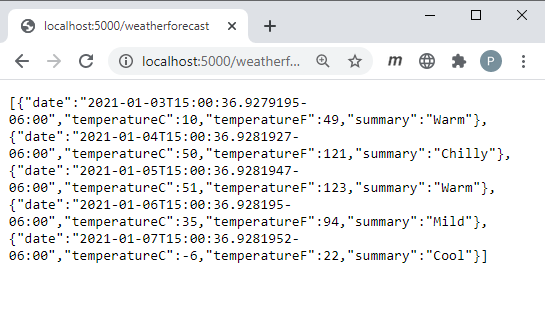
Select Run > Start Debugging from the menu to build the .NET Web API project and launch a browser. If a dialog box appears asking if you should trust the IIS Express certificate, answer Yes. In the Security Warning dialog that appears next, also answer Yes. Once the browser appears, it comes up with a 404 error page. Type in the following address into the browser address bar: https://localhost:5001/weatherforecast.
If you get an error related to privacy and/or HTTPS. Open the \Properties\launchSettings.json file and modify the applicationURL property to use http://localhost:5000. After hitting enter, you should see a string that looks like Figure 5. This means that your Web API server is working, and you're ready to create your own controller to retrieve product data from a SQL Server database.
Build Database Access Classes
This article uses the AdventureWorksLT sample database that comes with SQL Server. You can download a .bak file for this SQL database at https://github.com/PaulDSheriff/AdventureWorksLT In this GitHub repository, there's also a .sql file you can use to build the SQL database if the backup file doesn't work with your version of SQL Server.
Add Entity Framework
I'm going to use the Entity Framework to interact with the AdventureWorksLT database. To use the Entity Framework in the .NET application, you need to add a package to your project. From the VS Code menu, select Terminal > New Terminal. Ensure that the terminal prompt is in your WebAPI project folder and type in the following command.
dotnet add package
    Microsoft.EntityFrameworkCore.SqlServer
Build an Entity Class
Create a Product class in C# to match the fields in the SalesLT.Product table. Right mouse-click on the WebAPI folder and add a new folder named EntityClasses. Right mouse-click on the \EntityClasses folder and add a new file named Product.cs. Into this new file, add the code shown in Listing 1.
Listing 1: Build a Product class with properties that match the fields in the Product table.
using System;
using System.ComponentModel.DataAnnotations;
using System.ComponentModel.DataAnnotations.Schema;

namespace WebAPI
{
    [Table("Product", Schema ="SalesLT")]
    public partial class Product
    {
        [Required]
        [Key]
        [DatabaseGenerated(DatabaseGeneratedOption.Identity)]
        public int ProductID { get; set; }
        [Required(ErrorMessage = "The Product Name is required")]
        public string Name { get; set; }
        [Required]

    public string ProductNumber { get; set; }
    public string Color { get; set; }
    [Required]
    public decimal StandardCost { get; set; }
    [Required]
    public decimal ListPrice { get; set; }
    public string Size { get; set; }
    public decimal? Weight { get; set; }
    public int? ProductCategoryID { get; set; }
    public int? ProductModelID { get; set; }
    [Required]
    public DateTime SellStartDate { get; set; }
    public DateTime? SellEndDate { get; set; }
    public DateTime? DiscontinuedDate { get; set; }
    [Required]
    public Guid rowguid { get; set; }
    [Required]
    public DateTime ModifiedDate { get; set; }
    }
}
Add a AdventureWorksLTDbContext.cs file
To retrieve and modify data in the SalesLT.Product table through the Product class you need an instance of a DbContext class. Create a folder named \Models in your WebAPI project. Right mouse-click on this folder and create a file named AdventureWorksLTDbContext.cs. Add the code shown in Listing 2 to this file.
Listing 2: A DbContext class is needed to retrieve and modify data in a database through the Entity Framework.
using Microsoft.EntityFrameworkCore;

namespace WebAPI {
    public partial class AdventureWorksLTDbContext : DbContext {
        public AdventureWorksLTDbContext(
            DbContextOptions<AdventureWorksLTDbContext> options) : base(options) { }
    public virtual DbSet<Product> Products { get; set; }

    protected override void OnModelCreating( ModelBuilder modelBuilder)
    {base.OnModelCreating(modelBuilder);}
    }
}
Modify appSettings.json
You need a connection string for the DbContext object to work. It's a best practice to place your connection strings in the appSettings.json file. Open the appSettings.json file and add a new property named ConnectionStrings. Set the value of this new JSON object to the code shown below. Note that I had to break the connection string across multiple lines to format it for the printed page. When you type in your connection string, ensure that it's all is on a single line.
{
    "ConnectionStrings": {"DefaultConnection": "Server=Localhost;
        Database=AdventureWorksLT;
        Trusted_Connection=True;
        MultipleActiveResultSets=true"
    },
...
}
Configure Web API
When using a .NET Web API, a lot of “magic” happens with Dependency Injection and setting configuration options. Add some packages and configuration code to help make this magic happen.
Add System.Text.Json
You're going to be sending and receiving JSON from your Ajax calls. The recommended package to use these days is the one contained in the System.Text.Json package. Add this package to your WebAPI project by executing the following command in the terminal window of VS Code.
dotnet add package System.Text.Json
Add CORS
The JavaScript code you wrote in your node or .NET Web server is running on localhost:3000, however the Web API code is running on localhost:5000. These are two completely different domains. For your JavaScript or other client-side application to call this Web API, you must tell the Web API that you're allowing Cross-Origin Resource Sharing (CORS). To use CORS, you need to add this package into your project. Go back to the terminal window and type in the following command.
dotnet add package Microsoft.AspNetCore.Cors
Modify Startup.cs
Now that you've added two new packages, let's use them. Open the Startup.cs file and add two using statements at the top of the file.
using Microsoft.EntityFrameworkCore;
using System.Text.Json;
Locate the ConfigureServices() method and add the code shown in bold in Listing 3. This code informs this project that you want to allow CORS to be used. It also sets the JSON converter to automatically convert and property names that are in camel case to Pascal case and vice versa. The next lines inject an instance of the AdventureWorksLTDbContext class you created earlier and passes in an options object that is loaded with the connection string you stored in the appSettings.json file.
Listing 3: Configure services to work with CORS, serialize JSON and interact with your database.
public void ConfigureServices(IServiceCollection services) {
    // Tell this project to allow CORS
    services.AddCors();

    // Convert JSON from Camel Case to Pascal Case
    services.AddControllers().AddJsonOptions(options => {
        options.JsonSerializerOptions.PropertyNamingPolicy = JsonNamingPolicy.CamelCase;
    });

    // Setup the AdventureWorks DB Context
    // Read in connection string from
    // appSettings.json file
    services.AddDbContext<AdventureWorksLTDbContext> (options => options.UseSqlServer(
        Configuration.GetConnectionString("DefaultConnection"))
    );

    services.AddControllers();
    services.AddSwaggerGen(c => {c.SwaggerDoc("v1", new OpenApiInfo {
        Title = "WebAPI", Version = "v1"});
    });
}
Locate the Configure() method and add the lines of code shown in bold below. This code configures CORS with a list of URLs this Web API project allows to make calls. The other two chained methods, AllowAnyMethod() and AllowAnyHeader(), allow all verbs (GET, POST, PUT, etc.), and any HTTP headers.
public void Configure(IApplicationBuilder app, IWebHostEnvironment env) {
    ...
    app.UseCors(options => options.WithOrigins(
        "http://localhost:3000").AllowAnyMethod().AllowAnyHeader());

    app.UseEndpoints(endpoints => {endpoints.MapControllers();  });
}
Create a Base Controller
You're most likely going to be building several controllers, so it's best to create a base class that all your controllers can inherit from. Microsoft supplies the ControllerBase class that all controllers should inherit from. Create your own class like the one shown in Listing 4 that inherits from ControllerBase. Then make all your classes inherit from this BaseApiController class.
Listing 4: Always create a base controller class for all your controllers to inherit from.
using System;
using Microsoft.AspNetCore.Mvc;
using Microsoft.AspNetCore.Http;

namespace WebAPI.Controllers {
    public class BaseApiController : ControllerBase {

        protected IActionResult HandleException(
            Exception ex, string msg) {IActionResult ret;

        // TODO: Publish exceptions here

        // Create new exception with generic message
        ret = StatusCode(StatusCodes.Status500InternalServerError,
            new Exception(msg));
        return ret;
        }
    }
}
Adding your own base controller class allows you to add code that all controllers can use. For example, you might want a single method to handle any exceptions. In the HandleException() method, you could publish any exceptions, then return a specified status code such as a 500 that can be communicated back to the calling application. Right mouse-click on the Controllers folder and add a new file named BaseApiController.cs. Add the code shown in Listing 4 to this new file.
Delete Weather Classes
You're not going to need the WeatherForecast classes anymore, so feel free to delete the \Controllers\WeatherForecastController.cs and the \WeatherForecast.cs files from the project.
Create Product Controller
Now that you have Product and DbContext classes to allow data access to the SQL Server database, it's time to build a controller class to use those classes to get the data and send it back to the calling application. Right mouse-click on the Controllers folder and add a new file named ProductController.cs. Dependency Injection (DI) is used to insert the AdventureWorksLTDbContext object into the constructor of this controller (Listing 5). Remember that an instance of this class was created in the Startup.ConfigureServices() method.
Listing 5: The ProductController class inherits from the BaseApiController and has the DbContext injected into it.
using System;
using System.Collections.Generic;
using System.Linq;
using Microsoft.AspNetCore.Http;
using Microsoft.AspNetCore.Mvc;

namespace WebAPI.Controllers {
    [Route("api/[controller]")]
    [ApiController]
    public class ProductController : BaseApiController {

    public ProductController(AdventureWorksLTDbContext context) : base() {
        _DbContext = context;
    }

    private AdventureWorksLTDbContext _DbContext;
    }
}
When a class is detected in the constructor of a controller class, .NET looks up the class name in its DI list to see if there is an object that's been registered. If so, it retrieves the instance and injects it into the constructor. This object is assigned to the field _DbContext for use within any method in this controller class.
Get All Products
Add a Get() method to the new controller (Listing 6) and use EF to detect whether there are any products in the Products collection on the DbContext object. If there aren't, an ObjectResult object is created by calling StatusCode(StatusCodes.Status404NotFound, “message”). This method sets the HTTP status code of 404 and returns a message for the calling application to read. The HTTP status code (404) is placed into the status property of the XMLHttpRequest object and the message is placed into the responseText property.
Listing 6: The Get() method retrieves all products from the SalesLT.Product table.
private const string ENTITY_NAME = "product";

// GET api/values
    [HttpGet]
public IActionResult Get() {
    IActionResult ret = null;
    List<Product> list = new List<Product>();

    try {
        if (_DbContext.Products.Count() > 0) {
            list = _DbContext.Products.OrderBy(p => p.Name).ToList();
            ret = StatusCode(StatusCodes.Status200OK, list);
        }
        else {
        ret = StatusCode(StatusCodes.Status404NotFound,
            "No " + ENTITY_NAME + "s exist in the system.");
        }
    }
    catch (Exception ex) {
        ret = HandleException(ex,
            "Exception trying to get all " + ENTITY_NAME + "s.");
    }
    return ret;
}
If there are products in the Products collection, a call to StatusCode(StatusCodes.Status200OK, list) is made to create an ObjectResult object with the status code of 200 and the list of products to return.
If an error occurs when attempting to retrieve products from the database, a call to the HandleException() method in the base class is made. In this method, a status code of 500 is created and the response is the exception information.
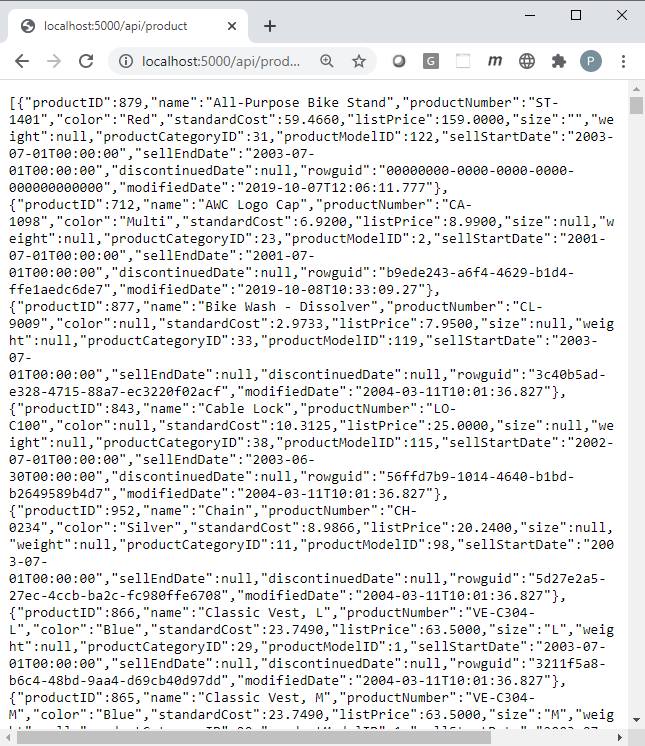
Try It Out
Run the Web API project by selecting Run > Start Debugging from the menu. Once the browser comes up, type in http://localhost:5000/api/product and you should see data appear like that shown in Figure 6.
Get a Single Product
Besides retrieving all products, you might also need to just retrieve a single product. This requires you to send a unique identifier to a Web API method. For the Product table, this is value in the ProductID field.
Go back to the Web API project and open the ProductController.cs file. Add a new method that looks like Listing 7. This method is very similar to the Get() method you created earlier, however, just a single product is returned if found.
Listing 7: The Get(int id) method is used to retrieve a single record from the database.
[HttpGet("{id}")]
public IActionResult Get(int id) {
    IActionResult ret = null;
    Product entity = null;

    try {entity = _DbContext.Products.Find(id);

        if (entity != null) {ret = StatusCode(StatusCodes.Status200OK, entity); }
        else {ret = StatusCode(StatusCodes.Status404NotFound,
            "Can't find " + ENTITY_NAME + ": " + id.ToString() + ".");}
    }
    catch (Exception ex) {ret = HandleException(ex,
        "Exception trying to retrieve " + ENTITY_NAME + " ID: " + id.ToString() + ".");
    }
    return ret;
}
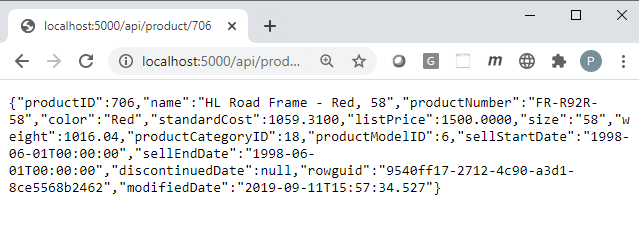
Try It Out
Save the changes to your ProductController and restart the Web API project so it can pick up the changes you made. When the browser comes up, type in the following: http://localhost:5000/api/product/706. This passes the value 706 to the Get(int id) method. You should see a screen similar to Figure 7.
Insert a Product
If you wish to send a new product to your Web server and have it inserted into the Product table, you need a POST Web API method to pass a JSON product object to. Create a new method in your ProductController class call Post(), as shown in Listing 8.
Listing 8: Pass in a JSON Product object and .NET Core automatically converts the object to a C# object.
[HttpPost()]
public IActionResult Post(Product entity) {IActionResult ret = null;
    try {
        if (entity != null) {
        // Fill in fields not sent by client
        entity.ProductCategoryID = 18;
        entity.ProductModelID = 6;
        entity.rowguid = Guid.NewGuid();
        entity.ModifiedDate = DateTime.Now;

      _DbContext.Products.Add(entity);
      _DbContext.SaveChanges();

      ret = StatusCode(StatusCodes.Status201Created, entity); }
      else {
          ret = StatusCode(StatusCodes.Status400BadRequest,
          "Invalid " + ENTITY_NAME + " object passed to POST method.");
      }
    }
    catch (Exception ex) {
        ret = HandleException(ex, "Exception trying to insert a new " + ENTITY_NAME + ".");
    }
    return ret;
}
The .NET Web API automatically takes a JSON object that has the same properties as the C# Product class you created earlier and maps it to the entity argument to this method. An example of a JSON object that could be passed might look like the following:
{
    "productID": 0,
    "name": "A New Product",
    "productNumber": "NEW-999",
    "color": "Red",
    "standardCost": 20,
    "listPrice": 40,
    "sellStartDate": "2021-01-15"
}
As you can see from the JSON object above, not all fields are present compared to the C# Product class. That's why, in the Post() method, you need to fill in a few other fields with some default values. I'm doing this just to keep things simple for passing in a JSON object. In a real application, you'd most likely be passing in all fields for your entity class.
Update Product Data
If you wish to update a product that already exists in the AdventureWorksLT Product table, you need a PUT method in your Web API project, as shown in Listing 9. Pass to this Put() method the unique ID of the product you wish to update and the product data to update. For the sample in this article, you're not asking the user for all product data. There are more fields in the Product table than you have on the Web page. Thus, you need to Find() the product in the Product table and retrieve all of the data and then only update those fields that you pass in from the front-end. Most likely, you won't be doing this in your applications; I'm just trying to keep the sample as small as possible.
Listing 9: Add a Put() method to allow updating to a table in your database.
[HttpPut("{id}")]
public IActionResult Put(int id,Product entity) {
    IActionResult ret = null;

    try {
        if (entity != null) {
        // Since we don't send all the data,
        // read in existing entity,
        // and overwrite changed properties
        Product changed = _DbContext.Products.Find(id);

    if (changed != null) {
        changed.Name = entity.Name;
        changed.ProductNumber = entity.ProductNumber;
        changed.Color = entity.Color;
        changed.StandardCost = entity.StandardCost;
        changed.ListPrice = entity.ListPrice;
        changed.Size = entity.Size;
        changed.Weight = entity.Weight;
        changed.SellStartDate = entity.SellStartDate;
        changed.SellEndDate = entity.SellStartDate;
        changed.ModifiedDate = DateTime.Now;

        _DbContext.Update(changed);
        _DbContext.SaveChanges();
        ret = StatusCode(StatusCodes.Status200OK, changed);
    } else {
          ret = StatusCode(StatusCodes.Status404NotFound,
              "Can't find ProductID=" + id.ToString());
      }
    } else {
          ret = StatusCode(StatusCodes.Status400BadRequest,
              "Invalid " + ENTITY_NAME + " object passed to PUT method.");
        }
      } catch (Exception ex) {
          ret = HandleException(ex,
              "Exception trying to update " + ENTITY_NAME + " ID: " +
              entity.ProductID.ToString() + ".");
         }

    return ret;
}
Delete Product Data
Now that you have inserted and updated product data, let's learn to delete a product from the table. Create a DELETE Web API method, as shown in Listing 10. Pass in the unique ID for the product you wish to delete. Locate the product using the Find() method and if the record is found, call the Remove() method on the Products collection in the DbContext. Call the SaveChanges() method on the DbContext object to submit the DELETE SQL statement to the SQL Server database.
Listing 10: Pass in a unique product id of the product you wish to delete.
[HttpDelete("{id}")]
public IActionResult Delete(int id) {
    IActionResult ret = null;
    Product entity = null;

    try {
        entity = _DbContext.Products.Find(id);
        if (entity != null) {
            _DbContext.Products.Remove(entity);
            _DbContext.SaveChanges();
            ret = StatusCode(StatusCodes.Status200OK, true);
        } else {
            ret = StatusCode(StatusCodes.Status404NotFound,
                "Can't find " + ENTITY_NAME + " ID: " + id.ToString() + " to delete.");
          }
    }
    catch (Exception ex) {
        ret = HandleException(ex,
        "Exception trying to delete " + ENTITY_NAME + "ID: " + id.ToString() + ".");
    }

return ret;
}
Create a .NET MVC Application
To make calls using Ajax from a Web page to the Web API server, you need to run the HTML pages from their own Web server. If you wish to use a .NET MVC application, follow along with the steps in this section of the article. If you wish to use a Node server, skip to the next section of this article entitled “Create a Node Web Server Project”.
Create this project by opening VS Code and selecting Terminal > New Terminal… from the menu. Click into the terminal window and navigate to a folder where you normally create your development projects. On my computer, I'm going to use the \Samples folder on my D drive. Run the following commands one at a time in the terminal (substituting your project folder for the first command).
CD D:\Samples

dotnet new mvc -n AjaxSample
Load the AjaxSample folder in VS Code and wait a few seconds until you see a prompt at the bottom right of your screen asking to add some assets to the project, as shown in Figure 8. Answer Yes to the prompt to add the required assets.
Open the \Views\Home\Index page file and make the file look like the code shown in Listing 11. You're going to add more HTML to this file later, but this small set of HTML provides a good starting point.
Listing 11: Add code in the cshtml file to run your web project.
@{
    ViewData["Title"] = "Ajax Samples";
}
<h1>Ajax Samples</h1>
<p>Bring up console window</p>

<button type="button" onclick="get();">Get Products</button>

@section Scripts {
    <script>
        'use strict';

        const URL = "/resources/products.json";
        //const URL = "http://localhost:5000/api/product";

    function get() {

    }
    </script>
}
Change the Port Number
Open the launchSettings.json file located under the \Properties folder and modify the applicationUrl property under the AjaxSample property, as shown in bold below. Because you're going to be using a Web API server that's running on a different port and thus a different domain, Cross-Origin Resource Sharing (CORS) needs to have a specific URL that you can whitelist. Change the URL to use port number 3000. Later, when you create your Web API server, you're going to use this domain address with CORS to allow calls to travel from one domain to another.
"AjaxSample": {
    "commandName": "Project",
    "dotnetRunMessages": "true",
    "launchBrowser": true,
    "applicationUrl": "http://localhost:3000",
    "environmentVariables": {
    "ASPNETCORE_ENVIRONMENT": "Development"
}
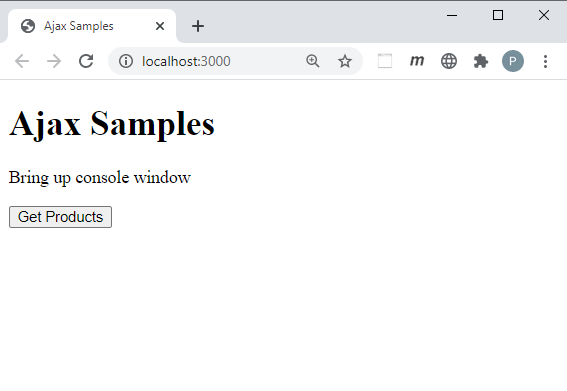
Try It Out
Run this MVC application and you should see a screen that looks like Figure 9.
Create a Node Web Server Project
To run the Ajax samples, you need to run the HTML pages from a Web server. There are several simple node Web servers that you can install from npm; I'm going to use one called lite-server. Create this project by opening VS Code and selecting Terminal > New Terminal… from the menu. Click into the terminal window and navigate to a folder where you normally create your development projects. On my computer, I'm going to use the \Samples folder on my D drive. Run the following commands one at a time in the terminal (substituting your project folder for the first command).
CD D:\Samples

MkDir AjaxSample
CD AjaxSample

npm init -y
npm install lite-server
Once the last command finishes, select File > Open Folder… from the menu and select the AjaxSample folder you created. You should now see a \node_modules folder and two .json files; package-lock and package. Open the package.json file and add new property to “scripts” property.
"scripts": {
    "dev": "lite-server",
    "test": "echo \"Error: no test
        specified\" && exit 1"
},
Create a Home Page
Like any website, you should have a home page that starts the Web application. Add a new file under the \AjaxSample folder named index.html. Add the HTML shown in Listing 12 into this new file. You're going to add more HTML to this file later, but this small set of HTML provides you with a good starting point.
Listing 12: Add a home page for your application.
<!DOCTYPE html>
<html>
<head>
    <title>Ajax Samples</title>
</head>
<body>
    <h1>Ajax Samples</h1>
    <p>Bring up console window</p>

    <button type="button" onclick="get();">Get Products</button>

    <script>
        'use strict';
        const URL = "/resources/products.json";
        //const URL = "http://localhost:5000/api/product";

        function get() {

        }
    </script>
</body>

</html>
Try It Out
To make sure your server is running correctly, save all your changes in all files, execute the following command in VS Code's terminal window.
npm run dev
If everything runs correctly, you should see a screen that looks like Figure 9.
You don't need to close the browser, just keep it open and switch back to VS Code. Every time you save your changes in VS Code, the lite-server picks up the changes and refreshes the HTML in your browser. If you do accidently close your browser, just reopen it and type in http://localhost:3000 and you'll be taken back to the index page.
Add a Resources Folder
To start illustrating how to use Ajax, you're going to read data from a .json file stored in the Web server. If you're using MVC, create a folder under the AjaxSample\wwwroot folder named \resources. If you're using lite-server, create a new folder under the \AjaxSample folder named \resources. Add a new file in the resources folder named products.json. Add the data shown in Listing 13 into this new file.
Listing 13: A JSON array of product objects.
[
    {
        "productID": 680,
        "name": "HL Road Frame - Black, 58",
        "productNumber": "FR-R92B-58",
        "color": "Black",
        "standardCost": 1059.31,
        "listPrice": 1431.50
    },
    {
        "productID": 707,
        "name": "Sport-100 Helmet, Red",
        "productNumber": "HL-U509-R",
        "color": "Red",
        "standardCost": 13.08,
        "listPrice": 34.99
    },
    {
        "productID": 709,
        "name": "Mountain Bike Socks, M",
        "productNumber": "SO-B909-M",
        "color": "White",
        "standardCost": 3.3963,
        "listPrice": 9.50
    },
    {
        "productID": 709,
        "name": "Mountain Bike Socks, M",
        "productNumber": "SO-B909-M",
        "color": "White",
        "standardCost": 3.3963,
        "listPrice": 9.50
    },
    {
        "productID": 712,
        "name": "AWC Logo Cap",
        "productNumber": "CA-1098",
        "color": "Multi",
        "standardCost": 6.9223,
        "listPrice": 8.99
    },
    {
        "productID": 821,
        "name": "Touring Front Wheel",
        "productNumber": "FW-T905",
        "color": "Black",
        "standardCost": 96.7964,
        "listPrice": 218.01
    }
]
Using XMLHttpRequest
As mentioned earlier in this article, the most fundamental building block of Ajax is the XMLHttpRequest object. Let's now use this object to retrieve the products in the \resources\projects.json file in your Web server. Open the index page file and modify the empty get() function to look like the following code.
function get() {
    let req = new XMLHttpRequest();

    req.onreadystatechange = function () {
    console.log(this);
    };

req.open("GET", URL);

req.send();
}
The code above creates an instance of the XMLHttpRequest object that's built-into your browser. It then assigns a function to the onreadystatechange event, which fires whenever the XMLHttpRequest object performs various operations that you learn about in the next section of this article. The next line of code calls the req.open() method and passes the type of request it's performing, and the URL on which to send the request. In this case, you are performing a GET on the URL pointing to the /resources/products.json file. The final line of code, req.send(), sends an asynchronous request to the Web server to retrieve the products.json file.
Try It Out
Save the index page file and if you're using MVC restart the debugger, or if you are using the lite-server, you don't need to do anything. Switch over to your browser and open the Developer Tools console window in your browser (typically the F12 key). Click on the Get Products button and you should see something that looks like Figure 10. Depending on the browser you use, the console window may look slightly different.

The XMLHttpRequest readyState Property
As you can see from the developer tools console window in Figure 10, you received four different states. As the XMLHttpRequest goes through retrieving the data, it sends some notifications that you're reporting in the function you assigned to the onreadystatechange event. An instance of the XMLHttpRequest object is assigned to this within the onreadystatechange event. The readyState property on the object can have one of five different values, as shown in Table 2.
Once the readyState property is equal to the value 4 (DONE), the call is complete. If the call is successful, the data returned from the Ajax call is available in the this.response property. The response property returns an array of product objects that looks like the data shown in Listing 13. If you want to just retrieve the array of product objects and not each state, modify the get() function to look like the following:
function get() {
    let req = new XMLHttpRequest();

    req.onreadystatechange = function () {
    if (this.readyState===XMLHttpRequest.DONE &&
        this.status === 200) {
        console.log(this.response);
        }
    };

    req.open("GET", URL);
    req.send();
}
In the above code, check the value of the readyState property to see if it's equal to the constant DONE. Also check the status property to see if the call was successful. A successful call should set the status property to a value between 200 and 399. A value of 400 and higher signifies an error occurred with the Ajax call.
Add a displayResponse Function
Instead of writing a bunch of console.log() statements within the onreadystatechange event function, create a function named displayResponse(). In this function, you can then write any calls you want such as those shown below.
function displayResponse(resp) {
    console.log(resp);
    console.log("");
    console.log("responseText: " + resp.responseText);
    console.log("status: " + resp.status.toString());
    console.log("statusTest: " + resp.statusText);
}
Modify the get() function to call the displayResponse() function when the status is equal to 200.
function get() {
    let req = new XMLHttpRequest();

    req.onreadystatechange = function () {
        if (this.readyState===XMLHttpRequest.DONE &&
        this.status === 200) {
        displayResponse(this);
        }
    };

    req.open("GET", URL);
    req.send();}
Try It Out
Save all the changes within VS Code. Restart the debugger if using MVC, then go back to your browser and click on the Get Products button again. In the console window, you should see the product data, plus the additional status property values.
Get Product Data from Web API Server
Leave the Web API project running and go back to the index page in your Web server and modify the constant URL to look like the following.
const URL = "http://localhost:5000/api/product";
Save the changes to the index page, restart the debugger, and go to the browser. Click the Get Products button and, in the console window, you should now see product data retrieved from the Product table in the AdventureWorksLT database.
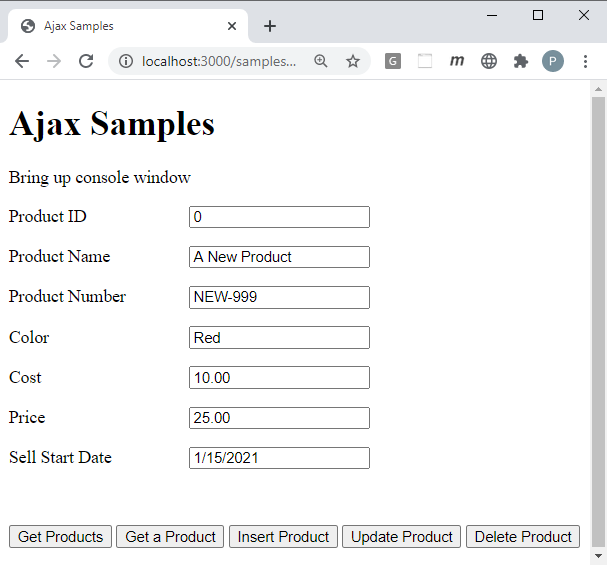
Add a Web Form to Submit Product Data
Let's now finish up the index page to allow you to enter Product data using a form. Look at Figure 11 to see what this page is going to look like.
Add Global Styles for Web Form
The MVC application already has the bootstrap CSS framework, so many styles are already there for you to use. If you're using MVC, go to the \wwwroot\css folder and open the sites.css file. If you're using the lite-server, add a new folder named \styles under your \AjaxSample folder and add a new file named sites.css in this new folder. Open the sites.css file and add the code shown below.
form .row label {
    display: inline-block !important;
    min-width: 10em !important;
}

.infoMessage {font-weight:bold;}

.errorMessage {font-weight:bold; background-color: red; color: white;}
If you're using Node server, add one additional style into the sites.css file.
.row {margin-bottom: 1em;}
Add a Product Form
In the index page, delete the button within the <body> but leave the <h1> and the <p> tags.
<button type="button" onclick="get();">Get Products</button>
Add the code shown in Listing 14 just below the <h1> and the <p> tag to your index page.
Listing 14: Add a
<form>
    <div class="row">
        <label for="productID">Product ID</label>
        <input id="productID"
               name="productID"
               type="text"
               value="0"/>
    </div>
    <div class="row">
        <label for="name">Product Name</label>
        <input id="name"
               name="name"
               type="text"
               value="A New Product"/>
    </div>
    <div class="row">
        <label for="productNumber">Product Number</label>
        <input id="productNumber"
               name="productNumber"
               type="text"
               value="NEW-999" />
    </div>
    <div class="row">
        <label for="color">Color</label>
        <input id="color"
               name="color"
               type="text"
               value="Red" />
    </div>
    <div class="row">
        <label for="standardCost">Cost</label>
        <input id="standardCost"
               name="standardCost"
               type="number"
               value="10.00" />
    </div>
    <div class="row">
        <label for="listPrice">Price</label>
        <input id="listPrice"
                name="listPrice"
                type="number"
                value="25.00" />
    </div>
    <div class="row">
        <label for="sellStartDate">Sell Start Date</label>
        <input id="sellStartDate"
               name="sellStartDate"
               type="text"
               value="1/15/2021" />
    </div>
    <div class="row">
        <label id="message" class="infoMessage"> </label>
    </div>
    <div class="row">
        <label id="error" class="errorMessage"> </label>
    </div>
    <div class="row">
        <button type="button" onclick="get();">Get Products</button>
        <button type="button" onclick="getProduct();">Get a Product</button>
        <button type="button" onclick="insertProduct();">Insert Product</button>
        <button type="button" onclick="updateProduct();">Update Product</button>
        <button type="button" onclick="deleteProduct();">Delete Product</button>
    </div>
</form>
Modify Script on a Page
You added more buttons in the index page, so you need to add functions to correspond to each button's click event. Modify the code in the <script> tag to look like Listing 15.
Listing 15: Add CRUD functions to product page.
<script>
    'use strict';
    const URL = "http://localhost:5000/api/product";

    function get() {
    let req = new XMLHttpRequest();
    req.onreadystatechange = function () {
        if (this.readyState===XMLHttpRequest.DONE && this.status === 200) {
            console.log(this.response);
            displayMessage("Products Retrieved");
        }
    };
    req.open("GET", URL);
    req.send();
}

    function getProduct() {  }
    function insertProduct() {   }
    function updateProduct() {   }
    function deleteProduct() {   }
</script>
Add Helper Functions into Scripts Folder
As with most applications, you're going to have some generic functions that you can reuse on many Web pages. To make them easy to reuse, create an ajax-common.js file into which you may place these functions. You then put this file into a folder that you can reference from any page that needs them. Create a file named ajax-common.js in the \wwwroot\js folder if using MVC, or if you're using lite-server, create a \scripts folder and place the file into that folder. Into this file, create three functions; getValue(), setValue(), and handleAjaxError().
Add a getValue() Helper Function
Each time you want to retrieve data from an input field using JavaScript, use the document.getElementById(“productID”).value. This is a lot of typing for each field, so add a simple helper function within the ajax-common.js file to perform this service for you.
function getValue(id) { return document.getElementById(id).value;}
Add a setValue() Helper Function
To place data into an input field using JavaScript, you use the code document.getElementById(“productID”).value = “data”. This is a lot of typing for each field, so add a simple helper function within the ajax-common.js file to perform this service for you.
function setValue(id, value) { document.getElementById(id).value = value;}
Add a displayMessage() Helper Function
In the <form> you added to the index page, there's a <label> with an ID of message where you can display informational messages to the user. Create a function named displayMessage() in the ajax-common.js file to which you can pass a message to display, as shown in the following code.
function displayMessage(msg) {document.getElementById("message").innerHTML = msg;}
Add a displayError() Helper Function
In the <form> you added to the index page, there's a <label> with an ID of error where you can display error information to the user. Create a function named displayError () in the ajax-common.js file to which you can pass an error object to display as shown in the following code.
function displayError(error) {document.getElementById("error").innerHTML = JSON.stringify(error);}
Add a handleAjaxError() Helper Function
Ajax errors can generally be handled by a common piece of code, as shown below. Add this function into the ajax-common.js file. Don't worry about what it does for now; you'll learn more about this function in a later article.
function handleAjaxError(error) {
    displayError(error);
    switch (error.status) {
        case 404:
            console.log(error.responseText);
            break;
        case 500:
            console.log(error.responseText);
            break;
        default:
            console.log(error);
            break;
    }
}
Add Product Helper Functions
Just like you have common functions for any page, you're going to have some functions that just deal with the product data. Add a file named product.js into the \wwwroot\js folder if you're using MVC, and place it into the \scripts folder if you're using lite-server. Add three functions into this file named getFromInput(), setInput(), and clearInput().
Add a getFromInput() Helper Function
Create a method called getFromInput() to create a product object. This product object should have the exact same property names as the C# entity class you created in the Web API project. The property names can be camel-case because you added the code in the Startup class to convert the names from camel-case to Pascal case.
function getFromInput() {
    return {
        "productID": getValue("productID"),
        "name": getValue("name"),
        "productNumber": getValue("productNumber"),
        "color": getValue("color"),
        "standardCost": getValue("standardCost"),
        "listPrice": getValue("listPrice"),
        "sellStartDate": new Date(getValue("sellStartDate"))
    };
}
Add a setInput() Helper Function
When a product is returned from the Web API, you need to place each property in the product class into each input field. Create a function called setInput() in the product.js file to perform this operation.
function setInput(product) {
    setValue("productID", product.productID);
    setValue("name", product.name);
    setValue("productNumber", product.productNumber);
    setValue("color", product.color);
    setValue("standardCost", product.standardCost);
    setValue("listPrice", product.listPrice);
    setValue("sellStartDate", product.sellStartDate);}
Add a clearInput() Helper Function
After deleting a product, or if you wish to clear the data before the user begins to add a new product, create a function called clearInput() to set each input field to a default value.
function clearInput() {
    setValue("productID", "0");
    setValue("name", "");
    setValue("productNumber", "");
    setValue("color", "");
    setValue("standardCost", "0");
    setValue("listPrice", "0");
    setValue("sellStartDate",
    new Date().toLocaleDateString());
}
Reference Scripts from Index Page
To use these .js files on your pages, you need to reference them using a <script> tag. If you are using MVC, add the two <script> tags shown in the code below just before the <script> tag in the index page.
<script src = "/js/ajax-common.js"></script>
<script src = "/js/product.js"></script>
If you're using the lite-server, add the following two <script> tags just before the <script> tag in the index page.
<script src = "/scripts/ajax-common.js"></script>
<script src = "/scripts/product.js"></script>
In the next articles, you're going to use these functions to retrieve data and populate the product form you created.
Summary
In this article, you built a .NET 5 Web API project to retrieve data from a SQL Server database table, serialize that data as JSON, and return it to your Web page. The ProductController handles all CRUD logic for the Product table in the AdventureWorkLT database. This is a standard controller used to retrieve, add, edit, and delete records in a table. One additional method you might add on is a method to search for records based on one or more fields in the table. In this article, you also built either a node Web server or an MVC application to run a Web page to communicate with the Web API server. You learned the basics of using the XMLHttpRequest object for making a simple Ajax call. In the next set of articles, you will learn more ways to make Ajax calls from HTML to a Web server.
Table 1: Several methods you may use to communicate from a Web page to a Web API server
| Technology | Description |
| JavaScript XMLHttpRequest using Callbacks | This is the most primitive method of Ajax communication and is the basis for almost all other Ajax implementations today. |
| JavaScript XMLHttpRequest with Promises | You can build your own wrapper around the callbacks and return a Promise. You can find many samples of doing this with a quick Google search. |
| Fetch API | Most modern browsers support this Promise-based API for Ajax communication. |
| jQuery using Callbacks | Prior to jQuery 1.5, you used callbacks to respond to Ajax events returned by the underlying XMLHttpRequest object. |
| jQuery using Promises | From jQuery 1.5 onward, the jQuery team put a Promise-based wrapper around the XMLHttpRequest object so you can use a more streamlined approach to Ajax queries. |
| jQuery Ajax Shorthand Functions | There are several shorthand functions, such as $.get(), $.post(), that allow you to shorten the syntax for making GET and POST requests of the Web API server. |
Table 2: The readyState property reports different values as the XMLHttpRequest performs various functions.
| Value | Description | Constant |
| 0 | Unsent | UNSENT |
| 1 | Opened | OPENED |
| 2 | Headers Received | HEADERS_RECEIVED |
| 3 | Loading | LOADING |
| 4 | Done | DONE |
