


We call them SPAs (single page applications), but that's rarely the real case. Most of our applications are driven by multiple views and some kind of navigation. This is where Vue Routing comes in. It allows you to build the kinds of apps you need to create. Let's see how routing in Vue 3 works.
What is Routing?
In many Vue projects, you'd like the ability to navigate to different parts of your application. If you think about how websites traditionally work, you could navigate from the home page to other pages in the site. SPA navigation works like this. You have views in your Vue project and want to be able to navigate to individual views. As you can see in Figure 1, Routing allows your Single Page Application to define a section of the app to show individual views. As the URL changes, instead of a network request for other page, the SPA recognizes the change and changes the view.
This is accomplished differently in different frameworks, but the basic strategy is the same: The URL defines what content the SPA shows to the user. This also means that because the location inside your application is defined by the URL, that you can share these URLs to allow for deep linking into an application.

With that in mind, let's see how Vue implements routing.
Introducing Vue Routing
Routing in Vue is handled by a separate package from the core Vue package. It's entirely optional, but in many cases, you'll want to leverage the package. To get started, you'll need this package. You can install it with npm:
npm install vue-router --save
Now that it's installed, you can create your router.
Creating the Router
The purpose of the Router is to define a set of rules to map URL patterns to individual components. Assuming that you have at least one component, you can start creating your routes like so:
// router/index.js
import { createRouter, createWebHistory } from 'vue-router'
import Home from '@/views/Home.vue'
import Cats from '@/views/Cats.vue'

const routes = [
    {
        path: '/',
        name: 'Home',
        component: Home
    },
    {
        path: '/cats',
        name: 'Cats',
        component: Cats
    }
]

const router = createRouter({ history: createWebHistory(), routes })
export default router
To start out, you'll need to create an array of objects that describe each route. A route typically has a name, a path, and a destination. In this example, when the root path is specified, it loads a Home component. You then import the createRouter function from the vue-router package and use it to create a router object with the routes. This object is a singleton that you can just return from the file.
When creating the router, you need to specify a history mode. You do this with factory methods from vue-router. In this example, I'm using createWebHistory, which just uses browser history mode. Then the URLs just look like any other Web address:
http://localhost:8080/cats/catlist/5
This is likely what you'll want to use, but it does require your back-end to ignore URLs that are being handled by Vue. If you're just hosting this in a bare Web server (e.g., nginx), it just works. But if you're using a back-end like ASP.NET, JSP, etc., you'll need to configure them.
Alternatively, there is a createWebHashHistory factory method that uses the inter-page linking mechanism that doesn't affect back-end at all:
const router = createRouter({
    history: createWebHashHistory(), routes
})
This change is easier to work with but does affect the “good-looking” URLs from the Web History method (note the hash (#) in the URL):
http://localhost:8080/#cats/catlist/5
Our first use for the router is to add it to application (in main.js/ts usually):
import { createApp } from 'vue'
import App from './App.vue'
import router from './router'

createApp(App).use(router).mount('#app')
You can see where you're passing into use when creating that app. You're effectively injecting it as a piece of middleware into the app so that you start watching for URL changes and following the route rules. But how do you use the router now that you have it?
Using the Router
Inside the vue-router package, there's a special component called RouterView. You can simply specify this component where you want it to exist in your UI (e.g., App.vue is common):
<!-- App.vue -->
<template>
    <div>
        <router-view/>
    </div>
</template>
The router view is used as a container where the component specified in the route will be loaded. As the URL changes, Vue replaces the view based on the Route rules. How do you specify changing the URL?
The next step is usually to add a component called a RouterLink. The router link creates an anchor tag that navigates to the new views. For example, you can add menu items to go to different views:
<div class="row">
    <div class="col-12">
        <div id="nav">
            <router-link to="/">Home</router-link> |
            <router-link to="/cats">Cats</router-link>
        </div>
    </div>

    <div class="col-12 bg-light">
        <router-view />
    </div>
</div>
In addition, you can make the links a bit less brittle by just specifying the route:
<router-link: to="{ name: 'Home' }">Home</router-link> |
<router-link: to="{ name: 'Cats' }">Cats</router-link>
You can see here that you're binding the to attribute to an object that holds some properties (this will be more important soon). The name I'm using here is the same name that's specified in the router (above).
Because these links are generated as simple anchors, you can still style them:
<router-link :to="{ name: 'Home' }" class ="btn btn-info">Home</router-link>
Programmatic Navigation
Using RouterLinks is a common way to facilitate navigating from route to route, but there are occasions you want to navigate directly from code. You can do this directly in the template by using an injected object called $router:
<button @click="$router.back()" class="btn btn-primary btn-sm">< Back</button>
The router object has several methods for navigating:
router.push (location, onComplete?, onAbout?): Navigates to a specific relative URL or named route. Optionally, it can specify callbacks for navigation completion or navigation abort:
router.push({ name: "Home" });
router.replace (location, onComplete?, onAbout?): The same asrouter.pushbut doesn't add another history entry.
router.replace({ name: "Home" });
router.go(n): Allows you to go forward or backward in the history of the app.
router.go(-2);
router.back(): Goes back one link in history. (Same asrouter.go(-1)).
router.back();
You can navigate from any code in a Vue project (e.g., Vuex, startup, utilities, etc.). To do this, just import the router object and use it like the injected $router object:
import router from "@/router";

export default
{
    props: {
        count: { required: true },
    },
    setup(props) {
        function onBack() {
            console.log("Going Back...");
            router.back();
        }
Underneath the covers, this just modifies and reacts to the window.history APIs in the browser itself.
Route Parameters
Routes aren't limited to just names and simple URLs; you can have parameters in your routes too. For example, if I specify a route as:
{
    path: 'cat/:url',
    name: 'Cat',
    component: Cat
},
The URL segment that starts with a colon (i.e., :) is a dynamic route segment (or parameter). When linking to the route, you include the parameter like so:
<router-link:to="{ name: 'Cat', params: { url: c.url } }">
Note that with this syntax, you must specify a params object, not just the property of the parameter that you want. Alternatively, you could just construct the URL (although this means that your URLs are a bit more fragile):
<router-link:to="'/cat/' + c.url">
In the Cat component, you can access the parameters just referring to a $route object in the template:
<img src="$route.params.url" class="img-fluid img-thumbnail w-100" />
Another option here is to have the parameters passed to the component as props. To do this, your route needs to specify that it wants to opt into passing the values as parameters by setting props to true:
{
    name: "CatList",
    path: "catlist/:count",
    component: CatList,
    props: true
},
Then, in your component, you can just specify properties for the parameters that will be passed like so:
export default
{
    props:
    {
        count: { required: true }
    }
}
Then you can use it as just another bindable piece of data in your component:
<div>Count: {{ count }}</div>
Matching Routes
Sometimes you need to use regular expressions to match the routes you want. In the Vue Router, you can do that with pathMatch in a route. Instead of a simple route string, you can use a path with a parameter of pathMatch to match the route:
In this example, if the route matches anything, you're redirecting back to the root of your application. This only works because the routes are matched in order:
const routes = [
    {
        path: '/',
        name: 'Home',
        component: Home
    },
    {
        path: '/cats',
        name: 'Cats',
        component: Cats
    },
    {
        path: '/:pathMatch(.*)*',
        redirect: "/"
    },
]
By making the catch-all route last, you can specify that if none of the routes are matched, you just send them to the home page (alternatively you can send them to a specific not-found component if you prefer). Although this is used for a catch-all mechanism in many apps, you can also use this to match any route by regular expression.
Nested Routing
So far, I've concentrated on top-level routing, but a common need is for nested routing. What exactly do I mean by nested routing? Much like the top-level routing that's so common, nested routing lets you define routes that are children of other routes. To specify these routes, you add them to a child property of the route itself:
{
    path: '/cats',
    name: 'Cats',
    component: Cats,
    children: [
        {
            name: "CatList",
            path: "catlist/:count",
            component: CatList,
            props: true
        },
        {
            path: 'cat/:url',
            name: 'Cat',
            component: Cat
        },
    ]
},
The path of the child routes are extensions to the path of the parent route. To see the catlist, the URL looks like:
http://localhost:8080/#/cats/catlist/5
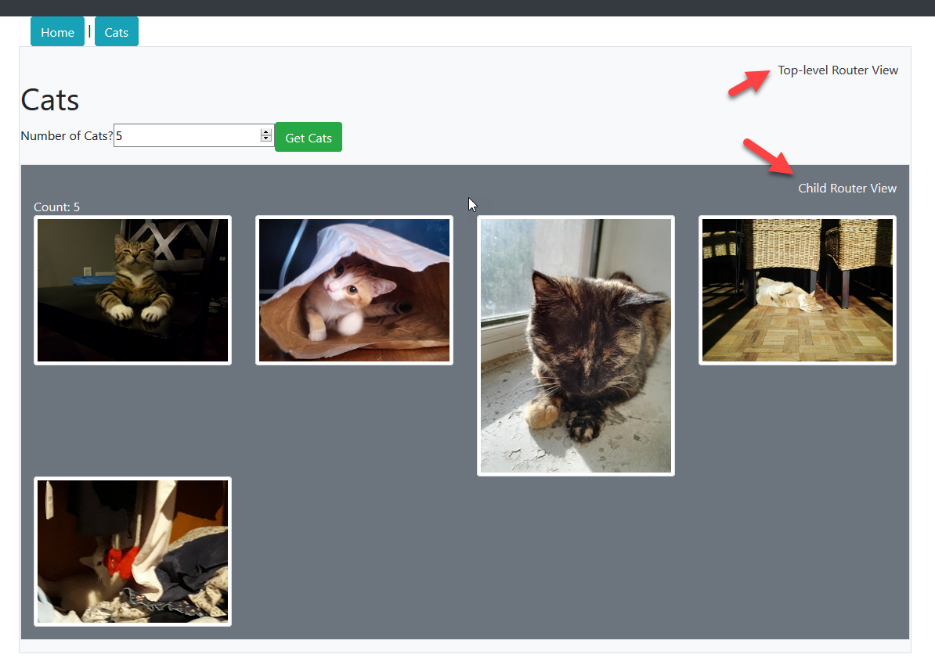
If the route matches the top-level route (e.g., /cats) and the rest matches the child-route, it hosts the component in the views' own RouterView. This requires that you have a nested Router Viewer to hold the child views. If you look at Figure 2, you can see that the main RouterView object contains the views of whatever route you're on. Inside that, there's a child RouterView to hold child routes.
This allows you to have nested routes that are resolved on views and sub-views. Using nested routes can make debugging the route matching so use this only as necessary.
Routing Guards
The last important topic that I'll discuss is the idea of routing guards. Routing guards are a way to inject code that can continue or abort certain navigations. For example, if you want to write out navigations, you could set a handler for beforeEach:
const router=createRouter({
    history: createWebHashHistory(),
    routes
})
router.beforeEach((to, from, next) => {
    console.log(`Navigating to: ${to.name}`);
    next();
});
Each of the guards sends three parameters:
- to: Route where the navigation is going
- from: Route where the navigation is from
- next: Function to call to continue the navigation
The beforeEach and afterEach can have handlers set and they're called for all route navigations. You can also have a handler on routes specifically (beforeEnter, afterEnter, beforeLeave, afterLeave):
{
    path: 'cat/:url',
    name: 'Cat',
    component: Cat,
    beforeEnter: (to, from, next) =>
    {
        next();
    }
},
The parameters here are identical but it only applies to navigation to and from this one specific route.
A common pattern is to create a guard forcing authentication. Although you could write a beforeEach handler to do this, a more common pattern is to create a function that performs the test and redirects to the log in if they aren't authenticated. For example:
function checkAuth(to, from, next)
{
    if (IsAuthenticated()) next();
    else next("/login");
}
Notice that you can replace the navigation with another route by just supplying it to the next function. You can then just assign this to the beforeEnter of the routes that need it:
const routes = [
{
    path: '/',
    name: 'Home',
    component: Home
},
{
    path: '/cats',
    name: 'Cats',
    component: Cats,
    beforeEnter: checkAuth
},
    //...
]
This way, you can allow specific pages and require authentication (or any other requirement like roles or claims). Navigation Guards are a great way to control how the routing is used.
Where Are We?
Although I haven't covered every topic, you should now understand how to set up and use the Vue Router to create multiple view projects. It allows you to build more complex and mature SPAs without manipulating the Virtual DOM manually.
