


With the cloud being such a big part of IT these days, it will come as no surprise to you that Visual Studio includes tools to help you consume Azure services and deploy your app to Azure. What you might not already know, though, is how much Microsoft has invested in these tools in Visual Studio 2019 and the new experiences that are built on top of them. Keep reading to learn more about how Visual Studio 2019 automatically discovers your app's dependencies on Azure services, helps you configure your local environment giving you a choice between accessing live Azure services or using local emulators, and helps you not just deploy your application in Azure, but more importantly make sure it runs correctly.
Microsoft always tries to light up new tools for as many .NET project types as possible. Even after the initial release of a new tool, we'll continue to add support for more project types in subsequent updates. Right now, the tools covered in this article are available for the following project types: ASP.NET, Azure Functions, WinForms, WPF, and Console.
In Brief: What It Takes to Consume Azure Services
If you already have a lot of experience consuming Azure services, you can safely skip this part. If it's been a while though, this is worth brushing up on. Here are the basics of what's required to consume Azure services from .NET apps:
- The SDK, which is comprised of binaries required to talk to Azure services and are distributed via NuGet. Today, each Azure service tends to have its own SDK, although keep in mind that it's not a hard requirement for every single Azure service to require an SDK.
- A small amount of source code that enables the project to make use of the SDK. Some use the term “bootstrapping” or “bootstrap code” to describe this. Sometimes this is where the authentication mode for communicating with the Azure service is configured.
- The configuration artifacts required by the SDK. The SDK may require certain configuration values to be read when the app runs. These configuration values are read from well-known configuration artifacts that must be added to the project for everything to work.
- The configuration values for the configuration artifacts. The value can be different for every environment the app runs in. For example, in a dev environment, you may want to connect to storageAccount1 and in a pre-production environment, you may want to connect to storageAccount2. This is achieved by having a different value in each environment.
Next, I'm going to cover how Visual Studio helps you manage all of the above with ease so you can focus on what matters the most: writing the business logic for your app.
Consume Azure Services Using Connected Services
I talked about what it takes to consume Azure services from a .NET app. You need an SDK in the form of NuGet packages, which you could acquire using Visual Studio's NuGet Package Manager, but what package names and versions do you need? Then you need some configuration artifacts, which you could add using Visual Studio's Add Item dialog, but which ones is this SDK going to look for? Also, when you put the configuration values in the configuration artifacts, what name should you use for each key-value pair?
You can get answers to all of these questions by going through the docs of each Azure service, but that takes time. On top of that, you must be careful to read the right version of the docs for the same framework version and project-type you're working with. Microsoft has observed customers in user studies making simple mistakes along the way, such as missing a step or misreading an instruction, which sometimes leads to frustration and loss of productivity. We realized that we could do more to help customers be successful, so in Visual Studio 2019, we came up with a revamped Connected Services experience (see Figure 1).
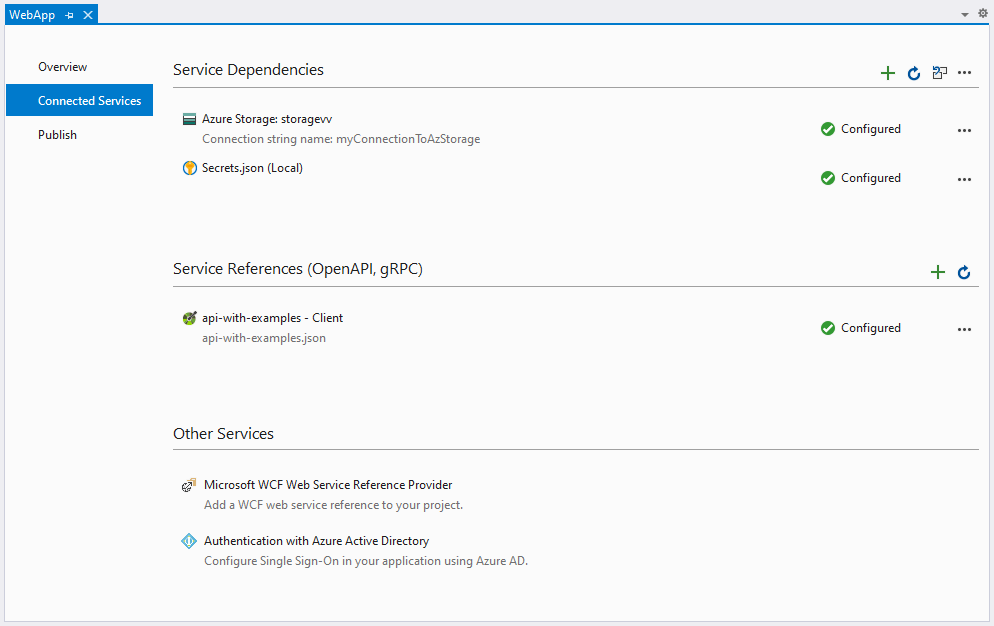
Let's quickly go over the UI changes to the Connected Services page. As you can see in Figure 1, the page contains three sections: Service Dependencies, Service References, and Other Services. Prior to Visual Studio 2019, the Connected Services page gave you a list of items to pick from, but the list wasn't uniform. Some items on the list help you consume Azure services while others help you stand-up and consume APIs by generating code. That made it challenging to add more functionality to the list without also adding confusion. We decided to split the old list up into Service Dependencies and Service References; leftover items that haven't been migrated but are still available under Other Services. Let's focus on the Service Dependencies section and talk about how it helps you consume Azure services and configure your local environment all in one go.
Get Started with Connected Services
Start by clicking the + icon on the top right corner of the Service Dependencies section (see Figure 1). A list of the supported Azure services (and their local emulators/alternatives) shows up, asking for you to pick one, as shown in Figure 2.
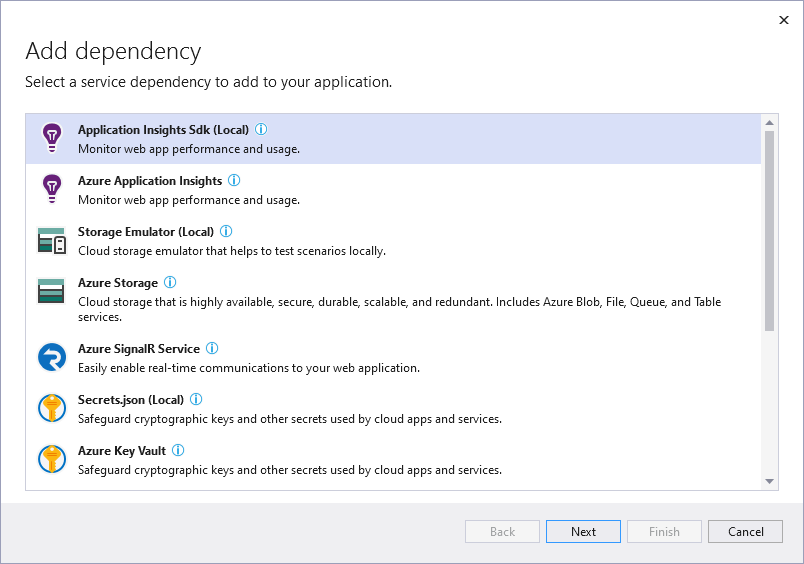
Table 1 has the complete list of what is currently supported, although keep in mind that we're continuously adding support for new Azure services with each update of Visual Studio. If you're looking for hosting Azure services such as Web Apps and Functions, you won't find them in this list; those are covered later in the section entitled Deploy Your App to Azure.
After picking an Azure service, you go through the following steps:
- Either provision a new instance of the service or search for an existing one, without leaving the IDE.
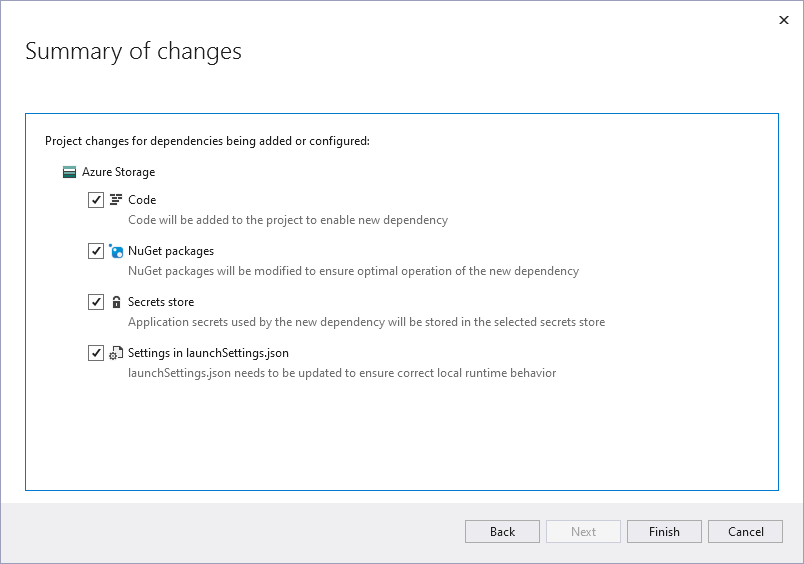
- Visual Studio reaches out to the instance selected and retrieves all information required to establish a successful connection. If any of the information is considered an application secret (e.g., connection strings, usernames, passwords, tokens, etc.) you also get the opportunity to either store it in Azure Key Vault or in a local
secrets.jsonfile that lives outside of your repo so that you never accidentally check it in. - Get a summary of the actions/changes that are about to take place. You can see an example of that in Figure 3 for adding Azure Storage.
With just a few clicks, you've enabled your application to consume an Azure service, configured how it should work locally, secured any related application secrets, and you're ready to start writing your business logic.
One Click to Restore Dependencies
If your local environment stops connecting to your Azure services successfully, Visual Studio can restore all the dependencies back to their working state by clicking the Restore icon at the top of the Service Dependencies table, two icons to the right of the + icon, as seen in Figure 1. Visual Studio checks to see if instances are missing and re-provisions them as well as checks whether configuration values are missing or incorrect and updates them with the correct values. If you really want to, you can even customize the restore operation by supplying optional parameters that let you overwrite things such as Azure resource group names and other details.
A Peek Under the Covers
To support all of this, Visual Studio creates two new files visible in Solution Explorer under Properties called serviceDependencies.json and serviceDependencies.local.json. Both files are safe to check into your repo, as they don't contain any secrets. Here's an example for serviceDependencies.json:
{
    "dependencies": {
        "secrets1": {
            "type": "secrets"
        },
        "storage1": {
            "type": "storage",
            "connectionId": "myConnectionToAzStorage"
        }
    }
}
Here's an example for serviceDendencies.local.json:
{
    "dependencies": {
        "secrets1": {
            "type": "secrets.user"
        },
        "storage1": {
            "resourceId": "/subscriptions/[parameters('subscriptionId')]/resourceGroups/[parameters('resourceGroupName')]/providers/Microsoft.Storage/storageAccounts/storagevv",
            "type": "storage.azure",
            "connectionId": "myConnectionToAzStorage",
            "secretStore": "LocalSecretsFile"
        }
    }
}
If you look closely at the contents of serviceDendencies.local.json, you'll notice that some values are parameterized. Visual Studio also creates a file called serviceDependencies.local.json.user that isn't visible in Solution Explorer by default. This file contains the value for all the parameters because some of them could be considered a secret (e.g., Azure subscription ID) and we don't recommend that you check it in unless you have fully understood the information that's being recorded in this file. Here's an example of serviceDependencies.local.json.user:
{
    "dependencies": {
        "storage1": {
            "restored": true,
            "restoreTime": "2020-08-21T16:48:10.47941Z"
        },
        "secrets1": {
            "restored": true,
            "restoreTime": "2020-08-21T16:47:56.93638Z"
        }
    },
    "parameters": {
        "storage1.resourceGroupName": {
            "Name": "storage1.resourceGroupName",
            "Type": "resourceGroup",
            "Value": "aapt821group"
        },
        "storage1.subscriptionId": {
            "Name": "storage1.subscriptionId",
            "Type": "subscription",
            "Value": "0000000-0000-0000-000-0000000000"
        }
    }
}
It's Never Too Late to Start Using It
If you've already configured your application to consume an Azure service without using Service Dependencies, it isn't too late to benefit from all the additional features that come with it. If you navigate to the Connected Services page, the Service Dependencies section automatically detects and lists Azure dependencies that already exist in your app. If you want to manage these existing dependencies through the Service Dependencies experience, all you have to do is click the “Configure” button next to each one of them. Give it a try; if you change your mind, you can always just delete the dependency afterward.
Deploy Your App to Azure Using Visual Studio Publish
Using Publish in Visual Studio is one of the easiest ways to deploy your application to Azure:
- It helps you navigate the hosting options available to you in Azure.
- It lets you provision new instances or search for existing ones without leaving the IDE.
- It suggests default settings/values based on what it knows about your project.
- It detects missing components that are required to make the deployment work and helps you acquire them.
- It detects your app's dependencies on Azure services and helps you to configure them correctly.
- It recommends supplementary Azure services to ensure that your app is secure and performs optimally in Azure.
Get Started with Visual Studio Publish
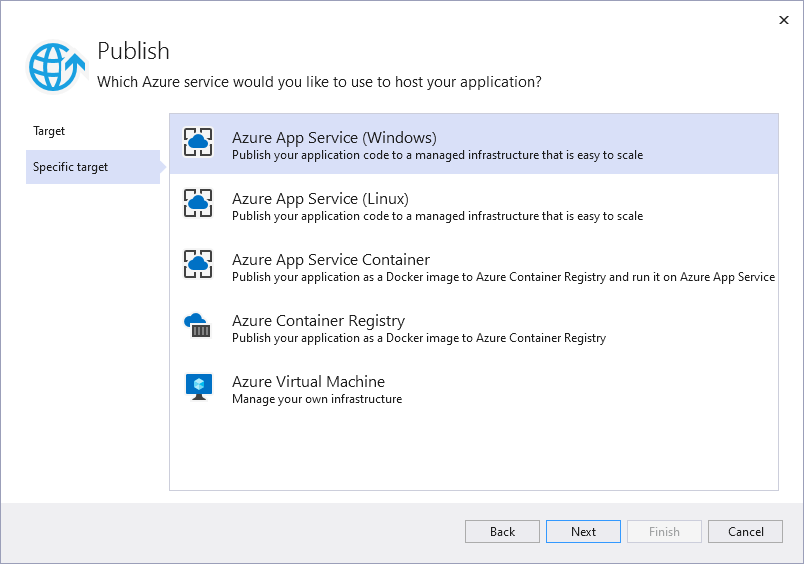
To get started, just right-click on your project in Solution Explorer and select Publish from the context menu. A dialog pops-up asking you to choose where to deploy to, with Azure listed at the top in alphabetical order. Clicking Next gives you a list of Azure hosting services to pick from, as shown in Figure 4. If you're interested in the complete listing of all hosting Azure services supported, check out Table 2.
After you pick the Azure hosting service you want, you'll get the opportunity to either create a new instance or search for an existing one without leaving the IDE. Completing all the steps creates a new Publish Profile file (*.pubxml) and displays the Publish Profile summary page, as seen in Figure 5 At this point, all that's left to do is hit the Publish button on the top right corner and the deployment begins. But what about those yellow warning icons? I'll address those in a moment.
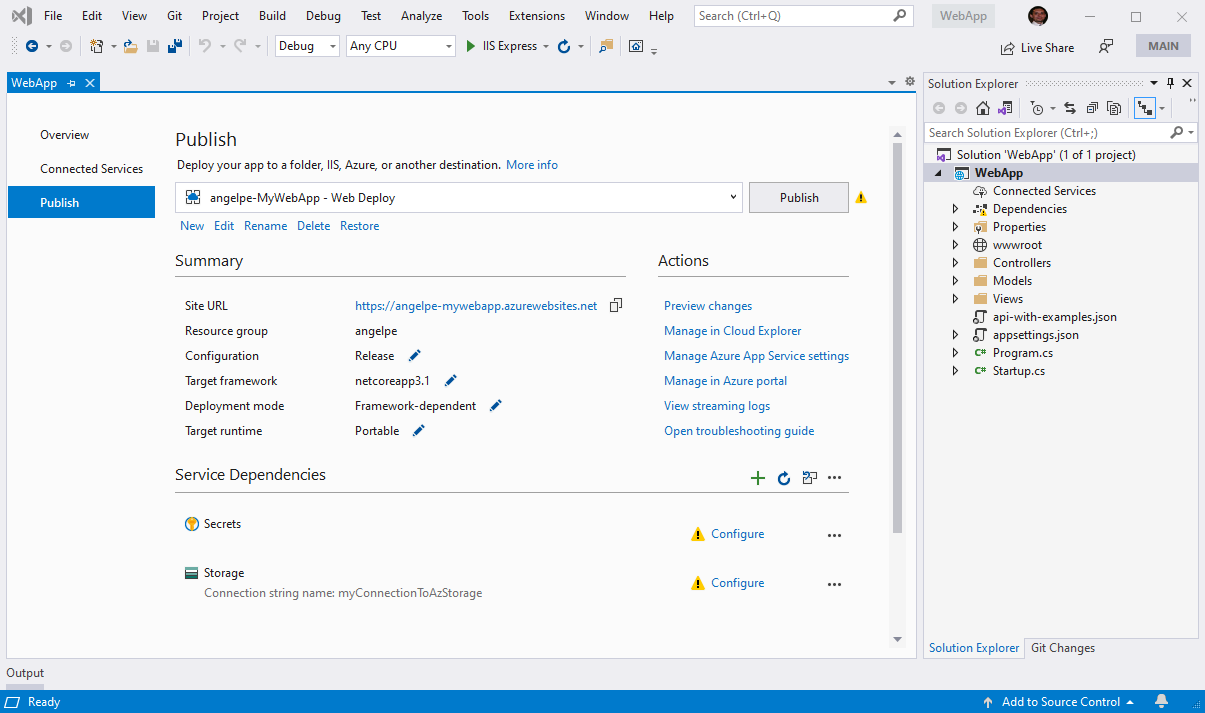
Configure Your App's Dependencies
When deploying to Azure, you can think of each Publish Profile as a different environment in Azure. During the creation of the Publish Profile, you picked the Azure hosting service to deploy to, but you didn't configure any of the other dependencies your app may have on Azure services. To do that, you can use what should be a familiar experience by now, the Service Dependencies section (bottom section on Figure 5).
Visual Studio will do its best to automatically detect dependencies and ask you to configure them for each Publish Profile. If it has detected unconfigured dependencies, it will warn you to not start the deployment until you've addressed them. That's what those yellow warning icons are in Figure 5. The detection logic looks for NuGet packages, source code, and configuration values — whatever's appropriate for each Azure service. If you don't want Visual Studio to manage one of the dependencies and stop warning you about it, you can select the Delete Dependency option from the ... menu.
It's also worth noting that you're not required to use the Service Dependencies section in Connected Services before you can use the Service Dependencies section in a Publish Profile. Naturally, they're designed to integrate with each other to give you the best possible end-to-end experience, but they also work great independently, giving you complete freedom.
Get Specific Recommendations
The Service Dependencies section recommends additional Azure services based on the security and performance needs of your app. Visual Studio has a deep understanding of your app and uses this information to give you specific recommendations. A good example is the recommendation to use the Azure SignalR Service with specific ASP.NET apps when performance is important.
Visual Studio has a deep understanding of your app and uses this information to give you specific recommendations'
Check Out All of These ARM Templates
Azure Resource Manager (ARM) is the deployment and management service for Azure. It provides a management layer that enables you to create, update, and delete resources in your Azure account. ARM templates are basically JSON files with a declarative syntax that let you deploy entire environments. They're the way Azure recommends that you implement infrastructure as code for your Azure apps, as you can simply include them in your repo and version them. Listing 1 includes the first 20 lines of such a file to give you an idea:
Lsiting 1: Implementing infrastructure in the repo
{
    "$schema": "https://schema.management.azure.com/schemas/2018-05-01/subscriptionDeploymentTemplate.json#",
    "contentVersion": "1.0.0.0",
    "parameters": {
        "resourceGroupName": {
            "type": "string",
            "defaultValue": "aapt821group",
            "metadata": {
                "_parameterType": "resourceGroup",
                "description": "Name of the resource group for the resource. It is recommended to put resources under same resource group for better tracking."
            }
        },
        "resourceGroupLocation": {
            "type": "string",
            "defaultValue": "centralus",
            "metadata": {
                "_parameterType": "location",
                "description": "Location of the resource group. Resource groups could have different location than resources."
            }
        },
    }
}
Visual Studio uses ARM to manage your app's dependencies and you can find the ARM templates that it uses in Solution Explorer under Properties > Service Dependencies followed by either local for your local environment or the name of the Publish Profile.
Final Thoughts
Give these Azure tools a try and let us know what you think. If you wish that we supported a feature or Azure service that we don't already, please let us know! You can submit your suggestions at https://developercommunity.visualstudio.com/.
Table 1: List of Azure services you can configure using Service Dependencies
| Azure service | Local emulators/alternatives that are also supported |
| Azure Application Insights | Application Insights SDK |
| Azure Storage | Azure Storage Emulator |
| Azure SignalR | |
| Azure Key Vault | Secrets.json |
| Azure SQL Server | SQL Server Express LocalDB, SQL Server On-Prem |
| Azure Cache for Redis | |
| Azure CosmosDB |
Table 2: List of Azure hosting services you can deploy to using Visual Studio Publish
| Azure hosting service | Details |
| Azure App Service (Web Apps) | Linux and Windows are both supported |
| Azure Functions | Linux and Windows are both supported |
| Azure Container Registry | Deployment of the container image to App Service is also supported |
| Azure VMs | Requires Web Deploy to be already enabled on the VM |
