


This 3-part article series presents how to use the Model-View-View-Model (MVVM) design pattern in MVC Core applications. The MVVM approach has long been used in WPF applications but hasn't been as prevalent in MVC or MVC Core applications. This article illustrates how using MVVM in MVC makes your applications even more reusable, testable, and maintainable. You're going to be guided step-by-step building an MVC Core application using the Entity Framework (EF) and a view model class to display and search for product data.
Related Articles
Use the MVVM Design Pattern in MVC Core: Part 2
Use the MVVM Design Pattern in MVC Core: Part 3
The Model-View-View-Model Approach
The reasons programmers are adopting the MVVM design pattern are the same reasons programmers adopted Object Oriented Programming (OOP) over 30 years ago: separation of concerns, reusability, maintainability, and testability. Wrapping the logic of your application into small, stand-alone classes allows you to reuse those classes in many different applications. Maintaining logic in classes allows you to fix any bugs in just one place and any other classes using that class automatically get the fix. When you don't use global variables in an application, testing your application becomes much simpler. Wrapping all variables and logic that operates upon those variables into one class allows you to create a set of tests to check each property and method in the class quickly and easily.
Any other classes using the class automatically get the fix.
The key to MVVM in MVC is moving logic out of the MVC controller and into a view model class that contains properties that you can bind to the user interface. The controller should only call a method in your view model, and periodically set a property or two prior to calling that method. Normally, properties that don't need to be set as view model properties will be bound to controls on your user interface. To ensure reusability of your view model classes, don't use any ASP.NET objects such as Session, ViewBag, TempData, etc. in your view model.
Why Use MVVM in MVC
When using MVVM in WPF, you typically have a view model class for each screen. In MVC, you do the same by having one view model class per page. Of course, there can be exceptions, but this separation keeps your controllers and view model classes small and focused. The controller's GET method creates an instance of the view model (or has one injected) and passes it as the model to the page. The page binds to properties on the view model as HTML input or hidden elements. These bound properties may come from an instance of one of your EF entity classes, or additional properties that are specific to that page. If you have input elements on the page, the POST method in the controller accepts the view model as its parameter and all the bound properties are filled in automatically.
From within the controller, call a method in the view model to get or save data, or any other command you need. Your controller methods are thus kept small because the code to load the page, and to save the data from the page, is all within the view model. Data binding takes care of all the rest.
Another big advantage of using a view model class is that unit testing is easier. There's no need to create an instance of, or test, any methods in the controller. If all the controller is doing is calling methods in the view model, then you just need to test the view model.
Many of us have been developing for many years and we've seen technologies come and go. However, the basics of how you create classes with methods and properties hasn't changed. If you keep any technology-specific objects such as Session, ViewData, TempData, etc., out of your view models, then moving from one technology to another becomes easier. For example, I've had many clients create an MVC application, then decide that they want to create a part of that application in WPF for their data-entry people. I only had to create the UI in WPF and simply reuse the view model classes that had already been tested.
The Tools You Need
If you follow along with the steps in this article, you're going to build an MVC Core application. The application is going to show you how to interact with a product table in a SQL Server database. I'm going to use Visual Studio Code, MVC Core, C#, the Entity Framework and the Adventure Works Lite sample database for SQL Server. You can get the Adventure Works Lite database on my GitHub at https://github.com/PaulDSheriff/AdventureWorksLT.
In the GitHub repository there's a file named AdventureWorksLT.bak that you can use to restore the SQL Server database. If you're unable to restore the backup, there's a SalesLT-Product.sql file that you can use to create the product table with data in any SQL Server database.
The Overall Project
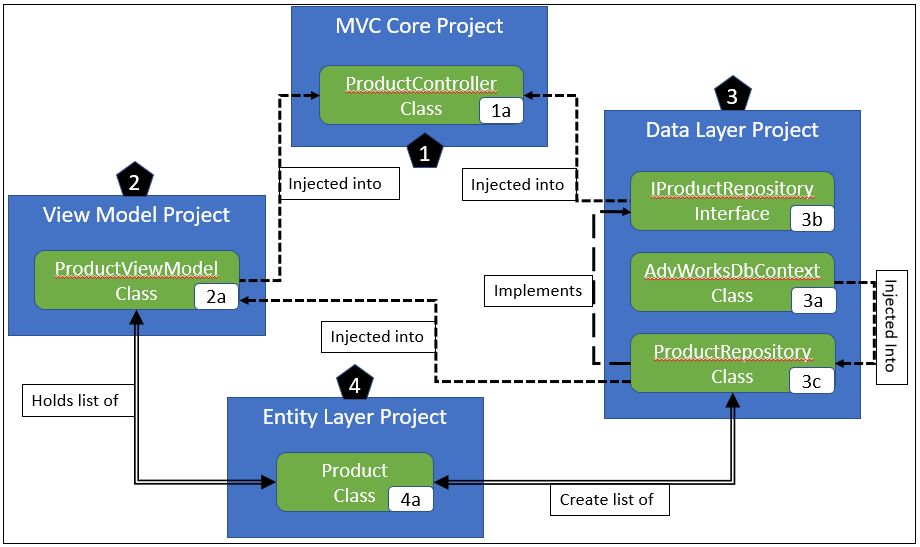
For this article, you're going to be creating the four projects shown in Figure 1. This architecture is one that I've found to be flexible, reusable, and testable. The four projects are the MVC Core application, and one class library each for your view model classes, data layer classes, and entity classes. For many of you, the only thing that might be a little different is the addition of the view model classes. The focus of this article is to show how to simplify your controllers and move most of your logic into view model classes. A secondary focus is to illustrate how to build a multi-layered project in Visual Studio Code with .NET Core.
In this article, you're going to be using the SalesLT.Product table in the AdventureWorksLT database. You'll first learn to build an HTML table to list all products in this table. Next, you add search capabilities so you can search on one or multiple columns. The logic to build the listing and searching is created in the view model class instead of in the controller.
The ProductController class (1a in Figure 1) has both an instance of a ProductViewModel class (2a) and an implementation of an IProductRepository (3b) injected into it by MVC Core. The implementation is a ProductRepository class (3c), which also has an instance of the AdvWorksDbContext class (3a) injected into it by MVC Core.
The ProductRepository is passed into the constructor of the ProductViewModel class by the DI service in MVC Core. A method named HandleRequest() is called on the view model to retrieve the data from the Product table using the Entity Framework, which is implemented in the ProductRepository class. Each row of data in the Product table is represented by the entity class Product (4a). A generic list of Product objects is placed into a Products property of the ProductViewModel. This view model class is used as the model to the Products page to create the HTML table.
Create the MVC Core Project
Let's create our MVC Core project using Visual Studio Code. Startup Visual Studio Code and open a terminal window by clicking the Terminal > New Terminal menu. Navigate to the folder where you normally place your development projects. For example, I'm going to create my project under the D:\Samples folder. Once I open a terminal window, I type in the command:
CD D:\Samples
Once you're in your development folder, create a new folder named MVVMSample using the MKDIR (or the MD) command:
MKDIR MVVMSample
Change to the new directory using the CD command in the terminal window, as shown in the command below.
CD MVVMSample
Create a new MVC Core project in the MVVMSample folder by executing the dotnet new mvc command.
dotnet new mvc
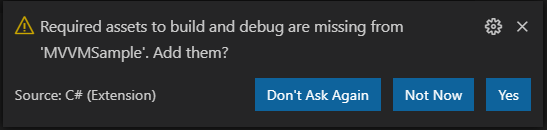
Once the command has run, open the folder in VS Code by clicking the File > Open Folder menu. A few seconds after opening the folder, you should be prompted with a dialog that looks like Figure 2. Click on the Yes button to add the required assets to the new project.
Try It Out
To ensure that everything is created correctly, click the Run > Start Debugging menu and a Web page should be displayed in your default browser.
Create the Entity Layer Project
Now that you have the MVC project created, start building the rest of your projects beginning with the Entity project. In this project is where you place all your classes that map to each table in your database. This project should be a simple class library with as few references to DLLs as possible. If you keep the references to a minimum, you can reuse your Entity DLL in other projects. Although you're going to map the Product entity in this article to a table in a SQL Server database, by keeping your entity classes in a separate DLL, you can also map Product data from an XML or JSON file to the same Product entity class.
To create the Entity project, open a terminal window by clicking on the Terminal > New Terminal menu. Go to your development directory (in my case that was D:\Samples). Type in the following commands to create a new folder named MVVMEntityLayer:
MD MVVMEntityLayer
CD MVVMEntityLayer
dotnet new classlib
The dotnet new classlib command creates a class library project with the minimum number of references to .NET Core libraries. Now that you've created this new project, add it to your Visual Studio Code workspace by clicking the File > Add Folder to Workspace menu. Select the MVVMEntityLayer folder and click on the Add button. You should see the MVVMEntityLayer project added to your VS Code workspace.
Save this workspace by clicking on the File > Save Workspace As... menu. Set the name to MVVMSampleWS and place it into the MVVMSample folder. In the future, you can now double-click on this MVVMSampleWS.code-workspace file to open your solution.
Add Data Annotations
In order to map a class to a table using the Entity Framework, you need some data annotation attribute classes. These data annotation classes are not a part of the default .NET Core library, so you need to add a library. Click on the Terminal > New Terminal menu and you should be shown options to open the new terminal window in either the MVVMSample or the MVVMEntityLayer folder. Select the MVVMEntityLayer folder and type in the following command to add the appropriate DLL so you can use the data annotation attributes.
dotnet add package Microsoft.AspNetCore.Mvc.DataAnnotations
Create the Product Class
Within the MVVMEntityLayer, project rename the Class1.cs file to Product.cs. Open the Product.cs file, remove the code currently in the file and replace it with the code in Listing 1. Most of the code in this Product class should be familiar to you. The [Table()] attribute is used to inform the Entity Framework of the name of the table and schema in which to find the table in the database. Add the [Column()] attribute to any decimal values so the precision and scale can be specified. Add the [DataType()] attribute to any fields to be displayed as currency or date values. MVC Core reads the [DataType()] attribute when using the DisplayFor() method and if it's currency, displays the value in the correct format on the Web page.
Listing 1: The Product class maps the fields in the Product table to properties in this class
using System;
using System.ComponentModel.DataAnnotations;
using System.ComponentModel.DataAnnotations.Schema;

namespace MVVMEntityLayer
{
    [Table("Product", Schema ="SalesLT")]
    public partial class Product
    {
        public int? ProductID { get; set; }
        public string Name { get; set; }
        public string ProductNumber { get; set; }
        public string Color { get; set; }

        [DataType(DataType.Currency)]
        [Column(TypeName = "decimal(18, 2)")]
        public decimal StandardCost { get; set; }

        [DataType(DataType.Currency)]
        [Column(TypeName = "decimal(18, 2)")]
        public decimal ListPrice { get; set; }

        public string Size { get; set; }

        [Column(TypeName = "decimal(8, 2)")]
        public decimal? Weight { get; set; }

        [DataType(DataType.Date)]
        public DateTime SellStartDate { get; set; }

        [DataType(DataType.Date)]
        public DateTime? SellEndDate { get; set; }

        [DataType(DataType.Date)]
        public DateTime? DiscontinuedDate { get; set; }
    }
}
Reference Entity Layer from the MVVM Sample Project
If you're used to using Visual Studio, you know that in order to use classes from another project, you must include a reference to that DLL. It's no different in VS Code, but to set the reference, you need to type in a command. Click on the Terminal > New Terminal menu and select the MVVMSample folder. Set a reference to the MVVMEntityLayer project using the following command.
dotnet add . reference ../MVVMEntityLayer/MVVMEntityLayer.csproj
Try It Out
To ensure that you've typed in everything correctly, run a build task to compile the projects. Because you have a reference from the MVVMSample to the MVVMEntityLayer, if you run a build task on the MVVMSample project, it builds the MVVMEntityLayer project as well. Select the Terminal > Run Build Task... menu and select the MVVMSample project. Watch the output in the terminal window and you should see that it compiles both projects.
Create the Data Layer Project
The next project to create is the Data Layer project in which you place all your repository classes. These repository classes interact with the tables in your database through the Entity Framework. Each repository class should implement an interface. Having both a class and an interface allows you to use DI to inject the concrete implementation of the interface. This is advantageous when it comes to testing time. You can swap out the concrete implementation, but the rest of your code stays the same.
To create this project, open a terminal by clicking on the Terminal > New Terminal menu. Go to your development directory (in my case, that was D:\Samples). Type in the following commands to create a new folder named MVVMDataLayer.
MD MVVMDataLayer
CD MVVMDataLayer
dotnet new classlib
Add this new project to your Visual Studio Code workspace, by clicking the File > Add Folder to Workspace... menu. Select the MVVMDataLayer folder and click on the Add button. You should now see the MVVMDataLayer project added to your VS Code workspace. Save your workspace by clicking on the File > Save menu. You can go ahead and delete the Class1.cs file, as you won't be needing that.
Add Entity Framework
For this article, you're going to use the Entity Framework for the concrete implementation of your repository classes. In order to use the Entity Framework in the .NET Core application, you need to add a package to the project. Go back to the terminal window that should still be open in the MVVMDataLayer folder. Type in the following command to add the Entity Framework to the data layer project.
dotnet add package Microsoft.EntityFrameworkCore.SqlServer
Add Some Folders
As you're going to have different types of files in this project, add three folders in which to store these different files named Models, RepositoryClasses, and RepositoryInterfaces. In the Models folder, place at least one class that inherits from the Entity Framework's DbContext class. You're going to have one repository class for each table that you need to interact with in your database. Place these classes in the RepositoryClasses folder. Into the RepositoryInterfaces folder is where you place the corresponding interface for each repository class.
Reference the Entity Layer
Because your data layer will be reading data from the Product table, you're going to need access to the Product class that you created earlier. Add a reference to the Entity Layer project you created earlier by opening a terminal window in the MVVMDataLayer folder and typing the following command:
dotnet add . reference ../MVVMEntityLayer/MVVMEntityLayer.csproj
Add a DbContext Class
For your simple article, you're just going to need a single class to inherit from the Entity Framework's DbContext class. Add a new file in the Models folder named AdvWorksDbContext.cs. Add the code shown in Listing 2 to this new file. The AdvWorksDbContext class is a standard implementation of an EF DbContext object. The constructor is passed an instance of a DbContextOptions object used to pass in any options such as a connection string. A single DbSet<Product> property is created to hold the collection of products that are read from the SalesLT.Product table.
Listing 2: Add a class that inherits from DbContext to access your database tables
using Microsoft.EntityFrameworkCore;
using MVVMEntityLayer;

namespace MVVMDataLayer
{
    public partial class AdvWorksDbContext : DbContext
    {
        public AdvWorksDbContext(DbContextOptions<AdvWorksDbContext> options) : base(options)
        {
        }

        public virtual DbSet<Product> Products { get; set; }
    }
}
Add Product Interface Class
Our repository class needs a single method named Get() used to retrieve all records from the Product table. Before creating the repository class, add an interface with the contract for this Get() method. Create a new file in the RepositoryInterfaces folder named IProductRepository.cs. Add the code shown in the code snippet below.
using System.Collections.Generic;
using MVVMEntityLayer;

namespace MVVMDataLayer
{
    public interface IProductRepository
    {
        List<Product> Get();
    }
}
Add Product Repository Class
In the RepositoryClasses folder, add a new file named ProductRepository.cs. Enter the code shown in Listing 3 into the new file you created. This class needs to implement the Get() method from the IProductRepository interface. In addition, a private property of the type AdvWorksDbContext should be added. This private property is set from the constructor of this class. When a ProductRepository class is created by the DI service, an instance of the AdvWorksDbContext also created by the DI service is injected into this class.
Listing 3: Each repository class implements an interface and receives a DbContext object in its constructor
using System;
using System.Collections.Generic;
using System.Linq;
using MVVMEntityLayer;

namespace MVVMDataLayer
{
    public class ProductRepository : IProductRepository
    {
        public ProductRepository(AdvWorksDbContext context)
        {
            DbContext = context;
        }

        private AdvWorksDbContext DbContext { get; set; }

        public List<Product> Get()
        {
            return DbContext.Products.ToList();
        }
    }
}
Reference Data Layer from MVVM Sample Project
Because the DI system is going to create an instance of our ProductRespository and the AdvWorksDbContext, you're going to need the data layer project referenced from the MVC Core project. Click on the Terminal > New Terminal menu and select the MVVMSample folder. Set a reference to the MVVMDataLayer project using the following command.
dotnet add . reference ../MVVMDataLayer/MVVMDataLayer.csproj
Try It Out
To ensure that you've typed in everything correctly, run a build task to compile the projects. Because you now have a reference from the MVVMSample to both the MVVMEntityLayer and the MVVMDataLayer projects, all three projects are built. Select the Terminal > Run Build Task... menu and select the MVVMSample project. Watch the output in the terminal window and you should see that it compiles all three projects.
Create View Model Project
Now that you've created the Product entity class and the data layer to get a collection of Product objects, you can build your view model class. So far, you may be thinking, why do I need a view model class? I have everything I need in my Product and my ProductRepository classes. The answer is because you want to cut down the amount of code you need to write in your controller, and you're going to need additional properties other than what is in your entity class.
I'm sure you've found that many times on your Web pages, you need additional properties to keep track of the page state. This state is keeping track of what page you're on when paging through a large table. Or what sort column you're sorted upon. If you're in an edit page, you might need to keep track of whether the user requested to do an add or an edit of the record. All of this additional data needs to be kept track of, so where do you put it? You don't want to add it to your entity class as you then need to add additional attributes to mark them as not mapped to the table. Plus, you're going to need these properties on many different pages, and you don't want to copy and paste them from one entity class to another.
This is where a view model class comes in. A view model class holds this additional state data along with an instance of your entity class (Figure 3). Later in this article series, you're going to add searching, paging, sorting, and CRUD logic to the product Web page. At that time, you're going to start adding additional properties.
Create your view model project by opening a terminal window. Go to your development directory and type in the following commands to create a new folder named MVVMViewModelLayer.
MD MVVMViewModelLayer
CD MVVMViewModelLayer
dotnet new classlib
Now that you've created this new project, add it to your Visual Studio Code workspace, by clicking on the File > Add Folder to Workspace... menu. Select the MVVMViewModelLayer folder and click on the Add button. You should now see the MVVMViewModelLayer project added to your VS Code workspace. Save your workspace by clicking on the File > Save menu.
Reference the Entity and Data Layers
Your view model class needs access to the Product and ProductRepository classes you created earlier. Add a reference to the entity layer and data layer projects you created earlier by opening a terminal window in the MVVMViewModelLayer folder and typing the following commands:
dotnet add . reference ../MVVMEntityLayer/MVVMEntityLayer.csproj
dotnet add . reference ../MVVMDataLayer/MVVMDataLayer.csproj
Create Product View Model Class
In the view model layer project, rename the Class1.cs file to ProductViewModel.cs and delete all the code within this file. Add the code shown in Listing 4 to create your ProductViewModel class. You can see two constructors on this class. You need a parameter-less constructor so MVC can create the class in the POST method of your controller. The other constructor is passed an instance of a ProductRepository class when the ProductViewModel is created by the DI system in MVC Core.
Listing 4: A view model class helps maintain state, exposes model properties to the UI, and interacts with repository classes
using System;
using System.Collections.Generic;
using System.Linq;
using MVVMDataLayer;
using MVVMEntityLayer;

namespace MVVMViewModelLayer
{
    public class ProductViewModel
    {
        /// <summary>
        /// NOTE: You need a parameterless
        /// constructor for post-backs in MVC
        /// </summary>
        public ProductViewModel()
        { }

        public ProductViewModel(IProductRepository repository)
        {
            Repository = repository;
        }

        public IProductRepository Repository { get; set; }
        public List<Product> Products { get; set; }

        public void HandleRequest()
        {
            LoadProducts();
        }

        protected virtual void LoadProducts()
        {
            if(Repository == null)
            {
                throw new ApplicationException("Must set the Repository property.");
            }
            else
            {
                Products = Repository.Get().OrderBy(p => p.Name).ToList();
            }
        }
    }
}
Two public properties are needed in the view model. One is for the repository object. This allows you to set the repository object in the POST method of your controller. The other property is a list of Product objects that will be loaded with all the products returned from the table. It's from this property that the HTML table is built.
Two methods are created in this first iteration of your view model. The protected LoadProducts() method is responsible for calling the Get() method on the Repository object and retrieving the list of product objects. The public HandleRequest() method is called from the controller to retrieve the product data. In the future, more logic is added to the HandleRequest() method to perform other functions such as searching, paging, adding, editing, and deleting of product data. The HandleRequest() method should be the only public method exposed from this view model class. By making all other methods not visible outside the class, your controller only needs to ever call a single method.
Reference View Model Layer from MVVM Sample Project
The DI service requires an instance of the ProductViewModel class to insert into your control, so reference the view model layer project from your MVC Core project. Click on the Terminal > New Terminal menu and select the MVVMSample folder. Set a reference to the MVVMViewModelLayer project using the following command.
dotnet add . reference ../MVVMViewModelLayer/MVVMViewModelLayer.csproj
Try It Out
To ensure that you've typed in everything correctly, run a build task to compile the projects. Because you have a reference from the MVVMSample to the MVVMEntityLayer, the MVVMDataLayer, and the MVVMViewModelLayer projects, all four projects will be built. Select the Terminal > Run Build Task... menu and select the MVVMSample project. Watch the output in the terminal window and you should see that it compiles all projects.
Set Up the MVC Project
Now that you have the entity, data, and view model projects created to support retrieving and modifying data in the Product table, it's now time to set up the MVC project for using these classes. The AdvWorksDbContext class needs to be injected using the DI service, so you need to add a reference to the Entity Framework in your MVC project. Select Terminal > New Terminal and ensure that the terminal prompt is in your MVVMSample project folder. Type in the following command to add the Entity Framework to your MVC project:
dotnet add package Microsoft.EntityFrameworkCore.SqlServer
Modify the Startup Class
In the Startup class is where you inject your classes into the MVC DI service. Open the Startup.cs file and add three using statements at the top. You need one each for your Data Layer, View Model Layer, and for the Entity Framework.
using MVVMDataLayer;
using MVVMViewModelLayer;
using Microsoft.EntityFrameworkCore;
Next, create a new method in the Startup class named InjectAppServices() as shown in Listing 5.
Listing 5: Build a separate method to inject your classes into the MVC DI service
private void InjectAppServices(IServiceCollection services)
{
    // Get connection string from appsettings.json
    string cnn = Configuration["ConnectionStrings:AdvWorksConnectionString"];

    // Add AdventureWorks DbContext object
    services.AddDbContext<AdvWorksDbContext>(options => options.UseSqlServer(cnn));

    // Add Classes for Scoped DI
    services.AddScoped<IProductRepository, ProductRepository>();
    services.AddScoped<ProductViewModel>();
}
This method is where you inject your application-specific classes. I like creating a separate method so I don't have an overly-large ConfigureServices() method. Add a call to the InjectAppServices() method from within the ConfigureServices() method as shown in the code snippet below.
public void ConfigureServices(IServiceCollection services)
{
    services.AddControllersWithViews();

    // Inject your application services
    InjectAppServices(services);
}
Add a Connection String
In the InjectAppServices() method, you retrieve a connection string from the appsettings.json file. Open the appsettings.json file and add an appropriate JSON property to store your connection string. For formatting purposes in this magazine, I had to break the connection string onto several lines. Your connection string must be on a single line.
"ConnectionStrings": {
    "AdvWorksConnectionString": "Server=Localhost;Database=AdventureWorksLT;Trusted_Connection=True;MultipleActiveResultSets=true;Application Name=MVVM Sample"
},
Create a Product List Page
I hope you agree that you now have a very elegant, reusable, and testable design with the code you've written so far. It's now time to see the fruits of your labor expressed in a controller of your MVC application. Create a new ProductController.cs file in the Controllers folder and add the code shown in Listing 6 to this new file.
Listing 6: The controller logic is very simple because of DI and the MVVM design pattern
using Microsoft.AspNetCore.Mvc;
using Microsoft.Extensions.Logging;
using MVVMDataLayer;
using MVVMViewModelLayer;

namespace MVVMSample.Controllers
{
    public class ProductController : Controller
    {
        private readonly IProductRepository _repo;
        private readonly ProductViewModel _viewModel;

        public ProductController(IProductRepository repo, ProductViewModel vm)
        {
            _repo = repo;
            _viewModel = vm;
        }

        public IActionResult Products()
        {
            // Load products
            _viewModel.HandleRequest();
            return View(_viewModel);
        }
    }
}
The MVC DI service injects an instance of the ProductRepository and the ProductViewModel classes into the ProductController class. Two private variables hold each of these instances passed in. When the user navigates to the Product/Products path in the MVC application, the HandleRequest() method is called on the view model. This method loads the products into the Products property in the view model. The view model is then passed to the Products.cshtml page, which you're creating next.
Add a Product Page
Add a Product folder under Views folder in which to put the MVC pages for displaying your product data. Create a Products.cshtml file in this new Product folder and enter the code shown in the snippet below.
@model MVVMViewModelLayer.ProductViewModel
@{
    ViewData["Title"] = "Products";
}

<h1>Products</h1>;
<partial name="_ProductList">
Add a Product List Partial Page
Add a partial page named _ProductList.cshtml in the Product folder. Add the code shown in Listing 7 to this new partial page file. You're going to be adding more functionality to the product page as you progress through this series of articles, so it makes sense to break your page into multiple partial pages. This is a good separation of concerns design pattern for Web pages.
Listing 7: Create a partial page for the display of the Product table
@using MVVMEntityLayer

<table class="table table-bordered table-hover">
  <thead>
    <tr>
      <th>Product Name</th>
      <th>Product Number</th>
      <th class="text-right">Cost</th>
      <th class="text-right">Price</th>
    </tr>
  </thead>
  <tbody>
    @foreach (Product item in Model.Products)
    {
      <tr>
        <td>@Html.DisplayFor(m => item.Name)</td>
        <td>@Html.DisplayFor(m => item.ProductNumber)</td>
        <td class="text-right">@Html.DisplayFor(m => item.StandardCost)</td>
        <td class="text-right">@Html.DisplayFor(m => item.ListPrice)</td>
      </tr>
    }
  </tbody>
</table>
Modify Index Page
To call the Product List page, open the Index.cshtml page in the Views\Home folder and modify the code to look like the snippet shown below.
@{
    ViewData["Title"] = "Home Page";
}
<div class="list-group">
    <a asp-action="Products" asp-controller="Product" class="list-group-item">Product List</a>
</div>
Try It Out
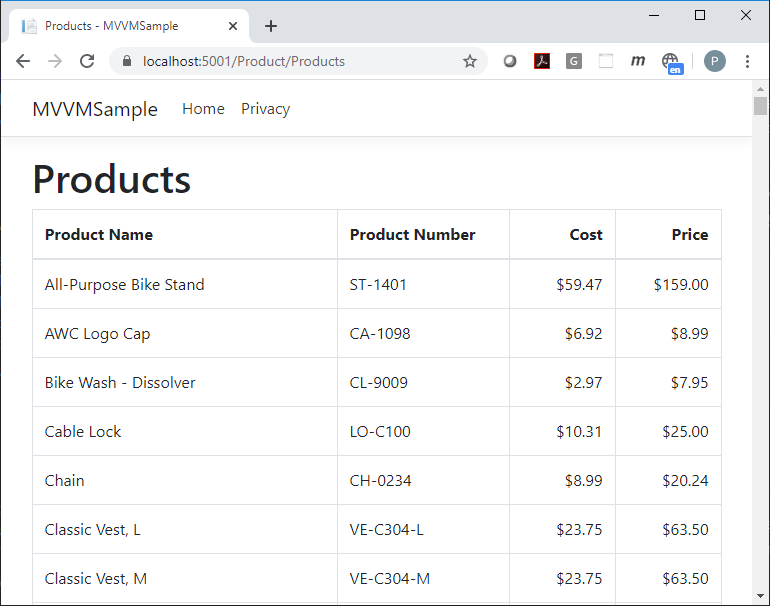
Run the application and click on the Product List link. If you've done everything correctly, you should see the list of products from the Product table in the AdventureWorksLT database, as shown in Figure 4.
Searching for Products
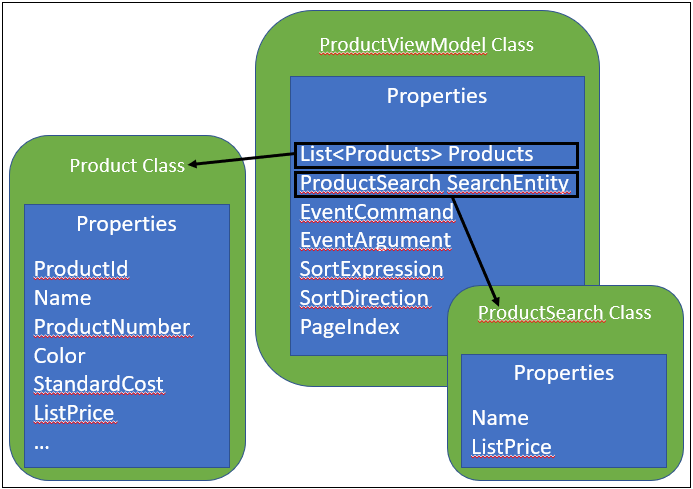
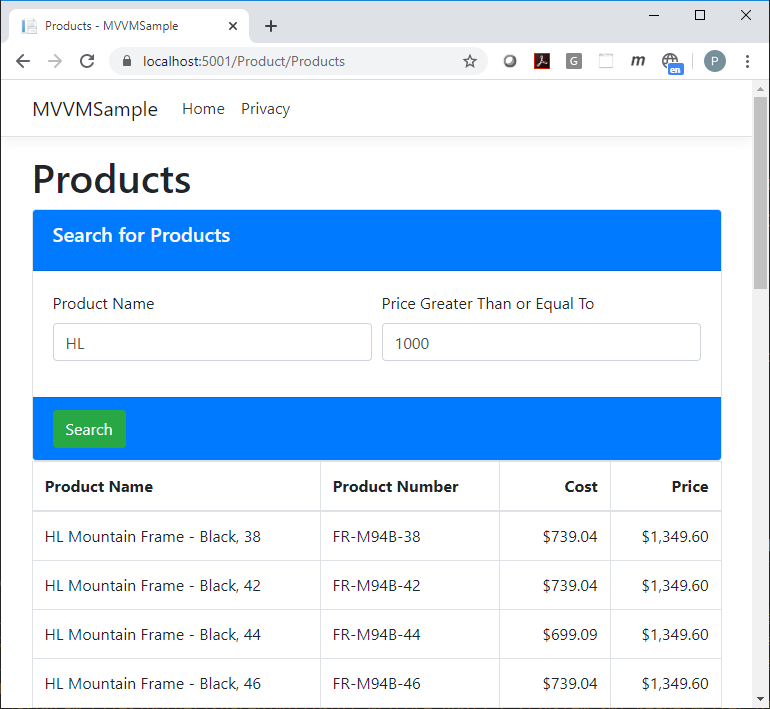
To further illustrate how simple using the MVVM design pattern makes your controller code, in this part of the article you add some HTML and code to search for products, as shown in Figure 5. Add a new entity class named ProductSearch (see Figure 3) to hold the two properties to search for. You're also adding a view model base class that all your view models are going to inherit from. This base class contains, for now, just a single property named EventCommand.
The Search button you see in Figure 5 uses a data- attribute to specify the command to send to the view model to process. Here's the HTML code you're going to enter in just a bit.
<button type="button" data-custom-cmd="search" class="btn btn-success">Search</button>
To get the command and send it to the view model, you're going to write a little bit of JavaScript to put the value “search” into a hidden field on this product page. That hidden field is bound to the EventCommand property in the view model base class. In the HandleRequest() method you're going to check to see if the EventCommand is filled in with a value, in this case “search”, and if it is, call a Search() method instead of the LoadProducts() method you called before to display all products.
Create a Product Search Class
To hold data for searching, create a new class in the Entity Layer project named ProductSearch.cs and add the code shown in Listing 8. The reason why you're creating a new class instead of just reusing the Product class is that eventually you're going to add data validation annotations to the Product class. You're not going to want those validations on these search values. Another reason is that if you wanted to search on the SellStartDate field, you might need two properties; BeginDate and EndDate to specify a date range. You don't want to add these two extra properties to your Product class because they don't map to any field in the Product table.
Listing 8: Add a new search class to hold the values to search for in the Product table
using System.ComponentModel.DataAnnotations;
using System.ComponentModel.DataAnnotations.Schema;

namespace MVVMEntityLayer
{
    public partial class ProductSearch
    {
        [Display(Name = "Product Name")]
        public string Name { get; set; }

        [Display(Name = "List Price Greater Than or Equal to")]
        [DataType(DataType.Currency)]
        [Column(TypeName = "decimal(18, 2)")]
        public decimal ListPrice { get; set; }
    }
}
Modify Data Layer to Perform Searching
A Search() method needs to be added to both the interface and to the repository class. Open the IProductRespository.cs file and add a new method declaration for the repository contract.
List<Product> Search(ProductSearch entity);
Next, open the ProductRepository.cs file and add a Search() method to complete the interface contract you just defined. In this Search() method, you add a Where() method to see if the Name column in the Product table starts with the value you entered in the ProductSearch Name property and the ListPrice column is greater than or equal to the value in the ListPrice property.
public List<Product> Search(ProductSearch entity)
{
    List<Product> ret;

    // Perform Searching
    ret = DbContext.Products.Where(p => (entity.Name == null || p.Name.StartsWith(entity.Name)) && p.ListPrice >= entity.ListPrice).ToList();
    return ret;
}
Add View Model Base Class
Add a new folder in the View Model Layer project named BaseClasses. Within this new folder, create a new file named ViewModelBase.cs. Add the code shown below to this new file.
namespace MVVMViewModelLayer
{
    public class ViewModelBase
    {
        public ViewModelBase()
        {
            EventCommand = string.Empty;
        }

        public string EventCommand { get; set; }
        public virtual void HandleRequest() {}
    }
}
Modify the Product View Model Class
To use the EventCommand property, ensure that all your view model classes inherit from this base class. Open the ProductViewModel.cs file and modify the class declaration as shown below.
public class ProductViewModel : ViewModelBase
Add a new property to this class to hold an instance of the ProductSearch class by entering the code shown below.
public ProductSearch SearchEntity { get; set; }
Instantiate a new instance of this ProductSearch class in both constructor methods on the ProductViewModel class. An instance is required if you want the user to enter data into the search values and have that data post back into the properties in the ProductSearch object. Be sure to also call the base class' constructor by invoking the base() call on each constructor.
public ProductViewModel() : base()
{
    SearchEntity = new ProductSearch();
}

public ProductViewModel(IProductRepository repository) : base()
{
    Repository = repository;
    SearchEntity = new ProductSearch();
}
Add a SearchProducts() method to the ProductViewModel class. This method is similar to the LoadProducts() method you wrote earlier in that you check to ensure that the Repository property has been set. You then assign to the Products property the results of calling the Search() method in the ProductRepository class.
public virtual void SearchProducts()
{
    if (Repository == null)
    {
        throw new ApplicationException("Must set the Repository property.");
    }
    else
    {
        Products = Repository.Search(SearchEntity).OrderBy(p => p.Name).ToList();
    }
}
Because you added a virtual HandleRequest() method in the view model base class, add the override keyword to the HandleRequest() method declaration in the ProductViewModel class.
public override void HandleRequest()
Modify the HandleRequest() method to check the EventCommand property to see if there's a value in it. If there's no value, call the LoadProducts() method as before. However, if there's a “search” value in the EventCommand property, call the SearchProducts() method you just created. The HandleRequest() method should now look like the code snippet below.
public override void HandleRequest()
{
    switch (EventCommand.ToLower())
    {
        case "search":
            SearchProducts();
            break;
        default:
            LoadProducts();
            break;
    }
}
Add Hidden Field Partial Page
Because you added a view model base class that's going to be used for all view models, you should add a partial page that creates hidden fields for the EventCommand property, and the other properties you're going to add later in this article series. Add to Views\Shared folder a new partial page named _StandardViewModelHidden.cshtml. Add the code shown below to this new file.
@model MVVMViewModelLayer.ViewModelBase
<input type="hidden" asp-for="EventCommand" />
Add Search Partial Page
Just like you create a partial page for the product table, create a partial page for the search area on your product page as well. Add a new file under the Product folder named _ProductSearch.cshtml. Into this file add the code shown in Listing 9.
Listing 9: Add a partial page for the search area on your product Web page
@model MVVMViewModelLayer.ProductViewModel
<div class="card">
  <div class="card-header bg-primary text-light">
    <h5 class="card-title">Search for Products</h5>
  </div>
  <div class="card-body">
    <div class="form-row">
      <div class="form-group col">
        <label asp-for="SearchEntity.Name" class="control-label"></label>
        <input asp-for="SearchEntity.Name" class="form-control" />
      </div>
      <div class="form-group col">
        <label asp-for="SearchEntity.ListPrice" class="control-label"></label>
        <input asp-for="SearchEntity.ListPrice" class="form-control" />
      </div>
    </div>
  </div>
  <div class="card-footer bg-primary text-light">
    <button type="button" data-custom-cmd="search" class="btn btn-success">Search</button>
  </div>
</div>
The code in the _ProductSearch.cshtml file creates a Bootstrap card with the search fields contained within that card. In the footer of this card, add a Search button. It's on this Search button that you add the data- attribute that's going to send the command “search” to the view model.
Modify Products Page
When you created the Product page earlier, you had a single <partial> tag to display the _ProductList.cshtml file. You now need to add two more partial pages to the Product page. However, you need to wrap these partial tags into a <form> tag so the data in the hidden field and the search fields can be posted back to the view model in the POST method of the Product controller. Open the Products.cshtml page and replace the previous <partial> tag with the code shown in the following snippet.
<form method="post">
    <partial name="~/Views/Shared/_StandardViewModelHidden.cshtml" />
    <partial name="_ProductSearch.cshtml" />
    <partial name="_ProductList" />
</form>
Post the Form Using JavaScript
On the Search button, you set the button's type attribute to button, which means that it won't post the form back to the controller. It's now time to see how you're going to accomplish that. At the bottom of the Products page, add a section for some JavaScript and enter the code shown in Listing 10.
Listing 10: JavaScript is used to get the command to send to the view model
@section Scripts
{
  <script>
    $(document).ready(function () {
        // Connect to any elements that have 'data-custom-cmd'
        $("[data-custom-cmd]").on("click", function (event) {
            event.preventDefault();

            // Fill in the 'command' to post back to view model
            $("#EventCommand").val($(this).data("custom-cmd"));

            // Submit form
            $("form").submit();
        });
    });
  </script>
}
The JavaScript in Listing 10 uses jQuery $(document).ready() to look for any HTML element that has the attribute data-custom-cmd on it when the page loads. It then hooks into its “click” function and overrides the default click event. When the button is clicked upon, the value in the data-custom-cmd attribute is retrieved and placed into the hidden field named EventCommand. The form is then submitted, which causes the fields in the search, plus the EventCommand hidden field to be posted to the controller.
The Post Method
The POST method is created by adding the [HttpPost] attribute above an MVC action method with the same name as the GET method you used earlier. To this POST method, an instance of the ProductViewModel is created by MVC and the data contained in the inputs within the <form> tag is filled into the corresponding properties. Open the ProductsController.cs file and add the POST method shown in the following code snippet.
[HttpPost]
public IActionResult Products(ProductViewModel vm)
{
    vm.Repository = _repo;
    vm.HandleRequest();
    return View(vm);
}
Try It Out
Run the application, enter some data, like “HL” for the Product Name, in the Search field and click on the Search button. If you've done everything correctly, you should see only products that start with the letters “HL” displayed in the product table.
Summary
In this article, you got a taste of how to architect an MVC Core application with multiple projects. Separating your entity, data, and view model classes into separate projects provides you with the most flexibility and helps you focus on each layer as you develop. You also learned how little code you need in your controller. Using a hidden field makes it easy to communicate commands to your view model. In the next article in this series, you'll learn how to do sorting and paging using the MVVM design pattern.
