


“Serverless” is a hot tech term that doesn't quite mean what it says. That's because there truly is a server hosting serverless apps and functions. The point is that it feels like there's no server because you don't have to handle or manage one or worry about things like scaling because it's all done for you. Serverless functions aren't simply Web services that you're hosting in the cloud. The functions are event-driven and have a beautiful way to orchestrate a variety of services through configurable triggers and bindings, reducing the amount of code you have to write. You can just focus on the logic you're trying to achieve, not on the effort of wiring up the orchestrations.
HTTP Requests, like a Web service, are just one type of event that can trigger your function to run. You can also wire functions up to other triggers, such as listening for changes in an Azure Cosmo DB database or a message queue. Other tasks you might want to perform can also be specified through configurable bindings that also don't require code. For example, you can use an input binding to retrieve some data from a database that your function needs to process. Output bindings - again defined with configurations, not code - let you send results to another service. Your function only needs to create the results in code and the binding will ensure that those results get passed on to their destination. A single function could be triggered by a write to your Cosmos DB database, then uses an input binding to gather relevant data from the database, and then uses a message queue output binding to update a cache. If you don't need any additional logic, the function is totally defined by the trigger and bindings.
All of these bindings and triggers remove many of the redundant tasks that you might otherwise have to perform and they allow you to focus on the logic of the function. And the Azure Functions service takes care of all of the server-related problems tied to hosting. Integration with Application Insights lets you monitor your functions to observe how your functions are performing and being used.
The Structure of Azure Functions
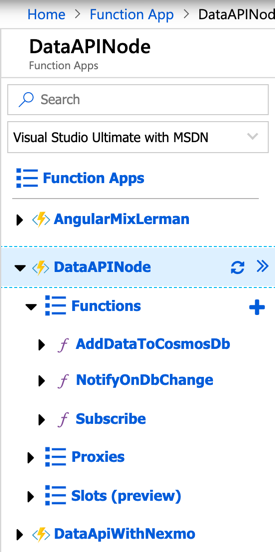
The structure of Azure Functions is defined by a Function App that hosts one or more related functions. The app has its own settings that are secure by default. This is a good place to store details like connection strings, credentials, and more. Then each function within the app is a self-contained set of triggers and bindings with its own additional settings. The only thing the functions share are the sub-domain URL and the app settings. Figure 1 shows some of the Function Apps in my subscription. I've expanded the DataAPINode app so you can also see the three functions I created for that app.
Preparing Your Environment
Although it's possible to create functions directly in the portal, both Visual Studio and Visual Studio Code have extensions that make it easy to develop, debug, and deploy Azure Functions. I'll use VS Code and its Azure Functions extension.
I found an easy inspiration for a new function. I often need to know how many words I've written for things like conference abstract submissions, etc. I find myself copying the text into Microsoft Word to get that count. You'll get to create your own function that returns character and word counts for a given bit of text.
I'll be using Visual Studio Code along with its Azure Function extension and a few other related extensions. If you haven't used Visual Studio Code before, I invite you to install it (for free on MacOS, Linux, or Windows) to try it out as you follow along. VS Code is cross-platform and is a breeze to install. (Go to code.visualstudio.com to install and learn more.) You can use Visual Studio 2017 or 2019, which has a similar extension built into the Azure workload. The VS extension doesn't have the same workflow, however. You can see how to get started with that in the docs and then come back to walk through the functions built in this article.
In VS Code, start by installing the Azure Functions extension through the Extensions icon in VS Code's Activity Bar (along the left side of the IDE). A prerequisite of the Azure Functions extension is that you install the Azure Functions Core Tools. There are links to the OS-specific installers in the Prerequisites section of the extension details (marketplace.visualstudio.com/items?itemName=ms-azuretools.vscode-azurefunctions). I'll warn you now that even for Windows, it is an npm install, but it's quick and painless.
You don't need an account to use this extension unless you plan to follow the deployment test later on. Note that if you have a Visual Studio Subscription, you have an Azure account. If you have neither, you can get a free account at https://azure.microsoft.com/en-us/free/.
Creating Your First Function
I began with a parent folder named Code Functions, in case I want to add more functions later. Then I created a sub-folder called WordCount. Open VS Code in the WordCount folder.
Next, you'll use the Azure Functions extension to turn the WordCount folder into an Azure Functions project.
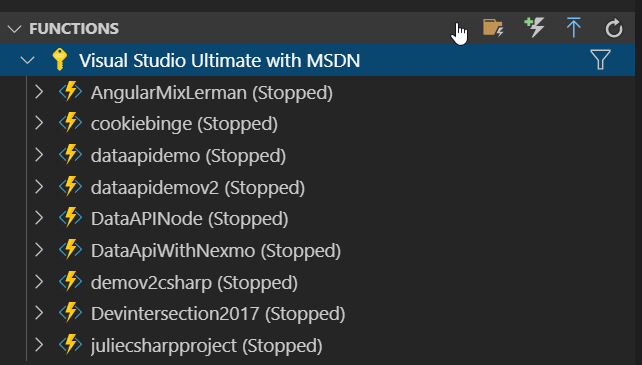
Click the Azure icon in the Activity Bar to show the Azure explorer. You'll see a window for Azure Functions. If you're logged into an Azure account, the Azure Functions explorer will also show you the Function apps in your account (Figure 2). I have a lot of demo function apps in my subscription. To save resources in my account, I've stopped them all while they're not actively in use.
Hover over the Functions toolbar (as I've done in Figure 2) to see the extension's icons to appear. The folder icon in the upper right-hand corner is to create an Azure Functions project in a folder. The bolt is to create a function inside the project. The up arrow is to deploy your function to the cloud, and the last one is a standard refresh icon.
Click the folder icon to create an Azure Functions project. You'll get a number of prompts to walk you through the project set up.
- Select the target folder for the project: Browse to the WordCount folder if needed.
- Select the language for your project from a drop-down list: I'm choosing C# but other current options are JavaScript, TypeScript, Java, and previews for Python and PowerShell.
- Select a runtime: This prompt will show only if the core tools aren't in your system's PATH. Choose Azure Functions v2 to build a .NET Standard-based function.
- Select a template: Choose HttpTrigger.
- Provide a function name: I named my function WordCount.
- Provide a namespace: I entered CodeMagFunctions.WordCount.
- Select Access Rights: For this demo, I'm using Anonymous to make things easy.
That's it. The extension will then build out the assets needed for this project.
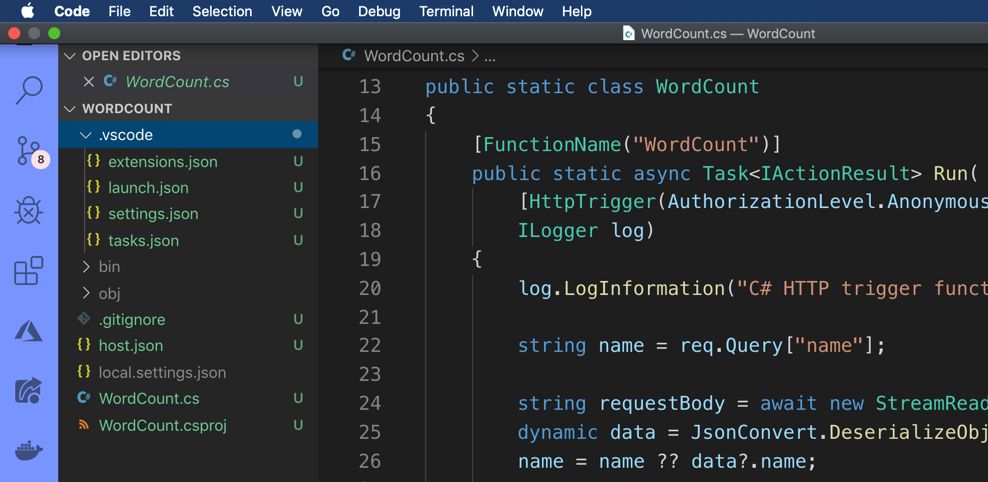
You'll see a new “stake in the ground” HttpTrigger function file in the editor and the assets from the template in the solution explorer (see Figure 3). The full code listing is in Listing 1. Notice that there are four files in the .vscode folder inside the parent (CodeFunctions) folder. The extensions.json files is a VS Code recommendation file code.visualstudio.com/docs/editor/extension-gallery#_workspace-recommended-extensions to ensure that anyone who also works on this source will be alerted about installing required extensions. The WordCount folder has a few files in addition to the csproj and cs files. The most important of these new files is local.settings.json. This is where you store the local version of function app settings, like connection strings and credentials, if you're using them. I won't be doing any of that in this demo. When you have a Function App in Azure, which is comprised of one or more functions, there's a set of application-level settings shared by all of its functions and you have to add them explicitly. That's what these settings align with.
Testing the Default Function
Before modifying our function for counting words, let's see the template logic in action. The full listing of the file, excluding using statements, is shown in Listing 1. This function takes an incoming string, assuming it's someone's name, and responds with “Hello,” to that name. The function is flexible, checking for the name both in the HttpRequest query parameters and in a request body (if one exists and has a property called “name”).
Listing 1: Default function code created by the HttpTrigger template
1 public static class WordCount
2 {
3     [FunctionName("WordCount")]
4     public static async Task<IActionResult> Run(
5         [HttpTrigger(AuthorizationLevel.Anonymous,"get",
6          "post",   Route=null)] HttpRequest req,ILogger log)
7       {
8           log.LogInformation("C# HTTP trigger function 9 processed a request.");
10
11           string name = req.Query["name"];
12           string requestBody =
13               await new StreamReader(req.Body).ReadToEndAsync();
14            dynamic data = JsonConvert.DeserializeObject(
15                    requestBody);
16            name = name ?? data?.name;
17            return name != null
18                 ?(ActionResult)new OkObjectResult($"Hello,{name}")
19                 : new BadRequestObjectResult(20 "Please pass a name on the query
21                 string or in the request body");
22        }
23 }
Running this function isn't the same as simply running a .NET Core app because it has to run the Azure Functions logic. The template that created the function project also created a VS Code Launch Configuration called “Attach to .NET Functions” in the launch.json file. If you click on the debug icon in the Activity Bar, you'll see that the debug configuration is set to this. To debug the function, you can either click the green arrow next to that dropdown or F5.
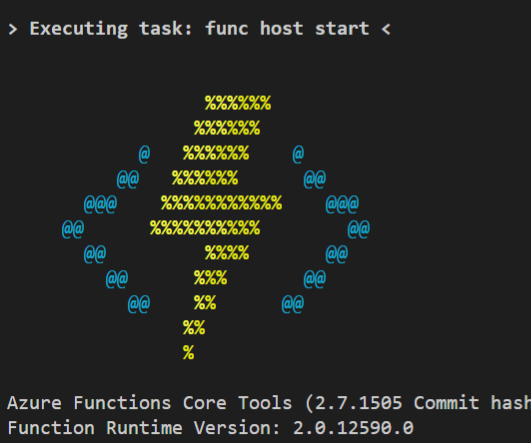
When you run the function, the Azure Functions SDK starts by calling dotnet build on the project. Then it runs a command from its own Command Line Interface (CLI): func host start. After this, you'll see the Azure Functions banner (Figure 4), which is a good clue that things are working.
Following some status messages, you'll then see in yellow text:
Http Functions: WordCount: [GET,POST] http://localhost:7071/api/WordCount
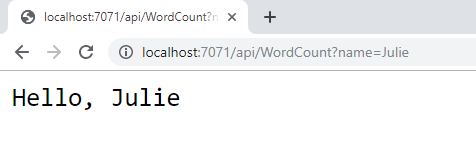
The SDK will continue to perform tasks and report them in the terminal. Wait until it's complete and displays the final message “Host lock lease acquired by instance ID ...” Now it is ready for you to try it out. You can CTRL-Click (or CMD-Click) the URL which will open your browser where you'll see the message “Please pass a name on the query string or in the request body”. That's because you still need to provide either a query parameter or a body. Modify the URL to include the name parameter, e.g., http://localhost:7071/api/WordCount?name=Julie. The browser will then display the response sent back from the function, which, in my case, is “Hello, Julie” as you can see in Figure 5.
When you're finished testing the function, return to the VS Code terminal and press CTRL-C to stop the function.
Transforming the Template Logic
Now let's modify the file created by the template. The key change will be adding logic to perform character and word counts.
I want the function only to read a request body, so I'll remove the code to read a query parameter.
11 //string name = req.Query["name"];
And further down, I only need to read the data from the request body. While I'm at it, I'll change the variable names from name to text.
old       16            //name = name ?? data?.name;
new       16            var text =  data?.text;
Now it's time for the logic that reads the text and creates an output with the character and word counts. Rather than creating yet another Azure Function to perform that task, I'll first added a sub class called DocObject to encapsulate the results of the analysis.
public class DocObject
{
    public string Text { get; set; }
    public int WordCount { get; set; }
    public int CharCount { get; set; }
    public int NonSpaceCharCount { get; set; }
}
Then I added a method (AnalyzeText) to the current function.
private static DocObject AnalyzeText(string text)
{
    var charsLen = text.Length;
    if (charsLen==0) return " ";
    var noSpacesLen = text.Replace(" ", "").Length;
    char[] delimiters = new char[]       { ' ', '\r', '\n' };
    var wordCount = text.Split(delimiters,
        StringSplitOptions.RemoveEmptyEntries).Length;
    var docObject = new DocObject { Text = text,
        WordCount = wordCount,
        CharCount = charsLen,
        NonSpaceCharCount = noSpacesLen };
    return docObject ;
}
These both go after the Run method. I had some help from stackoverflow.com/questions/8784517/counting-number-of-words-in-c-sharp to find an efficient way to count words that takes some punctuation into account.
Finally, you'll create a string from the results of AnalyzeText to send back in the function's result. Here is the new listing for the Run method of the WordCount function. I've removed the ILogger parameter in the method's signature along with the log.LogInformation call from the original logic.
[FunctionName("WordCount")]

public static async Task<IActionResult> Run(
    [HttpTrigger(AuthorizationLevel.Anonymous,"get", "post", Route = null)] HttpRequest req)
{
    string requestBody = await new StreamReader (req.Body).ReadToEndAsync();
    dynamic data = JsonConvert.DeserializeObject(requestBody);
    string text = data?.text;
    var httpResponseText = $@"CountText results: Total Chars:{docResults.CharCount}
        Chars No spaces: {docResults.NonSpaceCharCount}
        Word count: {docResults.WordCount}";
    return text != null
        ? (ActionResult)
        new OkObjectResult(AnalyzeText(text): new BadRequestObjectResult
        ("Please include text to analyze");
}
If you want to be sure that you haven't made any typos, you can run dotnet build from the terminal window. I think that's always a good idea.
Debugging the WordCount Function
One of the great features of the Azure Functions extension in VS Code as well as Visual Studio is that because you are writing it in the IDE, you can take advantage of all of the debugging features provided by the IDE. If you're new to VS Code, you may not realize that it has a very rich debugging experience with break points, watch variables, Code Lens, and more. So, if you find that your function isn't doing what you expect, you can set a breakpoint and debug as you would any other code.
Because the function now relies on a request body, you'll need a way to compose the body and include it with the HTTP request to the function for testing. You may already be a wiz with tools like Fiddler, Postman, or the browser developer tools. I'm a fan of another VS Code extension called REST Client Huachao Mao.
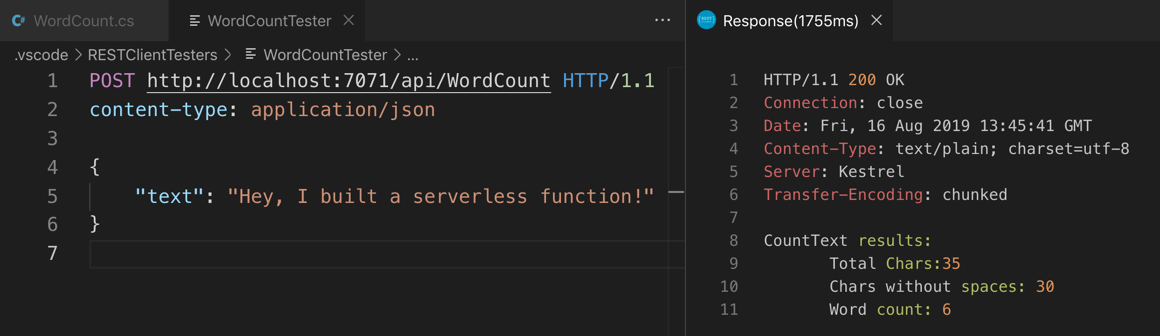
I created a new folder in the .vscode folder called RESTClientTesters to keep these out of my function project. Add a new file called WordCountTest.http. The HTTP extension isn't required for the REST client to work. I just use it to identify my REST client files. Enter an HTTP request, defining the method, headers, and body. Here's the simple request I'm using to start. The request body itself is the last three lines.
POST http://localhost:7071/api/WordCount HTTP/1.1
content-type: application/json
{
    "text": "Hey, I built a serverless function!"
}
Before you can test the request, you'll need to get the function running again. Put some breakpoints into the code if you want to step through to watch the logic in action, use F5 to run it in debug mode. Remember to wait for the “host lease locked” message to know that the function is ready to accept requests. Then, with the WordCountTest.http editor window active, you can send the request. You can use keystrokes (Windows: CTRL-ALT-R; macOS Opt-Cmd-R) or press F1 and select Rest Client: Send Request. The extension will open a new window to display the results returned from the function. The result shown in Figure 6 tells me that my text has 35 characters, 30 without spaces, and the word count is 6.
Deploying My New Function to the Cloud
For my new function to be truly useful, I'll need to deploy it to Azure. Even with 30 years of software experience, the term “deploy” still makes my heartrate go up a little. Luckily, both Visual Studio and VS Code make it easy. Remember the “upload” icon in the Azure Functions explorer shown in Figure 2? As long as you're logged into your account, there's not much to deploying this function. In my case, I'll need to ensure that the Function App is created first and then the WordCount function inside of it. Also, keep in mind those local settings I pointed out earlier. For this beginner function, I didn't do much that involved settings, such as define bindings, provide connection strings, or credentials. You'll get a chance to upload your local settings at the end of the deployment process.
Go ahead and click the upload button. You'll follow a series of prompts as you did when creating the function. First, create a new Function App in Azure (as opposed to adding it to an existing function app). You'll see that there's also an Advanced version of this option but choose the simple version for this demo. You'll need to provide a new name for the function app. The prompt asks for a “globally unique” name. That doesn't just mean unique to your account, but to anyone's account in the whole world. That's because the final URI will be a subdomain of azurewebsites.com. I chose CodeMagFunctions for this example. The simple version of "Create new Function App doesn't give you the chance to select a resource group or choose the location. The advanced option lets you specify these and additional settings for the new Function App. You can also modify settings in the Azure Portal after the fact.
After the extension creates the new Function App, it zips up the compiled function and pushes it up to Azure. You'll get some status reports and then a notification when it's done. At the end, you'll be prompted to upload the settings. I didn't need to do that, so I just closed that prompt window.
Because it's a zip file deployment, the function code will be read-only in the portal. You'll get a message about that with guidance to change an app setting if you want to edit directly in the portal. Essentially, if you're creating these in VS Code or VS, the assumption is that you will make any changes in your IDE and then re-deploy the updated function.
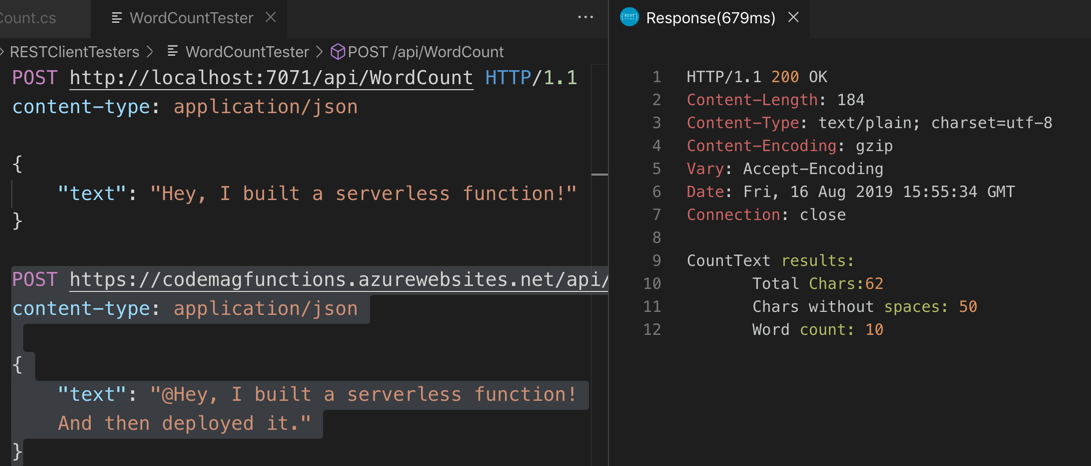
My function was published into the new Function App and the notification tells me the URI is https://codemagfunctions.azurewebsites.net/api/WordCount. You can continue to use the REST Client or your HTTP tool of choice to test out your live function. Note that I probably won't leave my function public for long to avoid eating up the Azure credits associated with my Visual Studio subscription.
To test from VS Code, I added a new POST command to the WordCountTester.http file that points to the new URL. Then I was able to select that full command (lines 8 through 13), press F1 and run the REST Client Send Request command again. The extension only ran the request I selected in the file. Figure 7 shows the new POST message and the response.
Next Steps: Try Out Some Bindings!
I originally started my Azure Functions journey by building and testing them directly in the portal where you can easily add trigger, input, and output bindings by clicking on UI elements. In the same time frame that my comprehension increased of how the functions worked, the Azure Functions extension for VS Code also evolved. I eventually transitioned to using VS Code with the extension to build, debug, and deploy the functions. I've also created a number of functions that read data from Azure Cosmos DB with input bindings, store data into Cosmos DB with output bindings, and even sent text messages with an output binding for the Twilio API. You can see all of this in action in a recorded conference session I gave at Oredev in 2018 which is available on YouTube at https://youtu.be/fp9bB3L5utM.
I won't detail how to do this in this already lengthy article, so here's a quick look at what the bindings look like for a Cosmos DB trigger function. This does require an Azure account and an existing Cosmos DB account. See this documentation to create a Cosmos DB account: "https://docs.microsoft.com/en-us/azure/cosmos-db/how-to-manage-database-account. In C#, the bindings are described, like the trigger in our WordCount function, as attributes of the Run method in code. This is quite different from how they're configured in a JavaScript or C# script-based function where the configurations live in a JSON file.
I've modified the WordCount function's Run method to include a CosmosDb output binding attribute that will store the documents into a container called Items in my database with a connection string now defined in local.settings.json:
public static async Task<IActionResult> Run(
    [HttpTrigger(AuthorizationLevel.Anonymous,"get", "post", Route = null)]
    HttpRequest req)
    [CosmosDB (databaseName: "WordCounts",
        collectionName: "Items",
        ConnectionStringSetting ="CosmosDBConnection",
        CreateIfNotExists=true)]
     ICollector<doc> docs)
{
There are three ways to ensure that the data intended for the output binding are discovered by the binding. One is to create an Out parameter in the signature. Because I'm using an asynchronous method, that's not possible with C#. Another way to make sure the output binding is discoverable is to return the value. But I am already using return to send the HttpResponse. The third way is to use an ICollector object. This is also needed if you want to send back multiple documents. But I'm using the ICollector pattern to return a single document, as it solves the problem.
After my code has received the populated DocObject in the docResults, I'll add that to the docs ICollector object:
documents.Add(docResults);
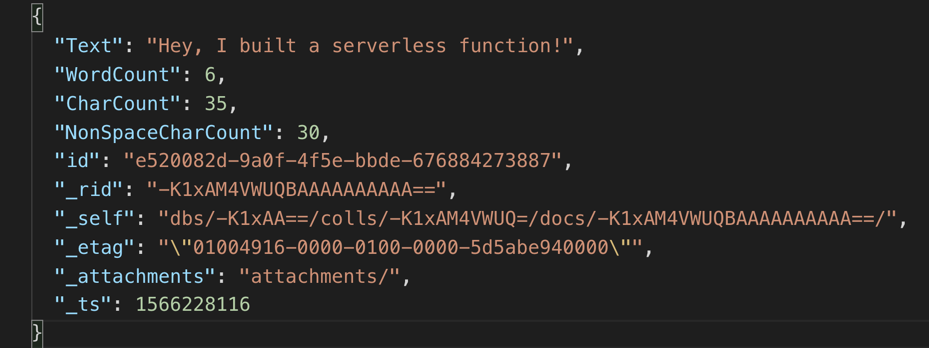
That's all I need to do. The output binding takes care of the rest which is one of the truly amazing benefits of the bindings. Now when I run my function, not only do I get the HttpResponse, but the document shown in Figure 8 was added to my Cosmos DB database (which, by the way, was created on the fly thanks to the CreateIfNotExists setting).
Summing Up
There's so much more to learn about using Azure Functions and how you can use them as part of your production solutions, not just little demo apps. I love working with tools that aren't just productive but are a joy to use; the combination of Azure Functions, Visual Studio Code, and the Azure Functions extension definitely falls into this category!
