


In my previous article (May 2019), I talked about the rudiments of AI. In this article, I'll introduce you to an amazing offering in Azure, which is the Azure Machine Learning Service. When working with AI, the easiest way to get started is, of course, Microsoft Cognitive Services. Cognitive Services are easy! If you can call a REST API, you can tap into the power of AI. For instance, you can submit a photograph, and Cognitive Services replies back with what it sees in the picture. Cognitive Services' capabilities continue to grow, but it already contains an impressive array of capabilities around speech, vision, knowledge, understanding, search, and more!
If you can call a REST API, you can tap into the power of AI.
As impressive as Cognitive Services is, you're bound to run into its limitations at some point. Let me preface this discussion by saying that Cognitive Services are growing very rapidly, along with their capabilities. I used to say that using Cognitive Services required you to make a call to the cloud, thereby making it unsuitable when you needed quick response times. But recently, Microsoft rolled out the capability of exporting your model as a Docker image. It still needs to be connected to the Internet to function because it pings back periodically, but all evaluation of queries is done locally, on your own hardware!
Eventually, though, you'll run into its limits.
The Limits of Cognitive Services
Let me preface this with two disclaimers:
- I'm a fan of Cognitive Services, if your needs are met with Cognitive Services, you should use them.
- The capabilities of Cognitive Services continue to grow at a rapid pace. Whatever I'm about to mention as limits could very well change.
Let's take a look at the current limitations in Cognitive Services: data restrictions, algorithm restrictions, network restrictions, and network-specific needs.
Data Restrictions
Cognitive Services are “pre-canned” services. For example, when you submit a picture of the Taj Mahal and it inaccurately identifies it as a dog, you're a bit out of luck until Microsoft fixes it for you. Fortunately, Cognitive Services are good enough that they don't make such obvious errors. However, you get my point here: When you're stuck, you're stuck.
Secondly, there are Cognitive Services that let you work with your data, such as custom vision, custom speech, LUIS, etc. But there are other restrictions, such as your inability to control where that data goes. Perhaps you wish to create a custom vision model where the data is so sensitive that you don't feel right sending it as a POST request to Microsoft despite all their assurances. That's another example where Cognitive Services backs you up against a wall.
Algorithm Restrictions
Cognitive Services are pre-canned services. In other words, you have no idea or control over what kind of algorithm was used to create your model. And you can't tweak it. Most data scientists are very familiar with numerous algorithms, and with practice, they've gotten good at picking just the right algorithm for the problem at hand.
Being able to pick the right algorithm has some advantages. It allows a skilled professional to create the best model at the best cost. You can also ride on the shoulders of those who've put in so much work in creating these algorithms.
Unfortunately, although Cognitive Services really bring the power of AI to the masses, they do so at the cost of less tweakability. For instance, Cognitive Services doesn't allow you to pick and choose what algorithm is in use. In fact, you have no idea what algorithm is in use, it's a black box as far as you're concerned. This is a tradeoff for the simplicity of tapping in the power of AI with just a simple REST call.
Network Restrictions
Frequently, organizations have weird network restrictions, possibly due to business or legal reasons. Classically, the technology they've used in the cloud to meet these requirements is Azure Virtual Network. For instance, let's say an organization wants to be absolutely sure about where its data is going. They don't want it on the public Internet, and to have zero chance of data snooping, they don't care if it uses SSL or not.
Usually, you'd create rules and boundaries using Azure Virtual Network. Or, frankly, sometimes even that isn't enough. Perhaps you want zero cloud when it comes to some part of the data. That's where the trouble lies.
Cognitive Services are dependent on the cloud. Practically speaking, even though the model can now be exported as a container, you must run it on a computer that's online. There goes your dream of using Cognitive Services on a ship that has no Internet connection.
Domain-Specific Needs
Cognitive Services are pre-canned, meaning that they're built to be consumed by a diverse set of customers. In other words, they aren't built specifically for you. But what if you need a custom AI service, something unique to your requirements. For example, this vision, speech (etc.) stuff is pretty cool, but what you really need is an AI system that understands customer churn patterns in your database. Cognitive Services has nothing to offer there.
This problem is very easily solvable using Azure Machine Learning Services. Let's have a look.
Azure Machine Learning Services
Azure Machine Learning Services is the offering in Azure that lets you create your own AI models. Put simply, it's an enterprise-class solution to your AI problems that gives you everything you'd expect from an enterprise solution. Here are some of the things Azure Machine Learning Services allows you to do:
- Manage all your AI work in one or more workspaces, thereby allowing multiple people to collaborate on problems and create historical knowledge.
- View and manage your experiments and their runs.
- Examine successful and failed runs along with logs to identify problems.
- Provision compute on demand and deprovision it when you don't need it. This is incredibly valuable in AI scenarios because you need lots of compute very quickly for a short amount of time.
- Create and manage models including versioning them automatically.
- Deploy, manage, and secure these models as services running in an Azure Container Instance, Azure Kubernetes services, or other surfaces.
- Collect data and update your models accordingly.
And so much more…
As you can imagine, if you wish to build a custom AI solution, Azure Machine Learning Services is an invaluable tool.
Set Up Your Development Environment
Your development environment can be Windows, Mac, or Linux. For the purposes of this article, I'll stick with Ubuntu Linux. The first thing to do is to install Python 3.
sudo apt-get install python3
Then install Miniconda. You can use the following steps to install Miniconda on Ubuntu.
- Visit https://docs.conda.io/en/latest/miniconda.html.
- Download the 64bit Linux version; it's a .sh script.
- Run the following command to make it executable, and ensure that you use the right filename in the right directory:
chmod +x minicondafile.sh
- Run the shell file that you just downloaded.
Miniconda installed isn't just going to work because it isn't in your path. You need to make another change to your ~/.bashrc file to ensure that the path includes Miniconda. The change is:
export PATH="$HOME/miniconda3/bin:$PATH"
To verify that Miniconda is working, run the following command and make sure it works.
conda list
Create an Isolated Python Environment
Now that I've installed Python and Miniconda, I wish to use Miniconda to create an isolated Python environment.
To create a new isolated environment, run the command:
conda create -n myenv python=3.7.3
This command installs the bare minimum of packages. To initialize your shell to use Miniconda, run this command:
conda init <shell_name>
By running this command, you make a change to your .rc file so Miniconda initializes itself in your shell environment.
To activate the previously created Python 3.7.3 environment, simply run the following command:
conda activate myenv
Go ahead and enable environment specific ipython kernels like this:
conda install notebook ipykernel
Now go ahead and created an isolated environment
ipython kernel install --user
At this point, you have an isolated Python environment. Now you can do things like install the Azure ML SDK.
Install the Azure ML SDK
The Azure ML SDK is an essential part of the Azure ML story. It allows you to completely manage your workspace directly from Python or Jupyter Notebooks.
To install the SDK and the other packages you need, ensure that you use the Python 3 environment by running Miniconda activate first, and run the following command:
pip install --upgrade 'azureml-sdk[notebooks]'
conda install -y cython matplotlib pandas
pip install -upgrade 'azureml-sdk[automl]'
Create a Jupyter Notebook
With the above packages installed, in order to work with Jupyter Notebooks, simply run this command:
jupyter notebook
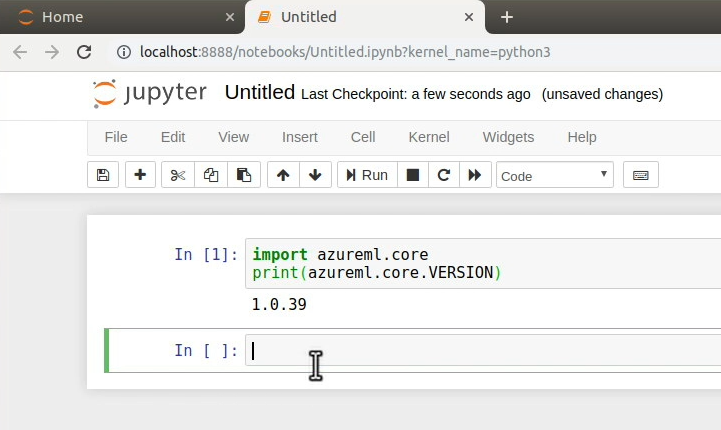
This should start up the Jupyter Notebook server where you can now create new Jupyter Notebooks and verify that you can use the Azure ML SDK, as shown in Figure 1.
At this point, your environment is good to go!
Create an Azure ML Workspace
Next, create an Azure ML workspace and connect to it using the Jupyter Notebook.
Log into your Azure Portal and choose to create a new Machine Learning workspace. Once the workspace is created, you can load it in your Jupyter Notebook using the code shown in Listing 1. It's very important that you substitute the correct values in Listing 1 to match your workspace.
Listing 1: Load a workspace
from azureml.core import WorkspaceWorkspace.get(
    name="workspacename",
    subscription_id="guid"
    resource_group="rg")
As soon as you run this cell, you're prompted to log in. Go ahead and perform the log in and verify that the workspace is loaded. You can verify that the workspace is loaded by executing this command:
ws.get_details()
Verify that this command writes out the details of your workspace. Now you can write out the workspace details as a config file using the command below:
ws.write_config()
This simple command writes out a file called .azureml/config.json with the details of the workspace. Later on, you can simply run ws.load_config() to load this workspace.
VSCode AI Tools
Visual Studio Code also comes with an amazing set of tools for AI-based development. To get these tools, search for “” under extensions, and choose to install the Azure Machine Learning extension. Installing this extension installs a bunch of dependent extensions also.
Now in VSCode, after signing on, you should be able to see your workspace looking like Figure 2.
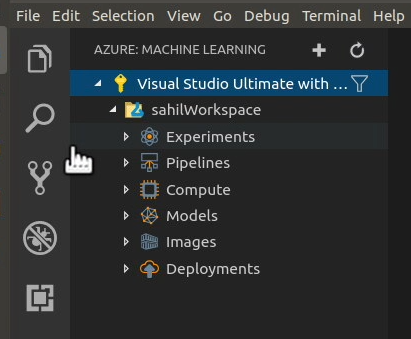
Here you can choose to create a new experiment and manage major parts of your workspace.
Back in the Jupyter Notebook, run the code shown in Listing 2 to verify that you can load the experiment.
Listing 2: Create an experiment
from azureml.core.experiment import Experiment
experiment = Experiment(workspace=ws, name='experimentname')

list_runs = experiment.get_runs()for run in list_runs
print(run.id)
This is generally how you'd go about interacting with the Azure ML workspace from directly within a Jupyter Notebook.
Leveraging Remote Compute
When working with AI models, you will frequently want to use remote compute. This is because calculation of the model may demand a lot of compute for a very short duration. You don't want to buy all this computing power and keep it sitting idle. You want to provision it, use it, and get rid of it as soon as possible, so your bills stay low.
Fortunately, Azure ML services makes this quite easy to do. You simply attach a compute target to your workspace using the code, as seen in Listing 3.
Listing 3: Create or attach a compute resource
import os

cluster_type = os.environ.get(
    "AML_COMPUTE_CLUSTER_TYPE", "CPU")
compute_target = ws.get_default_compute_target(cluster_type)
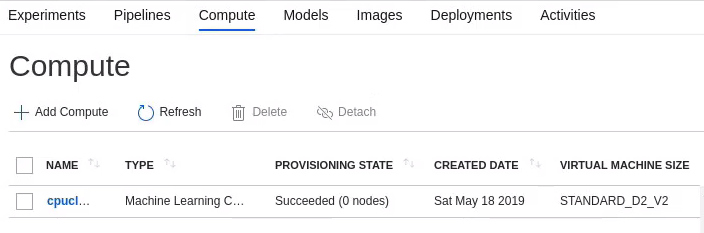
When you provision this compute using your Python script, you can verify that this compute target appears in your ML workspace as shown in Figure 3.
This is a really big deal because now you can provision and deprovision resources right out of your Notebooks, and this keeps your costs as low as possible without crippling your capabilities in any manner.
Now when you train the model on the remote cluster, your training time goes down from a few hours on your local modern laptop to a few minutes on this humungous server in the cloud. The cost? A couple of dollars! Not bad, huh?
Now when you train the model, training time goes from a few hours to a few minutes.
You can even monitor the run from your Jupyter Notebook using the following code snippet.
from azureml.widgets import RunDetails
RunDetails(run).show()
Running this snippet in your Notebook produces a widget, as shown in Figure 4.
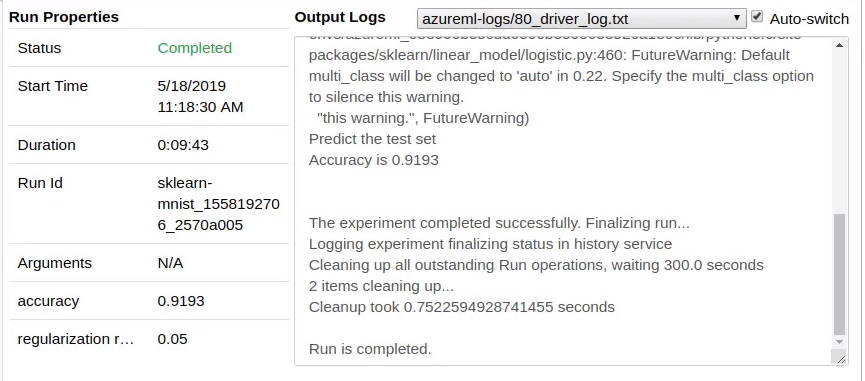
Certainly, you can also view the details of this run from Azure Portal, as can be seen in Figure 5.
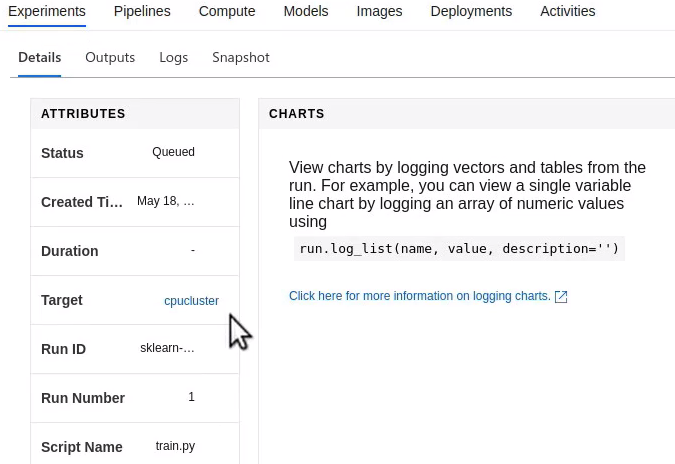
Running this experiment can take a while! Usually it's just a few minutes, but it really depends on your data set, and your algorithms, and your compute target. So you can sit and wait, or you can just submit this job and wait for the run to complete.
This is also achieved rather easily using a single line of code:
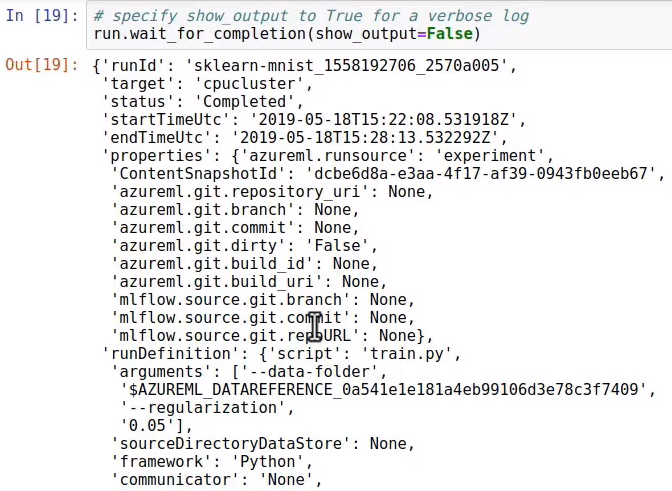
run.wait_for_completion(show_output=False)
When the run finishes, you should see an output like that shown in Figure 6.
At the end of a successful run, you can also easily check the quality of the generated model, as shown in Figure 7.

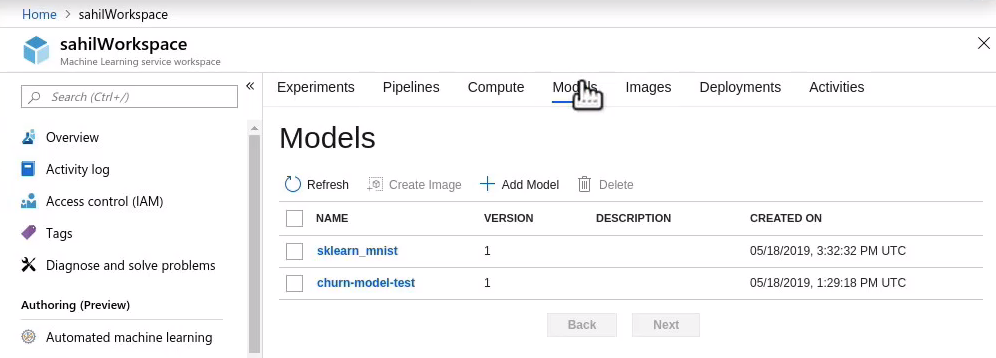
The only thing to do now is to register the generated model. The model is the output of your run. It's what you can easily convert into a callable Web service, usually deployed as a container or an AKS cluster.
To register the model, you simply call the lines of code shown in the next snippet from within your Notebook.
model = run.register_model(
   model_name='modelname',
   model_path='modelfile.pkl')
Once you run the above statement, your model appears in the Models list under the ML workspace, as shown in Figure 8.
Deploy the Model
To use a model, you have to deploy it as a Web service. I usually deploy it as an ACI (Azure Container Instance) or AKS (Azure Kubernetes Service). To deploy a model as a Web service, you must first create an inference configuration. This inference configuration allows you to specify things like the scripts and dependencies required to serve your model.
You'll need a scoring script, which is what's used by the Web service call to show how to use the model. This scoring script has two functions:
- Init(): Loads the model into the global object
- Run(input_data): Accepts an input and predicts results based on the model
Listing 4 shows the scoring script in use; Note that it's written in the Jupyter Notebook but it writes out a file called score.py.
Listing 4: The scoring script
%%writefile score.py
import json
import numpy as np
import os
import pickle
from sklearn.externals import joblib
from sklearn.linear_model import LogisticRegression

from azureml.core.model import Model

def init():
    global model
    model_path = Model.get_model_path('modelname')
    model = joblib.load(model_path)

def run(raw_data):
    data = np.array(json.loads(raw_data)['data'])
    # make prediction
    y_hat = model.predict(data)
    return y_hat.tolist()
Also, you will need an environment file that specifies all of the script's package dependencies. This file ensures that all of the dependencies are installed in the Docker image. In this case, the file looks like Listing 5. Note that this is just an example file; usually, you'll tweak this to suit your model.
Listing 5: Create the environment file
from azureml.core.conda_dependencies import CondaDependencies

myenv = CondaDependencies()
myenv.add_conda_package("scikit-learn")

with open("myenv.yml","w") as f:
    f.write(myenv.serialize_to_string())
You can then configure your ACI instance, specify the number of cores, memory etc. using the azureml.core.webservice.AciWebservice object using the deploy_configuration method.
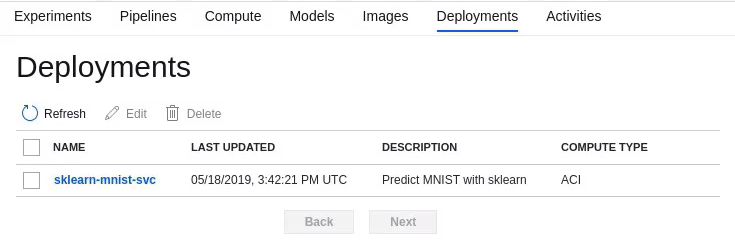
Finally, you deploy the ACI image using the azureml.core.webservice.Webservice.deploy_from_the Model method. The deployed model then looks like Figure 9.
The deploy_from_model method returns a service object. And you can use the following code snippet to wait for the deployment to finish and return you to the Web service URI:
service.wait_for_deployment(show_output=True)
print(service.scoring_uri)
That's it! Now issue a POST request to this URI and see your results in action. What's important to note is that what is deployed in the cloud is just a Docker container. So you could theoretically run it locally, completely offline. This is useful in IoT scenarios, for instance.
Summary
The Microsoft AI spectrum includes a number of offerings. Cognitive Services gives you a very quick and easy start into a lot of power. Like anything else, there's a massive impetus behind AI fueled by standards and community. There's a lot of research originating from Linux. You might know this, but graphics cards, because of their much higher calculation abilities, are playing a big role, and that's mostly in NVIDIA cards. And because Apple and NVIDIA don't exactly get along, a lot of this research and power is coming from Linux.
Luckily, for us, Microsoft loves Linux a lot lately; Windows is certainly rising to the challenge. It's not surprising, therefore, that Microsoft has wholly embraced AI and everything around it. Linux, Python, Docker, Kubernetes, and so much more.
Microsoft has made the right choice by standing on the shoulders of the community, giving all that power to us in the form of Azure Machine Learning Services.
Let me put it this way: When working with Azure Machine Learning Services, I'm missing nothing! I have all the capabilities that any serious AI engineer needs. And I gain a lot. I gain the Microsoft ecosystem. I gain Azure. I gain the ability to deploy, manage, and mature my models with great power and ease.
What is the next big thing you'll develop using AI? I can't wait to see!
