


An Angular application requires managing some application state, including server-side data, user information, user input, UI state, and many other variables. Developers often make use of injectable services to provide this function (including communication with some back-end Web APIs) in one centralized place, so that the rest of the components in the application can access this shared data to process or update it.
This works fine for small applications. In some cases, as the application grows in size and multiple components start issuing calls to update or read the application state, things become unstable. The application state may also become inconsistent or unreliable.
This article proposes a more mature and robust solution to application state management, including server-side data access and using the ngrx/store module.
Application State and the Need for a Store
The application state is a collective set of slices of data that represent the state of an application at any given time. As mentioned earlier, the application state can be any of the slices of data that you need to share across the application:
- Server-side response data: The data requested and returned from the Web APIs
- User information: When the user logs into your application, store the username, email, and other user-related information. This makes for quick access when the user browses and navigates the application later.
- User input: On any search page, the user types in a subject or phrase for a search and the application displays the results as a list on their screen. When the user clicks on a result, the application navigates to another page to view the details of the selection. The user can view another search result by navigating back to the search page and choosing something else from the list.
- UI state: One of the popular application UI structuring patterns is to have a vertical left-side menu and a right-side contents area. You provide a button to minimize the left-side menu. The state of the left-side menu is stored so that when the user navigates to another screen or page, the left-side menu remains minimized.
- Router/location state: When navigating from one screen to another, the application keeps track of the routing details. The state needs to track which record the user selected so it knows what to render later on.
The options are endless. You may add or remove to the state depending on how the application evolves.
You need a state management library or a Store. A state lives in the context of a Store, but also, a Store provides at least the minimum information needed to help manage the state. You can:
- Model and store the application state
- Update the state to maintain its validity
- Read the state data
- Monitor and observe changes to the state and make relevant changes when required
The ngrx/store module is a state management library based on the concepts of Redux (React World) and a little of RxJS that gives the Store a reactive nature.
Introducing the NgRX Store Module
The NgRX Store module is a state management library made for Angular. It's derived from the popular Redux state management library for React. The NgRX Store imports the state management concepts from Redux and adds to them RxJS to provide an observable means of communication throughout the Store APIs, thus giving Angular developers a familiar experience in developing Angular apps.
Some of the major concepts or terminology of the NgRX Store, most of which also apply to Redux are in the following section.
Provide a Single Source of Truth
The NgRX Store models a state as a single and simple JavaScript object inside the Store. The state is immutable or read-only. This means that there is no direct Store API to change the state object inside the Store. There are other means of updating the state that I will be discussing soon. An example of such a state object can be represented as:
const state = {
    developer: []
};
Actions
In order to update the state inside a Store, the application needs to dispatch an action. A reducer, also known as a pure function, catches this action, performs the update on the state, and returns a new revised and immutable state object. There is more discussion of pure functions and reducers in the sections below. An example of an action could be:
const action = {
    type: 'ADD_DEVELOPER',
    payload: {
        name: 'Bilal',
        competency: ['ASP.NET', 'Angular']
    }
};
The type property above states the intention of the action. In this case, the type property is ADD_DEVELOPER, meaning that you are dispatching an action to add the new Developer object stored in the payload property of the action. The payload is merely the data related to the action type that the reducer adds to the new state returned to subscribers of the Store.
Pure Functions
The Store uses pure functions to update the state. By definition, a pure function doesn't modify the state of variables outside of its scope. Simply put, a pure function always returns the same result given the same parameters. You can read more about pure functions here: http://www.nicoespeon.com/en/2015/01/pure-functions-javascript/.
Reducer or Action Reducer
In terms of a state management library, Action Reducer or a Reducer are pure functions. Reducers respond to actions and return a new state object with all the changes incorporated inside the state, thus the immutable nature of the state. The reducer analyzes the action dispatched, reads in the payload of the action, performs the suitable action on the state inside the Store, and returns a brand new state object with all the changes inside. An example of a reducer could be:
function reducer(state: State, action: Action) {
    const actionType = action.type;
    const developer = action.payload;

    switch (actionType) {
        case 'ADD_DEVELOPER': {
            const developers = [...state.developers, developer];
            return { developers }
        }
        ...
    }
}
An immutable object is an object whose state doesn't change after creation.
During the set up of ngrx/store module, as you will see later in this article, you configure the StoreModule class with a map among all available state segments in the application with their corresponding reducers. In other words, you're telling the Store that when you want to update this specific slice of the state, use this reducer.
Going back to the sample code above, a reducer is a pure function that accepts two input parameters. The first is the previous state (old values) and the second is the current action dispatched. Based on the action type and payload properties, the case statements take effect. The code snippet above spreads the previous array of developers of the state object into a new array and then adds the payload object into this new array. The payload is the new Developer object added onto the state array of Developers. The reducer returns a new state object encapsulating the latest data.
In the code snippet above, the last statement returns a new object with a single property of developers array. In this scenario, the state object tracks only a single property of type array of developers, hence the format of the return object of this reducer. The code uses a new feature of ES6 which is the Shorthand property.
The reducer always returns a new
stateobject with all the changes incorporated and never returns the previous state amended.
The result of dispatching an action and running the above reducer is having a new state object containing the new Developer record:
const state = {
    developers: [{
        name: 'Bilal', competency: ['ASP.NET', 'Angular']
    }]
};
Store
The application state resides inside a Store. The Store acts like a container for the state in the ngrx/store module. In addition, Angular components inject the Store into their constructors to establish the communication channel. The Store exposes two methods used by the Angular components. By injecting the Store, a component can have access to the following functions:
- select(). The Store uses this method to return a slice of state data from the state contained in the Store. It returns the Store object itself, which is an Observable, so that components can hook into the
select()method in order to monitor changes of the state when the Store composes a new state object. - dispatch(). The Store uses this method to allow components to dispatch actions to the Store. An action could, with an option, contain a payload. The Store handles the action dispatched via a reducer.
To summarize, a component dispatches an action on the Store. The Store responds to the action by executing the reducers and ends up composing a new state object. Store now has a new state and notifies subscribers (components) of the new update.
Selectors
Selectors are pure functions that take slices of the state as input arguments and return slices of state data that components can consume. Just as databases have their own SQL query language, ngrx/store module has its own query tools that are the Selectors.
In an Angular application, each Feature module is responsible for injecting its own state into the root application state. Hence, the state is a tree of properties that has sub properties, etc. You define selectors at different levels of the state tree to avoid manually traversing the state tree over and over whenever the Store composes a new state and notifies components.
Based on the state defined above in code, you want to query and return the array of Developers from the state using a selector:
export const getAllDevelopers =
    createSelector(getState, (state): Developer[] => {
        return state && state.developers;
    }
);
This selector returns a typed array of Developers. Now, any component can make use of the Store.select() method to subscribe to changes of the Developers data (a slice of state data).
this.store.select<Developer[]>(getAllDevelopers).subscribe(
    developers => console.log(developers)
);
Figure 1 depicts the communication among the different ngrx/store elements (Store, State, Reducer, Action, and Component):
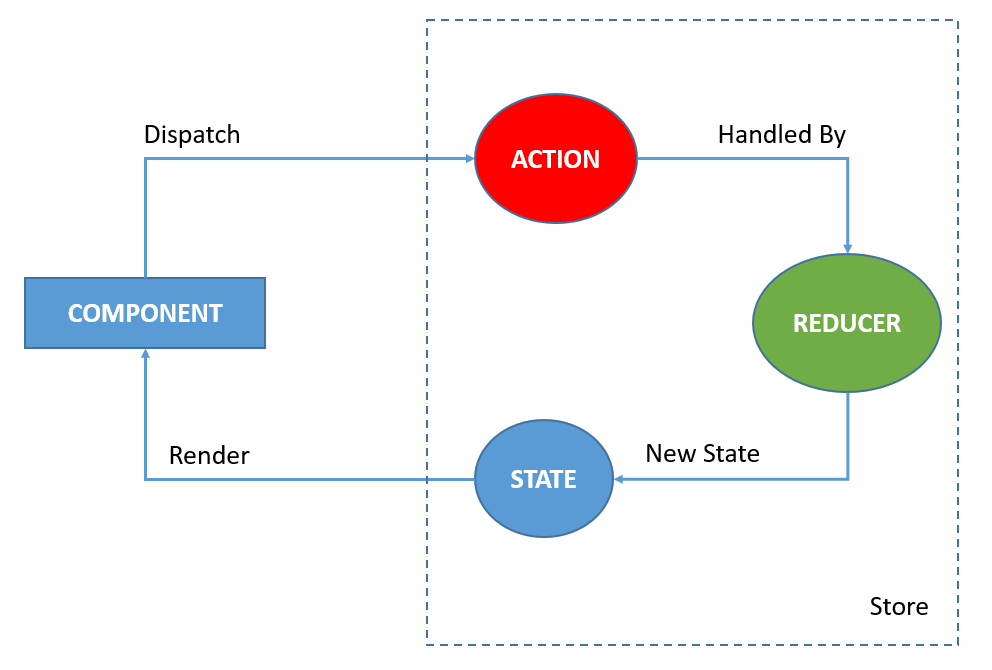
The cycle starts by having an Angular component dispatching an action to the Store. The Store captures the action and executes the reducers. The result is a new composed state saved inside the Store. Only then does the Store notify all the components associated with the changes in the stat, that a new state is available and ready for use. Notice that the flow among the components happens in a one-way data flow, simplifying and solving the chaos that results from not using a Store and relying only on components communicating with services to read and update the application state.
That was a brief summary of the NgRX Store, its definition, structure, and major components. Let's move on to the benefits of using the NgRX Store.
Benefits of NgRX Store Module
In general, there are a number of benefits when using a Store in Angular to manage the application state. For the ngrx/store module, it's clear that the benefits listed below apply perfectly and are virtually flawless in Angular applications:
- The Store maintains the state, giving the developer a single source of truth to query the application state and even update the state in a consistent manner.
- Testability is first class in the ngrx/store module. Reducers and selectors are pure functions, which makes the process of testing them easy. In addition, actions are simple JavaScript objects that you can mock to provide testing scenarios.
- The ngrx/store module supports both Root and Feature module state management. With the ngrx/store module, you continue to build your Angular app with either Lazy Loading or Eager Loading modules. The ngrx/store module allows you to define a slice of the root application state per each Feature module. The result is a single Root application state object, containing all the slice of states collected from all loaded Feature modules in the application.
- The performance benefits are remarkable in Angular application once you use the ngrx/store module. Change Detection in Angular is a huge topic and there isn't room for the details in this article. There are great articles listed in the sidebar.
In brief, Angular represents an application as a tree of components in a form of a hierarchy starting from the root component and going down to the leaf children components. At the same time, Angular creates a shadow tree for change detectors in a sense that every component has its own shadow change detector in the tree. Whenever a component's model changes, Angular runs the change detection process by traversing the tree of change detectors, compares each component's @Input() parameters and their properties to the state they had before the process ran, and makes sure all components in the application that are associated with the change are notified so that they can render a new HTML if necessary.
The default change detection strategy is not an efficient process in terms of performance as every component's @Input() parameter property is checked for any possible change. Angular provides an alternative change detection strategy which OnPush accommodates for. The performance is better, with its own strict conditions and requirements.
The OnPush strategy assumes that all components' @Input() parameters are immutable and unchangeable objects.
The Store uses the reducers to return new immutable composed slices of state. Such immutable data returned from the Store can be used to feed in the components' @Input() parameters. By using the Store, you're sure that all components' @Input() parameters are immutable and that the OnPush change detection strategy is applicable. Angular runs in the best optimized mode of performance when using this type of change detection process.
Angular triggers the change detection process only when the Store publishes a new state object. When the components' @Input() parameters are replaced, their references are changed and any change to a components' @Input() parameters' properties are ignored.
Angular Component Architecture
Angular Component Architecture can benefit Angular applications by taking full advantage of the Angular (@Input() and @Output()) and ngrx/store (dispatch() and select() methods) intrinsic features.
Figure 2 describes this pattern in detail.
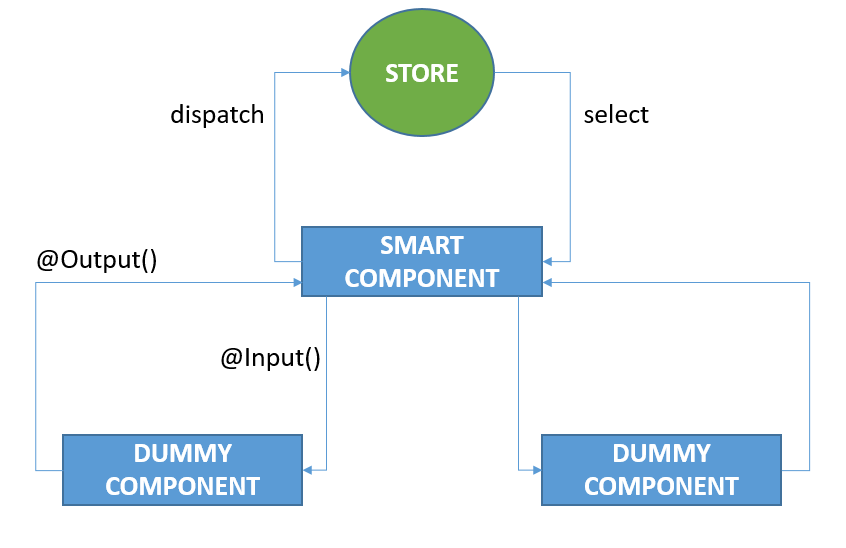
This pattern defines two types of components:
- Smart or Container
- Dummy or Presentational
The container component is the only component that's aware of the existence of the Store. The ngrx/store module intrinsic feature facilitates the communication between this component and the Store. The following explains the communication:
- The component subscribes to the Store via the
select()method to receive the stream of data requested whenever it's available in the Store. - The component dispatches an action to the Store via the
dispatch()method to signal the need to update the state.
Although the container component knows and communicates directly with the Store, the presentational component is not aware of the store. It simply uses Angular's intrinsic features to communicate with the container component. The container component acts like the middle man between the two while communicating with the Store. Any interaction between the container component and the presentational component filters through to the Store this way.
This is how the communication between the presentational component and the container component works:
- The presentational component defines @
Input()parameters to receive any slices of data coming over from the state via the container component's subscription to the Store. It's the responsibility of the container component to provide the proper data required by the presentational component. Remember, those @Input()parameters are immutable objects! - The presentational component uses @
Output()Event Emitters to request any update on the state of the application. The container component handles the event of the presentation component, which, in turn, dispatches an action directly to the Store.
You can clearly see the differentiation of responsibility for each type of the components. Although the presentational component solely uses the Angular intrinsic features to render any HTML, the container component depends fully on the ngrx/store module intrinsic features.
By using this pattern, you're adapting one of the main concepts of software development, which is the Separation of Concerns. Only one layer of components in your application is aware of the Store, and the rest, that is, the building blocks of presentational components, behave, as if there's no store in the application. This pattern promotes composing your application of small, concise, and single responsibility presentational components to build up your application.
You're adapting one of the main concepts of software development, the Separation of Concerns, when you use this pattern.
Migrate an Existing Angular Application to Use the NgRX Store Module
Now that you have some background information about what an application state is and how the NgRX Store helps with managing states, it's time to shift gears and move on to explore how to add and implement the ngrx/store module to an existing application.
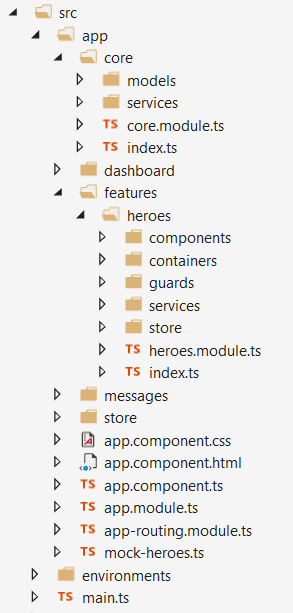
Most applications you develop are pure vanilla Angular applications. Here, it might be more interesting to learn how an existing Angular application can be migrated to use the ngrx/store module. Therefore, I've chosen as a starting application the official Heroes Angular application provided by the Angular team to demonstrate Angular features.
Demonstrating the power of ngrx/store module in handling Angular Feature modules, I had to refactor a bit of the Heroes application by introducing a new Feature module called Heroes. This module now contains all Hero-related code and components. You can check the final Heroes application integrated with the ngrx/store module by following this link: https://stackblitz.com/edit/angular-tour-of-heroes-example.
Figure 3 shows the new application structure.
Add the NgRX Store Module into an Existing Angular Application
First things first though, let's start by installing the following Node packages into the application.
- @ngrx/store. The @ngrx/store package represents the main NgRX Store package.
- @ngrx/store-devtools. The @ngrx/store-devtools package helps in instrumenting the Store to let you debug the application with time-travel debuggers like the famous Redux DevTools Chrome Extension.
- ngrx-store-freeze. The ngrx-store-freeze package represents a meta-reducer function of type
MetaReducerused to prevent mutating the state and is used only during development. - @ngrx/effects. The @ngrx/effects package handles the side effects of using ngrx/store module in an app. I haven't addressed the side effects yet, but will do so a little further down the track.
- @ngrx/router-store. The @ngrx/router-store package integrates the Angular Router with the ngrx/store module. The Store represents the single source of truth of an app and therefore, with the help of this Node package, the Store accesses Router-related information
Next up, how to add and configure the ngrx/store module to the application. (Refer to Listing 1.)
Listing 1: Add ngrx/store module to App Module
import { StoreModule, MetaReducer } from '@ngrx/store';
import { EffectsModule } from '@ngrx/effects';
import { StoreDevtoolsModule } from '@ngrx/store-devtools';
import { storeFreeze} from 'ngrx-store-freeze';

import {
    StoreRouterConnectingModule,
    RouterStateSerializer
} from '@ngrx/router-store';

import {
    AppState,
    reducers,
    CustomSerializer,
    effects
} from './store';

export const metaReducers: MetaReducer<any>[] = !environment.production ? [storeFreeze] : [];

export const storeDevTools: ModuleWithProviders[] =
    !environment.production ? [StoreDevtoolsModule.instrument()] : [];

@NgModule({
    imports: [
        ...
        StoreModule.forRoot((reducers) as any, { metaReducers }), EffectsModule.forRoot(effects),
            storeDevTools,
            ...
    ],
    ...
Start by importing the necessary modules from their corresponding Node packages, and then define an array of a single meta-reducer function. Once the application runs in Development mode, it activates and executes this meta-reducer function.
export const metaReducers: MetaReducer<any>[] = !environment.production ? [storeFreeze] : [];
A MetaReducer type represents a higher order reducer. A reducer acts as a pure function, so a MetaReducer represents a higher order function. By definition, a higher order function represents a function that takes an input parameter, a parameter that is itself a function, or a higher order function that returns a value of type function. A MetaReducer type accepts a reducer as an input parameter and returns a function with the exact same signature of a reducer. The ngrx/store module internally composes all of the provided reducers and wraps them with the provided meta-reducers. The ngrx/store module guarantees that the meta-reducer functions run first before the actual reducers.
A logging meta-reducer function represents a typical example of a useful meta-reducer. A logging meta-reducer function adds some logging messages before a reducer executes:
export function logger(reducer:
    ActionReducer<AppState>): ActionReducer<AppState> {
        return (state: AppState, action: any): AppState => {
            console.log('state', state);
            console.log('action', action);
            return reducer(state, action);
        };
    }
The logger() meta-reducer function shown accepts an input parameter of type ActionReducerstate and action variables to the console before returning the wrapped reducer.
The ngrx/store module defines the ActionReducer
export interface ActionReducer<T,
    V extends Action = Action> {
        (state: T | undefined, action: V): T;
}
A meta-reducer function defined with such a signature makes coding all reducers and meta-reducers much easier to compose and wrap.
Going back to the App Module code, you define an array of ModuleWithProviders classes to wrap the StoreDevtoolsModule.instrument() method so you can import it later on the App Module.
export const storeDevTools:
ModuleWithProviders[] =
    !environment.production ? [StoreDevtoolsModule.instrument()] : [];
Finally, import the modules into the App Module as follows:
StoreModule.forRoot((reducers) as any,
        { metaReducers }),

EffectsModule.forRoot(effects),

storeDevTools,
For now, the StoreModule.forRoot() method accepts an empty object. Later on, you'll provide some reducers.
In addition, the StoreModule.forRoot() method accepts a second argument of type StoreConfig interface.
export declare type StoreConfig<T,
    V extends Action = Action> = {
        initialState?: InitialState<T>;
        reducerFactory?: ActionReducerFactory<T, V>;
        metaReducers?: MetaReducer<T, V>[];
In this case, you only provide an array of meta-reducer functions, as defined above.
Right after importing the StoreModule class, you also import the storeDevTools array to provide a better debugging experience.
Lastly, on the App Module, import the EffectsModule class with an empty array. Later on, when you create the Effects, I will revisit the App Module and fill in the Effects. I haven't touched on the Effects or side-effects thus far, but I will do so in the section to come.
Before you configure the Heroes module with the NgRX Store modules, let's proceed by defining the Store first and then returning back to the Heroes module to configure it for the NgRX Store features.
Store Side-Effects
A code that dispatches an action to the Store can sometimes lead to some side-effects. For instance, you dispatch an action to load all Heroes data into the application. Such an action leads to a side-effect of having to communicate, via an Angular Service, with a Web API hosted on the server-side (or cloud) to return the Heroes data. The direct side-effects of the code dispatching an action to the Store results in the communication with an external Service.
The ngrx/effects module isolates the side-effects from the container components and provides a neat and concise solution to handle them inside an NgRX Store-enabled Angular application. Later on, the ngrx/store module dispatches an action to the Store to pass on any results or data retrieved from the server.
Figure 4 summarizes the communication path when using the ngrx/effects module.
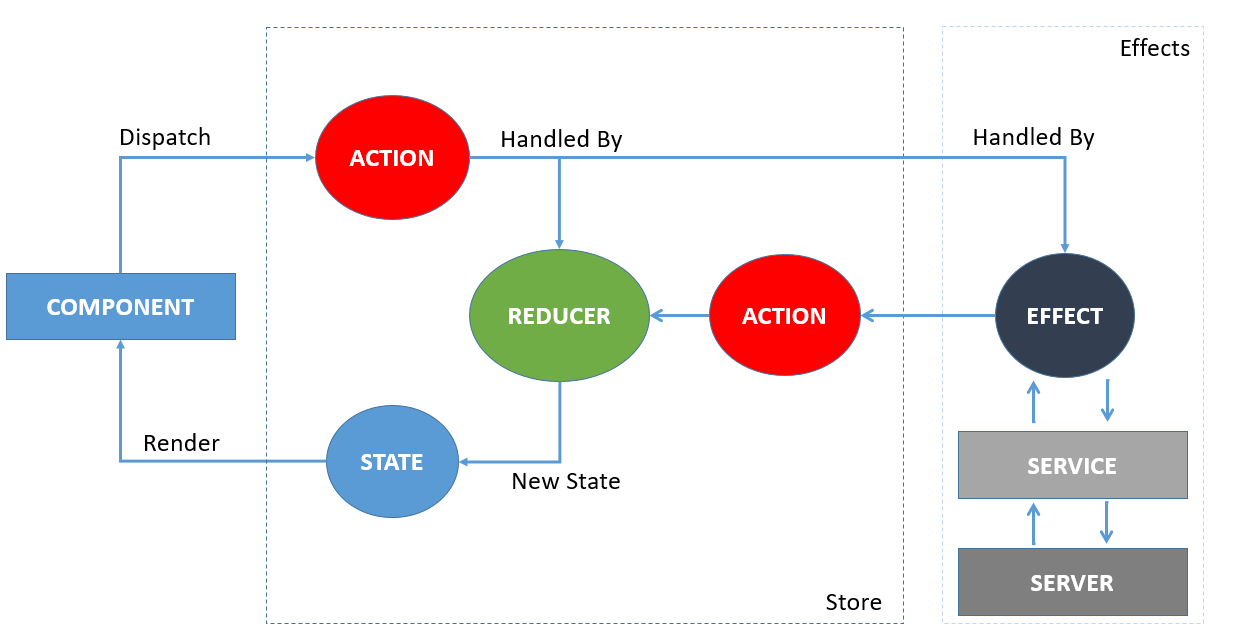
Here's what's happening:
- The ngrx/effects module listens to the actions dispatched to the Store.
- If there's an Effect hooked to listen to a dispatched action, the Effect runs and executes.
- Once the Effect receives the data from the server-side, it dispatches a new action to the Store so that the reducer kicks in and handles the data received from the Effect and updates the state accordingly.
Let's go back to the application and define a workable Store folder structure.
Define Store Folder Structure
Now that you've configured the ngrx/store module in the application, the next obvious step is to add the Store folder structure into the application. You may organize your folder structure the way you find suitable. In my case, I follow the basic folder structuring as shown in Figure 5.
Remember that we need this Store folder structure in two places:
- The root of the application
- Inside the Heroes (Feature) module
Figure 5 shows the Store folder structure.
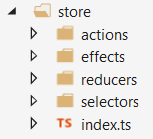
The structure is self-explanatory.
- The actions folder contains all Store actions.
- The effects folder contains all the Store effects.
- The reducers folder contains the Feature module state together with the reducers.
- The selectors folder contains all the selectors.
- The index.ts file is a barrel file to export everything from the Store (to make referencing the Store easier in the application via short paths).
Let's move on to define the actions.
Define Actions
When you first approach the ngrx/store module, you have to decide on the actions needed to run your application. Start by analyzing the process of loading Heroes data from the server-side and decide on the actions.
- You want to load all Heroes data from the server-side (Load Heroes Action).
- An Effect kicks in and retrieves the Heroes data from the server-side. The Effect also needs to inform the Store of the Heroes data retrieved, so it needs to dispatch an action (Load Heroes Success Action). In case the communication with the server-side fails or for any other reason, the Effect dispatches another action (Load Heroes Fail).
You can conclude that you need the following actions:
- Load Heroes action
- Load Heroes Success action
- Load Heroes Fail action
The ngrx/store module defines the Action interface as follows:
export interface Action {
    type: string;
}
You start the process of adding actions by defining some const variables that will serve as action types later on.
export const LOAD_HEROES = "[Heroes] Load Heroes";
export const LOAD_HEROES_FAIL = "[Heroes] Load Heroes Fail";
export const LOAD_HEROES_SUCCESS = "[Heroes] Load Heroes Success";
Always use a meaningful description for an action type that usually starts by specifying a category. In this case, the Heroes category.
Right after that, you define the custom action classes as follows:
export class LoadHeroes implements Action {
    readonly type = LOAD_HEROES;
}

export class LoadHeroesFail implements Action {
    readonly type = LOAD_HEROES_FAIL;

    // can pass any error from server-side
    constructor(public payload: any) {}
}

export class LoadHeroesSuccess
    implements Action {
        readonly type = LOAD_HEROES_SUCCESS;
        constructor(public payload: fromCore.Hero[])
{}
}
Every action class defines a type property because it implements the Action interface. In addition, in some cases, you need to define an optional payload property on the custom action classes so that the code that dispatches this action can pass in some additional data that the reducer uses later to compose a new state.
The LoadHeroesFail action class defines a payload property to hold the body of an Exception thrown during the communication with the server-side.
Similarly, the LoadHeroesSuccess action class defines a payload property to hold the actual Heroes data retrieved from the server-side and passes it to the reducer.
Finally, because you use TypeScript to develop Angular applications, you can add some action type checking by defining a new TypeScript type, called the HeroesAction type, to hold all of the action classes defined above. This way, a reducer handles only actions defined on this type.
export type HeroesAction =
    | LoadHeroes
    | LoadHeroesFail
    | LoadHeroesSuccess;
It's always a good idea to export all of the action classes defined in the Actions folder inside the /actions/index.ts barrel file. This makes it easier for referencing them later.
Now that you've defined the actions, let's move on to define the Feature module states and reducers.
Define Action Reducers
An action reducer or, simply, a reducer, is a pure function that the ngrx/store defines as an ActionReducer TypeScript interface. Reducers are the brains of the ngrx/store module. Whenever the reducer executes, it's responsible for creating and returning a new state.
First of all, you start by defining the HeroesState interface:
export interface HeroesState {
    entities: {[id: number]: fromCore.Hero},
    loaded: boolean,
    loading: boolean,
}
With this HeroesState interface in hand, you're tracking the following state information:
- Entities: This property is defined as an array-like object with a key of type
numberand a value of typeHeroclass. TheHeroclass is a simple class with only two properties:idof typenumberandnameof typestring. - Loaded and loading: These Boolean properties track the status of loading the data from the server-side. On one hand, the
loadingproperty is set totruewhen the Service initiates the communication with the server-side to retrieve the Heroes data. On the other hand, it's set tofalsewhen the data arrives from the server-side. Also, theloadedproperty is set totrueonly when the data arrives from the server-side.
Right after that, you define the initialState variable with some default values. This variable defines the default value of the state parameter on the reducer() function, as you will see soon.
export const initialState: HeroesState = {
    entities: {},
    loaded: false,
    loading: false,
};
You define the entities property as an empty object and set both the loaded and loading properties to false.
Then you define the reducer function:
export function reducer(
    state: HeroesState = initialState,
    action: fromActions.HeroesAction
): HeroesState {

switch (action.type) { }

return state;
}
The reducer is a function that accepts two parameters:
- state: The ngrx/store module calls the
reducer()function by passing the previous state object saved in the Store. You give thestateinput parameter an initial value so as not to have anundefinedvalue. - action: The
actionparameter represents the action that is currently dispatched to the Store.
The reducer() function simply returns a new immutable state.
The reducer() function checks the action's type property and performs an action accordingly to return a new immutable state. To illustrate more on this idea, assume action type value is LOAD_HEROES_SUCCESS:
case fromActions.LOAD_HEROES_SUCCESS:
{
    const heroes = action.payload;
    const entities = heroes.reduce(accEntities: {
        [id: number]: fromCore.Hero
    },
    hero) => {
        return {
            ...accEntities,
            [hero.id]: hero
        };
    },
        {
            ...state.entities // initial value
        }
    );

    return {
        ...state,
        loading: false,
        loaded: true,
        entities
    };
}
An Effect defined somewhere in the application dispatches this action. It creates a new LoadHeroesSuccess action object and populates its payload with the data retrieved from the server-side.
You reduce the array of Heroes into an array-like object (this format makes it easy later on to add/update/remove from the entities property) and return a new immutable state object. You start by Spreading (an ES6 feature) the previous state properties and then include the new entities property (containing the array-like object of Heroes data) so the new entities property overrides the previous value.
You provide more action type cases to handle more action types. Check Google search for other states and reducers.
Define each specific state together with its reducer inside their own code file. Use the reducers/index.ts barrel file to group all the states and reducers that you've defined separately into a single Feature state and reducer as follows:
import * as fromHeroes from './heroes.reducer';
import * as fromSearch from './heroes-search.reducer';

/**
* Prepare feature module state
*/
export interface HeroesFeatureState {
    heroes: fromHeroes.HeroesState;
    search: fromSearch.SearchHeroesState
}
You compose the HeroesFeatureState interface by including all other states as properties on this interface.
/**
* Register the reducers for the HeroesFeatureState
*/
export const reducers:
    ActionReducerMap<HeroesFeatureState> = {
        heroes: fromHeroes.reducer,
        search: fromSearch.reducer
    }
Then merge all reducers defined in this Feature module into a single reducer variable of type ActionReducerStoreModule class with reducers inside the Heroes module, as shown here:
StoreModule.forFeature('heroes', reducers),
Finally, define a selector to query the entire Feature module state inside the reducers/index.ts barrel file. Use this selector later on to query subsequent slices of the top-level Feature state, as you'll discover in the Define Selectors section below.
Define Effects
After you define the reducers, proceed to explore the Effects and define of few of them. (Refer to Listing 2.)
Listing 2: Define Effects for Heroes State
@Injectable()
export class HeroesEffects {
    constructor(
        private actions$: Actions,
        private service: fromCore.HeroService
    ) {
    }

    @Effect()
    loadHeroes$ = this.actions$.ofType(fromActions.LOAD_HEROES).pipe(
        switchMap(() => this.service.getHeroes().pipe(
            map((heroes: fromCore.Hero[]) =>
                new fromActions.LoadHeroesSuccess(heroes)),

            /* return an observable of the error */
            catchError(error =>
                of(new fromActions.LoadHeroesFail(error)))
          )
        )
    );
}
The first Effect to define is responsible for communicating with the server-side via an Angular Service to retrieve the Heroes data.
In the constructor of the HeroesEffects class, you inject two main things:
- actions$: An observable of all actions dispatched to the Store. The ngrx/effects module provides this observable.
- service: A custom Service wrapping all Heroes-related Web API calls (POST, GET, etc.)
Then, you define your first Effect block that you decorate with @Effect() decorator to signal to the ngrx/effects module that you want to register a new Effect.
You filter the actions$ observable searching for an action of type LOAD_HEROES. In other words, you're handling a dispatched action of type LOAD_HEROES. Then you use the switchMap() operator coming from the RxJS Library in order to call the Heroes Service to get all the Heroes from the server-side. Once the data is ready, you dispatch the LoadHeroesSuccess action.
Another interesting Effect to go over is the one defined below:
@Effect()
createHeroSuccess$ =
    this.actions$.ofType(
        fromActions.CREATE_HERO_SUCCESS)
    pipe(
        map(
            (action: fromActions.CreateHeroSuccess) => action.payload),
        map(
           (hero: fromCore.Hero) => new fromRoot.Go({
               path: ["/heroes/detail", hero.id]
           })
        )
    );
You filter the action$ observable searching for an action of type CREATE_HERO_SUCCESS. When the application creates a new Hero object, it dispatches this action with a payload of the specific Hero object created. This Effect listens for this action to be dispatched and navigates the user to a new component to view all the details of this new Hero object. It navigates the user by dispatching a special action called Go action. This is a Route action that I will cover further down in the article.
Because you usually have more than one Effect, go on and group all Effect classes into a single array inside the effects/index.ts barrel file. Later, you'll configure the ngrx/effects module inside the Heroes module by injecting this array to the EffectsModule class:
import { HeroesEffects } from './heroes.effects';
export const effects: any[] = [HeroesEffects];
And then inside the Heroes module:
EffectsModule.forFeature(effects)
You're finished configuring the ngrx/store and ngrx/effects modules inside the Heroes Feature module. Yay! Let's go on and define some selectors that you're going to use inside the container components later on.
Define Selectors
Actions, Reducers, and Effects are now in place, making the Store a workable environment. What you still need to do is figure out how the container components will respond to changes in the state.
You achieve this by defining selectors. Think of selectors as queries you execute against the Store to retrieve slices of the state.
You start first by defining a selector to retrieve the top-level Feature module state.
export const getHeroesFeatureState = createFeatureSelector
<HeroesFeatureState>('heroes');
Use the createFeatureSelector() function to create a query for the state defined for the entire feature module. Provide a string key representing the exact same name that you used to configure the reducers inside the StoreModule class in the Heroes module.
Because the Store represents the state as a tree of properties inside the Store, use the selectors to traverse down the tree to retrieve slices of the state.
export const getHeroesState = createSelector(
    fromFeature.getHeroesFeatureState,
    (state: fromFeature.HeroesFeatureState) => state.heroes);
Use the createSelector() function to create a query to retrieve the HeroesState. This function accepts one or more selectors. The last input parameter for this method accepts a projector() function. The projector function accepts all of the selectors defined on the createSelector() function as input.
Simply provide a single selector for the createSelector() function and for the projector() function, a single parameter which, in this case, is the HeroesFeatureState object. As a result, the projector() function you return is the HeroesState slice defined on the HeroesFeatureState object.
To get the entities out of the Heroes state object, define a new selector as follows:
export const getHeroesEntities = createSelector(getHeroesState, fromReducer.getHeroesEntities);
In this case, you call the createSelector() function passing in a single selector, the getHeroesState. The projector() function is already defined inside the reducer file and you pass it onto the createSelector() function to eventually return the entities property defined on the HeroesState object.
Another interesting feature of the Selectors is that you can compose selectors from various other selectors defined on different slices of the State. The selector below demonstrates this.
export const getSelectedHero = createSelector(
    getHeroesEntities, fromRoot.getRouterState,
    (entities, router):
        fromCore.Hero => {
            return router.state &&
                entities[router.state.params.id];
        }
);
One component of the Heroes module lists all the Heroes data available. Clicking any of the Heroes navigates you to the Details component to show all the details of the selected Hero object. Therefore, the component uses the selector above to retrieve the selected Hero.
This selector expects as input the getHeroesEntities and the getRouterState selectors. The getRouterState queries the Router object for information about the current Route (more on Router state in a moment). The projector() function expects the entities property and the current Router state as input parameters. Finally, given a Hero id (retrieved from the router.state.params.id) you query the entities property to return the Hero object intended.
Check the HeroListComponent to see an example of consuming those selectors. (Refer to Listing 3.)
Listing 3: HeroListComponent
@Component({
    selector: 'hero-list',
    changeDetection: ChangeDetectionStrategy.OnPush,
    template: `...`,
    styles: [`...`],
})
export class HeroListComponent {
    heroes$: Observable<fromCore.Hero[]>;

    constructor(private store: Store<fromStore.HeroesFeatureState>) { }

    ngOnInit() {
        this.heroes$ = this.store.pipe(select(fromStore.getAllHeroes));
        this.store.dispatch(new fromStore.LoadHeroes());
    }

    onDeleteHero(hero: fromCore.Hero): void {
        const remove = window.confirm('Are you sure you want to remove this hero?');
        if (remove) {
            this.store.dispatch(new fromStore.RemoveHero(hero));
        }
    }
}
You specify the ChangeDetectionStragey.OnPush at the component level. Having the ngrx/store module configured in an Angular application, you must always make use of the OnPush strategy.
With the ngrx/store module configured in an Angular application, you must always make use of the OnPush strategy.
You inject the Store object into the component's constructor(). You will use the Store object later to execute selectors and dispatch actions to the Store.
Now define the heroes$ observable variable to hold a reference for an observable stream of Hero objects. In the ngOnInit() method, you subscribe to the getAllHeroes selector by using a predefined method on the Store object, the select() method.
this.heroes$ = this.store.pipe(select(fromStore.getAllHeroes));
The Store itself is an RxJS Subject and you can pipe() in some selectors to retrieve the slices of data you're interested in. The select() method allows you to execute a selector or access a top-level state object via its name.
Here, you are passing the getAllHeroes selector to the select() method. The select() method returns an observable of Hero array. The heroes$ variable is automatically bound to any changes in this observable. When the reducer composes a new state object with new set of Heroes data, the select() method executes automatically and updates the heroes$ variable. The heroes$ variable is bound to the HTML markup with the use of Angular Async Pipes. The Async Pipe automatically subscribes to the heroes$ observable so that the HTML always receives the latest and newest set of Heroes data.
<div *ngFor="let hero of heroes$ | async">
Next, dispatch an action to the Store to load the Heroes data:
this.store.dispatch(new fromStore.LoadHeroes());
Now that you've dispatched the action, internally, the Store calls on the Effect defined before to handle such an action. Right after that, the Store calls the reducer to compose a new state by populating the entities property with whatever data that the Effect sends in. Finally, because the Store is an RxJS Subject, it emits the next() call to inform all the components linked to respond to the selectors that a new state is available. In this example, the heroes$ variable is automatically updated to reflect the new Heroes data.
Every time you visit the HeroListComponent you dispatch an action to the Store to retrieve the Heroes data once again from the server-side.
A pitfall with this method is that every time you visit the HeroListComponent you dispatch an action to the Store to retrieve the Heroes data once again from the server-side. You're better off loading the data once and when needed. For that you need to define a new Route Guard.
{
    path: '',
    canActivate: [fromGuards.HeroesGuard],
    component: fromContainers.HeroListComponent
}
Use a Route Guard to dispatch an action to the Store to load the Heroes data. You do this once in the Guard and that's all!
Define a new Route Guard and implement the canActivate() function with your own logic to communicate with the Store to dispatch any action.
Implement the canActivate() function in such a way that if the Heroes data is not yet loaded, it asks to load them by dispatching an action to the Store. Otherwise, use whatever's in the Store in that moment of time.
@Injectable()
export class HeroesGuard
    implements CanActivate {
        constructor(
            private store: Store<fromStore.HeroesFeatureState>) { }
            canActivate(): Observable<boolean> {
                return fromStore.checkStore(this.store)
                   .pipe(
                   switchMap(() => of(true)),
                   catchError(() => of(false))
                   );
            }
    }
The canActivate() function is defined inside a HeroesGuard class returning an observable of Boolean. It's either true or false. To activate or not to activate the route, that's the question! It then calls the checkStore() function that would return an observable of true only when the data has been successfully loaded.
The implementation of the checkStore() function is as follows:
export const checkStore = (store:
    Store<fromFeature.HeroesFeatureState>):
        Observable<boolean> => {

    return store.select(getHeroesLoaded).pipe(
        tap(loaded => {
            if (!loaded) {
               store.dispatch(
                   new fromActions.LoadHeroes());
            }
        }),
        // wait here
        filter( (loaded: boolean) => loaded),
        take(1)
    );
}
You execute the getHeroesLoaded selector and tap into the results. If the data is not loaded, dispatch an action to the Store to load the data. Otherwise, the RxJS filter() operator executes. The RxJS filter() operator only returns a value of true. Therefore, if the data hasn't been loaded yet, the processing of the above code pauses and waits for the data to be loaded. Because you dispatched an action inside the RxJS tap() operator, once the data is available in the Store, the store.select() method re-runs, causing the getHeroesLoaded selector to return true and therefore, the filter() operator returns with a value of true. Finally, you take a single value from the stream and return the results.
You have successfully implemented the ngrx/store module inside the Heroes Feature module. It's time to explore how to implement the ngrx/store module on the App Module and how to define the Router state.
Define the Router State
There is no harm in directly accessing the Router object from within the container components. However, given that the application treats the Store as a single source of truth, it's wise to integrate the ngrx/store module with the Router object.
Earlier, you installed the @ngrx/router-store Node package. This package is responsible for hooking up the Store with the Router object. To properly configure the ngrx/router-state module in the App Module, refer to Listing 4.
Listing 4: Configure Router State
@NgModule({
    imports: [
    ...
    StoreRouterConnectingModule,
    ],
    declarations: [
    ...
    ],
    providers: [
        {
            provide: RouterStateSerializer,
            useClass: CustomSerializer
        }
    ],
    bootstrap: [ AppComponent ]
})
export class AppModule { }
First, import the StoreRouterConnectingModule module. Then override the RouterStateSerializer class with a custom implementation. By default, when you import the ngrx/router-store module as-is, it registers a default RouterStateSerializer class that brings in the entire router state into the ngrx/store module. If you want to track only some properties of the router state in the Store, you must define a custom RouterStateSerializer class to extract only those properties from the router state.
Therefore, you add to the reducer/index.ts barrel file of the Store folder defined at the root of the application the following:
export interface RouterStateUrl {
    url: string;
    queryParams: Params;
    params: Params;
}

export interface AppState {
    router:
        fromRouter.RouterReducerState<RouterStateUrl>
}
You start by defining the custom RouterStateUrl interface. In this case, you're only tracking the URL of the Route, Query Parameters, and all Parameters passed to the Route itself.
Right after that, you define the root state of the application with a single sub-state that's the router state. The router state makes use of the built-in wrapper state, the RouterReducerState
Then define the application-level reducer as follows:
export const reducers: ActionReducerMap<AppState> = {router: fromRouter.routerReducer}
Here, you're using the built-in routerReducer class from the ngrx/store module. This reducer takes as input the previous or current initial state of type RouterReducerState
Next, you want to configure the StoreModule class in the App Module with the new reducer.
StoreModule.forRoot((reducers) as any, { metaReducers }),
Within the reducer file above, you define the CustomSerializer class, as shown in Listing 5.
Listing 5: CustomSerializer class
export class CustomSerializer
    implements fromRouter.RouterStateSerializer<RouterStateUrl> {
        serialize(routerState: RouterStateSnapshot): RouterStateUrl {
            const { url } = routerState;
            const { queryParams } = routerState.root;

            let state: ActivatedRouteSnapshot = routerState.root;
            while (state.firstChild) {
                state = state.firstChild;
            }
            const { params } = state;

            return { url, queryParams, params };
        }
}
Given a RouterStateSnapshot object, you extract the information required from the router state and return a new immutable object of type RouterStateUrl.
In summary, the StoreRouterConnectingModule class hooks into the Angular Router and dispatches a ROUTER_NAVIGATION action to the Store every time the Angular Router navigates to a new route. The StoreRouterConnectingModule class uses the CustomSerializer class to extract the needed information from the router state in order to populate the custom RouterStateUrl object.
After you configure the router state property, start using the selectors like the one in the Define Selectors section above, mainly the getRouterState selector.
Go ahead now and introduce some ngrx/store actions to communicate with the Router 1 and the Location service provided by Angular.
Define Router Actions and Effects
Older versions of @ngrx/router-store Node package defined some actions and Effects to serve as a wrapper on top of the Router object. With the latest version, those actions were dropped in favor of accessing the Router directly.
I prefer using those action wrappers and I tend to include them in my Angular applications. I brought in most of the code for those action wrappers from the older version of ngrx/router-store package as you can see here. https://github.com/ngrx/platform/blob/master/MIGRATION.md.
To start with, navigate to /app/store/actions/router.actions.ts and explore the file contents, as shown in Listing 6. You have just added basic NgRX Store routing actions.
Listing 6: Custom Router Actions
import { Action } from '@ngrx/store';
import { NavigationExtras } from '@angular/router';

export const GO = '[Router] Go';
export const BACK = '[Router] Back';
export const FORWARD = '[Router] Forward';

export class Go implements Action {
    readonly type = GO;
    constructor(public payload: {
        path: any[];
        query?: object;
        extras?: NavigationExtras;
    }) {}
}

export class Back implements Action {
    readonly type = BACK;
}

export class Forward implements Action {
    readonly type = FORWARD;
}

export type Actions = Go | Back | Forward;
The /app/store/effects/router.effects.ts file contains the RouterEffects class that implements the Effects corresponding to the actions above. (Refer to Listing 7.)
Listing 7: Router Effects
@Injectable()
export class RouterEffects {
    constructor(
        private actions$: Actions,
        private router: Router,
        private location: Location
    ) {}

    @Effect({ dispatch: false })
    navigate$ =
        this.actions$.ofType(RouterActions.GO).pipe(
            map((action: RouterActions.Go) => action.payload),
            tap(({ path, query: queryParams, extras }) => {
                this.router.navigate(path, { queryParams, ...extras });
            })
        );

    @Effect({ dispatch: false }) // no need to dispatch an action
    navigateBack$ =
        this.actions$.ofType(RouterActions.BACK).pipe(
            tap(() => this.location.back()));

    @Effect({ dispatch: false }) // no need to dispatch an action
    navigateForward$ = this.actions$
        .ofType(RouterActions.FORWARD)
        .pipe(tap(() => this.location.forward()));
}
The Go action is handled by an Effect that performs a navigation using the Router object navigate() method.
Notice how the @Effect() decorator specifies a value of false for the dispatch property. This signals to the ngrx/effects module that this Effect won't dispatch any action to the Store.
The Effects for both Back and Forward actions use the Location Service.
Once you have the router actions and Effects in place, you can easily make use of those actions in your container components as follows:
onGoBack(): void {
    this.store.dispatch(new fromRoot.Back());
}
Conclusion
With the intention of providing some insight into the NgRX Store capabilities, this introduction sheds light on the application state concepts, on how to use the Store in both Angular Root and Feature modules, and demonstrates how an existing Angular application can be migrated to use the NgRX Store to manage its state.
Application requirements sometimes gets more complicated to handle with a basic Store structure. In an upcoming article, join me as I delve further into using the NgRX Store to model an Angular application. This requires dynamically embedding multiple instances of a container component inside a parent component, in a way that the application uses a single state structure to manage the state of all dynamically embedded container components. This is a requirement that's rather rare and a little complicated but needed in developing Enterprise and Portal applications.
