


Maintaining multiple code bases for the various mobile platforms is one of the chores that today's developers have to contend with. For businesses, this translates to additional overhead that's both costly and time-consuming. Fortunately, Microsoft has the solution in the form of Xamarin.Forms. Xamarin.Forms is a library of APIs that allows developers to build native apps for Android, iOS, and Windows completely in C#. Perhaps the most compelling feature of Xamarin.Forms is its support for native UI - you code the user interface of your application using Xamarin.Forms-specific forms and controls. At runtime, each form and its controls are mapped to the respective native UI elements of each platform. This way, your application looks like a first-class citizen.
Although Xamarin.Forms allows you to focus on the UI aspects of your app development process, there are often times when you need to access platform-specific functionalities, such as location services, hardware access (camera, accelerometer, etc.), speech capabilities, and more. In Xamarin.Forms, this is achieved using the DependencyService class.
Although Xamarin.Forms allows you to focus on the UI aspects of your app development process, there are often times when you need to access platform-specific functionalities. This is where DependencyService comes in.
In this article, I'll walk you through the basics of DependencyService in Xamarin.Forms and work on a location service project that runs on both iOS and Android.
Components of DependencyService
In order to use DependencyService in Xamarin.Forms, you need three components:
- Interface: Defines the functionalities to be performed by each respective platform
- Implementation: The implementation by each platform of the functionalities defined by the interface
- Registration: Each implementing class must register with DependencyService via a metadata attribute. Doing so allows the DependencyService to supply the correct implementation during runtime.
Once the three components are in place, your shared code can explicitly call DependencyService for the implementation of the interface. Sound complicated? The following simple project makes it clear.
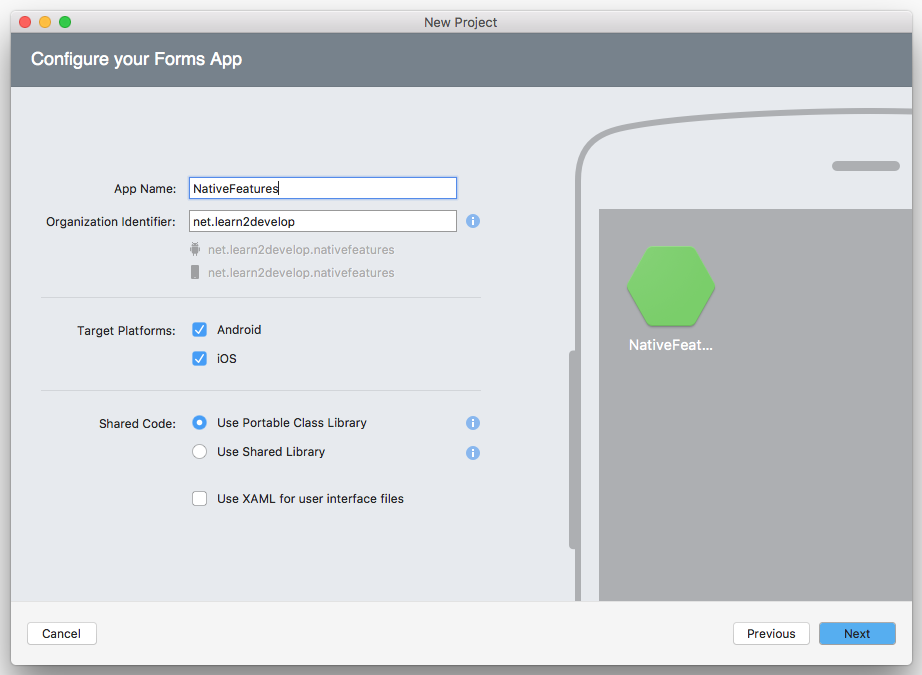
First, using Xamarin Studio create a new Xamarin.Forms project and name it NativeFeatures (see Figure 1).
Interface
Once the project's created, observe that there are three projects in the solution (see the left side of Figure 2):
- NativeFeatures: contains the shared code of the application
- NativeFeatures.Droid: contains the code for the Android application
- NativeFeatures.iOS: contains the code for the iOS application
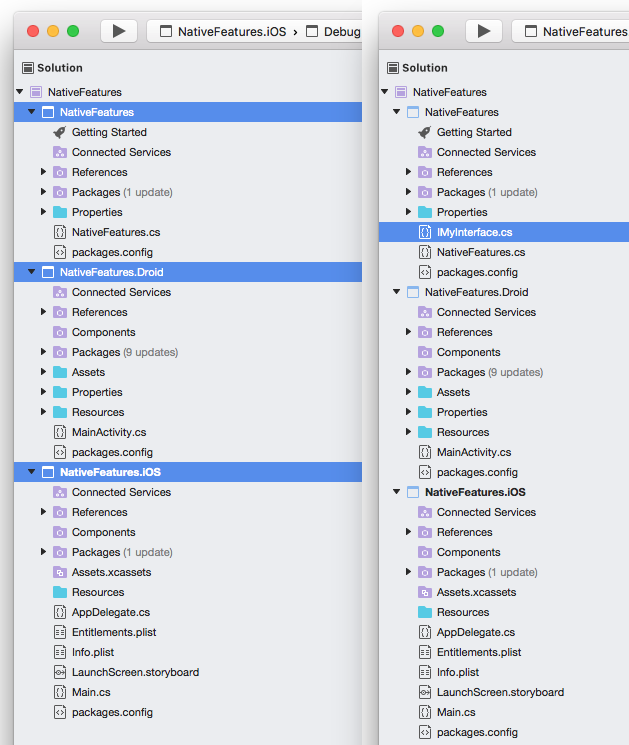
Let's now add an interface file to the NativeFeatures project (see the right side of Figure 2) and name it IMyInterface.cs. Populate it as follows:
using System;
namespace NativeFeatures
{
    public interface IMyInterface
    {
        string GetPlatformName();
    }
}
The interface file is straight-forward; it contains a method signature named GetPlatformName().
Implementation
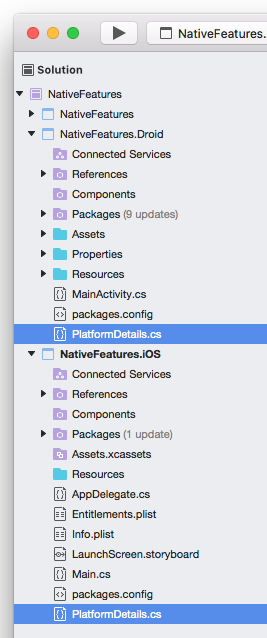
With the interface already added in the shared code project, you now want to implement the interface in each of the platforms. Let's add two class files named PlatformDetails.cs in the NativeFeatures.Droid and NativeFeatures.iOS projects (see Figure 3).
Populate the PlatformDetails.cs in the NativeFeatures.iOS project as follows:
using System;
namespace NativeFeatures.iOS
{
    public class PlatformDetails : IMyInterface
    {
        public PlatformDetails()
        {
        }
        public string GetPlatformName()
        {
            return "I am iPhone!";
        }
    }
}
Here, you implement the IMyInterface interface and provide the implementation for the GetPlatformName() method.
Likewise, populate the PlatformDetails.cs in the NativeFeatures.Droid project as follows:
using System;
namespace NativeFeatures.Droid
{
    public class PlatformDetails : IMyInterface
    {
        public PlatformDetails()
        {
        }
        public string GetPlatformName()
        {
            return "I am Android!";
        }
    }
}
Registration
Now that you have the interface and implementation for each platform done, how does DependencyService know who is implementing the interface? To allow DependencyService to know that, you need to register each implementing class using a metadata attribute. This comes in the form of:
[assembly: Xamarin.Forms.Dependency(typeof(ClassName))]
This metadata attribute registers a class with DependencyService as an implementing class so that it can be called during runtime.
Add the following statements to the PlatformDetails.cs in the NativeFeatures.iOS project:
using System;
using NativeFeatures.iOS;
[assembly: Xamarin.Forms.Dependency(typeof(PlatformDetails))]
namespace NativeFeatures.iOS
{
    public class PlatformDetails : IMyInterface
    {
        public PlatformDetails()
        {
        }
        public string GetPlatformName()
        {
            return "I am iPhone!";
        }
    }
}
Add the following statements to the PlatformDetails.cs in the NativeFeatures.Droid project:
using System;
using NativeFeatures.Droid;
[assembly: Xamarin.Forms.Dependency(typeof(PlatformDetails))]
namespace NativeFeatures.Droid
{
    public class PlatformDetails : IMyInterface
    {
        public PlatformDetails()
        {
        }
        public string GetPlatformName()
        {
            return "I am Android!";
        }
    }
}
Calling DependencyService
Finally, it's time to put all in action! In the NativeFeatures.cs file located in the shared code project, add the statements to match what's shown in Listing 1.
Listing 1: Calling the DependencyService from the Shared Code
using System;

using Xamarin.Forms;

namespace NativeFeatures
{
    public class App : Application
    {
        public App()
        {
            // The root page of your application
            var content = new ContentPage
            {
                Title = "NativeFeatures",
                Content = new StackLayout
                {
                    VerticalOptions = LayoutOptions.Center,
                    Children = {
                        new Label {
                            HorizontalTextAlignment =
                                TextAlignment.Center,
                            //Text = "Welcome to Xamarin Forms!"
                            Text =
                                DependencyService.Get<IMyInterface>().
                            GetPlatformName()
                        }
                    }
                }
            };

            MainPage = new NavigationPage(content);
        }

        protected override void OnStart()
        {
            // Handle when your app starts
        }

        protected override void OnSleep()
        {
            // Handle when your app sleeps
        }

        protected override void OnResume()
        {
            // Handle when your app resumes
        }
    }
}
The DependencyService.Get<IMyInterface>() method returns the implementing class in each platform, and using the returned class, you then call the GetPlaformName() method.
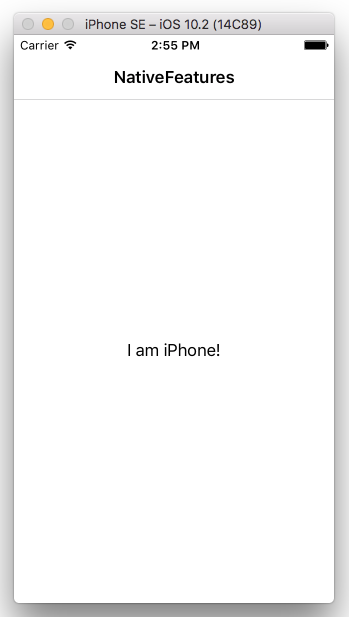
When you now deploy the application onto an iPhone Simulator, you should see the display as shown in Figure 4.
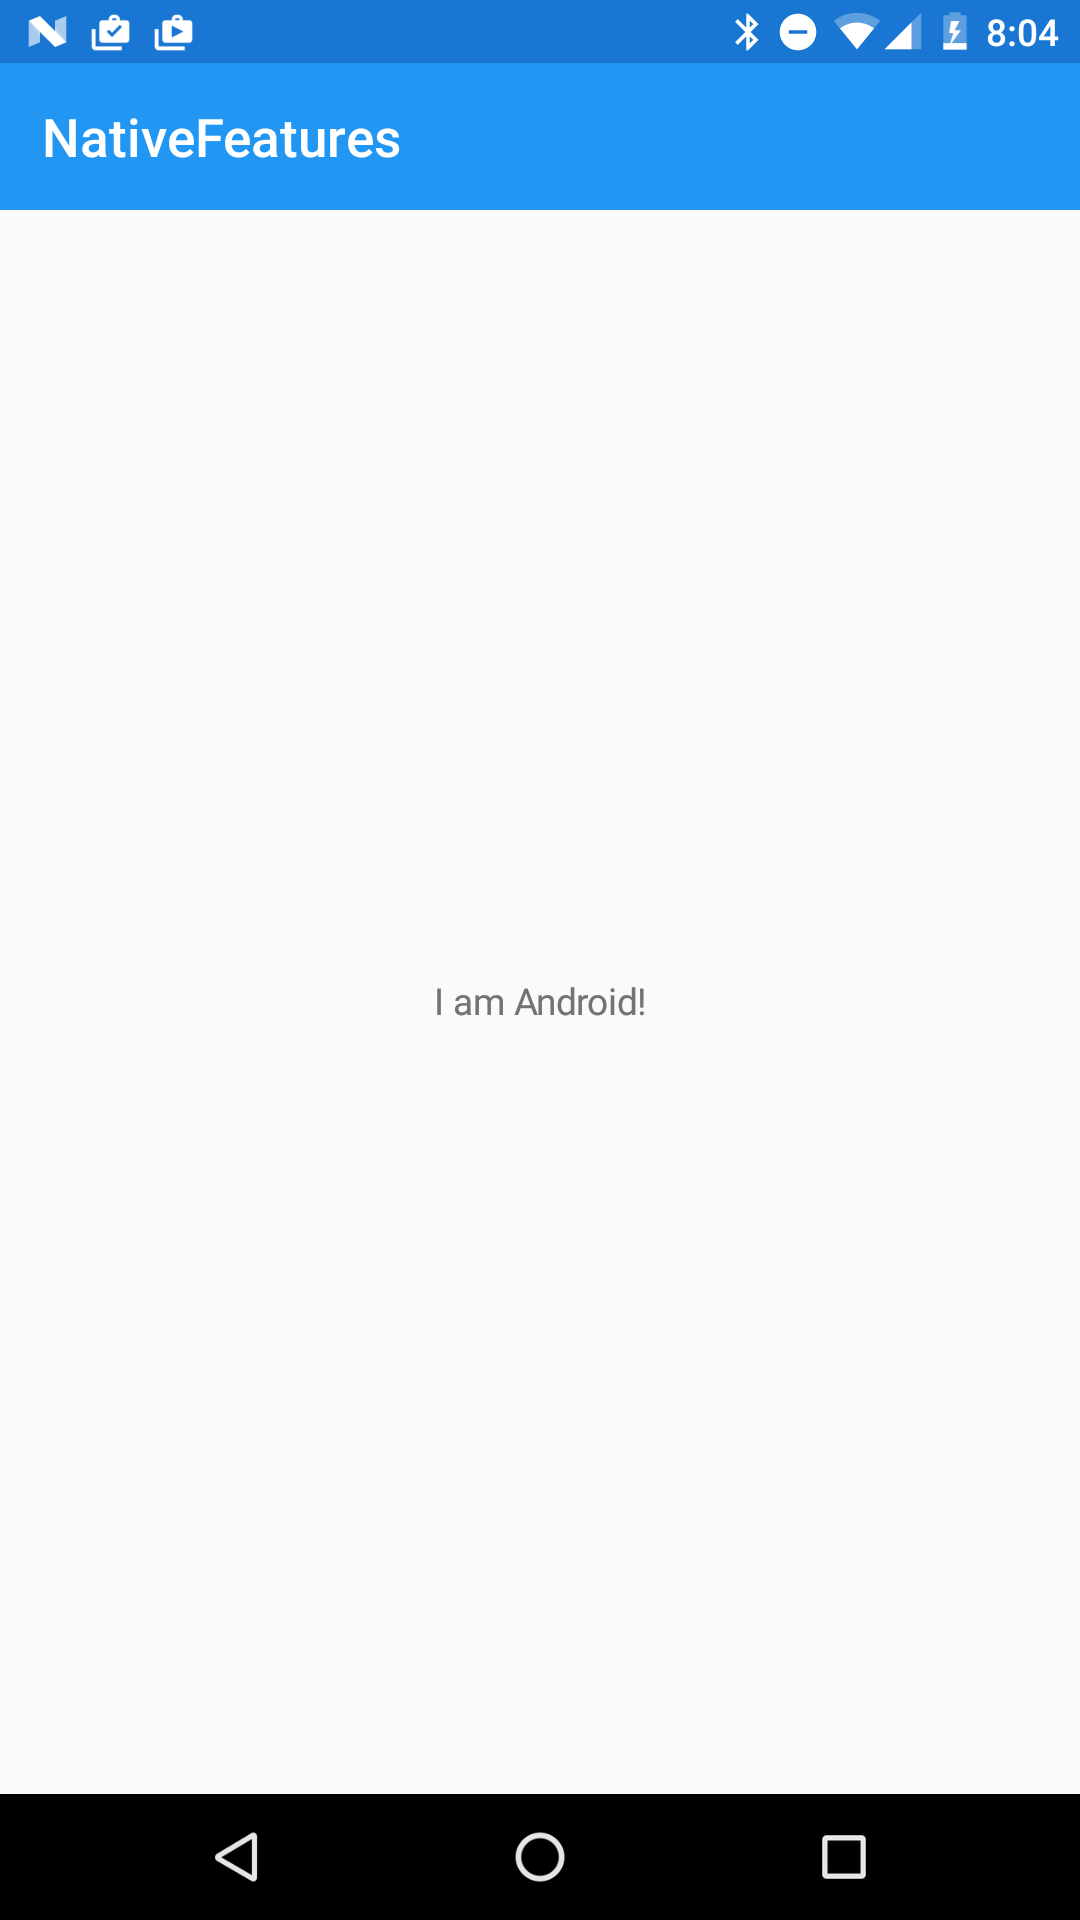
The same application running on Android displays the output, as shown in Figure 5.
Implementing Location-Based Services (LBS) using DependencyService
What you've seen in the previous section is really simple. To better understand how DependencyService works in real life, let's consider the scenario where you need to write an application that displays your current location. In this case, you have to use the location manager in each platform to get your location. This is a perfect example to use DependencyService.
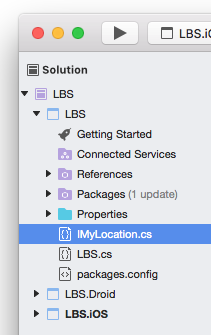
For this example, let's create a new Xamarin.Forms project and name it LBS. As usual, let's add an interface file named IMyLocation.cs to the shared code project, as shown in Figure 6.
Populate the IMyLocation.cs file as follows:
using System;
namespace LBS
{
    public interface IMyLocation
    {
        void ObtainMyLocation();
        event EventHandler<ILocationEventArgs>
            locationObtained;
    }
    public interface ILocationEventArgs
    {
        double lat { get; set; }
        double lng { get; set; }
    }
}
In the above, the IMyLocation interface has the following:
- ObtainMyLocation(): This method starts the location service.
- locationObtained: This event is fired whenever there is a new location reported by the location service on each platform. The location is passed via the event through an object of type
IlocationEventArgs. TheIlocationEventArgsinterface defines an object containing two properties:latandlng.
Implementing Location-Based Services in Android
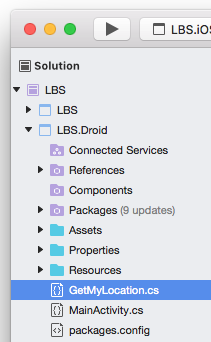
It's time to implement the location services in Android. For this, add a new Class file named GetMyLocation.cs to the LBS.Droid project (see Figure 7).
Populate the GetMyLocation.cs file as shown in Listing 2.
Listing 2: Implementing LBS in Android
using System;

using Android.Content;
using LBS.Droid;
using Xamarin.Forms;
using Android.Locations;

[assembly: Xamarin.Forms.Dependency(typeof(GetMyLocation))]
namespace LBS.Droid
{
    //---event arguments containing lat and lng---
    public class LocationEventArgs : EventArgs,
    ILocationEventArgs
    {
        public double lat { get; set; }
        public double lng { get; set; }
    }

    public class GetMyLocation : Java.Lang.Object,
        IMyLocation,
        ILocationListener
        {
            LocationManager lm;

            public void OnProviderDisabled(string provider) { }

            public void OnProviderEnabled(string provider) { }

            public void OnStatusChanged(string provider,
                Availability status, Android.OS.Bundle extras)
            { }

            //---fired whenever there is a change in location---
            public void OnLocationChanged(Location location)
            {
                if (location != null)
                {
                    LocationEventArgs args = new LocationEventArgs();
                    args.lat = location.Latitude;
                    args.lng = location.Longitude;
                    locationObtained(this, args);
                };
            }

            //---an EventHandler delegate that is called when
            // a location is obtained---
            public event EventHandler<ILocationEventArgs>
            locationObtained;

            //---custom event accessor that is invoked when client
            // subscribes to the event---
            event EventHandler<ILocationEventArgs>
            IMyLocation.locationObtained
            {
                add
                {
                    locationObtained += value;
                }
                remove
                {
                    locationObtained -= value;
                }
            }

            //---method to call to start getting location---
            public void ObtainMyLocation()
            {
                lm = (LocationManager)
                Forms.Context.GetSystemService(Context.LocationService);
                lm.RequestLocationUpdates(
                    LocationManager.NetworkProvider,
                        0,   //---time in ms---
                        0,   //---distance in metres---
                        this);
            }

            //---stop the location update when the object is
            // set to null---
            ~GetMyLocation()
            {
                lm.RemoveUpdates(this);
            }
        }
    }
The code in Listing 2 does the following:
- The
GetMyLocationclass implements theIMyLocationandILocationListenerinterfaces. TheILocationListenerinterface is required in Android; it contains the methods signature forOnProviderDisabled(),OnProviderEnabled(),OnStatusChanged(), andOnLocationChanged(). - When the shared code calls the
ObtainMyLocation()method, you first obtain an instance of theLocationManagerclass. TheLocationManagerin Android provides location services. - You can use the
LocationManagerclass to find your location using GPS or a combination of WiFi and cellular network (known as NetworkProvider). Here, I'm using the NetworkProvider. - Whenever a new location is found, the
LocationManagerclass fires theOnLocationChanged()method. In this method, you'll package the latitude and longitude of the location using theLocationEventArgsclass, which you've declared in the top part of the class. Once that's done, you'll fire thelocationObtainedevent. - You also need to create a custom event accessor that's invoked when a client of the
GetMyLocationclass subscribes to thelocationObtainedevent.
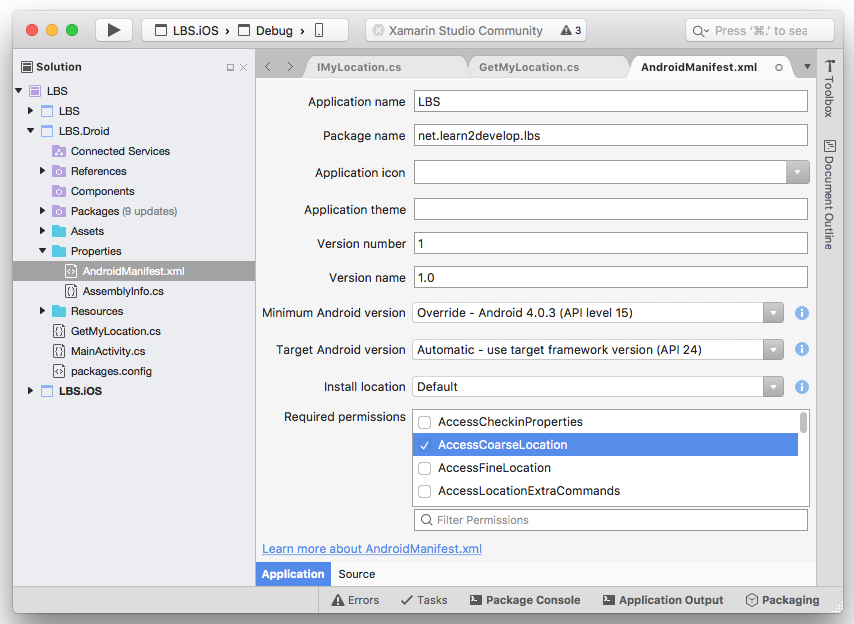
In Android, you need to add the AccessCoarseLocation permission to your project in order to use the NetworkProvider. Then, in the AndroidManifest.xml file of the LBS.Droid project, check the AccessCoarseLocation permission (see Figure 8).
Implementing Location-Based Services in iOS
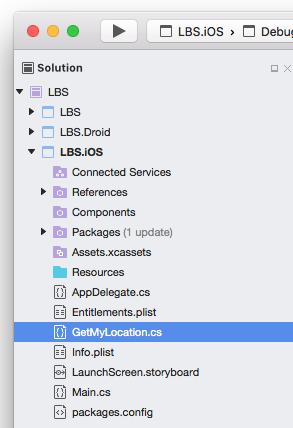
Like the Android project, add a new Class file to the LBS.iOS project and name it GetMyLocation.cs (see Figure 9).
Populate the GetMyLocation.cs file as shown in Listing 3.
Listing 3: Implementing LBS in iOS
using System;

using CoreLocation;
using LBS.iOS;

[assembly: Xamarin.Forms.Dependency(typeof(GetMyLocation))]
namespace LBS.iOS
{
    //---event arguments containing lat and lng---
    public class LocationEventArgs : EventArgs,
    ILocationEventArgs
    {
        public double lat { get; set; }
        public double lng { get; set; }
    }

    public class GetMyLocation : IMyLocation
    {
        CLLocationManager lm;

        //---an EventHandler delegate that is called when a
        // location is obtained---
        public event EventHandler<ILocationEventArgs>
            locationObtained;

        //---custom event accessor when client subscribes
        // to the event---
        event EventHandler<ILocationEventArgs>
            IMyLocation.locationObtained
        {
            add
            {
                locationObtained += value;
            }
            remove
            {
                locationObtained -= value;
            }
        }

        //---method to call to start getting location---
        public void ObtainMyLocation()
        {
            lm = new CLLocationManager();
            lm.DesiredAccuracy = CLLocation.AccuracyBest;
            lm.DistanceFilter = CLLocationDistance.FilterNone;

            //---fired whenever there is a change in location---
            lm.LocationsUpdated +=
                (object sender, CLLocationsUpdatedEventArgs e) =>
            {
                var locations = e.Locations;
                var strLocation =
                    locations[locations.Length - 1].
                    Coordinate.Latitude.ToString();
                strLocation = strLocation + "," +
                    locations[locations.Length - 1].
                    Coordinate.Longitude.ToString();

                LocationEventArgs args =
                    new LocationEventArgs();
                args.lat = locations[locations.Length - 1].
                    Coordinate.Latitude;
                args.lng = locations[locations.Length - 1].
                    Coordinate.Longitude;
                locationObtained(this, args);
            };

            lm.AuthorizationChanged += (object sender,
                CLAuthorizationChangedEventArgs e) =>
                {
                    if (e.Status == CLAuthorizationStatus.AuthorizedWhenInUse)
                    {
                        lm.StartUpdatingLocation();
                    }
                };

                lm.RequestWhenInUseAuthorization();
            }

            //---stop the location update when the object is set to
            // null---
            ~GetMyLocation()
            {
                lm.StopUpdatingLocation();
            }
        }
    }
The code in Listing 3 is similar to that of Listing 2, except:
- In iOS, you use the
CLLocationManagerclass to get your locations. - In iOS, you need to explicitly ask the user for permission to get his/her location, and you need to handle the
AuthorizationChangedevent of theCLLocationManagerinstance.
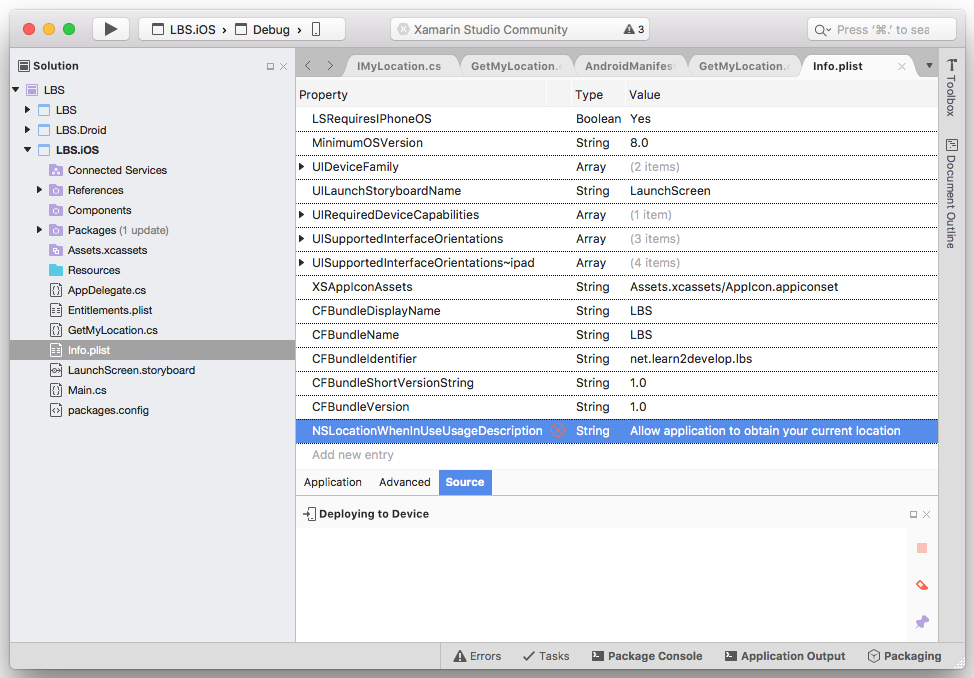
In the Info.plist file of the LBS.iOS project, add a new key as shown in Figure 10.
Using the GetMyLocation Class
Now that the implementations for the IMyLocation interface is finally done, call it in the shared code. Add the statements needed to the LBS.cs file, as shown in Listing 4.
Listing 4: Calling the DependencyService in the Shared Code
using System;

using Xamarin.Forms;

namespace LBS
{
    public class App : Application
    {
        Label lblLat, lblLng;
        IMyLocation loc;

         public App()
         {
             lblLat = new Label
             {
                 HorizontalTextAlignment = TextAlignment.Center,
                 Text = "Lat",
             };

         lblLng = new Label
         {
             HorizontalTextAlignment = TextAlignment.Center,
             Text = "Lng",
         };

         // The root page of your application
         var content = new ContentPage
         {
             Title = "LBS",
             Content = new StackLayout
             {
                 VerticalOptions = LayoutOptions.Center,
                 Children = {
                     new Label {
                         HorizontalTextAlignment =
                             TextAlignment.Center,
                             Text = "Current Location"
                     },
                     lblLat,
                     lblLng
                 }
            }
        };

        MainPage = new NavigationPage(content);
    }

    protected override void OnStart()
    {
        // Handle when your app starts
        loc = DependencyService.Get<IMyLocation>();
        loc.locationObtained += (object sender,
            ILocationEventArgs e) =>
        {
            var lat = e.lat;
            var lng = e.lng;
            lblLat.Text = lat.ToString();
            lblLng.Text = lng.ToString();
        };
        loc.ObtainMyLocation();
    }

    protected override void OnSleep()
    {
        // Handle when your app sleeps
    }

    protected override void OnResume()
    {
        // Handle when your app resumes
    }
}
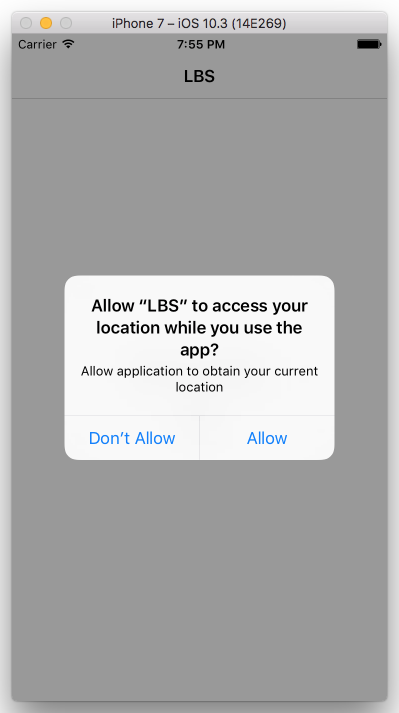
You are now ready to test the application. On the iPhone Simulator, you'll first be asked to grant permission (see Figure 11). Click Allow.
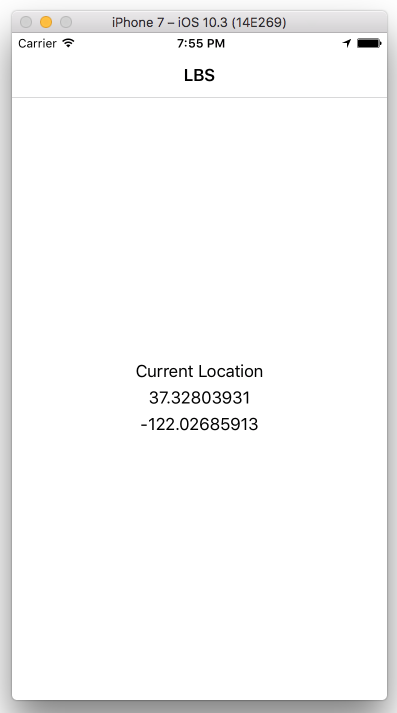
Once permission is granted, you'll see the location displayed (see Figure 12).
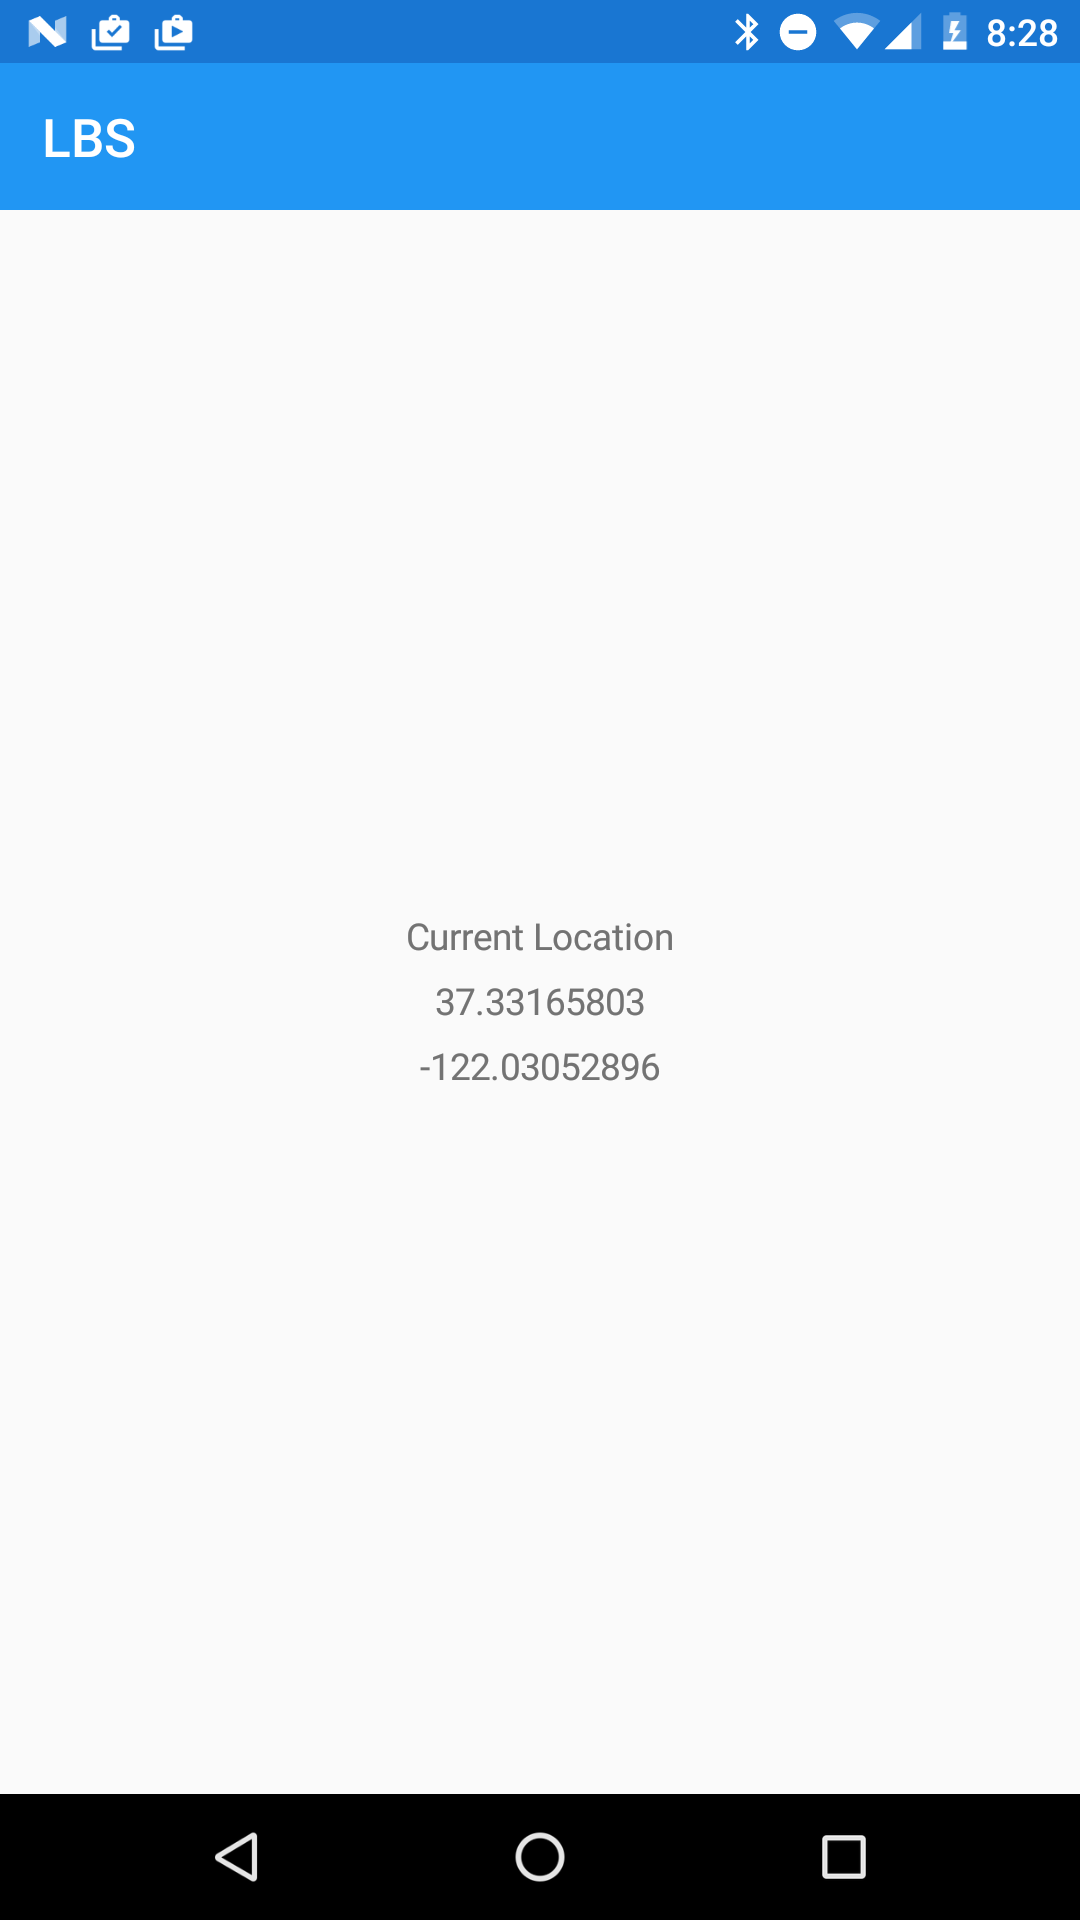
Likewise, on the Android, you will see the location displayed (see Figure 13).
Displaying a Map
Now that you can display locations in both the iOS and Android apps, let's do something more interesting. Displaying the latitude and longitude isn't cool enough - a better idea would be to display a map showing the current location. In addition, when you move, you want the map to move as well.
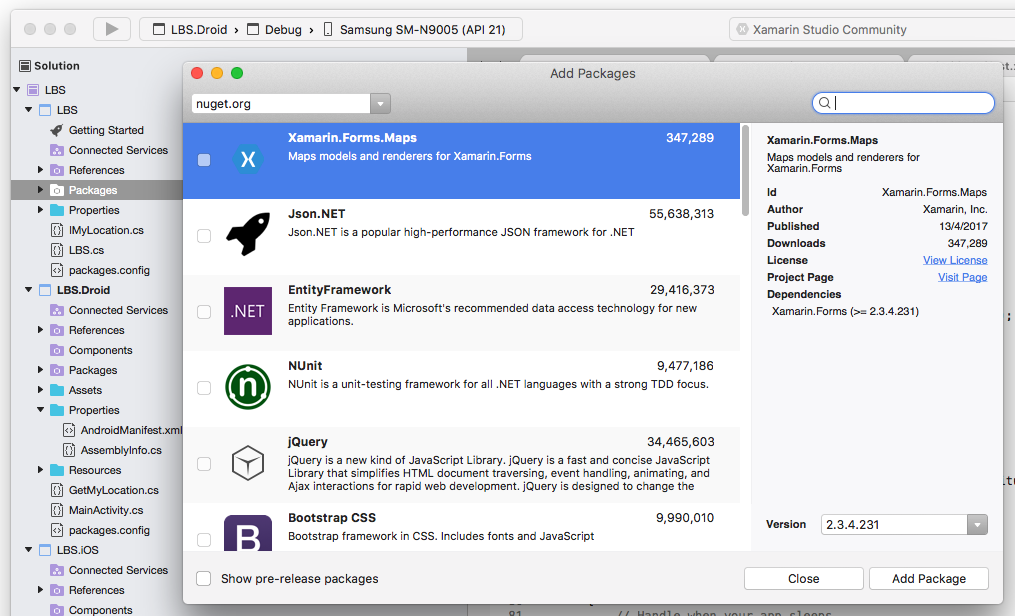
Fortunately, displaying a map in Xamarin.Forms is pretty simple. Just add the Xamarin.Forms.Maps package to the three projects in the solution (see Figure 14).
The Xamarin.Forms.Maps package automatically displays Google Maps on Android devices and the Apple Maps on iOS devices.
Displaying Maps in Android
In the MainActivity.cs file in the LBS.Droid project, add in the following statement in bold to initialize the map:
protected override void OnCreate(Bundle bundle)
{
    TabLayoutResource = Resource.Layout.Tabbar;
    ToolbarResource = Resource.Layout.Toolbar;
    base.OnCreate(bundle);
    global::Xamarin.Forms.Forms.Init(this, bundle);
    Xamarin.FormsMaps.Init (this, bundle);
    LoadApplication(new App());
}
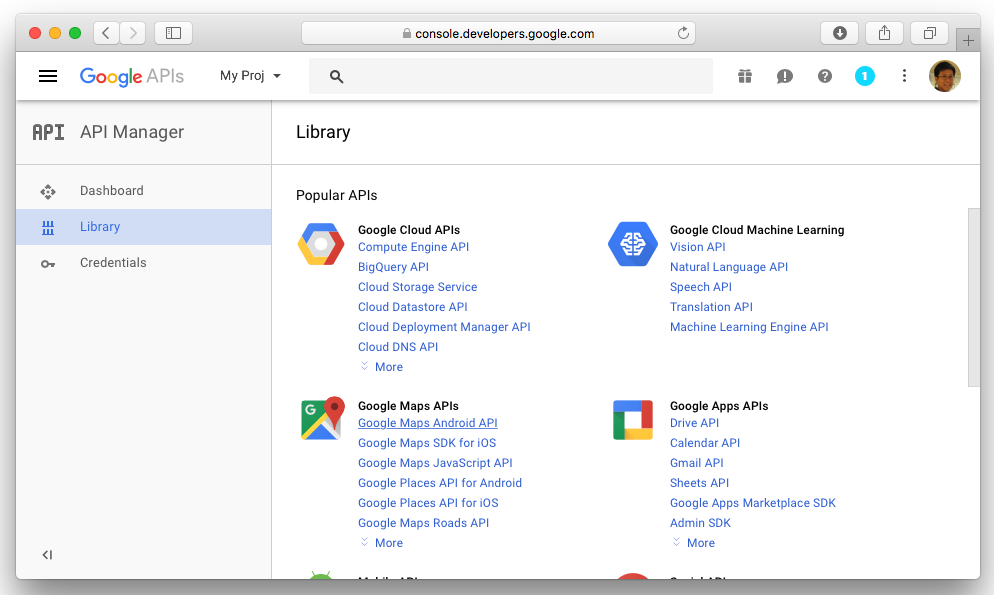
Next, you need to apply for an Android Maps API key in order to display the Google Maps in Android. Follow the steps below:
- Using a Web browser, go to
https://code.google.com/apis/console/. - Log in using your Google account.
- Click on the CREATE PROJECT button.
- Give a name to your project and click Create.
- In the API Manager page, click the Google Maps Android API link (see Figure 15).
- Click the ENABLE button at the top of the page.
- Click the Create Credentials button. You should now get your API key.
Add the following statements in bold to the AndroidManifest.xml file and replace Your_API_Key with the API key you have just obtained (see Listing 5).
Listing 5: Adding the permissions and the Maps API key to the AndroidManifest.xml file
<?xml version="1.0" encoding="utf-8"?>
<manifest xmlns:android="http://schemas.android.com/apk/res/android"
android:versionCode="1"
android:versionName="1.0"
package="net.learn2develop.lbs">
    <uses-sdk android:minSdkVersion="15"
        android:targetSdkVersion="23" />

<application android:label="LBS">
<meta-data
android:name="com.google.android.geo.API_KEY"
android:value="Your_API_Key" />
</application>

<uses-permission
    android:name="android.permission.ACCESS_COARSE_LOCATION" />
<uses-permission
    android:name="android.permission.ACCESS_FINE_LOCATION" />
<uses-permission
    android:name="android.permission.ACCESS_LOCATION_EXTRA_COMMANDS" />
<uses-permission
    android:name="android.permission.ACCESS_MOCK_LOCATION" />
<uses-permission
    android:name="android.permission.ACCESS_NETWORK_STATE" />
<uses-permission
    android:name="android.permission.ACCESS_WIFI_STATE" />
<uses-permission
    android:name="android.permission.INTERNET" />
</manifest>
Displaying Maps in iOS
Add in the following statements in bold to the AppDelegate.cs file in the LBS.iOS project to initialize the map:
public override bool FinishedLaunching(
    UIApplication app, NSDictionary options)
{
    global::Xamarin.Forms.Forms.Init();
    Xamarin.FormsMaps.Init();
    LoadApplication(new App());
    return base.FinishedLaunching(app, options);
}
}
Navigating the Map
You can now display the map in the UI. You'll also move the map to display the current location. To do that, add the statements needed from Listing 6 to the LBS.cs file.
Listing 6: Adding the code to display and move the map
public class App : Application
{
    Label lblLat, lblLng;
    IMyLocation loc;

    Map map;

    public App()
    {
        lblLat = new Label
        {
            HorizontalTextAlignment = TextAlignment.Center,
            Text = "Lat",
        };

        lblLng = new Label
        {
            HorizontalTextAlignment = TextAlignment.Center,
            Text = "Lng",
         };

         map = new Map(MapSpan.FromCenterAndRadius(
             new Position(37, -122), Distance.FromMiles(10)))
         {
             VerticalOptions = LayoutOptions.FillAndExpand,
             BackgroundColor = Color.Blue,
             IsShowingUser = true,
         };

         // The root page of your application
         var content = new ContentPage
         {
             Title = "LBS",
             Content = new StackLayout
             {
                 //VerticalOptions =
                 //    LayoutOptions.Center,
                 Children = {
                     new Label {
                         HorizontalTextAlignment = TextAlignment.Center,
                         Text = "Current Location"
                      },
                      lblLat,
                      lblLng,
                      map
                  }
             }
        };
        MainPage = new NavigationPage(content);
    }

    protected override void OnStart()
    {
        // Handle when your app starts
        loc = DependencyService.Get<IMyLocation>();
        loc.locationObtained += (object sender,
            ILocationEventArgs e) =>
        {
            var lat = e.lat;
            var lng = e.lng;
            lblLat.Text = lat.ToString();
            lblLng.Text = lng.ToString();

             var position = new Position(lat, lng);
             map.MoveToRegion(
                 MapSpan.FromCenterAndRadius(
                     new Position(position.Latitude, position.Longitude),
                     Distance.FromMiles(1)));
        };

        loc.ObtainMyLocation();
    }

    protected override void OnSleep()
    {
        // Handle when your app sleeps
    }

    protected override void OnResume()
    {
        // Handle when your app resumes
    }
}
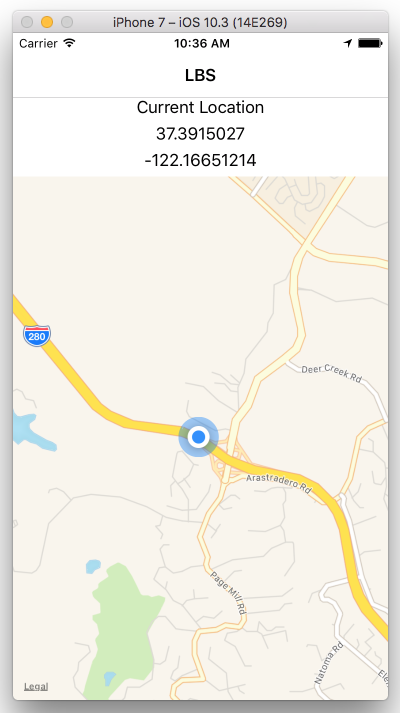
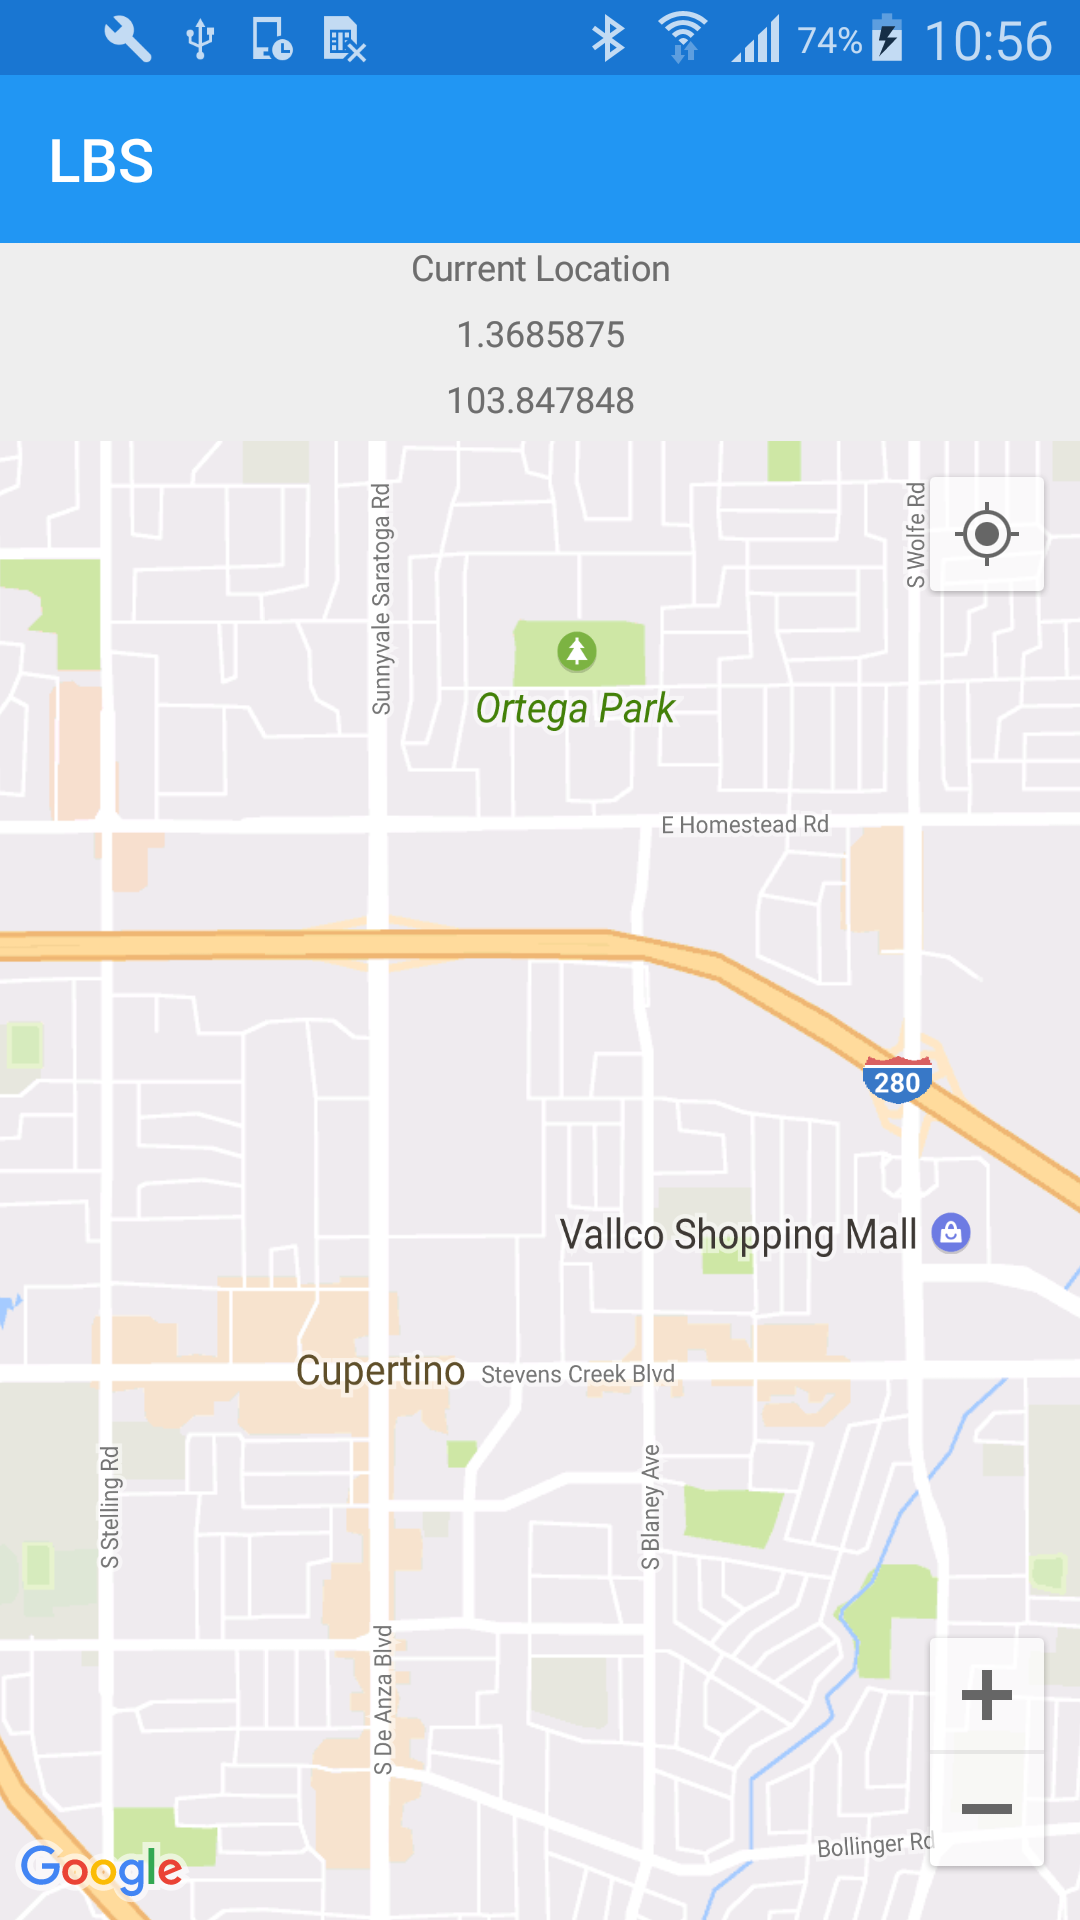
When you now run the application on the iPhone simulator, you'll be able to see the map (see Figure 16). What's more, the map will move whenever the location changes.
Similarly, you'll see the map on the Android device (see Figure 17).
Summary
In this article, you learned how DependencyService works and how you can use it to access platform-specific features. DependencyService is a very useful (and necessary) technology as it bridges the gaps left by Xamarin.Forms.
