


Delivering bug-free software on the first iteration is an impossible task. No matter how much time and preparation you put into architecting your application, there will undoubtedly be issues that you didn't predict or foresee. Brian Kernighan (a contributing developer to Unix and co-author of AWK) once said, “Debugging is twice as hard as writing the code in the first place. Therefore, if you write the code as cleverly as possible, you are, by definition, not smart enough to debug it.”
Most software projects have teams and resources dedicated to quality assurance and testing applications to make sure they're market ready. Even with specialized teams and sizeable QA budgets, many applications still launch with bugs. It's unavoidable and very much a part of the software lifecycle, so much so that users have even grown accustomed to it. How many times have you seen an app update in iTunes with an update description that reads “Bug Fixes”?
Just because it's not feasible to avoid these issues doesn't mean you don't still take precautions to combat them. Using real-world users to put your application through real-world use cases is a great way to uncover issues, and also gives you an avenue to collect feedback. Beta tests provide an avenue to gather data and catalogue bugs in a closed or open environment, and without the same level of risk that you undertake in a hard launch scenario.
Mobile services like HockeyApp and Crashlytics provide different ways to run beta tests within the Apple ecosystem, but TestFlight stands out in particular because it's directly integrated with the Apple iOS development environments. In this article, you'll take a look at how to provision and deploy a beta version of your application using the TestfFight platform and what benefits you can gain from doing so.
How Does TestFlight Work?
If you've ever built or deployed an iOS application, you likely know the headaches that the Apple provisioning system can cause. Admittedly this process has improved dramatically over the years, but it can still very much trip developers up if they don't understand the procedure. Additionally, you probably know that in order to deploy a version of the application to a test device, the UDID of that device must be embedded in the provisioning certificates. UDID stands for “Unique Device Identifier” and is used mainly to prevent unauthorized distribution of an application outside of an official Apple-approved channel, such as iTunes.
The UDID issue, however, is a barrier to running a successful beta test. Logistically, it's not feasible to request the UDIDs for potentially hundreds or even thousands of beta testers, especially because acquiring your UDID is no simple feat. TestFlight addresses this problem by offering two beta testing options, depending on the size and scope of the test you want to run. For smaller tests of 25 individuals or fewer, you can run a private internal beta and if you wish to run a larger scale test, TestFlight has an open beta option that supports up to 2,000 testers. However, the latter method does require a submission and approval process with Apple but, in exchange, bypasses the need for the user's UDID.
TestFlight has an open beta option that supports up to 2,000 testers and only requires an email address for each test user.
Regardless of the option you choose, TestFlight offers similar mechanisms for getting feedback from your testers. When you set up the application for TestFlight, you provide a support email address. All user-generated feedback and bugs get funneled into that provided email address. In order to submit an issue, the tester uses the main TestFlight app interface that corresponds with your application.
As you receive feedback, you'll likely want to iterate and deploy changes and fixes. TestFlight gives you the option to upload additional builds and automatically notifies your test group when the build is active. Additionally, the interface shows you status indicators that correspond to each individual tester:
- Notified: The user has received an email from the TestFlight system inviting them to test the build.
- Accepted: The user has accepted the TestFlight invitation.
- Testing: Indicates that the user has downloaded the beta build of the application.
Users with a Testing status will also have a “latest build” indicator that allows you to see what version they currently have installed. That information's useful when trying to debug an issue submitted by the specific user. Additional metrics available include how many days are left on the current active test, the total number of installs, and the total number of sessions.
Working with TestFlight
As mentioned previously, there are two different processes for creating and deploying a TestFlight build for beta testing. You can create either an internal or an external test, depending specifically on your needs. Regardless of which option you choose, the first few steps involved in the process are identical. The next few sections walk you through the shared steps and then branch out to explain the subtle differences between the two set ups.
Step 1: Upload a Build
In order to beta test a build, you must get a build from your development environment into the iTunes Connect interface. You can do this using XCode, but first you need to set up an application record within iTunes Connect. When you log into the portal, you're presented with a grid of icons. To get started adding an application record, click on the icon corresponding to “My Apps” and then click the “+” icon. Fill in the respective information and click Create.
Once that's done, you can return to XCode and create an archived build. You'll need proper provisioning setup to do this. XCode usually handles the provisioning on simpler builds, but if you need more assistance with this portion of the process, refer to the sidebar for more details. To create an archived build, set your test device to generic and then go to Product > Archive. Once that process completes successfully, you end up at the organizer screen displaying the archived build that you just generated. To the right of that build, you'll see a blue button that says, "Upload to App Store…". You need to complete this upload procedure in order to get the build into iTunes Connect. There's more detail on the intricacies of that process in the sidebar as well.
Once the build has uploaded, you can log in to iTunes Connect to verify that it was received. Figure 1 demonstrates where you can find the build you just uploaded. Builds go into a “processing” state when first uploaded and it can take anywhere from several minutes to several hours for the build to finish processing. You can't use the build in a beta test until it has completed the processing phase.

Step 2: Add Metadata for Your Application
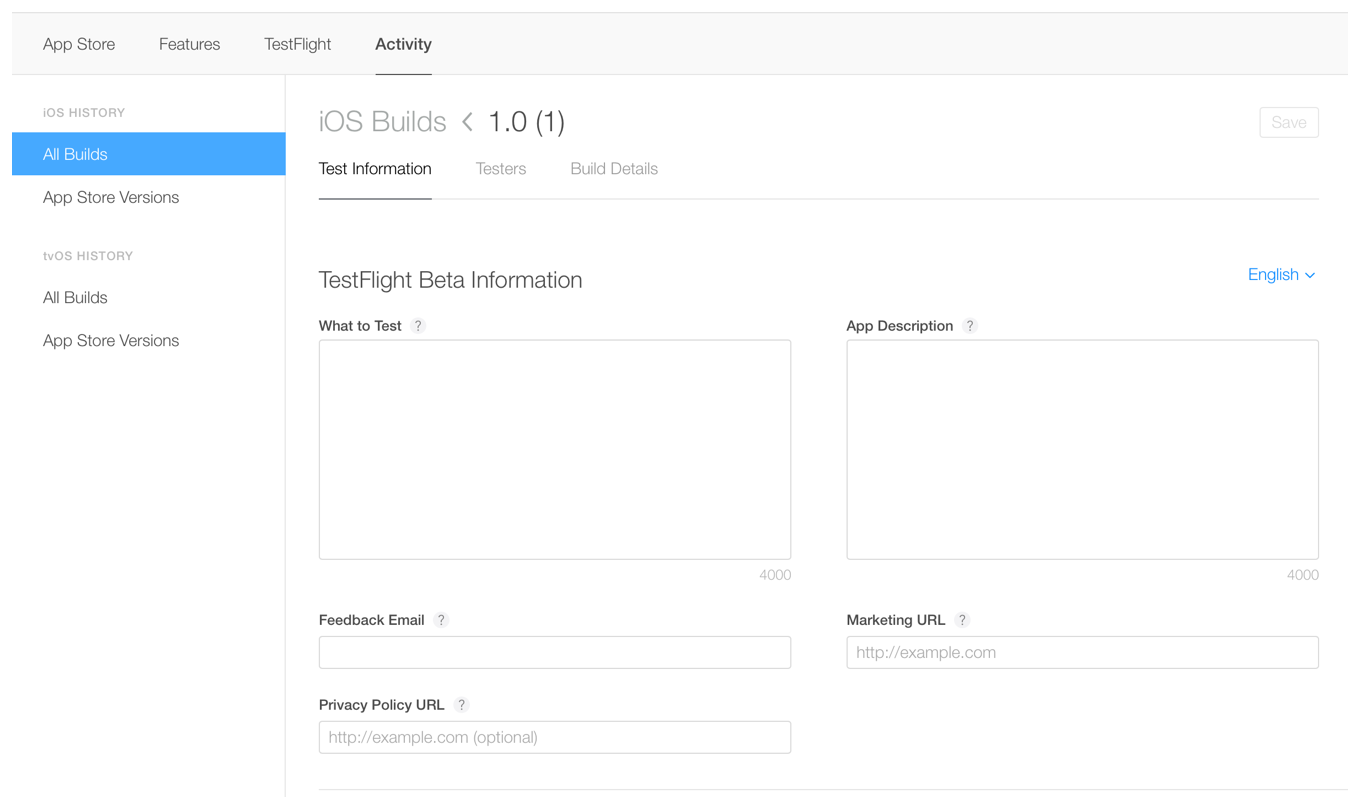
Once you've uploaded a build and located it in the Activity pane as illustrated in Figure 1, you can modify the metadata associated with the application. This metadata contains useful information such as:
- What to Test: specific instructions for your testing group
- App Description: basic information about your application's purpose
- Feedback Email: where Apple should send your tester's feedback
- Marketing URL: where your test group can go to learn more
- Privacy Policy URL: link to the application's Privacy Policy
To modify any of the previously mentioned items, select one of the builds from the “All Builds” list. Once having done that, you'll see “Test Information,” as demonstrated in Figure 2.
Once you've edited the test information to your liking, you're ready to start inviting users to test the application. This is where the process forks into the two different use cases discussed earlier. If you wish to run an internal test, read the following section. If you'd rather run an external test, skip the next section and head to step 3b.
Step 3a: Running an Internal Test
In order to be an internal tester, a user must be a part of the corresponding iTunes Connect team with one of the following roles: Admin, Technical, App Manager, Developer, or Marketer. You can set up individuals and invite them to the team using the “Users and Roles” section of the portal, which is accessible from the grid screen you see when you first log in. Invitations to join the team don't automatically set up those individuals to test your application. To do that, you need to go back into your applications and find the TestFlight tab located next to the Activities tab you accessed previously. Once there, select “Internal Testing,” as shown in Figure 3.
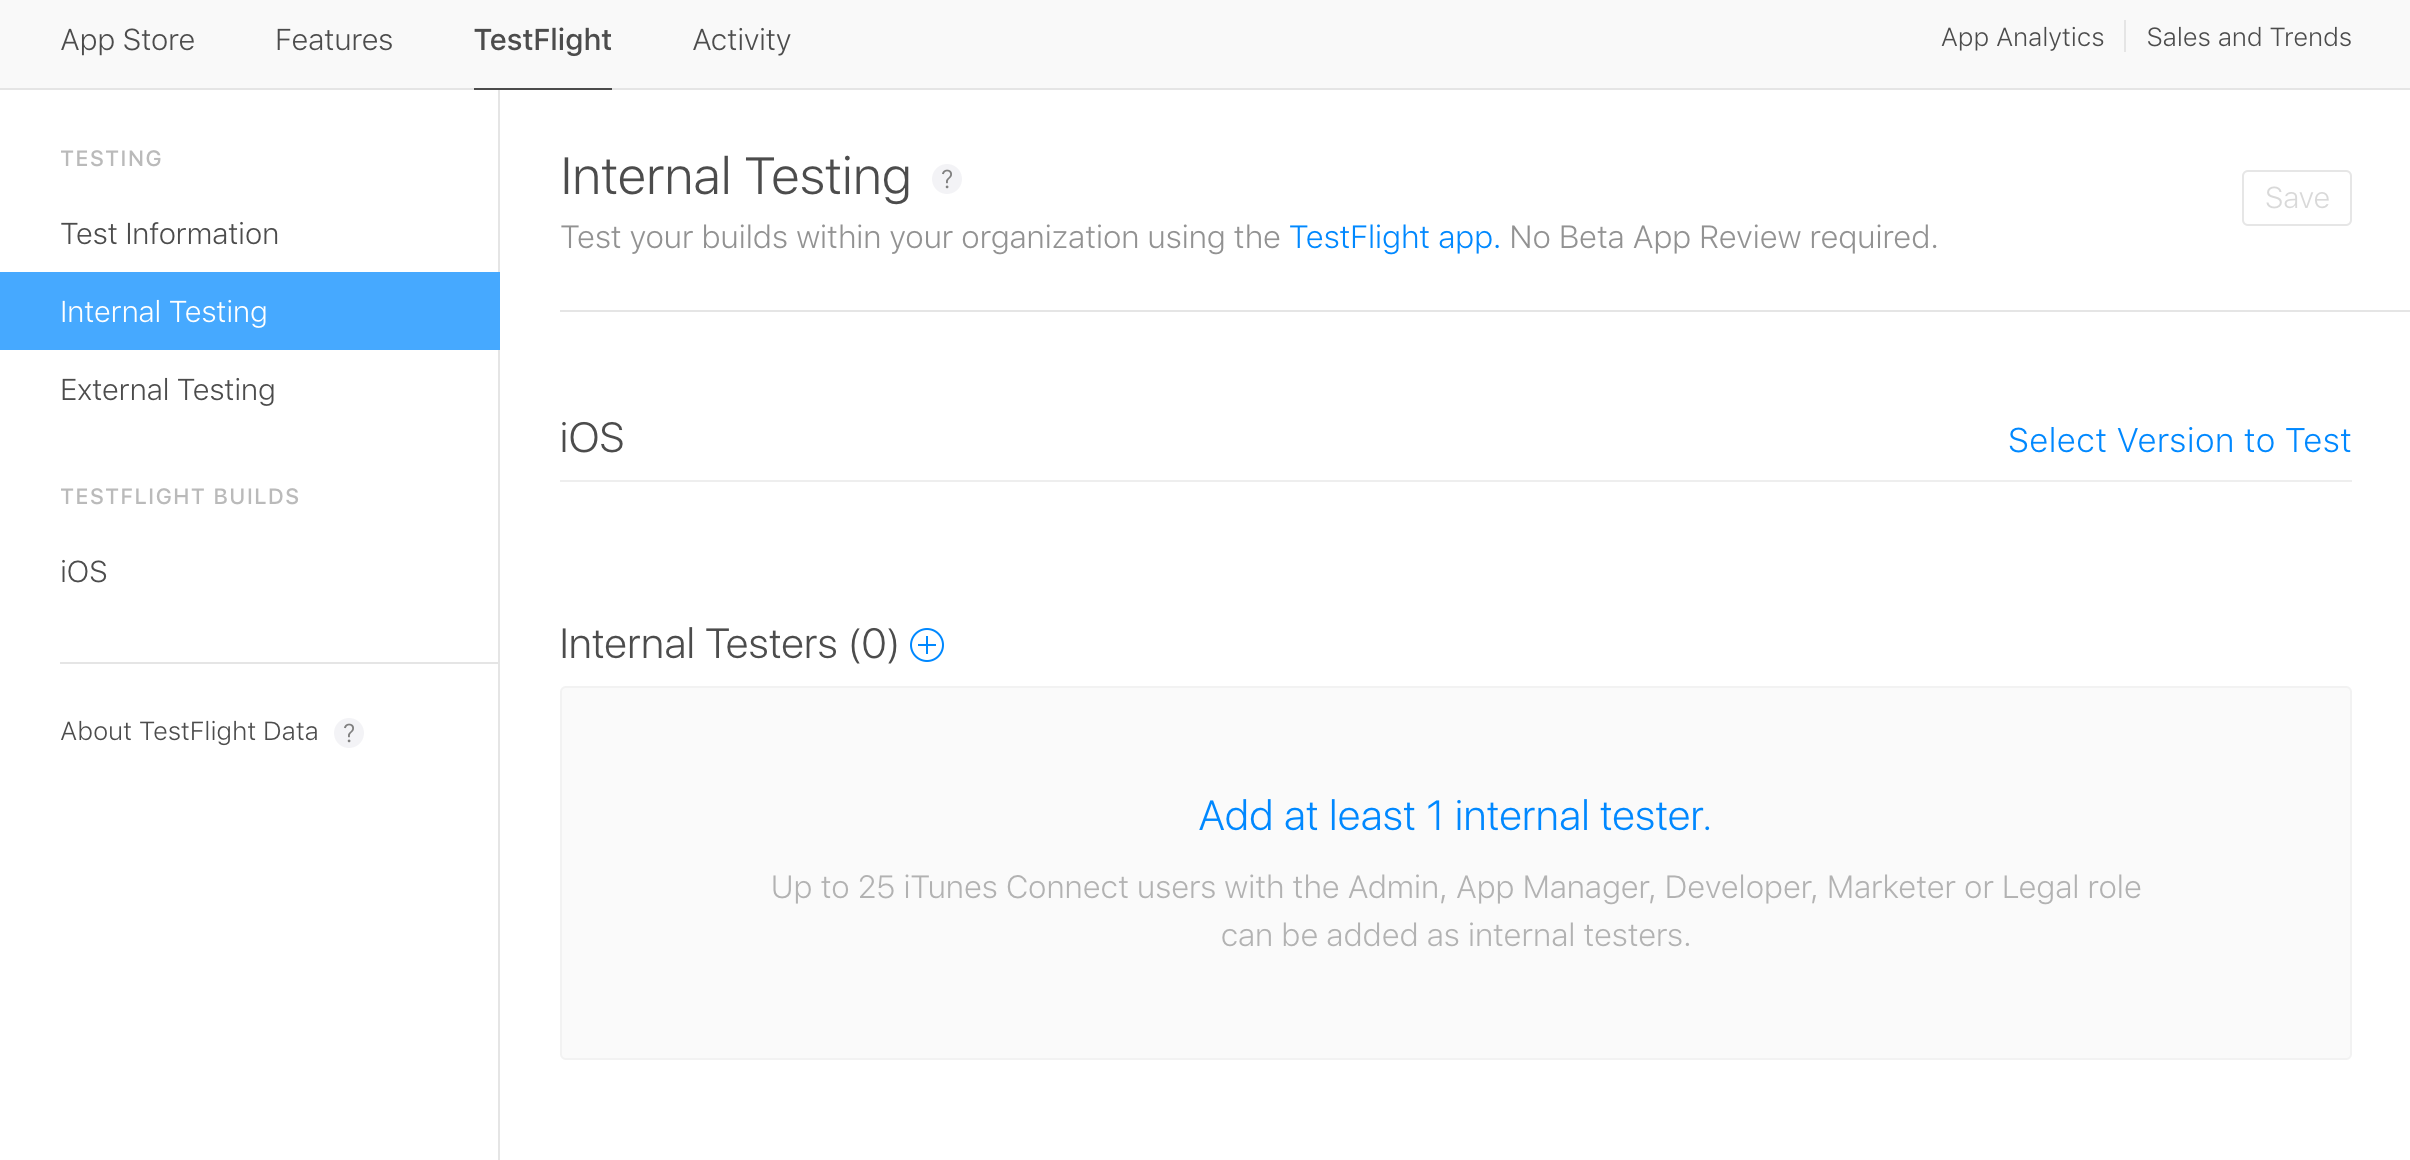
You'll notice that you need to select information corresponding to the two sections shown in Figure 3 before you can initiate a test. First, you select a build for your users to test. When you hit “Select Version to Test,” it shows you a list of any builds you previously uploaded via XCode. Once you've chosen the desired build, you need to add at least one tester. Click the “+” icon next to “Internal Testers” and select the desired users that you had added in the “Users and Roles” section beforehand.
After you configure the proper information for build and test group, a “Start Testing” button becomes active. Press that to initiate the test. This action automatically emails all the users you've selected, inviting them to test the build. The email directs the users to accept the invitation using the TestFlight application they can download via iTunes.
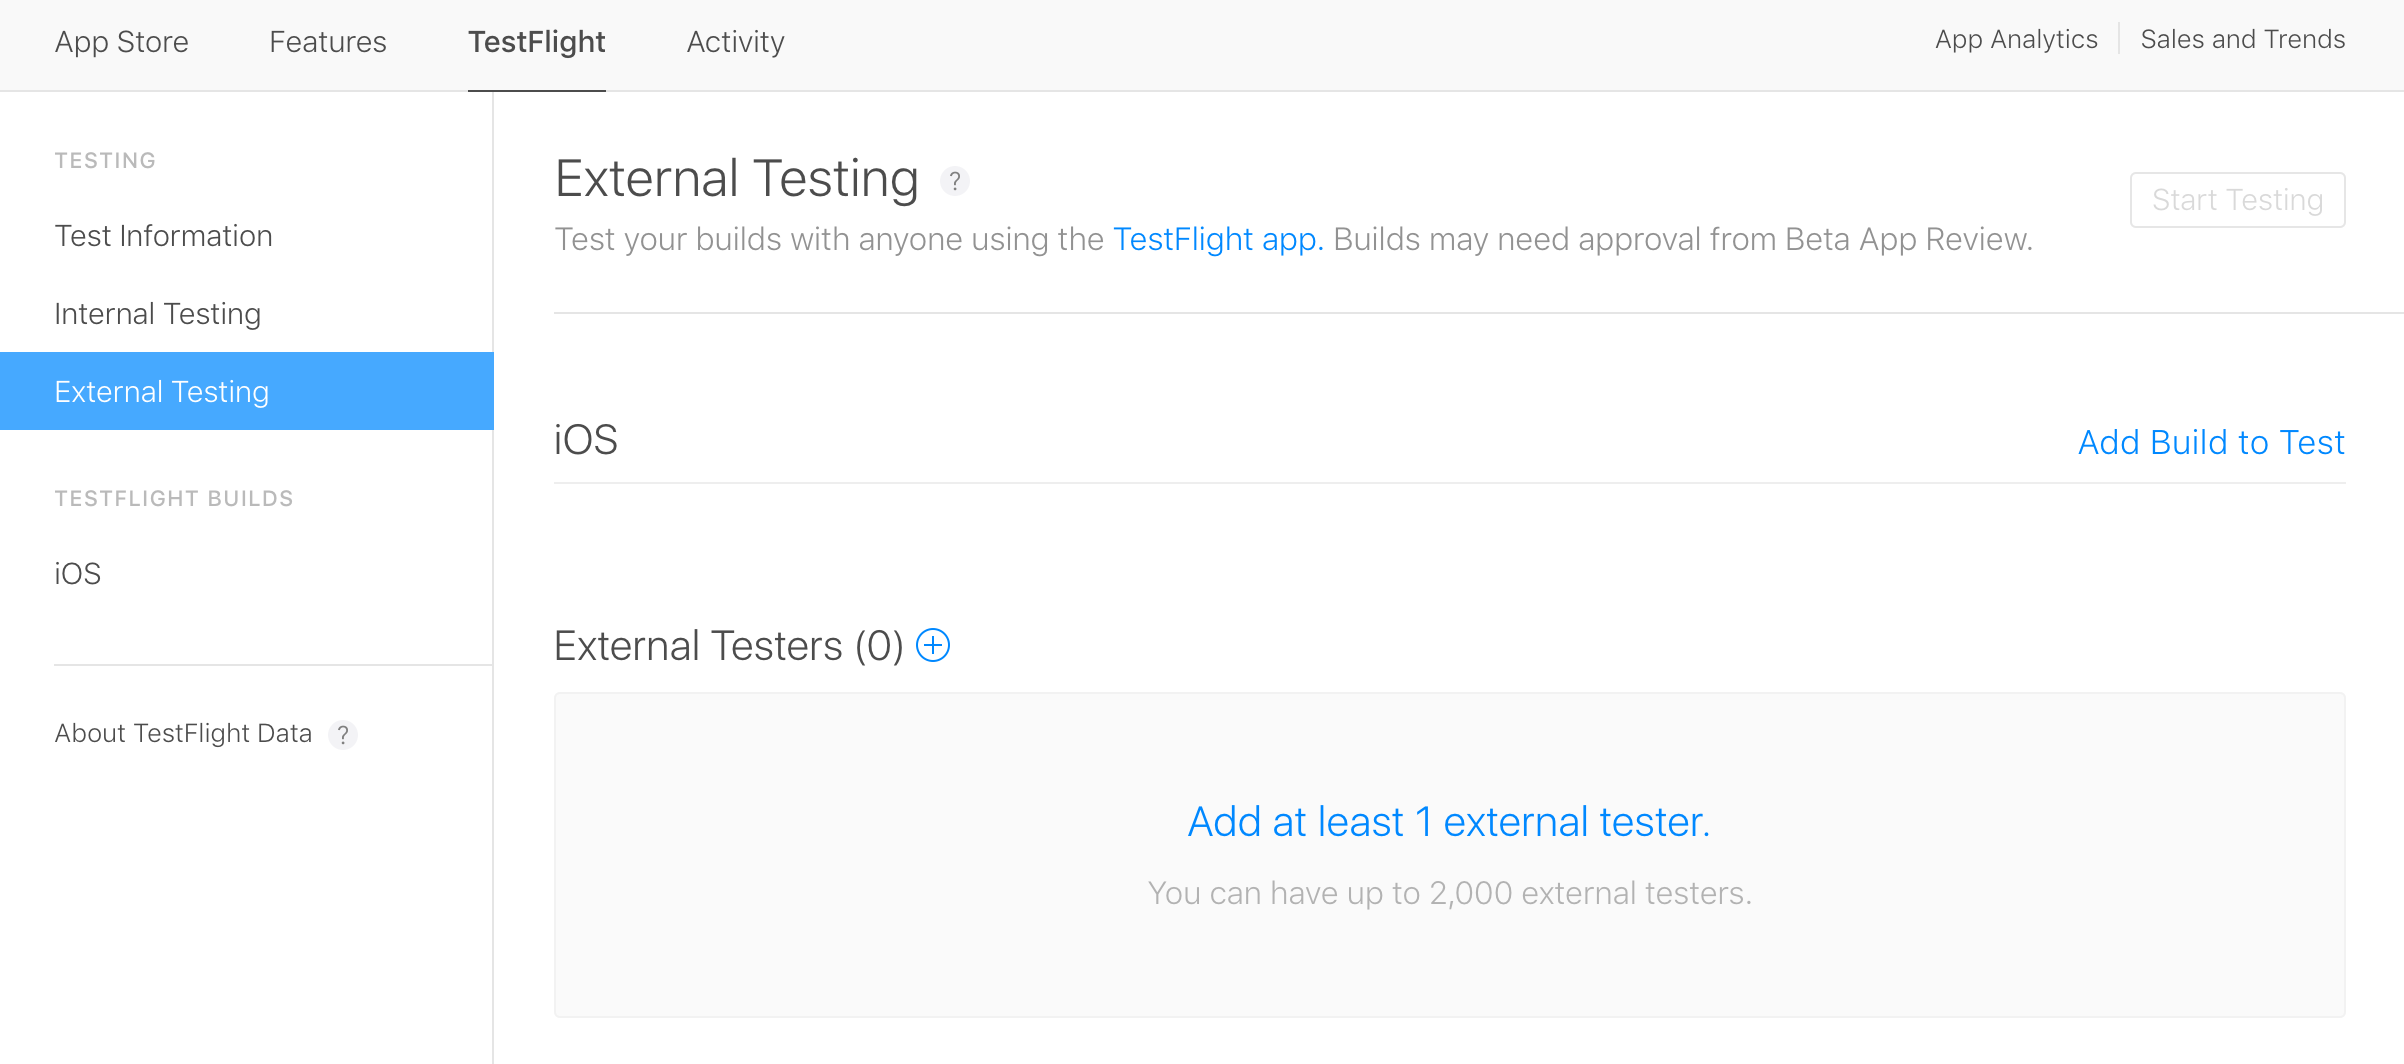
Step 3b: Running an External Test
As mentioned earlier, testing your build with an external user group of up to 2,000 testers requires your build to pass an approval process. To start this process, first navigate to the TestFlight tab for your respective application, which is located near the Activity tab you accessed previously. Once there, you need to access the section titled External Testing as pictured in Figure 4. Once you're on this screen, the following steps illustrate how you can add a build for Apple to review:
- Select “Add Build to Test” from the right side of the External Testing window.
- Select the version number from the drop down for the build you want to test. Click Add.
- If you haven't entered metadata for the build, you'll get a prompt to do so.
- You'll get a series of compliance questions. Answer these appropriately.
- Click Submit to send the build into a “Waiting for Review” status.
Once the build submission is complete, you need to wait for Apple to review it before a test can start. That approval process may take a few days. If Apple rejects your build or the metadata associated with it, the build gets removed from the External Testing panel and the status changes to rejected. You can click the status to view more details explaining why it didn't make the cut. If the build is approved, users with the Admin role get notified via email.
Once the build submission is complete, you need to wait for Apple to review it before a test can start
Once you have an initial build approved for the application, submitting small changes and tweaks doesn't require the same level of review. On consecutive uploads, you'll get asked if you made any significant changes to the application, such as adding completely new features. If you answer no, the build seems to get auto-approved and is available immediately. If you answer yes, the build goes through the approval process again.
While you wait for the build to get approved, you can start adding tester information. The only required information to add a tester to an external test is their email address. You can optionally include their first and last name. The portal allows you to add in one at a time manually, but you can also upload a CSV if you need to import many users at once. The format required for the CSV import is as follows:
first name, last name, email address
Once you've added the information for your test group and your selected build has been approved, you have the option to Start Testing. Selecting this auto-generates emails out to all the testers you added. This email directs users to accept an invitation to test your app via the TestFlight application that they can download through the iTunes App Store. External test invitations remain active for 60 days. If you wish to continue testing past the 60-day period, you need to upload a new build. Whenever you upload a new build, testers receive a push notification on their device letting them know that they can update their application from within the TestFlight app.
Wrapping Up
If you finish running your beta test before the time window of the test expires, navigate to the internal or external panels in the TestFlight section of iTunes Connect and select the “Not Available for Testing” option for the respective build. This prevents any further users from downloading the build. If you change your mind, you can always re-enable that build or upload a new build to continue the test.
After you've tested the application to your liking, you can submit it to the AppStore for review. Once the application is approved and the status changes to “Ready for Sale,” testing on all earlier builds automatically halts. For more information about submitting the build for sale in the AppStore, refer to the sidebar.
Beta testing is an important part of launching a mobile application. After working on a project for an extended period of time, you often develop a biased perspective on what you're building. Having a fresh pair of eyes on your product inspires new ideas and uncovers new bugs that otherwise might not have been realized, ultimately leading to a stronger product and a better chance at lasting success.
