


Although AngularJS ships with built-in routing, you may sometimes find it limiting; the Angular UI Router framework can help ease the pain. The native AngularJS routing implementation is responsible for initializing controllers that match application routes. Although this functionality works well in basic scenarios, in advanced situations, you quickly find that Angular's native routing:
- Requires you to manually change URLs strings throughout your code base when a URL changes.
- Requires you to remember the route syntax verbatim to navigate to a page.
- Does not offer nested views.
- Does not offer named views.
- Does not allow you to pass around data during navigation.
As an alternative, the Angular UI Router framework is an abstraction layer for routing that features a more declarative approach to navigation. The UI Router framework also fills in some of the gaps of the native implementation by providing nested and named views, allows you to pass data between views, and much more.
The Angular UI Router framework is an abstraction layer for routing that features a declarative approach to navigation
In this article, you'll learn to build a simple application that uses the UI Router framework. Along the way, you'll become familiar with states, how to resolve dependencies, and you'll learn various methods for navigation.
Understanding States
Perhaps the best way to appreciate the problem that the UI Router framework hopes to solve is to consider the nature of the Web. In most applications when you create a link to a page, you define an explicit URL path. For instance, if you wanted to navigate to your site's Products page, you may have a URL like:
http://www.example.com/products
There are two problems with this situation. The first is that you must remember the exact literal path to the Products page each time you establish a link. Although the example given here may be easy to recall, many real-world URLs are not so easily memorized. You encounter the next problem when the inevitable happens and someone decides to change the path to something else. When a URL changes then you have to make sure all existing links are updated to point to the new location.
Instead of having to keep track of the URL paths verbatim, wouldn't you rather just tell the application to “go to the Products page”? By allowing the application to concern itself with navigation, you're relived of having to know the literal path and are shielded from broken links caused by the inevitability of change. Using states gives you this level of flexibility. A state encapsulates a URL location, the state name, specialized data for the view, identifies a way to locate or generate the view, and can even expose custom events.
Introducing Angular UI Router
Angular UI Router is a framework that wholly replaces the native routing available in AngularJS. The UI Router is very similar to the native AngularJS routing in that applications are composed of a shell that holds a placeholder for dynamic content. Figure 1 demonstrates how the application shell hosts an element that uses the ui-view directive. As state rules are evaluated in the framework, HTML content is rendered inside the placeholder.
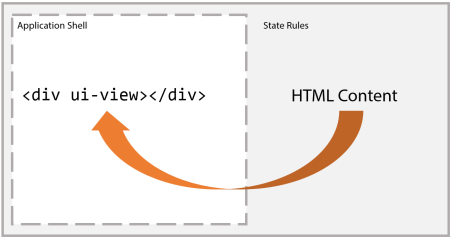
Angular UI Router is a framework that wholly replaces the native routing available in AngularJS.
Beyond rendering HTML content, the UI Router framework supports URL routing, the ability to resolve dependencies before controllers are initialized, named and nested views, utility filters, state change events, and declarative transitions among states.
Navigating Among States
There are a few different ways you can use to move between different states. The first way is the ui-sref directive. You're probably familiar with the href attribute of the HTML anchor tag (which represents a hypertext reference); similarly, the ui-sref directive refers to a state reference. You use the directive by declaring a state name with the ui-sref directive applied to an anchor. For example:
<a ui-sref="about">About Us</a>
As the UI Router framework evaluates this directive, the anchor is transformed to have the appropriate URL value. For example:
<a ui-sref="about" href="#about">About Us</a>
Notice that the element is updated to include an href attribute with a value corresponding to how the URL must be updated to navigate to the About Us page. The ui-sref directive is quite flexible. It supports simple scenarios as well as ways to deal with nested states and even parameterized values.
The next approach for navigating among states is to use a method off of the $state object that's available to an Angular controller. In this next snippet, you can see how the navigate method is implemented to call $state.go and transition the application to the about state.
angular.module('app').controller('PageController',
            ['$scope', '$state',
    function ($scope,   $state) {
        $scope.navigate = function () {
            $state.go('about');
        };
    }]);
The $state object is injected by the UI Router framework and includes a number of methods to help you manage and manipulate state in the application. The value here is that you tell the application to “go” to the about state and you're freed from knowing the literal URL path to the page.
Downloading and Installation
There are a number of different ways you can get access to the UI Router framework. You can download the latest version directly from the GitHub repository at https://github.com/angular-ui/ui-router. Alternatively, you can install the framework via Bower or NuGet or even include CDN links in your pages; both are available at http://cdnjs.com/libraries/angular-ui-router.
Using Angular UI Router
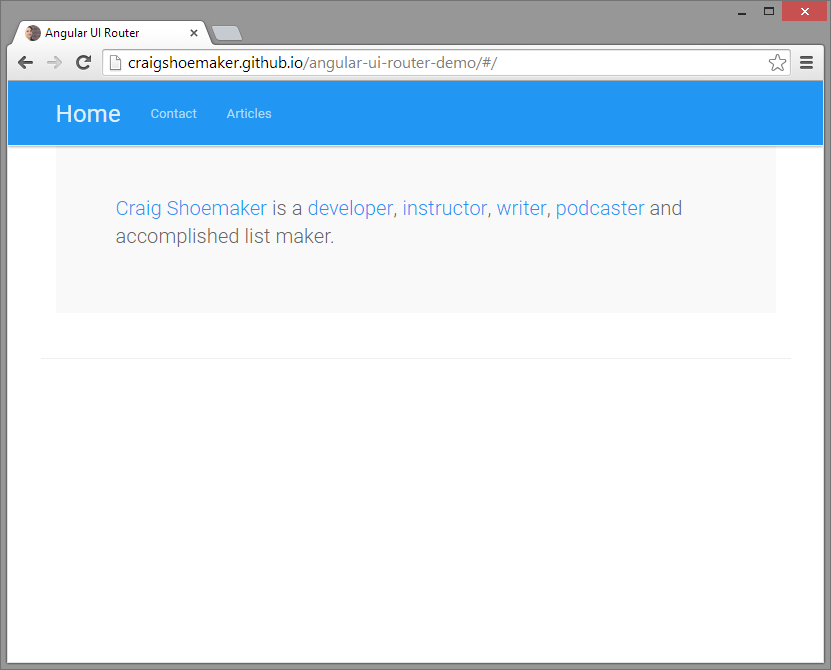
What follows is a tutorial demonstrating how to build a simple static content-based application using the UI Router framework. Figure 2 depicts the home page sample application you learn to build as you read through this article. From this screenshot, you can see the application shell and how the contents of the home page are injected into the placeholder using the ui-view directive.
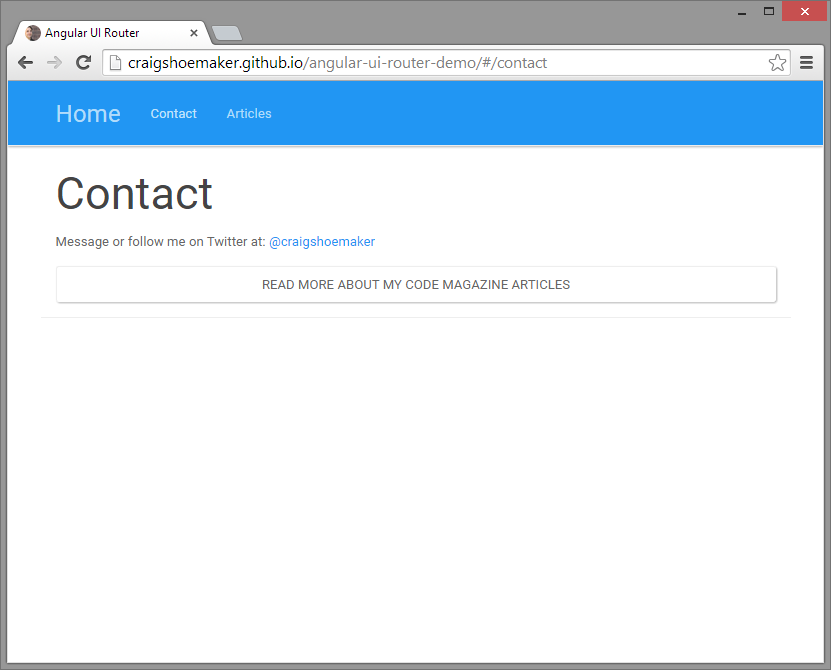
You can change states to navigate to the contact page, as shown in Figure 3. The mechanism on the contact page uses the $state object's go method by passing a state name to the method.
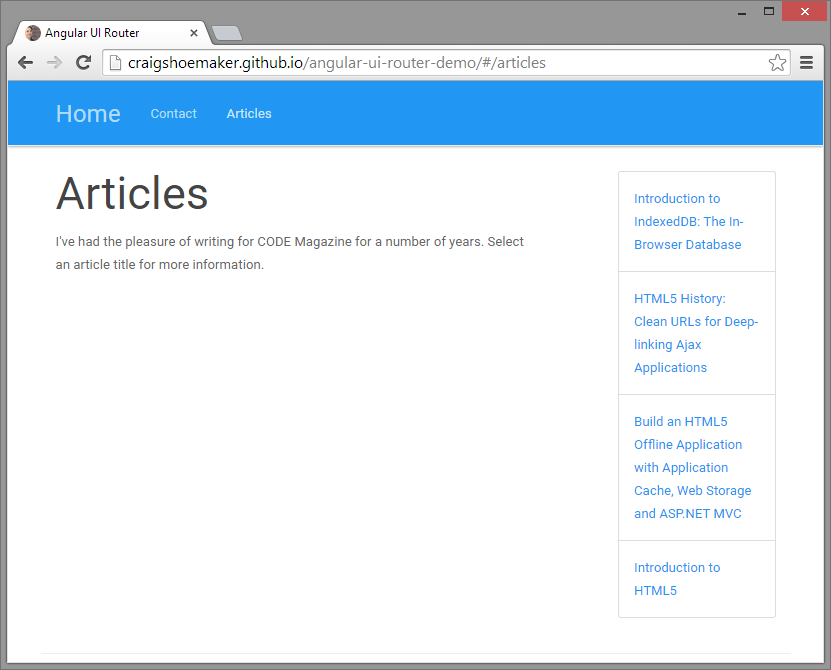
The next state is associated with the article's list page, as seen in Figure 4. Here, an array of article data is made available to the view after having the raw values injected into the controller by the UI Framework. Navigation on this page is facilitated through the ui-sref directive that allows you to declaratively express the application state to which you want to navigate.
The final page, illustrated in Figure 5, shows how a nested state is used in the application.
Configuration
In order to start working with the UI Router framework, you have to configure the page. The first step is to add the application name into the ng-app attribute of the HTML element on the page. Here, the app name is simply app.
<html ng-app="app">
Next, you need to add the ui-view directive to an element on the page to act as the placeholder for content injected by the framework. In this instance, the directive is added to a div element.
<div ui-view></div>
Finally, you must reference both Angular and Angular UI Router on the page.
<script src="scripts/lib/angular.min.js"></script>
<script src="scripts/lib/angular-ui-router.min.js"></script>
<script src="scripts/app/app.js"></script>
This code snippet also includes reference to the app.js script in the script/app folder that holds the code to initialize the Angular application. The initialization process is where most of the setup and interface with the UI Router framework is implemented.
Defining States
As stated previously, the basis for the UI Router framework is the use of different states in an application. By accessing each of these states, the application can navigate to or reconstitute itself to circumstances within the lifecycle of the application. The following section demonstrates how to define the states for the application; all of the code is implemented in the app.js file. Each section is examined in isolation, but if you'd like to see the full initialization script, please refer to Listing 1.
Listing 1: Application Initialization
(function (window) {

    'use strict';

    angular.module('app', ['ui.router'])

    .config(
        ['$stateProvider','$urlRouterProvider',

            function ($stateProvider, $urlRouterProvider) {

            $stateProvider

                .state('home', {
                    url: '/',
                    templateUrl: '/partials/home.html'
                })

                .state('contact', {
                    url: '/contact',
                    templateUrl: '/partials/contact.html',
                    controller: 'ContactController',
                })

                .state('articles', {
                    url: '/articles',
                    templateUrl: '/partials/articles.html',
                    resolve: {articles: 'ArticlesService'},
                    controller: 'ArticlesController'
                })

                .state('articles.article', {
                    url: '/:pageName',
                    templateUrl: function ($stateParams) {
                        return '/partials/articles/' +
                        $stateParams.pageName + '.html';
                    }
                });

        $urlRouterProvider.otherwise('/');
        }]);

}(window));
The first step is to configure UI Router in your AngularJS application. After naming the module, you have an opportunity to register the UI Router framework as a dependency of the application by adding the literal ui.router into the dependencies array. (Note how the comment denotes a placeholder for code in a subsequent snippet.)
angular.module('app', ['ui.router'])
       .config(/* add configuration here */);
Once the module is defined and dependencies are registered, the application is set up to run an anonymous function that executes during the configuration phase of the application. Here, there are a few resources injected into the function that are relevant to the UI Router framework.
['$stateProvider', '$urlRouterProvider', function ($stateProvider,
    $urlRouterProvider) {
   /* configure states here */
}]
The $stateProvider object features the state method that allows you to define granular application states that may or may not coincide with changes to the URL. The $urlRouterProvider is an object that gives you control over how the browser's location is managed and observed. In the context of the UI Router, $urlRouterProvider is used to help define a catch-all navigation scenario. Each of these objects are discussed in more detail in coming code snippets. (Again, note that subsequent code snippets are placed at the position of the placeholder comment in the previous snippet.)
Each application state is defined by providing a name and telling the framework where to find the markup for the view. Here, the home state is defined by providing the root location for the url and a value for the templateUrl property.
$stateProvider.state('home', {
    url: '/', templateUrl: '/partials/home.html'
})
This tells the application to load the contents of the home.html file into the ui-view placeholder when the user navigates to the root of the application. Here, you begin to see one of the advantages of having state-centric routing. If, for some reason, you wanted the URL for the home state to point to /home instead of the bare root location /, that change would only need to happen here in the configuration. This state forgoes any advanced setup and loads a static page into the browser. There may be other times when you want to associate a specific controller with the state.
The contact state is set up to load the markup of the contact.html page into the ui-view placeholder. Beyond doing a basic replace operation, the ContactsController is also associated to the view scoped at the level of the DOM element that hosts the ui-view directive.
.state('contact', {
    url: '/contact',
    templateUrl: '/partials/contact.html',
    controller: 'ContactController',
})
As shown in Figure 3, the Contact page includes a button to navigate to the Articles page. The navigation is done in the ContactsController and demonstrates how to wire-up a controller to a view loaded in on demand by the UI Router framework.
The Article page's state takes the configuration a step further by adding values into the object that resolves any configured values defined in the object. The purpose of this state is to render a list of the available articles on the site. This state is set up to have the article information available to the controller before it's instantiated. In the following snippet, the state defines a value in the resolve object.
.state('articles', {
    url: '/articles',
    templateUrl: '/partials/articles.html',
    resolve: {
        articles: 'ArticlesService'
    },
    controller: 'ArticlesController'
})
In this case, the articles property points to the string ArticlesService. When you pass a string as a value to the resolve property, the framework contacts a service registered under the same name and resolves the service down to its final value. In this case, the ArticlesService returns a promise so the associated controller isn't instantiated until the service's promise is resolved and the final object is available as an injectable value for the controller. The implementation for the ArticlesService is available in Listing 3.
Listing 3: Articles Service
(function (window) {

    'use strict';

    angular.module('app').factory('ArticlesService',

                ['$q',
        function ($q) {

            var deferred = $q.defer();

            deferred.resolve([
                {
                    title: 'Introduction to IndexedDB: The ' +
                        'In-Browser Database',
                    pageName: 'indexeddb'
                },
                {
                    title: 'HTML5 History: Clean URLs for ' +
                        'Deep-linking Ajax Applications',
                    pageName: 'html5-history'
                },
                {
                    title: 'Build an HTML5 Offline Application ' +
                        'with Application Cache, Web Storage ' +
                        'and ASP.NET MVC',
                    pageName: 'offline-apps'
                },
                {
                title: 'Introduction to HTML5',
                pageName: 'html5'
                }
            ]);

            return deferred.promise;
        }]);

}(window));
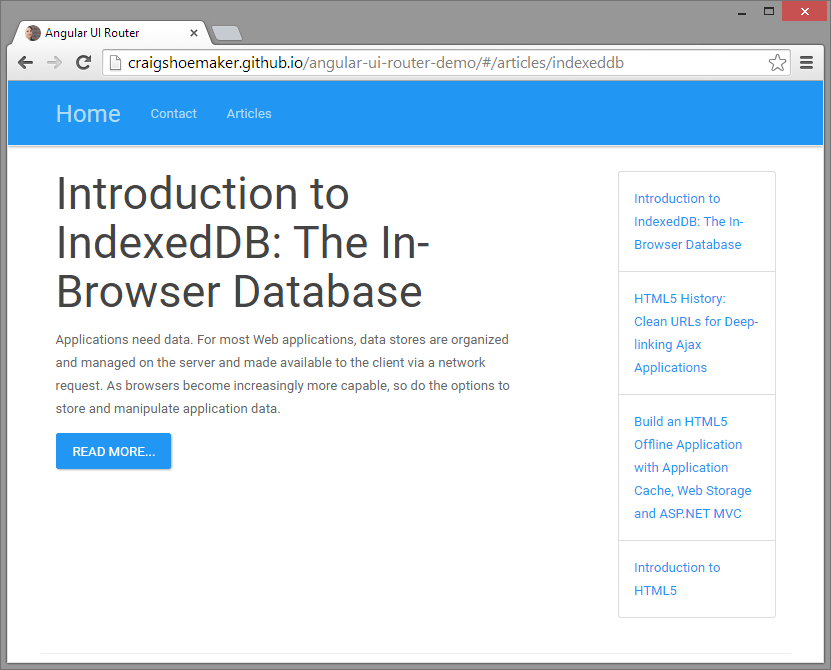
After the list of articles is rendered to the user as depicted in Figure 4, the user may select an article and drill into the site's content. This action is represented by a nested state. Notice how the state name includes a dot . between articles and article to denote a parent and child relationship among the states.
.state('articles.article', {
    url: '/:pageName',
    templateUrl: function ($stateParams) {
        return '/partials/articles/' + $stateParams.pageName + '.html';
    }
});
Here, there's a special rule applied to how the url property is evaluated. Since this is a nested view (as indicated by the dot in the state name) the value of the url property will be concatenated with the parent state's url value. This means that any matching states will have a URL that begins with /articles and then includes the page name of the article.
The presence of the colon : is indicative of a URL parameter. By introducing a parameter into the URL, the state definition becomes flexible enough to handle any state that matches the relationship it has with its parent state. This state also features a function that is run to return the value for templateUrl. Using a function here gives you an opportunity to use the parameters defined in the url of the state. Whatever name you give the parameter in the url property matches the property name of the $stateParams object. Therefore, this state takes the pageName passed in the URL to use in the templateUrl function to access individual content files that are eventually injected into the element hosting the ui-view directive.
This is the last state defined in the application. To see how all the states are implemented in the actual initialization script, refer to Listing 1.
The final command required to give the application is what to do if the user tries to access a URL that isn't defined in the configure method. By using the otherwise method from the $urlRouterProvider object, any unrecognized URLs are discarded and the application is redirected to a default location. In this instance, the application is configured to redirect to the root URL if the given URL does not match a defined state.
$urlRouterProvider.otherwise('/');
Now, with each application state defined, you can begin to turn your attention to building the ArticlesService.
Resolving Data with the Articles Service
The configuration for the article's state includes a value for the resolve option. This object is configured to have a string value of ArticlesService set to the articles property (see Listing 1 for context). Providing a string to the resolve object tells the framework to locate a service registered in the application and to resolve the service down to its final value. The ArticlesService is implemented to return a promise.
angular.module('app').factory('ArticlesService', ['$q',
    function ($q) {
        var deferred = $q.defer();
        deferred.resolve([
            /* data values */
        ]);
        return deferred.promise;
}]);
Here, the service is using the $q service to create a promise to return an array. In this instance, the values are hard-coded, but in a real-world context, you may need to access a remote server to provide the data. In any case, the service must be fully resolved before the router framework will pass execution to the associated controller. Therefore, as the article's state is invoked, ultimately the controller is passed an array of article objects as a dependency.
Using Resolved Data in the ArticlesController
One of the advantages of using the UI Router framework is the ability to enforce separation of concerns. As the articles state implements a resolve object, the raw array of articles is injected into the controller.
angular.module('app').controller('ArticlesController', ['$scope', 'articles',
    function ($scope,   articles) {
        $scope.articles = articles;
    }]);
This approach is superior to requiring the ArticlesController to “know” about the ArticlesService because it's much easier to mock a raw array of objects for testing purposes rather dealing with mocking the service itself. The full implementation for the application's controllers is found in Listing 2.
Listing 2: Controllers
(function (window) {

    'use strict';

    var app = angular.module('app');

            app.controller('ContactController',

                ['$scope', '$state',
        function ($scope,   $state) {

            $scope.navigate = function () {$state.go('articles');};

        }]);

            app.controller('ArticlesController',

                ['$scope', 'articles',
                    function ($scope,   articles) {

                    $scope.articles = articles;

                }]);

}(window));
Rendering the Articles List
Now that the application has navigated to the article's state and the controller has the resolved articles array set into scope, the view is now ready to be rendered. The Articles view is made up of two parts. The first is another div placeholder that uses the ui-view directive in order to create a nested view. The second is an unordered list of the different articles available on the site. Constructing the view like this allows you to click on different article titles while the list of article remains on the page. (You can see an example of this in Figure 5.) This is possible because the contents of the page are loaded in to the article-level ui-view while the page as a whole is rendered in the ui-view in the application shell. The full implementation of the application shell is available in Listing 4.
Listing 4: HTML Shell
<!DOCTYPE html>
<html data-ng-app="app">
<head>
    <meta charset="utf-8" />
    <meta
          name="viewport"
          content="width=device-width, initial-scale=1.0">
    <title>Angular UI Router</title>
    <link
          rel="stylesheet"
          href="css/bootstrap.min.css" type="text/css" />
    <link
          rel="stylesheet"
          href="css/global.css" type="text/css" />
    <link rel="icon" type="image/png" href="favicon.png" />
</head>
<body>
    <div class="navbar navbar-inverse navbar-fixed-top">
        <div class="container">
            <div class="navbar-header">
                <a ui-sref="home" class="navbar-brand">Home</a>
            </div>
            <ul class="nav navbar-nav">
                <li><a ui-sref="contact">Contact</a></li>
                <li><a ui-sref="articles">Articles</a></li>
            </ul>
        </div>
    </div>
    <div class="container page-content">
    <div ui-view></div>
    </div>
    <script src="scripts/lib/angular.min.js"></script>
    <script src="scripts/lib/angular-ui-router.min.js"></script>
    <script src="scripts/app/app.js"></script>
    <script src="scripts/app/services.js"></script>
    <script src="scripts/app/controllers.js"></script>
</body>
</html>
The following code snippet demonstrates how the articles view implements a nested view.
<div ui-view>
    <!-- default content goes here -->
</div>
...
<ul class="list-group">
    <li class="list-group-item">
        <a ui-sref="articles.article({pageName:
            '{{article.pageName}}'})">
            {{article.title}}</a>
    </li>
</ul>
There are three ways this markup uses the UI Router framework. First, the div element uses the ui-view directive as a placeholder, and, as the comment states, you can pass in default content to render in the placeholder before any content is rendered by the framework. Listing 5 demonstrates how a static message is used as placeholder content on the page before any content is loaded into the view.
Listing 5: Articles Partial
<div class="row">
    <div class="col-sm-8">
        <div ui-view>
            <h1>Articles</h1>
            <p>
            I've had the pleasure of writing for CODE
            Magazine for a number of years. Select an
            article title for more information.
           </p>
        </div>
    </div>
    <div class="col-sm-3 col-sm-offset-1 push-down-top">
        <ul class="list-group">
            <li class="list-group-item" ng-repeat="article in articles">
                <a ui-sref="articles.article({pageName:
                '{{article.pageName}}' })">{{article.title}}</a>
            </li>
        </ul>
    </div>
</div>
Second, the anchor element has the ui-sref directive applied. This signals to the UI Router framework to process this link in the context of the framework and ultimately renders a standard href value that matches the URL for the declared state based on the settings defined in the application configuration (see Listing 1).
The third way the framework is used is that the value of the ui-sref directive accepts an expression to generate the correct URL value for a nested state. Here, a hash is passed into the nested state hierarchy (in this case articles.article) where the value for pageName is bound to the incoming article's pageName. When the UI Router framework evaluates this expression, a corresponding URL value is generated for each article that matches the defined state rules.
More Abstract Navigation
The last controller to implement is the ContactController, which uses the state parameter's go method to navigate the application to a new state.
app.controller('ContactController', ['$scope', '$state',
    function ($scope,   $state) {
    $scope.navigate = function () {
        $state.go('articles');
    };
}]);
Here, by simply calling go with a state name, your controller is only concerned with declaring the state you wish to change to rather than trying to keep track of the concrete routing scheme in the application.
Conclusion
Although AngularJS comes stocked with a functional routing implementation, you can quickly realize the advantages of using a state-based routing framework for non-trivial applications. The UI Router framework provides easy ways for you to define states, resolve dependencies, and make use of nested views. For even more information on what the framework can do, make sure to visit the project's home on GitHub at https://github.com/angular-ui/ui-router.

