


One of the buzzwords you hear often is Bluetooth LE, short for Bluetooth Low Energy. Bluetooth LE is a wireless personal area network technology like its previous incarnation, Classic Bluetooth. Most people are familiar with Classic Bluetooth: You pair your Bluetooth headset with your mobile phone and use it to answer your calls, etc.
However, using Bluetooth Low Energy, you don't necessarily have to pair with a device in order to perform useful work. A number of health-related medical devices, such as the Heart Rate Monitor and Blood Pressure Monitor, allow your mobile device to connect to them and receive vital information about your health. One very cool use of Bluetooth LE is Apple's iBeacon. Using an iBeacon, a device can detect the presence of an iBeacon and use that information to provide locale-specific functions, such as merchandise promotion, payment information, etc.
In this article, you will learn the basics of Bluetooth LE and explore the world of iBeacons. You will see how you can write iOS and Android apps that use iBeacons to provide location-based services.
Classic Bluetooth versus Bluetooth Low Energy
The Classic Bluetooth that most people are familiar with is commonly referred to as Bluetooth v3.0 (or sometimes v2.1+EDR). A frequent use-case for Classic Bluetooth is for streaming, as it achieves substantial throughput. It can also connect as many as seven devices. One distinctive feature of Classic Bluetooth is the need to perform pairing of devices before data can be exchanged between them. Bluetooth LE, on the other hand, has lower data transfer rates, and it has ultra-low power consumption. Bluetooth LE also supports quick connection time and supports a large number of slaves. Most significant of all, Bluetooth LE has advertising functionality, which allows a device to let another scanning device detect its presence and optionally connect to it to retrieve additional data.
Devices that support either Classic Bluetooth or Bluetooth LE are known as single-mode devices. Devices that support both Bluetooth technologies are dual-mode devices. When shopping for devices that support Bluetooth, be aware of two marketing terms: Bluetooth Smart and Bluetooth Smart Ready. When a device is advertised as a Bluetooth Smart device, it only supports Bluetooth LE, whereas if a device is advertised as Bluetooth Smart Ready, it is supports both Classic Bluetooth and Bluetooth LE.
Support of Bluetooth LE in iOS and Android
Apple was an early adopter of Bluetooth LE, starting with its iPhone 4S. Here's a list of iOS devices that support Bluetooth LE:
- iPhone 4s and later
- iPad 3 and later
- iPad mini and later
- iPod touch 5 and later
Apple may have supported Bluetooth in its early stages, but Google is a little late to the party. Google placed a lot of focus on NFC (Near Field Communication) for its Android devices and it wasn't until Android 4.3 that Google officially added API support for Bluetooth LE. Some pre-Android 4.3 devices from Samsung shipped with the Bluetooth LE Stack installed, but in order to use it in your app, you had to use Samsung's SDK. Even if your device is upgraded to Android 4.3 or later, there's no guarantee that the device is now capable of Bluetooth LE functionality. One example is the Nexus 7 (2012 edition). The Nexus 7 uses the Broadcom chipset, which is capable of Bluetooth LE, but Google didn't certify it for Bluetooth LE use; it was only certified up to Bluetooth v3.0. Although the Nexus 7 can be updated to the latest Android 4.3, Google still didn't certify it for Bluetooth LE use. If you were using the Nexus 7, you were out of luck.
The 2013 edition of Nexus 7 supports Bluetooth LE. If you're stuck with the 2012 edition of the Nexus 7, there's still hope. You can buy the Bluetooth Low Energy Enable application from the Google Play store. The bad news? In order for it to work, you need to root your Nexus 7.
Here's list of some of the common Android devices supporting Bluetooth LE:
- Samsung Galaxy S3, S4, S4 Mini, S5, Note 2, and Note 3
- Nexus 7 (2013 edition)
- Nexus 4 and Nexus 5
- Optimus G, 4X, G2, and up
- HTC One and Butterfly
- Droid DNA
Apple's iBeacon
In iOS 7, Apple introduced a new technology called iBeacon, which is an indoor-positioning system trademarked by Apple. Using low-powered transmitters, iBeacons emit advertising data using Bluetooth LE. Devices can detect these iBeacons by scanning for specific advertising data. In theory, iBeacons can advertise up to a 50m radius, but in reality, it's much smaller due to the surrounding environment, such as walls, glass, and concrete.
To better appreciate the importance and usefulness of iBeacons, imagine the following scenario. You're in a large shopping mall where there are many retailers selling different types of merchandise. Traditional location-based services applications can tell your location, but they're not really useful when you are indoors; you don't really know exactly where you are in the shopping mall. You may be near a Nike store but you may not be aware of an ongoing promotion. Now, suppose that Nike has placed a beacon in its store and you're running the mobile application provided by the mall. The mobile app automatically scans for Nike's beacon. As soon as the beacon is detected, the app knows that you're somewhere near the Nike store (in iBeacon-speak, we say that we have now entered the region). The app can now connect to its own Web services to download promotion details based on the location of the store. Imagine that all the retailers in the mall have their own beacons, and it's not difficult to imagine how useful the app would be. As you move from one retailer to another, the app is able to offer context-specific promotional information based on your location.
It's important to note that a beacon by itself does not transmit any content to the scanning devices. It only transmits signals that tell scanning devices how close they are to the beacon.
Another use of iBeacon is payment. When you're ready to pay for your purchases in the Nike store, the application already knows that you are in the Nike store and you could pay directly using your phone.
Identifying iBeacons
To identify each iBeacon, an iBeacon is identified using three numbers: Proximity UUID (16-bytes), Major (2 bytes), and Minor (2 bytes) (see Figure 1).

The assignment of these three numbers is totally up to the implementers. To understand how these numbers are assigned, here's an example. Suppose Macy's is deploying iBeacons for its stores. Macy's has a number of branches in the US and they would have to order the same number of iBeacons. For all the iBeacons used by Macy's, all have the same Proximity UUID. For a particular branch, all of the iBeacons have the same Major. And in each department within that particular branch, all the iBeacons have a unique Minor. Figure 2 shows an illustration of this.
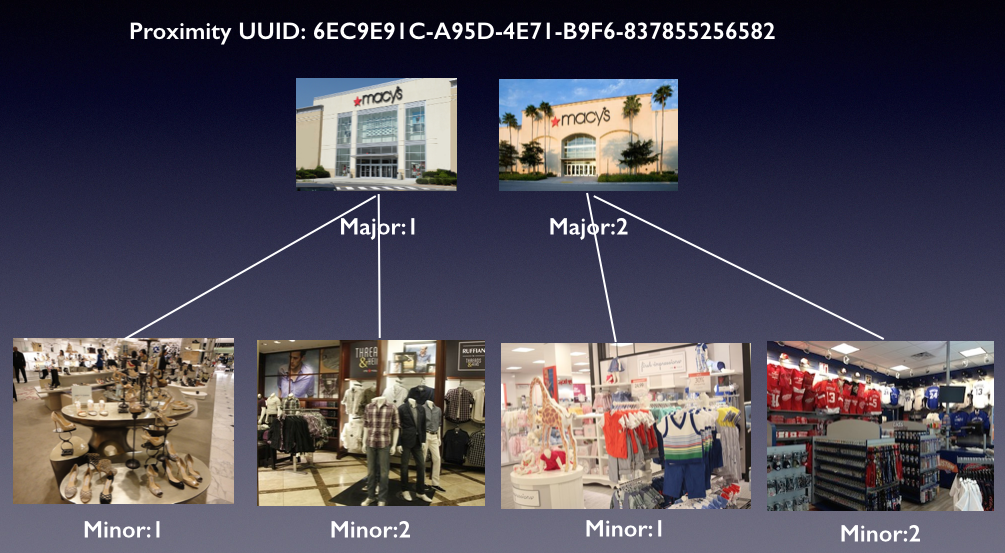
When apps detect these iBeacons, they make use of these three numbers to deduce the location of the user. The application sends the numbers to a Web service and fetches a list of promotional information related to each department of the store.
Buying iBeacons
Apple doesn't sell beacons. Instead, you buy beacons from a number of third-party manufacturers.
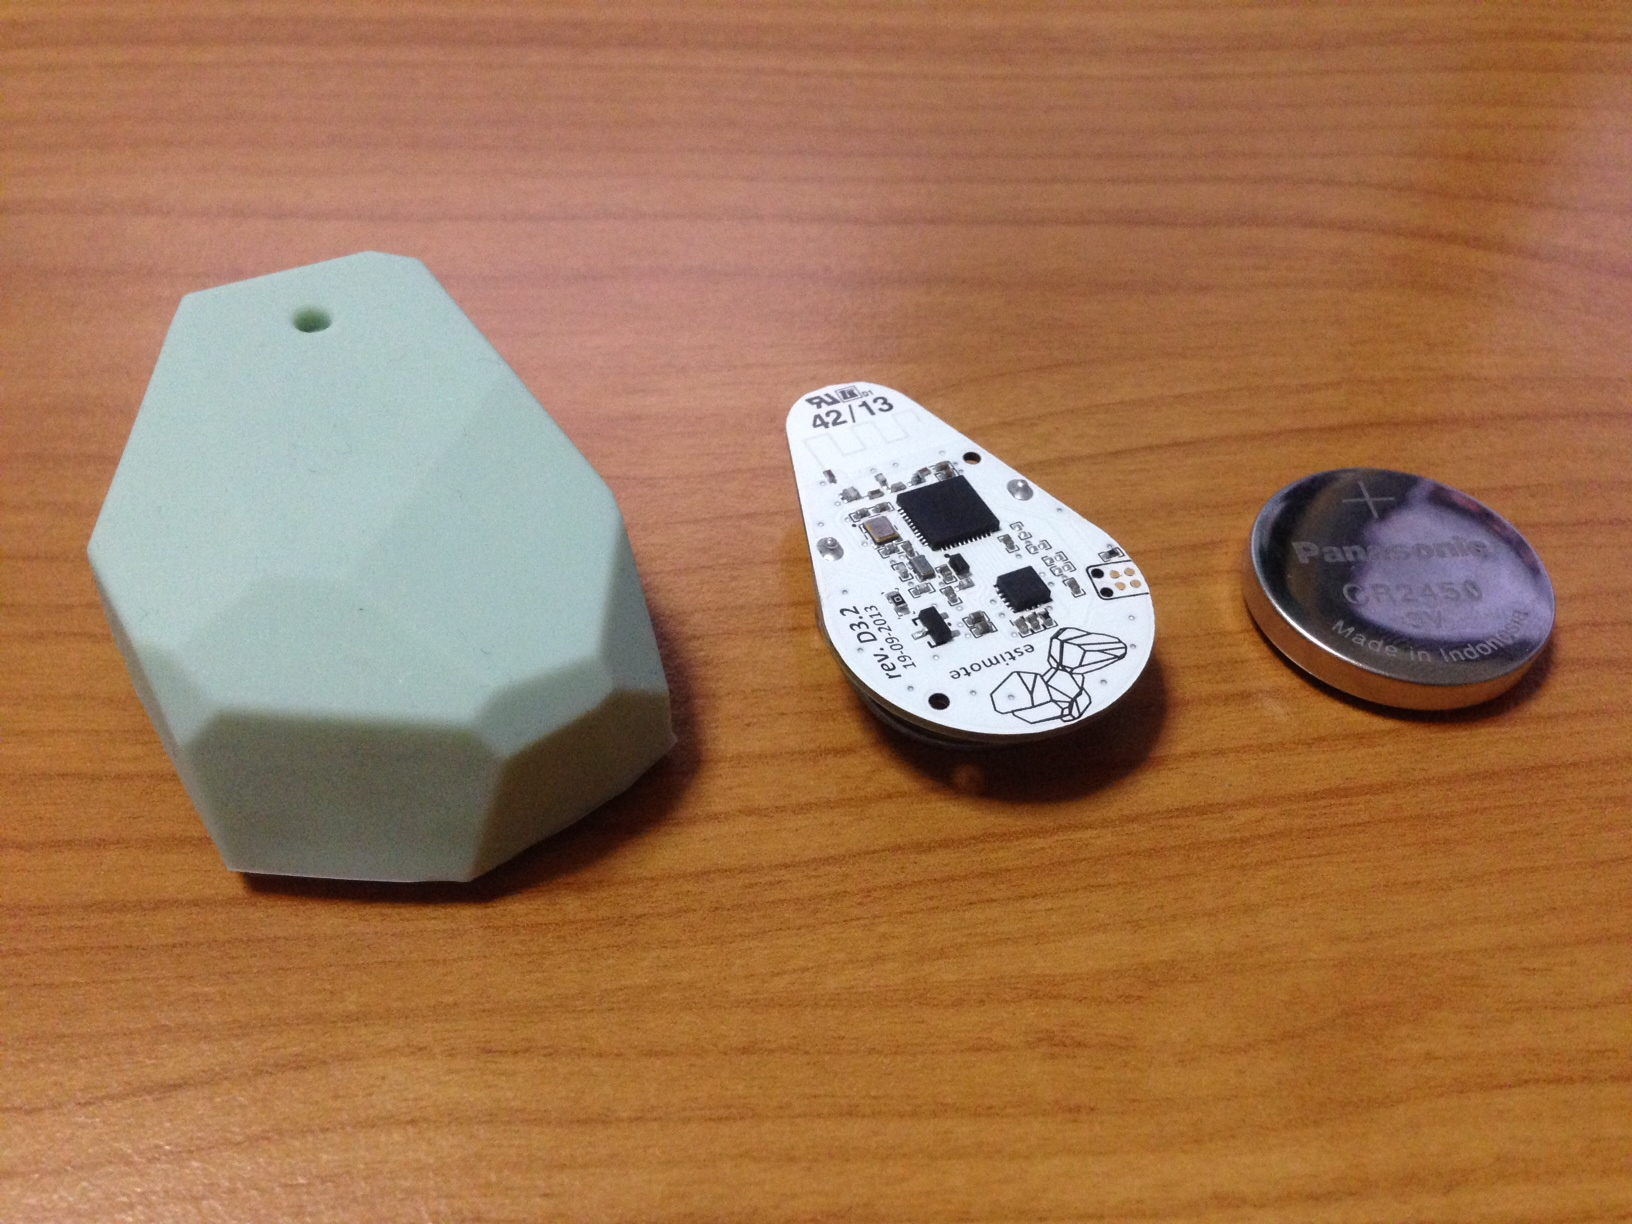
Beacons are tiny computers running their own proprietary operating systems. Estimote (https://www.estimote.com) is one of the best-known manufacturers of beacons. As one of the earliest adopters of iBeacon, Estimote has its own SDKs that allow developers to easily integrate iBeacon functionality into their applications. Figure 3 shows the Estimote iBeacon, as well as one without its protective rubber covering and with the battery removed. A single coin battery lasts for two years.
For a list of places to buy beacons, check out this link: https://beekyblogblog.wordpress.com/guide-to-ibeacons/.
If you're the tinkering type, you can also build your own iBeacons. The easiest would be to use a Raspberry Pi (https://www.raspberrypi.org/) and a Bluetooth Dongle (such as the IO Gear Bluetooth 4.0 USB Micro Adapter at https://www.iogear.com/product/GBU521/). You can then follow this tutorial (https://www.wadewegner.com/2014/05/create-an-ibeacon-transmitter-with-the-raspberry-pi/) to build your own iBeacons.
Scanning iBeacons in iOS
Enough with all the theory! Let's now create a simple app to demonstrate how iBeacon works. For a start, you'll use Xcode to create an iPhone application. For this example, I'm going to assume that you have an iBeacon. If you don't have one, don't worry. The next section will show you how to use an iOS device to act as an iBeacon.
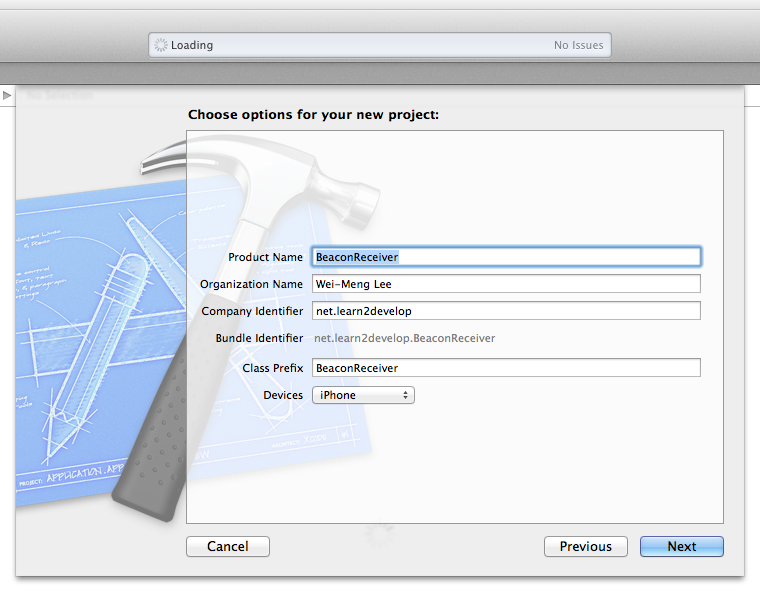
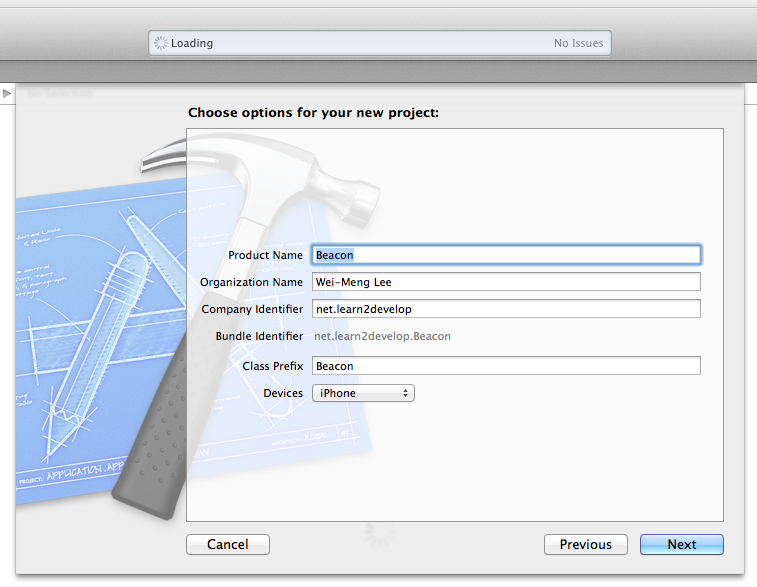
- Launch Xcode and create a new Single View Application project. Name the project BeaconReciever, as shown in Figure 4.
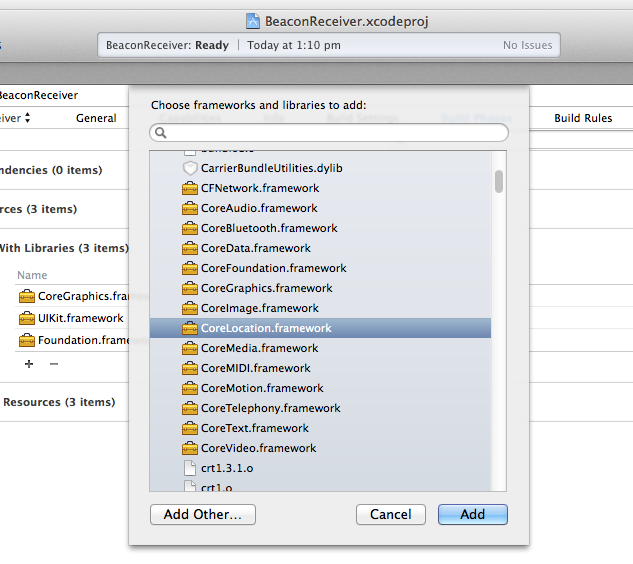
- Add the CoreLocation framework to the project (see Figure 5).
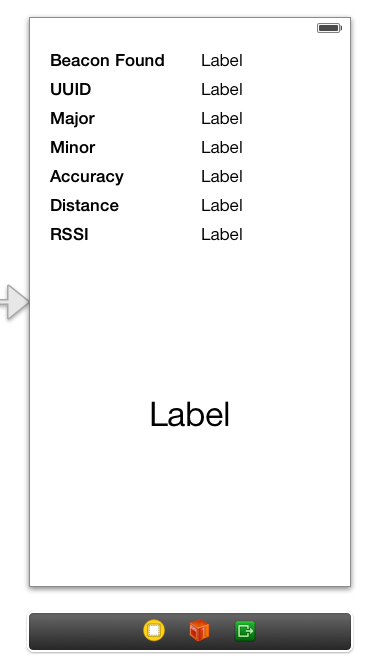
- Select the Main.storyboard file to edit it in the Storyboard Editor. Populate the View window with the Label views shown in Figure 6.
- In the BeaconReceiverViewController.h file, create the outlets for the various views and connect them to the views on the View window:
#import <UIKit/UIKit.h>
//---import the header for CoreLocation---
#import <CoreLocation/CoreLocation.h>

//---implement the protocol for the core location
// manager---
@interface BeaconReceiverViewController :
    UIViewController <CLLocationManagerDelegate>

//--- outlets for the views---
@property (weak, nonatomic) IBOutlet
    UILabel *lblBeaconFound;
@property (weak, nonatomic) IBOutlet
    UILabel *lblUUID;
@property (weak, nonatomic) IBOutlet
    UILabel *lblMajor;
@property (weak, nonatomic) IBOutlet
    UILabel *lblMinor;
@property (weak, nonatomic) IBOutlet
    UILabel *lblAccuracy;
@property (weak, nonatomic) IBOutlet
    UILabel *lblDistance;
@property (weak, nonatomic) IBOutlet
    UILabel *lblRSSI;
@property (weak, nonatomic) IBOutlet
    UILabel *lblStatus;
@end
Monitoring a Region
The next step is to monitor for regions covered by iBeacons.
- In the BeaconReceiverViewController.m file, add the statements, as shown in Listing 1.
- When scanning for iBeacons, you need to create a region using the Proximity UUID of the iBeacon that you are scanning for. In this example, you are scanning for Estimote's iBeacons. Estimote's iBeacons all come with the default Proximity UUID of B9407F30-F5F8-466E-AFF9-25556B57FE6D. Note that you can also specify a region using the Proximity UUID, Major, and Minor.
- To start monitoring a specified region, use the
startMonitoringForRegion:method of theCLLocationManagerobject; you must call this method once for each region that you want to monitor. - When the device enters a monitored region, the
locationManager:didEnterRegion:method is called. - When the device leaves a monitored region, the
locationManager:didExitRegion:method is called.
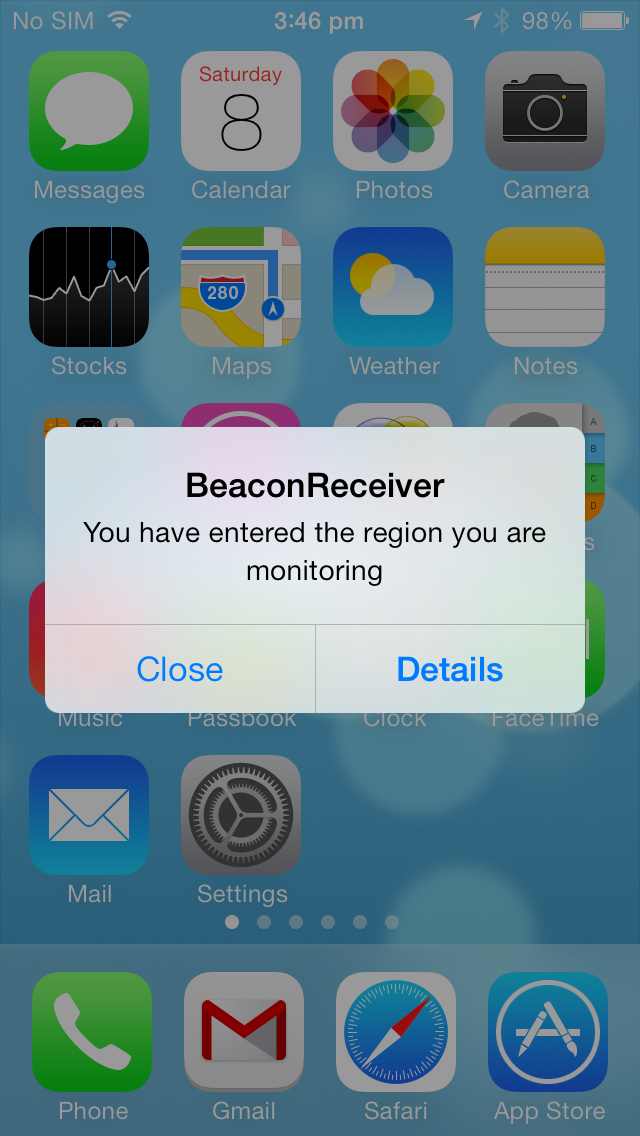
- Run and deploy the current application on an iOS device. Send the application to the background and walk away from the beacon that you have. When you are sufficiently far away (depending on the environment, 10-30 meters away) from the beacon, walk toward the beacon. When you have entered the region, you will see the notification, as shown in Figure 7.
Listing 1: Monitoring for a region in iOS
#import "BeaconReceiverViewController.h"

@interface BeaconReceiverViewController ()

//---declare the two properties---
@property (strong, nonatomic) CLBeaconRegion *beaconRegion;
@property (strong, nonatomic) CLLocationManager *locationManager;

@end

@implementation BeaconReceiverViewController

- (void)viewDidLoad
{
    [super viewDidLoad];

    //---init and set the delegate---
    self.locationManager = [[CLLocationManager alloc] init];
    self.locationManager.delegate = self;

    //---create a NSUUID object---
    NSUUID *proximityUUID = [[NSUUID alloc] initWithUUIDString:
        @"B9407F30-F5F8-466E-AFF9-25556B57FE6D"];
        //---Estimote beacon---

    //---create a region---
    self.beaconRegion = [[CLBeaconRegion alloc]
        initWithProximityUUID:proximityUUID
            identifier:@"net.learn2develop.myRegion"];

    //---start monitoring a region---
    [self.locationManager startMonitoringForRegion:self.beaconRegion];
}

//---called when the device enters a region---
- (void)locationManager:(CLLocationManager *)manager
        didEnterRegion:(CLRegion *)region {

    self.lblStatus.text = @"Entered region";

    UILocalNotification *localNotification = [[UILocalNotification alloc] init];
    //---the message to display for the alert---
    localNotification.alertBody = @"You have entered the region you are monitoring";

    //---uses the default sound---
    localNotification.soundName = UILocalNotificationDefaultSoundName;

    //---title for the button to display---
    localNotification.alertAction = @"Details";

    //---schedule the notification---
    [[UIApplication sharedApplication] presentLocalNotificationNow:localNotification];
}

//---called when the device exits a region---
-(void)locationManager:(CLLocationManager *)manager
        didExitRegion:(CLRegion *)region {

    self.lblStatus.text = @"Exited region";
    self.lblBeaconFound.text = @"No";
}

- (void)didReceiveMemoryWarning
{
    [super didReceiveMemoryWarning];
    // Dispose of any resources that can be recreated.
}

@end
Ranging iBeacons
Once you have entered a region, the next step is to range for iBeacons, looking out for all the iBeacons in the region. Doing so allows you to discover the Major and Minor of the individual iBeacons.
- In the
BeaconReceiverViewController.mfile, add the statements as shown in Listing 2.- After you have entered a monitored region, call the
startRangingBeaconsInRegion:method of theCLLocationManagerobject to start the delivery of notifications for beacons in the specified region. - After you have exited a monitored region, call the
stopRangingBeaconsInRegion:method of theCLLocationManagerobject to stop the delivery of notifications for beacons in the specified region. - When a beacon in the monitored region comes into range, the
locationManager:didRangeBeacons:inRegion:method is called; in this method you can find out more information of the detected beacon. For simplicity, you will only display details of the last iBeacon contained in the array.
- After you have entered a monitored region, call the
- Run and deploy the application on an iOS device. Like in the previous section, send the application to the background and walk away from the beacon that you have. Then walk back toward the beacon. When you enter the region, you'll see the notifications you saw previously. Tapping on the Details button brings the application to the foreground, as shown in Figure 8.
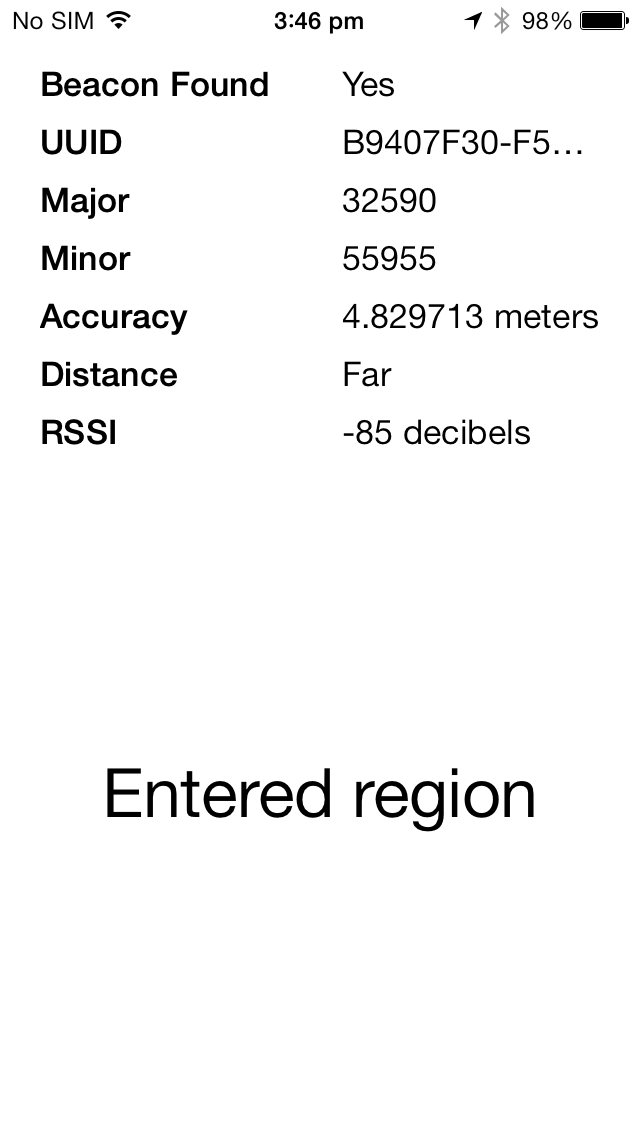
As you can see, the detected iBeacon has the Proximity UUID that you are scanning for. In addition, it has a unique major and minor. The accuracy value shows how far away you are (approximately) from the iBeacon. You shouldn't use this value as a precise distance between you and the beacon, as this value will fluctuate due to RF interference; instead use the proximity property to give you a relative sense of distance (immediate, near, far, or unknown). The RSSI value indicates the received signal strength of the iBeacon, measured in decibels.
Listing 2: Ranging for iBeacons in iOS
- (void)locationManager:(CLLocationManager *)manager
didEnterRegion:(CLRegion *)region {

    //---start ranging for iBeacons---
    [self.locationManager startRangingBeaconsInRegion:self.beaconRegion];

    self.lblStatus.text = @"Entered region";

    UILocalNotification *localNotification = [[UILocalNotification alloc] init];
    //---the message to display for the alert---
    localNotification.alertBody = @"You have entered the region you are monitoring";

    //---uses the default sound---
    localNotification.soundName = UILocalNotificationDefaultSoundName;

    //---title for the button to display---
    localNotification.alertAction = @"Details";

    //---schedule the notification---
    [[UIApplication sharedApplication] presentLocalNotificationNow:localNotification];
}

-(void)locationManager:(CLLocationManager *)manager
didExitRegion:(CLRegion *)region {

    //---stop ranging for iBeacons---
    [self.locationManager stopRangingBeaconsInRegion:self.beaconRegion];

    self.lblStatus.text = @"Exited region";
    self.lblBeaconFound.text = @"No";
}

//---when iBeacons are found---
-(void)locationManager:(CLLocationManager *)manager
        didRangeBeacons:(NSArray *)beacons
            inRegion:(CLBeaconRegion *)region {

    CLBeacon *beacon = [[CLBeacon alloc] init];
    beacon = [beacons lastObject];

    self.lblBeaconFound.text = @"Yes";
    self.lblUUID.text = beacon.proximityUUID.UUIDString;
    self.lblMajor.text = [NSString stringWithFormat:@"%@", beacon.major];

    self.lblMinor.text = [NSString stringWithFormat:@"%@", beacon.minor];

    self.lblAccuracy.text =
        [NSString stringWithFormat:@"%f meters", beacon.accuracy];

    switch (beacon.proximity) {
        case CLProximityUnknown:
            self.lblDistance.text = @"Unknown Proximity";
            break;
        case CLProximityImmediate:
            self.lblDistance.text = @"Immediate";
            break;
        case CLProximityNear:
            self.lblDistance.text = @"Near";
            break;
        case CLProximityFar:
            self.lblDistance.text = @"Far";
            break;
    }
    self.lblRSSI.text = [NSString stringWithFormat:@"%li decibels",
        (long)beacon.rssi];
}
Building Your Own iBeacons Using iOS
If you don't have access to an iBeacon, the next best thing you could do is to find another iOS device and use it to advertise as an iBeacon. In this section, I'm going to show you how to do that.
- Launch Xcode and create a new Single View Application project. Name the project, as shown in Figure 9.
- Add the CoreBluetooth and CoreLocation frameworks to the project (see Figure 10).

- Add the following statements to the
BeaconViewController.hfile:
#import <UIKit/UIKit.h>
//---import the headers for the two frameworks---
#import <CoreBluetooth/CoreBluetooth.h>
#import <CoreLocation/CoreLocation.h>

//---implement the protocol for the peripheral manager---
@interface BeaconViewController : UIViewController<CBPeripheralManagerDelegate>
@end
- Add the following statements in bold to the
BeaconViewController.mfile as shown in Listing 3.- A
CBPeripheralManagerobject is used to manage published services within the local peripheral's Generic Attribute Profile (GATT) database and to advertise these services to central devices. - When creating a
CBPeripheralManagerobject, the peripheral manager calls theperipheralManagerDidUpdateState: methodof itsdelegateobject. You need to implement thisdelegatemethod to ensure that Bluetooth Low Energy is supported and available to use on the local peripheral device. - To simulate an Estimote iBeacon, you can use the B9407F30-F5F8-466E-AFF9-25556B57FE6D Proximity UUID.
- A
CLBeaconRegionobject defines a type of region that is based on the device's proximity to a Bluetooth beacon, as opposed to a geographic location. A beacon region looks for devices whose identifying information matches the information you provide. When that device comes in range, the region triggers the delivery of an appropriate notification. - The
peripheralDataWithMeasuredPower:method of theCLBeaconRegionobject retrieves data that can be used to advertise the current device as a beacon; the returned dictionary encodes the beacon's identifying information along with other information needed to advertise the beacon; you shouldn't need to access the dictionary contents directly. - To start advertising the beacon, pass the dictionary to the
startAdvertising:method of aCBPeripheralManagerobject to begin advertising the beacon.
- A
- Run and deploy the current application on an iOS device. The device is now advertising as an iBeacon. You can use the application created in the previous section to verify this.
Listing 3: Advertising as an iBeacon
#import "BeaconViewController.h"

@interface BeaconViewController ()

//---declare three properties---
@property (strong, nonatomic) CLBeaconRegion *beaconRegion;
@property (strong, nonatomic) NSDictionary *beaconPeripheralData;
@property (strong, nonatomic) CBPeripheralManager
    *peripheralManager;

@end

@implementation BeaconViewController

- (void)viewDidLoad
{
    [super viewDidLoad];

    //---create a NSUUID object---
    NSUUID *proximityUUID = [[NSUUID alloc] initWithUUIDString:
        @"B9407F30-F5F8-466E-AFF9-25556B57FE6D"];

    //---create a region---
    self.beaconRegion = [[CLBeaconRegion alloc]
        initWithProximityUUID:proximityUUID
                        major:1
                        minor:1
                    identifier:@"net.learn2develop.myRegion"];

    self.beaconPeripheralData =
        [self.beaconRegion peripheralDataWithMeasuredPower:nil];

    self.peripheralManager =
        [[CBPeripheralManager alloc] initWithDelegate:self
                                                queue:nil
                                              options:nil];
}

-(void) peripheralManagerDidUpdateState:
    (CBPeripheralManager *)peripheral {

    NSLog(@"peripheralManagerDidUpdateState:");
    switch (peripheral.state) {
        case CBPeripheralManagerStatePoweredOff:
            NSLog(@"CBPeripheralManagerStatePoweredOff");
            break;
        case CBPeripheralManagerStateResetting:
            NSLog(@"CBPeripheralManagerStateResetting");
            break;
        case CBPeripheralManagerStatePoweredOn:
            NSLog(@"CBPeripheralManagerStatePoweredOn");

            //---start advertising the beacon data---
            [self.peripheralManager startAdvertising:self.beaconPeripheralData];
            break;
        case CBPeripheralManagerStateUnauthorized:
            NSLog(@"CBPeripheralManagerStateUnauthorized");
            break;
        case CBPeripheralManagerStateUnsupported:
            NSLog(@"CBPeripheralManagerStateUnsupported");
            break;
        default:
            NSLog(@"CBPeripheralStateUnknown");
            break;
    }
}

- (void)didReceiveMemoryWarning
{
    [super didReceiveMemoryWarning];
    // Dispose of any resources that can be recreated.
}

@end
You can generate your own UUID for your beacon using the UUIDGEN tool in Terminal.
Using the Estimote SDK for Android
In iOS, the APIs for scanning for iBeacons is already built into the CoreLocation framework. In Android, you need to make use of the SDKs provided by iBeacon manufacturers. In this section, you'll learn how to use the Estimote SDK to scan for iBeacons on your Android device.
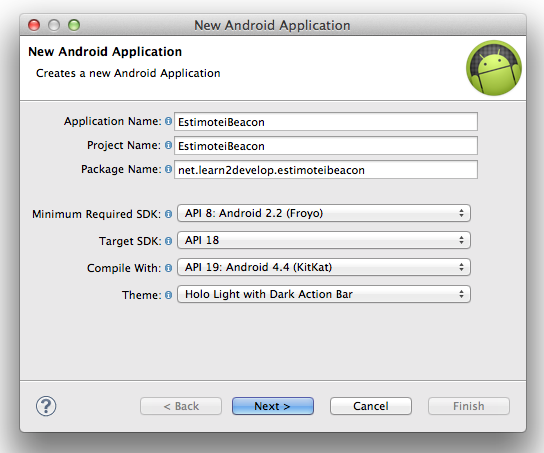
- Using Eclipse, create a new Android Application Project and name it EstimoteiBeacon, as shown in Figure 11.
- Download the Estimote SDK for Android from https://github.com/Estimote/Android-SDK.
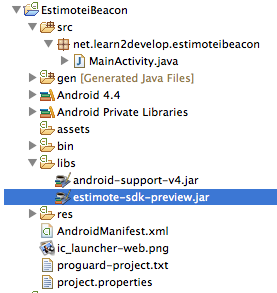
- Drag and drop the
estimate-sdk-preview.jarfile from the Estimote SDK onto thelibsfolder of your Android project (see Figure 12).
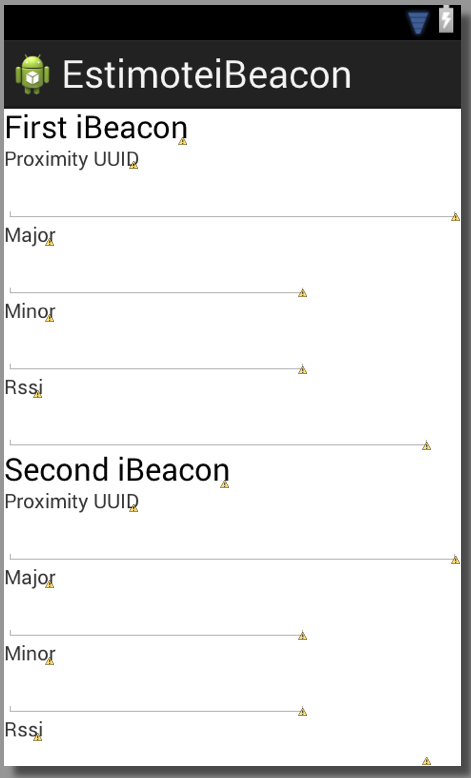
- Replace the content of the
activity_main.xmlfile with the statements shown in Listing 4. This creates the UI as shown in Figure 13.
Listing 4: Creating the UI to display the iBeacons detected
<LinearLayout xmlns:android=
    "http://schemas.android.com/apk/res/android"
    android:layout_width="fill_parent"
    android:layout_height="fill_parent"
    android:orientation="vertical" >

    <TextView
        android:layout_width="wrap_content"
        android:layout_height="wrap_content"
        android:text="First iBeacon"
        android:textAppearance="?android:attr/textAppearanceLarge" />

    <TextView
        android:layout_width="wrap_content"
        android:layout_height="wrap_content"
        android:text="Proximity UUID" />

    <EditText
        android:id="@+id/txtUUID1"
        android:layout_width="match_parent"
        android:layout_height="wrap_content"
        android:ems="10"
        android:focusable="false" />

    <TextView
        android:layout_width="wrap_content"
        android:layout_height="wrap_content"
        android:text="Major" />

    <EditText
        android:id="@+id/txtMajor1"
        android:layout_width="wrap_content"
        android:layout_height="wrap_content"
        android:ems="10"
        android:focusable="false" />

    <TextView
        android:layout_width="wrap_content"
        android:layout_height="wrap_content"
        android:text="Minor" />

    <EditText
        android:id="@+id/txtMinor1"
        android:layout_width="wrap_content"
        android:layout_height="wrap_content"
        android:ems="10"
        android:focusable="false" >
    </EditText>

    <TextView
        android:layout_width="wrap_content"
        android:layout_height="wrap_content"
        android:text="Rssi" />

    <EditText
        android:id="@+id/txtRssi1"
        android:layout_width="300dp"
        android:layout_height="wrap_content"
        android:ems="10"
        android:focusable="false" >
    </EditText>

    <TextView
        android:layout_width="wrap_content"
        android:layout_height="wrap_content"
        android:text="Second iBeacon"
        android:textAppearance="?android:attr/textAppearanceLarge" />

    <TextView
        android:layout_width="wrap_content"
        android:layout_height="wrap_content"
        android:text="Proximity UUID" />

    <EditText
        android:id="@+id/txtUUID2"
        android:layout_width="match_parent"
        android:layout_height="wrap_content"
        android:ems="10"
        android:focusable="false" />

    <TextView
        android:layout_width="wrap_content"
        android:layout_height="wrap_content"
        android:text="Major" />

    <EditText
        android:id="@+id/txtMajor2"
        android:layout_width="wrap_content"
        android:layout_height="wrap_content"
        android:ems="10"
        android:focusable="false" />

    <TextView
        android:layout_width="wrap_content"
        android:layout_height="wrap_content"
        android:text="Minor" />

    <EditText
        android:id="@+id/txtMinor2"
        android:layout_width="wrap_content"
        android:layout_height="wrap_content"
        android:ems="10"
        android:focusable="false" >
    </EditText>

    <TextView
        android:layout_width="wrap_content"
        android:layout_height="wrap_content"
        android:text="Rssi" />

    <EditText
        android:id="@+id/txtRssi2"
        android:layout_width="300dp"
        android:layout_height="wrap_content"
        android:ems="10"
        android:focusable="false" >
    </EditText>

</LinearLayout>
- Add the following statements to the
AndroidManifest.xmlfile. The first two permissions are for using Bluetooth on the device, and the third permission allows you to programmatically check whether or not the app is running in the foreground.
...
    <uses-sdk
        android:minSdkVersion="18"
        android:targetSdkVersion="18" />

    <uses-permission android:name=
        "android.permission.BLUETOOTH"/>
    <uses-permission android:name=
        "android.permission.BLUETOOTH_ADMIN"/>
    <uses-permission android:name=
        "android.permission.GET_TASKS"/>

    <application
        ...>
        <activity
        ...
        </activity>

        <service android:name=
            "com.estimote.sdk.service.BeaconService"
        android:exported="false"/>

    </application>

</manifest>
Monitoring a Region
Like in the case of the iPhone application, you want to monitor a region first.
- Add the statements to the
MainActivity.javafile that are shown in Listing 5.- You make use of the
BeaconManagerclass to set the background scan period, as well as monitor and range for beacons. - By default, the
BeaconManagerscans for five seconds and waits for 25 seconds before scanning again (in the background). To change the default background scanning period, use thesetBackgroundScanPeriod()method. - The
onEnteredRegion()method is called when the device enters a region; theonExitedRegion()method is called when the device exits a region. - To connect to the
BeaconService, use theconnect()method of theBeaconManagerclass; to disconnect from theBeaconService, use thedisconnect()method. - To start monitoring for regions, use the
startMonitoring()method, passing it aRegionobject. - The
isAppInForeground()helper method checks whether the application is running in the foreground
- You make use of the
- Deploy the application onto a BLE-enabled Android device. For testing, you can either use a real iBeacon, or use an iOS device to advertise as an iBeacon.
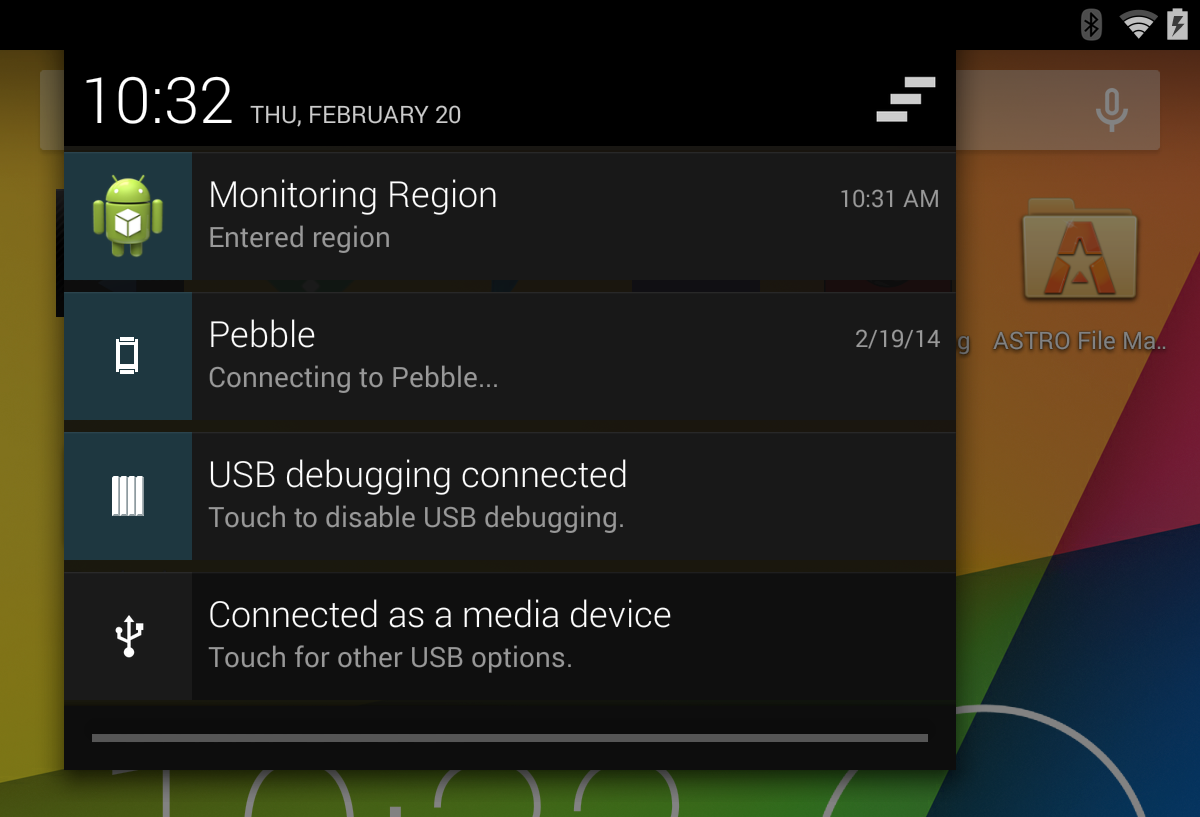
- When an iBeacon is found, it first displays the notification “Entered region” (see Figure 14).
Listing 5: Monitoring a region using the Estimote SDK
package net.learn2develop.estimoteibeacon;

import java.util.List;
import java.util.concurrent.TimeUnit;

import android.app.Activity;
import android.app.ActivityManager;
import android.app.ActivityManager.RunningTaskInfo;
import android.app.Notification;
import android.app.NotificationManager;
import android.app.PendingIntent;
import android.content.Context;
import android.content.Intent;
import android.os.Bundle;
import android.os.RemoteException;
import android.util.Log;
import android.view.Menu;
import android.widget.EditText;
import android.widget.Toast;

import com.estimote.sdk.Beacon;
import com.estimote.sdk.BeaconManager;
import com.estimote.sdk.BeaconManager.MonitoringListener;
import com.estimote.sdk.Region;

public class MainActivity extends Activity {

    private static final String
    ESTIMOTE_PROXIMITY_UUID = "B9407F30-F5F8-466E-AFF9-25556B57FE6D";

    private static final Region ALL_ESTIMOTE_BEACONS =
        new Region("regionId", ESTIMOTE_PROXIMITY_UUID, null, null);

    protected static final String TAG = "EstimoteiBeacon";

    private static final int NOTIFICATION_ID = 123;

    EditText txtUUID1, txtUUID2;
    EditText txtMajor1, txtMajor2;
    EditText txtMinor1, txtMinor2;
    EditText txtRssi1, txtRssi2;

    BeaconManager beaconManager;
    NotificationManager notificationManager;

    @Override
    protected void onCreate(Bundle savedInstanceState)
    {
        super.onCreate(savedInstanceState);
        setContentView(R.layout.activity_main);

        // ---get references to all the views in the activity---
        txtUUID1 = (EditText) findViewById(R.id.txtUUID1);

        txtUUID2 = (EditText) findViewById(R.id.txtUUID2);

        txtMajor1 = (EditText) findViewById(R.id.txtMajor1);

        txtMajor2 = (EditText) findViewById(R.id.txtMajor2);

        txtMinor1 = (EditText) findViewById(R.id.txtMinor1);

        txtMinor2 = (EditText) findViewById(R.id.txtMinor2);

        txtRssi1 = (EditText) findViewById(R.id.txtRssi1);

        txtRssi2 = (EditText) findViewById(R.id.txtRssi2);

        beaconManager = new BeaconManager(this);
        notificationManager = (NotificationManager)
            getSystemService(Context.NOTIFICATION_SERVICE);

        //---by default you scan 5s and then wait 25s
        // for this demo, you will scan more frequently---
        beaconManager.setBackgroundScanPeriod(
            TimeUnit.SECONDS.toMillis(1), 0);

        beaconManager.setMonitoringListener(new MonitoringListener() {
            @Override
            public void onEnteredRegion(Region region)
            {
                if (isAppInForeground(getApplicationContext())) {
                    Toast.makeText(getApplicationContext(),
                    "Entered region",
                    Toast.LENGTH_LONG).show();
                } else {
                    postNotification("Entered region");
                }
            }

            @Override
            public void onExitedRegion(Region region) {
                if (isAppInForeground(getApplicationContext())) {
                    Toast.makeText(getApplicationContext(),
                    "Exited region",
                    Toast.LENGTH_LONG).show();
                } else {
                    postNotification("Exited region");
                }
            }
        });
    }

    @Override
    protected void onStart() {
        super.onStart();

        notificationManager.cancel(NOTIFICATION_ID);
        beaconManager.connect(new BeaconManager.ServiceReadyCallback() {
            @Override
            public void onServiceReady() {
                try {
                    beaconManager.startMonitoring(ALL_ESTIMOTE_BEACONS);
                } catch (RemoteException e) {
                    Log.d(TAG, "Error while starting monitoring");
                }
            }
        });
    }

    @Override
    protected void onDestroy() {
        super.onDestroy();
        notificationManager.cancel(NOTIFICATION_ID);
        beaconManager.disconnect();
    }

    private void postNotification(String msg) {
        Intent notifyIntent = new
        Intent(MainActivity.this, MainActivity.class);

        notifyIntent.setFlags(Intent.FLAG_ACTIVITY_SINGLE_TOP);
        PendingIntent pendingIntent =
            PendingIntent.getActivities(
                MainActivity.this, 0, new Intent[] {notifyIntent },
        PendingIntent.FLAG_UPDATE_CURRENT);

        Notification notification = new
            Notification.Builder(MainActivity.this)
                .setSmallIcon(R.drawable.ic_launcher)
                .setContentTitle("Monitoring Region")
                .setContentText(msg)
                .setAutoCancel(true)
                .setContentIntent(pendingIntent)
                .build();
            notification.defaults |= Notification.DEFAULT_SOUND;
            notification.defaults |= Notification.DEFAULT_LIGHTS;
        notificationManager.notify(NOTIFICATION_ID, notification);
    }

    @Override
    public boolean onCreateOptionsMenu(Menu menu) {
        // Inflate the menu; this adds items to the
        // action bar if it is present.
        getMenuInflater().inflate(R.menu.main, menu);
        return true;
    }

    //---helper method to determine if the app is in the foreground---
    public static boolean isAppInForeground(Context context) {
        List<RunningTaskInfo> task = ((ActivityManager)
        context.getSystemService(Context.ACTIVITY_SERVICE))
               .getRunningTasks(1);
        if (task.isEmpty()) {
            return false;
        }
        return task
            .get(0)
            .topActivity
            .getPackageName()
            .equalsIgnoreCase(
                context.getPackageName());
    }
}
- When you walk out of a region, the application displays the notification "Exited Region".
Ranging for iBeacons
When the user enters a region, a notification appears. Tapping on the notification launches the application to the foreground. With the application in the foreground, it's now time to range for iBeacons.
- Add the statements to the
MainActivity.javafile (see Listing 6).- To start ranging for beacons, use the
startRanging()method, passing it aRegionobject; to stop ranging, use thestopRanging()method. - The
onBeaconsDiscovered()method is fired whenever one or more beacons is found; the iBeacons found will be presented as aListofBeaconobjects. - You can get the
Majorof an iBeacon by using thegetMajor()method of theBeaconclass. - You can get the
Minorof an iBeacon by using thegetMinor()method of theBeaconclass. - You can get the
RSSIof an iBeacon by using thegetRssi()method of theBeaconclass.
- To start ranging for beacons, use the
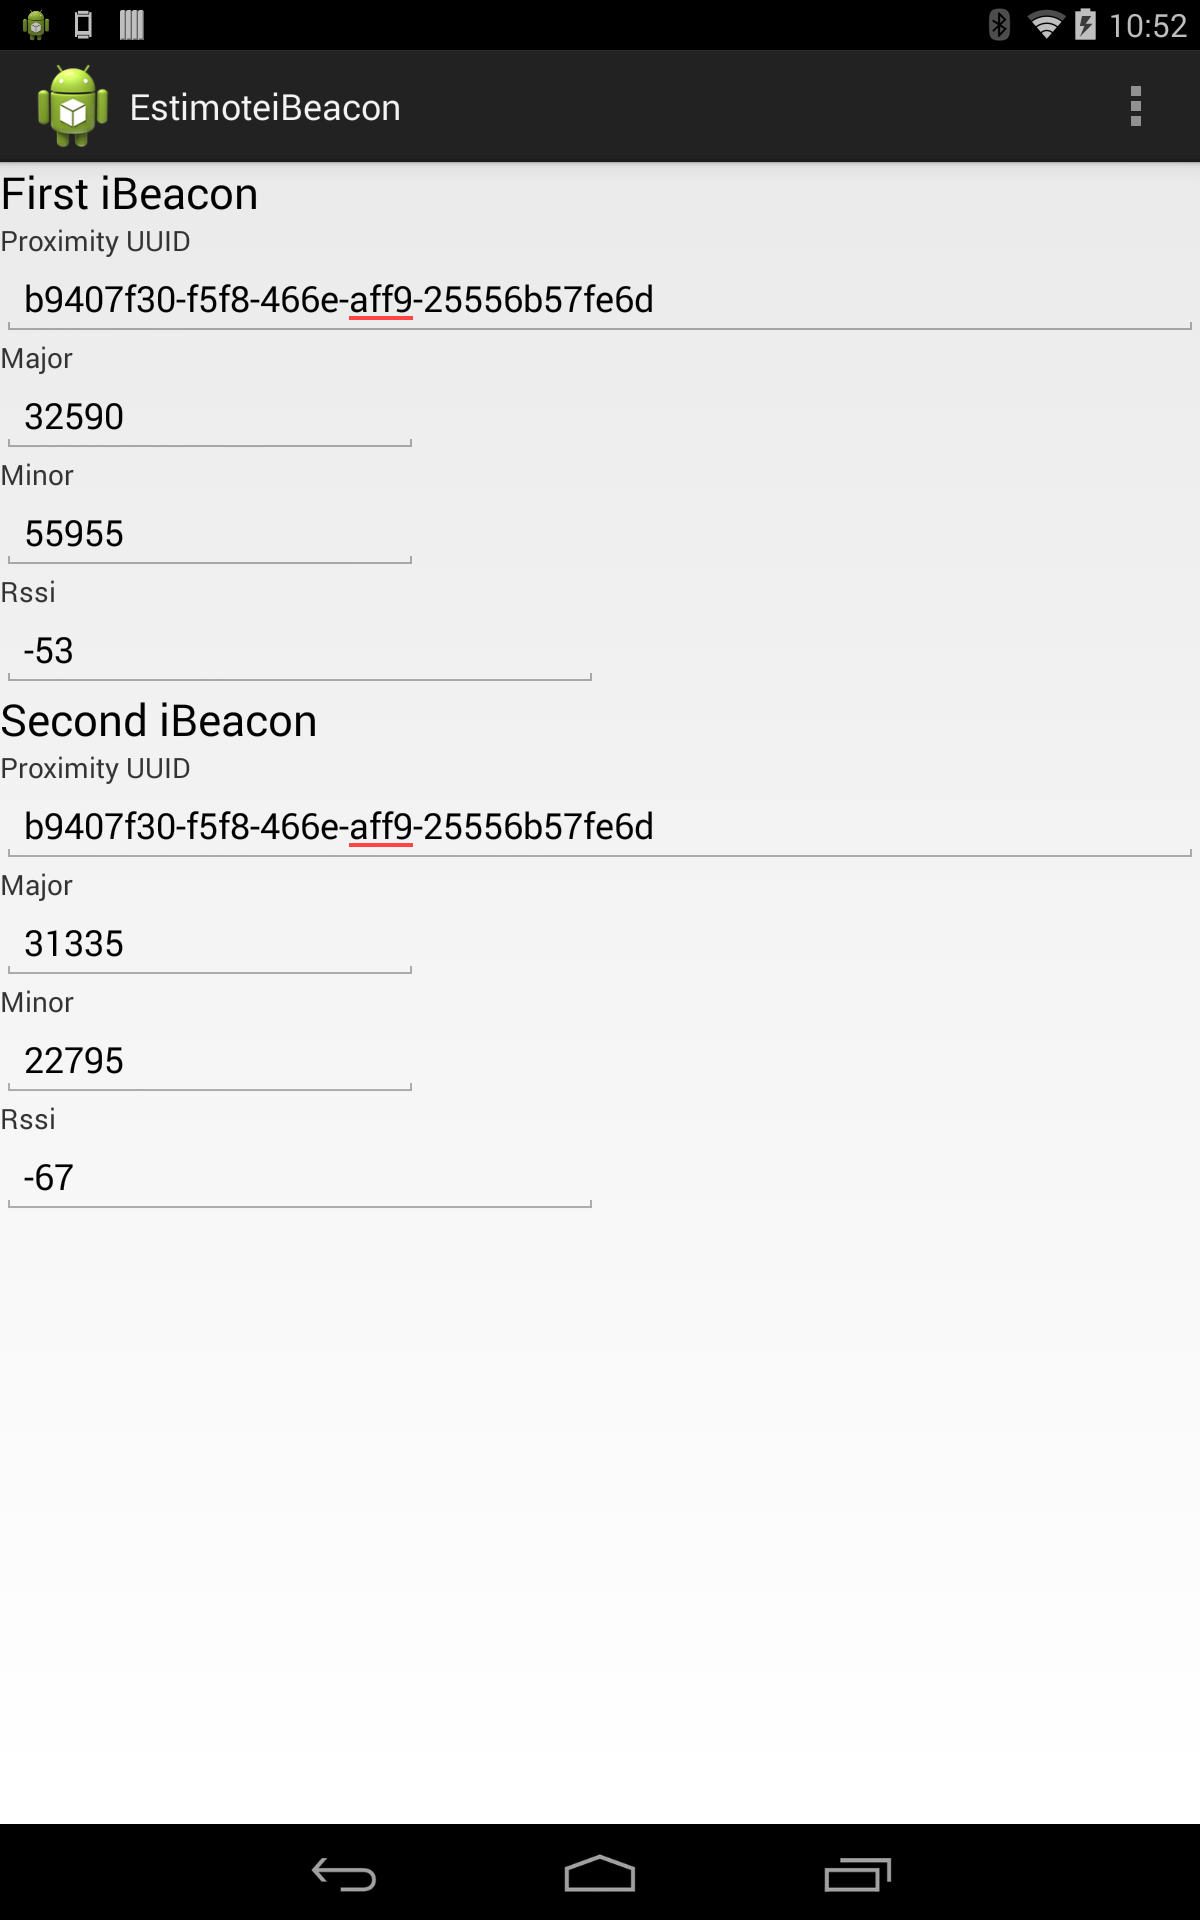
- Deploy the application onto a BLE-enabled Android device. When one or more iBeacons is found, it displays information about them (see Figure 15). For simplicity, information on only the first two iBeacons is displayed.
Listing 6: Ranging for iBeacons using the Estimote SDK
package net.learn2develop.estimoteibeacon;

import java.util.List;
import java.util.concurrent.TimeUnit;

import android.app.Activity;
import android.app.ActivityManager;
import android.app.ActivityManager.RunningTaskInfo;
import android.app.Notification;
import android.app.NotificationManager;
import android.app.PendingIntent;
import android.content.Context;
import android.content.Intent;
import android.os.Bundle;
import android.os.RemoteException;
import android.util.Log;
import android.view.Menu;
import android.widget.EditText;
import android.widget.Toast;

//---add this---
import com.estimote.sdk.Beacon;

import com.estimote.sdk.BeaconManager;
import com.estimote.sdk.BeaconManager.MonitoringListener;
import com.estimote.sdk.Region;

public class MainActivity extends Activity {

    private static final String
    ESTIMOTE_PROXIMITY_UUID = "B9407F30-F5F8-466E-AFF9-25556B57FE6D";

    private static final Region ALL_ESTIMOTE_BEACONS =
        new Region("regionId", ESTIMOTE_PROXIMITY_UUID, null, null);

    protected static final String TAG = "EstimoteiBeacon";

    private static final int NOTIFICATION_ID = 123;

    EditText txtUUID1, txtUUID2;
    EditText txtMajor1, txtMajor2;
    EditText txtMinor1, txtMinor2;
    EditText txtRssi1, txtRssi2;

    BeaconManager beaconManager;
    NotificationManager notificationManager;

    @Override
    protected void onCreate(Bundle savedInstanceState)
    {
        super.onCreate(savedInstanceState);
        setContentView(R.layout.activity_main);

        // ---get references to all the views in the activity---
        txtUUID1 = (EditText) findViewById(R.id.txtUUID1);

        txtUUID2 = (EditText) findViewById(R.id.txtUUID2);

        txtMajor1 = (EditText) findViewById(R.id.txtMajor1);

        txtMajor2 = (EditText) findViewById(R.id.txtMajor2);

        txtMinor1 = (EditText) findViewById(R.id.txtMinor1);

        txtMinor2 = (EditText) findViewById(R.id.txtMinor2);

        txtRssi1 = (EditText) findViewById(R.id.txtRssi1);

        txtRssi2 = (EditText) findViewById(R.id.txtRssi2);

        beaconManager = new BeaconManager(this);
        notificationManager = (NotificationManager)
        getSystemService(Context.NOTIFICATION_SERVICE);

        //---by default you scan 5s and then wait 25s
        // for this demo, you will scan more frequently---
        beaconManager.setBackgroundScanPeriod(
            TimeUnit.SECONDS.toMillis(1), 0);

        beaconManager.setMonitoringListener(new MonitoringListener() {
            @Override
            public void onEnteredRegion(Region region)
            {
                if (isAppInForeground(getApplicationContext())) {
                    Toast.makeText(getApplicationContext(),
                    "Entered region",
                    Toast.LENGTH_LONG).show();

                    //---range for beacons---
                    try {
                        beaconManager.startRanging(ALL_ESTIMOTE_BEACONS);
                    } catch (RemoteException e) {
                        Log.e(TAG, "Cannot start ranging", e);
                    }
            } else {
            postNotification("Entered region");
            }
        }

        @Override
        public void onExitedRegion(Region region) {
            if (isAppInForeground(getApplicationContext())) {
                Toast.makeText(getApplicationContext(),
                "Exited region",
                Toast.LENGTH_LONG).show();
            } else {
                postNotification("Exited region");
            }

            //---stop ranging for beacons---
            try {
                beaconManager.stopRanging(ALL_ESTIMOTE_BEACONS);
            } catch (RemoteException e) {
                Log.e(TAG, e.getLocalizedMessage());
            }

            runOnUiThread(new Runnable() {
                @Override
                public void run() {
                    //---clear the second group of EditText fields---
                    txtUUID2.setText("");
                    txtMajor2.setText("");
                    txtMinor2.setText("");
                    txtRssi2.setText("");

                    //---clear the first group of EditText fields---
                    txtUUID1.setText("");
                    txtMajor1.setText("");
                    txtMinor1.setText("");
                    txtRssi1.setText("");
                }
            });
        }
    });

    //---called when beacons are found---
    beaconManager.setRangingListener(new BeaconManager.RangingListener() {
        @Override public void onBeaconsDiscovered(
            Region region, final List<Beacon> beacons)
        {
            Log.d(TAG, "Ranged beacons: " + beacons);

            runOnUiThread(new Runnable() {
                @Override
                    public void run() {
                        if (beacons.size() > 0) {
                            Beacon iBeacon1 = null,
                            iBeacon2 = null;
                            //---get the first iBeacon---
                            iBeacon1 = beacons.get(0);

                            if (beacons.size()>1) {
                                //---get the second iBeacon---
                                iBeacon2 = beacons.get(1);
                            }
                            //---first iBeacon---
                            txtUUID1.setText(
                               iBeacon1.getProximityUUID().toString());
                            txtMajor1.setText(
                                String.valueOf(iBeacon1.getMajor()));
                            txtMinor1.setText(
                                String.valueOf(iBeacon1.getMinor()));
                            txtRssi1.setText(
                                String.valueOf(iBeacon1.getRssi()));

                            if (iBeacon2!=null) {
                                //---second iBeacon-
                                txtUUID2.setText(
                                    Beacon2.getProximityUUID().toString());
                                txtMajor2.setText(
                                    String.valueOf(iBeacon2.getMajor()));
                                txtMinor2.setText(
                                    String.valueOf(iBeacon2.getMinor()));
                                txtRssi2.setText(
                                    String.valueOf(iBeacon2.getRssi()));
                            } else {
                                //---clear the second
                                // group of EditText fields---
                                txtUUID2.setText("");
                                txtMajor2.setText("");
                                txtMinor2.setText("");
                                txtRssi2.setText("");
                            }
                        } else {
                            //---clear the first group of EditText fields---
                            txtUUID1.setText("");
                            txtMajor1.setText("");
                            txtMinor1.setText("");
                            txtRssi1.setText("");
                        }
                    }
                });
            }
        });
    }

    //---stop ranging for beacons when activity is killed---
    @Override
    protected void onStop() {
        super.onStop();
        try {
            beaconManager.stopRanging(ALL_ESTIMOTE_BEACONS);
        } catch (RemoteException e) {
            Log.e(TAG, "Cannot stop", e);
        }
    }

}
Although iOS allows you to scan for iBeacons as well as act as an iBeacon, in Android, you can only scan for iBeacons. Advertising as a peripheral in Android is not supported at the time of this writing.
Summary
In this article, you've learned what Bluetooth Low Energy is and how it's used in Apple's iBeacon technology. You've also seen how to scan for iBeacons on the iOS and Android platforms. In addition to scanning for iBeacons, iOS also allows you to use your iOS device to advertise as iBeacons, something that cannot be done on Android at the time of this writing. What interesting applications you write now depends on your own creativity! If you have new ideas on using iBeacon, send me an email.
