


In 2007, Microsoft unveiled a new vision called “Software + Services” that would fundamentally change the way that both Microsoft and their customers build software and have a gradual, yet marked ripple effect throughout the software giant’s entire strategy.
What inspired this shift in strategy at Microsoft is the same impetus for organizations of all shapes and sizes striving to take advantage of the tremendous opportunities for interconnectivity offered by the web and the economies of scale rendered by platforms that embrace interoperability.
Software + Services: A Vision
Microsoft’s shift in strategy was the maturation of an early vision initially embryonically outlined in a landmark 2005 memo by then Chief Architect Ray Ozzie entitled, “The Internet Services Disruption,” in which he addressed his executive peers and direct reports writing (see sidebar, “The Internet Services Disruption”):
“Computing and communications technologies have dramatically and progressively improved to enable the viability of a services-based model. The ubiquity of broadband and wireless networking has changed the nature of how people interact, and they’re increasingly drawn toward the simplicity of services and service-enabled software that ‘just works.’ Businesses are increasingly considering what services-based economics of scale might do to help them reduce infrastructure costs or deploy solutions as-needed and on subscription basis.“
This early memo manifested itself into the “Software + Services” vision first delivered nearly two years later at MIX 07 (see sidebar “Software + Services”):
“It’s our aspiration to create tools and platforms that will make your lives as developers easier, more productive, and profitable, in developing a software plus services solution . So you’ll have to be the judge as to whether we’ve succeeded in these aspirations.”
Ozzie went on to say:
“This software plus service pattern is very powerful, and it’s great for the user. It gives the user tremendous flexibility. We see this pattern in many of our own apps in-house, and I expect that we’ll see it in many of yours. It brings together the best of the Web, the best of the desktop, and the best of the device always using the service as a hub.”
Since 2005, investments in this vision have included presentation technologies for building rich, interconnected applications on the desktop like WPF, as well as Silverlight and ASP.NET MVC for building rich, perennially connected applications on the browser. In addition, advancements in distributed messaging and middleware capabilities with the introduction of WCF and continued investment in BizTalk Server, while rebuilding Microsoft’s framework for building long-running, composite solutions (WF), have made connecting and composing heterogeneous applications and systems more tenable than ever before.
Still, up until recently, while significant, these evolutions of the platform have fallen short of truly delivering on the Software + Services promise.
Indeed, for nearly a decade, organizations of all shapes and sizes have been applying service-oriented architecture (SOA) with varying degrees of sophistication (and success). Even where SOA has been successful, practitioners have traditionally been handicapped by the friction resulting from the non-interchangeable roles of client and service. For example, once a client learns the URI of a service endpoint, it consumes the service by making a request for which it either expects a response or no response at all (in the case of a one-way or datagram exchange). In order for the URI to be addressable and consumable by the client, the service must reside on the same network, or be routed to a different network via a traditional router or the Internet.
We’ve been using this model for exposing, composing and consuming services across network boundaries for almost two decades. The client can live anywhere and on any platform provided it can call a service over port such and such, but it is nearly impossible for a client living in a different network to call a service without some hosting or heavy infrastructure work that enables the endpoint to be exposed and consumed across a heterogonous network. These limitations have hampered the true realization of Software + Services by unnecessarily elevating the service to an entity that can only live within the walled garden of the enterprise or stood up by some expensive infrastructure. Azure Service Bus levels the playing field making Software + Services a reality.
The Lazarus Effect
Despite losing some of its luster due in part to the inherent complexity of middleware coupled with the insatiable need for our industry to oversaturate the market with hype and false promises, the need for SOA in composing solutions across the boundaries of the traditional enterprise has never been greater. Chris Howard of Gartner Research agrees. In his report, “The Lazarus Effect: SOA Returns” (see sidebar by the same name), Howard writes:
“To achieve the goals of a hybrid data center with processes spanning the internal/external boundary, service orientation is a prerequisite. This doesn’t mean that sophisticated services and mature SOA must already exist before an enterprise can venture into the cloud, but rather that architecture strategies that involve cloud computing must have a service orientation foundation.”
Fittingly, Azure Service Bus has much to do with enabling a new generation of hybrid computing, which in my view represents the realization of Software + Services and SOA to their full potential.
Azure Service Bus Relay Messaging
Microsoft is a platform company at its core. One of the things that make Windows Azure so compelling is that it is built on a single unified platform: Windows and .NET.
In December 2009, Microsoft released a new Internet-scale Service Bus that finally made Software + Services truly tenable. By applying similar techniques that have allowed chat software to traverse traditional boundaries inherent to modern networks (software firewalls, hardware firewalls, routing challenges due to the lack of public IP addresses and proliferation of NAT) and leverage the largest, most sophisticated and resilient network ever built (the Internet), Service Bus democratized the ability to stand up a service from anywhere in the world, ushering in a new era of truly hybrid computing.
In a nutshell, Service Bus provides a highly robust messaging fabric hosted by Windows Azure that serves as a relay between two (or more) endpoints. A client and service (or services) establish an outbound, bi-directional socket connection over either TCP or HTTP on the relay and thus, messages from the client tunnel their way through the relay to the service. In this way, both the client and service are really peers on the same messaging fabric. The service receives messages from the relay on behalf of the client and as such, the roles can easily be reversed. This pattern unlocks the power of Software + Services, which enables true hybrid enterprise composition allowing clients to communicate with services and vice-a-versa beyond the enterprise and literally from anywhere in the world, provided an Internet connection exists.
This pattern unlocks the power of Software + Services, which enables true hybrid enterprise composition…
This significant unlocking technology aside, what makes Azure Service Bus so practical is that the relay capabilities are modeled on WCF. To on-ramp Service Bus, the WCF developer need only choose the binding corresponding to the channel shape and protocols of interest. Support for REST and SOAP over HTTP as well as SOAP over TCP are provided by the relay bindings:
- BasicHttpRelayBinding: Complements BasicHttpBinding for WS-I Basic Profile Request-Response MEP over HTTP/S
- WebHttpRelayBinding: Complements WebHttpBinding for REST Request-Response MEP over HTTP/S
- WS2007HttpRelayBinding: Complements WsHttpBinding for WS-* Request-Response MEP over HTTP/S
- NetTcpRelayBinding: Complements NetTcpBinding for Request-Response MEP over TCP
- NetOneWayRelayBinding: Smart, optimized Datagram messaging over bi-directional TCP
- NetEventRelayBinding: Smart, optimized Multicast messaging over bi-directional TCP
Note: This article is not an introduction to Service Bus or Relay Messaging as it is already a well-established product that includes key capabilities for exposing services beyond traditional trust boundaries. However, if Service Bus is new to you, I recommend reading, “A Developer’s Guide to the Azure Service Bus” (see the sidebar) as I’ll be making some assumptions about your knowledge as I talk about the exciting new Brokered Messaging capabilities in Service Bus.
A Platform of Capabilities
As pivotal as Service Bus is to realizing the promises of Software + Services and hybrid composition, it is important to understand where it fits within the Microsoft Application Platform.
Like most Enterprise Service Buses (ESBs), Azure Service Bus is the manifestation of a number of core messaging patterns that provide the ability to design distributed messaging solutions in a loosely coupled manner that promotes autonomy and separation of concerns. What makes the Service Bus unique is that it provides these capabilities at Internet scale, meaning that it is designed to decouple clients and services regardless of whether they are running on premise in your own datacenter (or laptop), your partner or vendor’s datacenter or the cloud, and provides a messaging fabric that seamlessly spans across all of the above. As a result, the Service Bus is a key technology for enabling hybrid scenarios at the platform level (i.e., PaaS) and serves as a key differentiator in the market today for enabling organizations to adopt cloud computing in a pragmatic way.
It is important to note that the Service Bus is not a replacement for on-premise publish-subscribe messaging. It enables new scenarios that allow you to integrate your current on-premise messaging and provides the ability to compose clouds, be they your own, your partners or those of commercial cloud providers such as Microsoft.
I borrowed Figure 1 from the Microsoft whitepaper, “A Developer’s Guide to Service Bus” (see sidebar). Notice that the Service Bus is providing capabilities for integrating clients and services regardless of where they reside. For non-trivial SOA, on-premise pub-sub is a key capability for decoupling services and clients regardless of whether they reside on-premise or beyond.
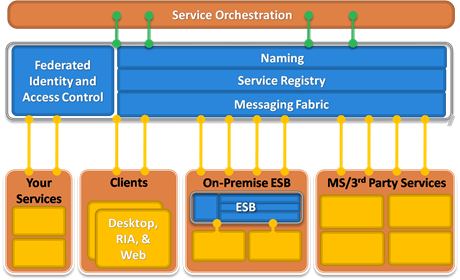
Today, BizTalk and Server AppFabric complement each other in providing very strong on-premise middleware collective capabilities including hosting, messaging, durable pub-sub, EAI, routing, transformation, orchestration/workflow and rules to name just a few. There is an exciting transformation taking place in Microsoft’s middleware strategy, which is poised to simplify the complexity inherent in building distributed messaging solutions by unifying overlapping capabilities and making them available at the platform level both on-premise and in the cloud with a relentless commitment to cross-platform interoperability both on the client and across the wire. Service Bus Brokered Messaging, including support for Queues and Topics, are built on this foundation.
A Common Distributed Messaging Scenario
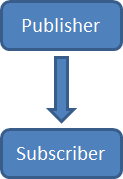
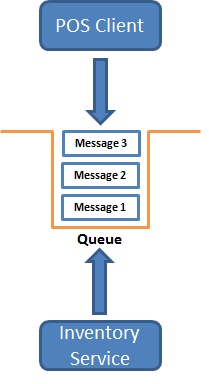
When building distributed systems, it is useful to design message exchanges in terms of publishers and subscribers (or producers and consumers). Publishers are clients (which incidentally can be a traditional client or service also acting as a client) that are either sending a request-response message and will wait for a response; or are sending a single, one-way message and expect no response (typical in asynchronous messaging). Subscribers care about these messages for one reason or another and thus subscribe to these messages. This is the essence of the Publish-Subscribe, or more succinct “Pub-Sub” messaging pattern (see sidebar, “Hohpe on Pub-Sub”. Figure 2 shows a one-way message exchange pattern.
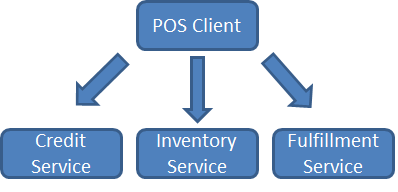
Now, to make this a bit more concrete, consider a point-of-sale system. Purchases, be they on-line or at brick-and-mortar retail outlets, typically involve a point-of-sale (POS) client with which a cashier or system interact, which in turn interacts with a middle layer, which manages a number of services to fulfill a purchase order.
One of the first things a smart POS system does when a unit is sold is trigger an event that will update inventory on that product so that the company can make proactive, intelligent decisions about managing inventory levels. In most cases, this is an automated administrative function, that is (or should be) transparent to the customer. When an order/sale is placed, an event occurs which is of interest to an Inventory Service that is exposed on a messaging fabric and participates as a core business function with the responsibility of decrementing the inventory count on the item, as well as other things like ensuring that inventory is in stock, etc.
Of course, this is just one of several things that likely need to happen when an order is placed. Credit card authorization as well as fulfillment (whatever that means in the context of the purchase) needs to take place as shown in Figure 3.
All of a sudden things are more complex and a point-to-point approach starts to become arduous. In a distributed system, it is very likely that the POS client is in a different process space and network than the other services. Who should keep track of the endpoints of the downstream services? What happens if the service goes down or is otherwise unavailable? The purchase workflow should function in a cohesive, homogenous manner while each participating service seamlessly fulfills its own responsibility with minimal friction. To achieve this, it is necessary to decouple the POS client from the downstream business of managing inventory levels, authorizing a credit card and shipping the product to the customer’s doorstep and delegate that work to a different layer in the system so that the POS client can focus on what it does best: move product.
Depending on the context, the credit authorization process may be request-response or one-way. On the web, for most high-volume online retailers, the financial outcome of the transaction is transparent to the purchase experience. Have you ever received an email from Amazon.com some time after you made your purchase and closed your browser, letting you know that your order is in a pending state because you need to update your expiration date on file so it can authorize your credit card? This asynchronous approach is common to facilitate scale and performance so that the POS front-end can scale as many customers as possible, and it is also good business.
That said, it is very important to note that when the credit card authorization is designed as one-way (from the POS client’s perspective), there are a number of guarantees that must be made. First, the Credit Service must receive the message within a reasonable timeframe, no matter how busy the front-end client services or middle-tier services are. Second, but of equal importance, is that the Credit Service must receive the message once and only once. Failure to deliver on the first or second guarantee will lead to lost revenue either due to lost transactions or very disgruntled customers.
Queues offer a good solution to this problem. Traditionally, queues are collections that provide a first-in, first-out data structure and are typically used to introduce durability in support of asynchronous work and occasionally connected clients and services. When working with a queuing system, a client writes to a known endpoint on the middle tier/messaging fabric that exposes this collection (private/local or public/somewhere on the network) without regard to the state of the downstream service(s) that might eventually consume the message. If the consuming service is running, it will read messages from the queue and dispatch work items accordingly. Otherwise, the queue will retain the message(s) until the service is available to retrieve the message or the message expires.
In the latest release of Service Bus, Microsoft introduces Brokered Messaging. The distinction between Relay Messaging and Brokered Messaging is that Relay Messaging uses a push model for message distribution to interested parties. Brokered messaging is just the opposite. Messages are instead pulled by interested parties from a Queue or Topic. As such, messaging between clients/producers and services/consumers is brokered by an intermediary using a special new message type called BrokeredMessage.
In this article, we’ll first explore how to leverage Azure Service Bus Brokered Messaging in your distributed messaging solutions to take advantage of the benefits that Queues provide. From there, we’ll move into some more advanced scenarios and demonstrate how you can implement publish-subscribe messaging with Service Bus Topics, which on the surface are very similar to Queues, but offer more robust capabilities on top of a common foundation. I’ll show you how to interact with both Queues and Topics using the Service Bus Client API designed for .NET, a comprehensive REST API for maximum reach across disparate clients as well as how to take advantage of these new features using the WCF programming model.
Installing Azure Service Bus SDK v1.5
To get started, you’ll need to provision a Service Bus account. There are a few options and some good offers available (including free trials), so make your way to http://azure.com and select the option that best fits your needs. Once you have an account created, you’ll use the Azure Management Portal to create a service namespace (see “A Developer’s Guide to Service Bus” for more information in the sidebar) and you’ll want to keep your namespace name and security credentials handy as you’ll need both to interact with Azure Service Bus Queues and Topics.
There are two options for installing the 1.5 SDK which is required for building applications that take advantage of Service Bus Relay Messaging and Brokered Messaging. The first is to download the SDK. The install is very straightforward and includes a new version of “Microsoft.ServiceBus.dll” (see a word on versioning below). The other option is to install the new client DLL in your solution by grabbing it from NuGet. If you are unfamiliar with NuGet, I highly recommend it as a quick and easy way to get up and running and is the approach I’ve taken in this article. I’ll walk you through each step of using NuGet and if you want a more comprehensive overview, check out the documentation at http://docs.nuget.org">http://docs.nuget.org.
The first thing you’ll want to do is install the NuGet extension. If you already have NuGet installed, please skip this section. Otherwise, in Visual Studio, click Tools and select Extension Manager. In the search dialog enter “NuGet.” A package should appear in the list called “NuGet Package Manager.” Install the package and then click Close.
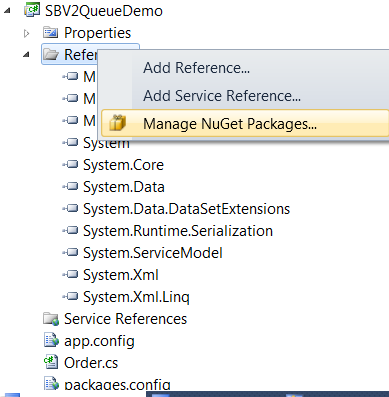
With NuGet installed, you should now be able to add a reference to your project. To do so, right-click on References. If NuGet is installed correctly, you will see a new option in the menu called Manage NuGet Packages (Figure 4).
At this point, search for Service Bus. You should see a package entry appear as shown in Figure 5. Select the package and click Install. Momentarily, you should see a new assembly called Microsoft.Service.Bus.dll added to the project as well as a configuration file called packages.config.

At this point, provided you have signed up for a Service Bus account, you have everything you need to get started.
A Word on Versioning
In the CTPs that preceded the release of the new Service Bus features, a temporary assembly called Microsoft.ServiceBus.Messaging.dll was added to serve as a container for new features and deltas that were introduced during the development cycle. The final release includes a single assembly called Microsoft.ServiceBus.dll, which contains all of the existing relay capabilities that you’re already familiar with, as well as the addition of support for Queues and Topics. If you are upgrading from the CTPs, you’ll want to get ahold of the new Microsoft.ServiceBus.dll version 1.5 which includes everything plus the new Queue and Topic features.
The new 1.5 version of the Microsoft.ServiceBus.dll assembly targets the .NET 4.0 Framework. Customers using .NET 3.5 can continue using the existing Microsoft.ServiceBus.dll assembly (version 1.0.1123.2) for leveraging the relay capabilities, but must upgrade to .NET 4.0 to take advantage of the latest features presented here.
Exploring Azure Service Bus Queues
Queues are an important addition to Service Bus capabilities because they provide an interoperable, reliable and durable foundation on which to build interactions between clients/producers and services/consumers. With Queues, a higher degree of indirection is achieved between the client and service, which introduces a number of natural side effects such as loose coupling and the ability to better balance and level load, both of which greatly benefit the reliability, availability and performance of your distributed solutions.
The perpetual mismatch of supply and demand of IT capacities is the sworn enemy of the quality attributes I just mentioned. If we think of this mismatch as load (demand) being introduced over time, the result is typically failure to deliver a service or spending too much on hardware and infrastructure to meet elusive demand. Our goal then should be to align demand with the current capacity of hardware and software to meet the need accordingly and make adjustments in a well-informed, pragmatic manner.
Queues allow us to better align demand with available supply because capacity can be tuned to scale as needed and at the pace that the consuming services can ingest work (messages). This is an effective way to align demand with current capacity because with Queues, a consumer can be throttled to only consume the messages from the Queue that it can handle. If the consumer/worker is offline, items in the Queue will queue up, which further decouples the client from the consumer since the client is not constrained by whether the consumer is up or online. If the consumer/worker is very busy, it will only consume the messages it is able to reliably pull from the Queue.
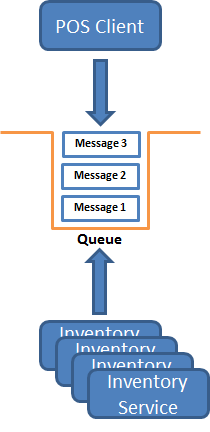
Figure 6 shows a generic example of a queue with a client/producer single consumer/worker/service. If we add more consumers/workers/services, each will consume messages at their own optimal rate (determined by processing capacity, tuning, etc.), resulting in a natural distribution of work. Of course, stronger, more capable consumers/workers might consume more messages, but as long as there are messages in the queue, there is work to be done and the capacity can be allocated accordingly. An example of this is shown in Figure 7 where multiple consumer instances compete for messages in a queue.
Queues (and Topics) are supported in Service Bus via three APIs:
- The .NET Client API, which allows .NET producers and consumers to communicate over Service Bus Queues (and Topics).
- The REST API, which allows a variety of producers and consumers to communicate over Service Bus Queues (and Topics) using REST and HTTP/s.
- The new WCF NetMessagingBinding binding, which allows WCF clients and services to communicate over Service Bus Queues (and Topics) using the WCF programming model.
While your choice in API will depend on the scenario and the type of solutions you are building, looking first at the .NET Client API will help you understand the Queues and Topics programming model because it is pretty finely grained and showcases all of the capabilities that Service Bus Queues and Topics have to offer.
When working with Service Bus Queues and Topics, there are two contexts in which you will work. The first is the management or administrative context in which you will conduct housekeeping activities like creating Queues and Topics, setting up subscriptions, configuring rules, etc. The runtime context is where you will actually interact with the Queues and Topics in terms of sending and receiving messages.
The list below shows the six fundamental classes you will use when working with Service Bus Queues:
- NamespaceManager: Used in the management context and provides the ability to perform administrative functions such as creating, inspecting and deleting Queues on your namespace in the messaging fabric.
- BrokeredMessage: Used in the runtime context and defines the message that you will send and consume over Service Bus Queues.
- QueueDescription: Used in the admin context and describes a Service Bus Queue.
- MessagingFactory: Used in the runtime context and, as its name implies, acts as a factor for creating classes that allow you to send and receive messages on a Queue using new classes such as QueueClient, MessageSender and MessageReceiver.
- QueueClient: Used in the runtime context and allows you to send and receive messages over a Queue.
- MessageSender/MessageReceiver: Used in the runtime context and allow you to send and receive messages over a Queue, Topic or both.
Let’s take a look at each of these classes in action by walking through a simple Queuing example.
Working with the Service Bus Namespace Manager
The first thing you need to do when working with Queues in the administrative context is create a NamespaceManager object, which is an anchor class for managing the Queues (and Topics) in your namespace:
NamespaceManager manager = new
 NamespaceManager(
ServiceBusEnvironment.CreateServiceUri("sb",
serviceNamespace, string.Empty), settings);
The constructor I’m using takes the address URI of the endpoint for your Service Bus namespace and an instance of the NamespaceManagerSettings class, which is used to define your security scheme:
// Configure and create NamespaceManager for performing
administrative operations
NamespaceManagerSettings settings = new
NamespaceManagerSettings();
TokenProvider tokenProvider = settings.TokenProvider
= TokenProvider.CreateSharedSecretTokenProvider(issuer,key);
Notice that I’m using the Shared Secret Token Provider with Azure Access Control Service. This is a fundamental provider that I will use in this article for demonstrating Queues and Topics, but be sure to check out the documentation (see sidebar, “Brokered Messaging Documentation”) which covers other security options provided by Azure Access Control Service.
Creating a Queue
The easiest way to create a Queue is to use the Azure Management Portal, however, I want to show you how to accomplish administrative actions imperatively with code, which will help you understand the full breadth of the Client API.
Once you have an instance of the NamespaceManager, you can create a Queue by calling the “CreateQueue” method on the NamespaceManager instance. As you can see in Listing 1, I’ve initialized the queueName field to “Orders”, which is the name of the Queue we will create:
// Create Queue
QueueDescription queue = manager.CreateQueue(queueName);
If successful, a Queue will be provisioned for you on the messaging fabric.
To avoid potential issues, I recommend always checking to see if the Queue you are going to create already exists. One way to do this is to try to delete the Queue prior to creating it. If the Queue already exists, it will be deleted, otherwise, a 404 (Not Found) is returned in the exception message:
try
{
manager.DeleteQueue(queueName);
}
catch (Exception ex)
{
Console.WriteLine(ex.Message);
}
An improvement that doesn’t rely on exceptions to determine logic flow is to use the GetQueues method on the NamespaceManager and check the collection to ensure the Queue does not already exist:
var qs = manager.GetQueues();

var result = from q in qs
where q.Path.Equals(queueName,
StringComparison.OrdinalIgnoreCase)
select q;
If the Queue does not exist, create the Queue:
if (result.Count() == 0)
{
Console.WriteLine("Queue does not exist");

// Create Queue
Console.WriteLine("Creating Queue...");

QueueDescription queue =
manager.CreateQueue(queueName);
}
When checking for the equality, be sure to ignore case as “orders” in the where clause above will be evaluated the same as “Orders” or “ORDERS” which is why I am using the “StringComparison.OrdinalIgnoreCase” option in my LINQ query above.
The best approach, however, is to call the QueueExists method on the NamespaceManager instance which returns a Boolean. This is a simpler, cleaner approach that was missing in the CTPs, but fortunately made it into the final release and is the preferred approach:
if (!manager.QueueExists(queueName))
            {
                manager.CreateQueue(new
 QueueDescription(queueName) { LockDuration =
TimeSpan.FromSeconds(5.0d) });
            }
That is all there is to creating a Queue. Some things to consider when designing your solution is that Queues can be from 1 GB to 5 GB in size, and Queue names are always created in lowercase regardless of the casing you use. If you choose to create your Queues using the Azure Management Portal, you will see a visual representation of the options that you are able to manage via properties in code.
Understanding the Brokered Message Class
Queues and Topics introduce a new message class called BrokeredMessage. The BrokeredMessage class represents a unit of communication between Service Bus parties. The Brokered Message class contains a message body and supports the use of properties outside of the body for storing metadata, headers, or payloads themselves. Note that this class has nothing to do with the WCF System.ServiceModel.Channels.Message class; however, when using the NetMessagingBinding, the classic WCF Message is used up until the message is prepared for the wire on the client as well as when it is received by the Service Model on the other end of the wire making brokered messaging in WCF virtually seamless (unless you are working with properties, which is a bit more complex and beyond the scope of this article). The BrokeredMessage class consists of a number of methods and properties which are fully documented in the Microsoft.ServiceBus.Messaging documentation (see sidebar entitled Microsoft.ServiceBus.Messaging Documentation), which we’ll explore as we progress through the new features.
To create a BrokeredMessage you simply instantiate it with its default constructor, or by passing in a serializable type.
In this example, I’m passing in an instance of a custom “Order” class from which a BrokeredMessage will be created by using the DataContractSerializer with a binary XmlDictionaryWriter to read the object:
Order order = new Order();
order.OrderId = 42;
order.Products.Add("Kinect", 70.50M);
order.Products.Add("XBOX 360", 199.99M);
order.Total = order.Products["Kinect"] + order.Products["XBOX 360"];

// Create a Brokered Message from the Order object
BrokeredMessage msg = new BrokeredMessage(order);
At this point, the message is ready to be sent.
There are a few things worth noting about working with BrokeredMessage. First, the payload of a BrokeredMessage must be serializable. The BrokeredMessage can be up to 256 KB in size, and each BrokeredMessage instance has a TimeToLive (TTL) property associated with the instance. By default, the TTL is virtually infinite, but you can set this value to a time span according to your requirements. When the TTL for a BrokeredMessage has expired, the message will be moved to the dead letter queue, provided that support for dead lettering has been set up. If it has not, the message will be discarded.
Some interesting and useful properties on the BrokeredMessage class include the Properties property, which stores a collection of name-value pairs for persisting properties that are added to the message, MessageId, SessionId, LockToken and CorrelationId. The MessageId provides a unique identifier for each message and is useful in searching for a specific message or detecting duplicate message consumption. SessionId and CorrelationId both provide a way to group messages such that a consumer can filter on a given session or correlation. LockToken provides a unique identifier representing a lock on a message when using non-destructive reads.
We’ll explore many of these properties as we progress through this article.
Preparing to Send a Message
To send the message, I create a MessagingFactory to create a QueueClient by passing in my endpoint URI and an instance of MessageFactorySettings:
MessagingFactory messagingFactory =
MessagingFactory.Create(ServiceBusEnvironment.CreateServiceUri
("sb", serviceNamespace, string.Empty),
messagingFactorySettings);
The MessageFactorySettings TokenProvider property is set just like with the NamespaceManagerSetting class above:
MessagingFactorySettings messagingFactorySettings = new
MessagingFactorySettings();
messagingFactorySettings.TokenProvider =
settings.TokenProvider =
TokenProvider.CreateSharedSecretTokenProvider(issuer, key);
From there, I ask the MessagingFactory for an instance of the QueueClient class, at which point I am ready to send the message:
QueueClient queueClient =
messagingFactory.CreateQueueClient(queueName,
ReceiveMode.PeekLock);

queueClient.Send(msg);
At this point, provided no exceptions are raised, the BrokeredMessage is sent across the wire and written to the “Orders” Queue.
Note that while I am showing synchronous invocation of the Send and Receive methods, I am doing so only for the sake of simplicity. I recommend striving to always use the corresponding asynchronous methods (BeginSend/EndSend and BeginReceive/EndReceive) whenever possible to free the calling thread from blocking while waiting to receive a message.
Working with MessageSender Instead of QueueClient
While sending a message is very simple when using the QueueClient, another option is to use a MessageSender class. The MessageSender class is a lower level class that allows you to send messages to the fabric without thinking about whether you are working with a Queue or a Topic. It’s a way to abstract that level of detail as your needs require.
You use a MessageSender by asking the MessagingFactory to create a MessageSender for you instead of a QueueClient:
MessageSender sender =
messagingFactory.CreateMessageSender(queueName);
From there you can send the message by calling the Send method on the MessageSender, just as you did with QueueClient:
BrokeredMessage msg = new BrokeredMessage(order);
sender.Send(msg);
Notice in Listing 1 that I’ve explicitly created a new BrokeredMessage in this example, because if you try to send the same instance of a BrokeredMessage twice, you will receive an error from the fabric because of duplicate MessageIds.
Consuming a Message from a Queue
Once the message has been sent, the time before it is consumed may vary. This temporal decoupling allows for the QueueClient to send the message without any concern for who will receive it or when it will be received. Provided the consumer is authorized to read from the Queue, when it reads the message is flexible as dictated by other competing consumers and the TTL associated with the message, but by default TTL is pretty high, so you are highly unlikely to encounter an issue unless you overwrite the default to take advantage of dead lettering or deferment.
To read the message from the Queue, I’m using the same QueueClient (though typically a different instance in a different consuming application would be used) to read from the Queue by calling the Receive method:
BrokeredMessage recdMsg = queueClient.Receive();
Calling Receive in this manner will return the next available message that is ready for delivery. Once I have received the message, I can read the message body into an instance of the “Order” class by calling the “GetBody()” method on the BrokeredMessage:
BrokeredMessage recdOrder = recdMsg.GetBody<Order>();
If you want to receive more than one message at a time (i.e., read all of the messages currently in the Queue), you can modify the code above to something like this:
while ((recdMsg = queueClient.Receive()) != null)
{
// Work with each message
}
The code in the loop will execute for each message found in the Queue within the default read timeout period.
Understanding ReceiveMode
By default, the QueueClient will do a non-destructive read using ReceiveMode.PeekLock, which can be passed into the Receive method. PeekLock provides “At Least Once” delivery semantics, such that more than one consumer can potentially read the message. This mode is preferred because it supports the competing consumer pattern and allows for more resilience in the event that something goes wrong in processing the message.
When using PeekLock, you consume a message in two phases. First, after the call to Receive on the QueueClient succeeds and you’ve safely stored or processed the message, you call the Complete method on the QueueClient, along with the LockToken that was assigned to the message to complete the read and inform the fabric that it’s OK to delete the message:
queueClient.Complete(recdMsg.LockToken);
This is the happy path. However, if the consumer is unable to process the message (due to a condition or exception, for example), it can call the Abandon method on the QueueClient instance informing the fabric that the message should be unlocked and made available for other consumers to read (or to allow the same QueueClient to try again):
queueClient.Abandon(recdMsg.LockToken);
If, after reading a message in PeekLock mode, the Complete method is not called within 30 seconds (the default lock duration), the message is unlocked and made available for the next consumer.
The other option is to explicitly set ReceiveMode to ReceiveMode.RecievedAndDelete, which is a destructive read and has the effect of enforcing an “At Most Once” receive semantic on the message since the first consumer to read the message will pop it off the Queue. This provides a simpler and quicker way to pop a message, but is not as resilient because once the message is read, it is removed from the Queue regardless of whether processing succeeded.
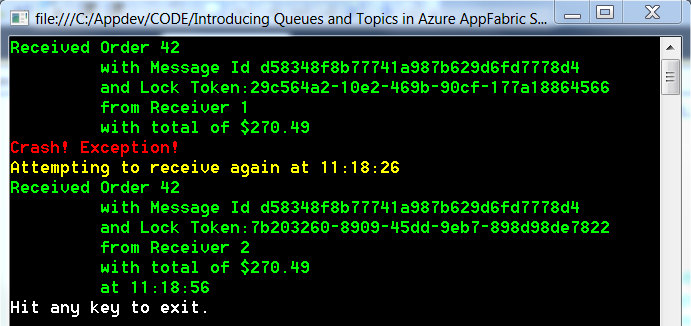
Listing 1 provides the full code for this example and shows how I wait to call Complete until after the second time the message is read. This simulates a situation where perhaps the first attempt fails (the consumer goes down after reading the message but before completing processing) but the second attempt succeeds. This two-phased pattern increases reliability in the event that something goes wrong with a previous consumer. You can also wrap a receive in a System.Transactions Transaction, which has the effect of automating these steps for you.
The resulting execution of Listing 1 is shown in Figure 8. Notice how it takes 30 seconds from the second attempt to receive the message until it is delivered. This is because the message has been locked for 30 seconds, disappearing from the queue and thus will not be available until the QueueClient calls complete for the given lock token or the lock expires.
Working with MessageReceiver
As with the MessageSender, you can also use the MessageReceiver class to receive messages if you want to abstract away the type of entity you are working with. In fact, I use a MessageReceiver to attempt the second read in the example in Listing 1, simply to demonstrate its usage.
As with the QueueClient example above, to obtain a MessageReceiver, you ask the MessagingFactory for an instance:
MessageReceiver receiver =
messagingFactory.CreateMessageReceiver(queueName);
From there, you call receive on it just as you would on a QueueClient:
BrokeredMessage recdMsg = receiver.Receive();
Additional methods such as “Defer()” and “DeadLetter()” are available on both the QueueClient and MessageReceiver. These allow you to postpone the processing of a message or move the message to a dead letter Queue; however, I’ll save these details for a future article or blog post.
As I mentioned earlier, it is also possible to group Queue messages into groups or sessions such that a consumer can filter on only those messages, but we’ll leave this introduction to Queues here for now.
Listing 1 includes the code found in the fully functional sample from the solution download that is available with the online version of this article.
Exploring Azure Service Bus Topics
As you can see, Queues provide a foundational pattern for building loosely coupled and reliable distributed messaging solutions. The ability to add consumers/workers to a process or message exchange in a manner that is transparent from the client/producer, temporal decoupling, load leveling and distribution make Queues pretty useful.
However, when you have more than one subscriber, as is the case with our POS scenario depicted in Figure 3, you now need to reason about when and how messages are delivered to each subscriber and who should have this responsibility. It can’t be the POS client because we want to decouple it from this kind of intimate knowledge. Adding this responsibility to each subscriber is also just as bad because it couples the downstream subscriber to this level of detail.
What we need is an intermediary that forms both a logical and physical relationship between publishers and subscribers such that a publisher - in this case the POS client - can publish messages to multiple subscribers such as the Inventory, Credit Card and Fulfillment services with the minimal degree of coupling. This is exactly what a Topic provides.
Topics are nothing new. They have been the mainstay of JMS-based systems for years, and thus have proven their usefulness in the field of distributed computing as a great way to logically associate messages to events of interest and implement pub-sub. Traditionally, in the Java world, Topics have been tied to Queues, but given the logical nature of a Topic, there is nothing to say that it can’t ride on top of any transport channel (Neudesic’s Neuron ESB is a good example of a bus that uses Topics as a logical channel that can be powered by multiple transports such as NetTCP, MSMQ, etc.).
To apply Topics to our scenario, when a sale occurs, the POS client publishes a message to the “Orders” Topic (just as it would to a Queue) to signal a new order event. At this point, corresponding subscribers are notified by the Topic according to rules set up for each subscription (if any rules have been configured at all).
The physical transport used for Service Bus Topics is Service Bus Queues, which allows you to harness the transport characteristics of Queues plus the logical abstraction that Topics provide, including rules for filtering on messages (and optionally performing some kind of action) before they are delivered to each subscriber with a valid subscription as shown in Figure 9. It is also possible - and likely - that each service exposes a different contract and thus, transformation between a canonical message and the expected message must take place, but this is a subject for a later article.
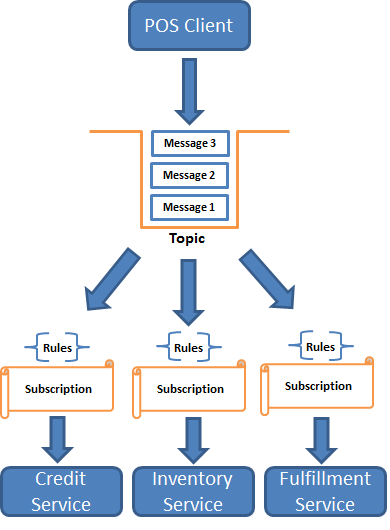
So far, you might be thinking that we could accomplish much of what I’ve discussed with Queues, specifically by leveraging Queue sessions/groups. One of the main differences is that Queues alone are not really designed for pub-sub. With Topics, up to 2,000 subscribers are supported, and each subscriber receives separate copies of a message according to their subscription. Because the subscriber doesn’t interact directly with the Topic as a consumer does with a Queue, this allows us to refine when or under what conditions a Subscriber should receive a message (beyond just a named session) based on a subscription and corresponding rules. Thus, the subscriber receives messages from the subscription, not the Topic, which provides a powerful level of interception as you’ll see shortly.
Topics introduce five new classes, which you’ll use in addition to the subset of classes we’ve already discussed including NamespaceManager, BrokeredMessage, MessageFactory, MessageSender and MessageReceiver:
- TopicDescription: Used in the management context and describes a Service Bus Topic.
- SubscriptionDescription: Used in the management context and defines a subscription on a given Topic.
- RuleDescription: Used in the management context and defines the filters (and optional actions) for associating messages with a subscription.
- TopicClient: Used in the runtime context and allows you to send messages to a Topic.
- SubscriptionClient: Used in the runtime context and allows you to receive messages from a Subscription over a Topic.
Creating a Topic
As with Queues, I first have some administrative/management operations we must perform to begin working with Topics. You can always use the Azure Management Portal to create a Topic (as well as one or many Subscriptions, covered shortly), but my goal is to show you how to accomplish these administrative functions using the Client API so that you understand its capabilities.
In keeping with a code-centric approach, I first create a NamespaceManager just as before:
NamespaceManager manager = new
NamespaceManager(ServiceBusEnvironment.CreateServiceUri(
"sb", serviceNamespace, string.Empty), settings);
Next, I use the Namespace Manager to create a Topic just as I would when creating a Queue:
TopicDescription topic = manager.CreateTopic(topicName);
When designing your solution, be mindful of name collisions. For example, if you have a Queue called “Orders” and try to create a Topic by the same name, you’ll get a “MessagingEntityAlreadyExists” exception informing you that there is a conflict because the entity already exists. A simple work around is to append “Topic” to the end of the Topic name as shown in Listing 2 or simply use the TopicExists method on the NamespaceManager as demonstrated in the Queue example.
Topics aren’t all that useful without a subscription. A subscription allows you to create an exclusive tap into the messages in the Topic designed specifically for your subscribers.
Let me show you how to create a subscription for each of the services depicted in Figure 9.
To create a subscription for the Inventory Service, I’ve created an instance of a SubscriptionDescription called “inventroyServiceSubscription” and initialized it with a name and the Topic for which I am creating the subscription:
SubscriptionDescription inventoryServiceSubscription =
new SubscriptionDescription { Name =
"InventoryServiceSubscription", TopicPath = topicName };
I’ve done the same for the Credit Service:
SubscriptionDescription creditServiceSubscription = new
SubscriptionDescription { Name =
"CreditServiceSubscription", TopicPath = topicName };
The last step is to register the subscriptions with the NamespaceManager by calling the CreateSubscription method on the NamespaceManager instance:
manager.CreateSubscription(inventoryServiceSubscription);
manager.CreateSubscription(creditServiceSubscription);
At this point I have two subscriptions configured on the OrdersTopic Topic.
Our online retailer probably has a centralized inventory management system and credit card processor, but may have different fulfillment centers around the world so it can expedite orders as quickly and efficiently as possible.
Now, what if we wanted to partition the Fulfillment Service subscriptions according to geography? Using subscriptions along with rules would allow us to define what messages should go to which subscription based on the customer order’s origin, so that the closest fulfillment center always receives the appropriate order to minimize cost and ship times (i.e., something like North America, South America, Africa, Europe, Asia, and Australia).
This is where the power and flexibility of subscriptions and corresponding rules come into play.
Rules and Actions
As mentioned earlier, Service Bus supports the ability to configure filters and actions on a subscription based on rules. Think of this as a somewhat primitive message processing pipeline.
The rule evaluates additional context or content of the published message by looking at properties on the message and uses these properties to apply some filtering and very lightweight orchestration, which in turn can be used to determine if the message(s) should be routed to the subscriber via the corresponding subscription (as I demonstrate below). If the filter matches, then any matching messages in the Topic are eligible for the subscription.
If you don’t specify a rule or a filter on a subscription, then by default, all messages sent to the Topic will be delivered to the subscriber. If you have more than one rule for a subscription, each rule that evaluates to true will result in a copy of the message being delivered to the subscriber.
You can also have a rule which, given a filter match, uses an action to modify a message property (such as specifying the fulfillment region based on the country of origin).
The Topic subscription is the right place for this kind of processing to happen because again, configuration of the rules is a management-time task and this logic is completely decoupled from the subscribers. Publishers and subscribers merely send/receive messages. It is the benefit of a logically centralized, yet physically distributed messaging model that a bus provides that affords us the ability to manage these details in a management versus runtime context, which leads to higher agility and maintainability of your distributed messaging solutions.
Let’s look at creating a subscription for our North America fulfillment center. The most common way to work with rules is to use the RuleDescription class. Once you have an instance of this class, you set the FilterExpression property to one of the FilterExpression types, the most powerful of which is the SqlFilterExpression. As shown below, I am looking for a message that contains a property called “CountryOfOrigin” with a value of “USA”.
RuleDescription northAmericafulfillmentRuleDescription =
new RuleDescription();

northAmericafulfillmentRuleDescription.
FilterExpression = new SqlFilterExpression(
"CountryOfOrigin = 'USA'");
If I associate this rule to a subscription, then only messages representing orders from the USA would match the subscription and be delivered to the subscriber. If I don’t add a rule, no messages are filtered at all.
The other powerful aspect of rules is the ability to evaluate a property in the message and take a corresponding action if the criterion is met. For example, I can look at the country of origin for a specific order, and as an action, set a property on the message to identify the fulfillment center. To implement this, you simply add a FilterAction to the RuleDescription. I’ve modified the “fullfillmentRuleDescription” above to take advantage of this feature:
northAmericafulfillmentRuleDescription.FilterAction =
new SqlFilterAction("set FulfillmentRegion='North
America'");
As shown above, I’m looking for messages that have a Country of Origin value of “USA” for this particular rule. If a message matches that filter expression, I use a “SqlFilterAction” to set the Fulfillment Region to “North America.” Please keep in mind that actions are completely optional, and in the real world, there would likely be a more sophisticated process for identifying the country of origin, but simple, contrived examples make it so that articles get published. (
To tie this all together, I’ve created a BrokeredMessage from an Order object and added two properties to it, one for the country of origin and another for the fulfillment region:
Order order = new Order();
order.OrderId = 42;
order.Products.Add("Kinect", 70.50M);
order.Products.Add("XBOX 360", 199.99M);
order.Total = order.Products["Kinect"] +
order.Products["XBOX 360"];

BrokeredMessage msg = new BrokeredMessage(order);
msg.Properties.Add("CountryOfOrigin", "USA");
msg.Properties.Add("FulfillmentRegion", "");
As you can see above and in Listing 2, I’ve intentionally set the FulfillmentRegion to an empty string because I’m using the SqlFilterAction in my fulfillmentRuleDescription RuleDescription to set it based on the Country of Origin.
Since we’re working with SQL 92, you can add additional conditions to the subscription’s Rule Description such as grouping orders from Canada or Mexico into the North America fulfillment center:
RuleDescription northAmericafulfillmentRuleDescription =
new RuleDescription();
          northAmericafulfillmentRuleDescription.
            FilterExpression = new SqlFilterExpression(
            "CountryOfOrigin = 'USA' OR
             CountryOfOrigin ='Canada' OR
             CountryOfOrgin ='Mexico'");
            northAmericafulfillmentRuleDescription.
               FilterAction = new SqlFilterAction(
               "set FulfillmentRegion='North America'");
To summarize, there are three things happening here. First, I’ve instantiated a RuleDescription using its default constructor. Next, I set its “FilterExpression” property to a “SqlFilterExpression.” The SqlFilterExpression is one of a few FilterExpression types, but is the most useful because it allows for filtering using familiar SQL 92 operators such as “=” (equal), “>” (greater than) or “<” (less than).
Likewise, if you change the Country of Origin to anything but the three values, the Fulfillment Service Subscriber for North America will simply not receive the order because it is only interested in orders from the US, Canada and Mexico.
So, now we have some properties we can play with and we’ve defined a RuleDescription. The last thing we need to do is create the NorthAmericaFulfillmentServiceSubscription, register it with the NamespaceManager and supply the RuleDescription as a second parameter of the CreateSubscription method (as shown in Listing 2, I have also set up a subscription and corresponding rule for a fulfillment center in Asia):
SubscriptionDescription
northAmericaFulfillmentServiceSubscription =
new SubscriptionDescription{ Name =
"NorthAmericaFulfillmentServiceSubscription",
TopicPath = topicName };

manager.CreateSubscription(
northAmericaFulfillmentServiceSubscription,
northAmericafulfillmentRuleDescription);
As opposed to the Inventory Service and Credit Service descriptions, which don’t filter out any messages at all, only messages that have a country of origin of “USA” will be delivered to the North America Fulfillment subscriber. In addition, the fulfillment region property on the BrokeredMessage will be set to “North America” for each message that matches the subscription to assist with processing once the message is received by the subscriber.
As with all administrative functions, this configuration is typically a one-time thing, and in production scenarios, you will more than likely rely on the Azure Management Portal when creating and managing your Queues, Topics and Subscriptions. As with queues, once these things have been configured, you can move on to runtime operations.
The full Topic sample is in Listing 2, including the administrative context work we’ve done up to this point, and you will also find a fully functional sample in the solution download that is available with the online version of this article.
Publishing on a Topic
With all of the management work behind us, we can now shift focus to the runtime context and publish a message on the Topic. The primary way to send a message to a Topic is to use the TopicClient class. I’ve used the MessagingFactory just as we did when creating a QueueClient, only this time, I’m creating a TopicClient:
TopicClient client =
messagingFactory.CreateTopicClient(topicName);
Once I have the TopicClient instance, I can simply call Send on the TopicClient to send the message:
client.Send(msg);
client.Close();
At this point the work on the client side is done, allowing the client to go back to processing more orders, knowing that the order has been reliably delivered to the “OrdersTopic” Topic.
Subscribing to a Topic
To subscribe to a Topic, you first ask the MessagingFactory for an instance of the SubscriptionClient (just as you have for building a QueueClient and TopicClient), and pass it the name of the Topic, the subscription you are interested in and ReceiveMode (remember PeekLock is the default):
SubscriptionClient inventoryServiceSubscriber =
messagingFactory.CreateSubscriptionClient(topicName,
"InventoryServiceSubscription",ReceiveMode.PeekLock);
As shown in Listing 2, this process is repeated for each of the subscribers by creating a SubscriptionClient for each.
Next, I call Receive on the SubscriptionClient instance:
recdMsg = inventoryServiceSubscriber.Receive();
If a message matches the Inventory Service Subscriber subscription, it will be received. If you want to read all of the messages currently available in the subscription, you can do something like this:
while ((recdMsg =
inventoryServiceSubscriber.Receive(
TimeSpan.FromSeconds(5))) != null)
{
// Convert from BrokeredMessage to native Order
recdOrder = recdMsg.GetBody<Order>();

// Complete read, release and delete message from the fabric
inventoryServiceSubscriber.Complete(recdMsg.LockToken);
}
In addition to the RuleDescription, which I added when I registered the subscription for the North America and Asia fulfillment center subscriptions, it is also possible to add rules on the SubscriptionClient itself before calling Receive by calling the AddRule method and providing either a RuleDescription or a FilterExpression. Each matching rule will result in a message being delivered to the subscriber.
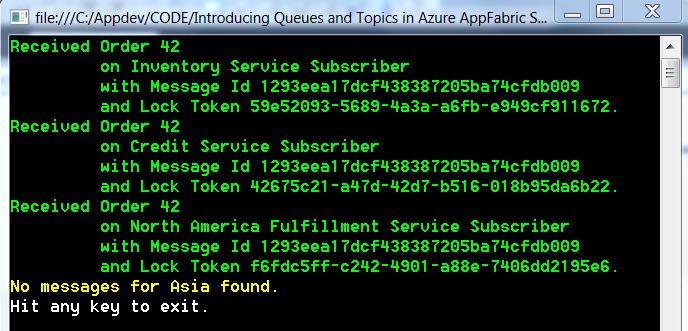
Figure 10 shows the result of running Listing 2. You can try the samples out for yourself by downloading the solution from the online version of this article.
Exploring the REST API
We’ve spent most of our time with the .NET Client API because it is the easiest programing model to learn with and is accessible to readers of multiple disciplines. That said, another very nice thing about the new features in Service Bus is that many of them are accessible across a variety of APIs including the .NET Client API (which we’ve been working with up to this point), the REST API and the NetMessagingBinding, which brings Queues and Topics to the WCF programming model.
While the .NET Client API offers the most access to the features that we’ve covered, you’ll find that most of the fundamental actions are also supported by the REST API. For example, with the REST API, you can:
- Create/delete a Queue or a Topic
- Get the description of a Queue or Topic
- Get a list of Queues, Topics, subscriptions and rules
- Send a message to a Topic or a Queue
- Read a message from a Topic or a Queue
Some of the features that are not available with the REST API include support for creating or retrieving rules, batching, group receivers, custom filter destinations and message enrichment.
A link to the Service Bus REST API reference is available in the sidebar and includes details for issuing HTTP/S requests for achieving each of these activities. The document is pretty comprehensive and provides you with the address template and HTTP verb to use for connecting to the Service Bus, the request (and response) headers to use for defining security and content types, request payload (if required), response payload (as appropriate) and expected response HTTP codes.
I’ll demonstrate how to retrieve a Queue description and send and receive a message to a Queue using the REST API by using one of my favorite testing tools called Fiddler (see sidebar for download).
Fiddler acts as a web proxy and logs all HTTP/S traffic between your computer and the Internet allowing you to view requests, responses, request/response headers and build your own requests. It’s a perfect tool for learning a new REST API because it requires zero code, is highly interactive and restricts you completely to HTTP constructs.
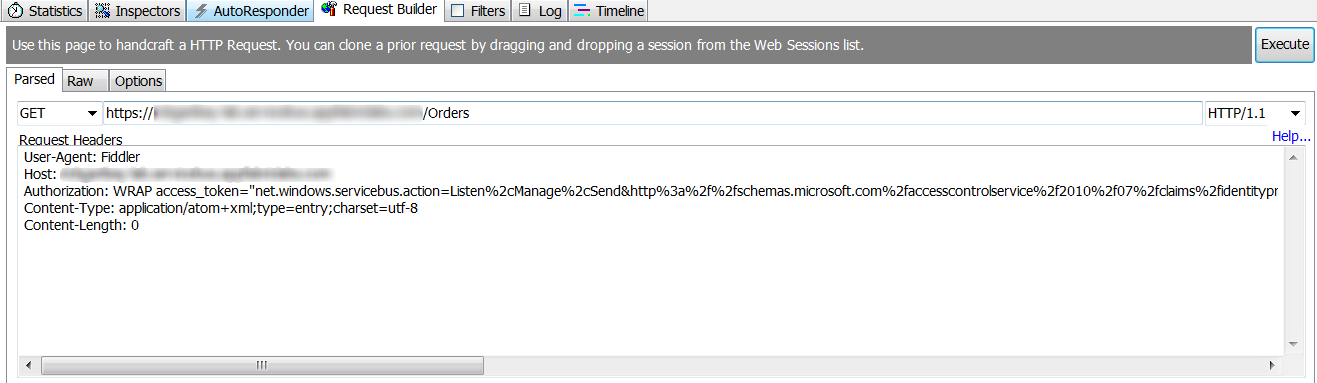
Getting the Description of a Queue
Since we already created a Queue called Orders, let’s take a look at how we can retrieve the Queue and inspect its properties using the REST API with Fiddler.
Since we won’t be writing any code, or using a Namespace Manager, you simply provide the request URI to your Service Bus endpoint, for example:
https://yourNamespace.servicebus.windows.net.
Since we’re addressing a resource, in this case a Queue, append the name of the Queue to the URI:
https://yourNamespace.servicebus.windows.net/Orders
Next, set the HTTP verb to “GET”.
The last thing we need to do is provide some request headers to include the content type and authorization token. Figure 11 shows the request in Fiddler.
The response comes back with a “200: OK” and a validated Atom entry with key Queue properties is returned in the response message as shown in Listing 3.
Send a Message to a Queue
Now that we’ve verified that the “Orders” Queue is available to receive messages, let’s look at how we can use the REST API to send a message.
Since we are sending a new message to the Queue, we’ll want to make a couple of changes to our request. First, change the request URI to include “/messages” in the path as follows:
https://yourNamespace.servicebus.windows.net/
Orders/messages
Next, change the HTTP verb to POST, and provide a payload for the message. In this case I just used plain text as shown in Figure 12.

The response comes back with a “201: Created”.
Reading a Message from a Queue
With at least one message in the “Orders” Queue, let’s retrieve it with the REST API. As with the .NET Client API, there are two approaches for reading a message. The default is to lock a message, read it and then release the lock once the message has been successfully processed (PeekLock). The other approach is to read and immediately delete the message (ReceiveAndDelete). I’ll demonstrate the latter.
In this case, we are going to potentially remove a resource, so we’ll change the HTTP verb to “DELETE”.
In addition, we can provide a timeout for the operation. The timeout allows us to tell Service Bus to wait for the elapsed time for a message to arrive before returning to the client. If we do not provide a timeout, the latest message in the Queue is returned. If no messages are available, an HTTP 204 is returned. Of course, if a message is present, it will return immediately, so think of the timeout as only really taking effect if there are no messages available for consumption at the time that you make your request.
To tell Service Bus to wait up to 60 seconds before giving up, the request URI looks like this and is as shown in Figure 13:
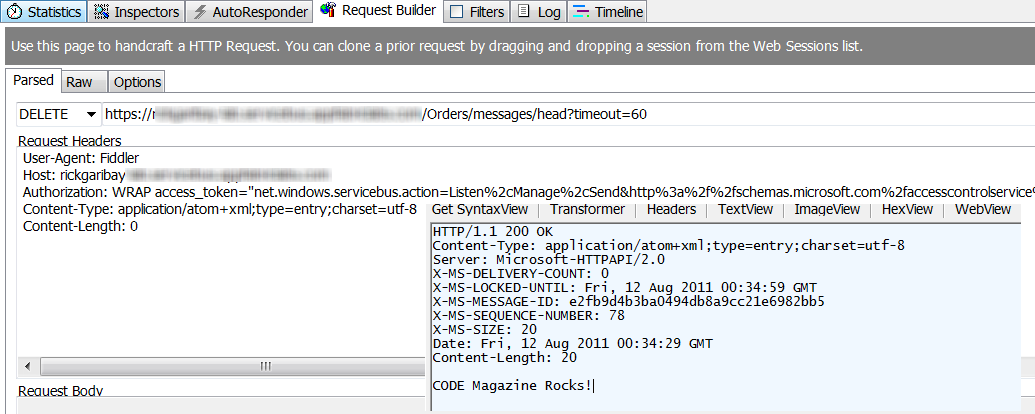
https://yourNamespace.servicebus.windows.net/Orders/
messages/head?timeout=60.
Provided a message is available within the timeout, the response comes back with “200 OK” and the payload is echoed back as shown in Figure 13 (note that I’ve overlaid the response into the request capture).
Exploring the WCF NetMessagingBinding
WCF is Microsoft’s core messaging framework for building service-oriented, distributed messaging solutions and provides a consistent programming model that unifies disparate messaging technologies and allows developers to think about the messaging domain in a more abstract sense consisting of endpoints (addresses, bindings, and contracts) and messages.
Many of Microsoft’s messaging investments including Service Bus relay, BizTalk LOB Adapters, SOAP, WS-* and REST have been built on this familiar programming model over the last five years and support for Service Bus Queues and Topics is no different.
So far, we’ve explored the new features in Service Bus by using the .NET Client API and REST API. As you can see, these messaging features are highly accessible across a variety of clients and platforms, which is important when you are building hybrid distributed messaging solutions.
While each of these imperative approaches has its strengths, many developers and architects prefer working with the abstraction that is provided by the WCF programming model because one of WCF’s biggest strengths is that it abstracts many of the underlying details from the development experience, which aids significantly in productivity and the ability to integrate with endpoints quickly.
Let me illustrate.
Assuming you are already familiar with WCF, you should be very comfortable with the code in Listing 4, which consists of a service contract called “IOrderService”, a data contract called “Order” and a concrete type that implements the service contract called “OrderService”. This is a very simple and consistent way to define the interface, message and implementation of a service with WCF.
Additionally, Listing 5 provides a boilerplate example of hosting a WCF service in a console application. If you’re familiar with WCF, you should be well acquainted with everything I’ve shown you with one exception - a new binding called NetMessagingBinding. The NetMessagingBinding provides everything you need to take advantage of Service Bus Queues and Topics in the runtime context with WCF.
As you can see below, I instantiate an instance of NetMessagingBinding just as I would any binding when imperatively hosting a WCF service:
NetMessagingBinding binding = new
NetMessagingBinding();
ContractDescription contract =
ContractDescription.GetContract(typeof(IOrderService),
typeof(OrderService));
To set the Shared Secret credentials for obtaining an ACS token, you set the TokenProvider property on the TransportClientEndpointBehavior as shown below:
TransportClientEndpointBehavior transportBehavior =
new TransportClientEndpointBehavior();
transportBehavior.TokenProvider =
TokenProvider.CreateSharedSecretTokenProvider(issuer,
key);
Next, I create a ServiceEndpoint, passing in the ContractDescription, the instance of the binding, the service namespace URI and add the TransportClientEndpointBehavior:
ServiceEndpoint endpoint = new
ServiceEndpoint(contract, binding, new
EndpointAddress(serviceBusEndpointAddress.
AbsoluteUri));
endpoint.Behaviors.Add(transportBehavior);
You’ll notice in Listing 5 that I’ve set the endpoint address URI to the familiar Service Bus endpoint of https://yourNamespace.servicebus.windows.net/Orders">https://yourNamespace.servicebus.windows.net/Orders, and appended “Orders” since I am listening for messages on the “Orders” Queue.
Once the ServiceHost is opened, the service is ready to begin receiving messages from the Orders Queue via Service Bus:
ServiceHost host = new
ServiceHost(typeof(OrderService),
serviceBusEndpointAddress);
host.AddServiceEndpoint(endpoint);

host.Open();
As shown in Listing 6, on the client side, things are just as simple. I create a ChannelFactory, which will give me my client proxy, and I simply send the Order message to the Queue using the “ProcessOrder” operation and the result is shown in Figure 14.

Of course, you could mix and match clients. With the OrderService running, send a message to the Orders Queue using the .NET Client API or REST API and almost immediately, the OrderService should receive the message.
What’s happening is that even though the client is sending a BrokeredMessage, the NetMessagingBinding takes care of converting from the BrokeredMessage to the WCF message at the service. Likewise, when using a WCF client, it will translate from the WCF message to the BrokeredMessage before the message is sent across the wire and written to the Queue (there are some limitations with this when using properties with a BrokeredMessage which require you to use the BrokeredMessageProperty class to specify which properties should be attached).
One of the added advantages of using WCF, besides the greatly simplified programming model, is that you don’t have to worry about polling imperatively for new messages as the NetMessagingBinding takes care of that for you. If you want to control the interval,
you can set the MessagingFactorySettings.NetMessagingTransportSettings.BatchFlushInterval knob to increase or decrease the polling interval.
Closing Thoughts
As you can see, Service Bus provides critical capabilities for composing distributed messaging solutions for the hybrid enterprise and delivers on the Software + Services vision that was first laid out over five years ago.
Queues and Topics build on top of an already robust set of capabilities introducing new levels of reliability for building loosely coupled distributed solutions across a variety of clients and services, be they on-premise, in the cloud, or a combination of the two.
There are many exciting changes happening within Microsoft around integration and middleware, and the release of Service Bus Brokered Messaging/Queues and Topics is a strong reflection of the commitment to the platform that I believe is going to make this new wave of innovation more exciting than ever before.
Lastly, it’s been a great privilege to have the opportunity to work with the Azure Service Bus team and experiment with the early bits ahead of release. I’d like to thank Todd Holmquist-Sutherland, Clemens Vasters, Abhishek Lal and David Ingham for the unprecedented access to their team, resources and information as well as kindly and patiently answering my many questions over the last several weeks.
Long live messaging!
