


Visual Studio 2005 will ship some great new controls, but suppose you want your own control to play in the Data Sources Window?
In this article, I'll explain how the Data Sources Window in Visual Studio 2005 will enable you to extend the list of controls supported for Drag Once Databinding. I'll show you how to create a PhoneBox control and an AddressBlock UserControl.
“I don't know what I don't know.”
In the September/October 2004 issue of CoDe, I discussed how developers can use Windows Forms to create a Data Bound form with a single drag & drop action. With Visual Studio 2005, this works on all our client platforms including Windows Forms, Visual Studio Tools for Office, Devices, and even Microsoft Reports using Reporting Services. In this article, I'll explain how you can use Drag Once DataBinding with your own set of controls.
First, a Quick Recap
Using the new Data Sources Window, developers can add several different types of Data Sources including databases using typed DataSets, business objects, and XML Web services. The Data Sources Window displays the “schema” of these objects. If you have a DataSet with a list of DataTables, you can navigate through the DataSet and drag your tables or columns to your form. If you have an object with public properties, you can drag away. As a result, Visual Studio creates the specific controls and labels; named and databound. Simply hit F5, and away you go.
For more detail, you can see the full article online at www.code-magazine.com/Article.aspx?QuickID=0409051
So now that you've got the basic idea down, and you've played with all the new controls that ship with Visual Studio 2005, you want to plug in your own control. How does this all work?
Customizing the Controls
To get a feel for how the model works, let's look at customizing the controls that we'll be shipping in the box.
Setting Up a Data Source
Use VS 2005 to create a new Windows Forms project. It doesn't really matter whether you choose VB, C#, J#, or even C++. Open the Data Sources Window and choose Add New Data Source. Choose Database to start with. (This article will cover objects a bit later*).* It doesn't really matter what database you use, but I'll use Northwind.
Once you provide a connection, you'll be prompted for a connection string name. If you're using Beta 1, be sure to check both checkboxes to save your connection string. We've changed this a bit in Beta 2 to be more intuitive, which hopefully doesn't need explanation, but that's what feedback is all about. (See sidebar, MSDN Feedback Center). Choose one or more tables from the Database Objects step of the wizard. I've chosen Employees, Orders, and Products because they have columns with several data types, which will be helpful for this example.
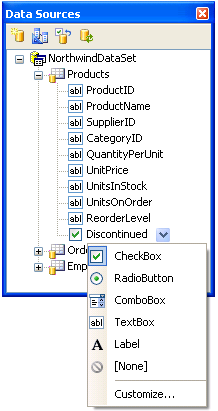
In the Data Sources Window, expand some of the tables to see the list of columns. Under the Orders table you can see some controls mapped to DateTimePicker, and Photo defaults to none. Test question: Why does the Northwind Employees.Photo column default to None as opposed to a Picture Box? Answer: The column in the dataset comes through as a Byte Array. We don't actually know if this is an image, Word document, or the binaries for Halo® 2. You can see that Products.Discontinued defaults to CheckBox, but if you click the DropDown you may notice a TextBox available as well.
Let's say you want to limit Boolean data types to CheckBox and you know that most, if not all, of your applications use binary data as Photo. You want to “customize” the list, and change the defaults.
Changing the Controls
In the Data Sources Window, select any of the nodes in the TreeView. You'll see the list of controls associated with that data type (Figure 1). For Employee.Photo you can see the list of controls associated with Byte Array. For Products.Discontinued, you see controls associated with Boolean. Choose Customize to launch the Tools-Options dialog box. Note that you're not necessarily customizing just one of these columns. This is just a shortcut to the Tools-Options pane (Figure 2).
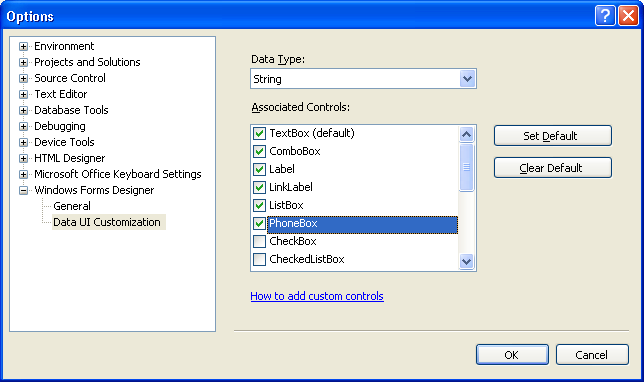
Tools-Options
Notice that this Data UI Customizations tab is under the Windows Forms Designer. The changes you make here will be specific to Windows Forms. They'll have no affect on the Devices Designer, Visual Studio Tools for Office, or Microsoft Reports. Each designer has its own list of controls.
Different Controls per Designer
Although there are many healthy debates about write once, run anywhere, this notion is still not near reality. Each application model has unique characteristics that require a different interface design. On a Tablet PC, users work with an Ink Pen. On a device, they tap. On Office, users work with Excel and Word documents. As a result, we have different controls based on the project type, or more specifically, the form designer.
Designing for the unknown is a key element when designing developer tools.
In order to enable different designers, and thus allow developers to map their own set of controls to different data types, the Visual Basic team designed an infrastructure to support different controls per designer. Based on the designer (Windows Forms, Devices, Visual Studio Tools for Office, Microsoft Reporting Services…), you will see a different set of controls. The logical extension would be Web Forms, but unfortunately the Data Sources Window will not be supported for Web development in Visual Studio 2005. For VS 2005 we only plan to support control customization for Windows Forms. However, based on your feedback, we'll likely add control customization for all designers and add support for the Data Sources Window in Web projects in a post-VS 2005 release.
Data Types
Looking back at the Tools-Options (Figure 2) you can see a couple of elements. You can see a Data Type DropDown at the top. You can associate this list of data types with specific controls. This list is a fixed list of types. Unfortunately we didn't have the time to make this list extensible, but, we did create a bucket for the things we knew we didn't know about.
“I don't know what I don't know”
There is a great saying I like to quote: “I don't know what I don't know.” Designing for the unknown is a key element when designing developer tools. By their very nature, developers will come up with scenarios our team just didn't think of when we originally built a given version of the product. To make sure tools don't get in the way, our team tries to incorporate designs that don't box developers into a pattern. We can optimize for a given scenario, but we should never constrain developers with glass ceilings. Visual Studio 2005 uses partial classes to enable a set of unknown extensions to the DataSet Designer. For custom controls, VS 2005 has a similar model. Under the Data Types DropDown, in the Tool-Options dialog, you'll see [Other]. This is the big 'ol bucket for any type that VS 2005 doesn't recognize. I'll show you how to use [Other] later when I show you how to create an AddressBlock control.
List Objects and Controls
In addition to [Other] you'll also see [List]. The List item displays controls for list objects within the Data Sources Window.
List objects are any object that represents an IList. This includes DataTables as well Object collections (such as Customer.Orders). In addition, any object displayed in the root of the Data Sources Window is, by default, considered a List. For instance, if you add the Address object defined in Listing 1 to the Data Sources Window it will appear in the root. As a result, you can choose the “Drop Type” for Address as a DataGridView or Details. In Beta 2 you'll be able to choose ComboBox as well. To understand this in more detail, I discussed how the DataConnector can turn a single object into a list in my last article.
Listing 1: Address type
Imports System.ComponentModel
''' <summary>
''' Represents a basic US domestic Address object
''' </summary>
Public Class Address

    Public Sub New()
        InitFields()
    End Sub
    Private Sub InitFields()
        _line1 = String.Empty
        _line2 = String.Empty
        _line3 = String.Empty
        _city = String.Empty
        _stateCode = String.Empty
        _zipCode = String.Empty
        _country = String.Empty
    End Sub

    Public Property Line1() As String
        Get
            Return _line1
        End Get
        Set(ByVal value As String)
            _line1 = value
        End Set
    End Property

    Public Property Line2() As String
        Get
            Return _line2
        End Get
        Set(ByVal value As String)
            _line2 = value
        End Set
    End Property

    Public Property Line3() As String
        Get
            Return _line3
        End Get
        Set(ByVal value As String)
            _line3 = value
        End Set
    End Property

    Public Property City() As String
        Get
            Return _city
        End Get
        Set(ByVal value As String)
            _city = value
        End Set
    End Property

    Public Property StateCode() As String
        Get
            Return _stateCode
        End Get
        Set(ByVal value As String)
            _stateCode = value
        End Set
    End Property

    Public Property ZipCode() As String
        Get
            Return _zipCode
        End Get
        Set(ByVal Value As String)
            _zipCode = Value
        End Set
    End Property

    Public Property Country() As String
        Get
            Return _country
        End Get
        Set(ByVal value As String)
            _country = value
        End Set
    End Property
#Region " Private Backing Fields "
    Private _line1 As String
    Private _line2 As String
    Private _line3 As String
    Private _city As String
    Private _stateCode As String
    Private _zipCode As String
    Private _country As String
#End Region
End Class
In the Tools-Options dialog box, let's select Boolean and remove RadioButton, ComboBox, TextBox, and Label. Then select Byte Array and select PictureBox. Click the Set Default button to make this the default control. Then remove Label, LinkLabel, ComboBox, and ListBox from the Byte Array. Click OK.
You've now customized the controls within your Data Source Window. Take a look at your DataTables within the Data Sources Window.
Are These Customizations per Project or per Machine?
So far, you've just changed machine-level settings. All the changes you've made in the Tools-Options dialog box are stored on your computer under Documents and Settings. Since you've changed the Windows Forms controls, they're in WinFormControls.xml. When Devices, Visual Studio Tools for Office, and Reporting Services support customization, they will likely have their own files as well.
Per Project Settings
Now that you have your machine defaults established, I'll show you how to make some changes to your specific project. If you look at Employee.Photo, you'll notice it now defaults to a PictureBox control. By choosing the DropDown next to the Photo column, you'll notice that you only have PictureBox and None. At this point you haven't changed any machine defaults within the project.
Since users cannot edit the EmployeeID column, let's change it to a Label by choosing Label from the EmployeeId DropDown in the Data Sources Window. It would be nice to default primary keys to Label, but you can't. Since the EmployeeId is an integer, there isn't a way to differentiate it from other integers, and I doubt you want to make the default control for all integers to be Label. I know the developer in you is saying, “But you have a primary key, why can't you store a hashing of attributes and data types to set different controls and properties.” We could have, but we only had so much time, and there are other enhancements we wanted to focus on, like Smart Captions (see sidebar, Smart Captions Are In).
It would be nice to default HomePhone to a MaskedEditBox with a specific mask, but you can't. Well, actually you can, sort of. Visual Studio 2005 doesn't have the ability to set properties on a selected control, but you can create your own inherited control. I'll show you how to do that in a little bit. First, let me show you where Visual Studio 2005 will store these changes.
The place Visual Studio 2005 stores the overridden control depends on whether you're using a DataSet, an object, or a Web service. For DataSets, Visual Studio 2005 buries a new file below the DataSet.xsd file. If you press the “Wizard of Oz” button, (Show hidden files), you'll see the files behind the curtain. One of the new files has an .xsc extension. This file contains the control mappings for your dataset. If the file is empty, Visual Studio 2005 will always use the defaults that you configured in the Tools-Options dialog box. So if you delete the file you will reset the project defaults to your machine settings.
Files Behind the Curtain
While you're looking back here, I might as well mention the three other files. The .xss file is where VS 2005 stores the location and size of all the elements on the DataSet Designer. This is the “Make me pretty” file. The DataSet.designer.vb file is the generated code file. VS 2003 would generate directly into the DataSet.vb/DataSet.cs file. In VS 2005 these files are yours to work with. VS 2005 won't clobber over your code. I covered a bit of this partial class support in the last article, but I'll delve into this deeper in a future article.
Object Control Mappings
For objects, VS 2005 stores this information in the .datasource file. If you look behind the My Project node you'll see a Data Sources folder that contains your .datasource files. This directory will only exist if you've added an object data source. Within this file, VS 2005 stores a pointer to the type, and any overridden control types. For XML Web services, VS 2005 uses the same model as objects, but VS 2005 stores them under the Web References folder.
Are all control “Drop Types” stored in these files?
No. One of the promises I made to myself when I joined Microsoft was to do what I can to make source code control work better within VS. Let's take another look at the way Visual Studio 2005 displays DropTypes in the Data Sources Window. For each column/property, you'll probably establish a project standard. The EmployeeId will likely always be a label. The HomePhone will likely be a PhoneBox control, (I know, I'm getting ahead of myself). The point is you'll likely establish standards and stick with them for the life of a project. However, let's take a look at the [List] DropTypes. These are the nodes in the root of the Data Sources Window, or any sub list such as Customer.Orders. Now I'm excluding 1:1 objects such as Customer.Address. I'll discuss these in a minute. In the 1:Many case, you'll likely switch back and forth between creating a Grid and individual controls (Details). We didn't see much value in storing a project default here. It seemed more frustrating that each time someone changed from Grid to Details they'd checkout the .datasource or dataset files and block other members of their team. I had hoped to store this List Drop Type in the proj.user file which doesn't get checked into source control, but we just didn't get the time. VS 2005 will keep your setting in memory, so as long as you keep VS open, it will keep your selection. If you close then open your project, VS 2005 will default to the DataGridView, or whichever control is at the top of the list.
But what about Customer.Address DropTypes? VS 2005 treats these differently. In this example, address isn't a list. It's simply a sub object that hangs off Customer. VS will store this DropType within the .datasource or .xsc file. So, later on when you create an AddressBlock control, VS can default it to Customer.Address and it will “stick” and be shared with the rest of your project team.
We're still trying to figure out how developers will know to check-in the .datasource files under MyProject\DataSources, so keep this in mind as we work through RTM of VS 2005.
Adding My Own Control
Now that you have some background on the basic customization features, how do you add our own controls? For the most part, it's no different then creating any user control.
PhoneBox Control
Don't you wish you could just have a simple control that automatically formatted a TextBox for phone number entries? In Visual Studio 2003, this was quite a bit more complex. In Visual Studio 2005, it's easier. Using the new MaskedTextBox control you can simply map the HomePhone column to this control and manually set the Mask each time, but even that's a pain. If I decide I want to change all my formatting from (999) 867-5309 to 999.867.5309, I'd have to go to each and every form and change the mask. Besides, this is a nice simple control. I'm sure you'll have more complex examples that will work just as well.
The DataConnector/BindingSource can turn a single object into a list.
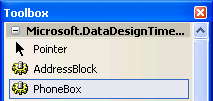
Let's start by creating a PhoneBox control. Add a new Control Library to your solution. Creating a separate project is important because you want this control to show up in your custom list all the time. Once you make this control a project default, subsequent projects will need to find the assembly. It's best to save you're DLL in a safe, common location. You don't need to GAC it, 'cause that's just evil. Now add the code from Listing 2 to your project. Build the project so that the PhoneBox control compiles successfully. The key is to verify your PhoneBox shows up on the Toolbox, as in Figure 3. You may need to select Rebuild All to get it to “kick in.”
Listing 2: PhoneBox control
''' <summary>
''' Represents a MaskedTextBox pre-masked with US Phone Format
''' </summary>
''' <remarks>In Beta 2, the DefaultBindingProperty will change from InputText to Text</remarks>
Public Class PhoneBox
    Inherits System.Windows.Forms.MaskedTextBox
    Public Sub New()
        MyBase.New()
        MyBase.Mask = "(999) 000-0000"
    End Sub

    <System.ComponentModel.DefaultValue("(999) 000-0000")> _
    Public Shadows Property Mask() As String
        Get
            Return MyBase.Mask
        End Get
        Set(ByVal Value As String)
            MyBase.Mask = Value
        End Set
    End Property
End Class
Magic in the Toolbox?
If you remember the Tools-Options dialog box for control customization, you may have noticed that not all controls were displayed. When we were trying to figure out how to filter the appropriate controls, we wanted to leverage something that already existed. Searching the entire hard drive, or requiring registration in the GAC (the better but still evil replacement for DLL hell*),* just didn't seem like a reasonable limitation. We decided to leverage the controls in the Toolbox, figuring this is where you'd likely place them anyway. When the Tools-Options dialog box loads, it iterates through all the controls in the Toolbox and loads any control that has one of three new binding attributes described later. This is why you need to make sure the PhoneBox shows up in the Toolbox.
So how do you proceed? You guessed it. Go to the Tools-Options dialog box and add your PhoneBox to the String data type. With that done, you can now go to the Data Sources Window and change the default control for Employee.HomePhone to PhoneBox.
So that sums up the simplistic model for custom controls. If you inherit from one of the .NET 2.0 Framework controls, and you leverage the same default binding property, that's all you need to do. Now I'll use an AddressBlock example to show how you can change the default binding property.
Will my 1.1 controls work with Drag-Once Databinding?
Hmmmm, maybe. So far we've been able to tweak the control list easily because we're leveraging 2.0 controls. When we started down this path, we quickly realized we didn't have the right data about each control to determine which property to default Databind to. In typical Microsoft fashion, we had too much information. We thought about building a Google search into the designer to find the right databinding property. But then how would I build my demos on the plane just hours before the next conference?
The Devil Is in the Details
On the surface, you might think this is a relatively simple thing to do. Create a control, name it, create a label, and establish databinding. But wait. Which property should VS bind to? Many controls support databinding on multiple properties. Even the TextBox control supports databinding to Text and Tag properties. Look at Table 1 and you'll see that most controls have more then one bindable property.
As you can imagine, this got even more complicated when we looked at complex controls such as the DataGridView. Sure we could assume DataSource, but that's a very restrictive view for control vendors. Say it together, “I don't know what I don't know.” Yes, we really do think about our third-party control vendors up front.
Now consider Lookup controls such as the ListBox or the ComboBox. They actually databind in a two-dimensional fashion. For a ComboBox to work effectively, you need to establish two sets of properties. One set to populate the list, and one to pull out the selected value. I've illustrated this in Figure 4.
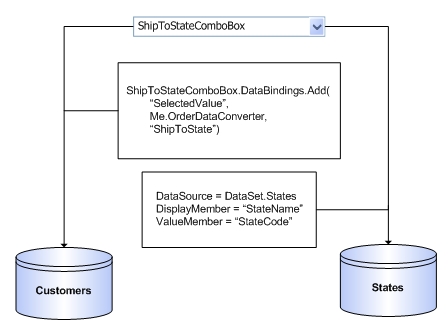
Suppose you want an Order form. That form needs to display the BillToState and the ShipToState. You may want to store the two-letter state code, but you want to display the full state name for your user. You can use a ComboBox to set several properties (Table 2).
I'll cover some cool new “lookup” control features in another article. This is another one of my pet peeves, so look for some lookup features in a post-Beta 1 build of Visual Studio 2005.
So now that I've outlined the complexity, how did we solve this?
DataBindingAttributes…
To solve this problem, the VB and Client teams introduced some new attributes to System.ComponentModel (see Table 3).
To see how we've used these, let's take a look at a few controls. Listing 3 lists some examples of how to use these attributes.
Listing 3: Sample controls with new databinding attributes
''' Textbox
<DefaultBindingProperty("Text")> _
Public Class TextBox

''' DataGridView
<ComplexBindingProperties("DataSource", "DataMember")> _
Public Class DataGridView

''' ComboBox
<LookupBindingProperties("DataSource", "DisplayMember",  "ValueMember", "SelectedValue"), _
DefaultBindingProperty("Text")> _
Public Class ListControl
...
Public Class ComboBox
    Inherits ListControl
Looking at TextBox, you can see Text is the default binding property. You can also see how DataGridView uses the DataSource property, and you can start to see the complexity of the ComboBox. We actually decorate ListControl with both the Default and LookupBindingProperties attribute. I'll explain that in a minute. Also notice that we actually implement these attributes on ListControl. This means that both ComboBox and ListBox get these attributes “for free.” This is how the PhoneBox got it's DefaultBindingProperty attribute for free. To clear an attribute from a control, you simply assign the attribute with no value. Notice the parameterless constructor on each of these attributes. For instance, let's say you have a control that inherits from TextBox but you don't want to support simple binding. You want to support List, or Complex binding to do something like an auto-complete control.
<DefaultBindingProperty(""), _
ComplexBindingProperties("StatesDataSoruce", _
 "DataMember")> _
Public Class StateControl
   Inherits TextBox
The above example will essentially clear the DefaultBindingProperty attribute. This means you won't be able to place the StateControl on a column or property.
Now that you know more about the attributes, you probably wonder how they get used. It turns out these attributes are helpful in several ways. How does VS 2005 know which controls will even work with Drag Once Databinding? Does a control support “Connect the Dots” data binding? What controls should VS 2005 display for the [List], compared to which controls should it display for the columns or properties? Which controls should display Lookup smart tags?
Remember back in the Tools-Options dialog box you could select the controls that are associated with [List]? These are the controls that appear on the root nodes of the Data Sources Window as well as any sub list item such as a DataTable or Customer.Orders.
Beta 2 will also include controls that have the LookupBindingProperties attribute in the [List] Controls.
How is the Lookup Attribute used?
In Beta 1, not very well. In Beta 2, we'll be better. As noted above, it can be quite difficult when working with ComboBoxes to remember the specific properties to set. It also makes it a bit more difficult to default behavior in the Data Sources Window. Consider the sample Orders form with a ShipToState ComboBox. The application has an Orders DataTable and a States DataTable. In the Data Sources Window, you default the Order.ShipToState to a ComboBox. When you drag this column to your form, VS 2005 will create the ShipToStateComboBox as well as a label. At this point VS 2005 knows to DataBind the Text to Orders.ShipToState. Wait, did I say Text? Yes.
The problem is that VS 2005 doesn't yet have anything set on the DataSource. Until the DataSource, DisplayMember, and ValueMember properties are set, the ComboBox doesn't have anything to pull out of the list for SelectedValue. At this point VS uses the DefaultBindingProperty attribute to find the Text property. The LookupBindingProperties aren't used, yet. If you run your form you'll notice an empty ComboBox. Hmmm, wouldn't it be cool if you could just drag that States DataTable to the ComboBox? We thought so to, so **in Beta 2 **when you drag a list from the Data Sources Window, (“Connect the dots”), onto an existing control that has the LookupBindingProperties attribute, VS 2005 will set the proper properties. VS will set the DataSource to a BindingSource that in turn has its DataSource set to the list you selected. But wait, there's more. For just $19.99, we'll also include setting the ValueMember to the first column of the primary key of the table. If no primary key is found, such as objects, VS will set the ValueMember to the first property found on the list. In addition, VS will set the DisplayMember to the first string on the DataTable, or first string property on the object. If no strings are found, VS will grab the first property on the list, regardless of its type. “But what about the Text data bindings?” No problem. VS uses a little VB pixie dust and moves the information from the data bound Text property to data bind the SelectedValue property. VS actually reads the DefaultBindingProperty attribute and LookupBindingProperties attribute to determine which properties to use, so you can implement your own properties on your own custom controls.
In Beta 2, VS will be able to do this in the reverse order as well. In the Data Sources Window you can set the States list (DataTable or Object) to a DropType of ComboBox. When you drag the States list to the form, VS will create a StatesComboBox with the DataSource, DisplayMember, and ValueMember properties established with the same logic above. You can then drag the Orders.ShipToState column to the ComboBox and VS will databind the SelectedValue to Orders.ShipToState. VS 2005 won't databind to the Text property because VS will determine that the DataSource property has been set so VS will pull the LookupMember value from the LookupBindingProperties attribute.
AddressBlock Custom Control
Now let's do something a bit more complicated. Or at least Visual Studio 2003 made this idea more complicated. How many times have you built a form that has a set of controls that represent an address? How frustrating is it to have to set the width of each control, name each one, or group the City, State, Zip on the same line? Wouldn't it be cool to just do that in one place, then, just instance the control on all of your forms? I think this was one intention of the UserControl, however, the UserControl wasn't very user friendly when it came to databinding. Ok FoxPro guys, I know you could do this seven years ago. I was one of those guys, and it's always frustrated me about VB and now Windows Forms.
I will show you how to create a UserControl with the typical Address controls. Line1-3, City, State, Zip, Country. Now I could go a little further and make the State and Country controls ComboBoxes and load them from a database, but Rod (CoDe's Editor in Chief) has already been gracious enough to extend the deadline to write this article for me. Besides, this is not a book and I'm already running long.
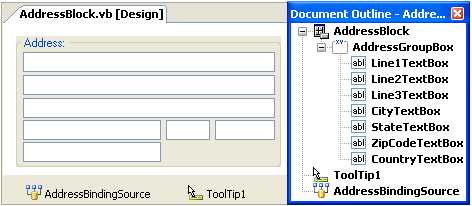
Let's add a UserControl to your Control Library project?the same project you added the PhoneBox control to. Now you could layout your forms from the Toolbox, but what fun would that be? You would have to name and databind each control; that's just so “old school.” Let's add the Address object to your control library project using Listing 2. Choose Rebuild Solution, then run through the Data Sources Wizard to add the Address object. It's important to have the Control Library selected when you run through the Data Sources Wizard. Remember, the Data Sources Window shows data sources for the active project. Set the Address DropDown to Details and drag it to your AddressBlock user control. Delete the labels and BindingNavigator and align the controls similar to Figure 5.
You can now add the code behind AddressBlock to expose a Public property named Address that you'll use to set to the Address BindingSource.DataSource (Listing 4**).** Notice the code also adds the DefaultBindingProperty attribute.
Listing 4: AddressBlock code behind
Imports System.ComponentModel
' Set the Binding Property for the DataSourceWindow
<DefaultBindingProperty("Address")> _
Public Class AddressBlock

    Private _address As Address
    ''' <summary>
    ''' Represents a standard Address Block
    ''' </summary>
    <Bindable(True)> _
    Public Property Address() As Address
        Get
            Return _address
        End Get
        Set(ByVal value As Address)
            _address = value
            If Not Me.DesignMode And _
                _address IsNot Nothing Then
                Me.AddressBindingSource.DataSource = _address
            End If
        End Set
    End Property
End Class
Columbus Was Right…
Long ago, Columbus discovered the world wasn't flat. Neither are your object models. The VS 2003 designers also thought the world was flat. Suffice it to say, the Columbus window, (AKA the Data Soruces Window) will display your hierarchical object model. VS 2005 intelligently handles 1:1 and 1:Many objects. You can see examples in Customer.Address or Customer.Orders. To get a feel for this, let's put your Address object to work.
1:1 Objects
Let's create a Customer object that has a few properties, and of course the Address object. Listing 5 shows the details of the Customer object. Add this code to your user control project.
Listing 5: Customer object
Imports System.ComponentModel.Collections.Generic
''' <summary>
''' A company that purchases goods
''' </summary>
Public Class Customer
    ''' <summary>
    ''' Creates a new customer.  Does NOT load the orders for
    ''' the customer by default
    ''' </summary>
    Public Sub New()
        Me.InitNew()
    End Sub
    ''' <summary>
    ''' Creates a new customer.  Does NOT load the orders for
    ''' the customer by default
    ''' </summary>
    Public Sub New(ByVal customerId As String, ByVal companyName As
    String, ByVal address As Address, ByVal phone As String)
        InitNew()
        _customerID = customerId
        _companyName = companyName
        _address = address
        _phone = phone
    End Sub

    Private Sub InitNew()
        _customerID = Guid.NewGuid.ToString("N")
        _companyName = String.Empty
        _address = New Address()
        _phone = String.Empty
    End Sub

    Public ReadOnly Property CustomerID() As String
        Get
            Return _customerID
        End Get
    End Property

    Public Property CompanyName() As String
        Get
            Return _companyName
        End Get
        Set(ByVal Value As String)
            _companyName = Value
        End Set
    End Property

    Public ReadOnly Property Address() As Address
        Get
            Return _address
        End Get
    End Property

    Public Property Phone() As String
        Get
            Return _phone
        End Get
        Set(ByVal Value As String)
            _phone = Value
        End Set
    End Property

    Private _customerID As String
    Private _address As Address
    Private _companyName As String
    Private _phone As String
End Class
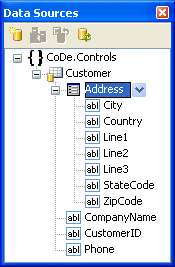
Now, rebuild your project and add the Customer object as a data source to your EXE project. At this point, you should see something that looks like Figure 6.
Are You Ready Yet? Are You Ready Yet?
Yes SpongeBob®, we're finally ready to add your custom control. You now have a Customer object that has several properties. One of them happens to be an Address object (1:1). If you remember the Tools-Options dialog box, you'll remember that Address is probably not listed in the Data Types. But, the big 'ol bucket [Other] is.
Let's add your AddressBlock control. Using the shortcut from the Data Sources Window, select Customize. Remember, it doesn't matter where you select it because it's just a shortcut. Now select [Other] as the Data Type and click AddressBlock. This is one example of how we design for the unknown.
Good News, Bad News…
Let's start with the bad news. If you're using Beta 1, you're likely wondering why your AddressBlock doesn't show as the DropType for Customer.Address. As with all Betas, not everything is fully baked.
The good news: You've heard from Columbus and he didn't fall off the end of the earth. He's just stopping off at Beta 2 and will be back by RTM to show us his journey.
To get this working in Beta 1 isn't difficult. Using the Data Sources Window, change Customer DropType to Details and drag it to your form. Now, using the Toolbox, find your AddressBlock control and drag it to your form. Ahhh, connect the dots, right? Well, no, this doesn't work in Beta 1 either. “Connect the Dots” is the cook on the Santa Maria. So we'll have to just use old faithful, the property grid. Select the AddressBlock control and expand the DataBindings section. You should see Address as a bindable property. Select the DropDown and you can select CustomerDataConnector or CustomerBindingSource, depending on which build of VS you are using, and select Address. Voila! You've got a picture of the earth from space; and yes, its round, it's hierarchical, and it doesn't require lots of designer gooey interfaces.
I could take this further and load the form with a collection of customers where each has an order. However, I really need to finish up here and leave room for some paying advertisers. You can download a more full-featured sample using a link from my team's blog. http://blogs.msdn.com/vbteam/category/4754.aspx
DataBinding Is Goodness
Hopefully you've seen several more examples of how the VB and Client teams are working hard to make databinding more reliable in your applications. In future articles, I'll write more about our Lookup features and the work we're doing to support DBNull and Nullable types.
Please visit our team blog to provide feedback, both good and bad. Also, don't forget the MSDN feedback center to log any bugs you find. As a Microsoft developer, you have new and direct ways to help us build the best development tool there is.
Table 1: Controls and their bindable properties.
| Control | Bindable Properties |
|---|---|
| TextBox | Text, Tag |
| DateTimePicker | Checked, Tag, Text, Value |
| CheckBox | CheckAlign, Checked, CheckState, Tag, Text |
| ComboBox | SelectedItem, SelectedValue, Tag, Text |
Table 2: ComboBox properties used for lookup.
| Property | Usage |
|---|---|
| DataSource | The IList used to populate the combo box. This might be the States datatable from a DataSet or a List(Of States) object. Gotta love generics... |
| DisplayMember | Indicates which property of the IList to use to display to the end user. DisplayMember could be the StateName column of the StatesDataTable or the Property name of the States object. We use Member because in this case we don't really need a property, just a named "member" of the collection. |
| ValueMember | Identifies which property of the IList to use to pass to the SelectedItem property. ValueMember could be the StateCode column of the StatesDataTable or the StateCode property of a States object. |
| SelectedValue | The value of the property named in ValueMember from the list in DataSource, for the currently selected item. |
Table 3: New databinding attributes.
| Attribute | Description |
|---|---|
| DefaultBindingProperty | Used for simple controls like the TextBox. |
| ComplexBindingProperties | Used for controls that manage a list like the DataGridView. |
| LookupBindingProperties | Used for controls that manage a list, as well as an individually bound item such as ComboBox. |
