


Using user controls for each of your screens is a great way to build WPF applications. Instead of having multiple windows pop-up on a user's screen, each user control can be loaded onto one main window. You do miss out on having the Minimize, Maximize, and Close buttons that a WPF window provides with this method. That's an easy situation to rectify and is the subject of this article.
To get the most out of this article, download the sample code from the CODE Magazine website, and open the solution in the Start folder. You can then follow along and enter the code from this article. You should also review my blog post entitled “An Architecture for WPF Applications” located at http://blog.pdsa.com/an-architecture-for-wpf-applications because there are classes, styles, and icons used in this article from the WPF solution presented in that post.
Exploring the Main Window and Loading of User Controls
When you create a new WPF application with Visual Studio, a MainWindow.xaml file is created. This window can be used to display each screen that you need for your application. A common layout for Windows applications is to have a main menu across the top, a content area for all of your screens, and a status bar at the bottom. You can create this layout on your main window by using three grid rows, as shown in the following code snippet:
<Grid Style="{StaticResource gridMainStyle}">
  <Grid.RowDefinitions>
    <RowDefinition Height="Auto" />
    <RowDefinition Height="*" />
    <RowDefinition Height="Auto" />
  </Grid.RowDefinitions>
  <!-- Menu Goes Here -->
  <!-- Content Area Goes Here -->
  <!-- Status Bar Goes Here -->
</Grid>
In this article, you're not going to use the status bar, but you will use the third row for minimized user controls. The main window in the starting solution has a menu system in row one that looks like this:
<Menu Grid.Row="0" IsMainMenu="True">
  <MenuItem Header="_File">
    <MenuItem Header="E_xit" Click="MenuExit_Click" />
  </MenuItem>
  <MenuItem Header="Users" Click="UsersMenuItem_Click" />
</Menu>
On the second row is a Grid control with the name contentArea. It's into this control that all your user controls are displayed on the window.
<!-- Content Area -->
<Grid Grid.Row="1" Name="contentArea" Style="{StaticResource contentAreaStyle}" />
Within the MainWindow.xaml.cs file is a method named DisplayUserControl(). This method accepts any user control and adds that control to the content area's Children property.
public void DisplayUserControl(UserControl uc)
{
    // Add new user control to content area
    contentArea.Children.Add(uc);
}
In the starting project, there's a user control named UserMaintenanceControl. The UsersMenuItem_Click event procedure displays this user control using the following code:
DisplayUserControl(new UserMaintenanceControl());
If you run the WPF application and click on the Users menu, the user maintenance control is displayed on the main window, as shown in Figure 1. The main window has Minimize, Maximize, and Close buttons, but the user control has no way of minimizing, maximizing, or closing.
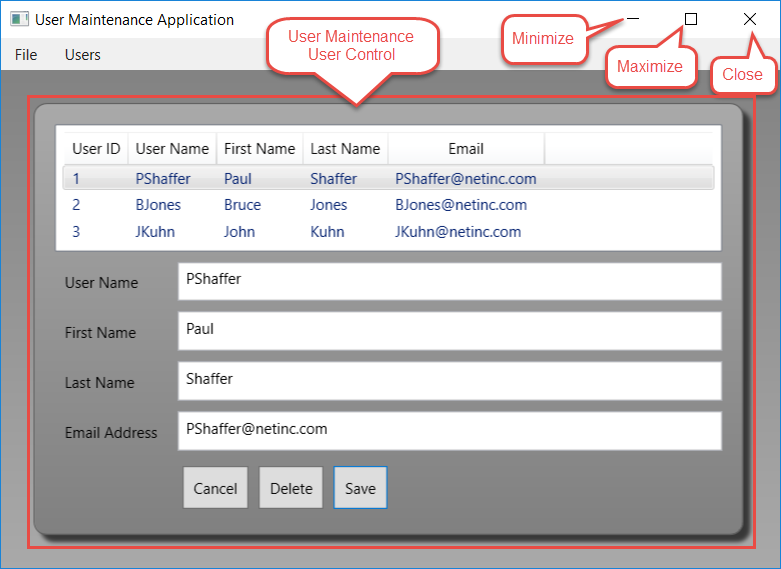
Your job in this article is to add each of these buttons to the user maintenance control and write the appropriate code to make each function. At the end of this article, you'll create a generic title bar user control that you can add to any user control. The generic title bar control allows you to set a title for the user control and specify which of the three buttons you want to display.
Add a Close Button
Open the UserMaintenanceControl.xaml file and notice that there are three row definitions. There's a ListView control in row one and the detail controls are in a grid in row two. The first row, row zero, is where you're going to build the title bar.
<Grid>
  <Grid.RowDefinitions>
    <RowDefinition Height="Auto" />
    <RowDefinition Height="Auto" />
    <RowDefinition Height="*" />
  </Grid.RowDefinitions>
  <!-- Add Title Bar Here -->
  <ListView Grid.Row="1" ...>
  <Grid Grid.Row="2">
    <!-- Detail controls here -->
  </Grid>
</Grid>
Add Title Bar Text
Build the title bar area using a Border control and a Grid control. Add the following code just after the comment <!-- Add a Title Bar Here -->:
<Border Grid.Row="0" Style="{StaticResource titleBarBorder}">
  <Grid>
    <Grid.ColumnDefinitions>
      <ColumnDefinition Width="*" />
      <ColumnDefinition Width="Auto" />
    </Grid.ColumnDefinitions>
    <TextBlock Grid.Column="0" Style="{StaticResource titleBarTitle}" Text="Users" />
  </Grid>
</Border>
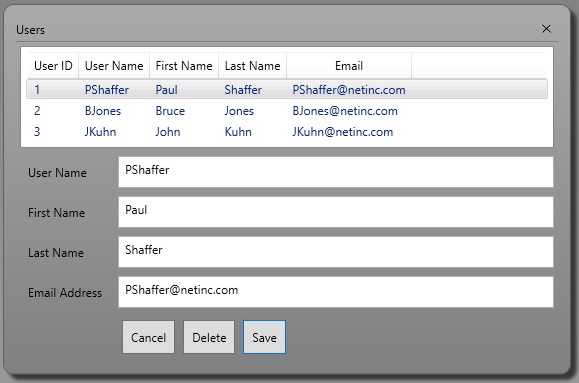
The resource titleBarBorder comes from the StandardStyles.xaml file in the WPF.Common project. This resource gives the border a thickness along the bottom of the border. That's where the single line below the title text and close button come from, as shown in Figure 2.
Add the Image for the Close Button
Just below the TextBlock control for the title text, add a StackPanel control where you can add the Close button, and eventually, the Minimize and Maximize buttons. The Close button is created using an Image control.
<StackPanel Grid.Column="1" Style="{StaticResource titleBarButtonArea}">
  <Image Source="pack://application:,,,/WPF.Common;component/Images/Close.png"
         ToolTip="Close"
         MouseLeftButtonDown="CloseButton_Click"
         Style="{StaticResource titleBarButton}" />
</StackPanel>
Create the MouseLeftButtonDown click event procedure and add a call to the message broker class, as shown in the following code snippet:
private void CloseButton_Click(object sender, MouseButtonEventArgs e)
{
    // Send close message
    MessageBroker.Instance.SendMessage(MessageBrokerMessages.CLOSE_USER_CONTROL);
}
The SendMessage() method of the MessageBroker class accepts two parameters. The first is a string value with a unique message ID. Instead of hard-coding strings, the MessageBrokerMessages class has a set of public string constants that make it easy to send standard messages. Read more about the MessageBroker class in the blog post located at http://blog.pdsa.com/a-message-broker-for-xaml-applications.
Close the Control in the Main Window
Once the User Maintenance user control is displayed on the main window, you need code to remove it. Open the MainWindow.xaml.cs file and notice that there's a method named CloseUserControl() that looks like the following:
private void CloseUserControl()
{
    // Remove current user control
    contentArea.Children.Clear();
}
You send the CLOSE_USER_CONTROL message out from the CloseButton_Click event procedure in the UserMaintenanceControl. Most of the messages you send from user controls are going to be received and processed by the Main Window class. You need to respond to the MessageReceived event in the main window.
Add the code shown below to the constructor. This code connects to the MessageReceived event and hooks it to an event procedure you create in this class.
public MainWindow()
{
    InitializeComponent();
    // Connect to instance of the view model created by the XAML
    _viewModel = (MainWindowViewModel)
    this.Resources["viewModel"];

    // Initialize the Message Broker Events
    MessageBroker.Instance.MessageReceived += Instance_MessageReceived;
}
Add the Instance_MessageReceived event and add the following code to respond to the CLOSE_USER_CONTROL message.
private void Instance_MessageReceived(object sender, MessageBrokerEventArgs e)
{
    switch (e.MessageName)
    {
        case MessageBrokerMessages.CLOSE_USER_CONTROL:
            CloseUserControl();
            break;
    }
}
Try it Out
Run the application, click on the Users menu item, and you should see the Users Maintenance control displayed in the content area. Click on the Close button you added earlier, and you should see the control removed from the content area.
Modify DisplayUserControl Method
Before adding a new user control, close any user control that's already in the content area. Add the code shown below in bold to the DisplayUserControl() method:
public void DisplayUserControl(UserControl uc)
{
    // Close current user control in content area
    CloseUserControl();

    // Add new user control to content area
    contentArea.Children.Add(uc);
}
Instead of closing the currently displayed user control, you could add code to add that control to a list of user controls. In the CloseUserControl() method, you could then remove the last child from the Children property and restore the last control added to the list of user controls. Doing this would provide you with “back” functionality like a Web browser. The code for this is beyond the scope of this article but isn't too difficult to code.
Add a Maximize Button
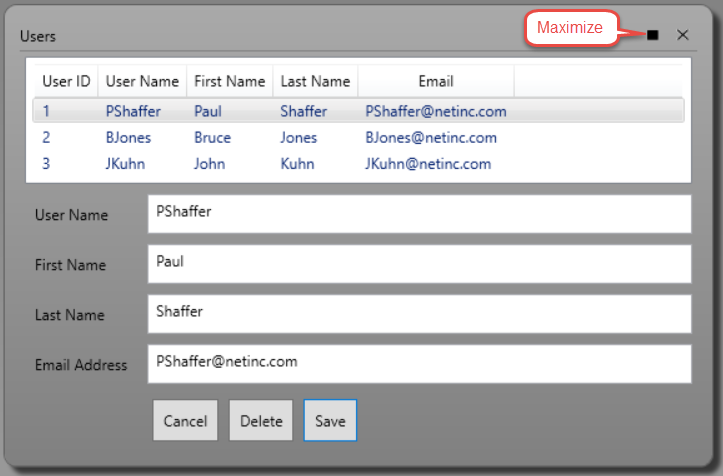
Another button on a normal WPF window is a Maximize button. When clicked, the window is expanded to fill up the whole screen. When clicked again, the window is shrunk back to its normal size. Let's add this functionality to the user controls. Open the UserMaintenanceControl.xaml file and before the Close button, add another <Image> control to represent the Maximize button, as shown in Figure 3.
<Image Source="pack://application:,,,/WPF.Common;component/Images/Maximize.png"
       ToolTip="Maximize"
       MouseLeftButtonDown="MaximizeButton_Click"
       Style="{StaticResource titleBarButton}" />
Create the MaximizeButton_Click event procedure in the UserMaintenanceControl.xaml.cs file. Add code to send a MAXIMIZE_USER_CONTROL message to the main window:
private void MaximizeButton_Click(object sender, MouseButtonEventArgs e)
{
    // Send maximize message
    MessageBroker.Instance.SendMessage(MessageBrokerMessages.MAXIMIZE_USER_CONTROL);
}
Open the MainWindow.xaml.cs file and add a MaximizeUserControl() method. This method sets the horizontal and vertical alignment properties to Stretch. Setting the content area grid control's horizontal and vertical alignment to Stretch causes the user control to expand to fill the available space in the content area of the main window.
public void MaximizeUserControl()
{
    contentArea.HorizontalAlignment = HorizontalAlignment.Stretch;
    contentArea.VerticalAlignment = VerticalAlignment.Stretch;
}
In the Instance_MessageReceived event procedure, add a new case statement to respond to the MAXIMIZE_USER_CONTROL message.
case MessageBrokerMessages.MAXIMIZE_USER_CONTROL:
    // Maximize User Control
    MaximizeUserControl();
    break;
Try it Out
Run the application and click on the Users menu item. Click the Maximize button and watch the control expand to fill the available space. Now that you have the user control maximized, you need to restore it back to its original size.
Restore User Control
When you click on a Maximize button on a window, the window fills up the available screen real estate. In addition, the tooltip for that button changes from Maximize to Restore Down. You're going to bind the tooltip for the Maximize button to a property that toggles between those two labels. Open the UserMaintenanceControl.xaml.cs file, position to a blank line below the constructor, and type in propdp. Press the tab key to have this snippet create a dependency property. Change the data type to a string. Change the property name to MaximizedTooltip. Change the value in the typeof() to UserMaintenanceControl, as shown in the code snippet:
public string MaximizedTooltip
{
    get {return (string)GetValue(MaximizedTooltipProperty);}
    set {SetValue(MaximizedTooltipProperty, value);}
}

public static readonly DependencyProperty MaximizedTooltipProperty = DependencyProperty.Register("MaximizedTooltip", typeof(string), typeof(UserMaintenanceControl), null);
Modify the constructor of this control to look like the following:
public UserMaintenanceControl()
{
    InitializeComponent();

    // Set DataContext of this control to itself for data binding
    DataContext = this;

    // Set Tooltip for Maximize/Restore button
    MaximizedTooltip = "Maximize";
}
Add a private field to this user control to keep track of what state the control is in: normal or maximized.
// Get/Set if the control is maximized
private bool _IsControlMaximized = false;
Modify the code in the MaximizeButton_Click event procedure to send either a restore or a maximize message. In addition, this event toggles the _IsControlMaximized field and the MaximizedTooltip property to their appropriate values.
private void MaximizeButton_Click(object sender, MouseButtonEventArgs e)
{
    if (_IsControlMaximized)
    {
        // Send restore message
        MessageBroker.Instance.SendMessage(MessageBrokerMessages.RESTORE_USER_CONTROL);
    }
    else
    {
        // Send maximize message
        MessageBroker.Instance.SendMessage(MessageBrokerMessages.MAXIMIZE_USER_CONTROL);
    }

    _IsControlMaximized = !_IsControlMaximized;
    MaximizedTooltip = (_IsControlMaximized ? "Restore Down" : "Maximize");
}
Open the UserMaintenanceControl.xaml file and bind the Tooltip property on the Maximize button to the new MaximizedTooltip property you just created.
ToolTip="{Binding MaximizedTooltip}"
Add Restore Method
Open the MainWindow.xaml.cs file and add a method named RestoreUserControl(). This method resets the HorizontalAlignment property to Left and the VerticalAlignment property to Top. Setting these properties on the grid causes the user control to shrink back to its original size.
public void RestoreUserControl()
{
    contentArea.HorizontalAlignment = HorizontalAlignment.Left;
    contentArea.VerticalAlignment = VerticalAlignment.Top;
}
Add a new case statement in the Instance_MessageReceived event procedure to call the RestoreUserControl() method when the RESTORE_USER_CONTROL message is sent.
case MessageBrokerMessages.RESTORE_USER_CONTROL:
    // Restore from maximized
    RestoreUserControl();
    break;
Try it Out
Run the application and click on the Users menu item. Click the Maximize button and watch the control expand to fill the available space. Hover over the button and notice that the tooltip has changed to Restore Down. Click on the Maximize button once more to watch the control shrink back to its normal size.
Add a Minimize Button
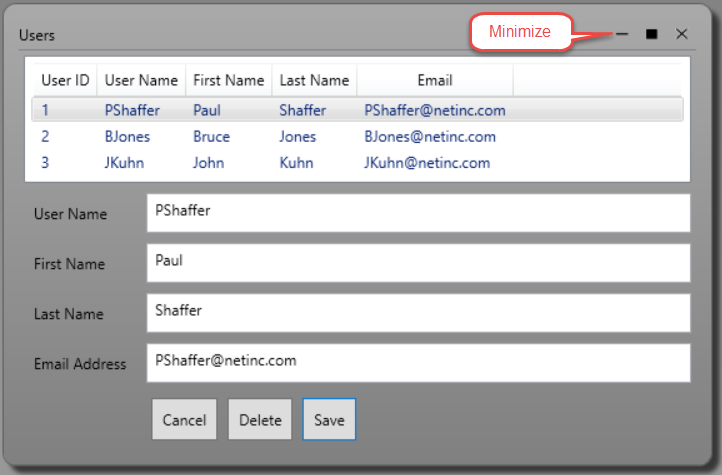
Another button on the title bar of a window is the ability to minimize the window to the task bar. As you're keeping all the user controls within the main window, you should create a task bar on the main window and have your user controls minimized to that area. Add a Minimize button to your user control, as shown in Figure 4.
Open the UserMaintenanceControl.xaml file and add a new Image control before the Maximize button.
<Image Source="pack://application:,,,/WPF.Common;component/Images/Minimize.png"
       ToolTip="Minimize"
       MouseLeftButtonDown="MinimizeButton_Click"
       Style="{StaticResource titleBarButton}"
       Visibility="{Binding Path=IsMinimizedVisible, Converter={StaticResource visibilityConverter}}" />
The above XAML adds an image and sets the Tooltip to the text Minimize. Be sure to create the MinimizeButton_Click event procedure referenced in the MouseLeftButtonDown event. The Visibility property is bound to a property named IsMinimizedVisible. This property isn't created yet, but you'll do so in the next section. The converter on this Visibility binding is using the visibilityConverter defined in the StandardStyles.xaml file in the WPF.Common project. This converter class returns the enumeration Visibility.Visible for a True value and Visibility.Collapsed for a False value.
Add IsMinimizedVisible Dependency Property
When the user control is minimized, you don't want the Minimize button to be displayed (Figure 5). As you saw in the XAML code, you're binding the Visibility property to a property named IsMinimizedVisible. Create this property as a dependency property in the UserMaintenanceControl.xaml.cs file.
public bool IsMinimizedVisible
{
    get {return (bool)GetValue(IsMinimizedVisibleProperty);}
    set {SetValue(IsMinimizedVisibleProperty, value);}
}

public static readonly DependencyProperty IsMinimizedVisibleProperty = DependencyProperty.Register("IsMinimizedVisible", typeof(bool), typeof(UserMaintenanceControl), null);
When the user control is displayed, the Minimize button should be visible. Set this property to a True value by adding the following line of code in the constructor.
IsMinimizedVisible = true;
Keep Track of Minimized State
Besides turning the Minimize button visible or invisible, you need a private field to keep track of whether the control is currently minimized. Yes, you could use the IsMinimizedVisible property you just created, but that's going to be used for visibility only. Keep the internal state of the control in a private field, as shown here:
// Get/Set whether or not the control is minimized
private bool _IsControlMinimized = false;
Get Original Width
When you minimize the control, you change the width. Change the MinWidth property of the user control to zero. When you restore the user control back to normal size, you need to put back the MinWidth property to its original value. Create a private field to hold the original minimum width value.
// Get/Set the minimum width of the control before minimizing
private double _OriginalMinWidth = 0;
Create Height and Width Constants
When you minimize a control, you need to set specific height and width properties. Instead of hard-coding these values somewhere in a method, create two constants just after the constructor of your user control so the values can be found easily.
private const double MINIMIZED_HEIGHT = 80;
private const double MINIMIZED_WIDTH = 200;
Write Minimize Code
In the MinimizeButton_Click event procedure you created earlier, add the following code to minimize the user control.
private void MinimizeButton_Click(object sender, MouseButtonEventArgs e)
{
    _IsControlMinimized = true;
    IsMinimizedVisible = false;
    MaximizedTooltip = "Restore Up";

    // Minimize the control
    _OriginalMinWidth = this.MinWidth;
    this.MinWidth = 0;
    this.Height = MINIMIZED_HEIGHT;
    this.Width = MINIMIZED_WIDTH;

    // Send minimize message
    MessageBroker.Instance.SendMessage(MessageBrokerMessages.MINIMIZE_USER_CONTROL);
}
The first line sets the _IsControlMinimized property to a True value. Next, set the IsMinimizedVisible property to false to hide the minimize button. Modify the tooltip on the maximize button to read Restore Up. This tells the user how to restore the minimized control to its normal state. The next lines of code set the height and width of the user control to the values you specified in the constants. The original MinWidth value is retrieved and stored into the private variable. The MinWidth property is set to zero to allow the control to shrink to a minimized state. Finally, a message is sent to the main window to minimize the user control.
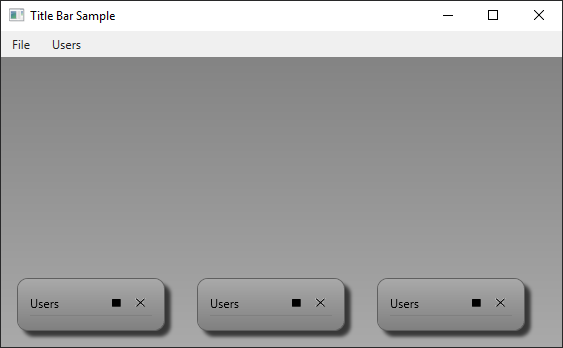
On the main window, the Minimize functionality is going to remove the user control from the content area Grid control and move it to another control where it can be displayed in a minimized state (Figure 5). You'll add this control a little later in this article.
Modify the Close Button Click Event
When the control is minimized, as shown in Figure 5, the Maximize and Close buttons are displayed. If the control is minimized and the user clicks on the Close button, send a modified version of the Close message to the main window. The message is the same, but, you add a reference to the user control as the payload of the message. Modify the CloseButton_Click event procedure to look like the following:
private void CloseButton_Click(object sender, MouseButtonEventArgs e)
{
    if (_IsControlMinimized)
    {
        // Send message to close minimized control
        MessageBroker.Instance.SendMessage(MessageBrokerMessages.CLOSE_USER_CONTROL, this);
    }
    else
    {
        // Send close message
        MessageBroker.Instance.SendMessage(MessageBrokerMessages.CLOSE_USER_CONTROL);
    }
}
Modify the Maximize Click Event
The Maximize button now needs to handle three states, as opposed to the two it previously had. You now need to check whether the control is minimized, maximized, or in a normal state. Modify the MaximizeButton_Click event to handle all three of these states, as shown in Listing 1.
Listing 1: The maximize button click event should handle all cases of how to restore or maximize a control
private void MaximizeButton_Click(object sender, MouseButtonEventArgs e)
{
    if (_IsControlMinimized)
    {
        _IsControlMinimized = false;
        IsMinimizedVisible = true;

        // Restore the control to full size
        this.MinWidth = _OriginalMinWidth;
        this.Height = System.Double.NaN;
        this.Width = System.Double.NaN;

        // Send restore message with user control to restore
        MessageBroker.Instance.SendMessage(MessageBrokerMessages.RESTORE_USER_CONTROL, this);
    }
    else if (_IsControlMaximized)
    {
        _IsControlMaximized = !_IsControlMaximized;

        // Send restore message
        MessageBroker.Instance.SendMessage(MessageBrokerMessages.RESTORE_USER_CONTROL);
    }
    else
    {
        _IsControlMaximized = !_IsControlMaximized;

        // Send maximize message
        MessageBroker.Instance.SendMessage(MessageBrokerMessages.MAXIMIZE_USER_CONTROL);
    }

    MaximizedTooltip = (_IsControlMaximized ? "Restore Down" : "Maximize");
}
If the user control is minimized, set the _IsControlMinimized property to a False value and the IsMinimizedVisible property to true so the Minimize button will once again be displayed. Next, restore the control's height, width, and minimum width to what they were before the control was minimized. Send the RESTORE_USER_CONTROL message to the main window and include a reference to this user control so the main window knows which control to restore.
If the user control is maximized, toggle the _sControlMaximized variable and send a Restore message to the main window with no payload. If the user control is in a normal state, then maximize the control by toggling the _IsControlMaximized variable and sending a MAXIMIZE_USER_CONTROL message to the main window.
Update Main Window to Support Minimized Controls
You updated the code of many of the click events to send new messages when responding to the Minimize, Maximize and Close click events. These new messages need to be handled in the main window. In addition, you added code to minimize a user control. That minimized control needs to be displayed somewhere other than the content area on the main window.
Add Minimized Area to Main Window
Create a new area on the main window into which you place the minimized user control (Figure 5). Open the MainWindow.xaml file and add a Border control with a WrapPanel control within it. Add these immediately below the content area grid control.
<!-- Minimized Controls Area -->
<Border Grid.Row="2" Style="{StaticResource minimizedBorderStyle}">
  <WrapPanel Name="minimizedArea" Style="{StaticResource minimizedAreaStyle}" />
</Border>
Add MinimizeUserControl() Method
Open the MainWindow.xaml.cs file and add a new method named MinimizeUserControl(). This method retrieves a reference to the current user control in the content area control. Call the CloseUserControl() method to remove the control from the content area. Finally, take the reference to the user control and add it to the WrapPanel control named minimizedArea. As soon as you do this, the control will be displayed in the last row on the main window, as shown in Figure 5.
public void MinimizeUserControl()
{
    // Get user control from content area
    UserControl uc = (UserControl)contentArea.Children[0];

    // Close current user control in content area
    CloseUserControl();

    // Add user control to minimized area
    minimizedArea.Children.Add(uc);
}
Call the MinimizeUserControl() method from the Instance_MessageReceived event procedure. Add a new case statement within this procedure, as shown in the next code snippet.
case MessageBrokerMessages.MINIMIZE_USER_CONTROL:
    // Minimize User Control
    MinimizeUserControl();
    break;
Try it Out
Run the application and click on the Users menu item to display the user maintenance screen. Click the Minimize button and you should see the control move from the content area into the minimized area.
Close from Minimized
The user has the option to close the user control when it's in a minimized state. Write a method named CloseMinimizedUserControl() in the main window. This method needs to locate the specific user control that's minimized as there may be more than one in the minimized area. Once the control is located, it's removed from the Children collection in the WrapPanel control. Open the MainWindow.xaml.cs file and add the following method:
public void CloseMinimizedUserControl(UserControl uc)
{
    // Remove user control from minimized area
    int index = minimizedArea.Children.IndexOf(uc);
    if (index >= 0)
    {
        minimizedArea.Children.RemoveAt(index);
    }
}
The CLOSE_USER_CONTROL message sent when a user control is in a minimized state contains a reference to the user control to close. Modify the Instance_MessageReceived method by locating the case statement for closing and add the code shown in bold below:
case MessageBrokerMessages.CLOSE_USER_CONTROL:
    if (e.MessagePayload == null)
    {
        // Remove user control from content area
        CloseUserControl();
    }
    else
    {
        // Move from minimized to content area
        CloseMinimizedUserControl((UserControl)e.MessagePayload);
    }
    break;
Try it Out
Run the application and click on the Users menu item. Click on the Minimize button to see the control move from the content area into the minimized area. Click the Close button to see the control disappear.
Restore from Minimized
Another message sent from the user control is to restore that control to its normal state. Write another method in the main window named RestoreMinimizedUserControl(). This method closes the minimized control, then removes the current user control in the content area. It then opens the user control to be restored by moving it into the content area.
public void RestoreMinimizedUserControl(UserControl uc)
{
    // Remove user control from minimized area
    CloseMinimizedUserControl(uc);

    // Close current user control in content area
    CloseUserControl();

    // Add user control to content area
    DisplayUserControl(uc);
}
Once again you need to modify the Instance_MessageReceived event to change the case statement for the RESTORE_USER_CONTROL message. Add the code shown in bold below:
case MessageBrokerMessages.RESTORE_USER_CONTROL:
    if (e.MessagePayload == null)
    {
        // Restore from maximized
        RestoreUserControl();
    }
    else
    {
        // Restore from Minimized
        RestoreMinimizedUserControl((UserControl)e.MessagePayload);
    }
    break;
Try it Out
Run the application and click on the Users menu item. Click on the Minimize button to see the control move from the content area into the minimized area. Click the Maximize button to see the control disappear from the minimized area and reappear in its normal state in the content area.
Create a Reusable Title Bar
Now that you've learned how to build a title bar for a single user control, let's extrapolate and build one that can be reused on any user control. There are a few features you should add to this reusable version of the title.
- Set the title text to display.
- Set the minimized height.
- Set the minimized width.
- Display or hide the minimize button.
- Display or hide the maximize button.
- Display or hide the close button.
You need to create dependency properties to support each of the above features.
Add a User Control to WPF.Common Project
Because you're building a user control that can be used on any user control and in any project, create this new user control in the WPF.Common project. This new user control is going to contain all of the title bar controls you previously placed on the user maintenance user control. The user maintenance user control is going to be the host control for the new title bar user control.
Go to the WPF.Common project and right-mouse click on the \UserControls folder. Select Add > User Control... from the menu. Set the name to TitleBarControl and click the Add button. Remove the <Grid></Grid> element from the user control. Add the Loaded event to the UserControl definition. Be sure to create this new event procedure. Your new TitleBarControl.xaml file should look like the following code snippet:
<UserControl x:Class="WPF.Common.TitleBarControl"
             ...
             d:DesignHeight="450"
             d:DesignWidth="800"
             Loaded="UserControl_Loaded">
</UserControl>
Open the UserMaintenanceControl.xaml.cs file and cut all the code below the constructor out and place it into the new TitleBarControl.xaml.cs file just below its constructor. Cut the code from the constructor after the call to the InitializeComponent(), and paste it into the constructor of the TitleBarControl. Your UserMaintenanceControl class should now look like the following:
using System.Windows.Controls;

namespace WPF.TitleBarSample.UserControls
{
    public partial class UserMaintenanceControl : UserControl
    {
        public UserMaintenanceControl()
        {
            InitializeComponent();
        }
    }
}
Open the TitleBarControl.xaml.cs file and add a new using statement at the top of this file.
using Common.Library;
The dependency properties you created in the user maintenance control used UserMaintenanceControl as their type. You need to change all of these to use the TitleBarControl now. Perform a search and replace on UserMaintenanceControl within the TitleBarControl.xaml.cs file and replace all occurrences with TitleBarControl.
Open your UserMaintenanceControl.xaml file and locate the Border control you created in this article. Cut the entire Border control out of this file and paste it in to the TitleBarControl. Remove the Grid.Row="0" attribute from the Border element.
Dependency Properties
To implement the features needed for this reusable control, you need to create a few dependency properties. Open the TitleBarControl.xaml.cs file and locate the MaximizedTooltip dependency property. Find a blank line below this property and use the propdp snippet to create each of the following dependency properties. See Table 1.
Constructor
Locate the constructor of the TitleBarControl and initialize the visibility dependency properties you just created to a True value. In the following code snippet are the two lines you should add to the end of the constructor.
IsMaximizedVisible = true;
IsCloseVisible = true;
Set New Bindings in the Title Bar Control
You need to modify a few pieces of the XAML that you just pasted into this control. You need to bind the Text property of the TextBlock control to the Title dependency property you just created.
<TextBlock Grid.Column="0" Style="{StaticResource titleBarTitle}" Text="{Binding Path=Title}" />
Modify each Image control to bind the Visibility property to the corresponding dependency property you just created. The binding on the Minimize button is already set to the correct property, so add a binding to the IsMaximizedVisible property to the maximize button.
<Image Source="pack://.../Maximize.png"
       ...
       Visibility="{Binding Path=IsMaximizedVisible, Converter={StaticResource visibilityConverter}}" />
Bind the Close button to the IsCloseVisible property.
<Image Source="pack://.../Close.png"
       ...
       Visibility="{Binding Path=IsCloseVisible, Converter={StaticResource visibilityConverter}}" />
Add Reference to Host User Control
Locate the private constants and fields you created earlier and add a new private field. The _theControl field is going to be set to the parent user control that's hosting this title bar user control. It's this field that's going to be used when you set the height, width, and minimum width properties.
// Get/Set a reference to the hosting user control
private UserControl _theControl = null;
Find Parent User Control
Earlier you added a private field, _theControl, used to reference the hosting user control for this title bar user control. In the UserControl_Loaded event procedure you're going to set that field. To find the hosting user control, you need to walk up the logical WPF tree. Create a GetParentUserControl() method to perform this lookup.
private UserControl GetParentUserControl(DependencyObject toFind)
{
    while (!(toFind is UserControl))
    {
        toFind = LogicalTreeHelper.GetParent(toFind);
    }
    return (UserControl)toFind;
}
UserControl_Loaded Event
The UserControl_Loaded event procedure is called the first time the user control is loaded, and every time it's moved from the content area to the minimized area. In this procedure, you should set the reference to the hosting parent control. You can also set the MinimizedHeight and MinimizedWidth properties. The dependency properties may be set from the hosting user control, but if they aren't, set them to the values from the constants you created. The UserControl_Loaded event procedure is shown in the following code snippet:
private void UserControl_Loaded(object sender, RoutedEventArgs e)
{
    if (_theControl == null)
    {
        // Get user control hosting this title bar
        _theControl = GetParentUserControl(this.Parent);

        // Set default minimized height/width
        MinimizedHeight = MinimizedHeight == 0 ? MINIMIZED_HEIGHT : MinimizedHeight;
        MinimizedWidth = MinimizedWidth == 0 ? MINIMIZED_WIDTH : MinimizedWidth;
    }
}
Modify the Close Click Event
The CloseButton_Click event procedure is almost the same as you wrote earlier in this article. Instead of passing this as the payload to the close message, you need to pass _theControl. The value in this is the title bar user control, but you need to close the hosting user control, so that's the value that must be passed.
private void CloseButton_Click(object sender, MouseButtonEventArgs e)
{
    if (_IsControlMinimized)
    {
        // Send message to close minimized control
        MessageBroker.Instance.SendMessage(MessageBrokerMessages.CLOSE_USER_CONTROL, _theControl);
    }
    else
    {
        // Send close message
        MessageBroker.Instance.SendMessage(MessageBrokerMessages.CLOSE_USER_CONTROL);
    }
}
Modify the Minimize Click Event
There are a few changes to make in the MinimizeButton_Click event procedure. Previously in this method, you used this because the title bar controls were located right on the user control. As the controls are now on another user control that will be hosted on the user maintenance user control, you need to replace all occurrences of this with _theControl. The specific code to change are shown in the snippet below.
// Get original min width, set to 0
_OriginalMinWidth = _theControl.MinWidth;
_theControl.MinWidth = 0;

// Minimize the control
_theControl.Height = MinimizedHeight;
_theControl.Width = MinimizedWidth;
Modify the Maximize Click Event
The MaximizeButton_Click event procedure has a few changes too. All of the changes are within the first if statement. Change all occurrences of this to _theControl because all title bar controls are now located in a different user control from the hosting control. The code to change is shown in this code snippet:
// Restore the user control to previous size
_theControl.MinWidth = _OriginalMinWidth;
_theControl.Height = System.Double.NaN;
_theControl.Width = System.Double.NaN;

// Send restore message with user control
MessageBroker.Instance.SendMessage(MessageBrokerMessages.RESTORE_USER_CONTROL, _theControl);
Replace Title Bar on User Maintenance Control
Build the solution to ensure a successful compile and to allow Visual Studio to place the new TitleBarControl in its Toolbox window. Open the UserMaintenanceControl.xaml file. Go to the View > Toolbox menu to display the Toolbox window. Locate the tab WPF.Common Controls and you should see the TitleBarControl (WPF.Common) control in the Toolbox. Drag and drop that control where you removed the Border control. Modify the control to look like the following code snippet:
<UserControls:TitleBarControl Grid.Row="0" Title="Users" />
Try it Out
Run the application and click on the Users menu item. Click on each of the different buttons to minimize, maximize, and close the user control. You can also set some of the other dependency properties to make the different buttons visible or not.
Summary
In this article, you learned to build a title bar using image controls and connecting to the main window via a message broker. You also built a generic title bar that can be added to any user control in any WPF application. Having a title bar allows you to provide minimize, maximize, and close functionality for user controls that are hosted on a window. Instead of having multiple windows popping up on the user's screen, you can keep screens contained within the main window.
Table 1: Dependency properties
| Property Name | Data Type | Description |
| Title | string | The title to display at the left-hand side of the title bar area |
| MinimizedHeight | double | The height for this control when minimized. |
| MinimizedWidth | double | The width for this control when minimized. |
| IsMaximizedVisible | bool | Whether or not the maximize button is displayed. |
| IsCloseVisible | bool | Whether or not the close button is displayed. |
