


To build a Single-Page Application (SPA) using Angular (v1.x), you typically build a single HTML page and inject HTML fragments within this one page as the user navigates within your application. There are a few different methods you can use to navigate around your SPA in Angular. Navigation in Angular employs a mechanism called routing. In this article, you'll be introduced to many of Angular approaches using the route provider and the route object. You'll learn the various properties of the route object to help you control how routing occurs.
Server-Side Development
Before I dive into Angular routing, it might be helpful to review how you accomplish the same goals of routing on the server-side. As you make the transition from server-side development to client-side development, you'll find many of the same concepts that you employ on the server-side have equivalents on the client-side. Of course, they're done differently, but the concepts are there nonetheless.
When developing server-side Web applications with MVC or Web Forms, you use a common layout page for all of the standard “chrome” you want around your content. This chrome is your header, footer and maybe a sidebar. The header consists of a menu system and maybe some graphics. The footer might have a copyright and some additional links. You don't want to duplicate the header and footer on each page in your application, as that's a maintenance nightmare. Instead, each MVC or Web Forms application has a special “layout” page where you create the chrome. You create your content pages with the HTML fragments you wish to display to the user, and inject those fragments within the layout page.
MVC has a special page named _Layout.cshtml, located under the \Shared folder (Figure 1). This page has a piece of Razor code called @RenderBody() that tells MVC where to inject your fragments of HTML and Razor code.

Web Forms uses a concept called a “Master Page”, shown in Figure 2 as Site.Master, which uses a <asp:ContentPlaceHolder /> control to specify where to inject your content pages.
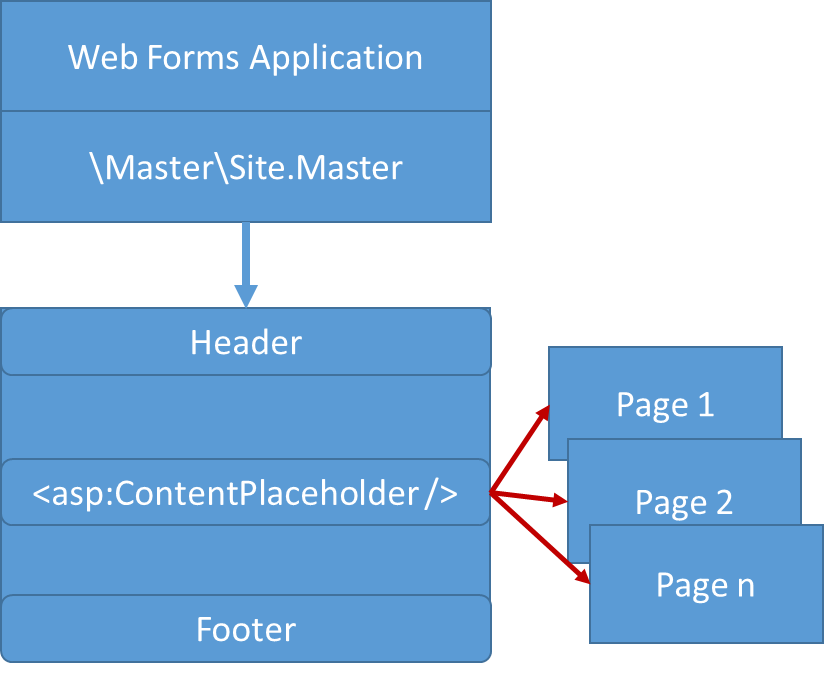
Both of these approaches keep the chrome version of your Web application in a single location, making changes to your website easy to accomplish. When creating a SPA using Angular (or any other client-side framework), you should strive to use this same technique. There's one key difference between these server-side technologies and Angular routing; MVC and Web Forms both post back to the server as you navigate from one page to another; Angular doesn't need to do any post backs.
Angular ng-view Directive
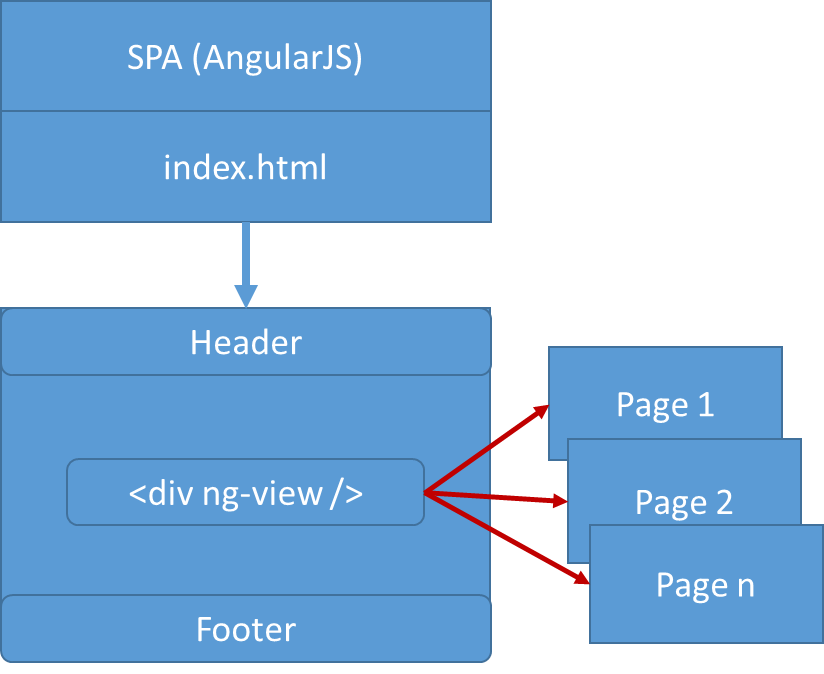
Angular has the same mechanism for defining an HTML page with the chrome, and a directive for specifying where to inject the HTML fragments that make up each content page. You create an index.html page with the chrome and a single <div> tag that uses the Angular directive ng-view (Figure 3). This directive is what's used to specify the location into which you inject the content pages.
It's important to note that only one instance of ng-view may be used in your Angular application. In other words, you can't nest an ng-view within another ng-view. If you're using this approach correctly, you shouldn't have to nest ng-view anyway.
Download Routing JavaScript File
In order to use Angular routing, download the angular-route.js file into your project. Of course, you must have already added Angular to your application. If you're using Visual Studio, you may use the NuGet Package Manager to search for and install the AngularJS.Route package. Or, open a browser and navigate to https://code.angularjs.org/1.5.8/ and download the angular.route.js file from there. Either way, once you download this script file, you'll want to reference it from your main HTML page. Be sure to place it after you have referenced the angular.js file, as shown in the following code snippet:
<script src="scripts/angular.js"></script>
<script src="scripts/angular-route.js"></script>
Declare Your Intention to Use Routing
The first step in any Angular application is to define a module that's the main entry point for your application. You define a module using the following code.
(function () {
    'use strict';
    angular.module('app', []);
})();
As you're going to be using routing in your Angular application, this is now a dependency that you need to tell Angular about.
The second parameter to the module() is an array of strings for you to specify the names of any dependencies needed for your application. In the next code snippet, you're passing in a single element array with the value of ngRoute. The ngRoute value is defined as a provider in the angular-route.js file that you downloaded and included in your project.
(function () {
    'use strict';
    angular.module('app', ['ngRoute']);
})();
The HTML Page
The complete HTML page, index.html, is shown in Listing 1. This page has a couple of anchor tags <a> that are used for the routing sample. In addition, the <div ng-view> element is also defined within a Bootstrap row and column. This is where all HTML fragments are displayed when you route to a new path.
Listing 1: The HTML page for the routing sample
<!doctype html>
<html>
<head>
    <title>Routing Sample</title>

    <link href="Content/bootstrap.min.css" rel="stylesheet" />
</head>
<body>
    <div ng-app="app"
        ng-controller="IndexController as vm" class="container">

    <div class="row">
        <div class="col-sm-12">
            <a href="#/page1" class="btn btn-primary">Page 1</a>
            <a href="#/page2" class="btn btn-primary">Page 2</a>
        </div>
    </div>

    <br />

    <div class="row">
        <div class="col-sm-12">
            <div ng-view></div>
            </div>
        </div>
    </div>

    <script src="scripts/angular.js">    </script>
    <script src="scripts/angular-route.js">    </script>

    <script src="app.module.js">    </script>
    <script src="index.controller.js">    </script>
</body>
</html>
The index.controller.js file that's referenced in the above Web page is an empty function, as there's no functionality needed for this sample Web page. The contents of the index.controller.js file is shown below just for completeness.
(function () {
    'use strict';

    angular.module('app').controller('IndexController',IndexController);
    function IndexController() {
    }
})();
Define Your Routes
After you've told Angular that you're using routing, it's now time to create some routes. Within the app.module.js file (or create another file called index.route.js, add the code shown in Listing 2.
Listing 2: Define routes to your Angular application
angular.module('app')
.config(function ($routeProvider) {
    $routeProvider
    .when('/',
    {
        template: ''
    })
    .when('/page1',
    {
        template: '<p>This is some text for Page1</p>'
    })
    .when('/page2',
    {
        template: '<h2>Page 2</h2>'
    });
});
The code in Listing 2 retrieves the module named app from Angular. It then chains the config() function to instantiate the routes for the module. Pass in your custom function to the config() function. This function is passed the $routeProvider provider, which is defined in the angular-route.js file. You use this $routeProvider variable to define the routes you wish to configure using the when() function. Each when() function is passed two parameters. The first parameter is a string that's matched up with the path you define in your Web page. For example, <a href="#/page1" .../> matches up with when('/page1'). The # symbol is used so that the browser doesn't try to navigate to a page. Angular looks for anything that starts with #/ and knows that you're using a route. Figure 4 shows the index.html page and the code in the $routeProvider definition and how they match up.
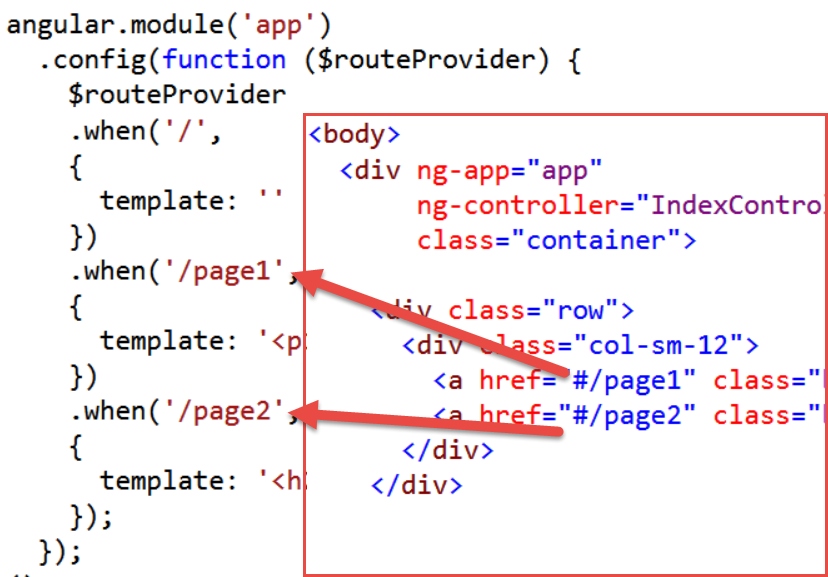
Angular looks for anything that starts with
#/and knows that you're using a route.
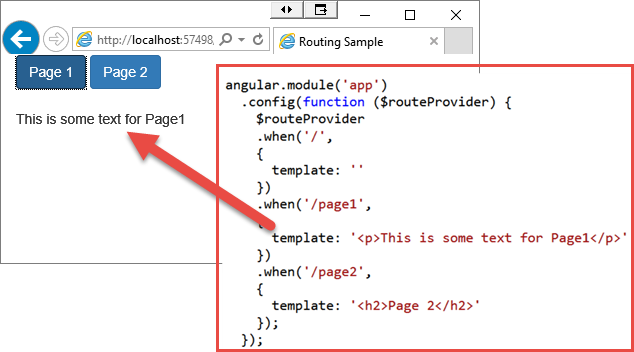
The second parameter to the when() function is an Angular route object. This object has several properties that can be set. For this initial sample, the template property is set. The template property lets you define any HTML code that you wish to display in the ng-view directive when this route is invoked. In Figure 5 and Figure 6 you can see both the final Web page and the corresponding code in the $routeProvider, which caused that HTML to be displayed.

Handling a Bad Link
If you have a link in your HTML page that doesn't have a corresponding when() function configured, you should display some error text to your user. After the last when() function is called, add an otherwise() function, as shown in the following code snippet:
.otherwise(
    {
        template: '<h2>Bad Link!</h2>'
    });
Avoid Hard-Coding HTML
The problem with the previous example is that you hard-coded HTML within your JavaScript. It's a best practice to keep all of your HTML in .html files in your project. Instead of defining your routes using the template property, use the templateUrl property, as shown in Listing 3. The templateUrl property must be set with the full path in relation to the index.html page. In this sample, all of the .html pages are in the same folder. However, if you place your templates in a separate folder, you may specify a path such as templateUrl: 'templates/page1.template.html'.
Listing 3: Use the templateUrl property to keep code in .html files
angular.module('app')
.config(function ($routeProvider) {
    $routeProvider
    .when('/',
    {
        template: ''
    })
    .when('/page1',
    {
        templateUrl: 'page1.template.html'
    })
    .when('/page2',
    {
        templateUrl: 'page2.template.html'
    })
    .when('/error',
    {
        templateUrl: 'badlink.template.html'
    })
    .otherwise(
    {
        redirectTo: '/error'
    });
});
In Listing 3, another new property was introduced in the otherwise() function: redirectTo. The redirectTo property allows you to redirect to another route. This property is most typically used in the otherwise() function. In the sample in Listing 3, if you attempt to go to a href such as the one shown in the following code snippet, you are redirected to the path /error, which displays the HTML in the badlink.template.html file.
<a href="#/badLink" class="btn btn-primary">Bad Link</a>
Another option for the otherwise() function is to simply specify a string as the first parameter. If a string is specified instead of an object, it interprets the string as a redirect.
.otherwise('/error')
Set the Controller Name
If the target page for your route has some functionality that needs to be performed, you'll have a controller associated with that page. An additional property that you can set on the route object when configuring your routes is the controller property. Set this property to the name of the controller function for that page.
.when('/page2/',
{
    templateUrl: 'page2.template.html',
    controller: 'Page2Controller'
})
An additional property that you can set on the
routeobject when configuring your routes is thecontrollerproperty.
When using the controller property in your route, you must include the .js file that contains the code for that controller on your main HTML page.
<script src="app.module.js"></script>
<script src="index.controller.js"></script>
<script src="page2.controller.js"></script>
The next snippet provides the code for the Page2Controller. This controller is a simple sample that sets a message property with some hard-coded text using the $scope application object.
(function () {
    'use strict';

    angular.module('app').controller('Page2Controller', Page2Controller);
    function Page2Controller($scope) {
        $scope.message = 'Page 2 says \'Hello\'';
    }
})();
Once the message property is set on the $scope object, that value can be displayed on the HTML fragment using the data binding syntax.
<h2>{{message}}</h2>
Alias the Controller
When developing Angular pages, it's always a good idea to alias your controller using the “as” syntax, as shown in the following code snippet:
<div ng-app="app"
ng-controller="IndexController as vm"
However, this syntax is only used when you're setting the ng-controller directive on your main page. On your page fragments, you're not using this directive. Not to worry, the route object supports a controllerAs property so you can set this alias name.
.when('/page1',
{
    templateUrl: 'page1.template.html',
    controllerAs: 'page1',
    controller: 'Page1Controller'
})
.when('/page2',
{
    templateUrl: 'page2.template.html',
    controllerAs: 'page2',
    controller: 'Page2Controller'
})
When you use the “as” syntax, the application scope is passed into your controller as this. Assign this to a local variable in your controller, and then create any properties you want on the application scope so you can use those properties in your HTML. In the Page1Controller, shown in the next snippet, create a property named message and set it to a hard-coded string.
(function () {
    'use strict';

    angular.module('app').controller('Page1Controller',
        Page1Controller);
    function Page1Controller() {
        var vm = this;
        vm.message = 'Hello from Page One!';
    }
})();
To use the message property on your HTML page, prefix the property name with the value you set in the controllerAs property. To display the value in the message property in your page1.template.html page, you use the following code:
<p>{{page1.message}}</p>
Again, if you're specifying controllers in your routing, make sure that you include the appropriate .js files on your index.html page.
<script src="app.module.js"></script>
<script src="index.controller.js"></script>
<script src="page1.controller.js"></script>
<script src="page2.controller.js"></script>
Pass a Parameter to a Route
Sometimes you need to pass a parameter to a page. You can also pass parameters to a route. In the anchor tag shown in the next snippet, you're passing a value of 12345 to the route defined by /page2.
<a href="#/page2/12345"
  class="btn btn-primary">Page 2 with parameter</a>
Keep your original /page2 route, but add an additional route using a when() function. After the /page2 add another forward slash followed by a colon (:) and a variable name, such as id.
.when('/page2',
{
    templateUrl: 'page2.template.html',
    controllerAs: 'page2',
    controller: 'Page2Controller'
})
.when('/page2/:id',
{
    templateUrl: 'page2.template.html',
    controllerAs: 'page2',
    controller: 'Page2Controller'
})
In your Page2Controller function, you now need to have the $routeParams injected. Add the $routeParams service as a parameter to your Page2Controller function. Before you use the parameter, test to see if the value was passed in by using an if statement as shown in the following code:
function Page2Controller($routeParams) {
    var vm = this;
    if ($routeParams.id) {
        vm.message = 'The id passed in was: '
        + $routeParams.id;
    }
    else {
        vm.message = 'Page 2 says \'Hello\'';
    }
}
If you need more than one value passed, just add another route, such as the following:
.when('/page2/:id/:extraText',
{
    templateUrl: 'page2.template.html',
    controllerAs: 'page2',
    controller: 'Page2Controller'
})
In your index.html, you call this route using the following:
<a href="#/page2/123/abc"
  class="btn btn-primary">Page 2 with 2 parameters</a>
In the controller for this page, add another test for this additional parameter.
if ($routeParams.extraText) {
    vm.message = 'extraText=' + $routeParams.extraText;
}
Programmatically Calling a Route
Many times, when running code in one of your controllers, you'll have a need to redirect the user to a new route. This is accomplished by calling the path() function on the $location service and then passing in one of your defined routes. The following code shows a couple of functions you may have in a controller. If either of these functions is called, the URL of the browser is set to the new path, and then the user is directed to the appropriate page. Make sure that you add the $location service as a parameter to your controller function.
function IndexController($location) {
    function goToPage1() {
        $location.path("/page1");
     }
     function goToPage2() {
         $location.path("/page2");
     }
}
Summary
Just like server-side Web development, the concept of having a single place for all of your chrome pieces is also used in Angular applications. The ng-view directive specifies where in your HTML page you wish to display other HTML. You need to download angular-route.js in order to use routing in your Angular Web pages. The controller and controllerAs properties of the route object define the controller and alias to be used with an HTML fragment. You're able to pass one or more parameters to a route and retrieve those parameters using the $routeParams service. Use the $location service to programmatically direct a user to a route in your Angular application.
