


If you follow iOS development in any capacity, you've likely heard of Apple's proprietary programming language called Swift. Since its introduction in 2014, Swift has undergone several iterations and continues to grow in popularity among the iOS developer community. RedMonk, a developer-focused analysis firm, assesses the popularity of programming languages by analyzing the volume of conversation around a specific language on Stack Overflow in combination with the number of repositories created using that language on GitHub. In recent years, Swift has been trending up in the popularity chart and, in 2016, Swift hits an all-time high, coming in at number 17 on the list.
With this rise in popularity, developers who previously worked with Objective-C (Apple's original iOS programming language) must adapt to the shifting landscape in order to stay relevant. Objective-C still remains a viable language at the moment, coming in at number 10 on the RedMonk list, but many industry jobs already require Swift proficiency and it could eventually replace Objective-C as the primary means for developing iOS applications.
The transition from Objective-C to Swift won't require relearning everything you know because many of the same concepts you acquired while working with Objective-C will transfer. However, as someone like me who's been working with Objective-C since the inception of the first iPhone, it will take time to remaster and polish your Swift skills to the same level of expertise and efficiency.
Compare and Contrast: Objective-C versus Swift
Swift is likely the more future-proof option at this point, but that doesn't mean that it trumps Objective-C in every scenario. Each of these languages has their own pros and cons respectively. Choosing which option will suit your project best requires taking inventory of the project's needs and then contrasting those needs with both of the languages' strengths and weaknesses.
Swift is likely the more future-proof option at this point, but that doesn't mean it trumps Objective-C in every scenario.
Objective-C isn't Irrelevant...Yet
For instance, one specific area where Swift needs improvement is tooling. As any iOS developer knows, Xcode is the official IDE (Integrated Development Environment) used to develop and deploy iOS applications. It supports a full range of tools for Objective-C development, like syntax highlighting, auto-complete, memory leak detectors, refactoring tools, runtime performance monitoring, and benchmarks, etc. These tools can often prove invaluable to developers. Although you can get the same level of tooling support by using third-party products or by looking into alternative IDEs, Swift lacks much of the same tooling that Objective-C offers out of the box with Xcode. You'll likely see additional tooling support in future iterations of Swift, but for the time being, this is one of Swift's weakest areas and it's definitely something to keep in mind as you transition to and/or experiment with Swift.
Library support should also be considered when transitioning to Swift. Objective-C has been the de facto development language for nearly 10 years on iOS and more than double that on MacOS. As a result, many of the most popular frameworks and third-party libraries are written in Objective-C. Technically, you can still use Objective-C libraries from within a Swift project, but it requires the tedious and error-prone process of creating Objective-C wrapper classes, which act as bridges between the two platforms. This can often result in additional overhead and technical debt for the project.
This same argument somewhat applies to learning material as well. Blog posts, tutorials, books, and online courses for Objective-C will exist in higher quantity than their Swift counterparts for a while. Although almost every online self-learning code institution offers some form of Swift class (see the sidebar for class suggestions), you'll find fewer practical examples of Swift implementations on sites like Stack Overflow and less library content on sites like GitHub.
You should also consider the target operating system when choosing between the two languages. As time passes, this issue becomes less and less relevant but currently, in order to support Swift, you must target iOS 7.0+ and Mac OS 10.9+. Anything prior to that and you'll have to resort to Objective-C. Contrarily, all versions of tvOS and watchOS support Swift.
Additionally, applications built using anything prior to Swift 3.0 will likely be 10-20MB greater in size than their respective Objective-C counterparts. This results from needing to include all of the Swift runtime libraries within the application, even if the application only has a single line of Swift code.
Swift is still very much in its maturation process. Apple continues to iterate on the platform and each new version seems to retire the previous one rather than simply adding to it and maintaining backward compatibility. While Swift remains in its growth period, Objective-C still has a place in iOS development.
So why would you bother learning or switching to Swift at this point? Because if you plan on being an iOS developer for the long run, Swift will eventually become your primary language for development. It's not a question of whether this will happen, but rather it's a question of how long it will take. Sooner or later, Swift will supplant Objective-C and become the dominant, if not the only, development language used to build applications for iOS, MacOS, Apple Watch, and Apple TV. As with learning anything, it takes time to perfect your craft and failing to get started now could be detrimental later.
If you plan to be an iOS developer for the long run, Swift
willeventually become your primary language for development. It's not a question of whether this will happen, but rather a question of how long it will take.
The Strengths of Swift
As mentioned earlier, Swift still has ground to cover, but it does offer several significant improvements over its Objective-C counterpart. Let's take a look at some of the key improvements and strengths of the platform.
- Speed: Swift is generally faster than Objective-C for several reasons, including: Swift is a static typed language, it can use static dispatching, it has improved dynamic dispatching, memory optimizations, inline functions, and also because the LLVM linker can optimize across source file boundaries.
- Safety: Objective-C uses pointers and if you call an object's method using an object that has yet to be initialized (nil pointer), nothing happens. The line of code does nothing. Although at first glance it might seem like a good idea that this doesn't cause the application to crash, it can be the source of all sorts of bugs and lead to many developer headaches as you try to pinpoint what's gone wrong. Swift introduces optional types for better handling of nil values. If a non-optional variable is assigned a nil value, it generates a compiler error. This consistent behavior results in errors as you write the faulty code, shortcutting the feedback loop and letting you correct your errors in real time. It ultimately leads to less time spent debugging.
- Readability: Swift is independent of the C foundation that Objective-C is tied to. This allows Swift to unify keywords, drop legacy conventions, and depart from more obscure syntax. Additionally, you no longer need semicolons to end a line, parenthesis to surround conditionals, and the removal of nested method calls means you no longer have brackets inside of brackets inside of brackets. You end up with an expressive language that more closely resembles natural English. It also means that Swift resembles other popular modern languages like JavaScript, Java, Python, and C#, making it easier for newcomers to adopt.
- Maintenance: Swift eliminates the two-file system that Objective-C uses (.h header file paired with .m implementation file), which means less code and less to manage. Previously, a developer needed to manually synchronize method and variable names between the two files, but with Swift, you don't have that extra overhead to worry about, giving you more time to focus on application logic. Keith Smiley, an iOS developer for Lyft, gave a talk about the company rewriting their application in Swift. He boasted that the code base shrunk by over 70%, going from an original 75,000 lines of code in Objective-C to a mere 22,000 in Swift while maintaining the same level of functionality and performance (check the side bar for a link to the talk).
Lyft's code base shrunk by over 70%, going from 75,000 lines of code in Objective-C to a mere 22,000 in Swift while maintaining the same level of functionality and performance.
- Playgrounds: Swift comes with an interactive environment called Swift Playgrounds. Within a playground, developers can write and test code in real time without compiling. It has a split view with the implementation on one side and the execution on the other. It can provide a quick way to debug application logic in small chunks, help programmers visualize data, and provide a stage for interactive learning.
- Open Source: Because Apple made Swift open source, there have already been initiatives to expand the platforms that Swift can run on. It's expanding to build on Linux and you can currently find solutions that let you write backend code in Swift. Additionally an effort is underway to make Swift Android compatible (see the sidebar for more details).
Moving from Objective-C to Swift in Code
Now that you've looked at the philosophical differences between Objective-C and Swift, turn your attention to the practical differences in implementation. How exactly does building a Swift project differ from building an Objective-C one? What are the major syntax differences? You'll take a look at this and more in the next sections.
Syntax Differences
Although Swift contains most of the object types you know in Objective-C, the syntax to use those objects has changed. In fact, most of the operations you've grown accustomed to in Objective-C have seen some syntax changes, some more drastic than others. Let's run through some of the familiar objects and operations to compare the Objective-C and Swift syntax.
- Variables and Constants: In Swift, variables are declared using the var keyword.
// Declaring a variable in Swift
var numberVariable = 1
var textVariable = "Hello World"
In the previous snippet, two variables of different types get declared: numberVariable of type integer and stringVariable of type string. Notice how you don't have to specify the type when declaring the variable. Swift is a type-safe language, so it can automatically deduce the variable type by assessing the assigned value. However, depending on the context, you may not assign a value at the same time you declare the variable. In this case, from a code readability standpoint, the intended type might not be inherently clear at first glance. In these instances, you can specify the type when you declare the variable as shown in the following snippet.
// Declaring a variable in Swift
var numberVariable: Int
numberVariable = 1

// Declaring a variable in Objective-C
int numberVariable;
numberVariable = 1;
Constants in Swift use the let keyword instead of the var keyword. You can only assign a value to a constant one time. Trying to change the value of a constant once it's already been assigned an initial value results in an error. It's important to note that the value of a constant doesn't need to be known at compile time, rather it can get generated during run time as long as it's only assigned once. Additionally, you can declare other object types like arrays as constants as well.
// Declaring a constant in Swift (compile time)
let textConstant = "Hello World"

// Declaring a constant in Swift (runtime)
var randomNumber = arc4random()
let numberConstant = randomNumber

// Declaring a constant in Objective-C
NSString *const textConstant = @"Hello World";
String Interpolation: Swift makes string interpolation easier and more readable than its Objective-C counterparts. You can insert variables into the string directly, resulting in more readable code.
// String Interpolation in Swift
var firstName = "Jason"
var author = "The author's name is \(firstName)"

// String Interpolation in Objective-C
NSString* firstName = @"Jason";
NSString* author = [NSString stringWithFormat:
@"The author's name is %@", firstName];
Functions: The function syntax in Swift differs pretty significantly from Objective-C. The following snippet demonstrates a function in Swift and compares it to the traditional Objective-C syntax for the same function. Notice that the return type appears at the end of the function declaration in Swift, as opposed to the beginning in Objective-C.
// Function declaration in Swift
func addTwoNumbers(a: Int, b: Int) -> Int {
    return a + b
}
// Call function in Swift
addTwoNumbers(a: 5, b: 7)

// Function declaration in Objective-C
- (int)addTwoNumbers:(int)a b:(int)b {
    return a + b;
}

// Call function in Objective-C
[self addTwoNumbers:5 b:7];
Additionally, functions in Swift are first-class types, meaning that you can assign them to variables and use them as either parameters or return values for other functions. Consider the following snippet. In this scenario, you see a function that takes another function as a parameter and then executes whatever function you pass to it.
// Using a Swift function as a parameter
func helloWorld() {
    print("Hello World")
}

func executeFunction(function: () -> ()) {
    function()
}

executeFunction(function: helloWorld)
Enumerations: Swift enumerations (enums) have quite a bit more flexibility in Swift than they did in Objective-C. For instance, Swift enums can assign strings, characters, integers, or floats whereas Objective-C was limited to integers. Additionally, they're also considered first-class types, adopting many of the same functionalities usually reserved for classes, such as computed properties and instance methods, which can provide additional context to an enum's current value.
// standard enum in Objective-C
enum carMakes {
    Honda,
    Toyota,
    Chevy,
    Ford
};

// example of how to utilize enum
int carMake = Honda;
This standard Objective-C enum, demonstrated in the previous snippet, called carMakes contains a list of various automobile manufacturers. By default, the system assigns an integer to each of the listed types starting with 0 for Honda, 1 for Toyota, etc. You can change the default system-assigned value of the enum types but beyond that, there isn't much additional functionality to take advantage of. As mentioned previously, with Swift, you can use other data types and implement functions and computations within the enum, as you can see illustrated in Listing 1.
Listing 1: Swift enumeration example
enum Car
{
    case Make(make:String, model:String)
    case Appearance(color:String, size:String)

    func description() -> String
    {
        switch self
        {
            case let .Make(make, model):
                return make + " " + model
            case let .Appearance(color, size):
                return color + " " + size
        }
    }
}

let car1 = Car.Make(make: "Toyota", model: "Camry")
let car2 = Car.Appearance(color: "Blue", size: "Sedan")
print(car1.description())  // Toyota Camry
print(car2.description())  // Blue Sedan
Notice that in Listing 1, you have an enum called “Car”. It has two cases that describe how you can create a Car: using make and model with the Make case or using color and size with the Appearance case. It also contains a function called “description,” which looks to see what case was used to construct the respective “Car” enum and returns a string representation of the car's associated values. Below the enum, you can see two examples of creating a “Car” using the different Make and Appearance cases. Regardless of which case you used to create car1 and car2, you can call the “description” function on either and it uses the information to construct a string description and return it.
Classes: An Objective-C class usually consists of two files: a .h header file and a .m implementation file. The structure, in most cases, resembles the following code snippet.
// class .h file
@interface ClassName : NSObject
@end

// class .m file
@implementation ClassName
@end
With Swift, the two-file system has disappeared and there's no longer a need for header files. As a result, class definitions get simplified to now resemble the following:
// Swift Class Definition
class ClassName {
}
Listing 2 demonstrates a more robust class definition and implementation. You can see that a class called NewCar gets created with three properties: condition, make, and model. Notice that under the property declarations, there's an initializer. This is important because without that initializer, the compiler throws an error. Swift doesn't allow nil values unless you use an Optional data type (covered in the next section) and without that initializer, you could instantiate an instance of the class without assigning a value to make or model.
Listing 2: Swift class example with setter method (required values)
class NewCar
{
    var condition: String = "New"
    var make:String
    var model:String

    init(make:String, model:String)
    {
        self.make = make
        self.model = model
    }

    func description() -> String
    {
        return "The \(make) \(model) is
                in \(condition) condition"
    }
}

var car = NewCar(make: "Toyota", model: "Corolla")
car.description() // The Toyota Corolla is in New Condition
Listing 2 also shows how you then create an instance of the class using that initializer method while assigning the class instance to a variable at the same time. Once done, you can then access the “description” method on the class using the assigned variable reference, as demonstrated.
What if you didn't want to set the make or model at the time the class gets initialized? Listing 3 demonstrates how this is achieved using Optionals. Changing make and model to optional types allows you to remove the initializing method. I'll cover Optionals and Listing 3 in more detail in the next section.
Listing 3: Swift class example using optional values
class NewCar
{
    var condition: String = "New"
    var make:String?
    var model:String?

    func description() -> String
    {
        return "The \(make!) \(model!) is
        in \(condition) condition"
    }
}

var car = NewCar()
car.make = "Toyota"
car.model = "Corolla"
car.description() // The Toyota Corolla is in New Condition
New Data Types: Optionals and Tuples
Swift expands on the data types you grew accustomed to in Objective-C with the addition of Optionals and Tuples. As mentioned briefly in the previous section, Optionals provide a way to tell the system that it's okay if this variable has a nil value at some point. Without the optional notation, a nil value results in a compiler error. You can declare a variable as an optional with the addition of a question mark after the variable type, as demonstrated in the following examples.
// Swift Optionals
var integerOptional: Int? // starts as nil
var stringOptional: String? // starts as nil
Notice how you didn't have to assign any value at the point that you declared the variable. Although you technically don't have to assign a value to any var when you declare it, when you declare it as an Optional, it takes on an initial value of nil. Let's look at the following snippet to see how that makes a difference.
// Normal Swift Variable
var someNumber: Int
print(someNumber) // this will cause a crash

// Swift Optional Variable
var someNumber: Int?
print(someNumber) // prints nil
someNumber = 20
print(someNumber) //prints Optional(20)
In the first example, the variable was declared but accessed before it has been assigned a value, causing the application to crash. In the second example, because you declared someNumber as an Optional, it starts as nil until it's later assigned the value of 20. Notice that when you go to print someNumber after assigning it a value of 20, the result of the operation is "Optional(20)". What does this mean? Because an Optional can technically be nil and accessing nil values directly can cause runtime errors, there's a layer of safety in between the program and the value that the Optional contains. Think of the Optional as a wrapper around the value. In order to access the raw value, you need to unwrap it. Unwrapping an Optional is as easy as adding an exclamation point after the variable name, but take special care, because unwrapping a nil Optional causes a runtime error as the exclamation point essentially translates to “I know this variable definitely has a value; please use it.” Consider the following examples.
// Incorrect optional unwrapping
var someNumber: Int? = Int("abc")
print(someNumber!) // value nil, fatal error

// Correct optional unwrapping
var someNumber: Int? = Int("abc")
if (someNumber != nil) {
    print(someNumber!)
}
As you can likely deduce from the example, you should confirm that the Optional doesn't contain a nil value before you unwrap it. Additionally, if you know that the Optional will contain a value at the time you plan to access it, you can have it automatically unwrap itself by swapping the question mark in the variable declaration for an exclamation point.
The other new data type found in Swift is called Tuples. Tuples provide a way to group many values into a single compound value. The values that a tuple contains can be of any type and you can mix and match types within a single tuple. Consider the following example containing a tuple for a used car.
var usedCar = ("Toyota", "Corolla", 45109)
// usedCar is of type (String, String, Int)
The tuple in the previous example groups together two strings and an integer to give the used car three contextual values: make, model, and total mileage on the vehicle. Notice that the tuple's data types don't have to be consistent. There you have (String, String, Int) but you could have (Int, Bool) or any other permutation. Once you create a tuple like usedCar, you can deconstruct it into individual variables at any point, as shown in the next example. Furthermore, that code snippet also shows that if you want to deconstruct the tuple but only need access to part of the data set it contains, you can use an underscore to let the system know to ignore the remaining values. Lastly, the snippet also demonstrates that you can reference the values of usedCar using dot notation with the index of the value.
// 1. deconstruct entire tuple
let (make, model, mileage) = usedCar
print("the make is \(make)")
print("the model is \(model)")
print("the mileage is \(mileage)")

// 2. deconstruct single value
let (make, _, _) = usedCar
print("the make is \(make)")

// 3. access tuple values using dot notation
print("the make is \(usedCar.0)")
print("the model is \(usedCar.1)")
Refer back to the initial creation of the usedCar tuple. You assigned it a tuple containing (“Toyota”, “Corolla”, 45109). Most of us could deduce that Toyota and Corolla refer to a brand of automobile. Using that context, it's a logical assumption that the last set of numbers might be mileage. However, not all data sets have the same level of transparency. If you wish to give your tuple additional context when you create it, you can provide element names, as shown in the next snippet.
var usedCar = (make: "Toyota", model: "Corolla", mileage: 45109)
print("the make is \(usedCar.make)")
print("the model is \(usedCar.model)")
print("the mileage is \(usedCar.mileage)")
Creating a New Project
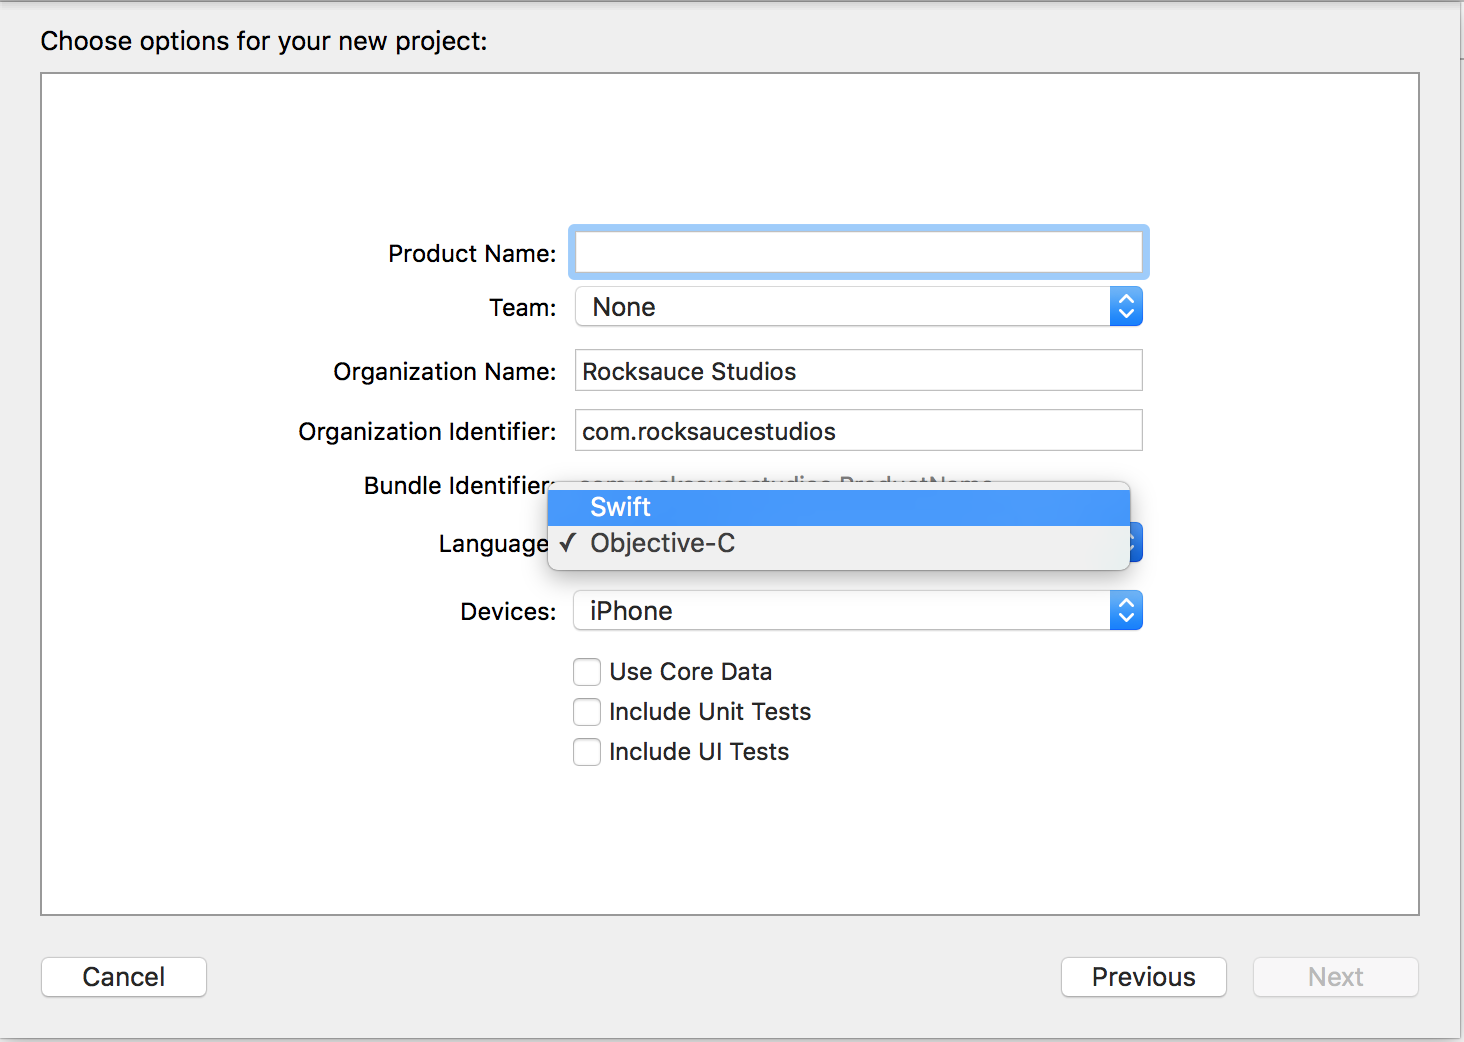
Creating a new Swift project is essentially the same process as creating an Objective-C project. In Xcode, go to File > New > Project to trigger the New Project dialog. Choose the project template and you'll get presented with the form pictured in Figure 1. Notice the language selection box illustrated. Here, you can select Swift as the language option for the project. Name your project as usual, click Next to choose a location to save the project into, and then press Create to launch into your new Swift project.
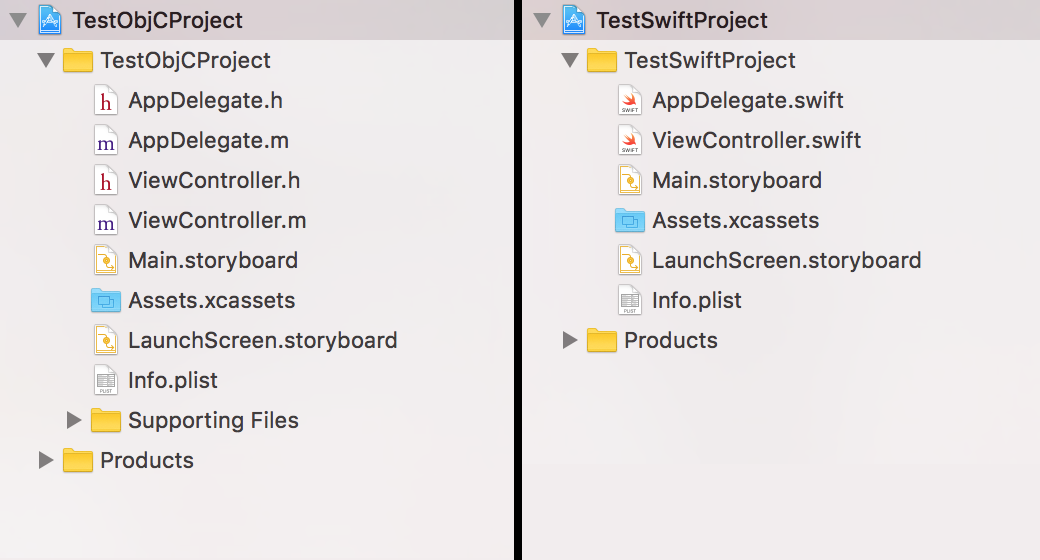
The project structure of a standard single-view Swift application resembles its Objective-C counterpart, as shown in Figure 2. Figure 2 demonstrates a traditional Objective-C project file structure on the left-hand side and a Swift starting structure on the right. Each has an application delegate, an initial view controller, and a main storyboard. Even the file's contents are nearly identical from a method standpoint. Controllers each have their initial viewDidLoad and didReceiveMemoryWarning canned functions and the app delegate has all the standard method calls that you're used to seeing. Once you understand the fundamental syntax differences between the two languages, jumping into Xcode shouldn't present a big challenge to anyone who's used to using the IDE for writing Objective-C applications.
Practice Makes Perfect
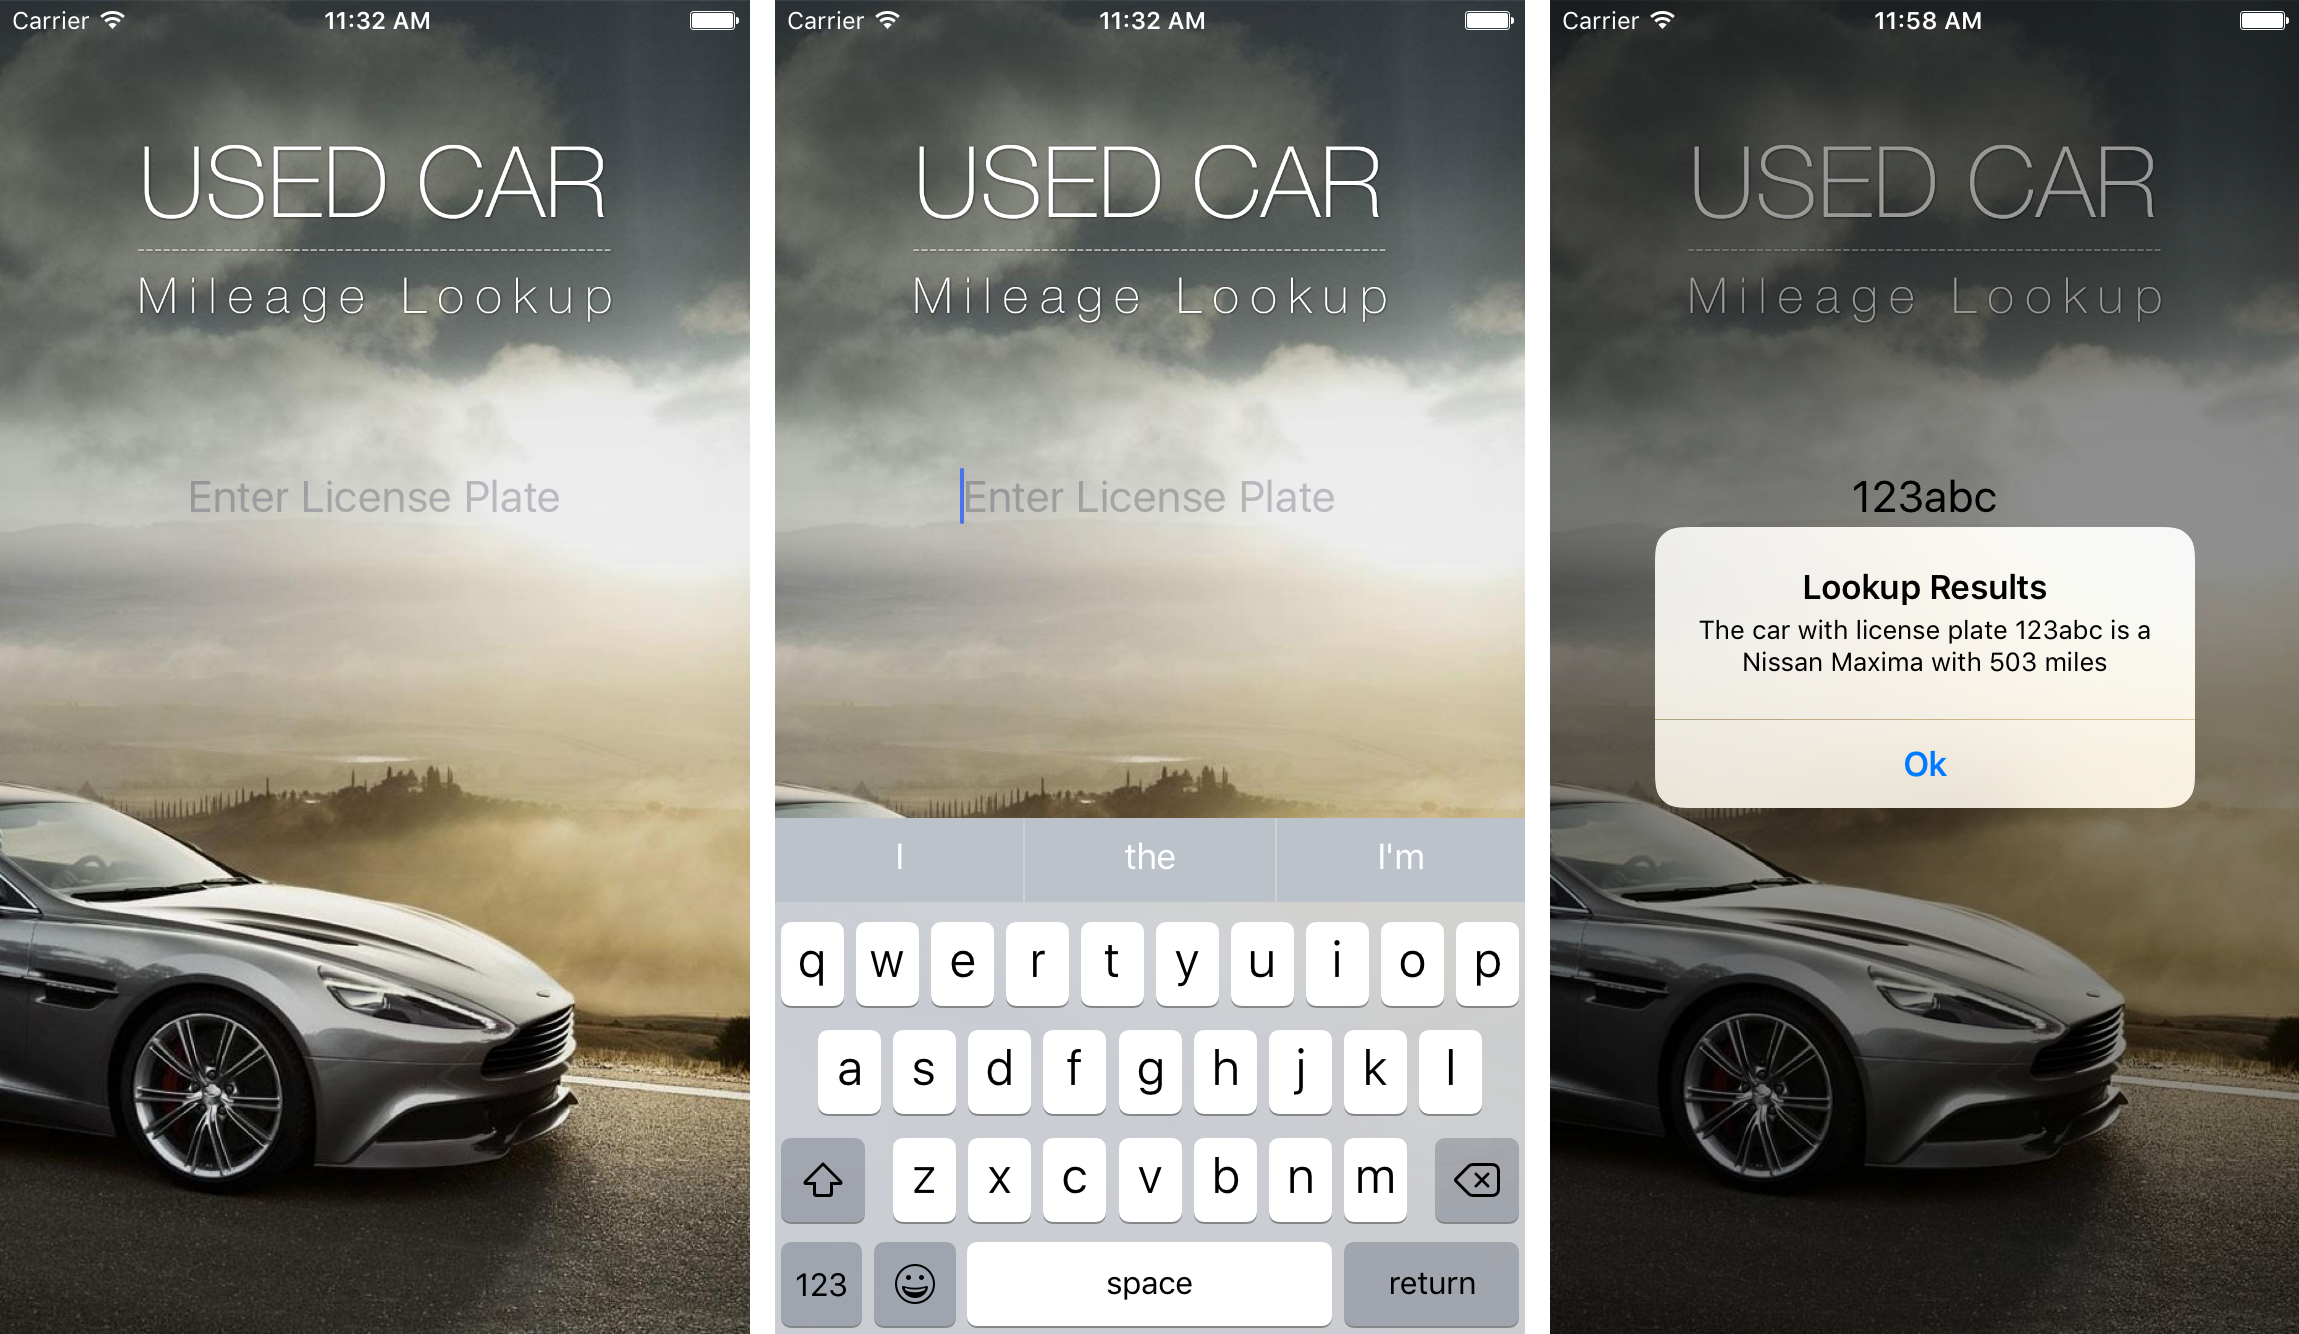
Let's take what you just learned in the previous sections and put it into practice to make a simple application. Often the best way to learn a new language in programming is to get your hands on it and work with it. Here, you'll continue the car theme to create an application that lets users look up the mileage of a used car by searching for a license plate number. Figure 3 demonstrates what the end result will look like.
The Set Up
The set up for this application is simple. First, create a new Swift project as described in the last section, choosing the Single View Application template when prompted. Once created, you'll first want to go to the main storyboard (Main.storyboard) and set up the UI elements. You can find the art assets from the screenshots in the sample code provided with this article. Add the background image, the logo, and the text field to the view and position them accordingly. You can set the background image to AspectFill so it looks good on any resolution device. Once done, you're ready to switch over to the ViewController.swift file and implement the application logic, which will get covered in the next section.
Application Logic
The application's main function is to let the user input a license plate number, at which point the app searches its data store (local mock data in this case) for a used car that matches the entered plate. If the application locates a match, it displays a dialog pop up with the car information and mileage, as shown in the far right screenshot in Figure 3. Listing 4 shows the entire ViewController.swift source from this completed application. Let's walk through it so that you understand exactly what's happening.
Listing 4: ViewController.swift from sample car application
import UIKit

class ViewController: UIViewController {

    // a used car object to manage car data
    class UsedCar {
        var make: String
        var model: String
        var licensePlate: String
        var mileage: Int

        init (make: String, model: String,
        licensePlate: String, mileage: Int) {
            self.make = make
            self.model = model
            self.licensePlate = licensePlate
            self.mileage = mileage
        }
    }

    // variables available to whole controller
    var car1: UsedCar?
    var car2: UsedCar?
    var car3: UsedCar?
    var car4: UsedCar?
    var carList = [UsedCar]()

    @IBOutlet weak var searchField: UITextField?


    override func viewDidLoad() {
        super.viewDidLoad()

        // simulate a data source with some mock cars
        car1 = UsedCar(make: "Toyota", model: "Corolla",
            licensePlate: "12345", mileage: 17564)
        car2 = UsedCar(make: "Dodge", model: "Durango",
            licensePlate: "abcdef", mileage: 22465)
        car3 = UsedCar(make: "Nissan", model: "Maxima",
            licensePlate: "123abc", mileage: 503)
        car4 = UsedCar(make: "Ford", model: "F150",
            licensePlate: "abc123", mileage: 49078)

        // add the cars to the array
        carList = [car1!, car2!, car3!, car4!]

    }

    // function that is called when
    // return is pressed on the keyboard
    @IBAction func searchForCar() {
        // call lookup with the text entered in field
        let searchResult =
            lookupUsedCar(licensePlate: (searchField?.text)!)

        // show appropriate message depending on
        // result that was found
        if(searchResult != nil) {
            showAlertPrompt(message: "The car with
            license plate \(searchResult!.licensePlate)
            is a \(searchResult!.make)
            \(searchResult!.model) with
            \(searchResult!.mileage) miles")
        }
        else {
                showAlertPrompt(message: "car not found");
        }
    }

    // takes license plate and searches for a car that matches
    func lookupUsedCar (licensePlate: String) -> UsedCar? {

        for car in carList {
            if(car.licensePlate == licensePlate) {
                return car;
            }
        }

        return nil;
    }

    // show an alert modal with a custom message
    func showAlertPrompt (message: String) {
        let alertController =
            UIAlertController( title: "Lookup Results",
            message: message,
            preferredStyle: .alert)

        let cancelAction =
            UIAlertAction(title:"Ok", style: .cancel, handler: nil)
            alertController.addAction(cancelAction)
            self.present(alertController, animated: true,
            completion: nil)
    }

    override func didReceiveMemoryWarning() {
        super.didReceiveMemoryWarning()
        // Dispose of any resources that can be recreated
    }

}
The first thing you'll notice is a class declaration for UsedCar. This class has several properties, such as make, model, license plate, and mileage. Notice that the initializer function takes all four as input, meaning that it's not possible to declare an instance of UsedCar with a nil value for any of the class' properties. If you hadn't used an initializer there, you'd have needed to declare all the properties as Optionals using the ? notation. Furthermore, instead of creating the class with a single line as shown later in Listing 4, you'd have needed to first initialize it and then later assign the values, as follows:
var car1 = UsedCar()
car1.make = "Toyota"
car1.model = "Corolla"
car1.licensePlate = "12345"
car1.mileage = 17564
Moving past the UsedCar class declaration, you'll notice several variable declarations. These variable declarations appear outside of any one function so that the entire controller has access to them. In this example, var is used instead of let because it makes sense that the inventory of used cars could change over time. In a practical, real-world example, that inventory would probably load in from a database or other external source, but for the sake of simplicity, you create a mock representation of that data using four car variables and an array. In addition to those variables, you create an IBOutlet that corresponds to the UITextField that you already added to your main storyboard. Once you add that variable, jump over to the storyboard and link it to the field.
Now, you arrive at the standard controller function viewDidLoad. Here, you'll instantiate the four car objects and add them to the carList array so you can iterate on them later when searching for a matching license plate. Notice how the initializer function that you created in the class definition insures all properties of the UsedCar class get assigned with the creation of each object. Once you complete that, you override the currently empty carList array with a new array containing the four car objects. You include the ! to unwrap the object so that the array holds the actual car and not the wrapped package of the object. In most cases, you need to confirm that the object you unwrap isn't nil, but since you just physically assigned values to all four cars, you know it's safe.
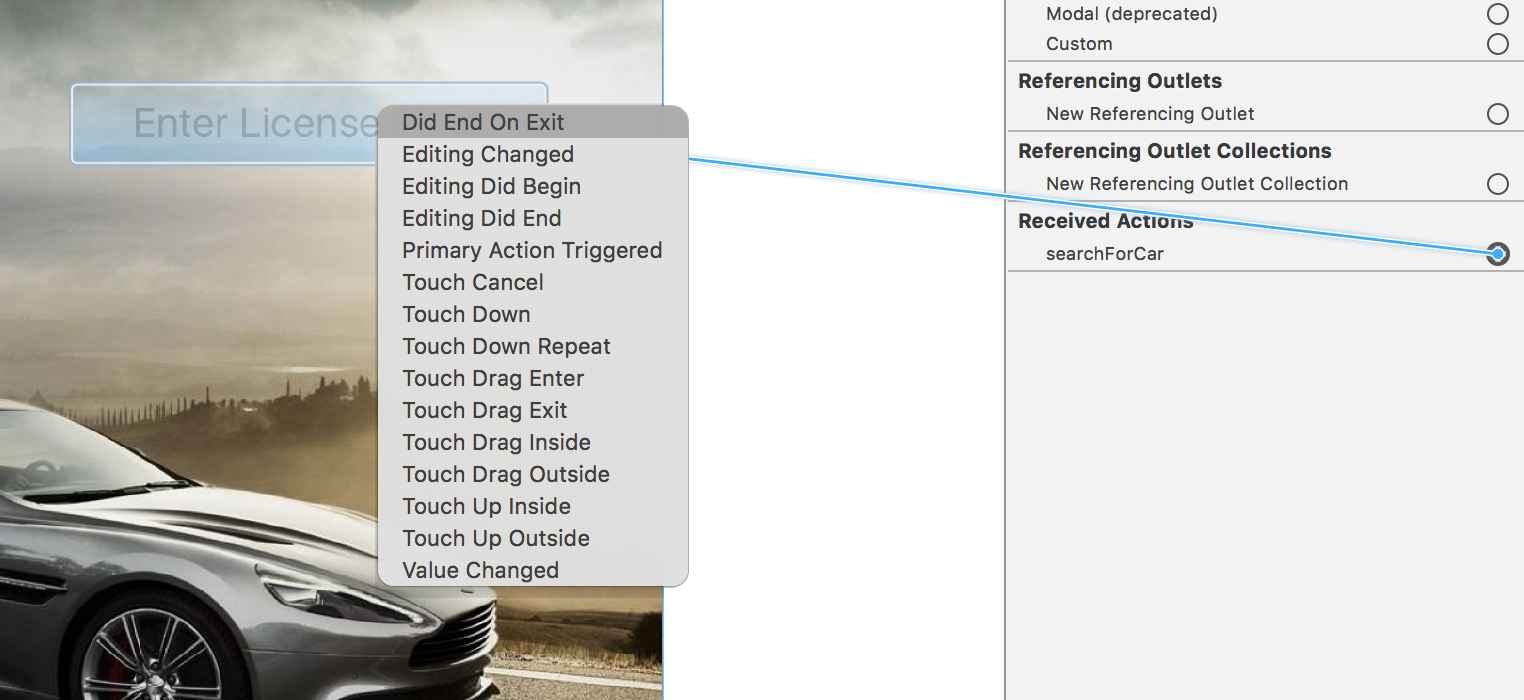
The next function gets called when the user presses the return key on the keyboard, indicating that they've concluded their input and wish to search for a used car based on the value they entered. @IBAction precedes the function declaration so that it can be linked to the text field in the storyboard. To link the action to the return key, go to the storyboard and drag the action to the text field and associate it with the “Did End on Exit” option, as shown in Figure 4.
Now you can implement the logic for the searchForCar function. The function takes no direct input because it's going to reference the text entered into the search field. You start by declaring a constant variable that represents the result of the search. Because the context of the search result is local to the search function, it's only assigned a value once per search performed, so let works here. The lookup function compares the license plate that the user entered with the carList you created earlier. If it finds a match, the matching UsedCar object gets returned. If it fails to find a match, nil gets returned. This causes searchResult to become an Optional even though you didn't explicitly tell it to. It's important to note that if the value you assign to a variable (in this case, the function return value, which is an Optional: UsedCar?) has the potential to be nil, the variable you assign it to becomes an optional.
It's important to note that if the initial value you assign to a variable has the potential to be nil, the variable you assign becomes an Optional even if you didn't declare it using the ? notation.
Because the searchResult has the potential to be nil, you need to check whether it contains a value before you unwrap it. If it has a value, you call a function to display an alert dialog with the car information, passing a message that you compose by combining unwrapped values of the corresponding UsedCar class object via string interpolation. If it doesn't have a value, you call a dialog to inform the user that no results were found. How do you determine if a used car exists corresponding to the user's entry? The lookupUsedCar function in Listing 4 determines this for you. It iterates over the car list using a for-in loop. Each loop iteration checks to see whether the corresponding car matches the user's entry by performing a string comparison on the respective license plates. If a match is found, it gets returned. If you reach the end of the loop with no match found, nil gets returned.
The last piece of the puzzle is the showAlertPrompt function that takes in a string message and generates a default system alert dialog to display the passed message. The searchForCar function uses this to display the results of the search effort. With that implemented you've completed the logic for the application and can run it to test your work. Entering a license plate corresponding to “12345”, “abcdef”, “123abc”, or “abc123” should find a match, whereas anything else should return no results.
Wrapping Up
Hopefully, over the course of this article you gained an understanding of the basic differences between Objective-C and Swift. Although the examples in this article may seem elementary, they represent the fundamental building blocks of knowledge that you'll need to tackle Swift effectively. As with anything, practice makes perfect. If you're interested in learning more about Swift, check the sidebar for additional educational material. Lastly, check the code download section for a link to the source code demonstrated in Listing 4.
