


Everyone wants to get their apps in front of the largest possible audience, and as mobile app stores are global, your app should be too. That makes localization into a vital marketing expense.
New development tools make it easy to support multiple languages and cultures, and you'll find that the hardest part is the language translation itself.
When doing a native application, of course you want to hit the major platforms: Android, iOS, and Windows Phone. By using the .NET Framework on each platform, you can share much of the code and get the globalization and localization functionality that comes with .NET. By building the application for Windows Phone first or concurrently with iOS and Android, you will be able to leverage some powerful tools from the .NET stack to make localization much easier to code.
In this article, I'm going to build the same application on Android, iOS, and Windows Phone 8. To do this, I'll use Xamarin's Android and iOS tools (formerly known as MonoDroid and MonoTouch). Xamarin's iOS and Android products use the native localization mechanisms on each platform. So although the iOS and Android information in this article has a definite .NET flavor, the core concepts also apply if you were doing Objective-C and Java development on each platform.
Know Your Localization Problem
What are the localization needs for your app? Have you been given any localization requirements? If you have, then you already have your marching orders. If you haven't been given any requirements for localization, think about your target markets. There are global app stores and you don't want to limit the marketability of your app if you don't have to.
How many languages do you need to support? If your app targets Canadian government employees, you need both English and French. If your app displays public transit information for cities in California, you want English and Spanish at minimum, Chinese and other languages if you can get translation resources. Know who your target audience is for your app.
Don't limit your app sales to a single market.
The Basic Terminology
There are some common terms used when you talk about localization. I'll cover the basic ones here.
Language: This is the language chosen by the user. The same language in different countries can have different spelling and grammar rules.
Locale: The culture for the user. This is the language matched to the country. Locale can be used to differentiate between different dialects of a language. For example American English (en-US) and UK English (en-UK) have different spellings for the same word (such as color and colour) and also different terms for the same items (like hood versus bonnet). It also includes how dates, numbers, and currency are displayed. The locale is usually defined with a lower-case two-character language code and an uppercase two-character county code, separated by a hyphen. The language codes are defined by the ISO 639 standard, using the two-letter codes defined as ISO 639-1. The country codes are defined by the ISO 3166 standard, with ISO 3166-1 alpha-2 defining the two-letter country codes.
A locale can be defined by only the language code, but it is more accurate to use language and country to account for regional differences. For example fr-CA represents the French language as it is used in Canada. This can be different than the French used in France with the locale code fr-FR. It's mostly the same language, but with minor spelling differences and very different idioms. The language resource files used by the applications are selected based on the locale. This is handled by the runtime code; you don't have to set this manually.
Culture/UICulture: The .NET representation of a locale. For the most part, you don't need to think about this part. The language resource should be selected by the app based on the locale.
Right to Left (RTL) Support
Do you need to support right-to-left (RTL) languages like Arabic, Hebrew, or Persian? This impacts how you layout out controls on the screen. The latest versions of mobile platforms have good support for RTL layout.
If you're writing an Android app, consider targeting Android 4.2 or later if you need RTL support. Full native support for RTL layout was added to 4.2. You can do RTL in older versions, but it's much easier in 4.2.
To add RTL support in Android 4.2, you'll need to do the following:
- Add the android:supportsRtl attribute to the
<application>element in your manifest file and set it totrue. This enables the RTL support in Android 4.2 (API level 17) and is ignored in older versions. - Convert “left” and “right” layout properties to “start” and “end”. For example, ‘android:paddingLeft’ becomes
android:paddingStart.
RTL layouts do not have the same level of support in iOS. The UILabel control displays the text in RTL if the text starts with the Unicode character 0x200F. Unicode has two characters that are invisible and set the direction of the text. The 0x200F character indicates RTL and 0x200E indicates LTR.
If you're writing an iPhone app, the narrow width of the screen limits you to one text item per row. If you're displaying multiple items horizontally, you need to detect the language and arrange the controls for the RTL layout.
Windows Phone uses a property named FlowDirection to set RTL and LTR. This is set by the current Culture of the phone; you don't need to do anything to support it. You can override the direction by adding a FlowDirection attribute to a control and setting it to LeftToRight or RightToLeft.
Building the Localized Cross Platform
The sample app is a basic note-taking app. It doesn't do a lot, but it does enough to show language and culture localization on each platform. A complete solution containing projects for Android, iOS, and Windows Phone 8 can be downloaded from the download of this article online at https://codemag.com/article/1401081
Windows Phone 8 First
I'm building the app on Windows Phone first because Microsoft has the best tools for writing and testing code; when you add the Xamarin tools, you can stay with a single language. Plus you gain a level of code reuse across the platforms. For localization, you have a secret weapon called the Multilingual App Toolkit. The Multilingual App Toolkit is a Visual Studio extension that handles the grunt work of adding language resource files. It can even use Microsoft Translator to machine translate some of the common language.
For localization, you have a secret weapon called the Multilingual App Toolkit. The Multilingual App Toolkit is a Visual Studio extension that handles the grunt work of adding language resource files.
You'll also use the T4 feature in Visual Studio to generate the Android and iOS string resource files from the Windows string resource files.
Creating the Windows Phone 8 App
I'll skip how to create a Windows Phone App because you can look at the sample solution or create an app of your own. What you need to do is to make sure that all of the text strings come from a resource file. The standard templates for a new Windows Phone app create the initial AppResources.resx file and wire it up for declarative binding in the XAML.
Instead of having embedded text strings like this:
<TextBlock Text="Hello World" />
You have something like this:
<TextBlock Text="{Binding Path=
    LocalizedResources.HelloWorld,
    Source={StaticResource LocalizedStrings}}"/>
If you need to set any text properties in the code-behind file, you just add the .NET resource syntax like this:
appBarButton.Text = AppResources.Save
Once you have the Windows Phone app working and with strings properly placed in the AppResources file, you'll add some languages and do a rough translation of the text
Create the Android App
A sample Xamarin.Android app is included with this project (https://codemag.com/article/1401081), and you can use that project or create one of your own. The code for using string resources is nearly identical between Xamarin.Android and Google's Java-based development toolkit. The design of the app should be the Android equivalent of the Windows Phone app. The Android layout files are a rough approximation for the Windows Phone XAML views.
Create the app, but don't worry about localizing the string resources. You'll want the resources that are generated from the Windows project. The reason for creating the project now is to create the project resource folder so that the tools have a destination folder for their output.
Create the iOS App
As with the Android app, a sample iPhone app that was created with Xamarin.iOS is included with this project at https://codemag.com/article/1401081. If you use Objective-C, the resource files are the same but the source code is different.
The UI for this app is code-based; it doesn't use the .xib files generated by the Xcode Interface Builder tool. It takes a little more to localize an iOS app than it does for Windows or Android, but it's pretty straight-forward and you'll use a String Extension method to help out.
As with the Android app, you don't have to worry about localization yet. You just want to get the folders set up for the automated transforms.
Install the Multilingual Toolkit
Now it's time to install the Multilingual App Toolkit for Visual Studio 2012. Follow these steps to get the Multilingual App Toolkit installed and usable with the sample project:
- Make sure that Visual Studio has all of the latest service packs and critical updates installed.
- Install the Multilingual App Toolkit from the language appropriate download link at
http://msdn.microsoft.com/en-us/windows/apps/hh848309.aspx. - Restart Visual Studio.
- Open the solution containing the Windows Phone app and select the Windows Phone app project.
- From the TOOLS menu, select “Enable Multilingual App Toolkit.” This enables the Multilingual App Toolkit to the project and adds a pseudo language (that you can ignore).
- From the PROJECT menu, select “Add Translation Languages…” This invokes the Translation Languages dialog box, as seen in Figure 1.
- Select French and Spanish and press the OK button.
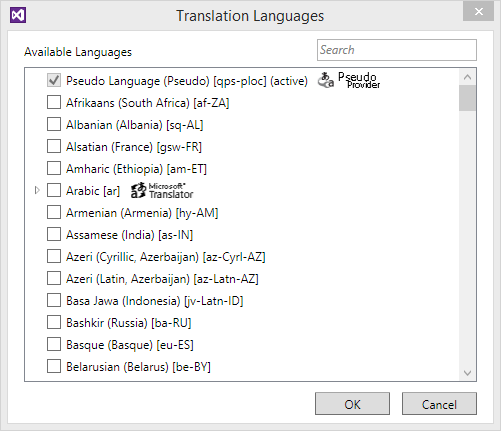
This adds the files AppResources.es.xlf and AppResources.fr.xlf to the project in the Resources folder. The xlf files are XLIFF (XML Localization Interchange File Format) files, which is standard XML format for storing localizable data that can be shared with external tools and third-party services.
Double-click on the AppResources.fr.xlf file. This opens up the file in the Multilingual Editor, as displayed in Figure 2.
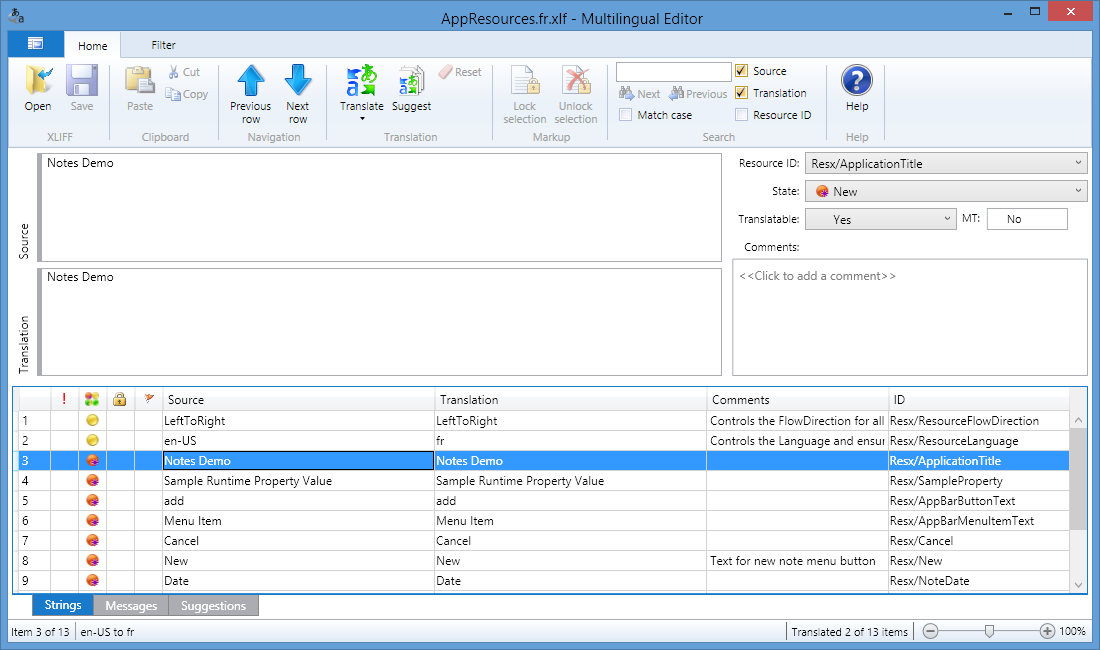
Select all of the strings with the state of New (red icon) and click the Translate button. This does a machine translation of each string and is going to be a rough approximation of the translated text. You will get a translation, but translated without any context. A language expert should validate the translation to make sure it's accurate. The Multilingual Editor sets the state of machine-translated text from “New” to “Needs Review.” This makes it easier for the language expert to know which items need to be reviewed.
An alternative way of using auto translate is to right-click on the .xlf files that were just added and select “Generate Machine Translations.” The Multilingual App Toolkit uses the Microsoft Translator service to translate all of the new string resources in the files.
Rebuild the project to generate the localized .resx files from the .xlf files.
To test the localized string resources, you need to deploy the app to the Windows Phone Emulator and change the country and language. Windows Phone 8 does not differentiate between US Spanish and Spain's Spanish. This is why, when you did the “es” locale, Windows Phone didn't recognize “es-US” when you selected Spanish as the language and US as the country.
It's a little cumbersome to test localization on Windows Phones because you have to run the Settings app on the Emulator (or device) and change the language (and region). This requires a reboot.
There is a shortcut that that requires a couple of lines of code. Instead of having the app pick up the current language and region from the operating system, you can force a specific language. In the constructor method of the main page, add two lines to set CurrentCulture and CurrentUICulture to the locale you want to test. That code will look something like this:
public MainPage()
{
    InitializeComponent();

    // Force the app to use a specific style
    Thread.CurrentThread.CurrentCulture = new CultureInfo("es-US");
    Thread.CurrentThread.CurrentUICulture = Thread.CurrentThread.CurrentCulture;

    DataContext = App.ViewModel;

    BuildLocalizedApplicationBar();
}
This can save a lot time during debugging, as opposed to changing the settings in the emulator each time, as that change reboots the emulator. Just remember to comment out or remove that before submitting the app. Otherwise, you'll have locked every user into one language. One way around this is to put the code inside a #ifdef DEBUG/#endif block. When you compile the code for release, the debug code won't be in the app.
If you set the language in the code, remove that code before you submit the app to the app store.
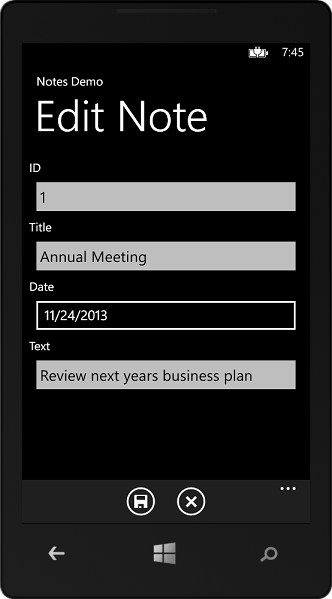
Using the sample Windows Phone project, the English page in English (US) appears in Figure 3.
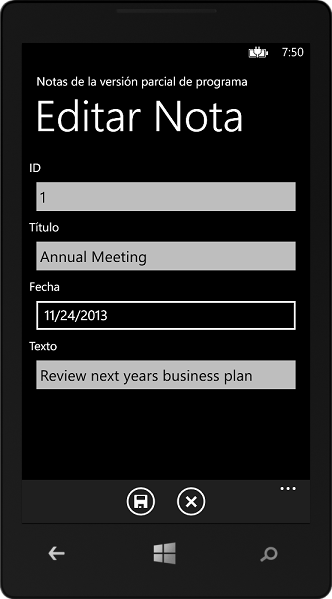
Changing the language to Spanish and the Region to Spain generates the Edit Notes page, as in Figure 4.
You can generate the Android and iOS string resource files from the Windows RESX files, but first you need to add the Android and iOS versions of this app to the solution.
Generate the Android and iOS Resource Files from the Windows Phone
With the Android and iOS apps using string resource files, it's time to transform the Windows string resource files into string resources for the other platforms.
Install the T4 Tools
A good programmer uses a tool for the grunt work. For this project, the tool is the T4 feature of Visual Studio, with a free extension from the Visual Studio Gallery called “T4 Toolbox.”
T4, which stands for Text Template Transformation Toolkit, is a template-based text generation framework that comes with Visual Studio. It's used by the Entity Framework to generate entities from database schema and by ASP.NET MVC to generate views and controllers. You're going to generate language resource files from language .resx files.
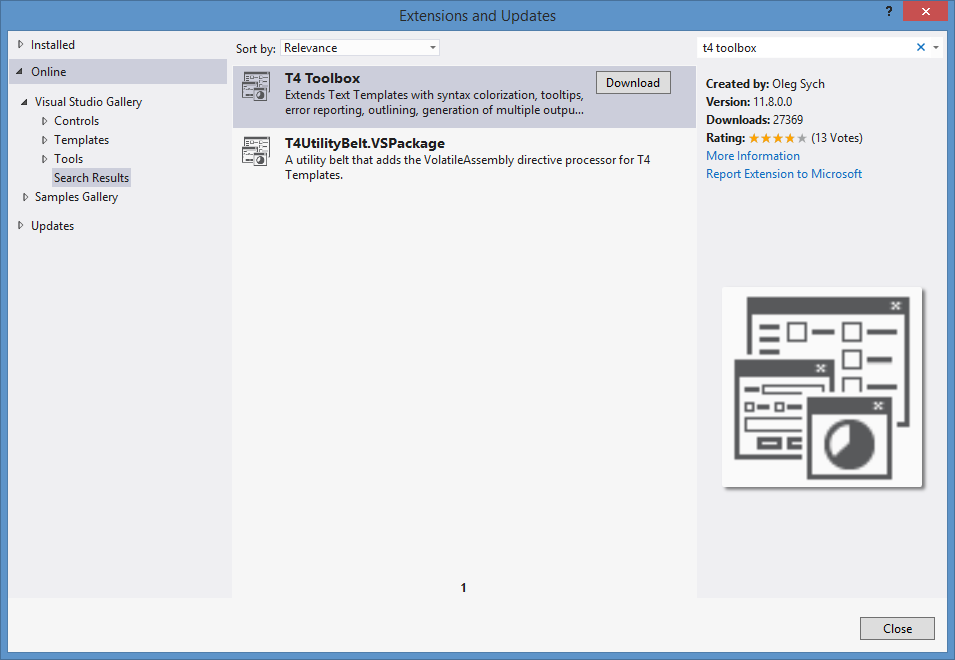
Among other things, T4 Toolbox makes it easier to generate multiple output files from a single source file. Install T4 Toolbox from within Visual Studio via the Extension Manager. From the main menu, select TOOLS, then Extension and Updates. Then select Visual Studio Gallery for T4 Toolbox and click the Download button, as shown in Figure 5.
Add the T4 Scripts
I wrote a T4 template that has the classes for transforming the Windows string resource files to the formats needed for Android and for iOS. This T4 file is named Resx2AndroidTemplate.tt and is included in Listing 1.
Listing 1: T4 Template classes that transform Windows Phone RESX to Android and iOS resource files
<#@ include file="T4Toolbox.tt" #>
<#@ assembly name="System.Core" #>
<#@ assembly name="System.Xml" #>
<#@ assembly name="System.Xml.Linq" #>
<#@ Assembly Name="System.Windows.Forms" #>
<#@ import namespace="System" #>
<#@ import namespace="System.IO" #>
<#@ import namespace="System.Diagnostics" #>
<#@ import namespace="System.Linq" #>
<#@ import namespace="System.Collections" #>
<#@ import namespace="System.Collections.Generic" #>
<#@ import namespace="System.Text.RegularExpressions" #>
<#@ import namespace="System.Xml" #>
<#@ import namespace="System.Xml.Linq" #>
<#@ import namespace="Microsoft.VisualStudio.TextTemplating" #>
<#+
public class Resx2AndroidTemplate : Template
{
    private ITextTemplatingEngineHost hostValue;
    public virtual ITextTemplatingEngineHost Host
    {
        get { return this.hostValue; }
        set { this.hostValue = value; }
    }

    public string ResxFileName {get; set;}

    public override string TransformText()
    {
        Dictionary<string, string> items = GenerateResources(ResxFileName);

        int l = items.Count;

        WriteLine("<?xml version=\"1.0\" encoding=\"utf-8\"?>");
        WriteLine("<resources>");


        foreach(KeyValuePair<string, string> pair in items)
        {
            Write("  <string name=\"");
            Write(pair.Key);
            Write("\">");
            Write(pair.Value);
            WriteLine("</string>");
        }
        WriteLine("</resources>");

        return this.GenerationEnvironment.ToString();
    }

    protected Dictionary<string, string>
    GenerateResources(string resxFileName)
    {
        Dictionary<string, string> items =
            new Dictionary<string, string>();
        string locale = GetLocale(resxFileName);
        string fullname = Host.ResolvePath(resxFileName);

        if (locale != "")
        {
            locale = "_" + locale;
        }

        // Read in the .resx file and collect the data elements
        if (File.Exists(fullname))
        {
            XDocument document =
                XDocument.Parse(File.ReadAllText(fullname));

            foreach(var item in document.Element("root").Elements("data"))
            {
                string Name = EscapeName(item);
                string Value = EscapeValue(item);

                items.Add(Name, Value);
            }
        }

        return items;
    }

    public string GetNameSpace(string filename)
    {
        string [] words = filename.Replace(".\\", "").Split(new char[] {'.'});
        return words[0];
    }

    public string GetLocale(string filename)
    {
        string [] words = filename.Replace(".\\", "").Split(new char[] {'.'});

        if (words.Length > 2)
        {
            return words[1];
        }
        else
        {
            return "";
        }

    }

    public string EscapeName(XElement item)
    {
        string name = item.Attribute("name").Value;
        return Regex.Replace(name, "[^a-zA-Z0-9_]{1,1}", "_");
    }

    public string EscapeValue(XElement item)
    {
        XElement vitem = item.Descendants().FirstOrDefault();
        string name = vitem.Value;
        name = name.Replace("'", "\\'");
        return name;
    }
}

public class Resx2iOSTemplate : Resx2AndroidTemplate
{
    public override string TransformText()
    {
        Dictionary<string, string> items = GenerateResources(ResxFileName);

        int l = items.Count;

        foreach(KeyValuePair<string, string> pair in items)
        {
            WriteLine(String.Format("\"{0}\"=\"{1}\";", pair.Key, pair.Value));
        }

        return this.GenerationEnvironment.ToString();
    }

    public string GetLanguage(string filename)
    {
        string lang = null;
        var f = Path.GetFileName(filename);
        var foo = f.Split('.');

        if (foo.Count() > 2)
        {
            if (foo[1].Length == 2)
            {
                lang = foo[1];
            }
        }
        if (foo.Count() == 2)
        {
            lang = "en";
        }

        return lang;
    }
}
#>
This script defines two classes, Resx2AndroidTemplate and Resx2iOSTemplate. The bulk of the code is in Resx2AndroidTemplate; it loads in a specified .resx file and creates a Dictionary<string, string> list from the string resources in the .resx file. I've added properties that let you specify the output folder. With multiple platforms as separate projects within a single solution, being able to specify the paths allows the T4 code to update the .csproj projects files correctly.
The TransformText() method takes the Dictionary of resource values and renders an XML file in the format of the Android string resource file.
The following is an excerpt from the AppResources.resx resource file for the Windows Phone app:
<?xml version="1.0" encoding="utf-8"?>
<root>
    <data name="ApplicationTitle" xml:space="preserve">
        <value>Notes Demo</value>
    </data>
    <data name="Save" xml:space="preserve">
        <value>Save</value>
    </data>
</root>
The `TransformText()`` method renders the following for Android:
<?xml version="1.0" encoding="utf-8"?>
<resources>
    <string name="ApplicationTitle">
        Notes Demo</string>
    <string name="Save">Save</string>
</resources>
The Android and Windows string resources have a very similar format and it's easy to generate Android from Windows. For iOS, the Resx2iOSTemplate class is based on the Resx2AndroidTemplate class. The TransformText() method renders a string resource file in the format that iOS compiler recognizes.
Based on the same AppResources.resx snippet, the rendered for iOS looks like this:
"ApplicationTitle"="Notes Demo";
"Save"="Save";
Another T4 script, Res2Others.tt in Listing 2, is the code that collects the resource files and runs the transformations on them. It executes in the Resources folder of the Windows Phone project and uses wild-card matching on the file name to process the .resx file for each language.
Listing 2: T4 Template to generate the resource files based on file wild cards
<#@ template debug="true" hostSpecific="true" #>
<#@ output extension="log" #>
<#@ import namespace="System.Text" #>
<#@ include file="Resx2AndroidTemplate.tt" #>
<#
    // Set the current directory to the .tt folder
    Directory.SetCurrentDirectory(
        Path.GetDirectoryName(Host.TemplateFile));

    // Create instances of the templates for iOS and Android
    Resx2AndroidTemplate r = new Resx2AndroidTemplate();
    Resx2iOSTemplate ri = new Resx2iOSTemplate();

    // Set the host to template object so that it
    // can resolve file paths
    r.Host = Host;
    ri.Host = Host;

    // Set the output project name so that the project files
    // will be correctly updates
    r.Output.Project = @"..\..\notes.Android\notes.Android.csproj";
    ri.Output.Project = @"..\..\notes.iPhone\notes.iPhone.csproj";

    // Set the destination for the generated
    // Android resource files
    var DestFolder = @"Resources\Values";

    // Set the file mask for the resx files to read from
    var files = Directory.GetFiles(".", "AppResources*.resx");

    foreach(var resxFile in files)
    {
        // Fix up the file name
        r.ResxFileName = resxFile.Replace(".\\","");

        // For Android, we get the locale so we can
        // write to the correct folder
        string locale = r.GetLocale(resxFile);

        if (!(locale.Equals("qps-ploc",
            StringComparison.CurrentCultureIgnoreCase)))
        {
            if (!string.IsNullOrWhiteSpace(locale))
            {
                locale = "-" + locale.Replace("-", "-r");;
            }

            string AndroidStringsFolder = DestFolder + locale;

            // Set the destination filename and path and
            // transform the resource
            r.Output.File = Path.Combine(AndroidStringsFolder,
                Path.GetFileName(Path.ChangeExtension(
                    r.GetNameSpace(resxFile), ".xml")));

            r.Output.Encoding = Encoding.UTF8;
            r.Render();

            // iOS follows a similiar path
            ri.ResxFileName = r.ResxFileName;

            // Don't need the locale, just the language
            var lang = ri.GetLanguage(ri.ResxFileName);

            if (lang != null) {
                ri.Output.File = Path.Combine(lang + ".lproj",
                    "Localizable.strings");

                ri.Output.Encoding = Encoding.UTF8;
                ri.Render();
            }
        }
    }
#>
This script has hard-coded paths to the resource folders for the Android and iOS apps, based on each app being a project in the same solution. This is easy to change to meet your needs. If you aren't already using the Xamarin tools or the other projects in a different solution, create the folders outside the solution and let the T4 transform output to those folders.
To run the transformation, right-click on Res2Others and select Run Custom Tool. The T4 engine runs the script and generates the transformed resource files. The code in Res2Others generates the platform folder names, based on the locale.
Android uses specially named folders in the project Resources folder. The folder Values is the default folder and usually contains the English (en) string resources. If only the language is localized, the folder is named Values-xx where “xx” is the two-character language code. If a country code is also used, the name is Values-xx-rYY, with “xx” as the language. The “r” meaning regions and “YY” as the country or region. The “r” is an Android quirk, just having the country/region code should be enough to indicate that there is a region. But, as that is what Android requires, it needs to include that “r.”
When Android needs to locate a string resource, it goes from most specific resource to most generic. For example, if you had Spanish language support and included both a generic Spanish resource and a US Spanish resource, it reads the resources in the following order:
- Values-es-rUS
- Values-es
- Values
The reason for this is so you don't need to translate every string for every language. If your app has 90% of the terms as the same translation for Spain and for the US, you put the country-specific terms in the Values-es-rUS and Values-es-rES folders.
In iOS, the folders are located off the root folder of the project and are named xx.lproj, where “xx” is the language. Apple does not support region-specific resource files for iOS projects. The first time that iOS resource files are generated, you'll need to set the Build Action to Content, under the file properties tab.
Localizing the Android App
After generating the resource files for Android from the Windows Phone project, rebuild the Android project. This generates the symbols for the resource strings so that you can use them in the layout designer and in the code.
With the layout files, it's pretty easy. You set the android:text property to @string/ResourceStringName. It doesn't matter how many string resource files you have or how they are named, Android references them all as @string. So a TextView control looks like this:
<TextView
    android:text="@string/NoteTitle"
    android:layout_width="fill_parent"
    android:layout_height="wrap_content"
    android:id="@+id/textView1" />
You'll be able to see the value of the NoteTitle resource at design time. You can select the displayed language in the designer to see the other languages. That's a handy feature that would also be useful with the Windows Phone XAML designer. If you change the language and country in the emulator, remember to restart the app. Otherwise the settings may not be completely localized.
If you change the language and country in the emulator, remember to restart the app or the settings may not be completely localized.
To reference the resource string in code, use the GetString() method in C# (Xamarin) or in Java. You pass in the resource ID for the string, which is generated when you build the app. In C#, it looks like this:
SomeButton.Text = Resources.GetString(Resource.String.SomeText);
And in Java, it's just slightly different:
SomeButton.Text = Resources.GetString(R.String.SomeText);
In addition to localizing the text in a layout file, you can have different layout files for different locales. As with string resource files, you can add localized layout folders by following the same naming conventions that were used for the string resource files.
Localizing the iSO App
With iOS, resources get compiled into what Apple calls bundles. To get a string resource, use the LocalizedString() method of the main bundle for the app. It looks something like this:
myLabel.Text = NSBundle.MainBundle.LocalizedString("Save", "", "");
This returns the resource value for Save. If the resource does not exist, the value Save is returned. That's a lot of code to use for every string resource to be assigned. With C#, you can make it much simpler with an extension method. Add this extension to your iOS project:
using System;
using MonoTouch.Foundation;

namespace notes.iPhone
{
    public static class LocalizationExtensions
    {
        public static string t(this string translate)
        {
            return NSBundle.MainBundle.LocalizedString(translate, "", "");
        }
    }
}
With that extension, the code to set the Text property of the UILabel control becomes:
myLabel.Text = "Save".t();
That extension was posted by Thomas Rosenstein on Stack Overflow. This is very handy for catching misspelled string resource keys. Unlike Android and Windows, iOS does not generate resource IDs; if you misspell the key string, you'll get that back as the translated value. The second parameter of the LocalizedString method is the optional default value. If you do not pass in a value, you get the key string returned. If you set that to something that should not appear in app (like "!!TILT!!!"), it makes it easier to catch misspelled or missing resource keys.
Other Concerns
There are a few additional considerations to keep in mind.
Dates, Numbers, and Currency
There's some additional work besides the language translation that you need to do.
Part of the localization process is making sure that dates, times, and numbers are displayed correctly. Always use the .ToString() methods to display the values. If you use the .ToShortDateString() method for a DateTime variable, you'll always get the right text for the locale.
Currency is a different concern. You can't automatically convert a currency value to the current locale. How you handle currency depends entirely on the needs of the application. Be careful how you localize the currency symbol. The value €10.00 does not have the same value as $10.00.
Gender
While translated terminology on mobile apps is usually terse, it's something that you will need to watch out for. In English, the definite article “the” is gender neutral. Many languages, such as French and Spanish, assign a gender to a noun and their equivalent of “the” depends on the gender of that noun. For example, take the following two sentence fragments as they appear in English:
- Press the button.
- Edit the photo.
In French, they could be translated as:
- Pressez le bouton
- Modifier la photo
For these examples, you translate the entire sentence. If you're creating the sentence at runtime and the noun is selected by the users, you need a way of determining the gender of the noun.
Plural forms
Handling plural forms can be tricky as the rules vary depending on the language. The most common pattern in English is the singular/plural rule. That's represented like this:
- You have 1 new message.
- You have 4 new messages.
In your code, you have two resource strings with a placeholder for the quantity; the string is selected by the quantity.
Although many languages follow the singular/plural rule, it's not universal. Asian languages (Chinese, Japanese, Korean, Vietnamese), only use the plural form. The Polish language has two forms (if the number is 1 or ends with 2 or 4-except 12 and 14-and everything else). To get an idea of the number of plural forms, see the list published on the Mozilla Developer site: https://developer.mozilla.org/en-US/docs/Localization_and_Plurals#List_of_Plural_Rules Editor's note: This URL is no longer good.
If you can avoid having to use plural forms, your code will be simpler. Instead of using the singular and plural forms for the number of emails, put the number at the end like this:
- New messages: 1
That works for any quantity, including 0. Another reason to use this method is that it uses less screen real estate, which is always a premium on a mobile phone.
Localization is More than Text
If your app has images, consider whether there need to be localized versions. If you use an icon or an image that has context in your culture, use a generic version or culture-specific versions. The Stop Sign is often used as an icon to indicate a button to stop a process or an action. Many countries use a variation of the word “Stop” in a red octagon shape, as shown in Figure 6.

Other countries use a local word and can even change the shape. Japan uses a triangle shape and the Japanese characters for “Stop” on their stop sign (Figure 7). When in doubt, use culture-specific icons.

Avoid using the flag of a country as a symbol to represent the language being used. This can be viewed as offensive to countries with populations that speak different languages. French-speaking Canadians are particularly sensitive to this. This is less of an issue with mobile apps than with browser apps. I have seen many sites that use a flag as way of displaying or changing the language that it's rendered with.
Use the Right Resources for the Text Translation
Although I used machine translation for this article, I wouldn't put out an app without having a language expert review the translations. Machine translation gives you a rough approximation and has value for checking layout and making sure that the text has been moved to a resource file.
If you're fluent in multiple languages, you are the first source for translation for those languages. Remember, localization is a marketing expense. If you know the language well enough to translate it, it's a cost savings for you.
If you really want to reach a global audience, you'll want to contract the translation work to a company that specializes in app localization. They can also translate the content that you submit to the app stores. Apple has a good list of resources for this work at https://developer.apple.com/internationalization/. Make sure that localization vender can work with the resource file formats that you're using. Use the Multilingual App Toolkit with its industry-standard XLIFF files.
If you use third-party components in your code, make sure that they can be localized and that they respect the locale settings.
Summary
When designing a mobile application, you want to localize that application so that it reaches more users than an app built just for the default language. If you plan to support multiple platforms, you can get away with only having to have the text resources translated once. With the tools available for Visual Studio and some custom T4 scripting, you can translate once and get resource files for each platform.
