


As the bedrock to the web, HTML has evolved in many ways from its birth in 1991. While the markup language has had its share of ups and downs, the advent of what’s being called “HTML5” is a welcome and much anticipated addition of new semantic capabilities and valuable APIs.
While the HTML has had its share of ups and downs, the advent of “HTML5” is a welcome and much anticipated addition of new semantic capabilities and valuable APIs.
What Is HTML5?
HTML5 is a series of new elements, updates to existing elements and new JavaScript APIs available through contemporary web browsers. In order to best describe what HTML5 is, perhaps starting with a few attributes of what HTML5 is not will help draw the most clear picture.
HTML5 is not the next iteration of XHTML. In fact many of the rules that you are accustomed to from your familiarity with XHTML are now changed in HTML5. The promise of XHTML’s standards compliance and strict validation may be music to the ears of all of us as software developers, but the pragmatic outcome of broken layouts and validation errors bubbling up to users created an unforeseen outcome - programmatic perfection does not translate into a usable web. XHTML simply isn’t a long-term standard.
The real world of the web contains scores of ill-formed HTML largely created by tools and people with less exacting standards than the conscientious web developer. While this may sound bad, the non-code enthusiasts are often tasked with creating content for the web and have no inclination to worry about whether or not every HTML attribute has a value in their markup, for instance.
HTML5 moves beyond the utopian dream of strict compliance to a schema and places the highest value on the user of the website over the HTML craftsman.
HTML5 places the highest value on the user of the website over the HTML craftsman.
“HTML5” no longer exists. In a strict sense, the term “HTML5” is a misnomer as there are no longer standalone versions of HTML. In the earliest incarnation of HTML5, there existed a notion of the next version of HTML being termed HTML5. The label of “HTML5” took hold in the market and started being used almost as an umbrella term for “the latest thing” in web development. Recently, Ian Hickson announced in his blog post, HTML is the New HTML5 (http://blog.whatwg.org/html-is-the-new-html5), the standards document once known as “HTML5” is now being maintained under the auspices of the plain name “HTML” as a fluid specification. The reasoning behind this is because HTML5 became a blanket term for many different technologies and browser vendors are implementing different parts of the standard. Therefore, the notion of “detecting HTML5” or “supporting HTML5” represents faulty thinking. Rather than looking for HTML5 in its totality, developers are better served by detecting the individual functionality required from HTML for an application.
So if HTML5 isn’t XHTML plus some new dazzling features, what is it? Simply put, HTML5 is the new HTML standard that includes most of the features and capabilities of HTML4 along with new semantic markup plus a number of new JavaScript APIs.
For clarity’s sake, this article still refers to the combination of markup enhancements and new JavaScript APIs as HTML5 in order to easily identify new technologies.
Semantic Markup
The value of Semantic markup on the web cannot be understated. When you consider many of the changes related to semantic markup you may realize that seemingly very little is different. While changing a DIV to a SECTION may not seem revolutionary, the underlying value is found in the page’s ability to more clearly describe the intent of the containing content with new tags over the old ones. Pages that contain inherent meaning will ultimately perform better in search engines, are easier to parse on the client and easier for external machines on the web to interpret and understand.
The semantic changes are a product of established design patterns. The contributors to the HTML5 specification include companies like Google, Microsoft, Apple, all the top browser vendors and literally hundreds of other organizations. These contributors analyzed the vast array of markup on the web and looked to create new HTML elements that reflect the intent of current makeup on the web.
So while new elements may not seem earth-shattering, the value is to give more intrinsic meaning to your HTML documents which creates a more open and usable web. Table 1 lists many of the HTML elements introduced in HTML5.
JavaScript APIs
If the first part of the equation of HTML5 is the markup, then the second half is represented by the new JavaScript APIs. In fact, the more you begin to develop applications in HTML5, the more you realize that most of the new functionality is in the updated scripting abilities of the browser.
While browser support for each script API is diverse among the browser landscape, Table 2 describes the promise of each API once fully supported.
Browser Support and the New Age of “Browser Wars”
In the early days of the web the browser landscape was akin to the Wild West. Each browser vendor, in an attempt to gain the most market share, began quickly implementing new features often using proprietary APIs. This fragmentation in the market created a situation where websites might only work correctly in a single browser or development teams were forced to replicate programming efforts in order to provide the same functionality for different browsers. In short, the situation was a lose/lose proposition for both web developers and website users.
The end of the browser wars emerged with the rising influence of the Web Standards Project which worked hard to get browser makers to agree to work within the established standards.
So the distinction today about the push and pull toward complete support for HTML5 is that each browser maker is implementing against the same standard. Long gone are the days where in order to implement the same functionality on a page you had to code for the Netscape API as well as the Internet Explorer API. Now the APIs are known and standardized, the dance now is just compensating for the time when a user’s browser may not have the capabilities of the standard.
To best aid you in reliably developing applications in HTML5 there are two resources that are invaluable:
-
Modernizr: Modernizr is a JavaScript library that implements detection features for different areas of the HTML5 specification. Rather than asking a browser whether or not it supports HTML5, you use Modernizr to find out if the particular feature you are expecting in the browser is supported. <a href="http://www.modernizr.com/">http://www.modernizr.com/</a> -
CanIUse.com: The website http://caniuse.com/ attempts to match different capabilities with different web browsers. If you need to know if an area of HTML5 will work for your target users, this website will help you make that decision.
Examples: HTML5 in Action
Now that you’ve had an opportunity to get familiar with the context around HTML5 and a review of the basic building blocks, the remainder of this article is dedicated to examples demonstrating how you can use some of the new features.
Refactor an XHTML Page to HTML5
One way to clearly illustrate some of the basic differences between the markup you may be used to writing today and HTML5 markup is to show a page crafted before and after using new markup.
Listing 1 contains code for a simple document which includes a number of aspects common to many web pages. First, note the DOCTYPE at the top of the document. This element follows the standard requirements for an XHTML document and lists a namespace used to identify the validation enforcement level for the rest of the document.
Other familiar practices include:
- Applying the appropriate MIME types to STYLE and SCRIPT tags
- Structuring the page with DIV elements and applying descriptive class names
- Using the SMALL element for presentational purposes
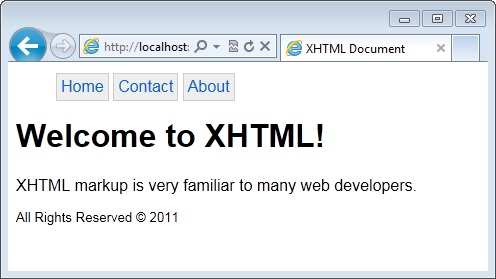
Figure 1 shows you how this page appears in the browser.
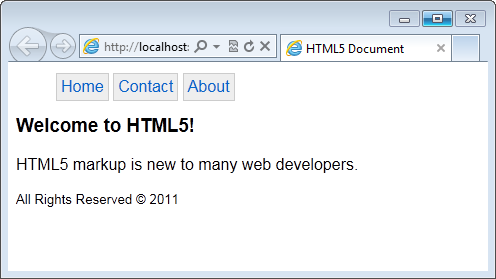
Implementing this same page using HTML5 markup, as depicted in Figure 2, renders nearly the same result, but the underlying semantic meaning of the elements takes on a whole new significance.
Figure 2: Sample HTML5 page.
Examine Listing 2 to review the updated markup. In HTML5:
- The DOCTYPE is greatly simplified
- Elements are introduced that have intrinsic semantic meaning
- Use of some elements, which formerly only had presentational purposes, are carried over from HTML4 and now carry semantic meaning
The first change you may notice is that the DOCTYPE element is greatly simplified. Using the following DOCTYPE switches capable browsers into their HTML5 parsing engine:
<!doctype html>
Older browsers that do not recognize the HTML5 DOCTYPE will revert to “quirks mode” when attempting to parse the markup. The value of browsers switching to quirks mode cannot be understated. This means that any browser that does not support HTML5 markup switches into a rendering mode which attempts to gracefully deal with any elements that are not recognizable. Practically speaking, this means that if the browser does not know what to do with a new element it will attempt to render it to the user in the most basic method possible.
Rather than breaking the page, the “quirks mode” approach is what gives HTML5 promise to begin using today. Even though the browser ecosystem will take some time to catch up, older browsers will still be able to read a HTML5 page.
The next significant change in the markup is the omission of the MIME types in the STYLE and SCRIPT elements for in-line code. In the past, the strict nature of XHTML required browsers to know what types of languages are being used when adding style and adding scripting to a page. However, in the modern era of web development, Cascading Style Sheets (CSS) and JavaScript have become the de-facto standards for adding style and behavior to web pages therefore the MIME types are no longer required to be declared explicitly. Should you decide to use another language for style or behavior or if you need to reference an external style sheet or script file, then you must add a MIME type and designate the appropriate technology.
In the XHTML example, the structure of the page is driven by DIV elements that have class names that refer generally to the semantic equivalence of the content. Using new markup introduced in HTML5, instead of using non-descript DIVs you may now use the more semantically significant elements.
The SECTION is one of the first new elements in this Listing 2. While the DIV creates an arbitrary division on the page, the SECTION element creates a logical grouping of data in the document.
The next new element in the listing is the HEADER. The purpose of this element is to act as a logical container for “header” content of a page. Often this content includes the organization’s logo and tagline, search box and site-wide navigation.
Keep in mind that since HTML5 markup is built around logical sections you may have more than one HEADER on a page. The HEADER element doesn’t declare a new section, but rather is the logical head area of a particular group. If you structure your page with a header at the root level of the document as depicted in Listing 2 then you are marking up a page-level header.
Next, the navigation of the page is marked up using the NAV element. In the past you may have taken to the practice of creating a DIV and applying a “nav” class name in order to support styling. If this seems familiar to you then the HTML5 flavor of the markup won’t change much from your existing code.
The significant difference in this case, once again, comes down to the intrinsic meaning of the code. At first you may be tempted to include any number of anchor tags in your markup inside a NAV element, as the links represent navigation around the web. Resist this temptation because the NAV element’s purpose is reserved exclusively for navigational elements of the site. You should reserve the contents of the NAV for site-wide navigational elements which link to destinations within the site itself.
The next new element is the ARTICLE element. Consider any written piece, like a CODE Magazine article for instance. As you are reading the article you encounter many different types of information on the page. You see advertisements, pull quotes and page numbers all interspersed with the main content of the article. The ARTICLE element’s purpose is to create a logical section around the main information on the page, keeping it separate from ancillary information. In the case of a CODE Magazine piece, the actual article text would live in the ARTICLE element.
While the ARTICLE is supposed to represent the meat of any given page once again, HTML5’s loose construction requirements permit more than one ARTICLE to appear on a page. While there are some reasonable times your page may require this type of construction, more often your application is best served by restricting a single ARTICLE element to a page.
The final main section in Listing 2 is the FOOTER. The rules and nuances for the FOOTER are the same as the HEADER, but the semantic meaning represents a container for information that concludes a section rather than introducing the content.
Lastly, consider the SMALL element. In the past, the SMALL element was used to achieve styling goals within the markup. Need something to appear small on the screen? Then use the SMALL element. The curious thing about the revisions to HTML brought by HTML5 is that some elements that had a past as being presentational elements are being retrofitted to no longer have presentation value, but now carry semantic weight. The SMALL element is one of those tags that got a new lease on life.
Now in the post-HTML5 world, the SMALL element’s purpose is to act as a logical container for what we might refer to as “small print” in a document. Therefore time stamp information, copyright disclaimers and any other type of legalese is now best placed in the SMALL element.
New Form Input Types
Another area of innovation brought by HTML5 is found in the much needed updates to the humble HTML form elements. Processing user input can be tricky business and the new input types go a long way to better forming, restricting and validating user input.
The array of new input types is wide and varied in purpose. The following section explains the different flavor of new input types found in HTML5 and items that naturally fall into groups are discussed together.
Date/time-centric Types
Expanding greatly on the ability to format data for a point in time, the date/time-centric types are among the largest group of new input types:
- The DATE input type represents a single day in time. Available arguments include the selected value and minimum and maximum range values.
<input type="date"
        id="arrivalDate" name="arrivalDate"
        value="2011-01-01" min="2011-01-01"
        max="2021-12-31" />
- The DATETIME type goes a step further and represents a single date with an associated time using the Coordinated Universal Time (UTC) format:
<input type="datetime"
        id="arrivalDT" name="arrivalDT"
        value="2011-01-01 09:30:00 UTC" />
- The DATETIME-LOCAL input type is nice when you need to represent time, but do not need to concern yourself with time locale differentiations:
<input type="datetime-local"
        id="arrivalDTLocal" name="arrivalDTLocal"
        value="2011-01-01 09:30:00" />
- The TIME type restricts the input to a particular point in time:
<input type="time"
        id="arrivalTime" name="arrivalTime"
        value="09:30:00" />
- The MONTH type allows the user to select a particular month within a given year. The value of this element follows the YEAR-MONTH NUMBER pattern:
<input type="month"
        id="birthMonth" name="birthMonth"
        value="1965-04" />
- The WEEK type is much like the month type where input is restricted to a week in a designated year. The value of this element employs a pattern similar to the month, except the week number is prefixed with a “W”:
<input type="week"
        id="vacationWeek" name="vacationWeek"
        value="2011-W26" />
Email, Tel, URL
Other new input types include the ability to set expectations on the type of data coming from a free-form text box. While the EMAIL, TEL and URL types don’t initially change anything visually on the page, the new types will power built-in validation rules and soft keyboard settings:
<input type="url"
        id="url" name="url" />
The snippet above demonstrates how to render a URL box, and the code is the same for TEL and EMAIL types, except you’d change the input type value of the element.
Miscellaneous Types
Finally, the remaining input types don’t naturally group together with any other types, so they are grouped here together.
- The COLOR element accepts a value of simple hex color strings or RGB values:
<input type="color"
        id="bgcolor" name="bgcolor"
        value="rgb(128,0,0)" />
- The RANGE type transforms the common textbox element into a slider allowing the user to select from a range of values. The value for the slider is constrained by the min and max values and increments are determined by the step value:
<input type="range"
        id="devExperienceRange"
        name="devExperienceRange"
        min="0" max="100" step="1" value="50" />
- The NUMBER type restricts data to only numerical values and is often accompanied by spin buttons in the browser to help facilitate increments and decrements to the value:
<input type="number"
        id="yearsInDev" name="yearsInDev"
        min="5" max="40" step="2" />
- The SEARCH type acts much like the existing text type, but once text is entered into the box an “X” glyph is rendered in the top right of the box giving the user an opportunity to clear the search terms:
        <input type="search"
                id="search" name="search"
                autofocus />
Attributes
In addition to the new input types, there are a number of new attributes available for each input type. Table 3 lists some of the common attributes you may find useful.
Listing 3 implements many of the new input types along with some of the new attributes in a single page that attempts to demonstrate how different browsers interpret the new input types.
Since development against the HTML5 specification among browser makers varies in scope, some browsers support more of the new forms markup than others. The accompanying figures depict how you might see this page should you try to view it in different browsers.
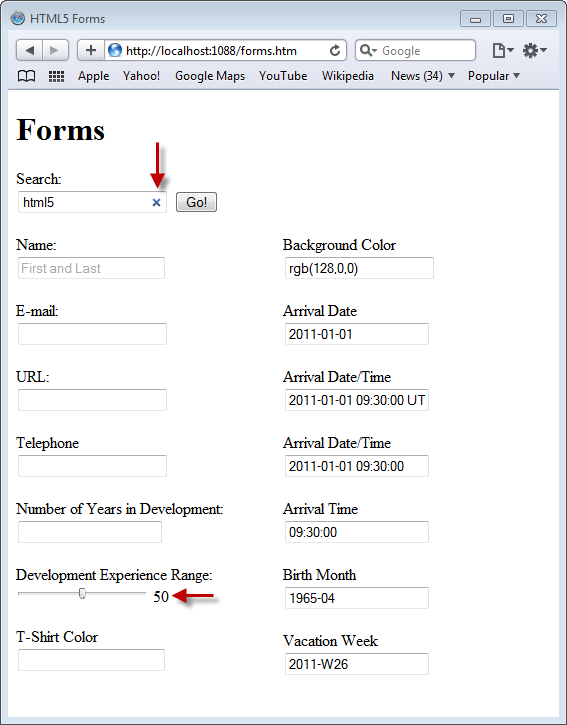
Figure 3 displays how the page displays in Internet Explorer 9. For the most part, this page doesn’t look materially different than what you are used to seeing in pre-HTML5 forms. The Internet Explorer team, while making great strides in other areas implementing HTML5, has yet to dedicate significant development cycles to add new forms features.
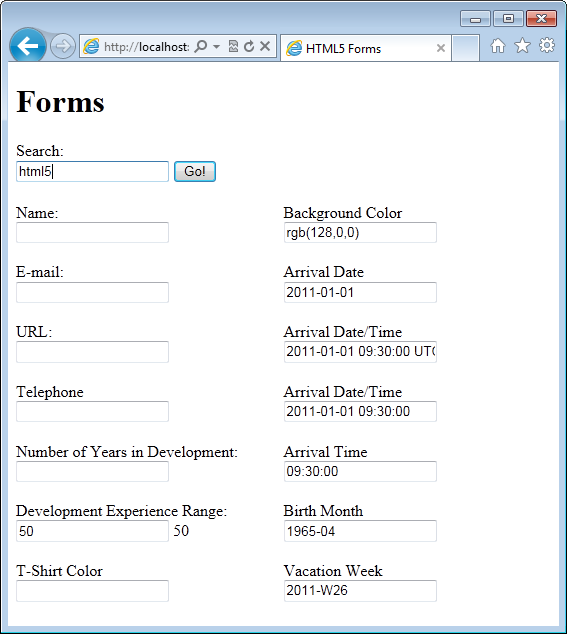
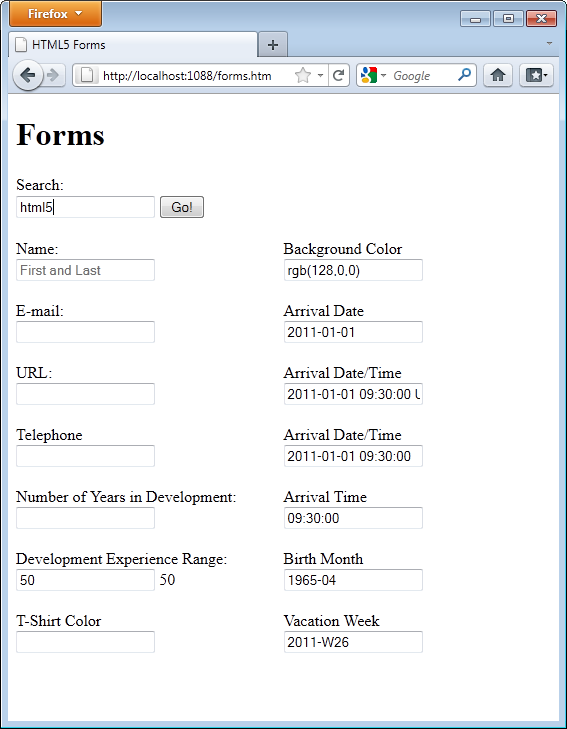
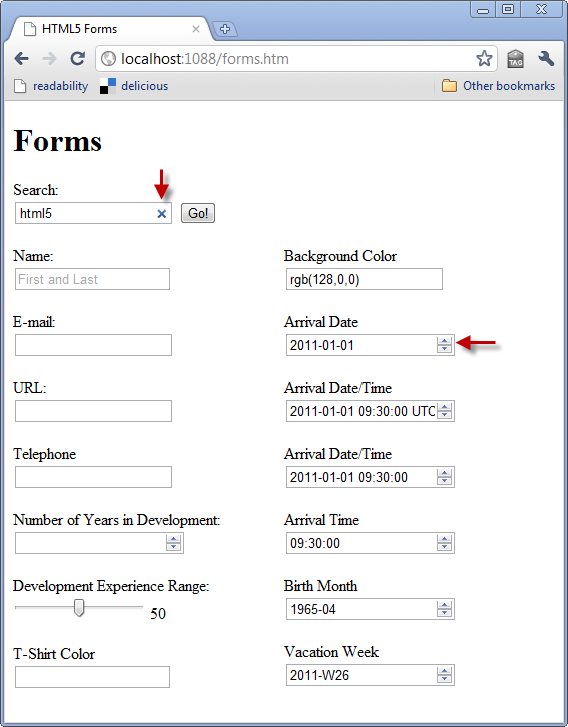
Figure 4 depicts the page loaded in Firefox 4. While the page largely looks the same as what is presented in Internet Explorer, look carefully at the Name element. The placeholder associated with the name text element is rendered to the user.
Loading the page in Safari 5 as shown in Figure 5 you begin to see that the input elements are beginning to differentiate in visual style. Safari includes the placeholder, but also supports the search element’s distinctive X which clears the search term for the user with one easy click.
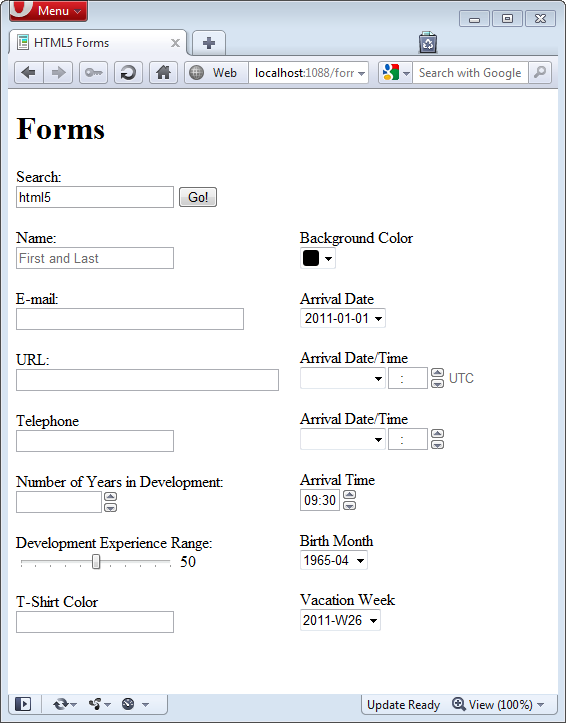
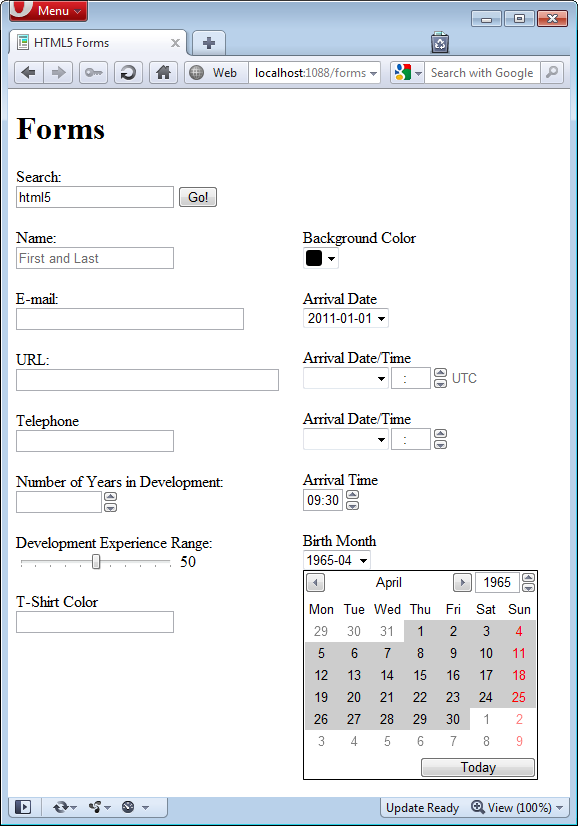
If you load the same page into Chrome 10 you’ll notice that the input elements are taking on an even more new look as represented by Figure 6. In Chrome you see:
- Search is supported
- Name includes the placeholder value
- Number of Years in Development number type features spin buttons to cycle through numerical values
- Development Experience Range is now rendered as a slider
- The date/time related elements include spin buttons that allow the user to cycle through valid input values
Lastly, if you take a look at the page in Opera 11.10 you can finally get an idea of how the input controls are meant to be ultimately rendered. Notice that in Figure 7, support includes:
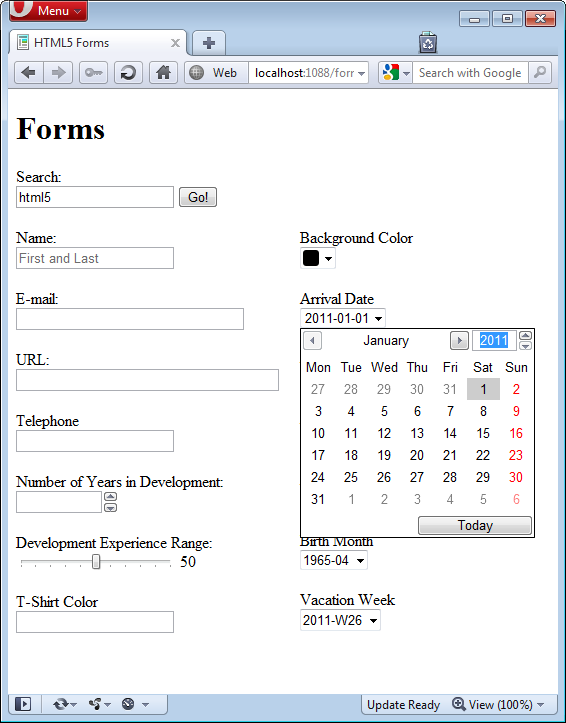
- Placeholder (Name)
- Spin buttons for numeric input (Number of Years in Development)
- Range (Development Experience Range)
- Color (Background Color)
- Date (Arrival Date)
- Date/Time (Arrival Date/Time)
- Date/Time Local (Arrival Date/Time)
- Time (Arrival Time)
- Month (Birth Month)
- Week (Vacation Week)
While the Opera team has obviously spent a considerable amount of development cycles on the new input types, unfortunately the search type is not fully implemented as depicted by Figure 7.
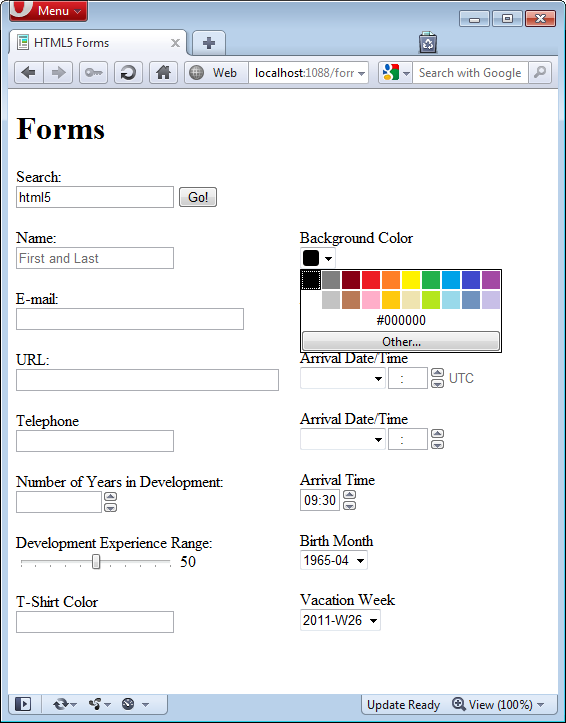
Other features of the forms in Opera lie just under the covers. To get a glimpse of just a few examples, if you click on the color element, a color picker control appears as shown in Figure 8. In Figure 9 you can see how the date/time picker is rendered and Figure 10 displays the date picker constrained to only select a full month.
In addition to controlling incoming data, one of the great advantages of using the new HTML input types is found in benefits realized by the mobile environment. Soft keyboards, as generated by mobile devices, have the ability to respond to the different input types in order to customize the user interface.
-
Figure 11 depicts a soft keyboard tailored for numerical data entry. For this keyboard, the numbers are situated at the top of the keyboard for easy access and special characters commonly used in conjunction with numeric data such as the dash and dollar sign. -
Figure 12 illustrates how the keyboard responds to an email input type. Notice that the @ sign is prominently located on the keyboard layout and most of the rest of the keys are reserved for letters of the alphabet. -
Figure 13 represents the traditional keyboard optimized for text entry. -
Figure 14 shows how the keyboard layout is formatted for entering URLs. Notice that the spacebar is removed from the keyboard as spaces are illegal in a URL.
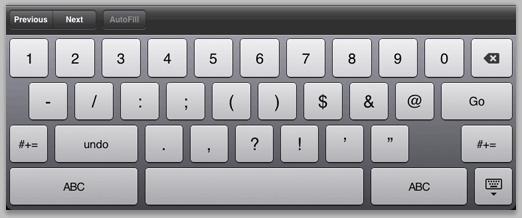
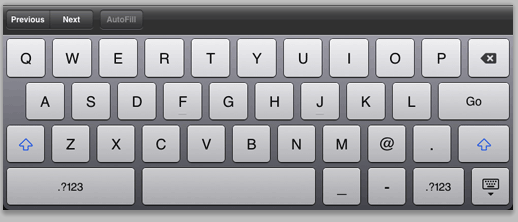
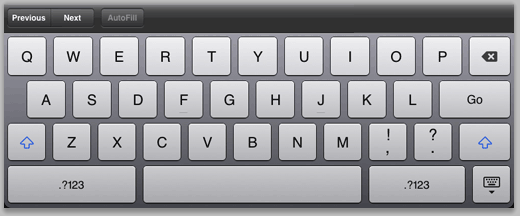
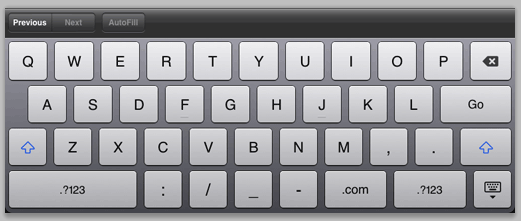
Chart with the Canvas Element
HTML5 support for canvas comes in two forms. The combination of the CANVAS HTML element and the Canvas API bring a powerful native drawing surface to the browser. The grid-based pixel-by-pixel nature of the Canvas make it the perfect tool for creating animations, plotting lines and graph and so much more. Figure 15 depicts a line chart built using the Canvas API.
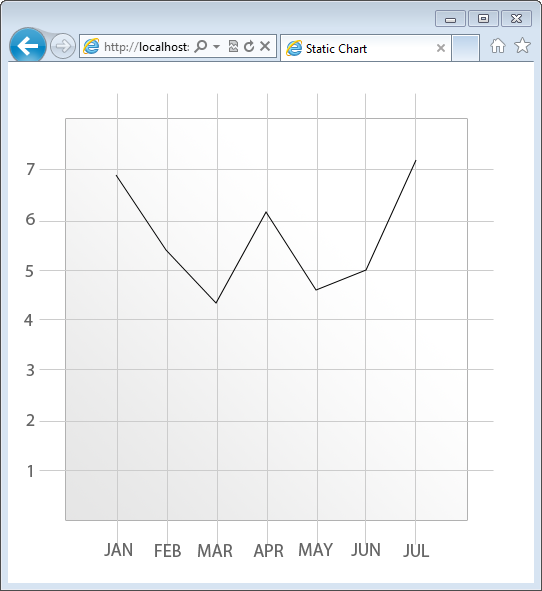
Listing 4 exposes the underlying markup used to render the chart to the user.
In Listing 4, the code begins by locating the CANVAS element on the page using document.getElementById. Next, support for the Canvas API is detected by interrogating the canvas variable to ensure an instance of the CANVAS exists and a check to see that getContext is available in the browser.
While the Canvas is the root element of the drawing surface, the Context is where all the action happens on the Canvas. Once you have a Context then you may begin drawing shapes, applying colors and manipulating what is rendered to the user. When getting an instance of the context there is a required parameter you must pass into the getContext function. For the time being, this parameter may only be a single value, “2d”. The current implementations of the Canvas API only support a 2D canvas and therefore require that you pass in “2d” as the argument value to instantiate a context. In the future you’ll be able to instantiate a 3D context, but there are no browsers that support the 3D canvas at this time.
Next, the callback of a loaded image is loaded into the Canvas. As stated previously, the Canvas is a native browser pixel-by-pixel drawing surface. This means that anything which appears on the canvas must be explicitly drawn to the canvas using JavaScript. Should you require a complex background on your Canvas then you may consider using a background image. Without the image, the code to create the grid, gradients and labels seen in Figure 15 would equate to many lines of code.
Instead of concerning your code with scores of commands to draw what essentially is a background image, the background is provided programmatically here by applying an image location to the src property of the Image object. The rest of the code is about the business of drawing the truly interactive parts of the chart.
Once the Canvas is detected, the context is available and the background is applied then the remaining code is responsible for plotting the date on the chart. To begin drawing on the Canvas, the first function call is to beginPath. Using this function signals to the browser that additional commands to draw a path are soon to follow. Next, a series of lineTo calls are made in succession. The parameters passed to lineTo represent first the location on the X axis and next the location on the Y axis to create a stopping point for the line. The lineTo function is called repeatedly until the full line is traced.
At this point the lines are indeed only traced as the browser has not yet been given the command to render the line to the user. The command to complete the rendering is found in the context’s stroke function. Once this function is called, then the plotted line appears in the browser.
JavaScript Selectors
If the rise and dominance of jQuery in recent years has demonstrated anything it’s that the browser was severely lacking in its ability to do useful DOM selection. Before jQuery, doing simple tasks like locating all the elements with the same class name represented a non-trivial task.
The updates to the Selection API ushered in by HTML5 now make native selection of the DOM just as robust as jQuery. The API now supports CSS3 selectors, as well as access to elements by a common class name. Further, performance is enhanced by having the selection integrated directly in the browser. Even as fast as the jQuery engine is, native selection is always preferable if possible.
Figure 16 is a screenshot of the same HTML page created in Listing 2 with some script added to the page. The script features calls to the new selection functions used to query the DOM in a number of different ways.
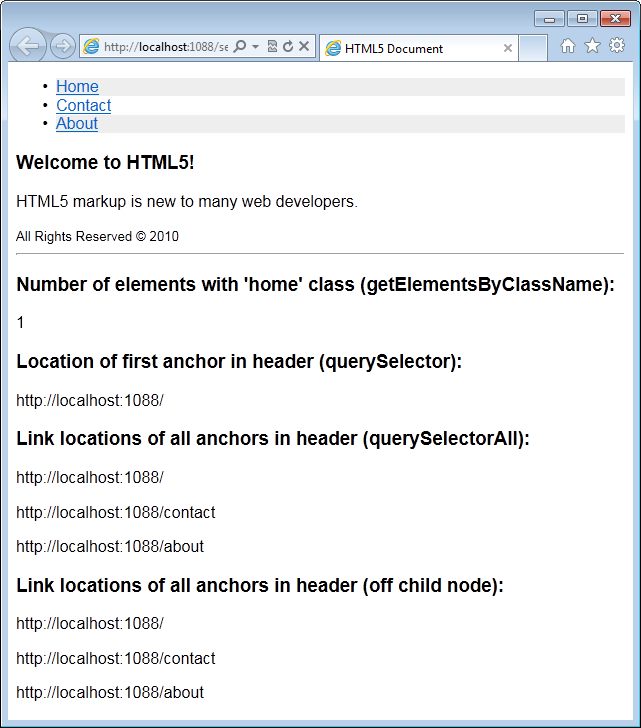
Listing 5 represents the markup used to render Figure 16. Notice that while jQuery is used in this listing, the only role the library serves on this page is to execute code when the page is in a ready state.
The first section of code uses the new getElementsByClassName function to query the document for all the elements that have the class name of home assigned.
var d = document.getElementsByClassName("home");
Calling getElementsByClassName returns an array of elements that exist in the DOM, found anywhere within the hierarchical structure of the document, that match the given class name.
The next script call demonstrates how to query the DOM for the first match of a selection expression.
var link = document.querySelector("section header ul
 li a");
Notice that the argument passed to querySelector is a CSS3 selector. As the browser attempts to find a match for the selector, once the first match of the selector is located, the selection process stops and the matched element is returned by the function.
Should you want to locate all the elements on the page that match a particular selection expression, then you use the querySelectorAll function. The querySelectorAll function operates the same way as querySelector, except rather than terminating the search once the first match is encountered, the query continues until all the matches to the expression are found. The return value for querySelectorAll is an array of the matching elements found in the DOM.
The next code example uses querySelectorAll with the exact same query expression to return an array of the anchor elements in the header of the document.
var links = document.querySelectorAll("section header
ul li a");
To further illustrate the Selection API’s ability to successfully process more robust CSS3 selection expressions, the next example uses the :nth-child(odd) filter criteria to locate alternating list items in order to style the list in a “zebra stripe” fashion.
var listItems = document.querySelectorAll("section
header ul li:nth-child(odd)");

for (var i = 0; i < listItems.length; i++) {
   listItems[i].className += " alt";
}
Once the alternating list items are detected on the page then the script loops through each item and adds the alt class to the element.
As web applications become more and more feature-rich, the amount of elements loaded into the DOM can grow rapidly. Selection performance against the DOM has the opportunity to degrade as the number of DOM elements increase even when native selection is used.
To allow your scripts to better narrow the selection scope, each of the selection functions are available not only off the root window, but also are available on any DOM element on the page. When running a selection on an element, the selection query is restricted to the children of that item. This means, if you want to query the entire page, you run the queries off window; otherwise, you may run the selections on any other DOM element.
The following code snippet first gets reference to the HEADER element on the page and then queries for all the anchors within its hierarchy.
var container = document.querySelector("header");
var anchors = container.querySelectorAll("a");
Conclusion
HTML5 offers a wide variety of ways to provide enhanced semantic meaning to your current content as well as a myriad of JavaScript APIs that add increasingly feature-rich capabilities to the web browser. While support for individual areas of HTML5 are varied, use of new markup and new APIs are possible today facilitated by the browser’s built-in compensation methods along with targeted feature detection.
Listing 1: Typical XHTML page
<!DOCTYPE html PUBLIC "-//W3C//DTD XHTML 1.0 Transitional//EN"
"<a href="http://www.w3.org/TR/xhtml1/DTD/xhtml1-transitional.dtd">http://www.w3.org/TR/xhtml1/DTD/xhtml1-transitional.dtd</a>">
<html xmlns="<a href="http://www.w3.org/1999/xhtml">http://www.w3.org/1999/xhtml</a>">
<head>
<title>XHTML Document</title>
<style type="text/css">
body
{
font-family:Arial;
}
#header ul li
{
display:inline;
}
#header ul a
{
border:1px solid #ccc;
padding:4px;
background-color:#eee;
text-decoration:none;
}
</style>
<script src="<a href="http://code.jquery.com/jquery-1.5.1.min.js">http://code.jquery.com/jquery-1.5.1.min.js</a>"
type="text/javascript"></script>
<script type="text/javascript">
// do something interesting here
</script>
</head>
<body>
<div id="content">
<div id="header">
<ul>
<li><a href="/">Home</a></li>
<li><a href="/contact">Contact</a></li>
<li><a href="/about">About</a></li>
</ul>
</div>
<div id="mainContent">
<h1>Welcome to XHTML!</h1>
<p>XHTML markup is very familiar to many
web developers.</p>
</div>
<div id="footer">
<small>All Rights Reserved &copy; 2011</small>
</div>
</div>
</body>
</html>
Listing 2: Refactored HTML5 page
<!doctype html>
<html>
<head>
<title>HTML5 Document</title>
<style>
body
{
font-family:Arial;
}
header ul li
{
display:inline;
}
header ul a
{
border:1px solid #ccc;
padding:4px;
background-color:#eee;
text-decoration:none;
}
</style>
<script src="<a href="http://code.jquery.com/jquery-1.5.1.min.js">http://code.jquery.com/jquery-1.5.1.min.js</a>"
type="text/javascript"></script>
<script>
// do something interesting here
</script>
</head>
<body>
<section>
<header>
<nav>
<ul>
<li><a href="/">Home</a></li>
<li><a href="/contact">Contact</a></li>
<li><a href="/about">About</a></li>
</ul>
</nav>
</header>
<article>
<h1>Welcome to HTML5!</h1>
<p>HTML5 markup is new to many web developers.</p>
</article>
<footer>
<small>All Rights Reserved &copy; 2011</small>
</footer>
</section>
</body>
</html>
Listing 3: New input types
<!doctype html>
<html>
<head>
    <title>HTML5 Forms</title>
    <link rel="Stylesheet" href="/global.css" type="text/css" />
    <style>
    label
    {
        margin-top: 20px;
        display: block;
    }
    input:not(type=submit)
    {
        width:200px;
    }
    .col
    {
        display: table-cell;
        width: 300px;
    }
    </style>
</head>
<body>
    <h1>Forms</h1>
    <form novalidate>
        <label>Search:</label>
        <input type="search"
                id="search" name="search"
                autofocus />
        <input type="submit" value="Go!" />
    </form>

    <form>
        <div class="col">
            <label for="name">Name:</label>
            <input type="text"
                    id="name" name="name"
                    placeholder="First and Last" required  />

            <label for="email">E-mail:</label>
            <input type="email"
                    id="email" name="email"
                    pattern="\b[A-Z0-9._%+-]+@[A-Z0-9.-]+\.
                             [A-Z]{2,4}\b"
                    required />

            <label for="url">URL:</label>
            <input type="url"
                    id="url" name="url" />

            <label for="phone">Telephone</label>
            <input type="tel"
                    id="phone" name="phone"
                    required />

            <label for="yearsInDev">Number of Years in
                    Development:</label>
            <input type="number"
                    id="yearsInDev" name="yearsInDev"
                    min="5" max="40" step="2" />

            <label for="devExperienceRange">Development
                    Experience Range:</label>
            <input type="range"
                    id="devExperienceRange"
                    name="devExperienceRange"
                    min="0" max="100" step="1" value="50" />
            <span id="rangeValue"></span>

            <label for="tShirtColor">T-Shirt Color</label>
            <input type="text"
                    id="tShirtColor" name="tShirtColor"
                    list="colors" />
            <datalist id="colors">
                <option value="Blue">
                <option value="Red">
                <option value="Green">
            </datalist>
        </div>

        <div class="col">
            <label for="bgcolor">Background Color</label>
            <input type="color"
                    id="bgcolor" name="bgcolor"
                    value="rgb(128,0,0)" />

            <label for="arrivalDate">Arrival Date</label>
            <input type="date"
                    id="arrivalDate" name="arrivalDate"
                    value="2011-01-01" min="2011-01-01"
                    max="2021-12-31" />

            <label id="arrivalDT">Arrival Date/Time</label>
            <input type="datetime"
                    id="arrivalDT" name="arrivalDT"
                    value="2011-01-01 09:30:00 UTC" />

            <label for="arrivalDTLocal">Arrival Date/Time</label>
            <input type="datetime-local"
                    id="arrivalDTLocal" name="arrivalDTLocal"
                    value="2011-01-01 09:30:00" />

            <label id="arrivalTime">Arrival Time</label>
            <input type="time"
                    id="arrivalTime" name="arrivalTime"
                    value="09:30:00" />

            <label for="birthMonth">Birth Month</label>
            <input type="month"
                    id="birthMonth" name="birthMonth"
                    value="1965-04" />

            <label for="vacationWeek">Vacation Week</label>
            <input type="week"
                    id="vacationWeek" name="vacationWeek"
                    value="2011-W26" />
        </div>

    </form>

    <script>
        var rangeValue = document.getElementById("rangeValue");
        var devExperienceRange =
                    document.getElementById("devExperienceRange");

        devExperienceRange.onchange = function () {
            rangeValue.innerText = this.value;
        }

        rangeValue.innerHTML = devExperienceRange.value;
    </script>
</body>
</html>
Listing 4: Static chart using the Canvas element
<!doctype html>
<html>
<head>
<title>Static Chart</title>
<script src="../scripts/<a href="http://jquery-1.4.4.min.js">jquery-1.4.4.min.js</a>"></script>
<script>
var canvas, context;
$(function () {
canvas = document.getElementById("chart");
if (canvas && canvas.getContext) {
context = canvas.getContext("2d");
var img = new Image();
img.onload = function () {
context.drawImage(img, 0, 0);
context.beginPath();
context.moveTo(100, 105);
context.lineTo(150, 180);
context.lineTo(200, 233);
context.lineTo(250, 142);
context.lineTo(300, 220);
context.lineTo(350, 200);
context.lineTo(400, 90);
context.stroke();
}
img.src = "../images/chart-background.png";
}
});
</script>
</head>
<body>
Listing 5: Using new HTML5 selectors
<!doctype html>
<html>
<head>
<title>HTML5 Document</title>
<style>
body
{
font-family:Arial;
}
.alt
{
background-color:#eee;
}
</style>
<script src="<a href="http://code.jquery.com/jquery-1.5.1.min.js">http://code.jquery.com/jquery-1.5.1.min.js</a>"
type="text/javascript"></script>
<script>
$(function () {
// returns every element with matching class names
var d = document.getElementsByClassName("home");
log("<h3>Number of elements with 'home' class:</h3> "
+ d.length);
// returns the first match found based on selector
var link = document.querySelector("section header ul li a");
log("<h3>Location of first anchor in header:</h3> "
+ link.href);
// returns every match found based on selector
log("<h3>Link locations of all anchors in header
(querySelectorAll):</h3>");
var links = document.querySelectorAll(
"section header ul li a");
for (var i = 0; i < links.length; i++) {
log(links[i].href);
}
// zebra stripes: adds the 'alt' class to all links
// except in footer nav
var listItems =
document.querySelectorAll(
"section header ul li:nth-child(odd)");
for (var i = 0; i < listItems.length; i++) {
listItems[i].className += " alt";
}
// querying is available on elements as well as the document
log("<h3>Link locations of all anchors in header (off child
node):</h3>");
var container = document.querySelector("header");
var anchors = container.querySelectorAll("a");
for (var i = 0; i < anchors.length; i++) {
log(anchors[i].href);
}
});
function log(msg) {
var l = $("#log");
l.html(l.html() + "<p>" + msg + "</p>");
}
</script>
</head>
<body>
<section>
<header>
<ul>
<li class="home"><a href="/">Home</a></li>
<li><a href="/contact">Contact</a></li>
<li><a href="/about">About</a></li>
</ul>
</header>
<article>
<h1>Welcome to HTML5!</h1>
<p>HTML5 markup is new to many web developers.</p>
</article>
<footer>
<small>All Rights Reserved &copy; 2010</small>
</footer>
</section>
<hr />
<div id="log"></div>
</body>
</html>
Table 1: Listing of new HTML elements found in HTML5.
| Element | Description |
|---|---|
| article | The article wraps the primary content of a web page. Often there is only one article per page, but there is no formal restriction to the number of occurrences on a page. |
| aside | As the article content represents the primary content on the page, an aside is meant to contain information peripherally related to the main content of the page. |
| audio | The audio element renders a media player specifically tailored for presenting audio files to the user. |
| canvas | The canvas element is a pixel-based drawing surface manipulated through a JavaScript API. |
| command | Used to add responsiveness to the user interface, the command element acts as a container for common functionality on the page and returns state information indicating whether or not the command is enabled or disabled. |
| datalist | The datalist element enumerates a set of predefined options available in input fields. |
| details | Used in conjunction with the summary element, the details element contains information that is alternatively displayed and hidden from the user when the summary element is clicked. |
| embed | The embed element is a new tag that defines a plugin or other external content to the page. |
| figcaption | Used along with the figure element, the figcaption serves as a container for a short description for the related figure. |
| figure | The figure element contains content like screenshots or code listings within a page. |
| footer | The footer element is a logical container for content that concludes a logical section. Common content found at the bottom of a page, like navigation and copyright information, are often associated with the footer element at the page root. |
| header | The header element is a logical group that introduces another logical section. The header at the root of the document wraps common navigation, logo and other elements often found at the top of a web page. |
| hgroup | The hgroup element acts as a container for H1 - H6 HTML heading elements creating a semantic link between the headings. |
| keygen | Used for cryptography, the keygen element generates a private key stored on the user’s machine and a public key which is sent to the server. |
| mark | The mark element is intended to facilitate highlighting text from a search. |
| meter | The meter element is created to represent values in between a known minimum and maximum range. |
| nav | Providing semantic meaning to a site’s navigation, the nav element wraps navigation elements in context of the site. |
| output | The output element is used to represent the output of script calculation on the page. |
| progress | The purpose of the progress element is to display the ongoing advancement of a task as the result of a script on the page. |
| rp | The rp element is used to display parenthesis around ruby text that is not supported by a browser. (If ruby and rt elements are supported then rp should be hidden via the style sheet.) |
| rt | The rt element identifies the actual ruby text section of a ruby annotation. |
| ruby | The ruby element contains text with ruby annotations to support character-based languages like Chinese or Japanese. |
| section | The section element is used to delineate logical segments in a page. |
| source | The source element is used in conjunction with the audio and video elements to define the source media for the players. |
| summary | Used in combination with the details element, the summary element wraps content that is alternately displayed and hidden to the viewer based on whether or not content in the details element is clicked. |
| time | The time element is used to mark up a single point in date and time. |
| video | The video element renders a media player specifically tailored for presenting audio files to the user. |
| wbr | Used to provide hyphenation guides for long words, the wbr element (or “word break”) helps the page decide where to break long words if necessary. |
Table 2: New JavaScript APIs found in HTML5.
| Element | Description |
|---|---|
| Canvas 2D Context | Providing a 2D drawing context native to the browser, the Canvas API is the interface to the new Canvas element. |
| Contacts | The Contacts API is an interface to a unified address book on the client. |
| File APIs | The collection of new File APIs grants read/write access to sandboxed files and folders on the client’s machine. |
| Forms | The Forms API extends the input type to recognize custom data types, enforces validation and adds new additional features to improve the user experience of web forms. |
| Geolocation | Geolocation is an API that manages scripted and verified access to the user’s physical location. |
| ~Indexed Database | Providing the interface for a client-side database, the Index Database API exposes both index and key-based access to data in the database. |
| Media Capture | The Media Capture API creates a channel to the device’s audio, image and media capabilities. |
| Messaging | The Messaging API exposes an interface to the devices messaging capabilities including SMS, MMS and email. |
| Microdata | The Microdata API enables web pages to easily be both human and machine-readable. |
| Offline Web Applications | Taking browser cache to the next level, Offline Web Applications create useable pages when the client is disconnected from the web. |
| Selectors Level 1 & 2 | Updates to the Selectors engine bring CSS3 selectors to first-class DOM selection in JavaScript. |
| Server-Sent Events | The Server-Sent Events API allows push notifications from the server to be consumed on the client in the form of DOM elements. |
| Web Notifications | Web Notifications define a structured way to display messages to the user and provide the appropriate events for the page to respond. |
| Web Sockets | The Web Sockets API allows for two-way communication between the client and server. |
| Web Storage | Implemented as local or session storage, Web Storage provides a key/pair persistence location for a web page. |
| Web Workers | Web Workers brings threading capabilities to the UI layer. |
| XMLHttpRequest Level 2 | The HTMLHttpRequest Level 2 API enhances ‘Ajax’ to support cross-origin requests, progress events, and handling byte streams for sending and receiving data to and from the server. |
Table 3: New optional input attributes.
| Attribute | Description |
|---|---|
| autofocus | Enabling autofocus will bring focus to an input element on the page when the page loads. Each page may have one and only one element using the autofocus attribute. |
| placeholder | Adding a placeholder to an element will create a “watermark” or text that will appear in the element only when there is no value entered. Once the user brings focus to the element, the placeholder value disappears. |
| pattern | The pattern attribute enforces a regular expression validation rule against the input element. |
| required | The required attribute enforces a required field validation rule against the input element. |
