


Microsoft’s Azure platform has finally been released into production. This new entry into the cloud computing market provides .NET developers with a scalable, robust platform for developing applications.
After over a year in CTP, Azure is finally ready for prime time. At PDC 2009, Microsoft announced the release of new components, such as the management API, that make Azure worth considering for use in production environments. In this article, I’ll demonstrate how to use the different components of Azure Services to build a self-scaling application.
The application that I’ll show you how to build will demonstrate several important concepts. First, I’ll look at the various types of Azure services and how to create them. I’ll investigate the development fabric, which is the local version of Azure for development and testing. I’ll look at Azure storage accounts, (see the sidebar, Azure Terminology) particularly at the queue, which can be used to distribute incoming work. Finally, I’ll create a service to monitor the size of the queue and adjust the number of service nodes available for processing based on load.
In order to demonstrate these components, I will create a service to generate Fibonacci numbers. I’ll also build in a delay to simulate a process that takes a reasonably long period of time. Calculating Fibonacci numbers is an O(N) task, which makes it a good candidate for demonstrating load balancing as well, since your application can submit multiple requests with varying workloads. Before I show you how to create Azure services, I want to take a moment to discuss some of the reasons that you might want to consider using Azure services.
Azure Value Proposition
Developers frequently ask, “Why should I care about Azure?” It’s a fair question, given that you will be required to learn a new skill set to deal with the complexities of creating and maintaining Azure applications. And make no mistake about it - despite marketing to the contrary, learning how to use Azure isn’t merely “leveraging your existing .NET skills.”
There are a number of scenarios in which the scalability offered by Azure services provides a significant value proposition. I’ll detail three here, but there are plenty of others. The first is for industries where it is easier to fund an operations and maintenance (O&M) project than a project in which the cost of the servers must be capitalized. Since Microsoft owns the servers, and users pay a monthly fee, capital costs are minimized.
A second scenario of interest is with public-facing websites or services that have some sort of predictable usage pattern. Online retailers are, perhaps, the best example of this scenario. Traffic may remain fairly flat most of the year, with spikes in traffic around Thanksgiving and Christmas. In this scenario, additional nodes can be added to handle these predictable increases in load.
A third scenario includes business processes that occur infrequently, but on a known schedule, such as the annual or bi-annual reappraisal of all real estate in a county. In this scenario, again, additional nodes can be provisioned to ensure this process completes in some reasonable period of time.
In either of the latter two scenarios, the additional nodes can simply be removed once the predicted period of additional load is past. This approach will allow scalability without incurring unnecessary cost. See the sidebar, Azure Cost Considerations.
Azure Service Basics
Azure services are comprised of two general types of services: web roles and worker roles. You can think of these essentially as web services and Windows services. Each deployed role will have a number of nodes. By default, this is one node per role.
A node is an interesting concept in itself. When a node is initialized, Windows Azure provisions three separate instances of the node - the active instance, a backup instance and a recovery instance. If Azure discovers that an instance of a node is not responding, Azure will replace that instance; if necessary, Azure will promote another instance to be the active node while it creates a new instance.
When a node is initialized, Windows Azure provisions three separate instances of the node - the active instance, a backup instance and a recovery instance.
Web roles can be ASP.NET roles, ASP.NET MVC 2 roles, or WCF service roles. In any of these cases, the nodes are publicly accessible. Web roles exist behind a load balancer, so developers don’t have to worry about managing work distribution across the nodes.
Worker roles, on the other hand, run behind the scenes. They’re not directly accessible from the Web, but they can make calls out to other services. This is particularly important in asynchronous scenarios, where you need to send a result back to the caller.
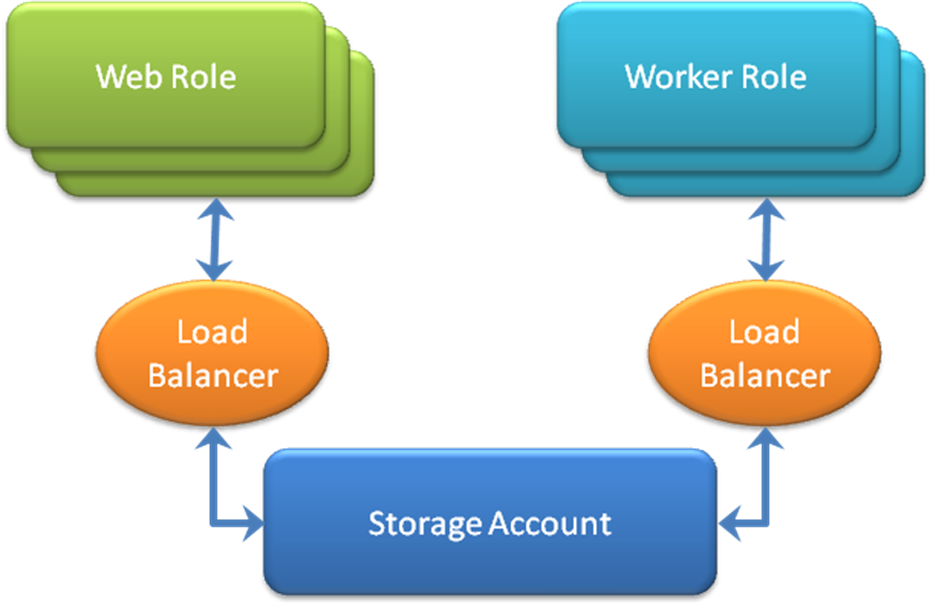
Web roles and worker roles both have access to Azure storage, which supports queues, blobs and tables. For the purposes of this article, I’ll limit the example to using the queue.
Figure 1 shows the relationships between the various types of Azure services and storage accounts.
Creating Roles
While creating a solution is generally straight-forward, Azure solutions involve an extra wizard which aids in the creation of the roles. This process is the same for both Visual Studio 2008 and Visual Studio 2010 Beta 2, although I use the latter for the screenshots and the code samples.
Note that if you’re using Visual Studio 2008, you’ll need to have the Azure toolkit installed before you start. The sidebar, New Features in VB 10 describes some of the differences between the code targeting .NET 3.5 instead of .NET 4.0.
Let me show you how to create roles. Simply open Visual Studio. Create a new project. When the wizard opens, under the language of your choice, choose “Cloud Service” as the project type. The only available template should be a “Windows Azure Cloud Service.”
Name the solution and project “SelfScalingAzure” and click OK. A new wizard will appear, as shown in Figure 2.
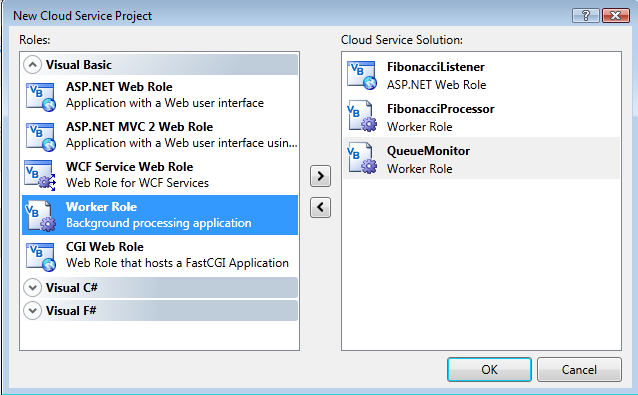
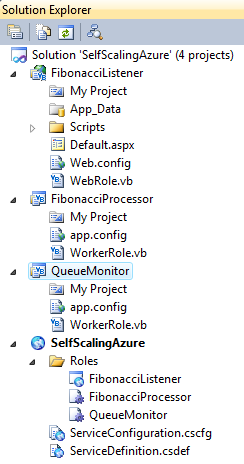
Select a “WCF Service Web Role.” Use the right arrow button to add this to the list of roles that will be created. Mouse over the role in the right-hand list box. You should see the icons shown in Figure 3. Click the Edit icon and rename the role to FibonacciListener. Repeat this process to create a worker role named QueueMonitor and a second worker role named FibonacciProcessor.

Once you’ve specified the three roles to create, click OK. The resulting solution should resemble that in Figure 4.
Configuring Roles
One significant difference between web roles and traditional web pages or services lies in the configuration. Whereas web.config is the standard mechanism for providing configuration in more traditional scenarios, Azure roles use a ServiceConfiguration file. There are actually two separate files - a configuration definition file and the actual configuration file. This is a critical point to note, as any configuration information stored in a web.config file cannot have changes applied without restarting your services.
Whereas web.config is the standard mechanism for providing configuration in more traditional scenarios, Azure roles use a ServiceConfiguration file.
Microsoft has made tremendous improvements around configuration files in the newest set of tools. Where each of these files needed to be edited by hand before, and kept perfectly in sync, there is now a new designer for editing them.
I’ll go ahead and add local connection strings to each of the roles since they all need access to the queue.
In the cloud service project in the Solution Explorer, expand the Roles folder. For each role, perform the following steps:
Right-click on the role, then select Properties.
Choose the Settings tab. Figure 5 shows the Settings designer.
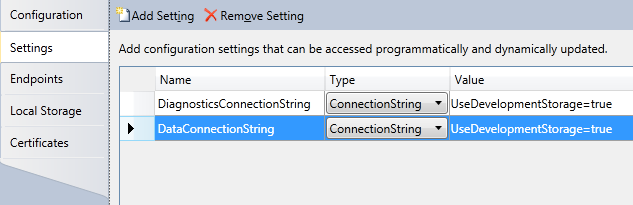
Click Add Setting. Name the setting “DataConnectionString” and set its type to “ConnectionString”. Use the ellipsis on the right-hand side of the Value text box, and accept the defaults. This will set the setting to use the development storage rather than a deployed copy.
If you open the ServiceDefinition.csdef file in the SelfScalingAzure project, you’ll see that the designer has added the following definition to each role:
<ConfigurationSettings>
    <Setting name="DiagnosticsConnectionString" />
    <Setting name="DataConnectionString" />
</ConfigurationSettings>
Opening the ServiceConfiguration.cscfg file reveals that the designer has also updated the actual configuration to include the DataConnectionString setting:
<Instances count="1" />
<ConfigurationSettings>
    <Setting name="DiagnosticsConnectionString"
             value="UseDevelopmentStorage=true" />
    <Setting name="DataConnectionString"
             value="UseDevelopmentStorage=true" />
</ConfigurationSettings>
The Instances Count property can be set either through the Configuration tab of the settings designer, or through the configuration file directly. This property will determine how many nodes are instantiated for the appropriate role.
Building the Fibonacci Service
In this next step I’ll show you how to create the service to generate Fibonacci numbers. Begin by deleting Service1 and IService1 from the FibonacciListener project. Add a new WCF Service (located under the Web category of items in the Add New Item wizard) called Fibonacci.svc. This will create a new interface called IFibonacci as well.
Replace the existing DoWork method declaration in IFibonacci with the following method declarations:
<OperationContract()> _
Function Ping() As Boolean
<OperationContract()> _
Function Calculate(ByVal n As Integer) As Int64
<OperationContract()> _
Sub BeginCalculate(ByVal n As Integer)
In order to decouple the functionality of calculating Fibonacci numbers from the service, you’ll need to create a new class library project called FibonacciLibrary. Delete Class1 and create a new class called Generator. This is the class that will be responsible for actually calculating the Fibonacci number requested. Normally, this class would be brought under unit test; for purposes of this article, this will be left as an exercise for you to complete on your own.
The implementation of the Fibonacci calculation in the Generator class is fairly straight-forward. By definition, F(0) = 0 and F(1) = 1. After that, F(n) = F(n-2) + F(n-1). Listing 1 shows the service implementation. The presence of a Thread.Sleep call ensures that this code takes a fairly long time to complete, simulating longer-running process.
Now all that remains is to complete the wiring of the service to the Generator class. Begin by adding a project reference from the FibonacciListener to the FibonacciLibrary project. The Calculate method of the service will be a call to the method of the same name in the Generator class that you just created. The body of the Fibonacci service is shown in Listing 2. For now, leave the BeginCalculate method stubbed out with no implementation - it will be used once you start putting messages on the queue.
Creating a Test Client
There’s an issue with the current Azure tools that prevents using the current test framework to create unit test projects for web or worker roles. Since you’ve already created a separate library that you can create unit tests against, this isn’t a serious issue. However, you will want to create a test harness to allow you to test the service itself.
It’s not possible to use the current test framework to create unit test projects for web or worker roles.
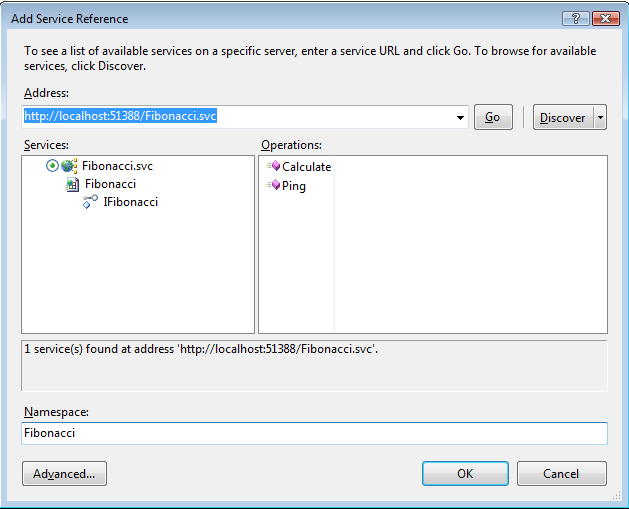
Start by creating a new console application called TestHarness. Next, add a service reference to hit the WCF endpoint you created. This is simple enough; simply right-click on the project in the solution explorer and select “Add Service Reference”. Click the “Discover” button to find services in the current solution. Visual Studio should find the Fibonacci service for you. Expand the tree until you see the IFibonacci interface exposed, as shown in Figure 6. Select the interface. Specify the namespace as Fibonacci, then click OK.
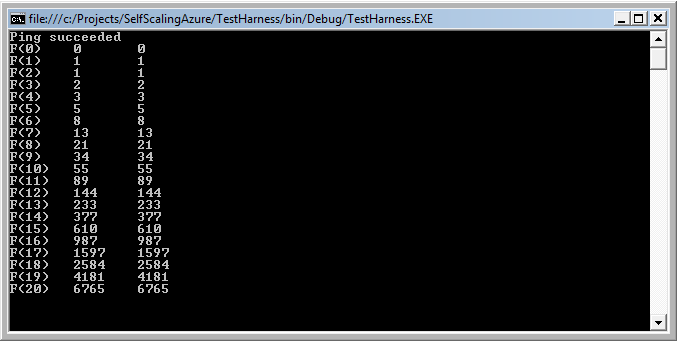
Modify Module1 as shown in Listing 3. You’ll create an array of integers that contains the first 21 Fibonacci numbers. This is a well-known sequence, and will allow you to ensure that you’re getting the expected result back from the service.
Essentially, all you’re doing is creating an instance of the service proxy, checking to see that the service responds, and then using the service to generate the first 21 Fibonacci numbers. You output both the number retrieved from the service and the correct value, and manually ensure that the service is returning the correct answers. The expected output is shown in Figure 7.
Azure Development Fabric
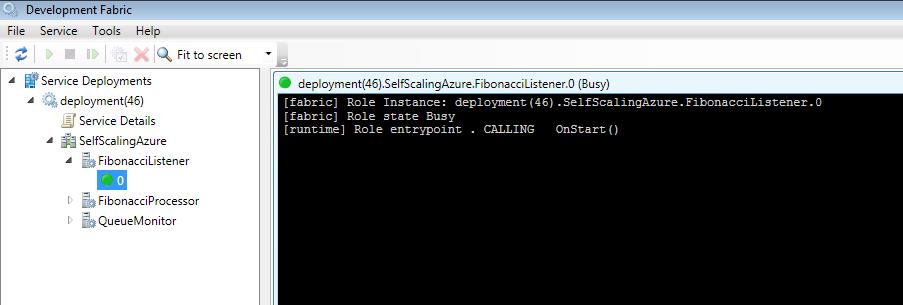
The “dev fabric” or “local fabric” is part of the Azure Tools for Visual Studio, and provides developers with a mechanism for testing Azure services without needing to have an active Azure account. Let’s take a moment to explore it. Begin by setting the SelfScalingAzure project as the startup project. Run the application.
You will notice a new icon appear in the system tray as the application is deployed. Right-clicking on this icon and selecting Show Development Fabric UI will display the UI shown in Figure 8. As you examine the tree, you’ll notice that each of the roles in the application are deployed to the dev fabric. The deployed nodes for each role are displayed as well, along with an icon denoting the node state. In Figure 8, the node icon is green, showing that it is healthy. Selecting a node will open a console window that gives additional information about the node status.
At this point, you may want to take just a moment to change the number of nodes for a role in the role properties, and see what effect this has on the dev fabric when you run the application.
Introducing Queues
Queue semantics in Azure are slightly different than generic .NET queues, i.e. Queue(Of T*).* In order to provide higher reliability, Azure queues use a “process at least once” semantic. This means that any processing you perform should be idempotent - that is, repeating the operation will yield the same result or end state. Otherwise, you run the risk of unexpected results if the same message is processed more than once.
Unlike Queue(Of T), retrieving a message from an Azure queue (using the GetMessage method) does not remove the message from the queue.
One important detail to note is that, unlike Queue(Of T*),* retrieving a message from an Azure queue (using the GetMessage method) does not remove the message from the queue. Instead, it hides the message on the queue until a timeout expires. At that point, the message reappears in the queue. This ensures that the message processing always completes, as you need to make an explicit call to DeleteMessage in order to remove it from the queue.
Azure queues accept only string messages, with a limit of 8 kb per message. Each Azure storage account can support multiple queues, with no limit to the number of messages that can be stored in a queue. (Note that the monthly cost for storage accounts is based on the amount of storage used, so this is a theoretical limitation with some pragmatic restrictions.)
Placing Messages on the Queue
In order to place a message on the queue, you first need to provide a connection to the Azure account. Providing the connection information is done through a connection string in the role settings - earlier, you set this to use the local development fabric rather than a deployed Azure account.
You’ll begin by modifying the Fibonacci.svc file to import the Microsoft.WindowsAzure and Microsoft.WindowsAzure.StorageClient namespaces. For those that used an earlier drop of the Azure SDK, you’ll notice that the StorageClient helper project has been added to the Azure SDK, so there is no longer any need to add this as a project reference.
Since you already have the connection string specified in the configuration, you need to instantiate a CloudStorageAccount and use this to connect to the queue using a CloudQueueClient. You’ll do this by creating a private readonly shared property that will initialize the queue the first time it is used. The implementation of the BeginCalculate method then becomes as simple as putting the input onto the queue as a message (see Listing 4 for the entire class).
Processing Messages
You need to perform a similar instantiation in the FibonacciProcessor role. This is the role that will perform the actual calculation of the Fibonacci number. In production code you would use the queue message to provide a callback location for the completion of an asynchronous call; here you’ll let the Thread.Sleep call you inserted into the Calculate method simulate the delay in writing the value to a database.
You’ll code the Run method to execute a tight loop. In each loop, you’ll check the queue for a message. If the queue contains a message, you’ll calculate the Fibonacci number requested. Otherwise, you’ll put the worker to sleep for some pre-determined period of time. Don’t forget that once the message is processed, it needs to be deleted from the queue! Listing 5 contains the code for this method.
One detail to note is that I’ve set the time delay before a requested message reappears to be one second. This means that, if I do not call DeleteMessage within one second, the message will reappear on the queue.
Monitoring the Queue
Now that you’re able to put requests on the queue via the FibonacciListener, and process them using the FibonacciProcessor, it’s time to write the QueueMonitor class in order to manage the service.
Managing Azure Services
One of the most important pieces of preparing Azure services for deployment into a real-world scenario is the ability to manage the number of nodes in real time.
Since there’s quite a bit of latency in standing up new nodes, you won’t be able to react instantaneously. (Generally, this latency is slightly less than a minute.) However, you can build a worker role that will monitor the number of pending requests in the queue and react appropriately.
One word of caution here: you will want to build in a limit to the number of nodes that can be stood up at any one time, since Azure’s fee structure is based on the number of activated nodes, regardless of whether they actually perform any work.
At this stage, the management API is limited to use through a REST API against deployed services. You’ll need to deploy an x509 certificate to your Azure account in order to authenticate calls to the REST API. (David Aiken has a great blog post on the steps required to create and deploy this certificate, here: http://tinyurl.com/****ybpmtus). One important difference: you’ll need to ensure that you include the private key in the export, as you’ll be deploying this to a different machine.
You’ll need to deploy an x509 certificate to your Azure account in order to authenticate calls to the REST API.
For now, you’ll build up the QueueListener role, with output to the dev fabric if you’re working locally. Create a new setting called IsDeployed in the QueueListener role properties, and set it to “False”. You’ll leverage this property to either log the need for an additional instance, or to actually make the call to Azure to spin it up.
You’ll also need to add configuration items to control the maximum number of nodes that will be spun up, the length of the window used to determine if a new node is required, and the latency between checks to see if a node needs to be added or removed.
In the QueueMonitor settings, add the following properties:
MinimumNodes (set to 2)
MaximumNodes (set to 5)
WindowLength (set to 3)
Latency (set to 1)
The MinimumNodes and MaximumNodes properties allow bounding the number of nodes that are available. The utility of the MaximumNodes property is evident. The MinimumNodes property will prevent the QueueMonitor worker role from attempting to remove the last node. It will also prevent the QueueMonitor from reducing the number of available nodes below normal operational requirements curing periods of low activity.
The units for both WindowLength and Latency will be minutes; the inclusion of both properties will allow more sophisticated techniques for determining if new nodes are required.
There are other properties you could add, such as specifying whether peak item count or average item count should be used, what thresholds should be used for determining whether the number of nodes needs to be adjusted, and the like. For now, these values will be hard-coded for simplicity’s sake.
The monitoring approach will be quite basic. After each interval of WindowLength has elapsed, the current number of items in the queue will be stored. A list of the number of items in the queue for the last Latency + 1 time intervals will be kept. This will allow either averaging or peak load to be used to determine if the number of nodes needs to be adjusted. Initially, you’ll be using peak load to determine if the number of nodes needs to be adjusted.
Before you can base any algorithm on the past counts of the number of items in the queue, you’ll need to create a class whose responsibility it is to track those counts.
Create a new class in the QueueMonitor project called MessageCountQueue. This class will use a queue internally, and restrict the total number of items in the queue to some predetermined capacity. (In this case, you’ll pass in the value of the WindowLength property.) The code for this class appears in Listing 6.
Before you begin, there are several namespaces that you’ll need to import in the QueueMonitor worker role.
Imports System.Net
Imports System.Threading
Imports Microsoft.WindowsAzure.Diagnostics
Imports Microsoft.WindowsAzure.ServiceRuntime
Imports Microsoft.WindowsAzure.StorageClient
Imports System.Security.Cryptography
Imports Microsoft.WindowsAzure
You’re now left with two tasks: connecting to the message queue and using the information contained therein to make a determination as to whether to add or remove nodes.
The first of these tasks is accomplished in the OnStart method, which is essentially the same as the same method in the FibonacciListener. You’ll need to add code to initialize the IsDeployed property and an instance of the MessageCountQueue.
IsDeployed = _
RoleEnvironment.GetConfigurationSettingValue(_
"IsDeployed")

itemCountQueue = _
New MessageCountQueue(WindowLength)
The complete code for OnStart, including the required properties, appears in Listing 7.
The second of these tasks involves some decisions about the algorithm to use. Since there are many algorithms that could be used here, you’ll want to implement the Strategy pattern for any sort of production use. For now, however, you’ll hard-code the algorithm.
The simplest algorithm is one that examines the number of items in the queue and, when that number exceeds a certain threshold, adds another node. When the number of items in the queue is reduced to zero, then a node can be removed, down to the specified minimum.
Since calls to the Azure management API are done via REST calls, they are asynchronous calls. In general, you can expect the latency for these calls to be around a minute, so it’s not advisable to set sampling latencies that are any less than this.
You’ll need to use the QueueMonitor worker role’s Run method to set up the monitoring algorithm. The code for this appears in Listing 8. Notice that there is no way to get the actual count of the number of items in the queue; the best you’ll be able to do is use the ApproximateMessageCount method.
You may also notice that, since you specified Latency in minutes, you also need to multiply the value from the configuration file by a factor of 60, 000 in order to convert it into milliseconds.
Adding and Removing Nodes
There are two methods left to implement: AddNode and RemoveNode. These methods require an HttpRequest to be created, along with specifying the x509 certificate that was created earlier. As part of the REST request, you’ll specify what Azure services to modify.
Listing 9 shows the code for loading an x509 certificate from a deployed worker role, and attaching it to the HttpRequest that is going to be made against the Azure service.
Adding and removing nodes are roughly the same task. The first step is to retrieve the configuration file for the service and determine how many nodes are currently instantiated for the FibonacciProcessor worker role. Once the file is retrieved, the number of nodes will need to be modified, and the new configuration file will need to be sent to the service through the REST API.
Listing 10 9 shows the code to implement these tasks.all of the tasks related to adding and removing nodes.
Testing the QueueMonitor
Now that I’ve written all of the code to monitor the queue and to modify the number of instantiated nodes, I need to test the QueueMonitor. Going back to the test harness I wrote earlier, I’ll modify it to deliberately make 120 125 requests per minute for F(5). This load test will execute for 3 minutes.
Since I added a 250ms pause to the loop, this should result in roughly 60 messages being on the queue after the first minute. Listing 11 10 contains the modified test harness code.
Once the QueueMonitor examines the queue, a second FibonacciProcessor node will be created. Opening my service account management console shows that the new node has been instantiated, as shown in Figure 9. After a period of time, the FibonacciProcessor nodes will empty the queue. The QueueMonitor will eventually detect the fact that the queue is empty, and remove the extra nodes.

Closing Thoughts
I’ve covered a lot of ground in this article. I began by showing you how to create a new cloud service with both worker and web roles, allowing you to kick off long-running processes from a test harness.
You were then able to see the web role executing code from within the local development fabric. You learned how to modify the configuration file to scale applications manually, specifying the number of nodes to be instantiated.
Once you completed this task, you then modified the web role to connect to a queue, placing calculation requests on the queue. You created a worker role to listen to the queue and process the requests that were there, including learning about the Azure queue’s “process at least once” semantics.
Next, you created a second worker role (the QueueMonitor) to monitor the queue. This worker role determines whether the current number of FibonacciProcessor nodes is sufficient for the current load, and adds or removes nodes accordingly. This allows you to deploy an application that will scale as needed, while also reducing the number of nodes that are deployed if there is excess capacity. This allows you to achieve good performance while minimizing the usage costs.
You now have a familiarity with the basics of Azure services and Azure storage, running on the development fabric. Hopefully, this exposure to some basic concepts has given you some ideas how you can leverage Azure, as well as whetting your appetite to learn more. I’ll leave advanced topics such as Azure deployment, SQL Azure, tables and blobs, the Azure service bus, and the rest of the Azure ecosystem to you to explore.
Listing 1: Generating Fibonacci Numbers
Public Class Generator
   Public Shared Function Calculate(ByVal n As Integer) As Int64
      If n = 0 Then Return 0
      If n = 1 Then Return 1

      If n > 40 Then Return -1

      Dim firstNumber As Integer = 0
      Dim lastNumber As Integer = 1

      For i As Integer = 2 To n
         Dim temp As Integer = lastNumber
         lastNumber += firstNumber
         firstNumber = temp
         Threading.Thread.Sleep(250)
      Next

      Return lastNumber
   End Function
End Class
Listing 2: FibonacciListener service
Public Class Fibonacci
   Implements IFibonacci

   Public Function Calculate(ByVal n As Integer) As Long _
   Implements IFibonacci.Calculate
      Return FibonacciLibrary.Generator.Calculate(n)
   End Function

   Public Sub BeginCalculate(ByVal n As Integer) _
Implements IFibonacci.BeginCalculate
   End Sub


   Public Function Ping() As Boolean _
Implements IFibonacci.Ping
      Return True
   End Function
End Class
Listing 3: Service test harness
Private expected() As Integer = {0, 1, 1, 2, 3, 5, 8, _
     13, 21, 34, 55, 89, 144, _
     233, 377, 610, 987, 1597, _
     2584, 4181, 6765}

Sub Main()
   Dim svc As New Fibonacci.FibonacciClient
   Try
      Dim pingResult As Boolean = svc.Ping

      If pingResult Then
         Console.WriteLine("Ping succeeded")

         For i = 0 To 20
            Console.WriteLine("F({0}){1}{2}{3}{4}", _
         i, vbTab, svc.Calculate(i), vbTab, _
         expected(i))
         Next
      End If
   Catch ex As Exception
      Console.WriteLine("Ping failed. {0}", ex.Message)
   End Try

   Console.ReadLine()
End Sub
Listing 4: Fibonacci Service implementation with Queue
Imports Microsoft.WindowsAzure.StorageClient
Imports Microsoft.WindowsAzure

Public Class Fibonacci
   Implements IFibonacci

   Private Shared _queue As CloudQueue
   Private Shared ReadOnly Property Queue As CloudQueue
      Get
         If _queue Is Nothing Then InitializeQueue()
         Return _queue
      End Get
   End Property

   Private Shared Sub InitializeQueue()
      Dim account = _
      CloudStorageAccount.FromConfigurationSetting( _
      "DataConnectionString")

      Dim queueClient = account.CreateCloudQueueClient()
      _queue = queueClient.GetQueueReference("fibonacci")
      _queue.CreateIfNotExist()
   End Sub

   Public Sub BeginCalculate(ByVal n As Integer) _
Implements IFibonacci.BeginCalculate
      Queue.AddMessage(New CloudQueueMessage(n.ToString))
   End Sub

   Public Function Calculate(ByVal n As Integer) As Int64 _
Implements IFibonacci.Calculate
      Return FibonacciLibrary.Generator.Calculate(n)
   End Function

   Public Function Ping() As Boolean Implements IFibonacci.Ping
      Return True
   End Function
End Class
Listing 5: FibonacciProcessor Run method
Public Overrides Sub Run()
   Dim timeOut As New TimeSpan(0, 0, 1)
   While (True)
      Thread.Sleep(2000)

      Dim message As CloudQueueMessage = Queue.GetMessage(timeOut)
      If message IsNot Nothing Then
         Dim input As Integer
         If Integer.TryParse(message.AsString, input) Then
            Generator.Calculate(message.AsString)
         End If
         Queue.DeleteMessage(message)
      End If
   End While
End Sub
Listing 6: MessageCountQueue
Friend Class MessageCountQueue
   Private Property Capacity As Integer
   Private Property Items As Queue(Of Integer)

   Public Sub New(ByVal capacity As Integer)
      Me.Items = New Queue(Of Integer)
      Me.Capacity = capacity
   End Sub

   Public Sub Enqueue(ByVal item As Integer)
      Items.Enqueue(item)
      While Items.Count > Capacity
         Items.Dequeue()
      End While
   End Sub

   Public Function Dequeue() As Integer
      Return Items.Dequeue
   End Function

   Public Function GetAverageCount() As Integer
      If Items.Count = 0 Then Return 0

      Dim total As Integer
      For Each item As Integer In Items
         total += item
      Next
      Return total / Items.Count
   End Function
End Class
Listing 7: QueueMonitor OnStart method
Private itemCountQueue As MessageCountQueue
Private _queue As CloudQueue
Private ReadOnly Property Queue As CloudQueue
   Get
      If _queue Is Nothing Then InitializeQueue()
      Return _queue
   End Get
End Property

Private Sub InitializeQueue()
   Dim account = CloudStorageAccount.FromConfigurationSetting(
     "DataConnectionString")

   Dim queueClient = account.CreateCloudQueueClient()
   _queue = queueClient.GetQueueReference("fibonacci")
   _queue.CreateIfNotExist()
End Sub

Private Property IsDeployed As Boolean

Private _windowLength As Integer
Private ReadOnly Property WindowLength As Integer
   Get
      If _windowLength = 0 Then
         Dim configSetting =
         RoleEnvironment.GetConfigurationSettingValue(
         "WindowLength")
         Integer.TryParse(configSetting, _windowLength)
      End If

      Return _windowLength
   End Get
End Property

Public Overrides Function OnStart() As Boolean
   DiagnosticMonitor.Start("DiagnosticsConnectionString")

   IsDeployed =
   RoleEnvironment.GetConfigurationSettingValue("IsDeployed")
   itemCountQueue = New MessageCountQueue(WindowLength)

   ' Restart the role upon all configuration changes
   AddHandler RoleEnvironment.Changing, AddressOf
   RoleEnvironmentChanging

   Return MyBase.OnStart()
End Function
Listing 8: QueueMonitor Run method
Public Overrides Sub Run()
   Trace.WriteLine("QueueMonitor entry point called.",
"Information")

   While (True)
      Dim messageCount = queue.ApproximateMessageCount
      If messageCount.HasValue Then
      itemCountQueue.Enqueue(messageCount.Value)

      Dim averageItemCount = itemCountQueue.GetAverageCount
      If averageItemCount > threshold AndAlso NodeCount <
      MaximumNodes Then
         AddNode()
      End If

      If averageItemCount < -threshold AndAlso NodeCount >
      MinimumNodes Then
         RemoveNode()
      End If

      Thread.Sleep(Latency)
   End While
End Sub
Listing 9: Adding and Removing Nodes
Private ReadOnly Property ThumbPrint As String
Get
' thumbprint can be found in the certificate details
' in certmgr.msc
Return "d3a39da249de56c1b1bc12fccfcc77b4fada7e36"
End Get
End Property
Private Sub AddNode()
NodeCount += 1
UpdateConfig(NodeCount)
End Sub
Private Sub RemoveNode()
NodeCount -= 1
UpdateConfig(NodeCount)
End Sub
Private Sub UpdateConfig(ByVal nodeCount As Integer)
Dim config As String = GetConfig(nodeCount)
Dim base64Config As String = EncodeTo64(config)
Dim request As HttpWebRequest
request = CreateAzureConfigHttpRequest(base64Config)
request.GetResponse()
End Sub
Public Function EncodeTo64(ByVal toEncode As String) _
As String
Dim bytes As Byte()
bytes = ASCIIEncoding.ASCII.GetBytes(toEncode)
Return System.Convert.ToBase64String(bytes)
End Function
Private Const ROLE_NAME As String = "FibonacciProcessor"
Private Const INSTANCE_COUNT As String = "Instances count="
Private Function GetConfig(ByVal nodeCount As Integer) _
As String
Dim configFile As String
configFile = My.Computer.FileSystem.ReadAllText( _
"ServiceConfiguration.cscfg")
' find the correct role and the instance count
Dim startIndex As Integer
Dim endIndex As Integer
Dim output As String
With configFile
startIndex = .IndexOf(ROLE_NAME)
startIndex = .IndexOf(INSTANCE_COUNT, startIndex)
startIndex += INSTANCE_COUNT.Length + 1
endIndex = .IndexOf("""", startIndex)
output = .Substring(0, startIndex)
output &= nodeCount.ToString
output &= .Substring(endIndex)
End With
Return output
End Function
Private Function CreateAzureConfigHttpRequest _
(ByVal base64Config As String) As HttpWebRequest
Dim cert As X509Certificate2 = GetCertificate()
' replace the subscription id and service name with
' those for your own deployed service
Dim uri As String
uri = "<a href="https://management.core.windows.net/">https://management.core.windows.net/</a>"
uri &= "<subscription-id>/services/hostedservices/"
uri &= "<service-name>/deploymentslots/production/"
uri &= "?comp=config "
Dim request As HttpWebRequest
request = HttpWebRequest.Create(uri)
request.Timeout = 5000
request.ReadWriteTimeout = request.Timeout * 100
request.Method = "POST"
request.ClientCertificates.Add(cert)
request.Headers.Add("x-ms-version", "2009-10-01")
request.ContentType = "application/xml"
Dim content As String = GetConfigString(base64Config)
Dim encoding As New ASCIIEncoding()
Dim bytes As Byte() = encoding.GetBytes(content)
request.ContentLength = bytes.Length
Dim newStream = request.GetRequestStream()
newStream.Write(bytes, 0, bytes.Length)
newStream.Close()
Return request
End Function
Private Function GetConfigString _
(ByVal base64Config As String) As String
Dim length As Integer = base64Config.Length
Dim content As New Text.StringBuilder(length)
With content
.Append("<?xml version=""1.0"" encoding=""utf-8""?>")
.AppendLine()
.Append("<ChangeConfiguration ")
.Append("xmlns=""<a href="http://schemas.microsoft.com/">http://schemas.microsoft.com/</a>")
.Append("windowsazure"" >")
.AppendFormat("<Configuration>{0}</Configuration>", _
base64Config)
.AppendLine("</ChangeConfiguration>")
End With
Return content.ToString
End Function
Private Function GetCertificate() As X509Certificate2
Dim store As New X509Store("MY", _
StoreLocation.CurrentUser)
store.Open(OpenFlags.ReadOnly Or _
OpenFlags.OpenExistingOnly)
Dim certs = store.Certificates.Find( _
X509FindType.FindByThumbprint, _
ThumbPrint, True)
Return If(certs.Count = 1, certs(0), Nothing)
End Function
Listing 10: Revised test client
Sub Main()
   Dim svc As New Fibonacci.FibonacciClient
   Dim pingResult As Boolean

   Try
      pingResult = svc.Ping

      If pingResult Then
         Console.WriteLine("Ping succeeded")

         For i = 0 To 125 * 3
            svc.BeginCalculate(5)
         Next
      End If
   Catch ex As Exception
      Console.WriteLine("Ping failed. {0}", ex.Message)
   End Try

   Console.ReadLine()
End Sub
