


Hudson makes continuous integration easy and powerful.
Though Hudson is a Java project, it can easily build your .NET applications. You configure Hudson easily via the Web interface rather than tweaking XML. With plenty of plugins available to .NET projects, Hudson provides plenty of powerful features.
Kohsuke Kawaguchi, a staff engineer at Sun Microsystems, released Hudson in February of 2005. Since that time, Java developers have adopted Hudson as their continuous integration server in greater and greater numbers. From Feb 1 through Feb 7 of this year, users downloaded Hudson 2855 times. Java developers use Hudson for three major reasons: ease of installation, ease of configuration, and ease of extensibility. Additionally, Hudson handles distributed builds across multiple platforms very well. A single Hudson master can control multiple Hudson slaves installed on different operating systems. My team runs our Hudson master on Linux with a Windows slave when we have jobs that require Windows. Hudson is truly easy and enjoyable to use. Fortunately, through some .NET-specific plugins, .NET developers can have that same ease of use.
Hudson uses an easy plugin model that has encouraged the community to author and submit over 100 plugins to the master Hudson repository. An additional 100 unofficial plugins appear in the Hudson usage statistics. While many of those extensions focus on the Java core of the Hudson community, there are enough Microsoft-specific and general use plugins to make Hudson worth a serious investigation. The .NET offerings include MSBuild, NAnt, MSTest, and FxCop. In addition, Hudson has easy integration with source control systems including Subversion, Git, Team Foundation Server, Visual Source Safe, CVS, and others. See the sidebar entitled, “More Plugins” for descriptions of more useful extensions to the Hudson system.
I will cover the initial installation of Hudson and setting up a complete build for an example project. My project will include integrating with Google Code for source control and source browsing, compiling with MSBuild, executing NUnit tests, publishing test results, and publishing build artifacts.
Downloads
In order to get started, you’ll need to download a few resources. You should get the latest versions for all downloads unless I state otherwise.
Hudson
Download Hudson from http://hudson.dev.java.net via the Downloads link on the left side of the page. I will show the installation of release 1.280, but with Hudson releasing as frequently as it does, that will not be the latest version by the time you read this. The link to release 1.280 is at http://shrinkster.com/1497.
NUnit
The example project uses NUnit as its testing framework. My example for this article will integrate the NUnit console runner with the Hudson build. Download NUnit from http://www.nunit.org/. I’ll use NUnit version 2.4.8 for .NET Framework 2.0, which is compatible with .NET 3.5.
.NET Framework
You probably already have the .NET Framework installed. The sample project requires .NET 3.5. If you do not already have .NET 3.5, install it via Windows Update.
Java Runtime Environment (JRE)
You probably already have this installed as well. Unless you changed the default installation location for Java, you can determine your Java version with this command:
C:\>java -version
You should see something like:
java version "1.6.0_07"
Java(TM) SE Runtime Environment
(build 1.6.0_07-b06)
You can download the latest JRE at http://java.sun.com/javase/downloads/index.jsp and click the download button for “JRE 6 update 12.” Follow the prompts and selections to download the Windows JRE. Once you have downloaded the JRE, launch the .exe file and follow the prompts to complete the installation.
Installation
To get Hudson up and running, you will simply start Hudson from a command prompt and then ask Hudson to install itself as a Windows service. Before you start, you need to consider a couple of configurations, which I’ll cover in the next sections.
HTTP Port
First, what port would you like Hudson to run on? The default port is 8080, but if you wish to use a different port, you can override the default with the httpPort option as described below.
Hudson Home
What directory would you like to install Hudson to? Hudson keeps all files including configuration and workspaces in the same root directory. Be sure to install Hudson on a disk that has plenty of room to handle working copies, compiled binaries, and archived builds. The default installation directory for Hudson is:
C:\Documents and Settings\<user>\.hudson
You can override the Hudson home directory using the HUDSON_HOME environment variable as described below.
Start Hudson
Open a command prompt and navigate to the directory containing the downloaded hudson.war file. If you want to run Hudson with the default configurations, issue the following command:
java -jar hudson.war
To change the directory Hudson works from and the port that Hudson runs on, use this command:
java -DHUDSON_HOME=<dir> -jar hudson.war
--httpPort=<port>
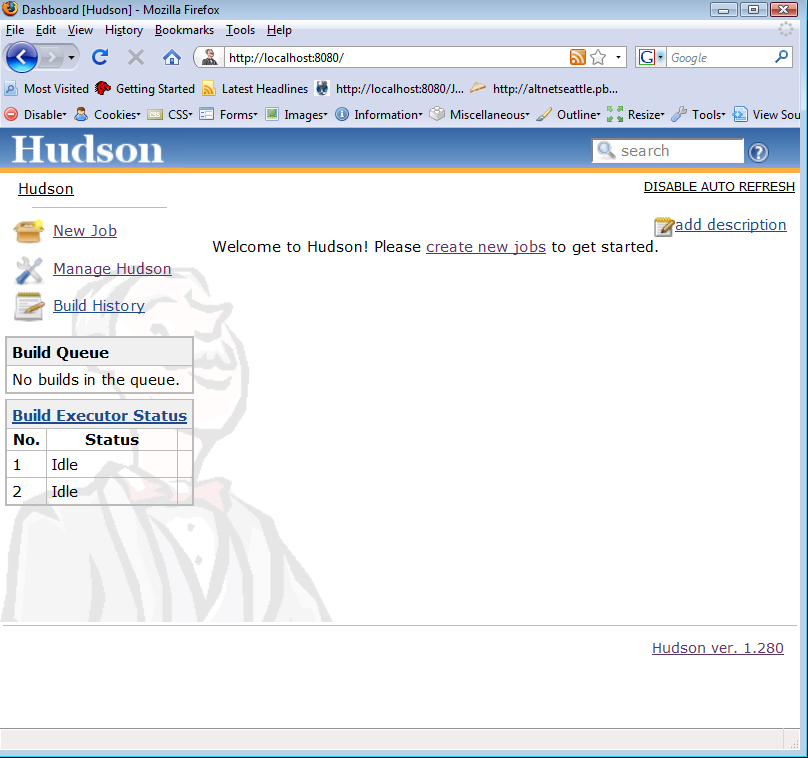
Assuming that you started Hudson on the default port, verify your Hudson installation by pointing your browser at http://localhost:8080/. You should see the Hudson home page as in Figure 1.
Configuration
Developers love Hudson for its ease of configuration. Rather than dealing with .XML files, users set configuration through a clean web UI. All Hudson configuration steps happen in the web browser. This includes configuring the base system, adding and configuring jobs, and installing plugins. Though Hudson actually stores its configuration in XML files, I have never needed to touch any XML directly while configuring Hudson.
Installing Plugins
To build .NET projects, you will need to get a few Hudson plugins. Fortunately, installing plugins, like all Hudson configuration, is simple. Follow these steps to get to plugin configuration:
You should find yourself at http://localhost:8080/pluginManager/. From here you will see tabs that show plugin information including lists of installed and available plugins. If your network requires you to download through a proxy server, you should configure the proxy settings under the “Advanced” tab.
Look at the list of available plugins under the “Available” tab. Select the checkboxes next to the plugins, “Google Code,” “MSBuild,” and “NUnit.”
Click the “Install” button at the bottom of the page and Hudson will download and install your selections. After installing the plugins, restart Hudson by terminating the program with a CTRL-C in the command window and reissuing the Hudson command.
Configuring Hudson
You configure Hudson through the web interface without having to deal with any XML configuration. Hudson display help links in the form of blue question marks for all portions of the configuration. These links provide excellent in-line help. If you have questions about a particular configuration, be sure to check the help links first. Follow these steps to get started configuring Hudson:
You should now be at http://localhost:8080/configure. Note that the Hudson home directory appears at the top of the page by the label, “Home directory.” This is where Hudson will store all configuration and jobs including the workspace and the archive of previous builds.
You will need to set the path to your msbuild.exe under the heading, “MSBuild Builder.” The Framework installs in version-specific subdirectories under the C:\WINDOWS directory, and that is where you will find msbuild.exe. The example project requires .NET 3.5. Therefore, you can use this path.
C:\WINDOWS\Microsoft.NET\Framework\
v3.5\msbuild.exe.
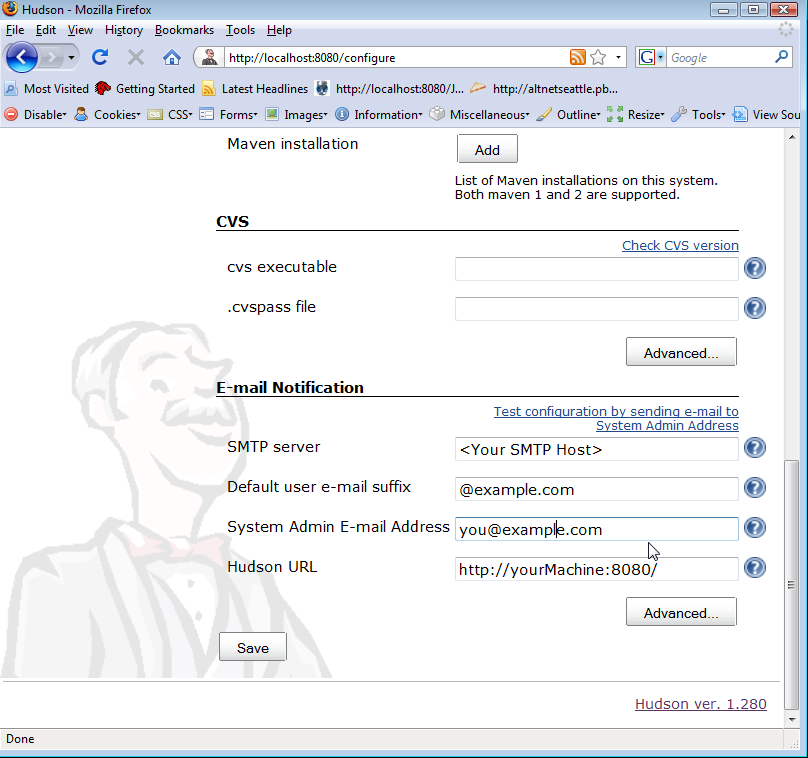
You will most likely want to configure the “E-Mail Notification” section so that you can get e-mails for failed builds (Figure 2). After configuring the SMTP server and the System Admin E-Mail Address, you can use the link provided to send yourself a test e-mail from Hudson.
Use the “Save” button at the bottom of the page to save your configuration.
Building Hello World
Now that you have configured Hudson, you can add your first build. A Hello World project has been setup at Google Code for this purpose. Since the source repository has public read-only access, anyone is welcome to set up a build for this project.
Creating the Base Project Configuration
Navigate to the home page for your Hudson installation at http://localhost:8080 and then click on New Job. Name your project “Hello_World,” select the “free-style software project” option, and click OK.
At a minimum, you will need to configure the project name, source code repository, build trigger, and build steps to get anything useful. Here are the configurations:
Project Name:
Hello_World

Google code website:
<a href="http://code.google.com/p/helloworlddotnet/">http://code.google.com/p/helloworlddotnet/</a>

Source Code Management:
Google Code

Build Triggers:
Poll SCM

Schedule:
* * * * *
The schedule setting tells Hudson to check source control for changes every minute. If you want to reduce the polling interval, see the help link for more instructions.
To add a build step, click “Add build step” in the “Build” section, and then select “Build a Visual Studio project or solution using MSBuild.” You can then configure the build file and command arguments as follows:
MsBuild Build File:
HelloWorld.sln

Command Line Arguments:
/t:Rebuild
Save the configuration and then press the “Build Now” link in the upper-left to get your first build. Hudson will create a workspace, download the latest source code, and rebuild the project. When the build starts, a new entry will appear in the “Build History” panel on the left-hand side of the browser. You can watch the console output of the build by clicking on the build timestamp link in the “Build History” box, then clicking on “Console Output.”
Source Code Integration
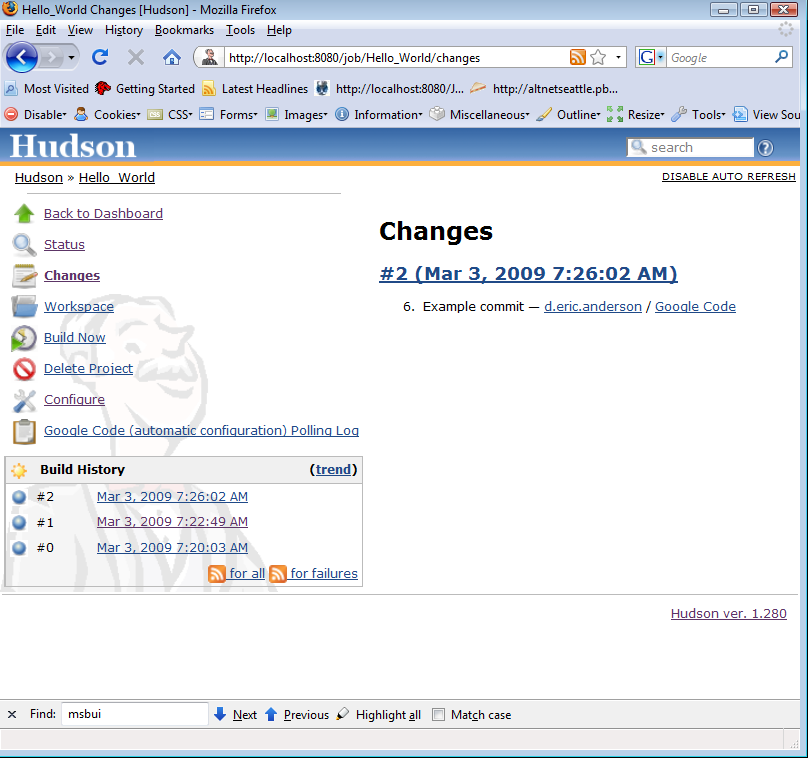
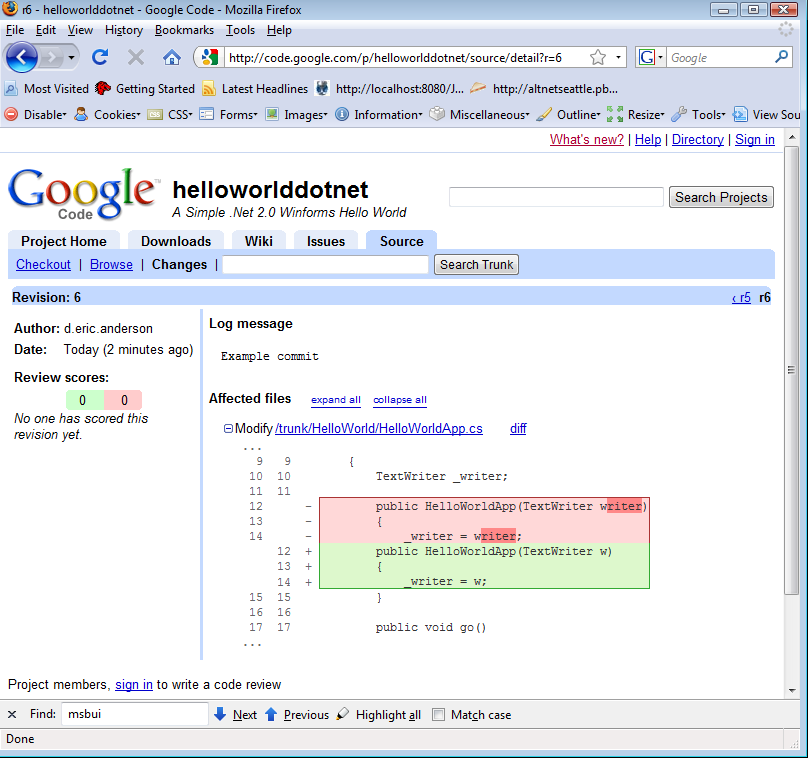
Hudson comes with the ability to talk with many source control systems. Some of them, like Subversion and CVS, ship with Hudson. Others, like Team Foundation Server and Git, require a plugin. With the Google Code plugin installed, Hudson will provide links through Google’s REST API so that with a couple of clicks, you can navigate from your Hudson build to the Google Code display of the change set for that build. I checked in one change to the repository after I set up the Hello World build for this article, and you can see the link that Hudson provides to Google Code in Figure 3. Following the link takes you to the Google Code website to display the changes as shown in Figure 4.
The changes link appears after Hudson starts detecting changes in the source control. If you want to see Hudson detecting changes, you will need to create a Hudson build for your own project. Once you commit a change to source control for that project, Hudson will start showing you the changes.
Hudson also provides integration with web interfaces for Subversion and CVS repositories including Trac, ViewSVN, FishEye, WebSVN, and others. Once you have configured the repository browser in the project settings, you will see a link similar to the Google Code link mentioned above.
Publishing Artifacts
If you look through the output, you will see that the build has created the HelloWorld.exe in the directory:
<Hudson Home>\jobs\Hello_World\workspace\
HelloWorld\bin\Debug\HelloWorld.exe.
While it is nice that Hudson built the artifact, it is not especially accessible there. Instead, you should publish the .exe built by Hudson as a build artifact. That way, users can easily download the output of the build and you can more easily move the artifacts through the rest of your deployment process. To publish the .exe as a build artifact, go back into the project configuration for the Hello_World project. Toward the bottom, select the “Archive the Artifacts” check box under the “Post-build Actions” heading. Under, “Files to Archive,” enter:
HelloWorld\bin\Debug\HelloWorld.exe
Save the configuration. Press “Build Now” and Hudson will rebuild the project and provide a link to the HelloWorld.exe. You can click on the link and download the .exe now. Note that each build keeps a reference to its published artifacts, and the project page will have links to the artifacts for the last successful build.
Running Unit Tests
At this point, you should have a successful (blue) build for the Hello World project. However, Hudson is not running unit tests. To get more confidence in your build, you should run the unit tests with each build. The Hello World project comes with a unit test project including a single NUnit test. The NUnit plugin for Hudson will reformat the NUnit output, but it will not execute the NUnit tests. To execute the test, you need to set up a batch process that uses the NUnit console runner.
Go back to the project configuration for the Hello_World project, scroll down to the build steps, and add a build step of type, “Execute Windows batch command.” Assuming you have installed NUnit 2.4.8 in the default location, your batch command should look like:
"C:\Program Files\NUnit 2.4.8\bin\
nunit-console.exe" HelloWorldTests\bin\Debug\
HelloWorldTests.dll /xml=nunit-output.xml

exit %%ERRORLEVEL%%
The first line of the script executes the nunit-console.exe and runs all tests found in HelloWorldTests.dll placing the results in nunit-output.xml. The second line of the script tells the batch script to bubble out the error level of the NUnit run. This bubbled out error level will cause the build to fail if any tests fail.
To publish the test results, select “Publish NUnit test result report,” and enter the name of the file that you told NUnit to generate, “nunit-output.xml.”
Save the configuration and then force another build of the project. After the build completes, navigate to the project page at:
http://localhost:8080/job/Hello_World/
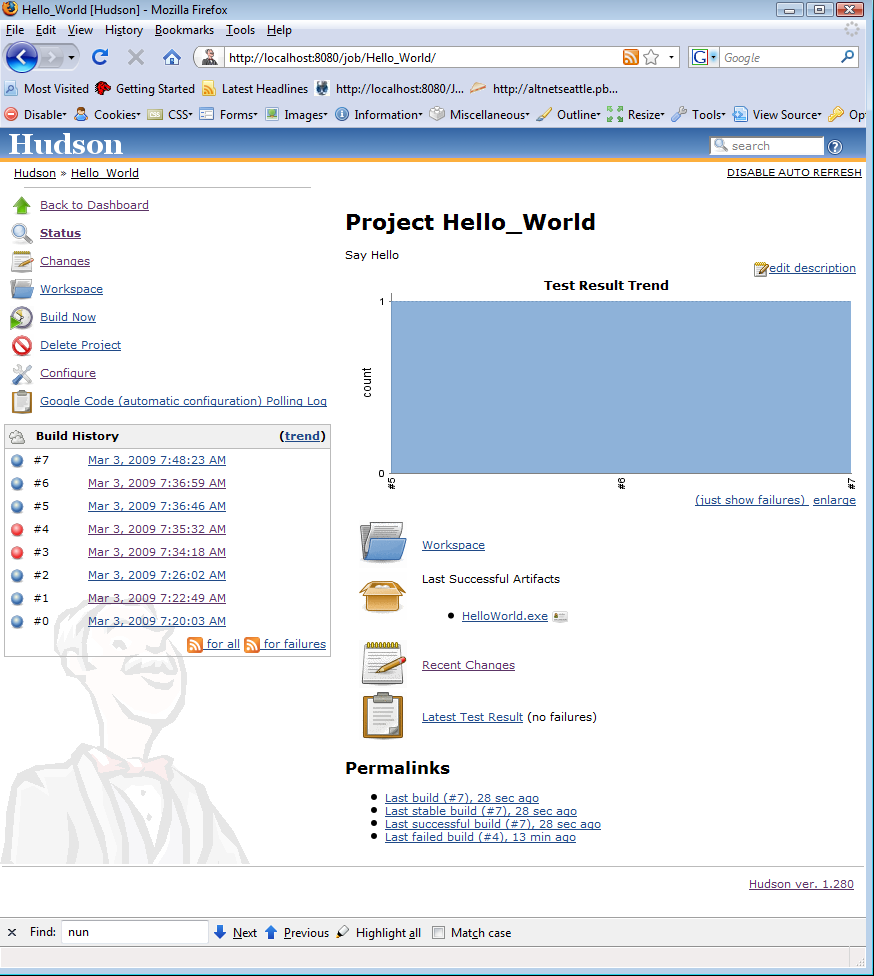
You should now see a link to the “Latest Test Result.” You can see the final screenshot of the project page in Figure 5. Note that the link given on the project page will always point to the latest published test results. If you want to send out a link to the test results from a specific build, simply navigate to the page for that build and the “Test Result” link from the build’s page will specifically reference the results from that build number.
Installing Hudson as a Windows Service
Now that you have a build setup, you will probably want to install Hudson so that it runs as a Windows service. Assuming your trial Hudson is still running, click on “Manage Hudson” on the Hudson home page, and then “Install as Windows Service.” Hudson will verify that you want to keep the same working directory and then install itself as a Windows service. After the installation, Hudson will prompt you to restart.
If you were running or want to run Hudson on a port other than 8080, you will have to make one small change to the hudson.xml file. Open the HUDSON_HOME\hudson.xml file with WordPad or some other editor that understands Unix-style line endings. Find the <arguments> block toward the bottom of the file and change the value assigned to the httpPort argument. After saving the configuration file, restart the Windows service and Hudson should start up on the port that you have assigned to it.
Wrap-Up
You should now have a passing build that is monitoring source control for changes, running unit tests, and publishing the results. You will find many additional useful plugins for Hudson as you go along. “More Plugins” lists some of the more popular and relevant plugins for .NET projects.
Be sure to check out the Hudson home page as well as the Hudson wiki and Hudson mailing lists. I love using Hudson, and if you give it a shot, you may too.
