


Building complex Web controls with rich client-interfaces often requires the integration of some client-side JavaScript code with the control’s server-side code.
While in some cases this does not have to become too complicated to achieve some pretty nifty results, it can often break the data synchronization between the control’s internal server code and the rendered client HTML code. This becomes a problem when the page posts back. In this article, I will build two very cool Web controls that are vulnerable to this problem and then show you how to fix it.
This article assumes a basic knowledge of custom Web control development as explained in “Custom Web Controls Demystified” published in CoDe Magazine Sept/Oct 2005 and Nov/Dec 2005. In the interest of space, I will not repeat basics of Web control development such as how properties work or how styling is added. I strongly encourage that you check out the previous articles and read the Web control tutorial I wrote.
The controls built in this article are designed for ASP.NET 2.0 for reasons explained later. Later in the article, I will give you a brief work-around explanation for getting them to work in ASP.NET 1.1 (or 1.0).
HTML remains the main language of Web applications at the very end of their rendering cycles. Unfortunately, the protocol that it rides on maintains a characteristic that Web developers have had to deal with known as statelessness. ASP.NET helps to deal with this with awesome architecture characteristics such as the postback mechanism and the ViewState variable. However, for certain functionality, it is still wise to put the extra effort and mix the technologies that lead to your Web page as opposed to constantly hitting the server using postback events. Specifically, I’m talking about using JavaScript and DHTML to access rendered elements on the client side. If you’re saying, “Great, we get the best of both worlds,” hang on, not so fast. Mixing client and server functionality requires a certain amount of finesse to achieve the nirvana that will contribute to the best user experience. Microsoft itself practices this belief as is demonstrated in the ASP.NET validation controls, which contribute a lot of JavaScript in order to provide a client-side validation experience.
A Conventional Approach
Get ready for a great ride because I’m going to show you how to build a couple of very cool controls with functionality that I have seen in commercial controls you would normally pay good money for. I will continuously demonstrate the benefit of full encapsulation that custom Web controls bring to Web programming. In my last couple of articles I taught you how to hit the ground running developing custom Web controls. One of the concepts I described was encapsulation of all functionality and behavior of a control as you would in a standard business object. This encapsulation will shine when you learn to build controls with complex behavior.
The first control I’ll show you how to build is called the EnhancedListBox. This control will extend the ASP.NET Listbox control by adding a heading and some reorder buttons. If you remember my “Custom Web Controls Demystified” articles (CoDe Magazine, Sep/Oct and Nov/Dec 2005) you will recognize this as an inherited control because it will directly inherit from the regular Listbox. Because of this, the control will serve as a drop-in replacement for the Listbox and will give you the ability to optionally display these extra features.
I’ll also show you how to build a composite control that will contain two of the above-mentioned EnhancedListBox controls. This control, called ListMover, will also contain some buttons that allow you to move list items from one list to another. You might have seen a control like this in Windows applications and maybe even on Web sites. So you may be asking, “What is the problem?”
Building sites with this type of functionality in ASP.NET is really not that difficult in the conventional method (non-Web control-oriented). First you would drop a regular Listbox control on your Web Form and fill it with some data (in whatever manner you want). Next you would add a label to serve as the heading and a couple of buttons to serve as the reorder buttons. Trapping the server side events for these buttons is standard operating procedure in ASP.NET so all you would need to figure out is a way to take the currently selected item and reposition it higher or lower in the list depending on which button the user clicked. You might write code like this for moving an item up in the list.
i_Index = ListBox1.SelectedIndex;
o_Item = ListBox1.SelectedItem;
ListBox1.Items.RemoveAt(this.SelectedIndex);
i_Index--;
if(i_Index < 0) i_Index = 0;
ListBox1.Items.Insert(i_Index, o_Item);
Let me analyze what’s happening here. First I’m saving the current Index and Item of the selected item in the list. Then I’m removing the item in the current position and reinserting it in a position one index lower. The logic behind his is pretty straightforward, so why am I demonstrating this? Using this conventional method of ASP.NET programming, the reorder buttons on the Web Form raise a server-side event that performs the reordering on the Listbox. This is triggered by a postback to the server and can be a heavy trip depending on what else is on the form as well as the speed of the Internet line.
However, because this code does a standard ASP.NET postback trip, ASP.NET takes care of handling state using its ViewState mechanism. When the page renders back, the contents of the Listbox are rendered correctly and in the order requested.
You can also reproduce this functionality in the ListMover control using the same conventional manner. For the purposes of brevity I won’t reproduce it here but you can probably figure out how it goes. The Web Form would contain a couple of Listboxes along with buttons signifying a move from left-to-right and a move from right-to-left. The server-side events for these buttons would extract the selected item from one Listbox and add it to the other and vice-versa. As in the first example, ViewState would work perfectly here to maintain the items in both of the Listboxes.
The Intent
I’m not going to show you how to place all the individual controls used in the examples I just described on a Web Form; this would accomplish nothing toward reuse. As you probably guessed, I’ll show you how to encapsulate the functionality described in each of the two examples into their own Web control. I’ll show you how to encapsulate all the behavior to accomplish the necessary functionality right into each control using the same server-side event model described in the conventional approach examples. Since each control can control its own state, the Web Form containing them will not have any additional work to do except to sit back and enjoy the ride. So far so good, so where is the problem you may ask? Well, assuming page developers use these two controls on pages with a lot of content, reposting to the server anytime a reorder or a move takes place is not exactly an example of Web site efficiency. This is where a bit of JavaScript comes into the mix. You’ll use JavaScript code to access the contents of the Listbox in the EnhancedListBox control in order to perform the reordering at the client. In the ListMover control, JavaScript code will move list items from one list to another. The end effect of this will be the same but with no server trip since no postback was triggered. Cool, so you can solve the problem with instant response time and no postbacks; what’s the catch?
The Problem
ASP.NET has a very fine distinction between what happens on the server and what happens on the client. In fact, for the most part the two are very disconnected; and herein lies the problem. If you remember my last article, I told you that a Web control is simply a server-side component which renders HTML to the browser. Well, the standard ASP.NET Listbox control renders the only thing that can produce a Listbox in HTML, a <select> tag. The <option> tags within the <select> tag are created using the contents of the Items property in the Listbox control. The Items property is filled at the server and its contents help build the proper HTML during rendering. This is very similar to a Textbox Web control rendering an <input> tag and its Text property mapping to the Value attribute of the <input> tag. Every time a page postback is triggered to the server, the Listbox control’s Item property is persisted to the ViewState and rebuilt from the ViewState just before the page re-renders.
Performing the reordering in the case of the EnhancedListBox, or moving items in the case of the ListMover at server-side is pretty straightforward and allows the built-in ViewState mechanism to function normally without any interference from us But when you add the ability to perform their function using client-side JavaScript, it throws a wrench into ViewState. The control(s) did NOT go back to the server so the Items collection property was never saved, to be reloaded at re-rendering. Instead the intent is to access the <option> items in the rendered <select> tag directly at the HTML level, way after the evidence of any existence of server-side counterparts has been eliminated. Using JavaScript code you can move or reorder items in the controls to your heart’s content, but the second a postback occurs on the page, guess what happens? The control’s list items revert back to their state before the moving (or reordering) began. In fact, the point they revert to is to the last postback or the initial page request if no postback had occurred.
Remember I said that if the functionality occurs at server-side during postbacks, ViewState is saved and reloaded fine, keeping the Items collection properly filled. But since your eventual goal is to perform this functionality on the client-side, you are no longer properly adjusting the contents of the Items property, and it is this property that you’re depending on for state storage. Now you can see the dilemma. But don’t worry-I wouldn’t be writing this article if I didn’t have a solution. So let’s take this one step at a time and start by developing the controls with the necessary client-side script code to perform the functionality each needs. Then I will teach you how to resynchronize it back with the server code.
The EnhancedListBox Control
In building the two controls, I will expand on concepts and ideas I taught you in the last couple of articles.
For the first control you’ll add two things to the existing ASP.NET Listbox control. First you’ll add a heading. Hey, why not? Most of the time you probably drop a label above a Listbox anyway so you might as well build it in. Afterward you’ll add two buttons to the Listbox-one to reorder up and the other down.
For brevity, I will omit all attribute decorations from all code snippets going forward.
Create a new class and make it inherit from the Listbox control like this:
using System.Web.UI;
using System.Web.UI.WebControls;

public class EnhancedListBox : ListBox
{
}
If you compile this code as-is and add the control to your toolbox, you’ll have a fully functional replica of the ASP.NET Listbox control with no differences whatsoever from the original. I chose to develop this control as an inherited control because I want it to be a drop-in replacement for the ASP.NET Listbox control. Later I’ll add properties that will allow the visibility of the heading and/or the reorder buttons to be turned off and on. When they are all turned off, the control will appear and behave exactly as a regular Listbox control. However, you cannot add controls to it compositely using an override to CreateChildControls because that’s used to build a control hierarchy. The ASP.NET Listbox control was written as a Rendered Control and draws its entire HTML directly to the rendering engine so that is where you need to inject your stuff. You’ll build the label and the two buttons using the Rendered Control approach, and render them by overriding the Render method. However, the instant you override this method, you completely cancel out all rendering in the original Listbox, and that’s unacceptable. So I’m going to do something a bit tricky.
Code Injection
My solution will draw this control as if I created it as a standard Rendered Control including table tags and the rendering of the label and buttons I’m adding. When I get to the part of the display rendering where I want to inject the original Listbox that I inherited from, I will call the base.Render method. This will inject all the code that Microsoft wrote for the Listbox control into that section of HTML I am trying to draw (Listing 1). The properties listed in Table 1 determine appearance and behavior for this code. I won’t list the property code in this article but you can see it all in the downloadable code. Note in the code that the buttons you are rendering are set to cause a postback based on the value of a property called ReorderButtonPostback. The implementation of IPostBackEventHandler will capture this postback.
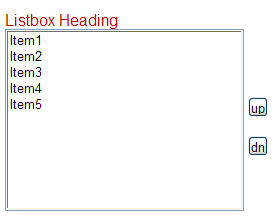
Now that the control looks the way you want (Figure 1), you can make the buttons do more than raise a postback. The finished product contains event handling code in the implementation of IPostBackEventHandler, as explained in my previous articles, so that events can be optionally raised to the server, in case a developer wants to execute further code at this point. But remember that you want to use these buttons to reorder the items in the Listbox and you want them to do it WITHOUT executing a postback. Now comes the fun part.
Adding the Client-Side Functionality
The first thing you’re going to do is actually the most straightforward part. In order to perform the reorder using client code, you obviously have to use JavaScript and attach it to the two buttons. I suggest you take this approach: Think backwards. Write the JavaScript to a rendered HTML file just like you wrote for an old fashioned pre-ASP Web page. The best way to do this is to run the control as-is, then view the source and copy the HTML code into an editor (VS.NET will do fine) and add the JavaScript. Listing 2 shows the JavaScript you need to add to your control in its raw form. This code would then need to be built by the control using a StringBuilder/StringWriter technique (Listing 3). The JavaScript code is made up of two functions that receive an HTML control (a <select> control in this case), takes the selected index and moves it up or down in the list-basically the same thing I showed you using server code at the beginning of this article. Now, it’s very important to understand where you’re adding this JavaScript code from within the Web control. In order for this JavaScript code to NOT get duplicated in the case of there being more than one EnhancedListBox control on a Web Form, you need to output it using the RegisterClientScriptBlock method from the Page.ClientScript object.
For this method to be functional, the OnInit event must call it, which you must override (Listing 4).
The last thing you need to do to get the buttons to work right is to wire the client methods you added to them. In the code in Listing 1 you saw a reference to a method called RenderButtons. Though I’m not including that code here (it’s in the downloadable code), I’ll tell you that it renders buttons using the techniques I taught in my previous article. If you look back at that article, you see that I taught you that tag attributes are “stacked” using the AddAttribute method before the actual HTML tag is rendered. You’ll use this same technique to wire the client-side methods to your buttons.
string s_MoveUp = "MoveItemUp(document.all." +
this.ClientID + ");

output.AddAttribute(
  HtmlTextWriterAttribute.Onclick, s_MoveUp);
Remember MoveItemUp is one of the JavaScript functions you already wrote. This code will stack this JavaScript command before rendering the button used for ordering up. You’ll use the same technique for the down-button. Note that I used ClientId to represent the ID of the control after rendering. In the case that this control would exist inside another composite control, this property would takes parent naming into consideration.
At this point, I want to remind you to download the finished controls as specified in the “Where to Download” sidebar, so you can see all this code properly put together into the finished product.
As the control stands now, you can use it on a Web Form successfully. You can add items to it the same way you would to a standard Listbox control. In fact, this is a complete drop-in replacement or the ASP.NET Listbox control. When you use the reorder buttons, you’ll see the items in the list change order accordingly. OK, let’s recall “the problem” now. If you drop a button on a Web form (no code needed for it) and you execute a postback, what do you think will happen? Well, exactly what I described earlier; any reorder changes you made with the reorder buttons will revert to whatever the control looked like before the last postback. So let’s fix this.
First I’ll add a little more JavaScript to the mix. Listing 5 shows this JavaScript but I’ll skip the other steps and tell you that it gets added in the OnInit method override, and built using the StringBuilder/StringWriter technique. Notice the name of the JavaScript method is BuildItemList. This function builds a string representation of the entire contents of the list box and places the string into the value property of an HTML element passed into the function. Think of this as a poor-man’s serialization of the list contents. The output style of the serialization can vary depending on your own design, but I used something from my past as specified in the “Delimiter Origins” sidebar. The call to this JavaScript function needs to get tacked on to the other code wired to the buttons.
string s_MoveUp = "MoveItemUp(document.all." +
this.ClientID + "); ";

string s_BuildItemList =
"BuildItemList(document.all." + this.ClientID +
",document.all.__" + this.ClientID + "); ";

output.AddAttribute(HtmlTextWriterAttribute.
Onclick, MoveUp + " " + BuildItemList);
Look at the two arguments you’re sending into the BuildItemList function. The first corresponds to the ID of the rendered control (the <select> tag). The second is another ID, named the same but prefaced with a “__”. This is a hidden textbox you still need to add to your Web control and it’s going to act as a place holder for the “serialized” item list. I’m going to register the hidden text field in the OnPreRender event.
protected override void OnPreRender(EventArgs e)
{
   base.OnPreRender(e);
   if(Page != null)
   {
       Page.ClientScript.RegisterHiddenField(
          "__" + this.ID, "");
   }
}
Notice that I’ve used the ID of our control to identify the hidden text field.
Where Are You So Far?
Ok, so far you have a fully functional Web control with client-side JavaScript wired into two buttons within it. The JavaScript successfully takes care of reordering the items in the Listbox and serializes the contents into a string; which it then stores in a hidden text field. All of this, I stress, is on the client-side. If a postback occurs, none of the reorder changes will keep because the Items server property of the control has not received any of the changes you made to it when reordering; but luckily you have those changes in the form of a serialized snapshot in the hidden text field. Have you painted a mental picture yet? You now have something that you can use to synchronize with the Items property. So how do you do this?
The Synchronization
To perform the synchronization upon the first postback and on every subsequent one, ASP.NET has a LoadPostData method in the implementation of the IPostBackDataHandler interface. The LoadPostData method gets called on every postback so this is where you need to do some work.
Earlier I told you that I’d explain why I’m writing these controls using ASP.NET 2.0. Besides the fact that you should already be embracing it now, ASP.NET 2.0 fixes a small oversight left out in 1.1 that makes your job here incredibly easier. The ASP.NET Listbox control already implements the IPostBackDataHandler interface in both versions (1.1 and 2.0). But in 2.0 Microsoft made the method definitions within it virtual (Overridable in VB). This means you don’t have to reimplement this interface in the EnhancedListBox control; instead you can just override the LoadPostData method. More importantly, this also means you can access the base implementation and not have to reproduce all that functionality in your extended control. What functionality you ask? Everything Microsoft put in there to handle the Items collection, the SelectedIndex, SelectedValue, and SelectedItem properties, and a whole other slew of code to perfect the functionality of the Listbox control. In ASP.NET 1.1 you would have to implement this interface in your derived control and provide your own code for the two methods defined, covering not only your own additions but also repeating everything that Microsoft already did in their control. This would be an incredible amount of work and would not only quadruple the length of this article, but would drive my hands into yet another stage of carpal-tunnel syndrome.
I guess someone in Redmond saw the error in their ways and made the methods virtual so developers can have access to Microsoft’s base code. So that’s exactly what I’m going to show you how to do now, override the LoadPostData method (Listing 6). In this override, you’ll call the base implementation first so you can get Microsoft’s code properly executed and not mess anything up that they intended for the Listbox control. You’ll then add the code you need to synch up the Items collection.
Alternatively, you could leverage the ListBox control by writing this as a composite control. In that case you would need to map out every property in the ListBox to your EnhancedListBox in order to make it a drop-in replacement for the ListBox. Either this way, or in the recreation of the LoadPostData method, you would still need to write a lot of code. If I needed to write this control specifically for ASP.NET 1.1, I would most likely take the most straightforward solution, the composite control solution.
As I explained in my last article, the LoadPostData method gives you access to every field posted to the server, including your hidden text field. This is stored in the postCollection argument passed into this method. If you wondered why you needed the hidden text field instead of accessing the posted <select> element using this argument, I’ll tell you why. Think back to the classic ASP days when you used Request.Form to access page fields. The only part of a <select> element you had access to at posting was the selected item. In the solution I’m teaching you, you need the entire contents of the list, hence the hidden text field. Listing 6 shows how to parse out the contents of the hidden text field and re-add the items into the Items collection. There’s also code there to hang on to what the selected index was before you cleared out the Items collection so you can reset it later. Note how you’re calling the base implementation first.
Finally you have to build the hidden text field the first time you render your control, in case the page postbacks before any attempts at reordering take place. The last line of the Render method will be:
output.Write(
   "<script language='javascript'>
    BuildItemList(document.all." + this.ClientID +
   ",document.all.__" + this.ClientID +
   ");</script>");
You can see this at the end of Listing 1.
All Synched-Up but More Places to Go
Tired of my pathetic attempt at catchphrases yet? Oh good, because I have plenty more.
You can now use the EnhancedListBox control to reorder some items, postback, and be sure that before the page is re-rendered back, the control’s server storage will be completely synchronized with the client storage that was altered at the client side. So now let’s use these same techniques and build a composite control called ListMover.
The ListMover Control
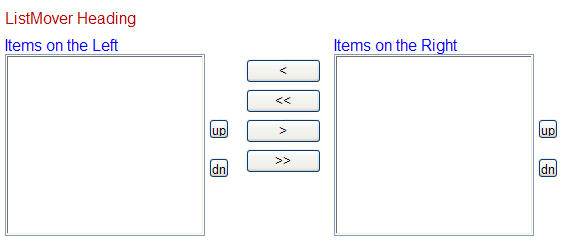
The ListMover control will contain two EnhancedListBox controls plus a few buttons used to move items back and forth between the two lists. Using the composite control building techniques I taught you in my last article, you’ll learn to create child controls and render them using some surrounding HTML so that your final control looks like Figure 2. What’s important to understand in this control is where certain things have to take place.

First of all, you have to add the JavaScript you need for this control in the override for the OnInit event using the same techniques used in the previous control. Listing 7 shows the JavaScript code you’ll need. Like you did in the last control, you’ll use JavaScript to access elements from a Listbox(<select> element) and in this case, move them over. As you can see, I’ve provided functions for adding items to a list, removing items from a list, as well as adding all and removing all from a list. I’ve separated the functionality instead of having single “move” methods so that I can make the removal of items from a list optional based on property settings. I think this gives the final control a bit more robustness but I won’t walk through the code in this article. Also note I have added a BuildItemList method as in the previous control.
Now you need to wire this client code into the buttons of the composite control. You’ll do this at the end of the CreateChildControls method where you initialized the child controls and built the Controls collection. I’ll show you the code for one of the buttons but the others work the same way (don’t forget to download the code).
string s_AddToLeft =
"AddSelectedItemToList(document.all." +
this.lstItemsOnRight.ClientID + ", document.all."
+ this.lstItemsOnLeft.ClientID + ", " +
(this.AllowDuplicatesOnLeft ? "true" : "false") +
"); ";

string s_RemoveFromRight =
"RemoveSelectedItemFromList(document.all." +
this.lstItemsOnRight.ClientID + "); ";

string s_BuildItemList =
"BuildItemList(document.all." +
this.lstItemsOnRight.ClientID + ",
document.all.__" + lstItemsOnRight.ClientID + ");
" + "BuildItemList(document.all." +
this.lstItemsOnLeft.ClientID + ", document.all.__"
+ lstItemsOnLeft.ClientID + "); ";

this.btnAdd.Attributes.Add("onclick", s_AddToLeft
+ " " + s_RemoveFromRight + " " + s_BuildItemList
+ " return false");
Note that I’m doing the same thing I did in the previous control. I’m building the JavaScript function calls into a string and attaching them to a button. The main difference is that since this is a composite control containing other controls, you can use the Attributes.Add method of adding code to the onclick event as opposed to putting it in the stack as in a rendered control. Notice too that I placed more than one function in the onclick attribute. Also note that the end of the function calls return false in order to cancel whatever postback the button would execute.
Finally, the code will make the initial call to the client function BuildItemList in an override to the Render method. This looks just like the one I walked you through in the EnhancedListBox control so I won’t repeat it here. In this control I registered two hidden text fields, one for each Listbox.
protected override void OnPreRender(EventArgs e)
{
   base.OnPreRender(e);
   if(Page != null)
   {
          Page.ClientScript.RegisterHiddenField(
          "__" + this.lstItemsOnRight.ClientID,
          "");

          Page.ClientScript.RegisterHiddenField(
          "__" + this.lstItemsOnLeft.ClientID,
          "");

          Page.RegisterRequiresPostBack(this);
   }
}
So you’ve built the composite control, provided some client-side JavaScript, and wired it into the buttons. As before, you can drop it on a form and use it; but it will suffer from the problem you had with the first control before you added the synchronization code. You can move items back and forth all you want but as soon as you initiate a postback (with any other control on the form) the control will revert back to its pre-postback state.
To fix this problem you’ll pretty much do the same kind of thing you did in the first control. However, since you are programming a composite control, not extending an already existing control, you need to implement the IPostBackDataHandler interface and provide implementation for the LoadPostData and RaisePostDataChangedEvent methods. The implementation here (Listing 7) is almost identical to that of the previous control except you’ll synchronize the Items collections of two EnhancedListBox controls instead of just one. And as before, you need to make sure you save your SelectedIndex locations so you can set them back after you synch up the Items collection. Also note that in the first control you were overriding the LoadPostData method of the base control so at one point you called its base, Since you’ll write a composite control from scratch there is no base to call and you simply need to provide the method’s implementation.
The final version of this control contains several properties that add functionality including properties that determine whether the items added to one list will be removed from the other, and if a list will allow duplicate items. It also contains extensive styling for maximum reuse. In my “Custom Web Controls Demystified” article I stated that in custom control development, the more properties and styling you add to your controls, the larger your use-market will be and the more sites it can be integrated into.
That’s about it. You’ve used hidden text fields, available from client-side script, to store the state of the list boxes, also available to use from client-side script. During the postbacks you used the contents of the hidden text fields to resynchronize with the server-side Items collection. The end result is a nice composite control that allows you to move list items back and forth with no server postback, yet keeps the changes made when a postback does occur.
Best of Both Worlds
One thing I didn’t touch with too much specificity before is why I mixed the controls in this article. I started by enhancing a standard ListBox control then used two instances of this enhanced control in the ListMover control; I did not build ListMover with two standard ListBox controls. One part of the ListMover control I left out of this article is the properties that will map to the properties that were added to the EnhancedListBox control. This way I can control the enhanced functionality of the two EnhancedListBox controls from the ListMover control that contains them. So you can see that you have the best of both worlds here-you have a ListMover control that allows you to move list items between the two lists or you could reorder each list. The real beauty here is something I mentioned in previous articles as one key benefit of Web control-oriented ASP.NET development-total encapsulation. The EnhancedListBox control contains all the code it needs to accomplish its goals-the reordering of its items. When I included two of them in the ListMover control, I got all the intelligence that came with them as extra functionality for the new control, including the client-side scripting each control includes and the client-to-server synchronization gave the EnhancedListBox control without having to worry about it in the ListMover control. The ListMover control simply had to worry about its own functionality. Figure 3 shows the ListMover control with the EnhancedListBox control’s reorder buttons turned on.
I strongly encourage you to download the complete code for both these controls from http://www.dotnetdude.com. Nothing compares to looking at a complete working product to fully understand its intricacies. Since I wrote these controls, I’ve used the ListMover quite a bit, not to mention a lot of downloads, and the EnhancedListBox control has pretty much replaced the standard ASP.NET ListBox in all my projects.
Conclusion
The techniques I used in this article demonstrate how to keep the server and client synchronized within a Web control and can be applied to many similar situations. While ASP.NET 2.0 introduces an intuitive interface for handling script callbacks, keeping functionality completely on the client remains the fastest solution and is compatible with ASP.NET 1.1 as well. I am, however, a big fan of the callback capabilities built into ASP.NET 2.0 and will cover them in future articles.
