


In my last article, Process XML Files Easily Using .NET 6/7, I showed you how to read and write XML files using LINQ to XML. Sometimes you might want to take a C# object and store it on disk or into a table in a database. If this is the case, you can use XML serialization to accomplish it. In this article, you're going to learn the many ways to serialize and deserialize C# objects to and from memory and disk. Along the way, you're going to create some classes with extension methods to simplify the serialization process.
What Is Serialization?
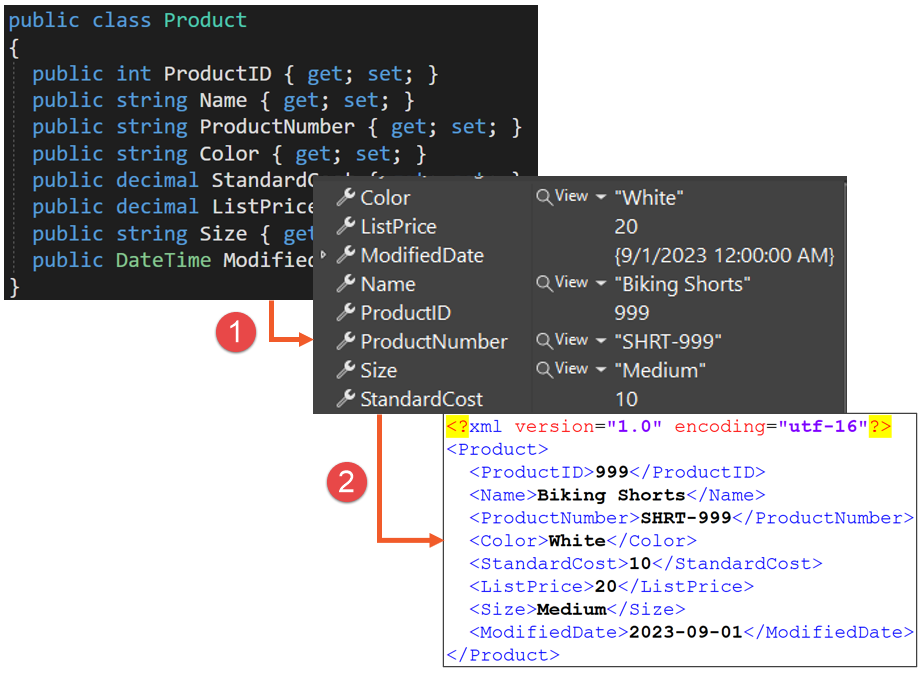
Serialization is the process of converting an object into a form that can be easily transported or stored. Figure 1 shows a Product class with data filled in at runtime (#1) that's then serialized into an XML document (#2).
There are different reasons you might want to serialize an object. Web API calls are probably the most common use for serializing an object. You take all the data in a C# object, serialize it into XML or JSON, and send it to a client so it can present that data on their UI. Configuration settings for an application are frequently stored as XML or JSON. It's very convenient to deserialize this data into a C# object in your application, so you don't need to read the data from raw XML or JSON line-by-line. If you frequently use a set of data such as U.S. state codes or employee types in an application, store this set of data in an XML file on the local disk. It's generally quicker to read and deserialize this data into C# objects from disk rather than making a call to a database across your network.
How to Serialize a C# Object
The XmlSerializer class is the .NET class most often used to perform serialization and deserialization of C# objects. This class is located within the System.Xml.Serialization namespace. Once you have a C# object with data, call the Serialize() method on the XmlSerialize class, passing in a stream object and the object to serialize. The C# object is then serialized to XML and placed into the stream. If the stream object is a memory stream, you now have an XML string in memory. If the stream object is a file writing stream, the XML is stored on disk in a file.
Rules of XML Serialization
There are some rules for the C# object you are trying to serialize. The class must have a parameter-less constructor. You must have public properties and/or fields to be serialized. No private properties or methods are serialized. The data serialized contains the name of the public properties and the data, no data type information or assembly information is included in the resulting XML.
Serialize an Object to XML
Let's get started looking at a sample of serializing a Product object into XML. I highly recommend you follow along as you read through this article as I'm providing you with step-by-step instructions. The first thing is to startup Visual Studio or VS Code and create a new Console Application using .NET 6 or later. Set the Name of this new console application to XmlSerialization.
Create a Product Class
Right mouse-click on the console application project and add a new class named Product and type in the code shown in Listing 1. This class has some integer, string, decimal, and DateTime data types. It's good to see how each of the different data types are serialized from C# to XML. I added a static method to the Product class to populate a mock product object with sample data to serialize.
Listing 1: Create a Product entity class to load nodes from the XML file.
using System.Text;

namespace XmlProcessing;

public class Product
{
  public int ProductID { get; set; }
  public string Name { get; set; } = string.Empty;
  public string ProductNumber { get; set; } = string.Empty;
  public string Color { get; set; } = string.Empty;
  public decimal StandardCost { get; set; }
  public decimal ListPrice { get; set; }
  public string Size { get; set; } = string.Empty;
  public DateTime ModifiedDate { get; set; }

  #region Static Method to Create a Mock Product
  public static Product CreateMock()
  {
    // Create an Object
    return new() {
      ProductID = 999,
      Name = "Mock Product",
      ProductNumber = "MOCK-001",
      Color = "White",
      StandardCost = 10,
      ListPrice = 20,
      Size = "Medium",
      ModifiedDate = DateTime.Now
    };
  }
  #endregion

  #region ToString Override
  public override string ToString()
  {
      return $@"
          {Name} ID: {ProductID}
          Color: {Color ?? "n/a"}
          Size: {Size ??  "n/a"}
          Cost: {StandardCost:c}
          Price: {ListPrice:c}
       ";
  }
  #endregion
}
Serialize a Product Using a StringWriter
To serialize a C# object such as a Product, create an instance of a Product object and fill it with data. In Listing 2, the entity variable of the type Product is created by calling the static CreateMock() method on the Product class. Create an instance of an XmlSerializer object, passing to its constructor the type of the entity variable. A stream object is required to serialize the Product object into, so a StringWriter object is created. Finally, call the Serialize() method on the instance of the XmlSerializer object, passing in the StringWriter object and the Product object. Display the XML by calling the ToString() method on the StringWriter object and pass the result to the Console.WriteLine() method.
Listing 2: Use the XmlSerializer class to serialize a C# object into XML.
using System.Xml.Serialization;
using XmlSerialization;

// Create an Object
Product entity = Product.CreateMock();

// Create XML Serializer
XmlSerializer serializer = new(entity.GetType());

// Create a StringWriter
using StringWriter sw = new();

// Serialize the object into the StringWriter
serializer.Serialize(sw, entity);

// Display the XML
Console.WriteLine(sw.ToString());
Try It Out
Open the Program.cs file and replace the entire contents of this file with the code in Listing 2. Run the application and you should see XML that looks like the following.
<?xml version="1.0" encoding="utf-16"?>
<Product xmlns:xsi="http://www.w3.org/..."
  xmlns:xsd="http://www.w3.org/...">
    <ProductID>999</ProductID>
    <Name>Biking Shorts</Name>
    <ProductNumber>SHRT-999</ProductNumber>
    <Color>White</Color>
    <StandardCost>10</StandardCost>
    <ListPrice>20</ListPrice>
    <Size>Medium</Size>
    <ModifiedDate>2023-09-01</ModifiedDate>
</Product>
Write the XML to a File
Once you have the XML string in memory, call the File.WriteAllText() method to save the data to a file. Pass in the file name to write to, the XML string, and System.Text.Encoding.Unicode to the WriteAllText() method. Write your XML files in Unicode format to be the most compatible among systems today. Listing 3 creates a variable named XmlFileName into which is placed the path My Documents\ProductSerialized.xml on your local computer. The rest of code to perform the serialization is the same, except for creating a new string variable, xml, which is then written to the file, and displayed in the console window.
Listing 3: Write a serialized C# object to an XML file.
using System.Xml.Serialization;
using XmlSerialization;

string XmlFileName = @$"{Environment.GetFolderPath(
    Environment.SpecialFolder.MyDocuments)}\Product.xml";

// Create an Object
Product entity = Product.CreateMock();

// Create XML Serializer
XmlSerializer serializer = new(entity.GetType());

// Create a StringWriter
using StringWriter sw = new();

// Serialize the object into the StringWriter
serializer.Serialize(sw, entity);

// Put the XML into a string variable
string xml = sw.ToString();

// Write XML to a File
File.WriteAllText(XmlFileName, xml, System.Text.Encoding.Unicode);

// Display the XML
Console.WriteLine(xml);
Console.WriteLine($"View the XML in '{XmlFileName}'");
Please note that due to formatting constraints of the printed magazine, I frequently break the C# verbatim literal strings for the XmlFileName variable across two lines. When you type them into your editor, make sure you put this file name all on one line. This also goes for any C# literal strings within Console.WriteLine() method calls.
Try It Out
Open the Program.cs file and replace the entire contents of this file with the code shown in Listing 3. Run the application and you should see XML appear in the console window. Open Windows Explorer and navigate to your My Documents folder and find the ProductSerialized.xml file. Open the file and view what's stored in the file.
Use a StreamWriter to Write to a File
If you don't need a string variable and you wish to write directly to a file, you can use a StreamWriter, as shown in Listing 4. Instead of StringWriter stream, an instance of a StreamWriter is created and three arguments are passed to the constructor. The first argument is the name of the file to write to, contained in the variable XmlFileName. The second argument is set to false as you want to overwrite the file name each time you serialize into this file. If you pass a true value, the serialized object is appended to the end of the file. The last parameter passed to the constructor is how you wish the string to be encoded. The default is UTF-8, which may have been fine 20 years ago, but today this should be set to UTF-16, which is represented by the enumeration System.Text.Encoding.Unicode. When you call the Serialize() method passing in the StreamWriter object, the file is immediately written with the XML serialized from the Product object.
Listing 4: Write a serialized C# object to an XML file using a StreamWriter object.
using System.Xml.Serialization;
using XmlSerialization;

string XmlFileName = @$"{Environment.GetFolderPath(
    Environment.SpecialFolder.MyDocuments)}\Product.xml";

// Create an Object
Product entity = Product.CreateMock();

// Create XML Serializer
XmlSerializer serializer = new(entity.GetType());

// Create a StreamWriter to write object into
using StreamWriter sw = new(XmlFileName, false, System.Text.Encoding.Unicode);

// Serialize the object into the StreamWriter
serializer.Serialize(sw, entity);

Console.WriteLine($"View the XML in '{XmlFileName}'");
Try It Out
Open the Program.cs file and replace the entire contents of this file with the code in Listing 4. Run the application and you should see a message appear that the file ProductsSerialized.xml has been written in to your My Documents folder. Open Windows Explorer and navigate to your My Document folder to view the XML file that has been written. You should see that the encoding for the XML document has been set to UTF-16.
Controlling the XML Serialization Process
Notice that all the XML written by the serialization process has been nicely formatted and there's an XML declaration. Sometimes, you may not want the document formatted, or you might want to omit the XML declaration. If this is the case, you need to create an instance of an XmlWritterSettings object and set the Indent property to false, and the OmitXmlDeclaration property to true. There are many other properties you can set as well to control how the XML is formatted.
In the code shown in Listing 5, create an instance of the XmlWriterSettings class prior to calling the Serialize() method. Set any of the appropriate properties to make the XML format the way you want. Create an instance of an XmlWriter class using the static Create() method. To the Create() method, pass in the stream object and the instance of the XmlWriterSettings class. Now you pass to the Serialize() method the instance of the XmlWriter along with the object to serialize. The serialization process now uses the properties set in the XmlWriterSettings object to format the serialized object.
Listing 5: Control the XML serialization process using an XmlWriterSettings object.
using System.Xml;
using System.Xml.Serialization;
using XmlSerialization;

string XmlFileName = @$"{Environment.GetFolderPath(
    Environment.SpecialFolder.MyDocuments)}\ProductNoFormatting.xml";

// Create an Object
Product entity = Product.CreateMock();

// Create XML Serializer
XmlSerializer serializer = new(entity.GetType());

// Create a StreamWriter to write object into
using StreamWriter sw = new(XmlFileName, false, System.Text.Encoding.Unicode);

// Create a XmlWriterSettings object
XmlWriterSettings options = new() {
   Indent = false,
   OmitXmlDeclaration = true
};

// Use an XmlWriter to format the XML
using XmlWriter xw = XmlWriter.Create(sw, options);

// Serialize the object to the StreamWriter
serializer.Serialize(xw, entity);

Console.WriteLine($"View the XML in '{XmlFileName}'");
Try It Out
Open the Program.cs file and replace the entire contents of this file with the code shown in Listing 5. Run the application and you should see a message appear that the file ProductNoFormatting.xml has been written in to your My Documents folder. Open the ProductNoFormatting.xml file and you should see that the XML declaration is missing and there is no indentation of the XML elements.
Deserialize XML to an Object
Let's now read an XML file (Listing 6) and convert the XML within that file into a Product object. Create a StreamReader object passing to the constructor the full path and file name to read. Next, pass the encoding used to serialize the XML in that file. Apply the Deserialize() method to the XmlSerializer object passing in the StreamReader object. The Deserialize() method reads the file and creates an instance of a Product class from the contents of the XML.
Listing 6: Use the XmlSerializer and the StreamReader classes to deserialize XML into a C# object.
using System.Xml.Serialization;
using XmlSerialization;

string XmlFileName =  @$"{Environment.GetFolderPath(
    Environment.SpecialFolder.MyDocuments)}\Product.xml";

Product? entity = null;

// Create XML Serializer
XmlSerializer serializer = new(typeof(Product));

// Read XML from a file
StreamReader sr = new(XmlFileName, System.Text.Encoding.Unicode);

// Deserialize XML to an object
entity = (Product?)serializer.Deserialize(sr);

if (entity != null) {
    // Display C# Object
    Console.WriteLine(entity);
}
Try It Out
Open the Program.cs file and replace the entire contents of this file with the code shown in Listing 6. Run the application and you should see the following appear in the console window. This output is the result of calling the ToString() method defined in the Product class.
Mock Product
    ID: 999
   Color: White
   Size: Medium
   Cost: $10.00
   Price: $20.00
Simplify XML Serialization
The code to serialize an object is not that difficult or long, but creating a generic extension method to perform the serialization and deserialization process can simplify the code even further. Right mouse-click on your console application and create a class named XmlSerializationHelper, as shown in Listing 7.
Listing 7: Create two extension methods to generically serialize and deserialize any object.
using System.Xml;
using System.Xml.Serialization;

namespace XmlSerialization;

/// <summary>
/// Extension methods to
/// serialize C# objects to XML and
/// deserialize XML into to C# objects
/// </summary>
public static class XmlSerializerHelper
{
    #region Serialize<T> Method
    public static string Serialize<T>(this T entity)
    {
        return Serialize<T>(entity, null);
    }

  public static string Serialize<T>
    (this T entity, XmlSerializerNamespaces? ns)
  {
      string ret = string.Empty;

      if (entity != null) {
          // Create XML Serializer
          XmlSerializer serializer = new(typeof(T));
          // Create a StringWriter to write into
          using StringWriter sw = new();
          // Create a XmlWriterSettings object
          // and add option to Indent
          XmlWriterSettings options = new() {
              Indent = true
          };

          // Use an XmlWriter to format the XML
          using XmlWriter xw = XmlWriter.Create(sw, options);
          // Serialize the object
          serializer.Serialize(xw, entity, ns);
          // Get the XML
          ret = sw.ToString();
      }

      return ret;
  }
  #endregion

  #region Deserialize<T> Method
  public static T? Deserialize<T>
    (this T _, string xml) where T : class
  {
      var ret = default(T);

      if (!string.IsNullOrEmpty(xml)) {
          // Create XML Serializer
          XmlSerializer serializer = new(typeof(T));
          // Create a StringReader with the XML
          using StringReader sr = new(xml);
          // Deserialize the XML into a C# object
          ret = (T?)serializer.Deserialize(sr);
      }

      return ret;
  }
  #endregion
}
This class has two overloaded Serialize() methods that can attach to any kind of object. The first method has no parameters being passed in. The second method accepts an instance of a XmlSerializerNamespaces class. This class is used if you wish to add any namespaces to your XML when serializing. You are going to learn more about working with namespaces later in this article. If you look at the code in the second Serialize() method, you can see that's almost exactly like the code you wrote earlier.
Within this XmlSerializationHelper class, there's also a single Deserialize() extension method. To this method, pass in an XML string, and it deserializes that XML into the type of object you pass in as T. Both these methods serialize to a memory stream. If you wish to write to a file, you need to do that either before or after calling these methods. If you want, you can add a couple more methods to this class to work with storing and retrieving from a file.
Serialize Product Using Extension Method
Open the Program.cs file and replace the entire contents of this file with the code shown in Listing 8. In this code, you create an instance of a Product object using the static method CreateMock(). Once you have a valid object, call the Serialize() method passing the type parameter, Product. This method returns a string of the object serialized as XML. You then have the option of writing it to a file as I have written in this code. As you can see, this code is greatly reduced from the amount you wrote before.
Listing 8: The Serialize extension method is now available on any C# object.
using XmlSerialization;

string XmlFileName = @$"{Environment.GetFolderPath(
    Environment.SpecialFolder.MyDocuments)}\Product.xml";

// Create an Object
Product entity = Product.CreateMock();

// Serialize the Object
string xml = entity.Serialize<Product>();

// Write XML to File
File.WriteAllText(XmlFileName, xml, System.Text.Encoding.Unicode);

// Display the XML
Console.WriteLine(xml);
Console.WriteLine($"View the XML in '{XmlFileName}'");
Try It Out
Run the application and you should see the XML appear in the console window. You can also open the Product.xml file to see the serialized Product object as XML.
Deserialize a Product Using Extension Method
To use the extension method, Deserialize(), first create an instance of a Product object and place it into the entity variable (Listing 9). Read in the XML from a file then call the Deserialize() method passing the type parameter Product and the XML read from the file. The Deserialize() method returns a Product object with the data filled in from the XML.
Listing 9: The Deserialize() extension method can be used on any C# object.
using XmlSerialization;

string XmlFileName = @$"{Environment.GetFolderPath(
    Environment.SpecialFolder.MyDocuments)}\Product.xml";

Product? entity = new();

// Read XML from a file
string xml = File.ReadAllText(XmlFileName);

// Deserialize XML to an object
entity = entity.Deserialize<Product>(xml);

if (entity != null) {
  // Display Object
  Console.WriteLine(entity);
}
Try It Out
Open the Program.cs file and replace the entire contents of this file with the code shown in Listing 9. Run the application and you should see the output from the ToString() method of the Product class.
Mock Product  ID: 999
   Color: White   Size: Medium
   Cost: $10.00   Price: $20.00
C# XML Attributes to Control Serialization
When serializing a C# object to XML, you may wish to control how the XML will get written. For example, you may have some properties that you don't want to be serialized into the XML, such as a Password property. You may want some properties to be written as attributes instead of elements. Some properties you may want to change the name of when they're written as elements or attributes. All of these things, and more, can be accomplished by using the set of [Xml*] attributes from the System.Xml.Serialization namespace.
Create a ProductWithAttributes Class
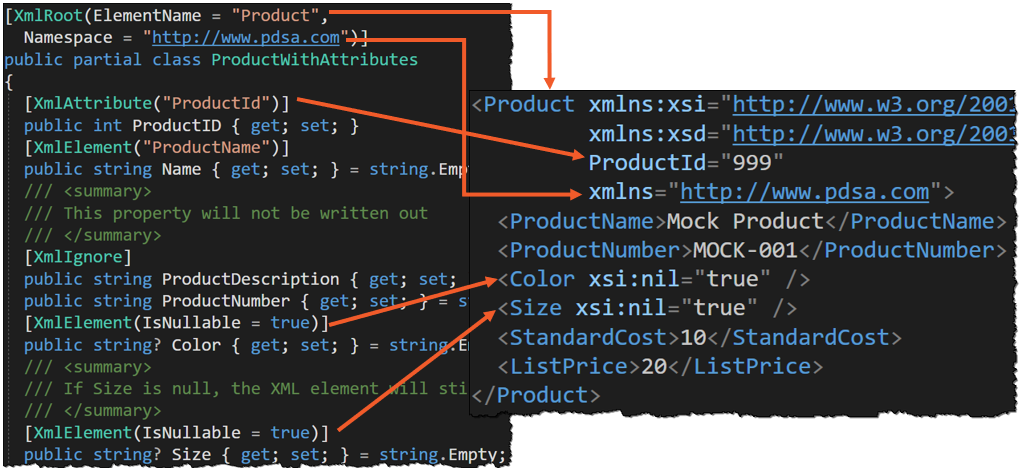
Right mouse-click on the console application project and add a new class named ProductWithAttributes. Replace the entire contents of this new file with the code shown in Listing 10. The first attribute is [XmlRoot], which is applied to the class and controls what the root node name is going to be. Included in this attribute is a Namespace property that lets you add an XML namespace to the root node. Next, you have an [XmlAttribute] attribute that writes the ProductID property as an attribute instead of an element. Optionally, you can pass in the attribute name you want it to serialize the property as. In this case, the ProductID property becomes ProductId when serialized. Notice that the letter D is changed from an upper-case to a lower-case letter.
Listing 10: A product class decorated with C# attributes to control XML serialization.
using System.Text;
using System.Xml.Serialization;

/// <summary>
/// Using the [Xml*] attributes
/// </summary>
[XmlRoot(ElementName = "Product",
         Namespace = "http://www.pdsa.com",
         IsNullable = false)]
public partial class ProductWithAttributes
{
  [XmlAttribute("ProductId")]
  public int ProductID { get; set; }

  [XmlElement("ProductName")]
  public string Name { get; set; } = string.Empty;
  public string ProductNumber { get; set; } = string.Empty;
  [XmlElement(IsNullable = true)]
  public string? Color { get; set; } = string.Empty;
  public decimal StandardCost { get; set; }
  public decimal ListPrice { get; set; }

  /// <summary>
  /// If Size is null, the XML element
  /// will still appear
  /// </summary>
  [XmlElement(IsNullable = true)]
  public string? Size { get; set; } = string.Empty;

  /// <summary>
  /// This property will not be written out
  /// </summary>
  [XmlIgnore]
  public string ProductDescription { get; set; } = string.Empty;

  #region Static Method to Create a Mock Product
  public static ProductWithAttributes CreateMock()
  {
      // Create an Object
      return new() {
          ProductID = 999,
          Name = "Mock Product",
          ProductNumber = "MOCK-001",
          Color = "White",
          StandardCost = 10,
          ListPrice = 20,
          Size = "Medium"
      };
  }
  #endregion

  #region ToString Override
  public override string ToString()
  {
    StringBuilder sb = new(1024);

    sb.AppendLine($"{Name}  ID: {ProductID}");
    sb.AppendLine($"Color: {Color ?? "n/a"} Size: {Size ?? "n/a"}");
    sb.AppendLine($"Cost: {StandardCost:c}  Price: {ListPrice:c}");

    return sb.ToString();
  }
  #endregion
}
The default for serialization is element-based XML, but you can still apply an [XmlElement] attribute and specify a different name for a property. In this case, the property Name is serialized as ProductName. There's a ProductDescription property, but in the resulting XML, you won't find this element because of the [XmlIgnore] attribute applied to this property. Both the Color and Size properties are defined as nullable strings. If the [XmlElement(IsNullable = true)] attribute is applied to Color, and the color value is set to a null value, the element is still written into the XML, with a value set to nil. If this attribute is NOT applied to a property and the value of that property is null, the entire property is not written into the XML.
Serialize a Product with XML Attributes
Open the Program.cs file and replace the entire contents of this file with the code shown in Listing 11. In this code, create an instance of the ProductWithAttributes class and set the ProductDescription property to A description. Set the Color and Size property values to null. Next, call the Serialize() method to generate the XML.
Listing 11: Applying XML attributes to a class helps you control how the object is serialized.
using XmlSerialization;

string XmlFileName = @$"{Environment.GetFolderPath(
    Environment.SpecialFolder.MyDocuments)}\ProductWithAttributes.xml";

// Create an Object
ProductWithAttributes entity = ProductWithAttributes.CreateMock();
entity.ProductDescription = "A description";
entity.Color = null;
entity.Size = null;

// Serialize the Object
string xml = entity.Serialize<ProductWithAttributes>();

// Write XML to File
File.WriteAllText(XmlFileName, xml, System.Text.Encoding.Unicode);

// Display the XML
Console.WriteLine(xml);
Console.WriteLine($"View the XML in '{XmlFileName}'");
Try It Out
Run the application and you should see the XML displayed in the console window. Figure 2 shows you how each of the XML attributes affect the resulting XML output.
Deserialize a Product with XML Attributes
To deserialize the XML generated from the previous code, write the same code as shown in Listing 9, just change the file name.
Generate Attribute-Based XML Instead of Element-Based
By default, the XmlSerializer generates all properties as elements. You can change this by attaching the [XmlAttribute] attribute to all properties on your classes as shown in Listing 12. Open the Program.cs file and replace the entire contents of the file with the code shown in Listing 8. Change the XmlFileName variable to use a file name of ProductAttributes.xml.
Listing 12: Apply an [XmlAttribute] attribute to all properties to serialize as attribute-based XML.
using System.Xml.Serialization;

namespace XmlSerialization;

public class ProductAttributeBased
{
  [XmlAttribute("ProductID")]
  public int ProductID { get; set; }
  [XmlAttribute]
  public string Name { get; set; } = string.Empty;
  [XmlAttribute]
  public string ProductNumber { get; set; } = string.Empty;
  [XmlAttribute]
  public string Color { get; set; } = string.Empty;
  [XmlAttribute]
  public decimal StandardCost { get; set; }
  [XmlAttribute]
  public decimal ListPrice { get; set; }
  [XmlAttribute]
  public string Size { get; set; } = string.Empty;
  [XmlAttribute]
  public DateTime ModifiedDate { get; set; }

  #region Static Method to Create a Mock Product
  public static ProductAttributeBased CreateMock()
  {
      // Create an Object
      return new() {
          ProductID = 999,
          Name = "Mock Product",
          ProductNumber = "MOCK-001",
          Color = "White",
          StandardCost = 10,
          ListPrice = 20,
          Size = "Medium",
          ModifiedDate = DateTime.Now
      };
  }
  #endregion

  #region ToString Override
  public override string ToString()
  {
      return $@"
          {Name} ID: {ProductID}
          Color: {Color ?? "n/a"}
          Size: {Size ?? "n/a"}
          Cost: {StandardCost:c}
          Price: {ListPrice:c}";
  }
  #endregion
}
Try It Out
Run the application and the console window displays the attribute-based XML. You can also open the ProductAttributes.xml file to view the attribute-based XML.
Nested Objects
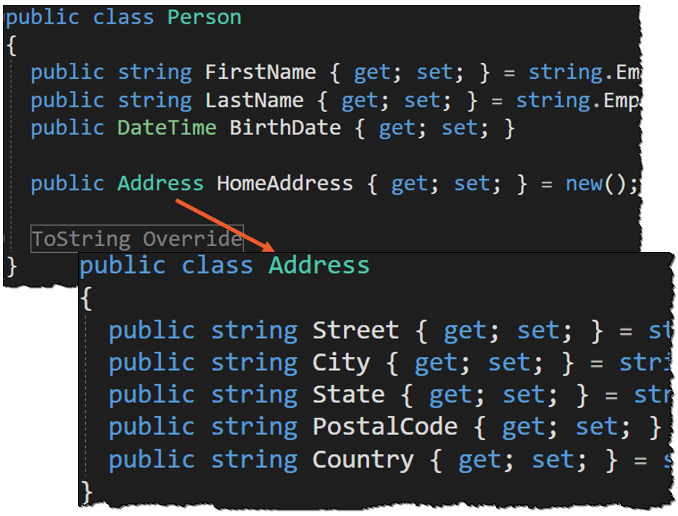
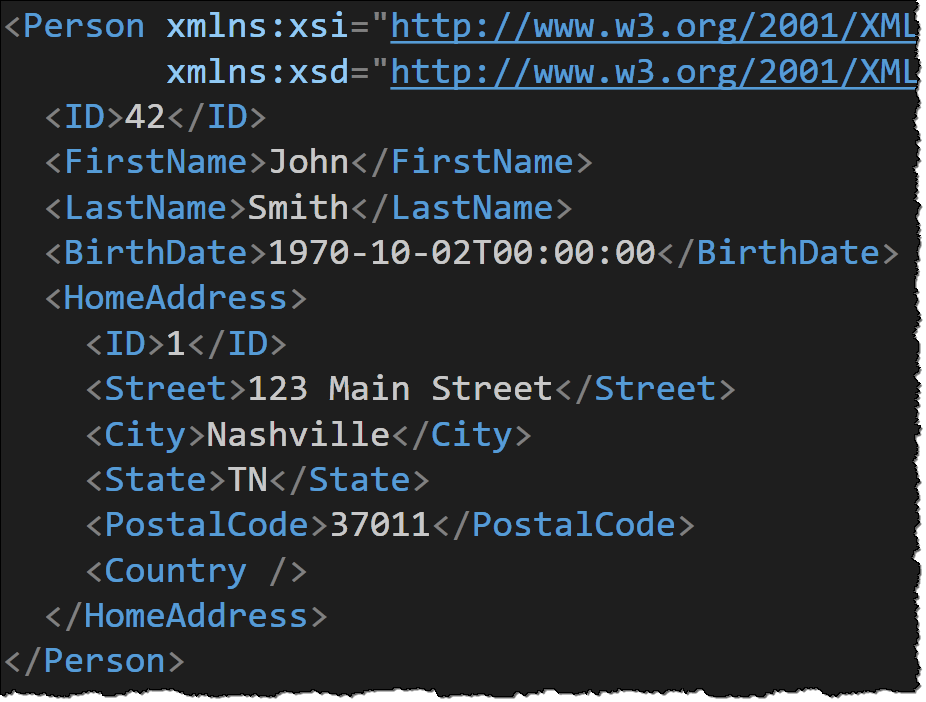
If you have a class that contains a property that's a reference to another object, the serializer can express this relationship as XML. Look at Figure 3 and you see a Person class that has a HomeAddress property that's an instance of the Address type. If you create an instance of a Person and fill in the HomeAddress property with an instance of an Address class, this relationship is converted to XML as shown in Figure 4.
Create an Address Class
Right mouse-click on the console application project and add a new class named Address. Replace the entire contents of this new file with the code shown below.
namespace XmlSerialization;
public class Address {
    public int ID { get; set; }
    public string Street { get; set; } = string.Empty;
    public string City { get; set; } = string.Empty;
    public string State { get; set; } = string.Empty;
    public string PostalCode { get; set; } = string.Empty;
  public string Country { get; set; }
    = string.Empty;
}
Create a Person Class
Right mouse-click on the console application project and add a new class named Person. Replace the entire contents of this new file with the code shown in Listing 13. Open the Program.cs file and replace the entire contents of the file with the code shown in Listing 14. This code creates an instance of a Person in a variable named entity and fills in the FirstName, LastName, and BirthDate properties with data. It then sets the HomeAddress property to a new instance of an Address class and fills in the appropriate properties in this object.
Listing 13: Create a Person class that contains an Address object.
namespace XmlSerialization;

public class Person
{
  public int ID { get; set; }
  public string FirstName { get; set; } = string.Empty;
  public string LastName { get; set; } = string.Empty;
  public DateTime BirthDate { get; set; }
  public Address HomeAddress { get; set; } = new();

  #region ToString Override
  public override string ToString()
  {
      return $@"[Person] Class
      Name: {LastName}, {FirstName}";
  }
  #endregion
}
Listing 14: Create a nested object to view how it is serialized into XML.
using XmlSerialization;

// Create an Object
Person entity = new() {
    ID = 42,
    FirstName = "John",
    LastName = "Smith",
    BirthDate = Convert.ToDateTime("10/2/1970"),
    HomeAddress = new Address() {
        ID = 1,
        Street = "123 Main Street",
        City = "Nashville",
        State = "TN",
        PostalCode = "37011"
    }
};

// Serialize the Object
string xml = entity.Serialize<Person>();

// Display the XML
Console.WriteLine(xml);
Try It Out
Run the application and you should see the serialized XML appears as that shown in Figure 4.
Nested List
If you have a class that has a property defined as a List<T>, you want each element within this list to also be serialized into XML. Once again, the XmlSerializer class performs this serialization for you automatically. Look at Figure 5, where you can see an Employee class that inherits from the Person class and adds a couple of properties. The Supervisor class inherits from the Employee class, and it contains a property named Employees that contains a generic list of Employee objects. Let's create these classes in the console application.

Create Employee Class
Right mouse-click on the console application project and add a new class named Employee. Replace the entire contents of this new file with the code shown in Listing 15.
Listing 15: Create an Employee class that inherits from the Person class.
namespace XmlSerialization;

public class Employee : Person
{
    public decimal Salary { get; set; }

    #region ToString Override
    public override string ToString()
    {
        return $@"[Employee] Class
            Name: {FirstName} {LastName}
            Employee #: {EmployeeId}";
    }
  #endregion
}
Create a Supervisor Class
Right mouse-click on the console application project and add a new class named Supervisor. Replace the entire contents of this new file with the code shown in Listing 16. This class has a property named Employees that's of the data type List<Employee>.
Listing 16: A Supervisor class that inherits from the Employee class and has a list of employees as a property.
namespace XmlSerialization;

public class Supervisor : Employee
{
    List<Employee> Employees { get; set; } = new();

    #region ToString Override
    public override string ToString()
    {
        return $@"[Supervisor] Class
            Name: {FirstName} {LastName}
            Direct Reports = {Employees.Count}";
    }
    #endregion
}
Try It Out
Open the Program.cs file and replace the entire contents of this file with the code shown in Listing 17. Two Employee objects are added to the Employees property in the Supervisor object. Run the application and the serialized XML should look like the XML shown in Listing 18. Notice that the <Employees> element is the name of the property in the Supervisor class. Each object added to the Employees property are of the type Employee so this becomes the element name for each employee in the list.
Listing 17: Show a nested list of objects serialized as XML.
using XmlSerialization;

// Create an Object
Supervisor entity = new() {
    ID = 42,
    FirstName = "John",
    LastName = "Smith",
    BirthDate = Convert.ToDateTime("10/2/1970"),
    HomeAddress = new Address() {
        ID = 1,
        Street = "123 Main Street",
        City = "Nashville",
        State = "TN",
        PostalCode = "37011"
    },
    Employees = new List<Employee>() {
        new Employee() {
            ID = 22,
            FirstName = "Sally",
            LastName= "Jones" },
        new Employee() {
            ID = 73,
            FirstName = "Bob",
            LastName= "Cranley" }
    }
};

// Serialize the Object
string xml = entity.Serialize<Supervisor>();

// Display the XML
Console.WriteLine(xml);
Listing 18: Nested lists use the name of the List property as the element name.
<?xml version="1.0" encoding="utf-16"?>
<Supervisor>
    <ID>42</ID>
    <FirstName>John</FirstName>
    <LastName>Smith</LastName>
    <BirthDate>1970-10-02T00:00:00</BirthDate>
    <HomeAddress>
       // OTHER ELEMENTS HERE
    </HomeAddress>
    <Employees>
        <Employee>
            <ID>22</ID>
            <FirstName>Sally</FirstName>
            <LastName>Jones</LastName>
              // OTHER ELEMENTS HERE
        </Employee>
        <Employee>
            <ID>73</ID>
            <FirstName>Bob</FirstName>
            <LastName>Cranley</LastName>
            // OTHER ELEMENTS HERE
        </Employee>
    </Employees>
</Supervisor>
Change Name of Array Elements
If you don't want the name of the List<T> property to be the parent element name for the list, add an [XmlArray] element above the list property to modify the parent element name. You can rename each child element name within the list by using the [XmlArrayItem] attribute as shown in the code snippet below.
public class Supervisor : Employee
{
    [XmlArray("DirectReports")]
    [XmlArrayItem("DirectReport")]
    public List<Employee> Employees { get; set; } = new();
    // REST OF THE CODE HERE
}
Try It Out
Add the two attributes shown and run the application to view the XML generated. You should see the list of employees is now called <DirectReports> and each child employee element is now called <DirectReport>.
Working with Namespaces
Just like there are namespaces in the .NET Framework to help avoid collisions between the same named classes, you also have namespaces in XML documents. The purpose of namespaces in XML is the same, to help avoid element/attribute name collisions between two different XML documents. Look back at Figure 4 and you can see that the <Person> node contains an <ID> element, and so does the <HomeAddress> element. You use a namespace to uniquely identify each <ID> element so you can search for one or the other.
Open the Person.cs file and an [XmlType] attribute before the class declaration. In the constructor for the attribute, set the Namespace property to "http://www.pdsa.com/person". This namespace will now be added to each node in the <Person> element.
[XmlType(Namespace = "http://www.pdsa.com/person")]
public class Person
{
    // REST OF THE CODE HERE
}
Open the Program.cs file and replace the entire contents of the file with the code shown in Listing 19. Before the call to the Serialize() method, create an instance of an XmlSerializerNamespaces class. Call the Add() method on this new object passing in a unique prefix (sometimes called an alias) and the same namespace URI declared in the [XmlType] attribute. Pass this instance of the XmlSerializerNamespaces class to the Serialize() method to ensure that the namespace and its prefix are used when generating the XML.
Listing 19: Use the XmlSerializerNamespaces object to add namespaces to your XML document.
using System.Xml.Serialization;
using XmlSerialization;

string XmlFileName = @$"{Environment.GetFolderPath(
     Environment.SpecialFolder.MyDocuments)
    }\PersonWithNamespaces.xml";

// Create an Object
Person entity = new() {
    ID = 42,
    FirstName = "Sally",
    LastName = "Jones",
    BirthDate = Convert.ToDateTime("10/1/1970")
};

// Add Namespaces with a prefix/alias
// to the serialized XML
var ns = new XmlSerializerNamespaces();
ns.Add("per", "http://www.pdsa.com/person");

// Serialize the Object
string xml = entity.Serialize<Person>(ns);

// Write XML to File
File.WriteAllText(XmlFileName, xml,
  System.Text.Encoding.Unicode);

// Display XML
Console.WriteLine(xml);
Console.WriteLine($"View the XML in '{XmlFileName}'");
Note that the URI used in the [XmlType] is case-sensitive, so make sure you spell it the same when adding it to the namespaces collection. You can use a public constant declared within the Person class, then use that constant in both the [XmlType] attribute and when adding the namespace.
Try It Out
Run the application and you should see the XML output as shown in the following code snippet.
<Person xmlns:per="http://www.pdsa.com/person">
    <per:ID>42</per:ID>
    <per:FirstName>Sally</per:FirstName>
    <per:LastName>Jones</per:LastName>
    <per:BirthDate>1970-10-01T00:00:00</per:BirthDate>
    <per:HomeAddress>
        <per:ID>0</per:ID>
        <per:Street />
        <per:City />
        <per:State />
        <per:PostalCode />
        <per:Country />
    </per:HomeAddress>
</Person>
Notice the prefix/alias per is used on each element. Also notice the two different ID properties use the same namespace. Each ID is a different number and should be identifying different objects, so you should add a different namespace to the Address class.
Address
Open the Address.cs file and add an [XmlType] attribute before the class declaration. In the constructor for the attribute, set the Namespace property to "http://www.pdsa.com/address". This namespace will now be added to each node in the <HomeAddress> element that is part of the <Person> element.
[XmlType(Namespace = "http://www.pdsa.com/address")]
public class Address
{
  // REST OF THE CODE HERE
}
Open the Program.cs file and add the following just under where you added the Person namespace to the XmlSerializerNamespaces object. This line of code now adds another prefix/alias and the corresponding URI to the list of namespaces that should be used when serializing a Person object.
ns.Add("addr", "http://www.pdsa.com/address");
Try It Out
Run the application and you should now see a more correct version of the <Person> XML element, as shown in the following code snippet. Notice that you now have different prefixes for the <ID> element in the Person element versus the <ID> in the HomeAddress element.
<Person xmlns:per=http://www.pdsa.com/person
        xmlns:addr="http://www.pdsa.com/address">
    <per:ID>0</per:ID>
    <per:FirstName>Sally</per:FirstName>
    <per:LastName>Jones</per:LastName>
    <per:BirthDate>
        1970-10-01T00:00:00
    </per:BirthDate>
    <per:HomeAddress>
        <addr:ID>0</addr:ID>
        <addr:Street />
        <addr:City />
        <addr:State />
        <addr:PostalCode />
        <addr:Country />
    </per:HomeAddress>
</Person>
Deserialize XML with Namespaces
Open the Program.cs file and replace the entire contents of this file with the code shown in Listing 20. This code is the exact code you used before to deserialize XML back into a C# object. There's nothing special that you need to do other than to make sure that if the XML file has namespaces defined and that those definitions are expressed as [XmlType] attributes on your C# classes.
Listing 20: There is nothing special to do when deserializing XML with namespaces.
using XmlSerialization;

string XmlFileName = @$"{Environment.GetFolderPath(
    Environment.SpecialFolder.MyDocuments)}\PersonWithNamespaces.xml";

// Create an Object
Person? entity = new();

// Read XML from a file
string xml = File.ReadAllText(XmlFileName);

// Deserialize XML to an object
entity = entity.Deserialize<Person>(xml);

// Display the Object
Console.WriteLine(entity);
Working with Arrays of Objects
Up to this point, you've just serialized and deserialized single C# objects. What if someone sends you an XML document that contains an array of objects such as Product objects, as shown in Figure 6.
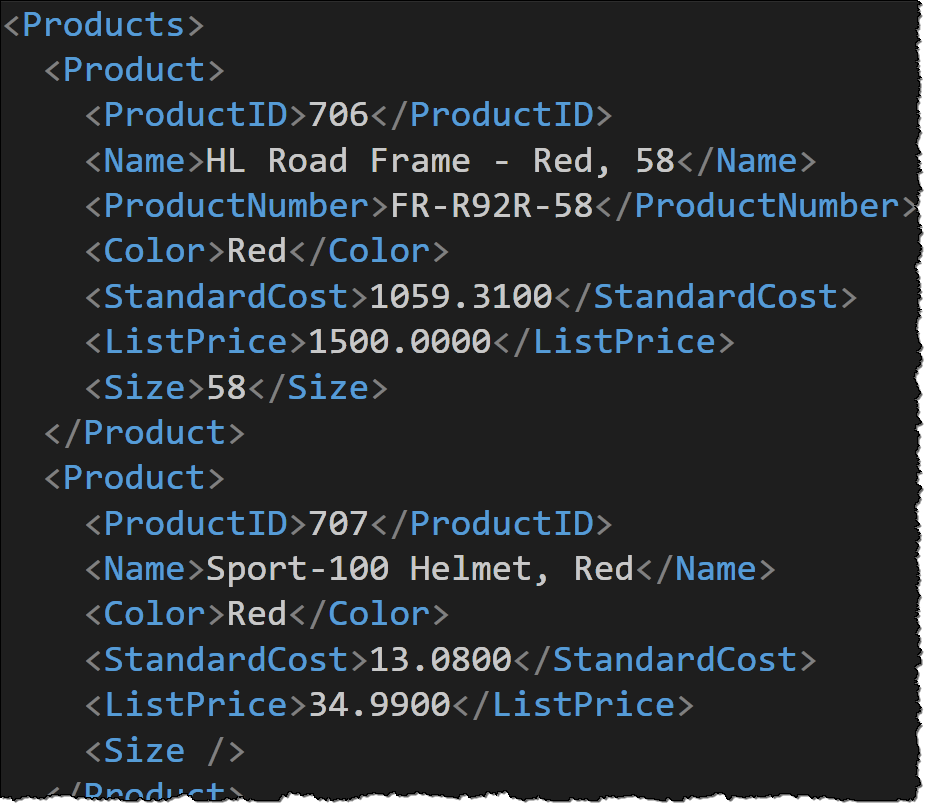
In the downloads that accompany this article, there is a file called Products.xml. Copy this file to your “My Documents” folder. Open the Program.cs file and replace the entire contents of this file with the code shown in Listing 21.
Listing 21: Deserializing a list of objects can cause issues if the XML parent node is not a certain name.
using XmlSerialization;

string XmlFileName = @$"{Environment.GetFolderPath(
    Environment.SpecialFolder.MyDocuments)}\Products.xml";

List<Product>? list = new();

// Read XML from a file
string xml = File.ReadAllText(XmlFileName);

// Deserialize XML to an object
list = list.Deserialize(xml);

if (list != null) {
    foreach (Product row in list) {
        if (row != null) {
            Console.WriteLine(row.ToString());
        }
    }
}
Try It Out
Run the application and an error will occur as shown in Figure 6. The problem is that you're using a generic List<Product> variable. The XmlSerializer doesn't know how to map the <Products> root node to a generic type.
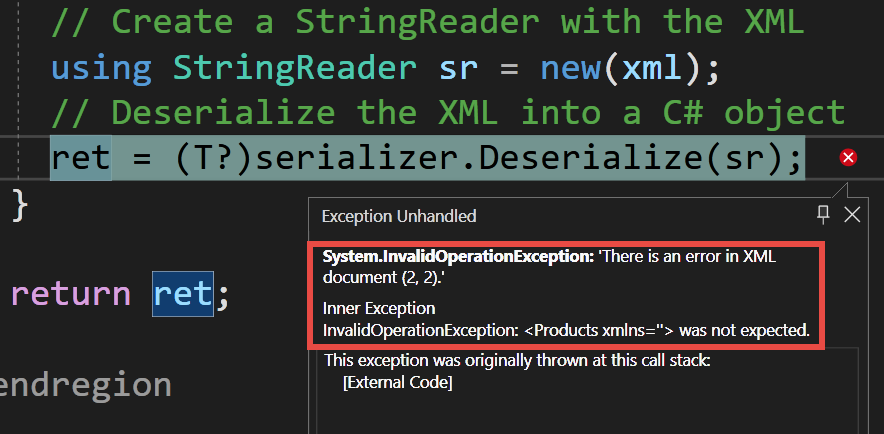
How to Fix This Deserialization Error
There are two methods you can use to fix this error you're receiving. The first method is to open the Products.xml file and change the <Products> root node to <ArrayOfProduct> and change the ending tag to </ArrayOfProduct>. Save and close the file and re-run the application and the code will work. However, it's not practical to open all XML files you are receiving and make these changes. The second method to fix this error is to create a collection class, as shown in the next section of this article. If you've modified the root node to <ArrayOfProduct>, put it back to <Products> before moving on to the next section.
Create a Product Collection Class
The best method to retrieve an array of product objects from an XML file is to create a wrapper class around the array of product objects, as shown in Listing 22. Right mouse-click on your console project and create a class called ProductCollection and decorate this class with the [XmlRoot] attribute. In this attribute, set the root element name by setting the ElementName property to "Products". Using this attribute informs the XmlSerializer of the root name it should be looking for in the XML it's processing. Next, create a property that is an array of Product objects. Decorate this property with the [XmlElement] attribute and set its ElementName property to "Product". This informs the XmlSerializer that each of the <Product> elements are to be considered a repeating set of data that it should deserialize into this ProductAsArray property in this class.
Listing 22: Create a collection class to successfully read in an XML array of objects.
using System.Xml.Serialization;

namespace XmlProcessing;

[XmlRoot(ElementName = "Products")]
public class ProductCollection
{
    [XmlElement(ElementName = "Product")]
    public Product[] ProductAsArray { get; set; } = Array.Empty<Product>();

    [XmlIgnore]
    public List<Product> Products
    {
        get { return ProductAsArray.ToList(); }
        set { ProductAsArray = value.ToArray(); }
    }
}
I prefer to work with a List<Product> objects as opposed to an array of Product objects. Therefore, I've added another property to this class called Products that's of the type List<Product>. Notice that I decorated this property with the [XmlIgnore] attribute so if you serialize using this class, this property is not serialized.
Try the Product Collection Class
Open the Program.cs file and replace the entire contents of this file with the code shown in Listing 23. This code declares an instance of a ProductCollection class named entity. It reads the XML from the Products.xml file and then deserializes it into the array of products declared in the ProductCollection class.
Listing 23: Deserialize the collection class.
using XmlSerialization;

string XmlFileName = @$"{Environment.GetFolderPath(
    Environment.SpecialFolder.MyDocuments)
}\Products.xml";

ProductCollection? entity = new();

// Read XML from a file
string xml = File.ReadAllText(XmlFileName);

// Deserialize XML to an object
entity = entity.Deserialize(xml);

if (entity != null) {
    foreach (Product row in entity.Products) {
        if (row != null) {
            Console.WriteLine(row.ToString());
        }
    }
}
Try It Out
Run the application and you should see the list of products displayed in the console window.
Serialize a Collection of Products
If you wish to serialize a generic collection of Product objects to XML, do NOT use the data type List<Product> because there is no way to set the root node. If you do serialize using List<Product>, the root node will always be <ArrayOfProduct>, as shown in the following code snippet.
<ArrayOfProduct>
    <Product>
        <ProductID>680</ProductID>
         <Name>HL Road Frame - Black, 58</Name>
             // MORE ELEMENTS HERE
    </Product>
    <Product>
        <ProductID>706</ProductID>
        <Name>HL Road Frame - Red, 58</Name>
        // MORE ELEMENTS HERE
    </Product>
</ArrayOfProduct>
It's better to create a collection wrapper class around the generic list of Product objects, such as the ProductCollection class you created earlier. Open the Program.cs file and replace the entire contents of the file with the code shown in Listing 24. In this code, you create an instance of a ProductCollection class and set the Products property to a list of Product objects. The setter of the Products property converts this generic list to an array of Product objects and sets the ProductAsArray property. It's the ProductAsArray property that's serialized to XML.
Listing 24: Serialize your collection object to get the correct XML.
using XmlSerialization;

string XmlFileName = @$"{Environment.GetFolderPath(
      Environment.SpecialFolder.MyDocuments)}\ProductList.xml";

ProductCollection pc = new() {
    Products = new()
    {
        new Product {
            ProductID = 680,
            Name = @"HL Road Frame - Black, 58",
            ProductNumber = @"FR-R92B-58",
            Color = @"Black",
            StandardCost = 1059.3100m,
            ListPrice = 1431.5000m,
            Size = @"58",
            ModifiedDate = Convert.ToDateTime("3/11/2008")
        },
        new Product {
            ProductID = 706,
            Name = @"HL Road Frame - Red, 58",
            ProductNumber = @"FR-R92R-58",
            Color = @"Red",
            StandardCost = 1059.3100m,
            ListPrice = 1431.5000m,
            Size = @"58",
            ModifiedDate = Convert.ToDateTime("3/11/2008")
        }
    }
};

// Serialize the Object
string xml = pc.Serialize<ProductCollection>();

// Write XML to File
File.WriteAllText(XmlFileName, xml,
  System.Text.Encoding.Unicode);

// Display the XML
Console.WriteLine(xml);
Console.WriteLine($"View the XML in '{XmlFileName}'");
Try It Out
Run the application and the following XML is displayed in your console window. Notice that the root node is <Products>, as it should be, and not <ArrayOfProduct>.
<Products>
  <Product>
      <ProductID>680</ProductID>
      <Name>HL Road Frame - Black, 58</Name>
        // MORE ELEMENTS HERE
  </Product>
  <Product>
      <ProductID>706</ProductID>
      <Name>HL Road Frame - Red, 58</Name>
      // MORE ELEMENTS HERE
  </Product>
</Products>
Serialize Derived Types
Another potential pitfall that can happen when serializing C# objects to XML is when you have a base class with several derived types. In the code shown in Listing 25, the entity variable is declared as a type of Person, but the instantiation is as type Employee. This is perfectly valid for C# but presents some issues when attempting to serialize to XML. The serializer is expecting a Person, but the actual implementation is an Employee, so it doesn't know about this type and thus throws an exception, as seen in Figure 8.
Listing 25: Serializing derived types can cause errors.
using XmlSerialization;

Person entity = new Employee() {
    ID = 42,
    FirstName = "Sally",
    LastName = "Jones",
    BirthDate = Convert.ToDateTime("10/1/1970")
};

// Serialize the Object
string xml = entity.Serialize<Person>();

// Display the XML
Console.WriteLine(xml);
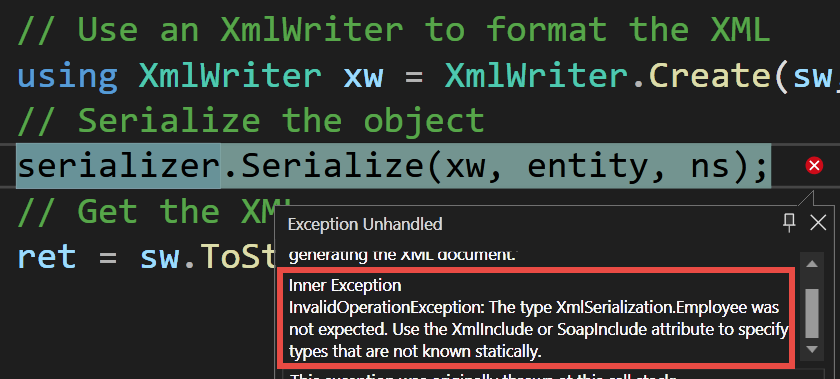
Try It Out
Open the Program.cs file and replace the entire contents of the file with the code shown in Listing 25. Run the application and you should see an error occur like that shown in Figure 8.
Add XmlInclude Attribute to Person Class
To inform the XmlSerializer object about the Employee class, use the [XmlInclude] attribute on the base class and specify the type of Employee in its constructor. Open the Person.cs file and add an [XmlInclude] for the Employee class that inherits from this class, as shown in the code snippet below. You may have as many [XmlInclude] attributes as you need on a base class.
[XmlInclude(typeof(Employee))]
public class Person
{
   // REST OF THE CODE HERE
}
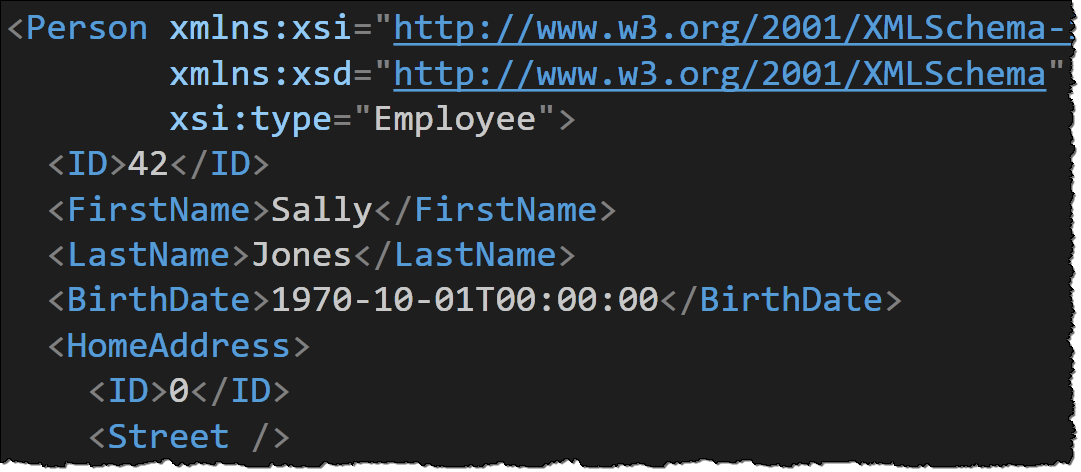
Try It Out
Run the application and, when the <Person> element is generated, it includes an xsi:type="Employee" attribute. This indicates that a type other than the default type (Person) was used to generate this XML, as shown in Figure 9.
Open the Person.cs file and add an [XmlInclude] for the Supervisor class as that class also inherits from person.
[XmlInclude(typeof(Supervisor))]
If you create a List<Person> objects but place a Supervisor object in the first element, and an Employee object in the second element, you can see how it marks the xsi:type on each <Person>`` element, as shown in **Figure 10**. Open the Program.cs` file and replace the entire contents of this file with the code shown in Listing 26.
Listing 26: Serialize a list of different derived types.
using XmlSerialization;

// Create a List<Person>
List<Person> list = new() {
   new Supervisor() {
      FirstName = "Sally",
      LastName= "Jones" },
    new Employee() {
      FirstName = "Bob",
      LastName= "Cranley" }
};

// Serialize the Object
string xml = list.Serialize<List<Person>>();

// Display the XML
Console.WriteLine(xml);
Try It Out
Run the application and look at the console window to see something that looks like Figure 10. Notice the xsi:type="Supervisor" and xsi:type="Employee" on each of the <Person> elements.
![Figure 10: The [XmlInclude] attribute marks with each element with the data type that created that element.](https://codemag.com/Article/Image/2401041/image10.png)
Using Schemas
If you receive XML documents from other programmers, how do you ensure that someone has sent you a valid XML document? After all, these are just text files, so anyone could add additional fields. This is where an XML schema comes in. An XML schema is associated with an XML document and defines the complete list of all elements and attributes that are allowed within the XML document. The XML schema language used to describe documents is called XML Schema Definition (XSD). The precursor to XSD was Document Type Definition or DTD. The use of DTD files is discouraged; you should only use XSD files.
Schema Layout
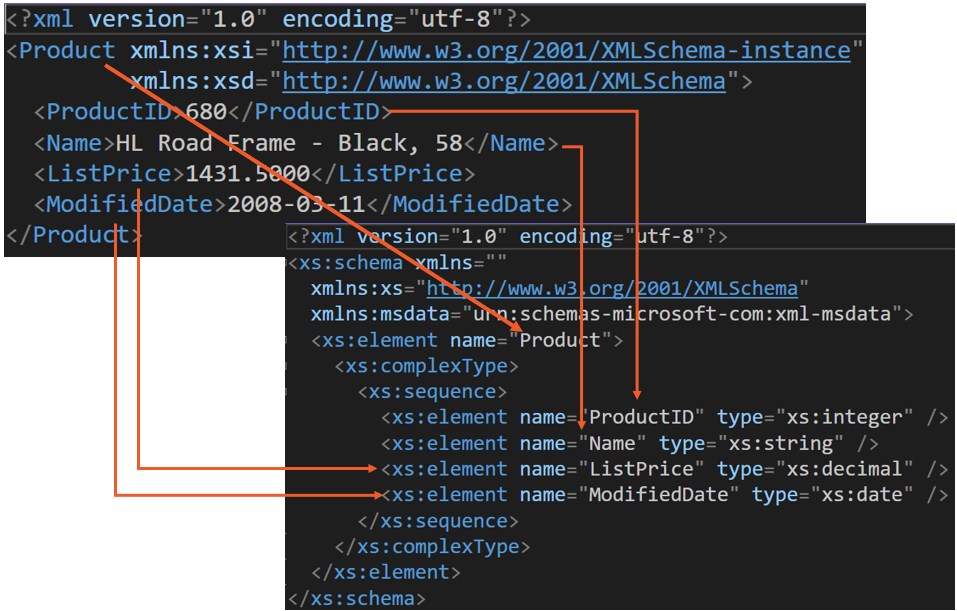
An XML Schema Definition file is just another XML file that has a specific layout, such as the one shown in Figure 11. In this figure, you see how each of the elements in the <Product> XML file are mapped to the different attributes within the XSD file.
Create a Schema with Visual Studio
There are a few different methods to create an XSD file from an existing XML file. You can use Visual Studio, or the XSD command line tool. Open Visual Studio and load the Product.xml file you created in one of the earlier examples. You should find this file located in your My Documents folder: C:\Users\YOUR LOGIN\Documents. After loading the XML file in Visual Studio, click on the XML > Create Schema menu. A new file with the XSD schema is loaded into Visual Studio. It does its best to infer the data types, but you may have to fix them up based on the data type that you know you want to use.
Create a Schema Using the XSD Tool
There is a command-line utility that comes with .NET called XSD.EXE. With this tool, you can generate an XML file from an existing XML file. Learn more about this tool at this URL: https://tinyurl.com/3eycwm3n. Open a Developer Command Prompt and navigate to your My Documents folder (C:\Users\YOUR LOGIN\Documents) within this command prompt. Type in the following command and this tool will produce a new file in your My Documents folder called Product.xsd:
xsd Product.xml
Validating XML Documents with Schemas
As mentioned, an XSD file is used to validate that someone sent you a valid XML document. To perform the validation of an XML document in C#, load that XML document into an XDocument object. Create an XmlSchemaSet object and add the full XSD path and file name to this XSD file. Call the Validate() method on the XDocument object passing in the XmlSchemaSet object. The second parameter to the Validate() method, shown in Listing 27, is an event handler method. In this code, I'm handling this event inline with an anonymous method. The event handler is only called if an error occurs when validating the XML document against the XML schema.
Listing 27: Add an XML Schema file to validate XML documents.
using System.Xml.Linq;
using System.Xml.Schema;

string XmlFileName =
  @$"{Environment.GetFolderPath(
      Environment.SpecialFolder.MyDocuments)
     } \Product.xml";
string XsdFileName =
  @$"{Environment.GetFolderPath(
      Environment.SpecialFolder.MyDocuments)
     } \Product.xsd";
string msg = "XML is valid.";

XDocument doc = XDocument.Load(XmlFileName);

// Create an XmlSchemaSet Object
XmlSchemaSet schemaSet = new();
// Add an XSD file to it
schemaSet.Add("", XsdFileName);

// Validate the document
doc.Validate(schemaSet, (sender, args) =>
{
  // If an error occurs
  // get the message
  msg = args.Message;
});

// Display Message
Console.WriteLine(msg);
Try It Out
Open the Program.cs file and replace the entire contents of this file with the code shown in Listing 27. Assuming you have generated the Product.xsd file from the last section, it should validate the Product.xml file successfully.
Handling Schema Errors
Open the Program.cs file and immediately after the code that adds the XsdFileName to the XmlSchemaSet, add a new XElement that creates a <Customer> element, as shown in the following code. This causes the Validate() method to fail the validation process.
// Create an invalid XElement object
// and add to XML Document
doc.Root?.Add(new XElement("Customer",
    new XElement("CustomerID", "999"),
    new XElement("CustomerName", "Customer 999")
  ));
Next, replace the code that performed the Validate() method with the following code snippet. This snippet now checks the Severity property on the ValidationEventArgs parameter named args. Depending on the value in the Severity property, you can take different actions. In the code below, I'm only creating different messages.
// Validate the document
doc.Validate(schemaSet, (sender, args) =>
{
    // Check the error severity
    switch (args.Severity) {
        case XmlSeverityType.Error:
            msg = $"Error: {args.Message}";
            break;
        case XmlSeverityType.Warning:
            msg = $"Warning: {args.Message}";
            break;
    }
});
Try It Out
After modifying the Program.cs, run the application and the following should be displayed on the console window "The element Product has invalid child element Customer. This is the value returned from the Message property in the args parameter.
Summary
In this article, you were introduced to all the various methods to serialize and deserialize C# objects into, and from, XML. You have a lot of control over the serialization process by using attributes to change to attribute-based XML and writing the XML to memory or to a file. You learned how to create an extension method that adds a Serialize() and Deserialize() methods to any C# object. Special care must be taken when working with generic lists of objects. It's usually best to create a wrapper class to help you work with these generic lists. Finally, you learned to work with schema definition files to help you validate an XML document.
