


XML files are very handy for storing data that you might not want to keep in a database. It's a good choice for prototyping because you don't need to set up any database tables and connection strings. Instead, you can send a complete project to a user with embedded XML files that they can try out immediately. XML files can also be used to cache often-used but seldom-changed data such as U.S. state codes or Canadian provinces. Instead of making a network round-trip to a database from your web server, XML files can be stored right on the web server. This saves a lot of time and reduces network traffic. And, for small, single-user, off-line applications, XML files can be used in place of database because you can read and write to them easily.
In this article, you're going to learn how to read and write XML files using C# and .NET 6/7. There are a few minor differences from the .NET Framework classes you've used before. The .NET 6/7 XML processing has been greatly optimized and processes XML files much faster than the .NET Framework. In this article, you'll learn to create XML document in memory, and to save and load XML files from disk. You'll also see how to use LINQ to XML for processing XML nodes including sorting, filtering, and aggregation.
The .NET Classes for XML Processing
The namespace where the .NET XML classes are located is System.Xml.Linq. Although there are several XML classes, there are only a few that you're going to use consistently. XDocument and XElement are the two most often used classes for working with XML documents. The XDocument object represents a complete XML document and the XElement object represents a single element. I prefer to use the XElement class as it's usually much simpler coding. It's not too often that I need all the features of the XDocument class.
The XDocument class contains the XML declaration, processing instructions (XML stylesheet), and comments needed to create a valid XML document. If you're just using XML as a data transfer mechanism, you probably don't need all these things. It's not wrong to use the XDocument class, but you'll find that you have to add more properties or call different methods just to do some simple XML processing, compared to the XElement class.
An XML Primer
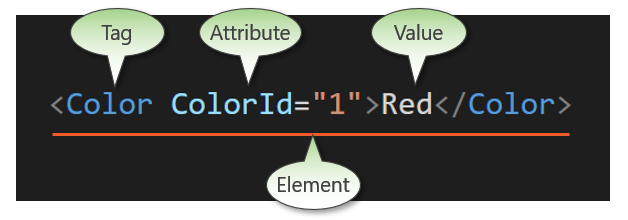
Before you read much further, it's probably a good idea to review the structure of an XML document. Let's first discuss a single XML element (Figure 1) that's made up of an opening Tag name, such as <Color>, followed by some Value between this tag and the closing tag, </Color>, with the same name. You may optionally add one or more Attributes within the opening tag. All of these pieces together make a valid XML element, sometimes referred to as a node. You may have an empty element/node that can be expressed as <Color></Color> or simply as <Color />.
Look at Figure 2 now and you'll see an example XML document with a Declaration at the very top of the document. Next, there's a Root element that's typically named with a plural tag name, such as Products, Customers, Employees, etc. Within this root node, you may have a collection of one or many Parent elements/nodes. The parent tag names are typically singular, such as Product, Customer, Employee, etc. Within a parent element, you may have one or more Child nodes. These nodes contain elements to describe a parent node, such as a product. In Figure 2, you see such elements as Name, ProductNumber, Color, StandardCost, ListPrice, and Size. Although each of these is a child node to the parent element, they are all sibling nodes of one another.
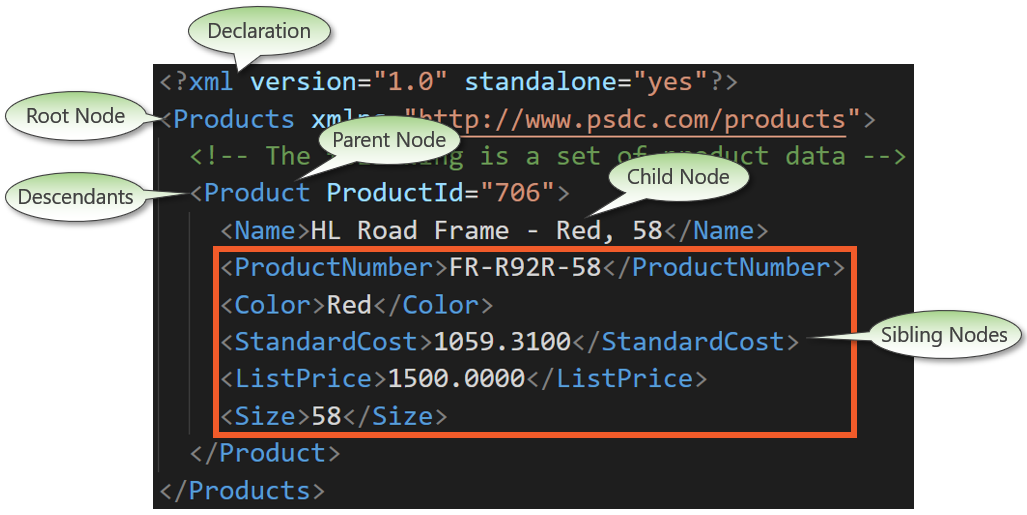
In this article, you're primarily going to be using a Product XML document with the structure you see in Figure 2. You're going to learn to create a product document using .NET classes and by parsing a string of XML into a valid XDocument and XElement object. You'll learn to save that document to disk and load an XML file back into an XDocument or XElement object. In addition, you're going to use the LINQ to XML syntax to filter, sort, and aggregate the data within the XML document.
Create XML Documents
Let's start this article by looking at how to create XML documents using both the XDocument and XElement classes. I'd highly recommend that you follow along as you read through this article. I'll be providing you with step-by-step procedures to follow. The first thing is to start up Visual Studio or VS Code and create a new Console Application using .NET 6 or later. Set the Name of this new Console Application to XmlProcessing. Open the Program.cs file and replace the entire contents of this file with the following code.
using System.Xml.Linq;

// Create a root element <Products>
XDocument doc = new (new XElement("Products"));

Console.WriteLine(doc);
Try It Out
Run the application and you should see a single line appear in the console window. Congratulations! You just created your first XML document.
<Products />
Using the XElement Class to Create an XML Document
The creation of an empty element XML document can also be accomplished using the XElement class. Replace the entire contents of the Program.cs file with the code in the next snippet. As you can see, you eliminate a couple of parentheses and a new statement when using the XElement class.
using System.Xml.Linq;

// Create a root element <Products>
XElement doc = new XElement("Products");

Console.WriteLine(doc);
If you run this version, you'll see the exact same output appear in the console window.
Add an XML Declaration and Comment
A valid XML document should have an XML declaration. This declaration informs the consumer of this XML document about the version of the XML standard used. It identifies the encoding used in the XML document, and if this XML document is standalone. The standalone attribute is set to yes or no and tells the consumer if this XML document relies on any external source such as a DTD or schema for its content. To create a valid XML document with an XML declaration, you must use the XDocument class, not the XElement class.
Open the Program.cs file and replace the entire contents with the code in the next snippet. When Microsoft designed the constructor for the XDocument class, they allowed you to pass in an XDeclaration as the first parameter, then an object array as the second parameter. This allows you to pass in an XComment object and then an XElement object.
using System.Xml.Linq;

// Create an XML document
XDocument doc =
    new(new XDeclaration("1.0", "utf-8", "yes"),
        new XComment("Product Data"),
        new XElement("Products"));

Console.WriteLine(doc.Declaration?.ToString());
Console.WriteLine(doc.ToString());
Try It Out
Run the application and you should see the following output in the console window.
<?xml version="1.0"
      encoding="utf-8"
      standalone="yes"?>
<!--Product Data -->
<Products />
Create an Element within the XML Document
The previous example is not very real-world, after all, there are very few times you create an XML document with an empty root node. Most likely, you'll place one or more parent nodes within the root element. The XElement objects constructor accepts the name of the root element to create, followed by an object array so you can pass as many other XElement objects as you want. Open the Program.cs file and replace the entire contents of this file with the code shown in Listing 1. I've indented the code to show you the hierarchy this code will create in the resulting XML.
Listing 1: Use an XDocument object to create a valid XML document with a declaration.
using System.Xml.Linq;

XDocument doc = new(
  new XDeclaration("1.0", "utf-8", "yes"),
  new XComment("Product Information"),
  new XElement("Products",
      new XElement("Product",
          new XElement("ProductID", "1"),
          new XElement("Name", "Bicycle Helmet"),
          new XElement("ProductNumber", "HELM-01"),
          new XElement("Color", "White"),
          new XElement("StandardCost", "24.49"),
          new XElement("ListPrice", "89.99"),
          new XElement("Size", "Medium"))
  )
);

// Display the Document
Console.WriteLine(doc);
Try It Out
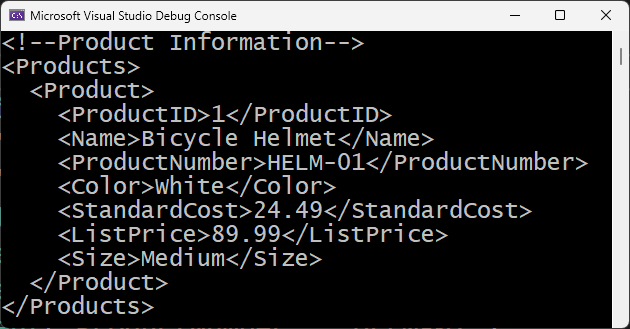
Run the application and what appears in your console window should look like Figure 3. When the ToString() method of the XDocument object is called by the Console.WriteLine() method, the XDeclaration isn't shown. You can always get to the XML declaration by using the Declaration property on the XDocument object.
Create Product Node with an Attribute
As you saw in Figure 1, an opening tag may contain one or more attributes. Use the XAttribute class to create an attribute on a tag. Pass to the constructor of this class the attribute name, followed by the value to put into this attribute, as shown in Listing 2. Open the Program.cs file and replace the entire contents of the file with the code shown in Listing 2.
Listing 2: Create an attribute on an element using the XAttribute class.
using System.Xml.Linq;

XDocument doc =
    new(
        new XDeclaration("1.0", "utf-8", "yes"),
        new XComment("Product Information"),
        new XElement("Products",
            new XElement("Product",
                new XAttribute("ProductID", "1"),
                new XElement("Name", "Bicycle Helmet"),
                new XElement("ProductNumber", "HELM-01"),
                new XElement("Color", "White"),
                new XElement("StandardCost", "24.49"),
                new XElement("ListPrice", "89.99"),
                new XElement("Size", "Medium"))
        )
      );

// Display the Document
Console.WriteLine(doc);
Try It Out
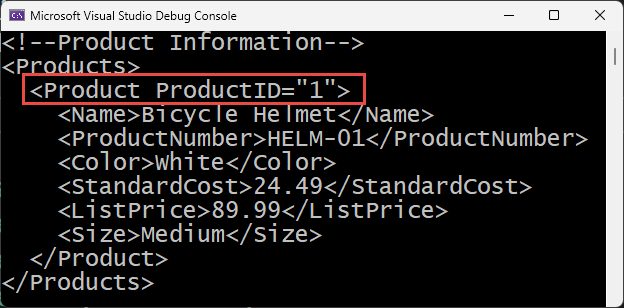
Run the application and your console window should show that the ProductID attribute has been assigned a value of “1”, as shown in Figure 4.
Create Nested XML Document
Not all XML documents have just one level of child nodes. Sometimes a child node can become a parent and have child nodes under it, such as the XML shown in Figure 5.
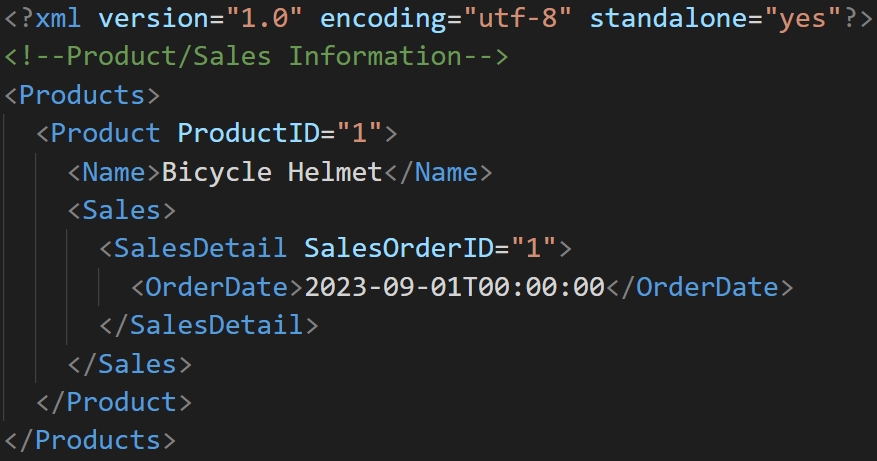
Open the Program.cs file and replace the entire contents of the file with the code shown in Listing 3. In looking at this code, you can see the XElement creating the <Products> root node. Then immediately under that, another XElement creates the <Product> parent. This is followed by the ProductID attribute, then by another XElement that creates the Name element. The next XElement creates a <Sales> parent node, which then creates a <SalesDetail> element under it. This <SalesDetail> element is identified with a "SalesOrderID" attribute. There is also an <OrderDate> element under it.
Listing 3: Create nested XML documents easily by nesting XElement objects.
using System.Xml.Linq;

XDocument doc =
    new(
        new XDeclaration("1.0", "utf-8", "yes"),
        new XComment("Product/Sales Information"),
        new XElement("Products",
            new XElement("Product",
            new XAttribute("ProductID", "1"),
            new XElement("Name", "Bicycle Helmet"),
            new XElement("Sales",
                new XElement("SalesDetail",
                new XAttribute("SalesOrderID", "1"),
                    new XElement("OrderDate", Convert.ToDateTime("9/1/2023")))
            )
            )
        )
    );

// Display the Document
Console.WriteLine(doc);
Try It Out
Run the application to see the result that should look like the XML in Figure 5.
Parsing a String into an XML Document
Instead of creating many different objects using the XDocument, XDeclaration, XComment, and XAttribute classes, you can create an XML string using a C# verbatim string. Create a string such as that shown in Listing 4 and parse that into an XML document using the Parse() method on either the XDocument or XElement class. Open the Program.cs file and replace the entire contents of the file with the code shown in Listing 4.
Listing 4: Use a C# verbatim string to create your XML in a more readable manner.
using System.Xml.Linq;

string xml = @"<?xml version='1.0' standalone='yes'?>
<!--Product Data -->
<Products>
    <Product>
        <ProductID>706</ProductID>
        <Name>HL Road Frame - Red, 58</Name>
        <ProductNumber>FR-R92R-58</ProductNumber>
        <Color>Red</Color>
        <StandardCost>1059.31</StandardCost>
        <ListPrice>1500.00</ListPrice>
        <Size>58</Size>
    </Product>
</Products>";

// Create XML Document using Parse()
XDocument doc = XDocument.Parse(xml);

// Display the Document
Console.WriteLine(doc.Declaration?.ToString());
Console.WriteLine(doc);
Try It Out
Run the application and you should see an XML document that looks just like the C# verbatim string.
Saving Documents
Now that you've seen how to create XML documents using XDocument and XElement, you may want to store that XML in a file on your hard drive. There are a few different techniques you can use to save XML to a file. If you have the XML document loaded into an XDocument or XElement object, call the Save() method passing in a valid path and file name.
Using XDocument.Save()
Open the Program.cs file and replace the entire contents of the file with the code shown in Listing 5. This code initializes a string variable called XmlFileName with a path and file name on your hard drive where you want to store the XML you're parsing into an XDocument object. Change this path to a valid location on your hard drive. Notice that I didn't apply any indentations to the XML verbatim string. I did this on purpose to show that the Save() method formats the XML prior to storing it on the hard drive. Due to formatting constraints of the printed magazine, I had to break the string within the Console.WriteLine() method across two lines. You'll see this throughout this article, so when you type them into your editor, please make sure they're all on one line.
Listing 5: Write an XML string as an XML document on disk.
using System.Xml.Linq;

const string XmlFileName = @"D:\Samples\NewProducts.xml";

// Create XML Document using Parse()
XDocument doc = XDocument.Parse(@"
<Products>
<Product>
<ProductID>706</ProductID>
<Name>HL Road Frame - Red, 58</Name>
<ProductNumber>FR-R92R-58</ProductNumber>
<Color>Red</Color>
<StandardCost>1059.31</StandardCost>
<ListPrice>1500.00</ListPrice>
<Size>58</Size>
</Product>
<Product>
<ProductID>707</ProductID>
<Name>Sport-100 Helmet, Red</Name>
<Color>Red</Color>
<StandardCost>13.08</StandardCost>
<ListPrice>34.99</ListPrice>
<Size />
</Product>
</Products>");

// Save to disk
// Formats the XML automatically
doc.Save(XmlFileName);

Console.WriteLine($"Open the file
    '{XmlFileName}' to see the results");
Try It Out
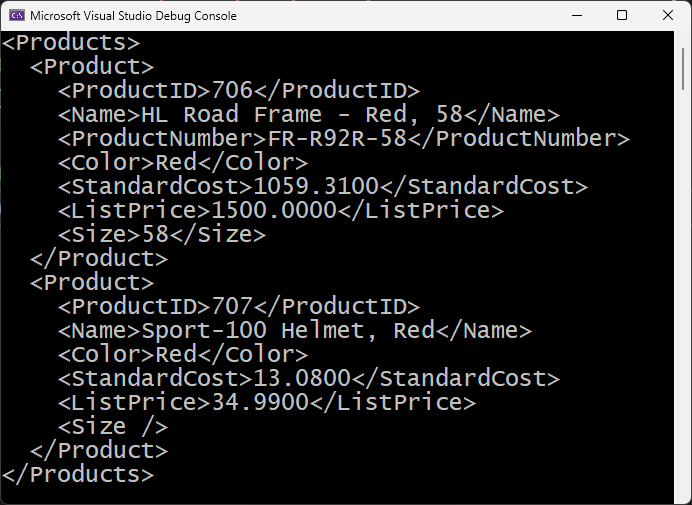
Run the application to store the XML on disk. Open the XML file and you should see that the XML has been formatted. If you don't wish to format the XML, pass the enumeration SaveOptions to the second parameter to disable formatting, as shown in the following code snippet.
doc.Save(XmlFileName, SaveOptions.DisableFormatting);
Using the XmlWriter Class to Save XML
Having a verbatim string that represents your XML in code doesn't always work if you're gathering data from a user and need to replace certain values within the XML. If this is the case, employ the XmlWriter class to write each element for you. The XmlWriter allows you to write directly to a file, or you can pass in a stream to the Create() method to build the XML in any type of stream you want. The XmlWriter object is a forward-only, non-cached stream, which means that you can only write into the XML object in the exact order that you want the XML to appear in.
Open the Program.cs file and replace the entire contents of the file with the code shown in Listing 6. In this code, you create an instance of an XmlWriter using the Create() method. To the Create() method, pass in a string representing the full path and file you wish to write to. You then call methods such as WriteStartElement(), WriteAttributeString(), WriteString(), and WriteEndElement() to build each node of your XML. Finally, you call the Close() method on the XmlWriter object to inform the stream that you've finished creating your XML document. Unlike the Save() method on the XDocument and XElement objects, this method doesn't format the XML.
Listing 6: Use the XmlWriter class for fine-grained control over writing XML.
using System.Xml;

const string XmlFileName = @"D:\Samples\NewProducts.xml";

// Create an XML Writer
using XmlWriter writer = XmlWriter.Create(XmlFileName);

// Write Root Element <Products>
writer.WriteStartElement("Products");

// Write Parent Element <Product>
writer.WriteStartElement("Product");
// Write Attribute <Product ProductID="999">
writer.WriteAttributeString("ProductID", "999");

// Write Child Element <Name>
writer.WriteStartElement("Name");
// Write the Value
writer.WriteString("Bicycle Helmet");
// Write Ending Element </Name>
writer.WriteEndElement();

// Write Sibling Element <ProductNumber>
writer.WriteStartElement("ProductNumber");
writer.WriteString("HELM-01");
writer.WriteEndElement();

// Write Sibling Element <Color>
writer.WriteStartElement("Color");
writer.WriteString("White");
writer.WriteEndElement();

// Write Ending Parent Element </Product>
writer.WriteEndElement();

// Write Ending Root Element </Products>
writer.WriteEndElement();

// Close the Writer
writer.Close();

Console.WriteLine($"Open the file
    '{XmlFileName}' to see the results");
Formatting the XML Using the XmlWriter
As mentioned previously, the XmlWriter object doesn't format the XML. However, you can pass a second parameter to the Create() method with some options within an XmlWriterSettings object. There are quite a few properties you can set on this XmlWriterSettings object, but the most common ones are Encoding and Indent. The code shown below shows you how you might change the code in Listing 6 to use formatting and to apply Unicode as the encoding on the XML document.
XmlWriterSettings settings = new()
{
  // Set the Format Options
  Encoding = Encoding.Unicode,
  Indent = true
};

// Create the XML Writer
using XmlWriter writer = XmlWriter.Create(XmlFileName, settings);

// REST OF THE CODE HERE
Loading XML Files
Sometimes you're not going to build XML within your application, but you'll read a file that someone has sent to you. In this case, there's a Load() method on both the XDocument and XElement classes. Let's start by using the Load() method of the XDocument class. Open the Program.cs file and replace the entire contents of the file with the code shown in the code snippet below. In the download for this article, there are several XML files that you can place on your hard drive and point the XmlFileName variable to.
using System.Xml.Linq;

const string XmlFileName = @"D:\Samples\ProductsSmall.xml";

// Read XML using XDocument
XDocument doc = XDocument.Load(XmlFileName);

// Display XDocument
Console.WriteLine(doc);
Try It Out
After changing the path to the ProductsSmall.xml file, run the application and you should see the XML appear in your console window, like that shown in Figure 6.
Load an XML File Using XElement
In the code snippet below, you can see almost the exact code as the previous example. The only difference is that in this one, you use the XElement class instead of the XDocument. If you replace the contents of the Program.cs file with the following code snippet, change the path to the XML file, and run the application, you'll see the same results as that shown in Figure 6.
using System.Xml.Linq;

const string XmlFileName = @"D:\Samples\ProductsSmall.xml";

// Read XML using XElement
XElement elem = XElement.Load(XmlFileName);

// Display XElement
Console.WriteLine(elem);
Getting First Node
The XDocument and the XElement classes both contain a FirstNode property. However, when this property is accessed on the XDocument class, the root element is returned. When the FirstNode property of the XElement class is accessed, the first parent element is returned.
Open the Program.cs file and replace the entire contents of the file with the code shown in the following code snippet. After loading the XML document, check the FirstNode property of the XDocument (or XElement) object to ensure that it isn't null. If isn't null, you can display the contents of the FirstNode property using Console.WriteLine().
using System.Xml.Linq;

const string XmlFileName = @"D:\Samples\ProductsSmall.xml";

// Read XML using XDocument
XDocument doc = XDocument.Load(XmlFileName);
if (doc.FirstNode != null) {
    // Display the first node
    Console.WriteLine(doc.FirstNode);
}
else {
    Console.WriteLine("No XML Found");
}
Try It Out
Run the application and the console window should look exactly like the XML shown in Figure 6.
Get First Node Using the XElement Class
Modify the line of code in the previous example that loads the XML file to use the XElement object, as shown below.
// Read XML using XElement
XElement elem = XElement.Load(XmlFileName);
Try It Out
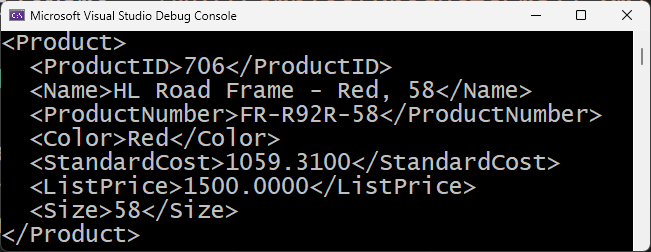
Run the application and you should see the first parent node in the console window, as shown in Figure 7. When using the XElement object, the first parent node is displayed, as opposed to the complete XML document that you got when using XDocument object.
Iterate Over Nodes and Display Values
Most XML documents have more than just a single node. In that case, you'll most likely wish to iterate over all the parent nodes in the XML document and do something with the values in the child nodes. This is where LINQ to XML comes in very handy. LINQ to XML uses the LINQ syntax to select, filter, sort, and aggregate the data in your XML documents. As you've seen previously in this article, you first need to load the XML document into an XDocument or XElement object, as shown in the following code snippet.
// Read XML using XDocument
XDocument doc = XDocument.Load(XmlFileName);
After loading the XML document into an XDocument object, use the Descendants() method in a LINQ expression to return a set of XElement objects of the parent nodes that start with the element <Product>, as shown in the following code snippet.
List<XElement> list =
    (from row in doc.Descendants("Product")
     select row).ToList();
Once you have this collection of <Product> nodes, you may now iterate over this collection and do something with each node. Open the Program.cs file and replace the entire contents of the file with the code shown in Listing 7.
Listing 7: Use the Descendants() method with an XDocument object to retrieve all nodes.
using System.Xml.Linq;

const string XmlFileName = @"D:\Samples\ProductsSmall.xml";

// Read XML using XDocument
XDocument doc = XDocument.Load(XmlFileName);

// Use LINQ to XML to retrieve
// all Parent nodes (Descendants)
// under the Root node
List<XElement> list = (from row in doc.Descendants("Product")
                       select row).ToList();

// Iterate over all Parent nodes
foreach (XElement row in list) {
    // Retrieve each Child node
    // using Element("NodeName").Value
    Console.WriteLine($"Product Name:
        {row.Element("Name")?.Value}");
    Console.WriteLine($"   Product Id:
        {row.Element("ProductID")?.Value}");
}

Console.WriteLine();
Console.WriteLine($"Total Products: {list.Count}");
When iterating over each XElement object, you can retrieve each value in the <Name> and <ProductID> elements using a call to the Element() method passing in the element name. For example, row.Element("Name")?.Value retrieves the value for the product name, and row.Element("ProductID")?.Value retrieves the value for the product ID.
Notice the use of the null-conditional operator (?.) used when attempting to retrieve a value from an element such as row.Element("Name")?.Value. If you misspell the name of the element, or that element doesn't exist, a null value is returned from this expression. Using the null-conditional operator avoids a runtime error if the element you're trying to retrieve isn't present in the XML document. For example, look at the following XML node and see that the <Name> element is completely missing. If you didn't use the null-conditional operator, you'd get a runtime error when attempting to access the <Name> element's value.
<Product>
    <ProductID>706</ProductID>
    <ProductNumber>FR-R92R-58</ProductNumber>
    <Color>Red</Color>
    <StandardCost>1059.3100</StandardCost>
    <ListPrice>1500.0000</ListPrice>
    <Size>58</Size>
</Product>
Try It Out
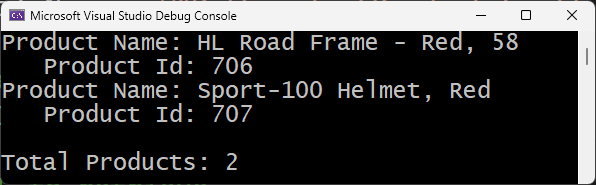
In the ProductsSmall.xml file, there are only two parent <Product> nodes. When you run the application, those two parent nodes are iterated through in the foreach loop, and the data is displayed in the console window, as shown in Figure 8.
Get All Nodes Using XElement
If you want to use the XElement object to load the XML file into memory, use the code below in place of where you used the XDocument object.
// Read XML using XElement
XElement elem = XElement.Load(XmlFileName);
Modify the LINQ expression to use the Elements() method on the elem variable that contains the XML document. The Elements() method returns the list of <Product> nodes. The rest of the code is the same as you currently have in your Program.cs file.
List<XElement> list =
  (from row in elem.Elements("Product")
   select row).ToList();
Try It Out
Run the application and you should see the same results as those shown in Figure 8.
Simplify XML Value Retrieval with Extension Methods
There are a couple of problems with using the Element("NAME") method to retrieve element values. First, you must always use the null-conditional operator (?.) each time you attempt to access each XML element to avoid an error. Secondly, all XML values are retrieved as string values. If you wish to retrieve the <ProductID> value as an integer value, you need to use a cast operator. However, if you misspell the node name as <ProdctID>, you're trying to cast a null to an integer. As you know, this produces a runtime error.
To solve these issues, create a generic extension method, named GetAs<T>(), of the XElement class to automatically perform these functions for you. This method is called in place of the Element() method to retrieve the value from a specific element as shown in the two examples below.
row.GetAs<string>("Name")
row.GetAs<int>("ProductID")
Pass to this new GetAs<T> method the data type you wish to convert the value into. This method also checks for a null value, or that the element doesn't exist and returns the default value for the data type passed in. If you're attempting to retrieve a numeric value such as ListPrice for example, and that element doesn't exist, this method returns a zero (0) value.
Right mouse-click on the console application project and add a new class named XmlHelper. Replace the entire contents of the new file with the code shown in Listing 8. This class contains a single generic extension method for now, however, later in this article, you'll add a couple more methods.
Listing 8: Create an extension method to help read element values in an XML node.
using System.Globalization;
using System.Xml.Linq;

namespace XmlProcessing;

public static class XmlHelper
{
    public static T GetAs<T>(
        this XElement elem, string name)
            where T : notnull
    {
        var ret = default(T);

        if (elem != null) {
            XElement? current = elem.Element(name);
            if (current != null) {
                string value = current.Value;
                // Cast to Return Data Type
                // NOTE: ChangeType() can not cast
                // to a Nullable type
                if (value != null) {
                    ret = (T)Convert.ChangeType(value,
                    typeof(T), CultureInfo.InvariantCulture);
                }
            }
        }

        return ret;
    }
}
The GetAs<T>() method accepts the generic data type T you wish this method to return and a string parameter that is the name of the element to read in the current node. I defined this method to only allow types that can't be nullable. This is because I use the Convert.ChangeType() method to perform the conversion and this method cannot convert any value into a nullable data type.
This method first initializes the return variable, ret, to the default value for the data type passed in. It checks to ensure that the elem parameter passed in is not null. It then attempts to retrieve the element requested. If this element is not null, then the value is retrieved from that element. If the value retrieved is not null, the Convert.ChangeType() method is applied to the value, and it's converted into the data type requested.
Open the Program.cs file and modify the loop to use the GetAs<T>() extension methods, as shown in the code snippet below.
foreach (XElement row in list) {
    Console.WriteLine($"Product Name:
        {row.GetAs<string>("Name")}");
    Console.WriteLine($"Product Id:
        {row.GetAs<int>("ProductID")}");
}
Try It Out
Run the application and you should see the same results as those shown in Figure 8.
Sorting and Filtering XML Data
LINQ can sort and filter a collection by applying where and orderby clauses respectively in the query. Both these clauses take one or more element values retrieved from the XML to perform their respective operations.
Order by Color and List Price
In the sample shown in Listing 9, you're loading a new XML file called Products.xml. This XML file has 40 product nodes to read in. There are multiple colors of different products such as Black, Red, Silver, etc. The code in Listing 9 loads this XML file, then uses a LINQ query that orders the data by the color values first, then within each color, sorts the data by the list price values.
Listing 9: Use the orderby clause to sort the XML data.
using System.Xml.Linq;
using XmlProcessing;

const string XmlFileName = @"D:\Samples\Products.xml";

// Read XML using XElement
XElement elem = XElement.Load(XmlFileName);

// Use LINQ to XML to retrieve
// all Parent nodes (Elements)
// sorting by Color then by ListPrice
List<XElement> list =
  (from row in elem.Elements("Product")
   orderby row.GetAs<string>("Color"),
           row.GetAs<decimal>("ListPrice")
   select row).ToList();

// Iterate over all Parent nodes
foreach (XElement row in list) {
    // Retrieve each Child node
    // using Element("NodeName").Value
    Console.WriteLine($"Product Name:
        {row.GetAs<string>("Name")}");
    Console.WriteLine($"   Product Id:
        {row.GetAs<int>("ProductID")}");
}

Console.WriteLine();
Console.WriteLine($"Total Products: {list.Count}");
I've been writing LINQ using the query syntax, but you're free to use method syntax for your LINQ queries if you prefer. I prefer method syntax, but each method works the same. If you want to use method syntax to write the LINQ query show in Listing 9, here's the query you would write.
List<XElement> list = elem.Elements("Product")
    .OrderBy(row => row.GetAs<string>("Color"))
    .ThenBy(row => row.GetAs<decimal>("ListPrice"))
    .ToList();
When using the method syntax, the first sorting clause uses the OrderBy() method, and any succeeding sorting clauses use the ThenBy() method.
Try It Out
Run the console application and view the output in the console window. You'll see that the colors have been sorted alphabetically, and within each color you'll see the list price values go from smallest to largest.
Get Only Those Products with a Silver Color
To retrieve a subset of nodes from the XML file, use the where clause in your LINQ query. In the code shown in Listing 10, you see that the where clause takes the values returned from the Color element and only returns those elements whose color is equal to Silver.
Listing 10: Use a Where clause to filter rows in an XML file.
using System.Xml.Linq;
using XmlProcessing;

const string XmlFileName = @"D:\Samples\Products.xml";

// Read XML using XElement
XElement elem = XElement.Load(XmlFileName);

Console.WriteLine($"Total Products in File:
    {elem.Elements("Product").Count()}");
Console.WriteLine();

// Use LINQ to XML to retrieve
// Parent nodes (Elements)
// where the Color value is 'Silver'
List<XElement> list = (from row in elem.Elements("Product")
     where row.GetAs<string>("Color") == "Silver"
     select row).ToList();

// Iterate over all Parent nodes
foreach (XElement row in list) {
    // Retrieve each Child node
    // using Element("NodeName").Value
    Console.WriteLine($"Product Name:
        {row.GetAs<string>("Name")}");
    Console.WriteLine($"   Product Id:
        {row.GetAs<int>("ProductID")}");
}

Console.WriteLine();
Console.WriteLine($"Products Matching Criteria:{list.Count}");
Note that after loading the XML document using the Load() method, I'm displaying the total count of all elements in the document. I'm doing this to show you that the Load() method reads in the complete XML document from disk. There's no streaming of the XML data; the file is read in completely. Be aware that if you have a large XML file, you may not be able to load it all into memory at one time. If you have a very large XML file, you might want to investigate the XmlReader class. Microsoft has an excellent article on streaming a large XML file at How to perform streaming transform of large XML documents (LINQ to XML).
Try It Out
Run the console application and you should see results that look like Figure 9 in your console window.

Get a Single Node
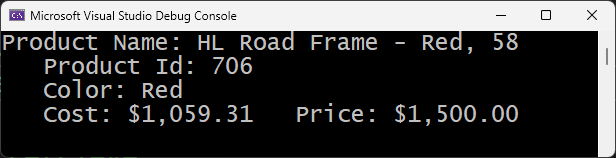
In the Product.xml file, the <ProductID> element has a unique value for each node in the file. In database terms, this is the primary key field. If you wish to retrieve a single node, use the where clause in combination with the SingleOrDefault() method. If the single node is found, then that XElement object is returned. If it isn't found, then a null is returned. Listing 11 shows an example of returning a single node from the Product.xml file.
Listing 11: Apply SingleOrDefault() when you know you are retrieving a single node.
using System.Xml.Linq;

const string XmlFileName = @"D:\Samples\Products.xml";

// Read XML using XElement
XElement elem = XElement.Load(XmlFileName);

// Use LINQ to XML to retrieve
// a single child node
XElement? prod = (from row in elem.Elements("Product")
    where row.GetAs<int>("ProductID") == 706
    select row).SingleOrDefault();

// If node found, display values
if (prod != null) {
    Console.WriteLine($"Product Name:
        {prod.GetAs<string>("Name")}");
    Console.WriteLine($"   Product Id:
        {prod.GetAs<int>("ProductID")}");
  Console.WriteLine($"   Color:
        {prod.GetAs<string>("Color")}");
  Console.Write($"   Cost:
        {prod.GetAs<decimal>("StandardCost"):c}");
  Console.WriteLine($"   Price:
        {prod.GetAs<decimal>("ListPrice"):c}");
}
Try It Out
Run the application and you should see the data for the product with the ID of 706 displayed in the console window, as shown in Figure 10.
Joining Two XML Files Together
In the download with this article, you'll find a Products.xml file and a SalesOrderDetails.xml file. The Product.xml file contains information about each product. The ProductID element is a unique identifier for each node. In the SalesOrderDetails.xml file, there's sales order information that contains just the ProductID element relating back to the Product file, as shown in Figure 11. Using LINQ, you can perform a join between these two XML documents where the ProductID value in the SalesOrderDetails file equals the ProductID value in the Product file.
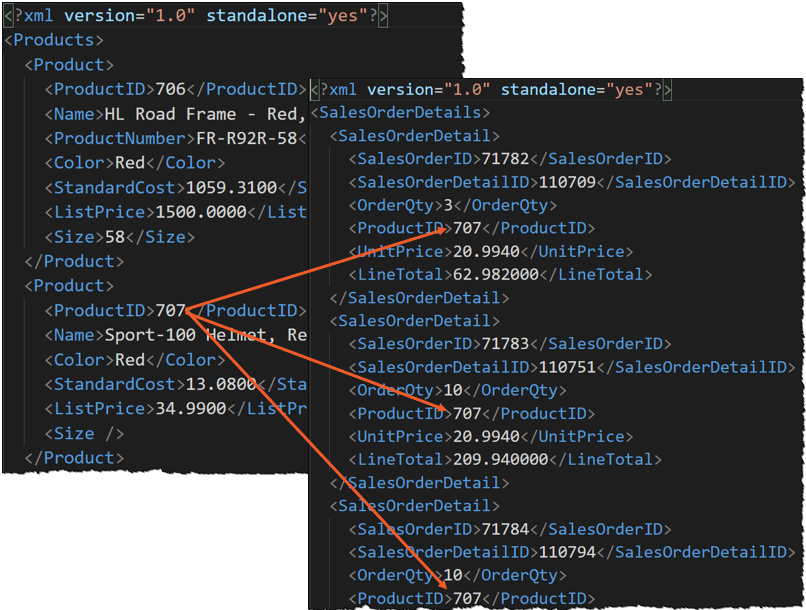
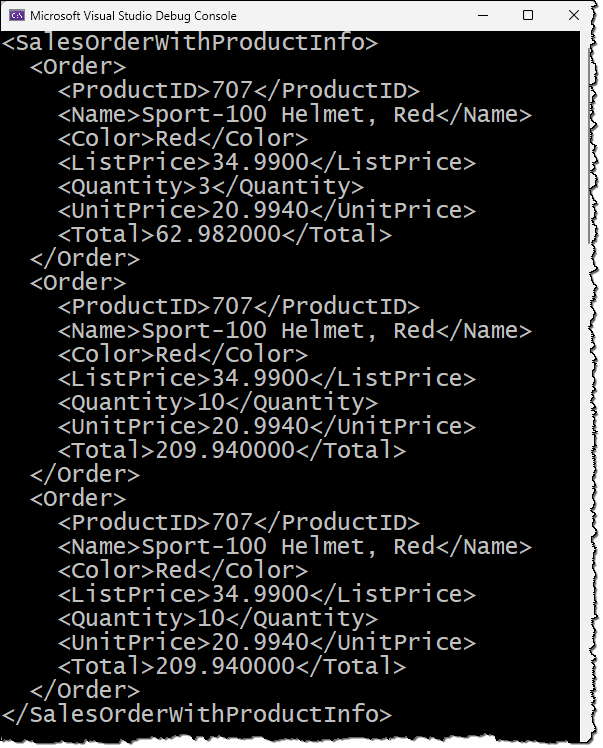
Once this join relates the two nodes, you can write code to create a new XML document with elements from each file. In Listing 12, a LINQ join relates the two records, then uses the ProductID, Name, Color, and ListPrice elements from the Product file, and the OrderQty, UnitPrice, and LineTotal elements from the SalesOrderDetails file to create the new <Order> element. I limited the rows returned from the SalesOrderDetails file to only three so you can see the complete document in Figure 12.
Listing 12: Join two XML documents together using the join, on, and equals statements.
using System.Xml.Linq;
using XmlProcessing;

const string XmlFileName = @"D:\Samples\Products.xml";
const string SalesFileName = @"D:\Samples\SalesOrderDetails.xml";

XElement prodElem;
XElement detailElem;

// Load Products XML File
prodElem = XElement.Load(XmlFileName);
// Load Sales Order Detail XML File
detailElem = XElement.Load(SalesFileName);

// Write Query Here
XElement newDoc = new("SalesOrderWithProductInfo",
    from prod in prodElem.Elements("Product")
        orderby prod.GetAs<int>("ProductID")
    join order in detailElem.Elements("SalesOrderDetail").Take(3)
        on prod.GetAs<int>("ProductID") equals
            order.GetAs<int>("ProductID")
    select new XElement("Order",
        new XElement("ProductID",
            prod.GetAs<int>("ProductID")),
        new XElement("Name",
            prod.GetAs<string>("Name")),
        new XElement("Color",
            prod.GetAs<string>("Color")),
        new XElement("ListPrice",
            prod.GetAs<decimal>("ListPrice")),
        new XElement("Quantity",
             order.GetAs<decimal>("OrderQty")),
        new XElement("UnitPrice",
            order.GetAs<decimal>("UnitPrice")),
        new XElement("Total",
            order.GetAs<decimal>("LineTotal"))
    )
);

// Display Document
Console.WriteLine(newDoc);
Try It Out
Run the application to perform the join, and your console window should look like Figure 12. You can see the three <Order> elements that relate the sales information with the product information.
Get Nodes with Attributes
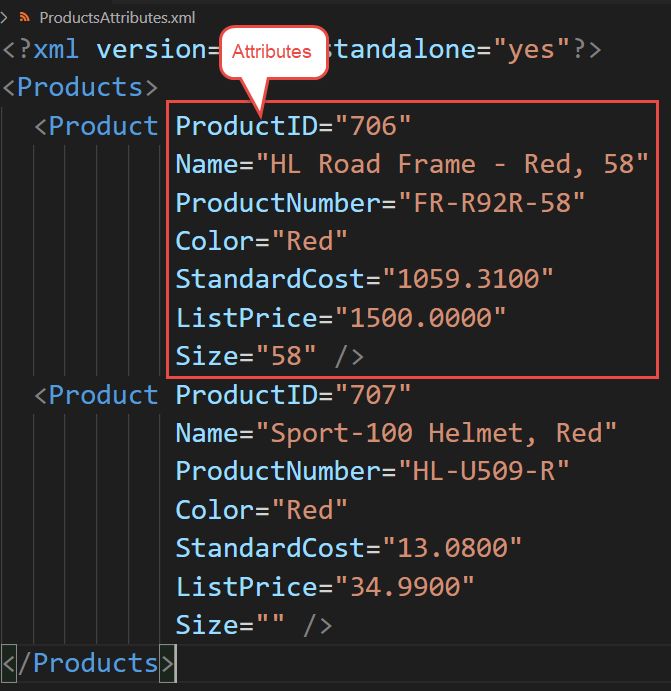
Previously in this article, you saw an example of adding an attribute to an element. Some XML documents you may encounter may be all attribute-based instead of all element-based. In the samples for this article, there's a ProductsAttributes.xml file where the data for each <Product> element is expressed as attributes, as shown in Figure 13.
Read Attributes from Product Elements
Open the Program.cs file and replace the entire contents of the file with the code shown in Listing 13. The beginning of this code should be very familiar, as you're simply loading the XML from the ProductsAttributes.xml file and creating a list of all <Product> elements. When you iterate over each product, use the Attribute() method to retrieve those attribute values you are interested in. Just like you did with the Element() method, you must use the null-conditional operator (?.) in case an attribute is missing.
Listing 13: Retrieve attribute-based XML data using the Attribute() method.
using System.Xml.Linq;

const string XmlFileName = @"D:\Samples\ProductsAttributes.xml";

// Read XML using XElement
XElement elem = XElement.Load(XmlFileName);

// Read all Product Elements
List<XElement> list =
  (from row in elem.Elements("Product")
   select row).ToList();

// Iterate over each Element
foreach (XElement row in list) {
  // Use the Attribute() method
  Console.WriteLine($"Product Name:
      {row.Attribute("Name")?.Value}");
  Console.WriteLine($"   Product Id:
      {row.Attribute("ProductID")?.Value}");
}

Console.WriteLine();
Console.WriteLine($"Total Products: {list.Count}");
Try It Out
Run the application and you should see that it produces the same results as when you read the data using the element-based Products.xml file.
Add an Attribute Extension Method
Just like you did with the Element() method, let's write a generic extension method named GetAttrAs<T>() to check for nulls, and to return the attribute value converted to the data type you request. Open the XmlHelper.cs file and add the method shown in Listing 14. This code is almost exactly the same as the GetAs<T>() method, except you're using the Attribute() method to return the data.
Listing 14: Add a new extension method to handle attribute-based XML.
public static T GetAttrAs<T>
  (this XElement elem, string name)
    where T : notnull
{
  var ret = default(T);

  if (elem != null) {
      XAttribute? current = elem.Attribute(name);
      if (current != null) {
          string value = current.Value;
          // Cast to return data type
          // NOTE: ChangeType() cannot cast
          // to a Nullable type
          if (value != null) {
              ret = (T)Convert.ChangeType(value,
                  typeof(T),
                  CultureInfo.InvariantCulture);
          }
      }
  }

  return ret;
}
Go back to the Program.cs file and modify the loop to use this new extension method when retrieving the attribute values, as shown in the following code snippet.
foreach (XElement row in list) {
    Console.WriteLine($"Product Name:
          {row.GetAttrAs<string>("Name")}");
    Console.WriteLine($"   Product Id:
          {row.GetAttrAs<int>("ProductID")}");
}
Try It Out
Run the application and you should again see the same product data as you did before.
Where, Order By, and Attributes
Again, just like with reading the values of elements, you can use the GetAttrAs<T>() extension method within where and orderby clauses. The code below shows the usage within a where clause to only get those nodes where the Color attribute is equal to “Silver”.
List<XElement> list =
    (from row in elem.Elements("Product")
     where row.GetAttrAs<string>("Color") == "Silver"
     select row).ToList();
Below is an example of using the extension method in an orderby clause to order the data by the color values.
List<XElement> list =
    (from row in elem.Elements("Product")
     orderby row.GetAttrAs<string>("Color")
     select row).ToList();
Aggregation
Many times, when processing a set of data, you want to aggregate that data into a single value. For example, when writing SQL in a database, you can aggregate data using Count, Sum, Min, Max, Avg, and Distinct. LINQ provides the same aggregation methods, and they all work with XML data. Let's look at each of these different methods.
Count
To calculate the total number of nodes in an XML document, apply the Count() method to the set of nodes returned by the Elements() method. The set of nodes is an IEnumerable<XElement> object, so you must use the Count() method, and not the Count property, as shown in the code snippet below.
using System.Xml.Linq;

const string XmlFileName = @"D:\Samples\SalesOrderDetails.xml";
XElement elem = XElement.Load(XmlFileName);

// Count the Sales Orders
int value = elem.Elements("SalesOrderDetail").Count();

// Display Count
Console.WriteLine($"Total Orders: {value}");
The Count() method is used in the code snippet above. To use the Count property, you must force LINQ to XML to read the entire list of the IEnumerable<XElement> items using the ToList() method. Once this method has been called, all elements have been iterated over and the Count property is now available, as shown in the code below.
int value = elem.Elements("SalesOrderDetail").ToList().Count;
Try It Out
Run the application and the total amount of records counted by LINQ is displayed in your console window.
Sum
Each sales order in the SalesOrderDetails.xml file has a <LineTotal> element with a decimal value of the total amount of that line item. If you wish to get a sum of all LineTotal element values, write the code shown below.
using System.Xml.Linq;
using XmlProcessing;

const string XmlFileName = @"D:\Samples\SalesOrderDetails.xml";
XElement elem = XElement.Load(XmlFileName);

// Get the Sum of all Line Totals
decimal value =
    (from row in elem.Elements("SalesOrderDetail")
     select row.GetAs<decimal>("LineTotal")).Sum();

// Display the sum as a currency
Console.WriteLine(value.ToString("c"));
The Sum() method is expecting a collection of single numeric values to add up. This means that the select statement at the end of the LINQ query must return a single numeric value. In the code above, use the extension method GetAs<T>() to produce a collection of LineTotal values. It's this collection of decimal values that the Sum() method adds up to produce the final result.
Try It Out
Run the application and the sum of all LineTotal values is displayed in your console window. I applied the ToString("c") method to the value variable just to display the total as a currency value.
Minimum
Let's continue using the SalesOrderDetails.xml file to find out the minimum value of all the LineTotal element values. This can be accomplished by applying the Min() method to the collection of LineTotal values as shown in the code below.
using System.Xml.Linq;
using XmlProcessing;

const string XmlFileName = @"D:\Samples\SalesOrderDetails.xml";
XElement elem = XElement.Load(XmlFileName);

// Get Minimum value in the Line Totals
decimal value =
    (from row in elem.Elements("SalesOrderDetail")
     select row.GetAs<decimal>("LineTotal")).Min();

// Display the minimum as currency
Console.WriteLine(value.ToString("c"));
Try It Out
Run the application and the minimum value of all the LineTotal values is displayed in your console window.
Maximum
You may also query the SalesOrderDetails.xml file to get the largest value of all the LineTotal values. Write the same code as you did before, but change the Min() method to the Max() method, as shown in the code below.
using System.Xml.Linq;
using XmlProcessing;

const string XmlFileName = @"D:\Samples\SalesOrderDetails.xml";
XElement elem = XElement.Load(XmlFileName);

// Get Maximum value in the Line Totals
decimal value =
    (from row in elem.Elements("SalesOrderDetail")
     select row.GetAs<decimal>("LineTotal")).Max();

// Display the minimum as currency
Console.WriteLine(value.ToString("c"));
Try It Out
Run the application and the maximum value of all the LineTotal values is displayed in your console window.
Average
With the Sum() and Count() methods you already learned, you could easily calculate the average of all LineTotal values in the SalesOrderDetails.xml file, however, this would take two passes through the complete XML document. Instead, Microsoft supplied us with the Average() method, as shown in the code below.
using System.Xml.Linq;
using XmlProcessing;

const string XmlFileName = @"D:\Samples\SalesOrderDetails.xml";
XElement elem = XElement.Load(XmlFileName);

// Get average value in the Line Totals
decimal value =
    (from row in elem.Elements("SalesOrderDetail")
     select row.GetAs<decimal>("LineTotal")).Average();

// Display the minimum as currency
Console.WriteLine(value.ToString("c"));
Try It Out
Run the application and the average value of all the LineTotal values is displayed in your console window.
Distinct
In the Products.xml file, there are forty products with a Color element. Many of the values in the Color elements are duplicated as many products have the same color. If you wanted to populate a drop-down list with a list of colors, you can use the Distinct() method on the Color element values as shown in Listing 15 to get just the unique set of colors.
Listing 15: Use the Distinct() method to get unique values from a single element in the XML document.
using System.Xml.Linq;
using XmlProcessing;

const string XmlFileName = @"D:\Samples\Products.xml";

XElement elem = XElement.Load(XmlFileName);

// Get all distinct colors
// sorted by the color name
List<string> list =
    (from row in elem.Elements("Product")
     select row.GetAs<string>("Color")).Distinct()
     .OrderBy(color => color).ToList();

// Display all unique colors
foreach (string color in list) {
    Console.WriteLine(color);
}
Try It Out
Run the application to view the list of distinct colors extracted from the product data as shown in Figure 14.

Document Modification
So far in this article, you've learned how to read and aggregate data from XML documents. Let's now look at modifying data in an XML document.
Add a New Node
Adding a new node to an existing document is as simple as creating the new element by building a new XElement object and calling the Add() method on the XElement object that contains your XML document, as shown in Listing 16. An alternative method is to use another XElement object and call the Parse() method on an XML string and then add that new XElement object to the other one.
Listing 16: Add a new XElement to an XML document.
using System.Xml.Linq;

XElement elem = XElement.Parse(@"
<Products>
    <Product>
        <ProductID>706</ProductID>
        <Name>HL Road Frame</Name>
        <Color>Red</Color>
        <ListPrice>1500.00</ListPrice>
    </Product>
</Products>");

// Create new XElement to add
XElement newElem =
    new("Product",
        new XElement("ProductID", "745"),
            new XElement("Name", "Bike Helmet"),
            new XElement("Color", "White"),
            new XElement("ListPrice", "50.99")
    );

// Add new element to XML Document
elem.Add(newElem);

// Display Document
Console.WriteLine(elem);
Try It Out
Run the application and you should see a new <Product> node has been added to the XML document, as shown in the snippet below.
<Products>
  <Product>
    <ProductID>706</ProductID>
    <Name>HL Road Frame</Name>
    <Color>Red</Color>
    <ListPrice>1500.00</ListPrice>
  </Product>
  <Product>
          <ProductID>745</ProductID>
          <Name>Bike Helmet</Name>
          <Color>White</Color>
          <ListPrice>50.99</ListPrice>
        </Product>
</Products>
If you're using an XDocument for your XML document, you need to call the Add() method on the Root property of this object to add the new XElement object, as shown in the following code snippet.
doc.Root.Add(newElem);
Update New Node
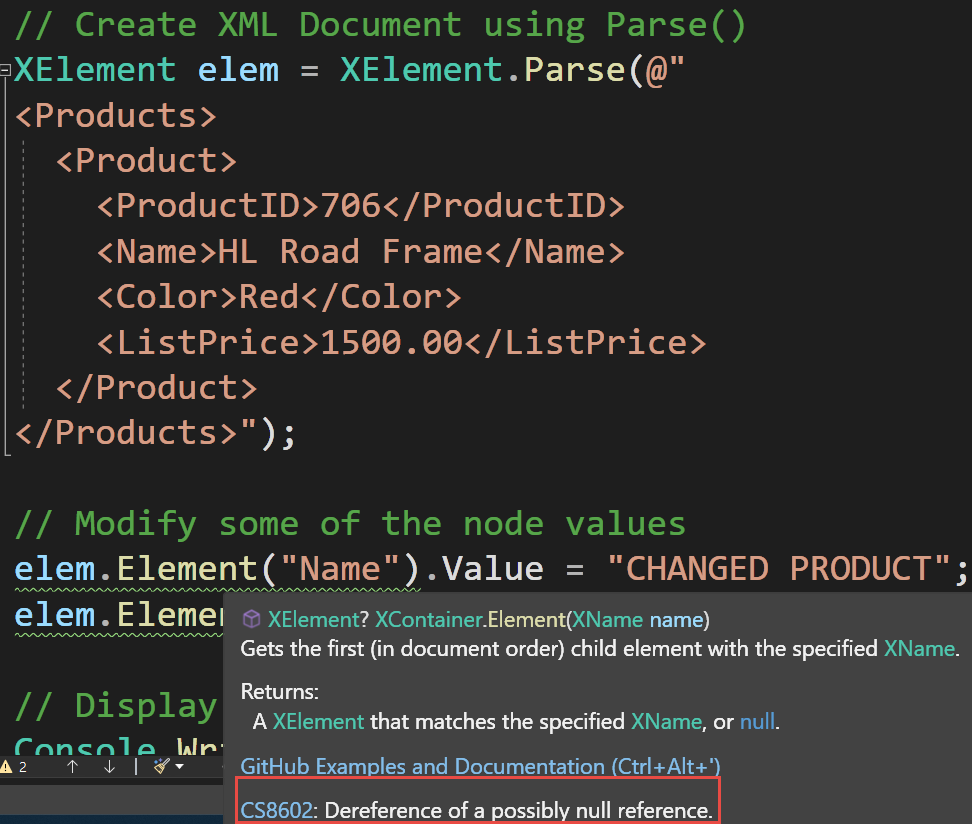
Consider the code in Figure 15. An XElement object is created using the Parse() method, and then the Name and ListPrice elements are updated. However, notice the warning message at the bottom of the figure that says that you could possibly have a null reference. If you misspell the name of the element, you'll get a null reference, which gives you a runtime error when you attempt to update the value.
To avoid this error, create another extension method in the XmlHelper class that updates a value into an element. Open the XmlHelper.cs file you created earlier and add the following method.
public static void UpdateElement(this XElement elem, string name, object value)
{
    if (elem != null) {
        XElement? current = elem.Element(name);
        if (current != null) {
            current.Value = (string)value;
        }
    }
}
Use this new extension method to update any element. First, however, you need to locate the specific element you're interested in modifying. In the code shown in Listing 17, create an XML document with a single node, then retrieve that node using the Descendants().FirstOrDefault() to get a reference to the XElement object. Once you have a reference to the element, you may now update any element by calling the UpdateElement() extension method.
Listing 17: Once you get a reference to an XElement node in the XML document, you can update it.
using System.Xml.Linq;
using XmlProcessing;

// Create XML Document using Parse()
XDocument doc = XDocument.Parse(@"
<Products>
    <Product>
        <ProductID>706</ProductID>
        <Name>HL Road Frame</Name>
        <Color>Red</Color>
        <ListPrice>1500.00</ListPrice>
    </Product>
</Products>");

// Get the First product element
XElement? elem = doc.Root?.Descendants().FirstOrDefault();

if (elem != null) {
    // Modify some of the node values
    elem.UpdateElement("Name", "CHANGED PRODUCT");
    elem.UpdateElement("ListPrice", "999.99");
}

// Display the Changed Element
Console.WriteLine(doc);
Try It Out
Run the application and you should see the changes reflected in the element, as shown in Figure 16.

Delete Node
To delete an element in an XML document, you also must first locate the element to delete just like you did when updating. In the code shown in Listing 18, LINQ is used to locate an element. Check the element retrieved to ensure that it isn't null, and if it isn't, call the Remove() method on that element. When you display the document, you should see that the element has been removed from the XML document.
Listing 18: Delete a node by using the Remove() method after locating the element to delete.
using System.Xml.Linq;
using XmlProcessing;

const string XmlFileName = @"D:\Samples\ProductsSmall.xml";

// Read XML using XDocument
XDocument doc = XDocument.Load(XmlFileName);

// Use LINQ to XML to retrieve
// a single child node
XElement? elem = (from row in doc.Root?.Descendants("Product")
    where row.GetAs<int>("ProductID") == 706
    select row).SingleOrDefault();

if (elem != null) {
    // Delete the node
     elem.Remove();
}

// Display XDocument
Console.WriteLine(doc);
Try It Out
Run the application and you should see that only a single node is left after deleting one of them.
Summary
XML is still used in applications today and at some point, you might need to interact with some XML documents. You now have the skills to create, load, process, and save XML documents. You learned a couple of different methods you can use for adding and updating nodes within an XML document. I highly recommend using LINQ to XML for iterating over, and aggregating data in an XML document. You'll most likely end up building several extension methods to make working with XML documents much simpler. In my next article, I'll go into depth on how to serialize and deserialize XML to C# classes and vice versa.
