


Cloud computing is now in its second decade of existence, and those two decades of development have been nothing but astounding. In these two decades, we've moved way beyond virtual machines and cloud storage. We now have tools like cloud functions (lambdas), containerization, and too many technologies to discuss in one article.
One area that's seen a huge amount of innovation is cloud databases. We have legacy database services hosting familiar databases like MySQL, Postgres, and SQL Server. There are also offerings for many other styles of data, such as documents, columnar data, key value data, etc.
One of the relatively new entrants to cloud computing, and the focus of this article, is called Snowflake. Snowflake is a unique offering because it provides many capabilities that developers need today. Need a cloud-based SQL database? Need a database capable of querying JSON data stored in a column? Need the ability to securely share data with external vendors without exposing your infrastructure to them? Snowflake handles many of these concepts very well.
In my 30+ years of software development, I've seen many products come and go. Every once and a while, I come across a product that I consider a game changer. The product that I'm about to discuss is called Snowflake and I can say without a doubt that this is a game-changing product.
Imagine a request from the marketing department. “We'll be receiving a huge dataset from Widgemo, Inc. We'll be performing analytics on it and a quick turnaround is paramount. This dataset will be around 100,000,000+ records and will be pushed to the usual Amazon Bucket. I know that's not hard to handle but there's an exception. Isn't there always? This dataset has PII (personally identifiable information) in it and needs to be viewable only by the analytics team. Oh, and there's one more little item. We need to share the raw results with the client in real-time every time we process the data. Please get back to us with an estimate.”
There are two ways to handle this request. The first way is a classic cloud process. You add resources to the EC2 (server) and RDS (database) instances to handle the load.
- Create a process to download the data from S3 into a set of objects.
- Send that data into Postgres (or SQL Server, MySQL, etc.).
- Create a process for querying the data masked or unmasked.
- Create a process to send data to the client's preferred sharing technology (downloadable file, SFTP, S3 bucket, Azure Storage, etc.).
- Test and put the process into production.
The second way to handle the load is to use a few commands in Snowflake, like this:
- Add Resources
ALTER WAREHOUSE SET WAREHOUSE_SIZE=LARGE;
- Import data from S3.
COPY INTO FROM S3 <COMMAND OPTIONS HERE>
- Control PII information.
CREATE OR REPLACE MASKING POLICY address_mask
  AS (VAL string) RETURNS string ->
  CASE
    WHEN current_role() IN ('MARKETING') THEN VAL
    ELSE '*********'
 END
- Share data with the client.
CREATE SHARE <COMMAND OPTIONS HERE>
As you can see, each of these processes can satisfy the user's request. The big difference is the time from request to production. The first process could take a day or more, depending on the development team's backlog. The second process is only a few commands from start to finish. Speed is a definite competitive advantage, and it's the built-in features of Snowflake that enable it. Let's have a look.
Snowflake Features
Snowflake is a strange amalgamation of many modern divergent database concepts. The following list represents some of the high-level features:
- It's SQL compliant, offering SELECT, INSERT, UPDATE, DELETE, etc., and CREATE TABLE, CREATE VIEW, CREATE SCHEMA, and JSON querying.
- Snowflake can store and query JSON data stored in a specialized column type.
- It's cloud agnostic (Azure, AWS, GCP). I call this BYOC (bring your own cloud). You can have your Snowflake infrastructure set up on the cloud provider of your choice.
- Embedded Python. Snowflake can embed and call Python code from your queries and procedures.
- Secure data sharing. Snowflake can both share and consume shared data with other Snowflake instances. The cost of compute in shared environments is paid by the consumer of that data, not the host.
- Multiple client access. You can access your data using the technology of your choice. There are drivers for ODBC, Python, Node, and GO.
- Pay as you go with “infinite” scaling. With the flick of a switch (really, a simple command line), you can add or reduce your computer power for queries performed.
“Infinite” Computing with Snowflake Warehouses
When you're dealing with Snowflake, you must understand that the concept of the warehouse isn't what you normally think of: organized data storage. Instead, the concept of data warehouses in Snowflake is COMPUTE not storage. Let me reiterate: It's COMPUTE and not a store of data.
A good metaphor is that it's like a car into which you can add cylinders on the fly. Want to save gas ($$$)? Choose a small car. Want to head down the Autobahn at 200KM an hour? Make the car an eight cylinder. Snowflake COMPUTE is run in powers of 2: 1, 2, 4, 8, 16, 32, and on up to 256 cylinders of COMPUTE power. The unique aspect of Snowflake is that you can control how many cylinders you use for any given transaction. You pay for them, but the power of upgrading a single query or set of queries with the flick of a switch is compelling.
You pay for it using Snowflake's simple model to pay for credits based on the edition of Snowflake you create. Credits are used to pay for credit hours: one credit = one credit hour. Your warehouse size is how the system determines how credit hours are billed and you pay more credits for the larger warehouses. All queries are billed on a per-minute basis. Figure 1 shows the prices per credit hour based on edition.
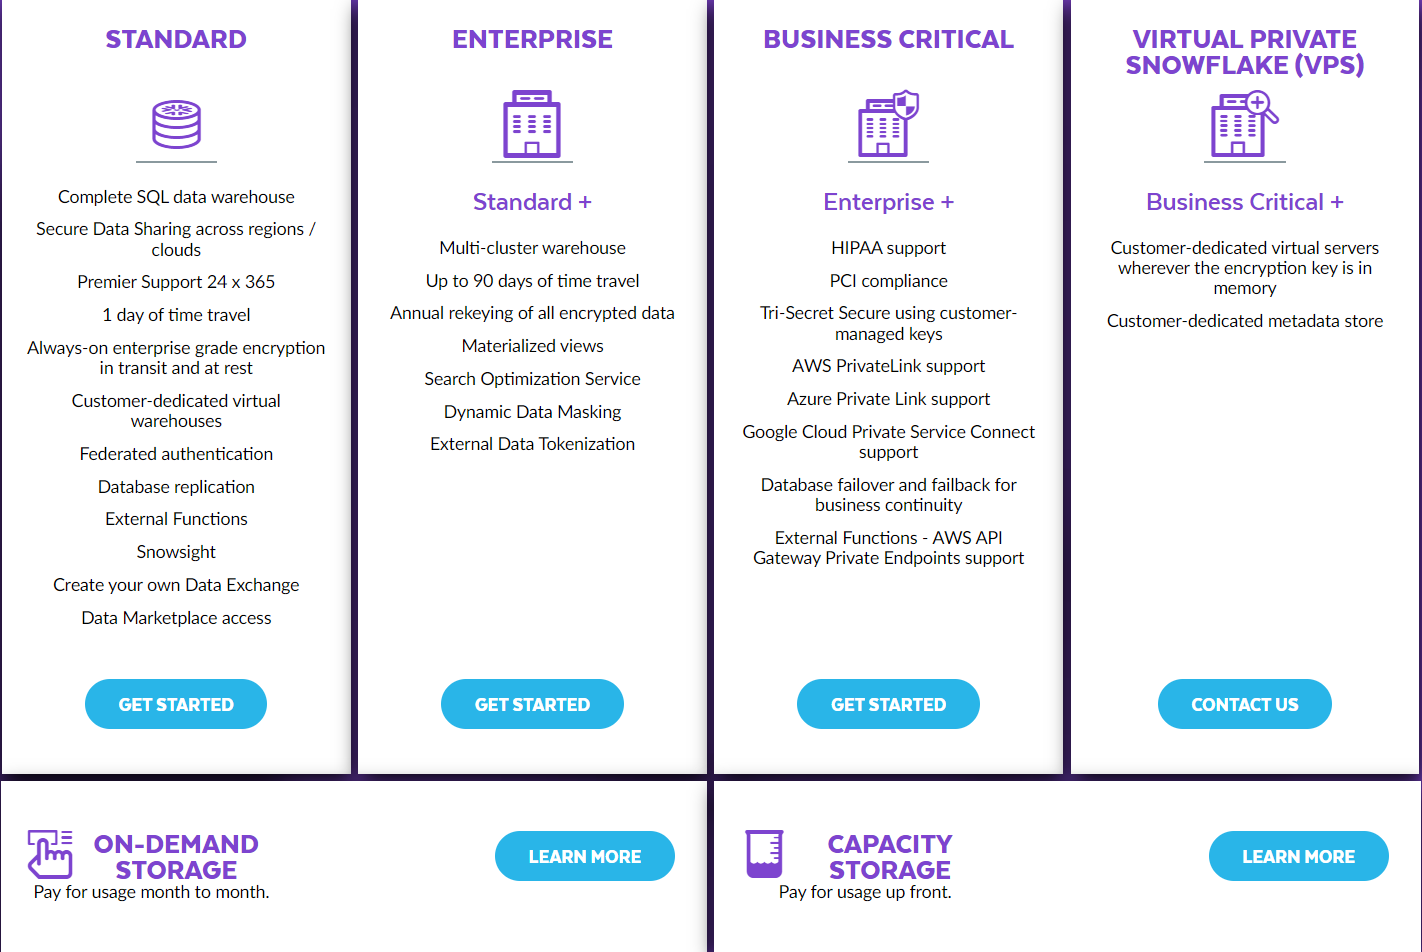
Some features, like PCI or HIPAA, require the higher editions of Snowflake.
To better understand how this works, let's look at an example. The following code is simple. It creates new tables using different warehouse sizes. The source table is called DEMO_DATA and has 100,000,000 records in it. This code creates new copies of that table using different warehouse sizes. The command is as follows:
ALTER WAREHOUSE SET WAREHOUSE_SIZE=SMALL;

CREATE TABLE DEMO_DATA_SMALL AS
  SELECT * FROM
    PRARIE_DEVCON_DATABASE
      .PUBLIC.PEOPLE_HUGE;

ALTER WAREHOUSE SET WAREHOUSE_SIZE=MEDIUM;

CREATE TABLE DEMO_DATA_MEDIUM AS
  SELECT * FROM
  PRARIE_DEVCON_DATABASE
    .PUBLIC.PEOPLE_HUGE;

ALTER WAREHOUSE SET WAREHOUSE_SIZE=LARGE;

CREATE TABLE DEMO_DATA_LARGE AS
  SELECT * FROM
   PRARIE_DEVCON_DATABASE
    .PUBLIC.PEOPLE_HUGE;

ALTER WAREHOUSE SET WAREHOUSE_SIZE=XXLARGE;

CREATE TABLE DEMO_DATA_XXLARGE AS
  SELECT * FROM
   PRARIE_DEVCON_DATABASE
      .PUBLIC.PEOPLE_HUGE;
The results are as follows:
- SMALL: 24 seconds
- MEDIUM: 19 seconds
- LARGE: 12 seconds
- XXLARGE: 8 seconds
As you can see, the performance for larger warehouse sizes is significant. In some, the tables contain over a billion records. The difference is astonishing.
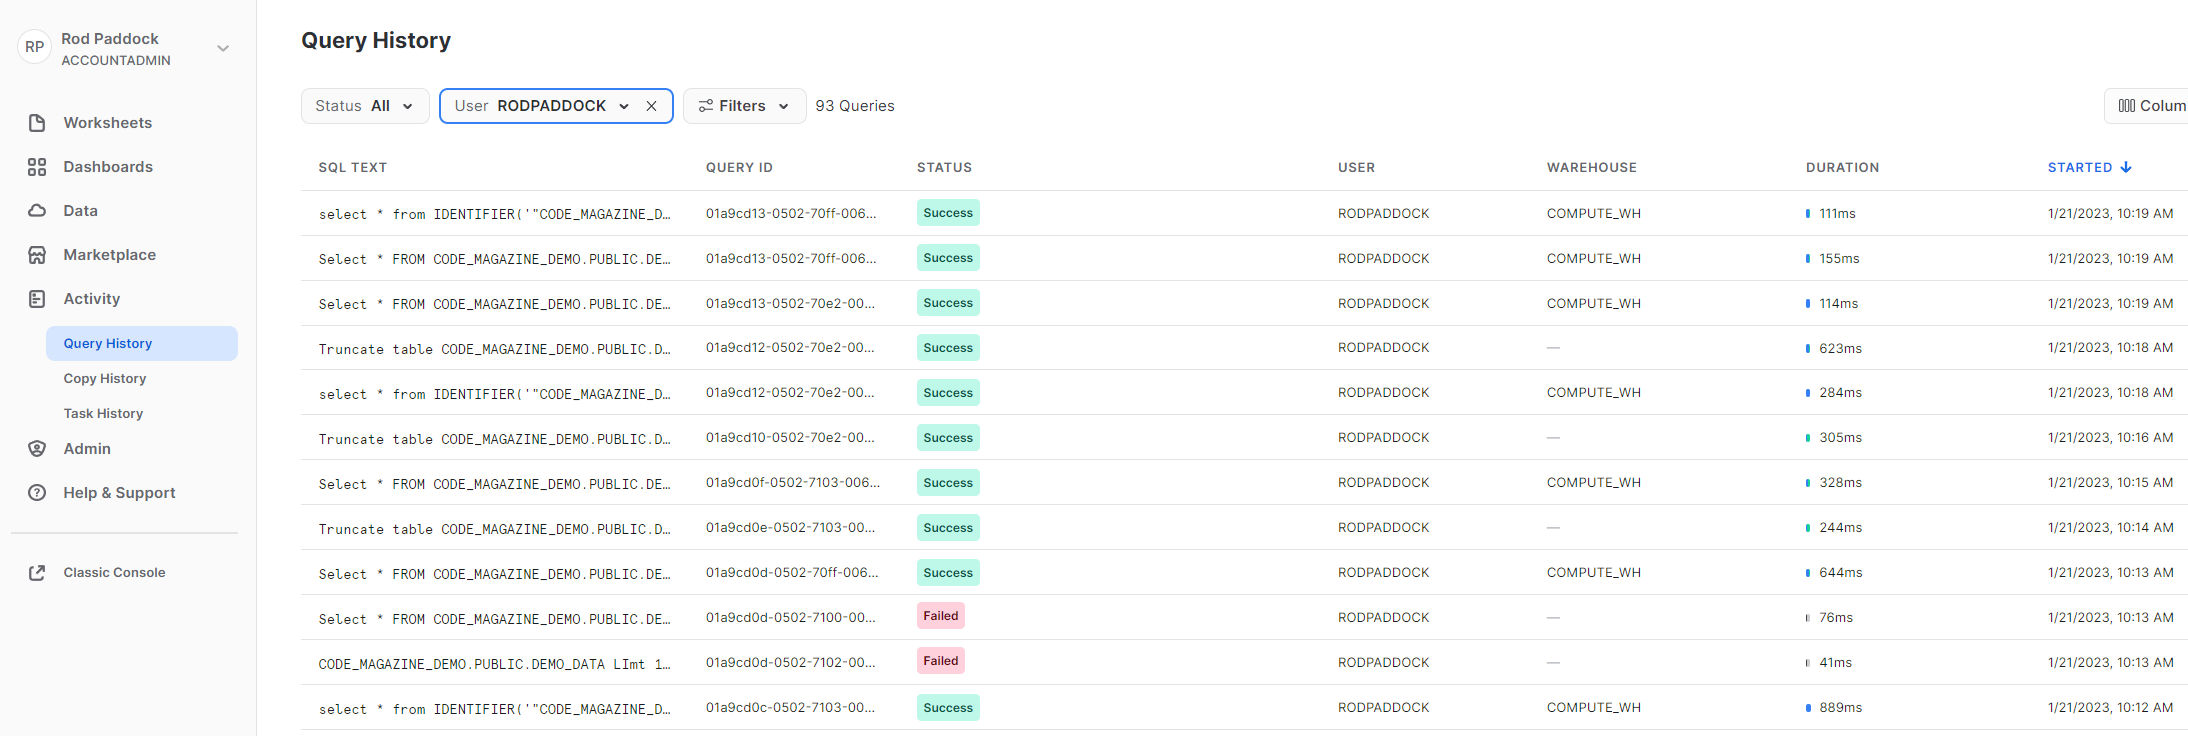
Snowsight
The main mechanism for managing your snowflake infrastructure is a web-based application called Snowsight, which has many features. Figure 2, Figure 3, and Figure 4 highlight some of the most frequently used features of Snowsight.
Understanding Worksheets
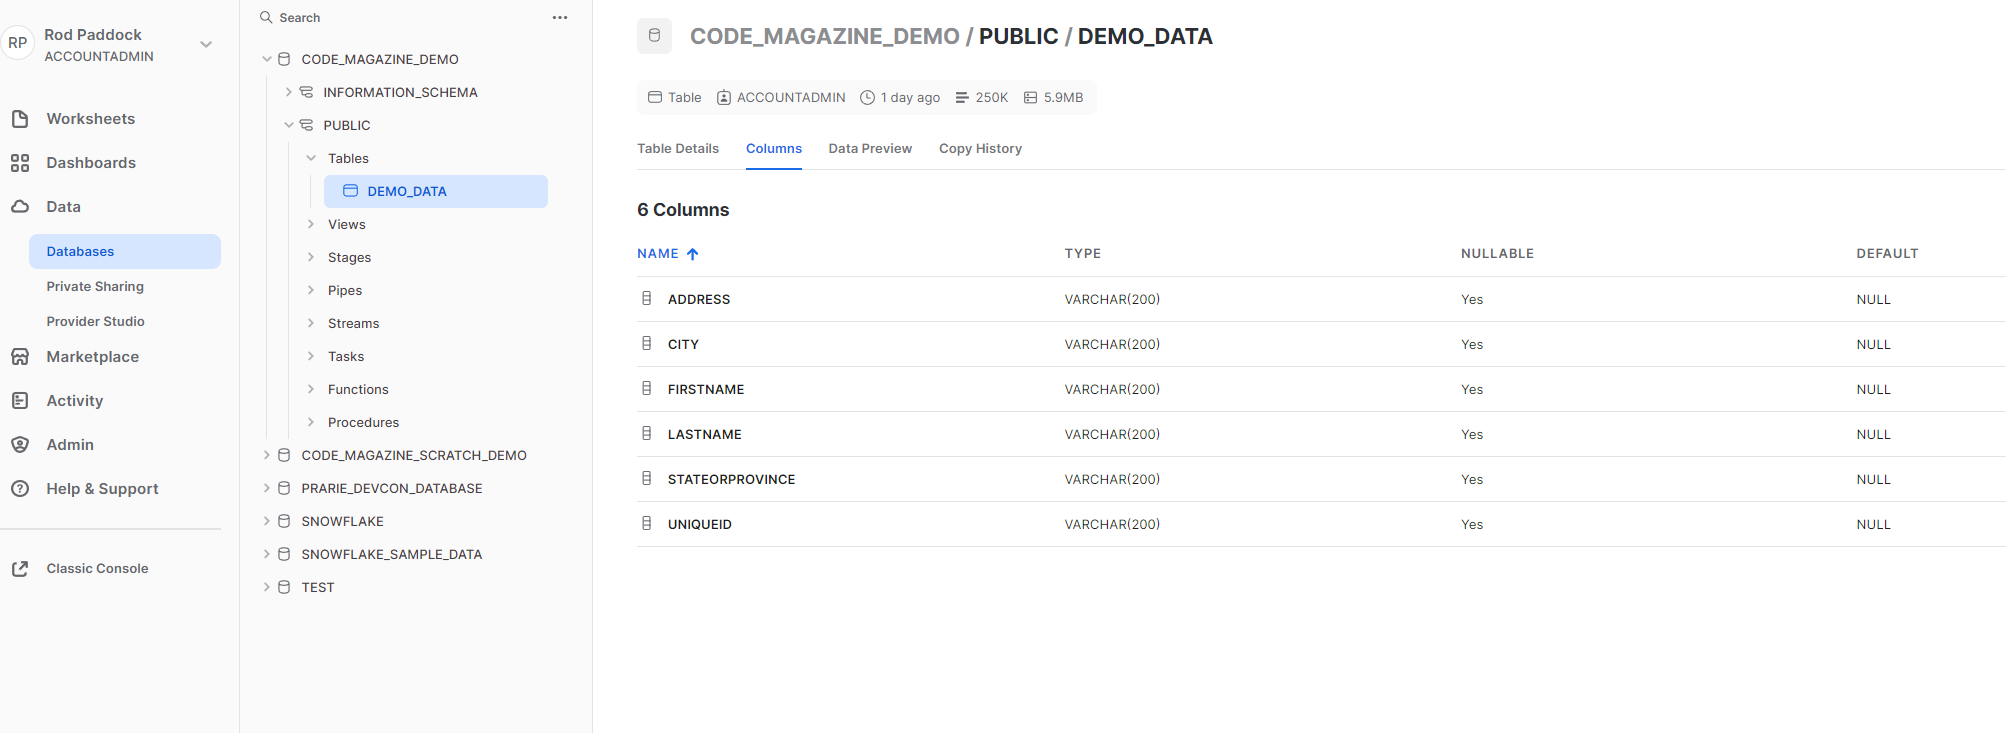
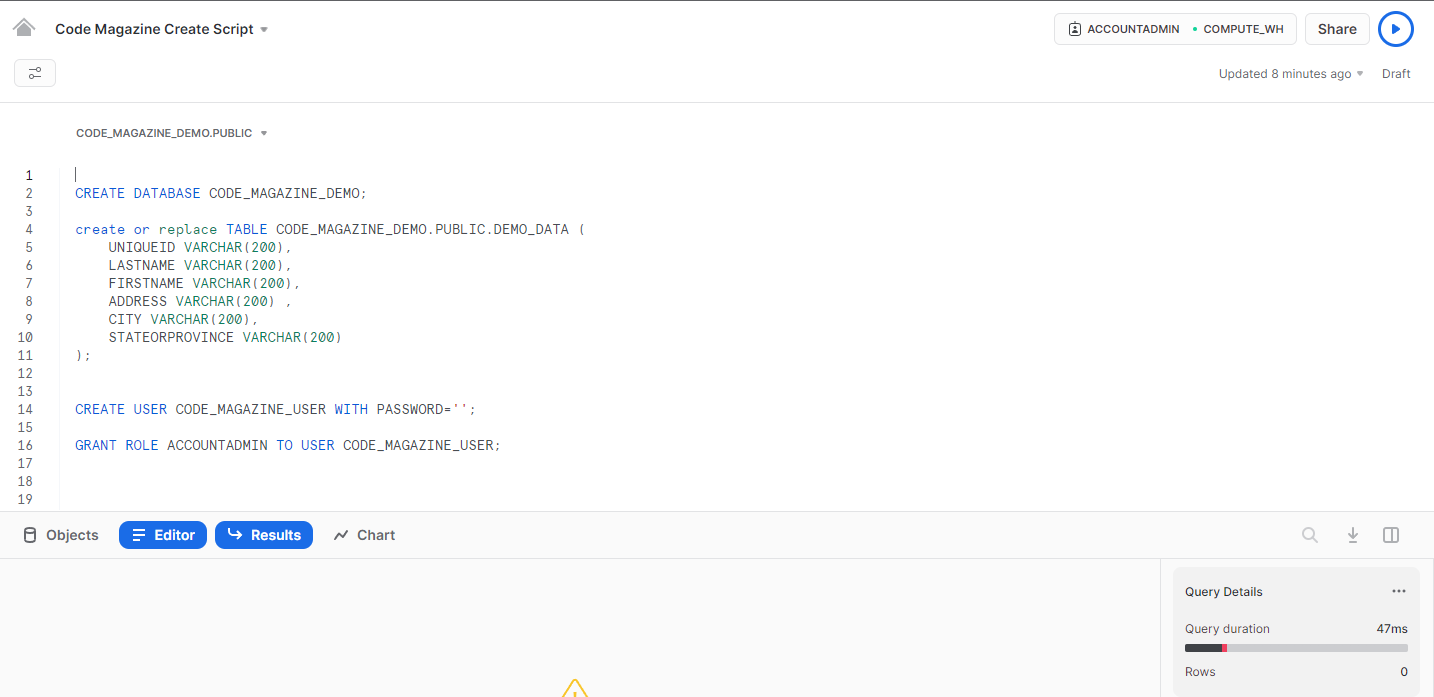
The worksheets screen is where you can run scripts. Figure 5 shows a worksheet with a snippet of code. This snippet is used to create the database, table and useraccount that you'll use in the examples in this article.
CREATE DATABASE CODE_MAGAZINE_DEMO;
create or replace TABLE
CODE_MAGAZINE_DEMO.PUBLIC.DEMO_DATA (
  UNIQUEID VARCHAR(200),
  LASTNAME VARCHAR(200),
  FIRSTNAME VARCHAR(200),
  ADDRESS VARCHAR(200) ,
  CITY VARCHAR(200),
  STATEORPROVINCE VARCHAR(200)
);
CREATE USER CODE_MAGAZINE_USER
WITH PASSWORD='PASSWORD';

GRANT ROLE ACCOUNTADMIN
TO USER CODE_MAGAZINE_USER
Building a Data Loading Pipeline
Before you can begin querying, analyzing, and sharing data, you need to get that data into your Snowflake instance. In the following section, you'll learn how to build a simple pipeline so you can access data via Snowflake. Building a pipeline consists of the following steps:
- Create a CSV file.
- Send CSV to an S3 bucket.
- Construct a Format in code.
- Construct a Stage in code.
- Create a COPY INTO command.
- Open a connection.
- Run a SQL command to load data.
Starting Your Project
This example creates a small console application to fabricate some sample data and send it to Snowflake. The first step is to create a console application via the Visual Studio interface. The code samples that follow depend on C# 11 and its new string capabilities. To enable this in your project, you'll need to add the following section to the top of your Visual Studio project file.
<LangVersion>latest</LangVersion>
Once you've created your project and enabled C#11, you can go to work on the pipeline. Add the code from Listing 1 to your application. Listing 1 is a class capable of creating a specified number of sample objects. These sample objects are returned in a List<T> structure, which you can then save to a CSV file that will ultimately make it into your Snowflake database via an S3 bucket.
Listing 1: Code to create sample data
namespace SnowflakeDemo;

public class RandomDataService
{
    public class Person
    {
        public string UniqueId { get; set; } =
             System.Guid.NewGuid().ToString();
        public string LastName { get; set; } = "";
        public string FirstName { get; set; } = "";
        public string Address { get; set; } = "";
        public string City { get; set; } = "";
        public string StateOrProvince { get; set; } = "";
    }

    public List<Person> GetSamplePeople(int howMany = 100000)
    {
        var lastNames = GetLastNames();
        var firstNames = GetFirstNames();
        var addresses = GetStreetNames();
        var cities = GetCities();
        var states = GetStatesAndProvinces();

        var retval = new List<Person>();
        for (int i = 0; i < howMany; i++)
        {
            var person = new Person();
            person.LastName = lastNames[Between0and9()];
            person.FirstName = firstNames[Between0and9()];
            person.City = cities[Between0and9()];
            person.StateOrProvince = states[Between0and9()];
            person.Address =
               $"{RandomAddressNumber()} " +
               $"{addresses[Between0and9()]}";

            retval.Add(person);
        }
        return retval;
    }
    public int RandomAddressNumber()
    {
        var random = Random.Shared.Next(1000, 99999);
        return random;
    }
    public int Between0and9()
    {

        var random = Random.Shared.Next(0, 9);
        return random;
    }

    public List<string> GetLastNames()
    {
        var retval = new List<string>();
        retval.Add("Lucas");
        retval.Add("Smith");
        retval.Add("Spielberg");
        retval.Add("Gygax");
        retval.Add("Garland");
        retval.Add("Wolff");
        retval.Add("West");
        retval.Add("Kardashian");
        retval.Add("Van Halen");
        retval.Add("Grohl");
        return retval;
    }

    public List<string> GetFirstNames()
    {
        var retval = new List<string>();
        retval.Add("Mary");
        retval.Add("Leslie");
        retval.Add("Jane");
        retval.Add("Jessica");
        retval.Add("John");
        retval.Add("Paul");
        retval.Add("George");
        retval.Add("Ringo");
        retval.Add("Eddie");
        retval.Add("Alex");
        return retval;
    }

    public List<string> GetStreetNames()
    {
        var retval = new List<string>();
        retval.Add("Orange");
        retval.Add("Main");
        retval.Add("Maple");
        retval.Add("Oak");
        retval.Add("Poplar");
        retval.Add("Chestnut");
        retval.Add("Elm");
        retval.Add("Redwood");
        retval.Add("Lincoln Blvd");
        retval.Add("Sepulveda Blvd");
        return retval;
    }

    public List<string> GetCities()
    {
        var retval = new List<string>();
        retval.Add("Seattle");
        retval.Add("Austin");
        retval.Add("Regina");
        retval.Add("Calgary");
        retval.Add("Winnipeg");
        retval.Add("Portland");
        retval.Add("Los Angeles");
        retval.Add("Encino");
        retval.Add("Montreal");
        retval.Add("Ottawa");
        return retval;
    }

    public List<string> GetStatesAndProvinces()
    {
        var retval = new List<string>();
        retval.Add("AB");
        retval.Add("SK");
        retval.Add("CA");
        retval.Add("OR");
        retval.Add("WA");
        retval.Add("TX");
        retval.Add("CO");
        retval.Add("NY");
        retval.Add("MN");
        retval.Add("KY");
        return retval;
    }

}
Send to CSV File
Once you've created your sample data, you can save those records to a CSV file. This example uses the CsvHelper library, which you can install using NuGet with the following command:
Install-Package CsvHelper -Version 30.0.1
Once you've installed the package, add the code from Listing 2. This class has a function capable of writing data to a CSV file with a specified delimiter. My preference is the pipe character ("|") because commas are more prevalent in data than pipe characters.
Listing 2: Use CsvHelper to create a delimited CSV file
using System.Globalization;
using CsvHelper;
using CsvHelper.Configuration;
namespace SnowflakeDemo;
public class CsvTools
{
public static void WriteCsvFile(
   dynamic dataToWrite,
   string outputFile,
   string delimiter)
    {
   var config = new CsvConfiguration(CultureInfo.InvariantCulture);
      //include header
      config.HasHeaderRecord = true;
        //change delimiter
      config.Delimiter = delimiter;
        //quote delimit
        config.ShouldQuote = args => true;
   using (var writer = new StreamWriter(outputFile))
   using (var csv = new CsvWriter(writer, config))
       {
          csv.WriteRecords(dataToWrite);
       }
    }
}
Sending Files to S3
Once you've created your CSV file, you then need to send it into an Amazon S3 bucket. This is done using the AWS SDK S3 package that can be installed via NuGet with the following command:
Install-Package AWSSDK.S3 -Version 3.7.101.58
Once you've installed the package, add the code from Listing 3. This code uses the Amazon SDK to write your file to an S3 bucket. You will need a few elements: the Bucket you wish to write to, AWS Access, and the Secret keys that grant access to this bucket.
Listing 3: Use the Amazon SDK to write the file to an S3 bucket
using Amazon;
using Amazon.Runtime;
using Amazon.S3;
using Amazon.S3.Transfer;

namespace SnowflakeDemo;

public class AmazonTools
{
public AmazonS3Client
   GetS3Client(BasicAWSCredentials creds, RegionEndpoint endpointRegion = null)
 {
     var clientRegion = RegionEndpoint.USEast1;
     if (endpointRegion != null)
     {
         clientRegion = endpointRegion;
     }

     var client = new AmazonS3Client(creds, clientRegion);
     return client;
 }

 public BasicAWSCredentials GetBasicAwsCredentials(
     string awsAccessKey, string awsSecret)
    {
      var retval = new BasicAWSCredentials(
          awsAccessKey, awsSecret);
      return retval;
 }

    public void UploadFile(AmazonS3Client client,
        string bucketName, string fileName)
    {
        var ms = FileToMemoryStream(fileName);
        var utility = new TransferUtility(client);
        var req = new TransferUtilityUploadRequest();
        var fi = new FileInfo(fileName);
        utility.Upload(ms, bucketName, fi.Name);
    }

    public MemoryStream FileToMemoryStream(string fileName)
    {
        var fs = new FileStream(fileName, FileMode.Open, FileAccess.Read);
        var ms = new MemoryStream();
        fs.CopyTo(ms);
        return ms;
    }
}
Sending Data to Snowflake
The final step of this process is to copy data from S3 into your Snowflake databases. This is done via the Snowflake COPY INTO command. The COPY INTO command has two sections that are required to facilitate the loading of your command. These are the STAGE and the FORMAT sections of the command. Let's have a look.
A STAGE is a set of code that provides the information needed to access your S3 data. In particular, you need the bucket, item key, AWS access key, and AWS secret key. The following block of code represents a STAGE used to access data via an Amazon S3 bucket:
's3://[[BUCKET_NAME]]/[[ITEM_KEY]]'
  CREDENTIALS = (AWS_KEY_ID='[[AWS_ACCESS_KEY]]'
  AWS_SECRET_KEY='[[AWS_SECRET_KEY]]')
  FORCE=true
Snowflake supports multiple types of data formats that can be used to load data into snowflake tables. Snowflake supports CSV, JSON, XML, Parquet, and others. FORMATS describe how the data to be loaded is represented in your file to import. The following code represents the format of a CSV file delimited with a pipe character and with data quoted in double-quote characters.
file_format=(type='csv'
  COMPRESSION='AUTO'
  FIELD_DELIMITER='|'
  RECORD_DELIMITER = '\n'
  FIELD_OPTIONALLY_ENCLOSED_BY= '"'
  SKIP_HEADER = 1
  TRIM_SPACE = FALSE
  ERROR_ON_COLUMN_COUNT_MISMATCH = TRUE
  ESCAPE = 'NONE'
  DATE_FORMAT = 'AUTO'
  TIMESTAMP_FORMAT = 'AUTO'
  NULL_IF = ('\\N','NULL')
)
The following code builds a STAGE fragment.
namespace SnowflakeDemo;
public class SnowflakeTools
{
    public string GetStage(
           string bucketName,
           string itemKey,
           string accessKey, string secretKey)
    {

  var retval = $"""
    's3://{bucketName}/{itemKey}'
     CREDENTIALS = (AWS_KEY_ID='{accessKey}'
     AWS_SECRET_KEY='{secretKey}')
     FORCE=true
            """;
        return retval;
    }
}
The following code builds a FORMAT fragment.
public string GetFormat(string delimiter)
{
    var retval = $"""
      file_format=(type='csv'
        COMPRESSION='AUTO'
        FIELD_DELIMITER='{delimiter}'
        RECORD_DELIMITER = '\n'
        SKIP_HEADER = 1
        TRIM_SPACE = FALSE
        ERROR_ON_COLUMN_COUNT_MISMATCH = TRUE
        ESCAPE = 'NONE'
        DATE_FORMAT = 'AUTO'
        TIMESTAMP_FORMAT = 'AUTO'
        NULL_IF = ('\\N','NULL')
      )
         """;
   return retval;
}
Create a COPY INTO Command
Once you have your STAGE and FORMAT you're ready to create your COPY INTO command. The following code can be used to facilitate this process.
public string GetCopyCommand(
   string databaseName,
   string tableName,
   string stageInfo,
   string formatInfo)
{
var retval = $"""
   COPY INTO {databaseName}.PUBLIC.{tableName}
   FROM {stageInfo} {formatInfo};
   """;
   return retval;
}
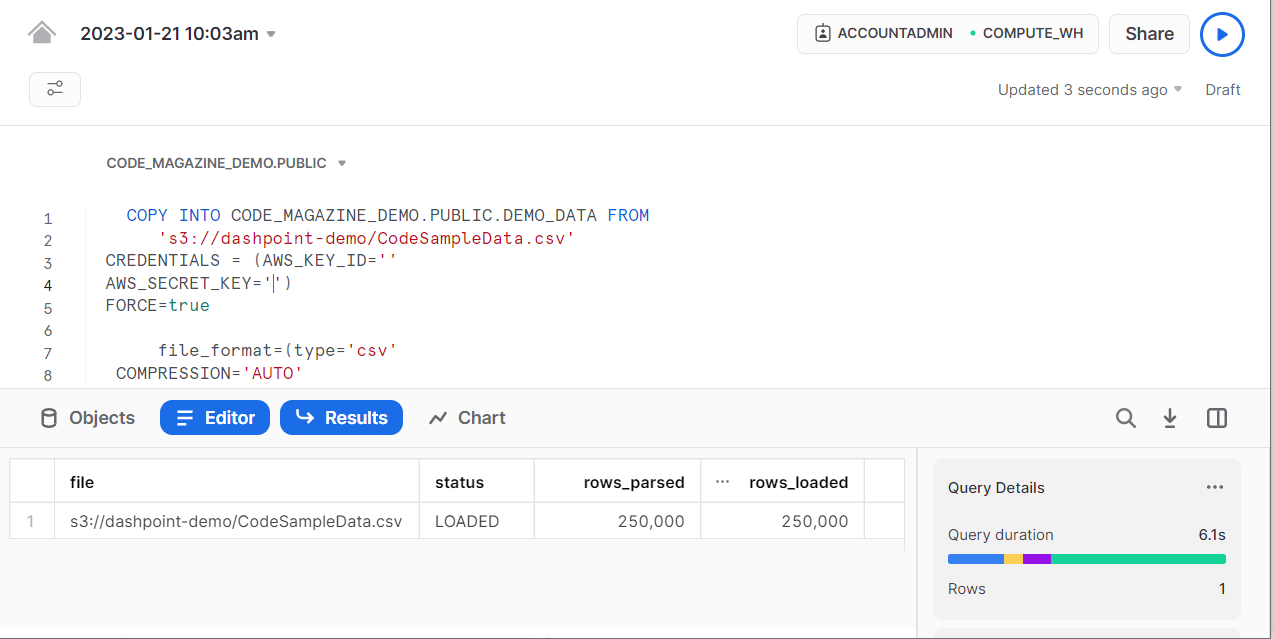
The following code shows the final COPY INTO command that you can execute via a database connection within a Snowsight worksheet.
COPY INTO CODE_MAGAZINE_DEMO.PUBLIC.DEMO_DATA FROM
  's3://dashpoint-demo/SampleData.csv'
  CREDENTIALS = (AWS_KEY_ID='ACCESS_KEY'AWS_SECRET_KEY='SECRET_KEY')
  FORCE=true
  file_format=(type='csv'
     COMPRESSION='AUTO'
     FIELD_DELIMITER='|'
     RECORD_DELIMITER = '\n'
     SKIP_HEADER = 1
     TRIM_SPACE = FALSE
     ERROR_ON_COLUMN_COUNT_MISMATCH = TRUE
     ESCAPE = 'NONE'
     DATE_FORMAT = 'AUTO'
     TIMESTAMP_FORMAT = 'AUTO'
     NULL_IF = ('\\N','NULL')
  );
Executing Commands via ADO.NET
Once you've created your COPY INTO command, you need to call it to load your data into Snowflake. You can run this via a worksheet or via code. Figure 6 shows the code being executed via a worksheet.
If you wish to execute this command from your applications, you need to add one more code fragment. This fragment is the connection string you'll use to call Snowflake via ADO.NET. The next snippet contains a method that helps you create a proper connection string:
public string GetConnectionString(
       string snowflakeIdentifier,
       string userName,
       string password,
       string databaseName,
       string tableName)
 {
  var retval = $"""
        account={snowflakeIdentifier};
        user={userName};
        password={password};
        db={databaseName};
        schema=public;
        warehouse=COMPUTE_WH
    """;
        return retval;
}
The following code should be familiar. You simply open a connection, create a command object and call ExecuteNonQuery(). This is what I was talking about earlier. Snowflake meets you where you are and supports the tools you're familiar with.
using (var conn = new SnowflakeDbConnection()
  { ConnectionString = connStringCode }
    {
    conn.Open();
    var cmd = conn.CreateCommand();
        cmd.CommandText = copyCode;
        cmd.CommandType = CommandType.Text
        cmd.ExecuteNonQuery();
The Pipeline Code
Now you have a nice set of pipeline code. Listing 4 shows the result of all the code you created above. Figure 7 shows the data you created in the pipeline process.
Listing 4: The full pipeline code
using System.ComponentModel;
using System.ComponentModel.DataAnnotations;
using System.Data;
using CsvHelper;
using Snowflake.Data.Client;

namespace SnowflakeDemo
{
  internal class Program
  {
    static void Main(string[] args)
    {
      if (Environment
             .GetEnvironmentVariable("DEMO_KEY") == null ||
        Environment
             .GetEnvironmentVariable("DEMO_SECRET") == null ||
        Environment
             .GetEnvironmentVariable("DEMO_SNOWFLAKE_USER") == null||
        Environment
             .GetEnvironmentVariable("DEMO_SNOWFLAKE_PASSWORD") == null)
     {
       Console.WriteLine(
          "You need the following environmental " +
          "variables setup:\n" +
          "DEMO_KEY\n"+
          "DEMO_SECRET\n"+
          "DEMO_SNOWFLAKE_USER\n"+
          "DEMO_SNOWFLAKE_PASSWORD");
       Console.ReadKey();
     return;
     }
    var awsAccessKey =
        Environment.GetEnvironmentVariable("DEMO_KEY");
    var awsSecret =
        Environment.GetEnvironmentVariable("DEMO_SECRET");
    var snowflakeUser =
        Environment.GetEnvironmentVariable("DEMO_SNOWFLAKE_USER");
    var snowflakePassword =
        Environment.GetEnvironmentVariable("DEMO_SNOWFLAKE_PASSWORD");
    var snowflakeIdentifier = "gra75419";
    var databaseName = "CODE_MAGAZINE_DEMO";
    var tableName = "DEMO_DATA";

    var bucketName = "dashpoint-demo";
    var fileName = @"D:\data\junk\CodeSampleData.csv";
    var itemKey = "CodeSampleData.csv";

    var random = new RandomDataService();
    var csvTools = new CsvTools();
    var amazonTools = new AmazonTools();
    var snowflakeTools = new SnowflakeTools();


   var data = random.GetSamplePeople(250000);
       csvTools.WriteCsvFile(data,fileName,"|");
       amazonTools.UploadFile(amazonTools.GetS3Client(
          amazonTools.GetBasicAwsCredentials(awsAccessKey,awsSecret)),
            bucketName, fileName);

   var stage = snowflakeTools.GetStage(bucketName,itemKey,awsAccessKey,
      awsSecret);
   var format = snowflakeTools.GetFormat("|");
   var copyCommand = snowflakeTools.GetCopyCommand(databaseName,
      tableName,stage,format);

   var connString = snowflakeTools.GetConnectionString(
      snowflakeIdentifier, snowflakeUser, snowflakePassword,
      databaseName, tableName);

    //send the data
   using (var conn = new SnowflakeDbConnection()
   { ConnectionString = connString })
      {
         conn.Open();

         var cmd = conn.CreateCommand();
         cmd.CommandText = copyCommand;
         cmd.CommandType = CommandType.Text;
         cmd.ExecuteNonQuery();
       }
       Console.WriteLine("Data Sent To Snowflake");
       Console.ReadKey();

     }
   }
}
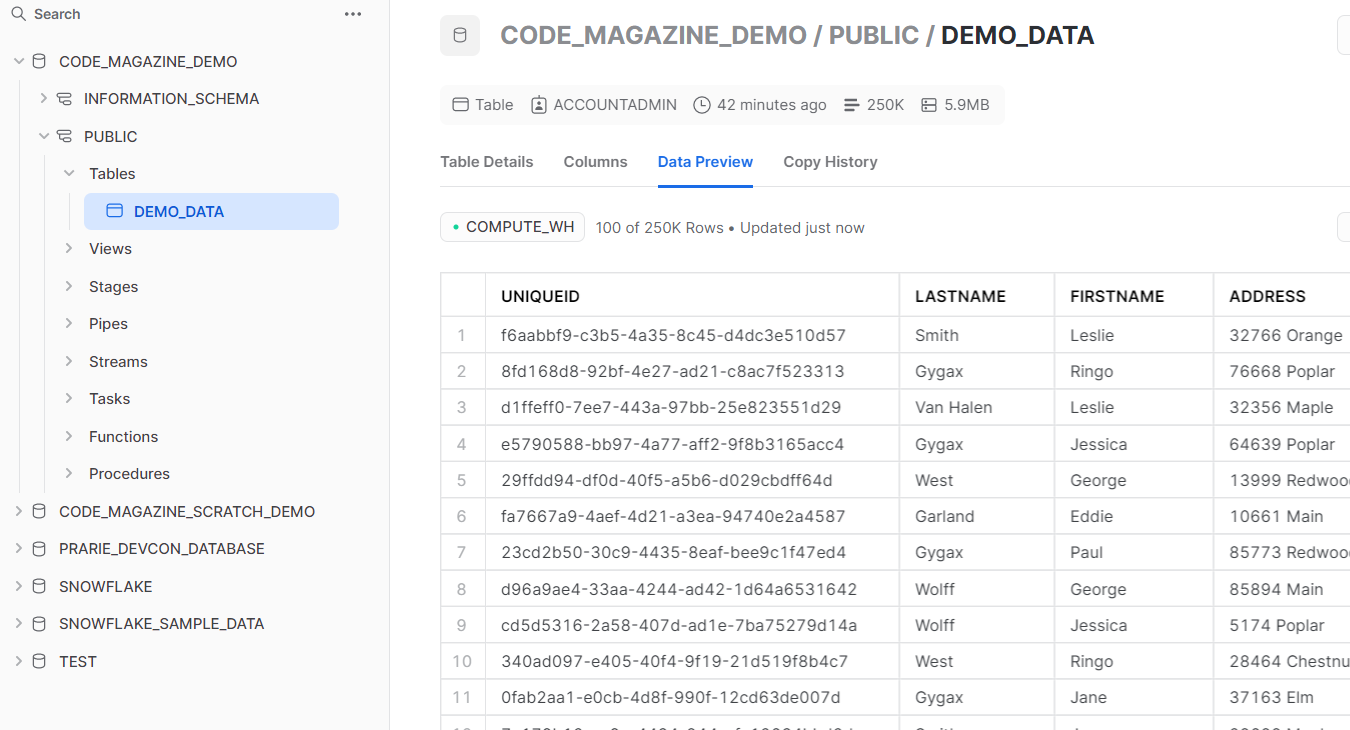
Securing Information with Masking
One of the more compelling features of Snowflake is the ability to control access for who can view the contents of different data elements. This is particularly important when dealing with PII information. This feature is known as a masking policy in Snowflake. The following command shows how to secure data via masking policy. It creates a masking policy that shows data unmasked for people with the MARKETING role and shows asterisks for all others. That policy is then applied to the ADDRESS column in the DEMO_DATA table.
CREATE OR REPLACE MASKING POLICY address_mask
  AS (VAL string) RETURNS string ->
  CASE
     WHEN current_role() IN ('MARKETING') THEN VAL
     ELSE '*********'
  END
ALTER TABLE DEMO_DATA
  MODIFY COLUMN ADDRESS SET
  MASKING POLICY address_mask;
Figure 8 shows the unmasked data.
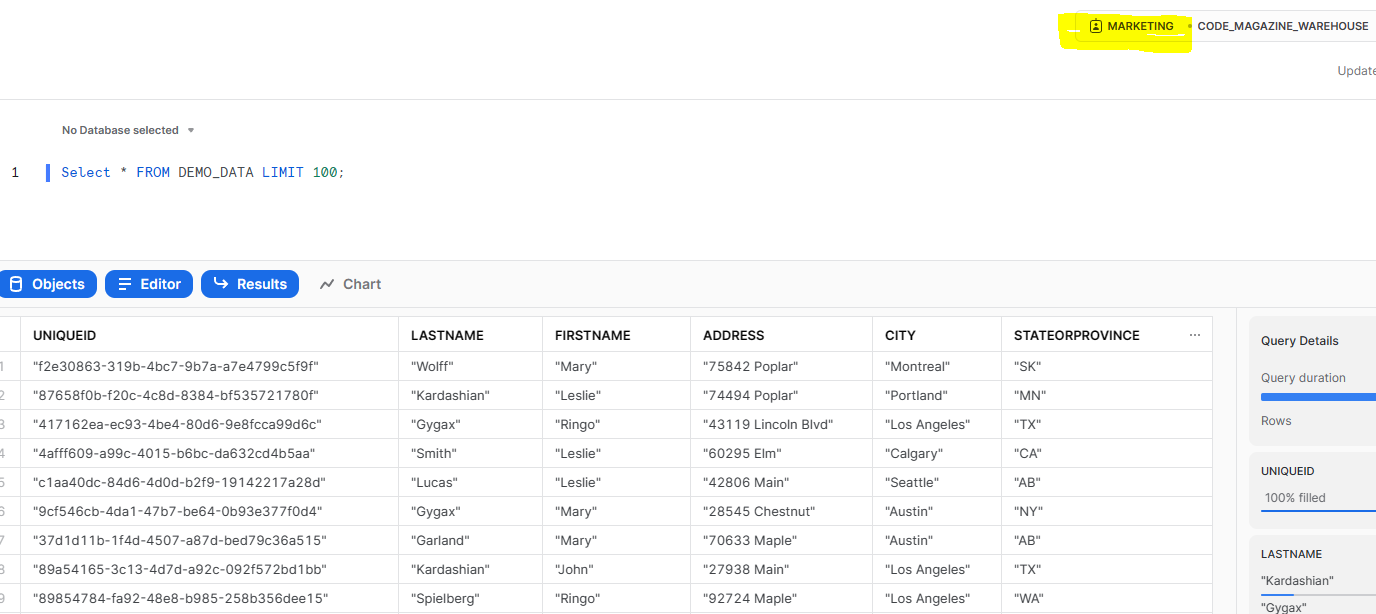
Figure 9 shows the masked data that most users will see.
Sharing Data
Once you have data in Snowflake, you can share that data with other snowflake users. The real benefit of this is that the consumer of that data pays for the compute costs. With other cloud databases, the owner of the data is responsible for its consumption costs.
You have a couple of choices when sharing data. The first choice is to share data with a consumer in the same region where your Snowflake instance was set up. This is by far the simplest mechanism for sharing data and, from my experience, the most common use case.
The second choice is to share data with a consumer residing in a different region or other cloud provider. This type of sharing uses Snowflake's replication tools. For this article, I'll be exploring the simple use case.
Outbound Shares and Inbound Shares
There are two basic share types. Outbound shares allow you to share data with other Snowflake users from one or more of your Snowflake instances. Inbound shares are data sources provided to you by other Snowflake users.
You have two ways to create an outbound share: via SQL code or via Snowsight. This article demonstrates the SQL code way to do this. The first is to execute commands from a worksheet like this:
CREATE SHARE CODE_MAG_OUTBOUND ;
GRANT USAGE ON DATABASE CODE_MAGAZINE_DEMO
 TO SHARE CODE_MAG_OUTBOUND
GRANT USAGE ON SCHEMA CODE_MAGAZINE_DEMO.PUBLIC
  TO SHARE CODE_MAG_OUTBOUND;

GRANT SELECT ON CODE_MAGAZINE_DEMO.PUBLIC.DEMO_DATA
  TO SHARE CODE_MAG_OUTBOUND;

CREATE SECURE VIEW V_SORTED_DEMO_DATA
  AS
  SELECT * FROM DEMO_DATA ORDER BY LASTNAME,FIRSTNAME;

GRANT SELECT ON VIEW
  CODE_MAGAZINE_DEMO.PUBLIC.V_SORTED_DEMO_DATA
    TO SHARE CODE_MAG_OUTBOUND;

ALTER SHARE CODE_MAG_OUTBOUND
  ADD  ACCOUNTS=XXXXXX;
Creating Databases from Shares
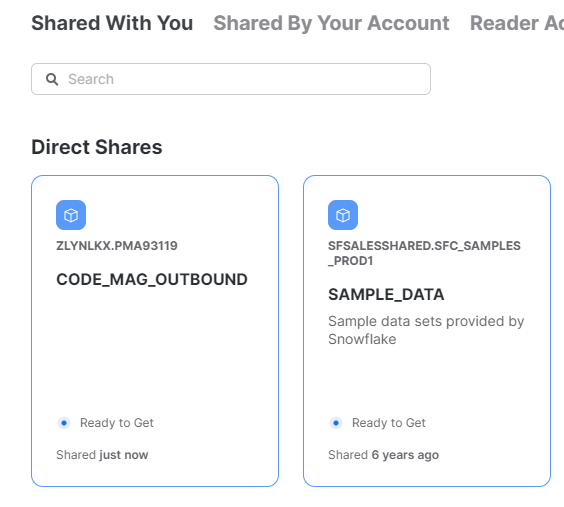
Once data has been shared with you from another Snowflake account, you can access that data via a database that's created from the share. There are two ways to create a database from a share. The first is Snowsight. You do this by selecting Data-Private Sharing from Snowsight. Then choose “Shared with You” on the data sharing screen. This brings up a screen with datasets shared with you, as shown in Figure 10.
Click on the share you wish to create a database for. You will be presented with the Get Data dialog, as shown in Figure 11.
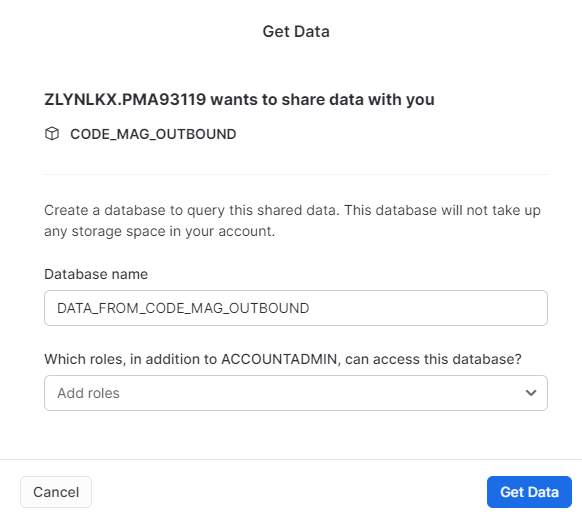
From this dialog, you can specify the name of your database. You can also optionally specify which security group(s) can access this database.
The second way to create a database from a share is to execute a command from a Snowsight worksheet. To create a database from a share, issue this command:
CREATE DATABASE ANOTHER_DEMO
  FROM SHARE  XXXXX.YYYYY.CODE_MAG_OUTBOUND
The share name parameters for this command can be derived from the screen in Figure 11 from the previous example.
Once you've created a database from a share, you can access it via Snowsight, as shown in Figure 12.

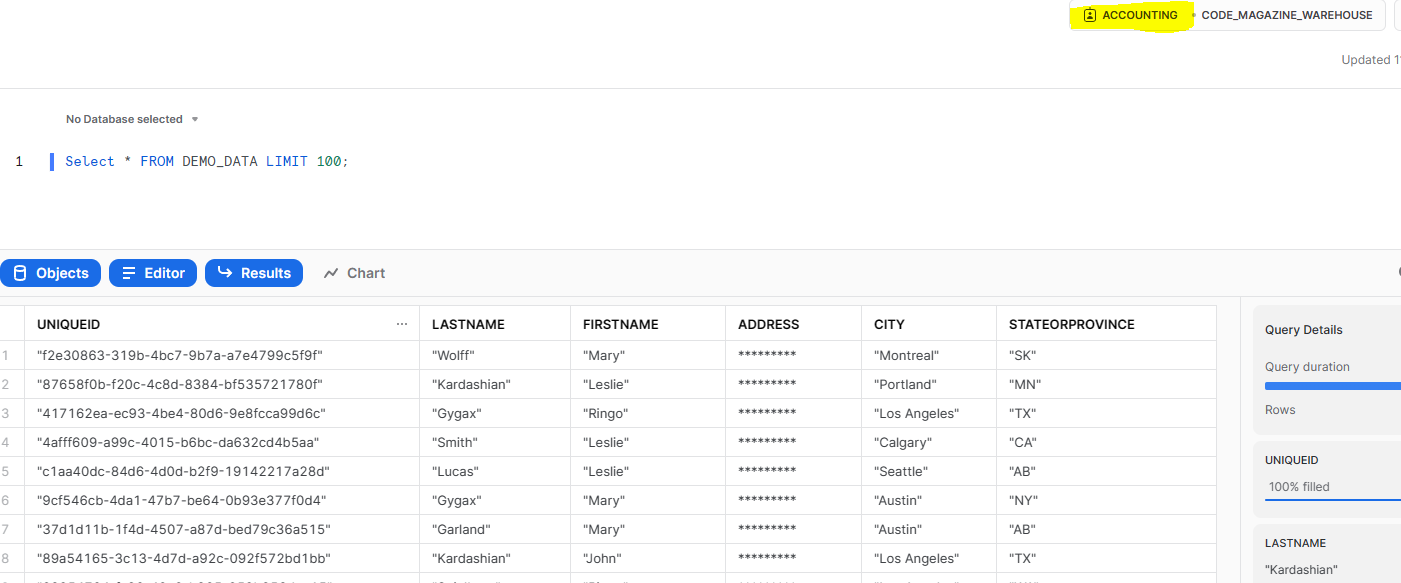
Figure 13 shows data shared from the demos created earlier in this article. One thing you'll notice immediately is that the masking policy is in effect on shared data.

I've been working with Snowflake for several years now and it wasn't until 2022 that I realized that the ability to share data in such a simple fashion is monumental. We no longer need to set up S3 buckets or Azure Blog Storage accounts. We simply grant access to a set of tables/views and the customer can access them using the SQL commands they're already proficient in.
Conclusion
Snowflake is that rare product that possesses immense power yet can be used by mere mortals to access that power. This article only scratches the surface of what Snowflake is capable of. Other areas of interest to you might include Python integration, clean room technology, and more interesting use cases using another “snow” technology called Snowpipe. Give them a look. You won't be disappointed.
