


In this article, I'll cover the anatomy of handling an incoming HTTP request. I'll also uncover how Laravel internally runs all kinds of middleware to ensure that it generates a response for the request. Finally, I'll look at how it generates the response, down to the client that initially requested the resource.
This new article on PHP Laravel is part of a series I launched a few issues back to cover developing MVC applications with PHP Laravel. If you haven't had a chance to read the first three tutorials, you can access them through these links:
- Building MVC Applications in PHP Laravel: Part 1
- Building MVC Applications in PHP Laravel: Part 2
- Service Containers in PHP Laravel
One component often overlooked or perceived as part of the C (controller) in MVC is the routing engine. It's the brains behind the MVC pattern. It's one of the most important components in MVC that initially receives the request from the client and allocates which controller will handle it.
The brains behind routing in Laravel is the app\Providers\RouteServiceProvider.php file. This service provider reads and loads all route configuration files you've defined in your application and makes all the route configurations ready to serve the next HTTP Request.
Middleware, on the other hand, is as important as a routing engine. Through middleware, you can inspect and take action before and/or after a specific request is handled and processed by Laravel. For instance, you can have middleware that runs for a specific route, the members' area route, to check whether the user trying to access this route is indeed a member. Accordingly, the middleware can take action to either redirect the user to the membership page to become a member or allow the request to go through for a registered member.
The Anatomy of a Laravel Request Life Cycle
Let's go through the anatomy of a typical Laravel HTTP request and study all the major components involved in processing this request.
Figure 1 highlights the components that I'll be discussing.
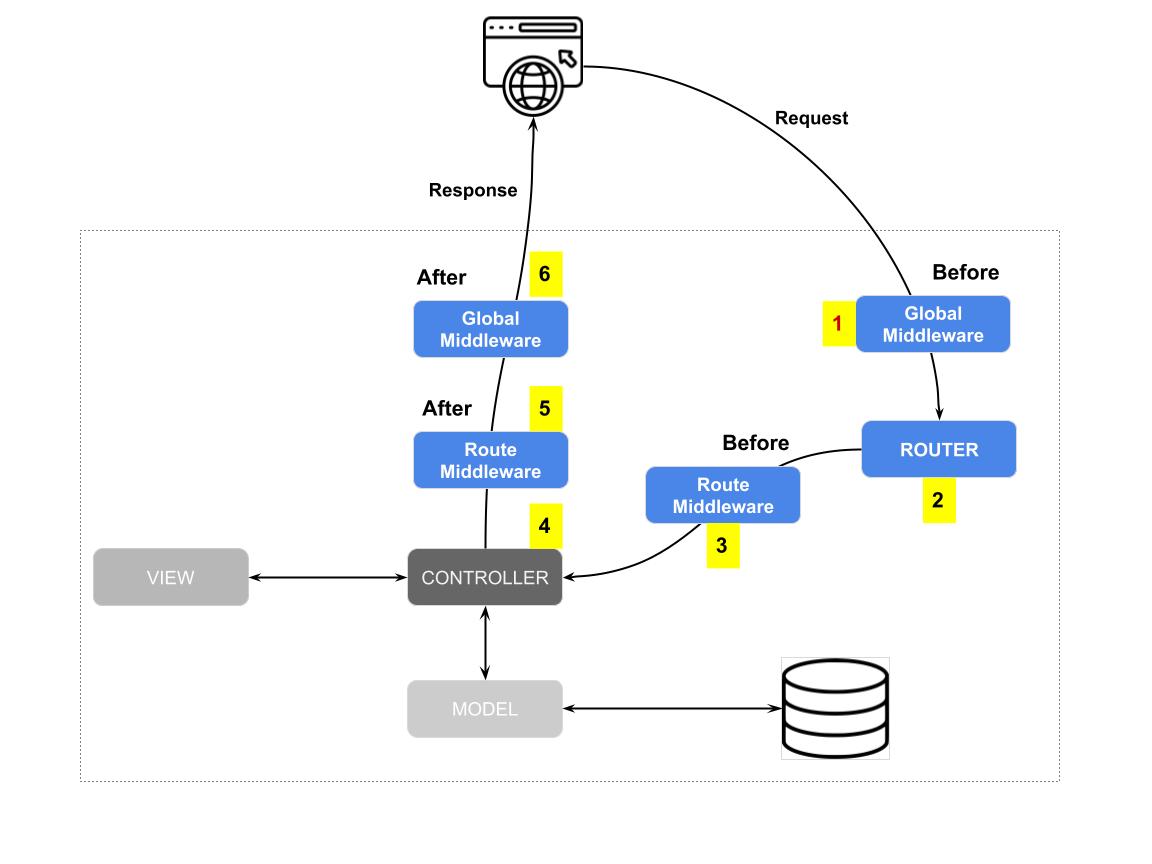
Let's go through the stages involved in Figure 1:
- The browser (client) requests a resource (View or API endpoint).
- Laravel bootstraps the application.
- The HTTP kernel, a component managed by Laravel, passes the incoming request through a series of Global middleware. Global middleware applies to any incoming HTTP request. That middleware is defined inside the
app\Http\Kernel.phpfile through the$middlewarevariable. - The kernel collects all of the global middleware and runs them one by one. It runs the Before Global Middleware first. I'll cover the Before and After Middleware later in the article.
- The kernel then hands off the request to the
Illuminate\Routing\Routerclass. - The router collects all middleware defined on the route and runs them individually. It runs the Before Middleware first.
- Right after running all Before Middleware, the router matches the incoming request with the suitable Controller and Action function and hands off the execution of the request to the Controller to generate a proper response.
- The router then runs all the After Middleware on the resulting response from the previous step.
- The kernel collects all of the global middleware and runs them one by one. It runs the After Global Middleware now.
- Laravel finally sends down the response to the requesting client. This step ends the request on the server side.
To process a request, Laravel runs Global, Route Group, and Route-specific middleware.
This is, in brief, how Laravel handles an incoming request.
Middleware in Laravel
Anything that runs on a server between receiving an incoming HTTP request and sending out a response is technically middleware.
Middleware is the glue between requests and responses. When a new request hits your application, Laravel passes this request through a series of middleware before generating a response and sending it back to the browser.
Let's discuss the types of middleware you can have in Laravel.
Before Middleware
A middleware in Laravel can have two phases: before and after. The before-phase is the code Laravel runs against the incoming request before it handles it inside a controller/action.
Here's an example of how to write a Before Middleware in Laravel.
class BeforeMiddleware implements Middleware {
    public function handle($request, Closure $next)
    {
        // Do stuff here

        return $next($request);
    }
}
The BeforeMiddleware has a handle() function that includes your custom code and ends with a call to the next middleware in the chain of middeware that Laravel should run.
After Middleware
The middleware after phase is the code Laravel runs against the response generated by executing the matching controller/action. In this context, the after phase inspects the response rather than the request and adds additional headers, for example.
Here's an example of how to write an After middleware in Laravel.
class AfterMiddleware implements Middleware {
    public function handle($request, Closure $next)
    {
        $response = $next($request);

        // Do stuff here
        return $response;
    }
}
The AfterMiddleware has a handle() function that lets Laravel first execute the incoming request and generate a response. The code stores the response in the $response variable. Then, the middleware can inspect the generated response and add more things to it before returning the final response to the next middleware in the chain.
Full Middleware
You can also combine before and after phases both in a single middleware as follows:
class AllPhasesMiddleware implements Middleware {
    public function handle ($request, Closure $next)
    {
        // Do stuff here
        $response = $next($request);

        // Do stuff here
        return $response;
    }
}
In this case, the AllPhasesMiddleware runs some code before generating a response from the incoming request. It then inspects the resulting response to add more things and returns this response to the next middleware in the chain.
Middleware has two phases: a Before phase that occurs before processing the request and an After phase that occurs after running the controller/action.
Types of Middleware
In Laravel, there are three different types of middleware:
- Global middleware
- Route Group middleware
- Route middleware
Global middleware is defined inside the app\Http\Kernel.php file. Open this file and locate the $middleware array variable.
protected $middleware = [
    ...\TrustProxies::class,
    ...\HandleCors::class,
    ...\PreventRequestsDuringMaintenance::class,
    ...\ValidatePostSize::class,
    ...\TrimStrings::class,
    ...\ConvertEmptyStringsToNull::class,
];
In the next article of this series, I'll dig deeper and show you how the different types of midleware run inside the Laravel framework. For now, it's important to familiarize yourself with the different types of middleware available in Laravel.
The route group middleware is also defined inside the same kernel file. Open this file and locate the $middlewareGroups array variable.
Listing 1 shows the route middleware groups.
Listing 1: Route middleware groups
protected $middlewareGroups = [
    'web' => [
        ...\EncryptCookies::class,
        ...\AddQueuedCookiesToResponse::class,
        ...\StartSession::class,
        ...\ShareErrorsFromSession::class,
        ...\VerifyCsrfToken::class,
        ...\SubstituteBindings::class,
  ],
  'api' => [
      'Throttle:api',
      ...\SubstituteBindings::class,
   ],
];
In the Router section later in this article, I'll discuss the route middleware groups in depth. As you'll see shortly, the route middleware is assigned to specific routes or a group of routes.
You can read more about Laravel middleware here (https://laravel.com/docs/9.x/middleware).
The Router Object
Routes are the stepping stone in the lifecycle of MVC applications. Whenever you open an existing Laravel application, you should first open its routes and study them. Learning about the application's routes makes it very clear what functionality it offers and how to access all of its features.
A route in Laravel is a bridge that connects the outside world to your source code by mapping an incoming HTTP request to either a Closure or a Controller Action to return a response to the client.
For those following this series on building MVC applications with PHP Laravel, open the sample Laravel application you built in the first two episodes.
Let's define a basic route in Laravel. Go to the routes/web.php file and add the following route definition:
Route::get('/', function () {
    return view('welcome');
});
In this code snippet, you're defining a GET request mapping. Whenever you visit the application's root path, represented by a forward slash, the Closure runs and returns the welcome.blade.php view to the browser.
The Route object corresponds to the Illuminate\Support\Facades\Route facade. The Illuminate\Routing\Router object backs up this facade. The Router object, as I'll explore in a future article of this series on Advanced Routing in Laravel, is responsible for running the incoming HTTP request through a pipeline of middleware until it generates a response and returns it to the browser.
Not only can you define GET HTTP requests, but all well-known HTTP methods are available, such as GET, POST, PATCH, DELETE, etc. Here's a full list of HTTP methods to study: (https://developer.mozilla.org/en-US/docs/Web/HTTP/Methods)
Let's explore routes in more depth now.
Defining Routes
To define a route, you need first to understand what functionality you're building. For example, in an application to manage real estate properties, one of the modules an admin needs is to manage real estate properties.
An admin needs to:
- View a list of all real estate properties
- View the details of single real estate property
- Add a new real estate property
- Update the details of existing real estate property
- Delete existing real estate property
Now that you understand what functionality you need, let's open a Laravel application and define all those routes the Laravel way.
First, you'll define the routes manually. In the next section, you'll learn about route resources.
Open the routes/web.php file once again and paste the following collection of route definitions:
Get a list of all properties:
Route::get(
   '/properties',
   [PropertyController::class, 'index']
)->name('properties.index');
Get a single property:
Route::get(
   '/properties/{property}',
   [PropertyController::class, 'show']
)->name('properties.show')->middlware('auth');
Get Property Create Form:
Route::get(
   '/properties/create',
   [PropertyController::class, 'create']
)->name('properties.create')->middlware('auth');
Post or create a new property:
Route::post(
   '/properties',
   [PropertyController::class, 'store']
)->name('properties.store')->middlware('auth');
Get Property Update Form:
Route::get(
   '/properties/{property}/edit',
   [PropertyController::class, 'edit']
)->name('properties.edit')->middlware('auth');
Put or update an existing property:
Route::put(
   '/properties/{property}',
   [PropertyController::class, 'update']
)->name('properties.update')->middlware('auth');
Delete an existing property:
Route::delete(
   '/properties/{property}',
   [PropertyController::class, 'destroy']
)->name('properties.destroy')->middlware('auth');
You've used other HTTP methods than the GET. You use POST to create a new property, the PUT to update an existing property, and the DELETE to delete or destroy an existing property.
Laravel defines those standard seven routes to manage a single Model. You can represent any route in Laravel using one of those seven routes.
Previously, you've seen how to map an HTTP method with a URL path to a PHP closure. In this list of routes, you map a route to a Controller and Action function to generate the response.
Implementing Controllers
Let's go through each route and define the corresponding controller/action function.
Something common you'll notice that applies to all routes is that the user needs to be authenticated to access those routes. This is done by specifying the middleware('auth') middleware.
Index Route
Let's take the first route:
Route::get(
   '/properties',
   [PropertyController::class, 'index']
)->name('properties.index');
The route defines the following: The PropertyController class, specifically the index() function, handles an HTTP GET request on the /properties path; The PropertyController::index function is responsible for generating a response for this request; Also, you're giving the name of properties.index for this specific route. You can use the route name to redirect the user to a specific route instead of using the actual URL. This URL might change in the future for any number of reasons. However, the name stays the same.
public function index()
{
   $properties = RealEstateProperty::all();
   return view('property.index', ['properties' => 'properties']);
}
The index() function retrieves all the real estate properties in the database and returns the resources/views/property/index.blade.php.
You may return a JSON response, a file, or any other data from your controller actions.
As a refresher, you can create the RealEstateProperty model and the PropertyController class by running the following commands consecutively.
php artisan make:model RealEstateProperty -m
php artisan make:controller PropertyController
The -m flag generates a migration file to create the corresponding real_estate_properties database table.
Show Route
Now let's implement the action functions for the next route definition.
Route::get(
   '/properties/{property}',
   [PropertyController::class, 'show']
)->name('properties.show')->middlware('auth');
The properties.show named route defines a mapping between a GET request for the URL /properties/{property} and the handler of that request, the PropertyController::show action function.
However, this specific route defines the URL: /properties/{property}. The Router is capable of handling URL placeholders. Those placeholders are called Route Parameters. In this case, the route expects the property route parameter. This parameter corresponds to the RealEstateProperty ID field. To view the details of a specific Real Estate Property, you must add the property ID on the URL.
Let's check together the show() action function.
public function show(RealEstateProperty $property)
{
   return view('properties.show',compact('property'));
}
The show() function accepts a RealEstateProperty object as an input parameter. Wait - you pass a RealEstateProperty ID on the URL and receive an object? Yes! This is another feature offered by the Router object called Implicit Binding (https://laravel.com/docs/9.x/routing#route-model-binding). The Router assumes that the router parameter passed represents the Key of a Model object. Then, based on the type of input parameter you assign in the show() function, it queries the database for an object of that type where the object's ID equals the value of the route parameter.
You're not limited to this default behavior. For instance, you may want the route parameter to represent the Model Name. Laravel's got you covered. You can instruct the Model to use a different route Key for implicit binding data retrieval.
Open the app\Models\RealEstateProperty.php and add this function:
/**
 * Get the route key for the model.
 *
 * @return string
 */
public function getRouteKeyName()
{
    return 'name';
}
That's all!
You can read more about route parameters in Laravel here (https://laravel.com/docs/9.x/routing#route-parameters).
Create Route
Now let's implement the action functions for the next route definition.
Route::get(
   '/properties/create',
   [PropertyController::class, 'create']
)->name('properties.create')->middlware('auth');
The properties.create named route defines a mapping between a GET request for the URL /properties/create and the handler of that request, the PropertyController::create action function.
The admin uses this route to create a new Real Estate Property entry in the database. Let's check the backing create() function behind it.
public function create()
{
   return view('properties.create');
}
The create() function returns a view that allows the admin to fill in the details of a new Real Estate Property.
Store Route
Now let's implement the action functions for the next route definition.
Route::post(
   '/properties',
   [PropertyController::class, 'store']
)->name('properties.store')->middlware('auth');
The properties.store named route defines a mapping between a POST request for the URL /properties and the handler of that request, the PropertyController::store action function.
This route handles the creation of a new Real Estate Property record in the database. It expects a request payload containing all the record details to create. Let's check the backing store() function behind it.
Listing 2 shows the entire source of this function.
Listing 2: store() function source code
public function store(Request $request)
{
    $validator = Validator::make($request->all(), [
        'name' => 'required|max:255',
        'location' => 'required',
        'price' => 'required|'integer',
        // ...
    ])->validate();

    RealEstateProperty::create($validator->validated());

    return redirect()
        ->route('properties.index')
        ->with('success','Property created successfully.');
}
It receives the Request object. This object contains the request payload and other useful information.
The function starts by validating the incoming HTTP request by calling the validated() function on the Validator object. Using the Validator object, you can define rules to validate the request. For instance, the name field should be present with a maximum of 255 characters. You can define whatever validation rules you want to at this stage.
After validating the request payload, you use the model static create() function on the RealEstateProperty model object. This function represents mass assignment in Laravel Eloquent and accepts an associative array of the columns you want to populate on the newly created record. Remember, this function works closely with the $fillable array property you define on the RealEstateProperty model object. Whatever you allow inside this array will pass through the static create() function.
protected $fillable = [
   'name',
   'location',
   'price'
];
Based on the current definition of the $fillable array, only name, location, and price fields can be passed through the static create() function.
You can read more about validation in Laravel here: https://laravel.com/docs/9.x/validation.
After creating the new record in the database, the store() function redirects the admin back to the index page to list all the Real Estate Property records, passing along a success message to notify the admin that the operation has succeeded. Notice how the function redirects to a named route rather than specifying the URL. This is why adding names to the routes makes your application flexible and maintainable.
Named route allows you to refer to the routes when generating URLs or redirects to the specific routes
Another way of doing validation is by using FormRequests in Laravel. This object extends the HTTP request object. I can't dig deeper into FormRequests right now, but, in brief, you can define a new FormRequest that contains all the validation rules. Then, instead of receiving an instance of the Request object, you'll receive an instance of the FormRequest object. Laravel automatically runs the validation code for you before even calling the action function.
You can read more about FormRequests in Laravel here: https://laravel.com/docs/9.x/validation#form-request-validation.
Edit Route
Now let's implement the action functions for the next route definition.
Route::get(
    '/properties/{property}/edit',
    [PropertyController::class, 'edit']
)->name('properties.edit')->middlware('auth');
The properties.edit named route defines a mapping between a GET request for the URL /properties/{property}/edit and the handler of that request, the PropertyController::edit action function. It has the property route parameter to identify which property to edit.
The admin uses this route to edit an existing Real Estate Property entry in the database. Let's check the backing edit() function behind it.
public function edit(RealEstateProperty $property)
{
    return view('properties.edit', ['property' => $property]);
}
The edit() action function is fairly simple. It receives a Real Estate Property object via the Router's implicit binding feature. It returns the Edit View together with the Real Estate Property object. The view uses this object to populate the Form for the admin to edit.
Update Route
Now let's implement the action functions for the next route definition.
Route::put(
   '/properties/{property}',
   [PropertyController::class, 'update']
)->name('properties.update')->middlware('auth');
The properties.update named route defines a mapping between a PUT request for the URL /properties/{property} and the handler of that request, the PropertyController::update action function.
This route handles updating an existing Real Estate Property record in the database. It defines the Real Estate Property ID and expects a request payload containing the updated record details. Let's check the backing update() function behind it.
Listing 3 shows the entire source of this function. It receives the Request object and the implicitly bound Real Estate Property object.
Listing 3: update() function source code
public function update(Request $request, RealEstateProperty $property)
{
   $validator = Validator::make($request->all(), [
      'name' => 'required|max:255',
      'location' => 'required',
      'price' => 'required|'integer',
      // ...
   ])->validate();

   $property->update($validator->validated());

   return redirect()
      ->route('properties.index')
      ->with('success','Property updated successfully.');
}
The function starts by validating the incoming HTTP request by calling the validated() function on the Validator object. It then uses the update() function to perform the underlying update on the database.
After updating the record in the database, the update() function redirects the admin back to the index page to list all the Real Estate Property records, passing along a success message to notify the admin that the operation has succeeded.
Delete Route
Now let's implement the action functions for the last route definition.
Route::delete(
   '/properties/{property}',
   [PropertyController::class, 'destroy']
)->name('properties.destroy')->middlware('auth');
The properties.destroy named route defines a mapping between a DELETE request for the URL /properties/{property} and the handler of that request, the PropertyController::destroy action function.
This route handles deleting an existing Real Estate Property record from the database. It has the property route parameter to identify which property to delete. Let's check the backing destroy() function behind it.
public function destroy(RealEstateProperty $property)
{
   $property->delete();

   return redirect()->route('properties.index')
     ->with(
        'success',
        'Property deleted successfully'
    );
}
It receives the implicitly bound Real Estate Property object as an input parameter.
The function starts by deleting the Real Estate Property object by calling the delete() function. It then redirects the admin to the index page to list all the Real Estate Property records, passing along a success message to notify the admin that the operation has succeeded.
Route Resources
The concept of a Resource stems from the REST architecture that positions a resource at the core of an API. All the operations you perform on the application are eventually performed against a Resource. You can read more about REST here: https://restfulapi.net/.
In Laravel, if you think of an Eloquent Model as a resource, you might perform the same set of operations on the resource. Therefore, Laravel has a shorthand representation that simplifies defining routes.
All of the routes defined under the section Defining Routes could be replaced by a single-line route resource, as follows:
Route::resource('properties', PropertyController::class);
That's it! The static resource() method internally defines the Laravel standard seven routes for you.
For this to work smoothly, you need to use the following command to create the PropertyController object.
php artisan make:controller \
   PropertyController --resource
I've added the --resource flag to signal to Laravel to generate a function for each resource operation.
In some cases, you don't need all of the seven routes. You can define whatever resource operation you need in two different ways:
Route::resource(
   'properties',
   PropertyController::class
)->only(['index', 'show']);
You use the only() function to specify what resource operations you want to define.
The other way around is to define what resource operations to exclude:
Route::resource(
   'properties',
   PropertyController::class
)->except(['create', 'store', 'edit', 'update']);
Finally, when using route resources and you want to define additional routes to the standard seven routes, you must place the additional routes before the route resource definition. Otherwise, you'd be overwriting the resource routes.
For instance, I want to define a mass deletion route for multiple real estate properties. The way I do it is as follows:
Route::delete(
   'posts/destroy',
   [PropertyController::class, 'massDestroy']
);
Route::resource(
   'properties',
   PropertyController::class
);
Another feature that you'll find useful to use in your projects is the nested resource controllers. You can check this example here: https://laraveldaily.com/post/nested-resource-controllers-and-routes-laravel-crud-example.
There are many more details related to route resources in Laravel that you can read about here: https://laravel.com/docs/9.x/controllers#resource-controllers.
Route Files and Groups
Now that you know about routing in Laravel, let's dig deeper and understand the routes folder in Laravel. If you navigate to the /routes folder, you'll notice a set of route files:
- api.php: This file contains the routes related to a Laravel API. With Laravel, you can build both a web application and an API application.
- channels.php: This file contains routes for broadcasting. Laravel supports broadcasting and real-time processing.
- web.php: This file contains the routes related to the web application.
Now that you have all those route files, how does Laravel load them into the application and make them available for the Router to match later on? The answer lies inside the app\Providers\RouteServiceProvider.php file.
Locate this file and check the boot() method. Listing 4 shows the boot() method source code.
Listing 4: RouteServiceProvider booth() method source code
public function boot()
{
    // ...

    $this->routes(function() {
        Route::middleware('api')
            ->prefix('api')
            ->group(base_path('routes/api.php'));

        Route::middleware('web')
            ->group(base_path('routes/web.php'));
    });
}
The method starts by calling the $routes method defined on the parent Illuminate\Foundation\Support\Providers\RouteServiceProvider.php file. It passes a Closure to this method. Later on, Laravel executes this Closure and loads all of the routes in the application.
The first statement in the Closure loads the routes defined inside the routes/api.php file. The second one loads the routes defined inside the routes/web.php file.
In both statements, Laravel groups the routes under each file separately. It assigns a prefix for each group, and finally, it applies the route middleware group api and web consecutively.
Therefore, the routes defined inside the routes/api.php file are prefixed by the string api.
Let's open the routes/api.php file and see what default content it has:
Route::middleware('auth:sanctum')
   ->get('/user', function (Request $request) {
 return $request->user();
   });
It defines a single GET request for /user. The handle of this request is a Closure that returns the logged-in user. The auth:sanctum middleware is applied to this route, meaning only authenticated users can access this route.
The URL corresponding to this route is: /api/user rather than /user. That's because of the prefix applied to all routes inside this file.
Going back to the boot() function Closure, it assigns a route middleware group to both route files.
At the end of this article, you will learn more about middlewares in Laravel. Meanwhile, let's open the app\Http\Kernel.php file and locate the $middlewareGroups array variable shown in Listing 1.
This is an associative array with two keys only: api and web. Each key in this array represents an array of middleware classes. We call those routes middleware in Laravel. The $middlewareGroups we call the route middleware groups.
Laravel runs and executes the middleware defined under the group web for all the routes defined inside the routes/web.php file. Similarly, it executes the middleware defined under the group api for all the routes defined inside the routes/api.php file.
Custom Route File
In addition to the default route files, you can also have your route files. Sometimes, you need to group some routes separately so that you don't jam your web.php file. For instance, I usually keep all the admin route definitions in a separate admin.php file.
Follow the steps below to create a custom route file and register it successfully in your app.
To instruct Laravel to load the new route file, go to app\Providers\RouteServiceProvider.php file, and inside the boot() method, add the following line toward the end of the Closure, as shown in Listing 5.
Listing 5: Load a custom route file
public function boot()
{
     // ...

     $this ->routes(function () {
         Route::middleware('api')
             ->prefix('api')
             ->group(base_path('routes/api.php'));

         Route::middleware('web')
             ->group(base_path('routes/web.php'));

         Route::middleware('is_admin')
             ->namespace($this ->namespace)
             ->group(base_path('routes/admin.php'));
     });
}
Notice that I'm using a new route, the middleware group called is_admin. Let's create this new group. Open the app\Http\Kernel.php file and locate the $routeMiddlewareGroups array variable. Add the following line:
protected $middlewareGroups = [
    'web' => [...],
    'api' => [...],
    'is_admin' => [
        // ... any middleware here
        App\Http\Middleware\IsAdminMiddleware::class,
    ],
];
Next, let's create the new middleware inside the app\Http\Middleware folder. Listing 6 shows the source code for this new middleware.
Listing 6: IsAdminMiddleware.php source code
namespace App\Http\Middleware;

class IsAdminMiddleware
{
    public function handle(
        $request,
        Closure $next
    )
    {
        if( !Auth::check() ) {
            return redirect()->route('login');
       }

       if( Auth::user()->isAdmin == true ) {
           return $next($request);
       }

       return redirect()
           ->back()
           ->with('unauthorized',
                  'You are unauthorized to access this page');
    }
}
The middleware's handler method checks whether the user is authenticated. If not, it redirects back to the log in page. Otherwise, it checks whether the user is an admin. Otherwise, it redirects back to the previous page with an error message.
Route Grouping
Let's revisit the list of routes you originally defined for the real estate property management module. Listing 7 shows all the routes.
Listing 7: All routes
Route::get(
    '/properties',
    [PropertyController::class, 'index']
)->name('properties.index')->middlware('auth');

Route::get(
    '/properties/{property}',
    [PropertyController::class, 'show']
)->name('properties.show')->middlware('auth');

Route::get(
    '/properties/create',
    [PropertyController::class, 'create']
)->name('properties.create')->middlware('auth');

Route::post(
    '/properties',
    [PropertyController::class, 'store']
)->name('properties.store')->middlware('auth');

Route::get(
    '/properties/{property}/edit',
    [PropertyController::class, 'edit']
)->name('properties.edit')->middlware('auth');

Route::put(
    '/properties/{property}',
    [PropertyController::class, 'update']
)->name('properties.update')->middlware('auth');

Route::delete(
    '/properties/{property}',
    [PropertyController::class, 'destroy']
)->name('properties.destroy')->middlware('auth');
You now understand that you can use Route::resource() whenever you use all seven standard routes. What if you don't want to use the resource routes? Can you improve the routes and minimize repetitions?
A few things to note about those routes:
- They all require the Auth middleware.
- They all share the same Controller.
- They all share the same prefix of /properties.
You could rewrite the above routes as shown in Listing 8.
Listing 8: Routes with groups
Route::prefix('/properties')
   ->middleware(['auth'])
   ->controller(PropertiesController::class)
   ->name('properties.')
   ->group(function() {

  Route::get('/', 'index')->name('index');

  Route::get('/{property}', 'show')->name('show');

  Route::get('/create', 'create')->name('create');

  Route::post('/', 'store')->name('store');

      Route::get('/{property}/edit', 'edit')->name('edit');

      Route::put('/{property}', 'update')->name('update');

      Route::delete('/{property}', 'destroy')->name('destroy');
});
Route Groups in Laravel are so powerful in beautifying the routes and making them more readable. Let's understand the different methods you have used:
- prefix(): Use this method to specify a prefix in the route URL.
- middleware(): Use this method to specify one or more middleware to apply on this current route.
- controller(): Use this method to specify a common Controller to use for all the route handlers.
- name(): Use this method to specify a common prefix route name. Notice the dot at the end of the string properties.
- group(): Use this method to group all routes with some common behavior and place them all inside a Closure.
I recommend reading this article on Laravel Route Grouping: https://laravel-news.com/laravel-route-organization-tips.
Routing Best Practices
In this section, I'd like to share a video session delivered by Adam Wathan (https://twitter.com/adamwathan), the creator of Tailwind CSS (https://tailwindcss.com/), for Laracon US 2017. In this video, Adam shares some concepts about how to think in routes, decide on the routes your application needs, divide your source code into smaller and more manageable controllers, and much more.
I recommend that you watch this video and take notes to help you decide on your application's routes: Cruddy by Design (https://www.youtube.com/watch?v=MF0jFKvS4SI).
Conclusion
In this fourth article of my series on developing MVC applications with PHP Laravel, I discussed routing and middleware.
The topic of middleware and routing in Laravel is complicated and manyfold. That's why I'll be writing a more in-depth guide, showing how Laravel runs an incoming HTTP request from the beginning until a response is generated and sent back to the browser. During this next article, you'll learn how Laravel runs all kinds of middleware, how the router matches a route, and how it hands off the execution of the incoming request to the matching controller and action function.
Stay tuned and happy Laravelling!
