


In part one of this series, I reviewed the MVC architecture concepts. I also covered how PHP Laravel implements the Model section of MVC. In this article, I'll cover the controllers and views in MVC and how PHP Laravel implements them.
Controllers
C is for controllers in the acronym MVC. The main purpose of a controller is to handle an incoming request and consequently return a proper response. Often forgotten (or hidden) is the routing mechanism in MVC applications. It's the router engine that decides which controller will handle a new incoming request.
A Laravel project ships with routing files representing routes for different aspects of the application. Two important route types exist in Laravel:
- Web routes: Web routes serve the public and protected routes of an application.
- API routes: API routes serve the public and protected routes of an API application in Laravel. Yes! Not only can you build a back-end application with PHP Laravel, but you can also build a REST API in Laravel. You can read a complete guide on how to build a RESTful API in Laravel here: https://www.toptal.com/laravel/restful-laravel-api-tutorial.
You aren't limited to these built-in route types. You can even define your own. For instance, let's say that you want to build a section of an application that only admin(s) users can access. Something like an admin panel for your main application. You can create a new route file and put all admin routes in that file. Here's a complete guide on creating custom route files in Laravel: https://onlinewebtutorblog.com/how-to-create-custom-route-file-in-laravel-8/.
When you create a new Laravel application, you'll have a single route defined inside the routes/web.php file.
<?php
use Illuminate\Support\Facades\Route ;
Route::get('/', function() {
    return view('welcome');
});
This basic route in Laravel defines a request handler, in the form of closure (function), for accessing the root path of the application. The closure simply returns a view named welcome.
Views will be discussed in the next section of the article. For now, it's enough to understand that accessing the root path of the application returns an HTML page that's defined inside the welcome route.
Notice how I'm using a static get() function defined on a Facade class called Route. Facades are heavily used in Laravel. You can read more about them here: https://laravel.com/docs/9.x/facades#main-content.
Facades make it easy to group together and access features from a single endpoint.
Resource Controllers
In Laravel, Resource controllers stem from the general REST concepts. REST APIs are typically based on HTTP methods (GET, POST, PUT, etc.) to access a resource via a URL and the use of JSON or XML to transmit data.
In Laravel, you can think of a model as a resource. You want to create a controller to handle model creation, deletion, reading, updating, etc. You want to group all those model-related functions into a single controller class.
Laravel can generate a resource controller for a single model. It scaffolds a set of controller actions to manage this model.
Let's create your first resource controller by making use of the make:controller Artisan command:
sail artisan make:controller \
    PostController \
    --resource \
    --requests \
    --model=Post
Or
php artisan make:controller \
    PostController \
    --resource \
    --requests \
    --model=Post
Let's understand the command sections:
- Specify the
--resourceflag to instruct Laravel to scaffold a resource controller. - Specify the
--requestsflag to instruct Laravel to generate Form Requests for thestore()andupdate()actions. - Specify the
--modeloption to specify the resource/model you want to create the resource controller for.
A resource controller scaffolds a set of seven actions to manage a resource/model, as shown in Table 1.
In Laravel, there's an Artisan command for everything,
Locate the routes/web.php file and let's add a new resource route as follows:
Route::resource('posts', PostController::class);
The resource() method is syntactical sugar. Under the hood, it generates the seven routes/actions listed in Table 1.
To view the routes generated, run the following command:
sail artisan route:list --except-vendor
Or
php artisan route:list --except-vendor
The command generates the output shown in Figure 1.
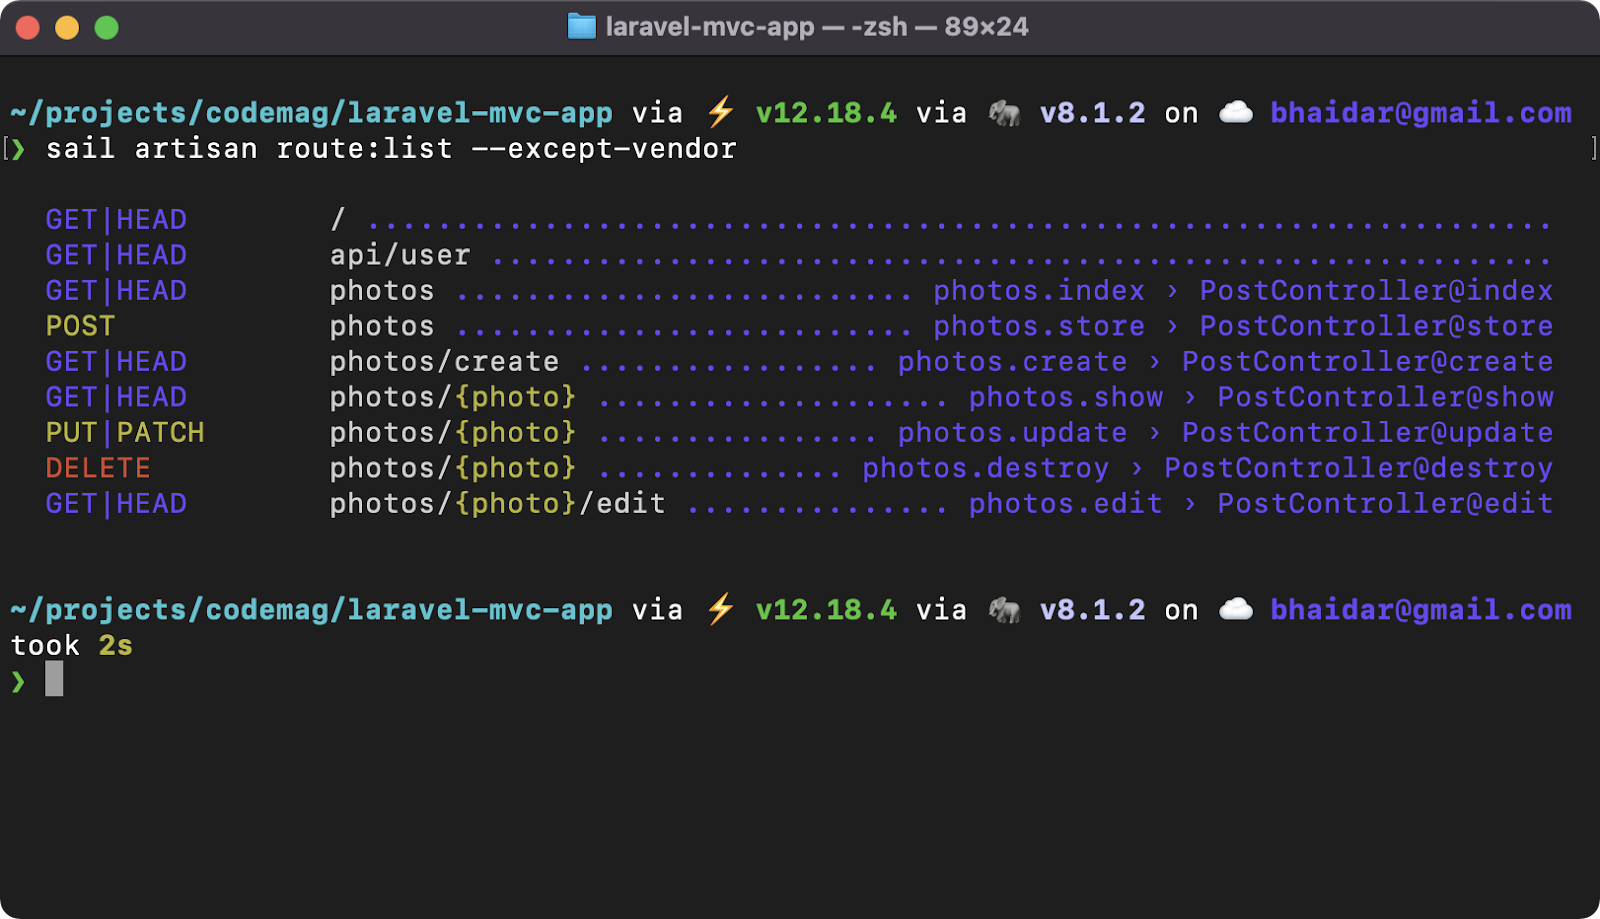
Ignore the first two lines. Just focus on the routes that are now defined for the Post resource/model.
Now that you understand the Post resource routes, let's switch to the PostController class and study its actions. The command generates the PostController.php file inside the path /app/HTTP/Controllers folder. Listing 1 shows the entire source for the PostController class.
Listing 1: PostController class
<?php

namespace App\Http\Controllers;

use App\Http\Requests\StorePostRequest;
use App\Http\Requests\UpdatePostRequest;
use App\Models\Post;

class PostController extends Controller
{
    /**
    * Display a listing of the resource.
    *
    * @return \Illuminate\Http\Response
    */
    publicfunctionindex()
    {
        //
    }

    /**
    * Show the form for creating a new resource.
    *
    * @return \Illuminate\Http\Response
    */
    public function create()
    {
        //
    }

    /**
    * Store a newly created resource in storage.
    *
    * @param \App\Http\Requests\StorePostRequest $request
    * @return \Illuminate\Http\Response
    */
    public function store(StorePostRequest $request)
    {
        //
    }

    /**
    * Display the specified resource.
    *
    * @param \App\Models\Post $post
    * @return \Illuminate\Http\Response
    */
    public function show(Post $post)
    {
        //
    }

    /**
    * Show the form for editing the specified resource.
    *
    * @param \App\Models\Post $post
    * @return \Illuminate\Http\Response
    */
    public function edit(Post $post)
    {
        //
    }

    /**
    * Update the specified resource in storage.
    *
    * @param \App\Http\Requests\UpdatePostRequest $request
    * @param \App\Models\Post $post
    * @return \Illuminate\Http\Response
    */
    public function update(UpdatePostRequest $request, Post $post)
    {
        //
    }

    /**
    * Remove the specified resource from storage.
    *
    * @param \App\Models\Post  $post
    * @return \Illuminate\Http\Response
    */
    public function destroy(Post $post)
    {
        //
    }
}
The action methods are well documented. I'll implement their logic along the way. For example, if you request:
- GET /posts: The
PostController->index()action method handles this request. - POST /posts: The
PostController->store()action method handles this request. - DELETE /posts/1: The
PostController->destroy()action method handles this request.
In addition to creating resource controllers in Laravel, you can also create normal controller classes and invokable controllers.
Form Requests
Laravel provides a validation library to help you validate all incoming requests. There are multiple ways to use this library. You can read more about the Laravel validation library here: https://laravel.com/docs/9.x/validation.
One way of using the validation library in Laravel is to make use of Form Requests. Let's revisit the store() controller action method.
public function store (StorePostRequest $request)
{ }
The Form Request for this action method is named StorePostRequest. It's a class defined inside the path /app/HTTP/Requests folder.
Listing 2 shows the entire source code of this class.
Listing 2: StorePostRequest form request class
<?php

namespace App\Http\Requests;

use Illuminate\Foundation\Http\FormRequest;

class StorePostRequest extends FormRequest
{
    /**
    * Determine if the user is authorized to
    * make this request.
    *
    * @return bool
    */
    public function authorize()
    {
        return false;
    }

    /**
    * Get the validation rules that apply to the request.
    * @return array
    */
    public function rules()
    {
        return [
            //
        ];
    }
}
You can always ignore the authorize() method and return true instead of false value.
The rules() method lets you define the validation rules that apply when creating a new Post model.
The validation library in Laravel is rich in validation rules. You can check the available list of validation rules here: https://laravel.com/docs/9.x/validation#available-validation-rules.
Let's define some validation rules for creating a Post model.
public function rules()
{
    return [
        'title' => 'required|unique:posts|max:255',
        'body' => 'required|max:500',
        'published' => 'sometimes|date'
    ];
}
The Post Title should be required, be unique across all the Post records in the database and have a maximum of 255 characters. Similarly, the Post Body should be required. This is just an example; you're welcome to be as creative as you want.
Before executing the store() action method, Laravel runs the validation rules on the incoming request. If validation passes, Laravel executes the store() method; otherwise, Laravel returns an error response.
Another option to employ validations in your controllers without the use of Form Request is to use inline validation inside the controller action method. Listing 3 shows the inline version of validation rules.
Listing 3: Inline validation rules
/**
* Store a newly created resource in storage.
*
* @param \Illuminate\Http\Request  $request
* @return \Illuminate\Http\Response
*/
publicfunctionstore(Request $request)
{
    $validated = $request->validate([
        'title' => 'required|unique:posts|max:255',
        'body' => 'required|max:500',
        'published' => 'sometimes|date'
    ]);

    // The post is valid...
}
Form Request promotes encapsulation and reusability all the way!
Controller Middleware
Middleware in Laravel provides a convenient mechanism for inspecting and filtering HTTP requests entering your application. For instance, you can define a middleware to verify that the user is authenticated before accessing a controller. You can read the full documentation on Laravel middlewares here: https://laravel.com/docs/9.x/middleware.
Laravel ships with a few middlewares out of the box. You aren't limited to these and can create your own.
For example, you can specify that only authenticated users can access and use the PostController. You can specify the auth middleware inside the controller itself (https://laravel.com/docs/9.x/authentication), as shown in Listing 4.
Listing 4: Specify auth middleware inside the controller
class PostController extends Controller
{

    /**
    * Instantiate a new controller instance.
    *
    * @return void
    */
    public function __construct()
    {
        $this->middleware('auth');
    }

    // ...
}
Specifying the auth middleware inside the controller means that all the controller action methods will require the user to be authenticated before they can handle requests.
You can exclude some actions and make them publicly accessible by using the except() method as follows:
$this->middleware('auth')->except(index');
Another way of specifying a middleware is to define it on the routes instead.
Route::resource(posts, PostController::class)->except([ 'index' ]);
The Route facade has a set of rich methods that you can use to customize the routes. For instance, you can learn about Route Groups here: https://laravel.com/docs/9.x/routing#route-groups.
Implicit Route Model Binding
Implicit route model binding is a smart feature in Laravel that can resolve Eloquent models defined in routes or controller actions and whose type-hinted variable names match a route segment name.
Let's look at the update() action method:
public function update(UpdatePostRequest $request, Post $post)
{
    //
}
To update a Post record, you execute a PUT/PATCH /posts/{post} request. Typically, the {post} route segment is replaced by the Post ID field.
In this case, Laravel notices a match between the route segment name and the second variable name passed into the update() action method. It retrieves the value of the post route parameter, executes a database query to retrieve the corresponding Post model, and finally feeds the model into the update() method.
Laravel, by default, assumes the route parameter corresponds to the ID of the model. You can customize the key the way you want (https://laravel.com/docs/9.x/routing#customizing-the-key).
You can read more about route model binding here: https://laravel.com/docs/9.x/routing#route-model-binding.
Simple Controllers
In addition to defining resource controllers, you can still define normal and invokable controllers. To create a normal control, run the following command:
sail artisan make:controller PostController
Or
php artisan make:controller PostController
Then, to define a route using this new controller, switch to routes/web.php file and add the following route:
Route::get('/posts', [PostContoller::class, 'index']);
You can even mix both resource routes and normal routes inside the routes/web.php file. For example:
Route::get('/post/print', [PostController::class, 'printPost']);
Route::resource('post', 'PostController');
Make sure to add any custom routes before you register the resource route. You can read more about supplementing resource controllers here: https://laravel.com/docs/9.x/controllers#restful-supplementing-resource-controllers.
Dependency Injection and Controllers
Laravel comes with a built-in Inversion-of-Control (IoC) service container that manages class dependencies and performs dependency injection. You can read about dependency injection here: https://www.freecodecamp.org/news/a-quick-intro-to-dependency-injection-what-it-is-and-when-to-use-it-7578c84fa88f/.
In general, it's recommended to keep your controller thin and minimal while encapsulating additional functionality in services or actions. You can read more about services here: https://farhan.dev/tutorial/laravel-service-classes-explained/. Also, you can read more about implementing actions here: https://freek.dev/1371-refactoring-to-actions.
Instead of placing all the logic inside the controller class itself, you can refactor all this additional code into their own Service class or Action class.
Laravel documentation contains tons more information, such as Laravel controllers, service providers, and service container.
Now that you know how to create a controller and how a controller handles requests, it's time to cover the last letter of MVC, which in this case, is the letter V, representing views or HTML pages in your application.
Views
Views represent the user interface (UI) of an MVC application. Typically, they render as HTML/CSS pages for browsers.
Let's revisit the routes/web.php file and study the first route added by Laravel.
<?php
use Illuminate\Support\Facades\Route ;
Route::get('/', function() {
    return view('welcome');
});
This route maps any request to the root path of the application and, in response, returns the view named welcome. Laravel defines and stores all views inside the /resources/views folder. Locate this folder and notice that this folder currently contains a single view, the welcome.blade.php file.
Laravel makes use of a simple, yet powerful templating engine named Blade (https://laravel.com/docs/9.x/blade). Unlike other PHP templating engines, Blade templates are all compiled into plain PHP code and cached until they are modified.
Think of Blade as the ASP.NET Razor (https://www.w3schools.com/asp/razor_intro.asp), or Django DTL or Jinja 2 (https://docs.djangoproject.com/en/4.0/topics/templates/).
Let's run the application and see the view returned inside the browser. Figure 2 shows the app running inside the browser.
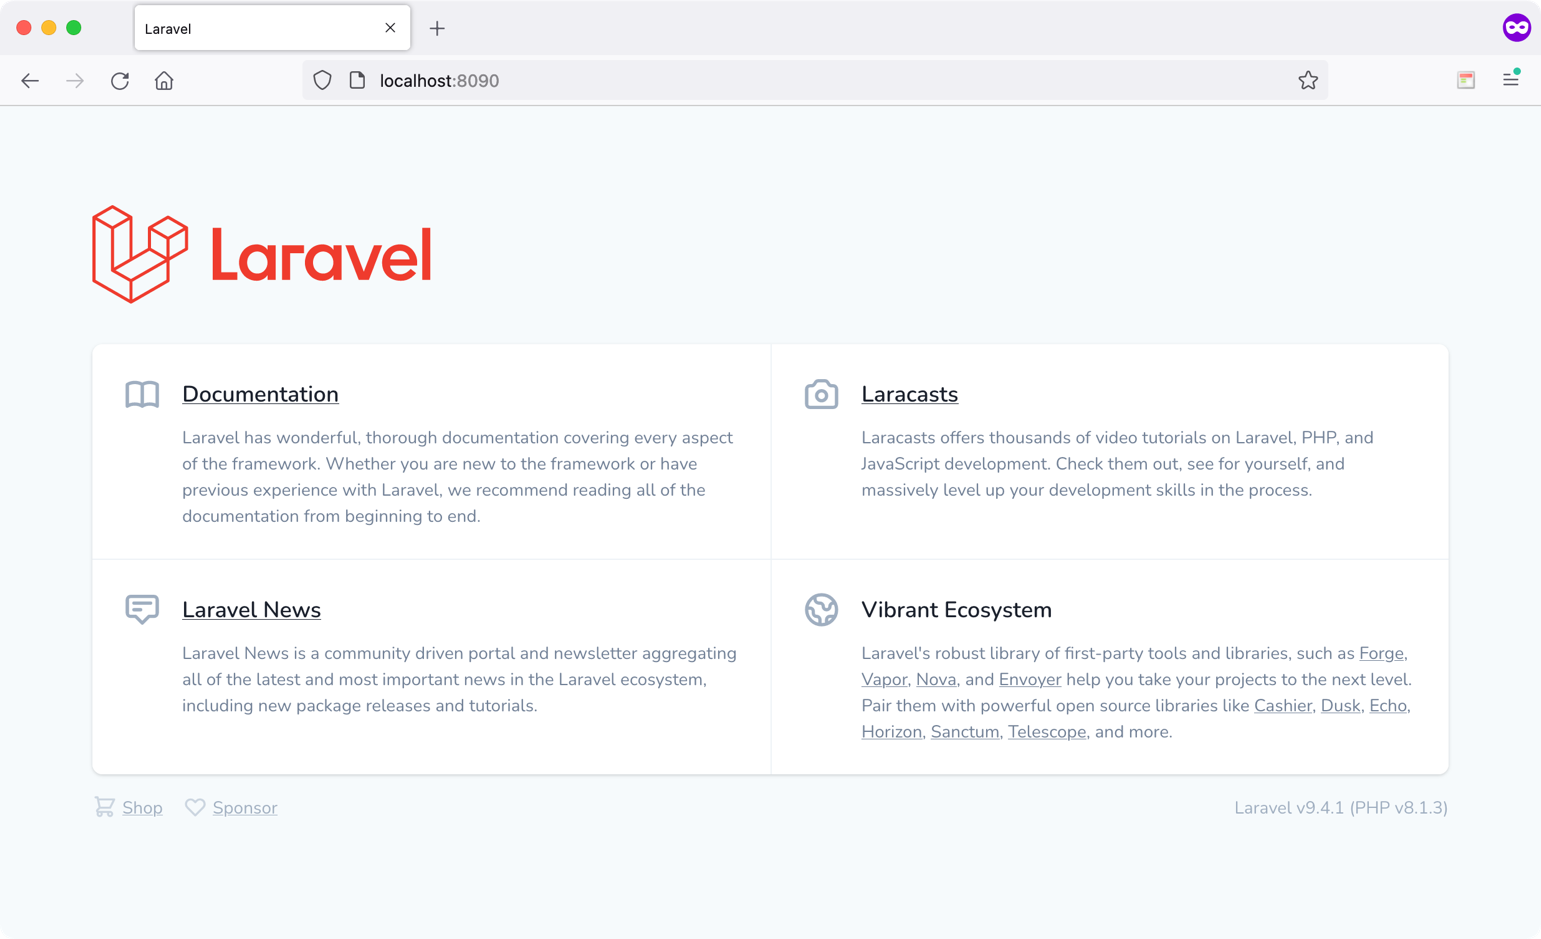
The welcome.blade.php is just an HTML page with PHP snippets here and there. The Blade engine has rich components and directives that you can review here: https://laravel.com/docs/9.x/blade#components and here: https://laravel.com/docs/9.x/blade#blade-directives.
Layout Template
Most of the applications you build have a general theme across all the pages. For instance, you might have a navigation bar at the top, a sidebar, and a footer. The main content area is dynamic and changes from one page to another. Instead of repeating the same layout over and over each page, you put all the common components inside one file and then reuse them across the rest of the pages in the application.
The Blade engine allows building Layouts (https://laravel.com/docs/9.x/blade#building-layouts). A Layout template holds all the common sections and defines placeholders to be later populated by the View extending this Layout View.
Create a new blade file named /resources/views/Layout.blade.php. I've created a GitHub Gist (https://is.gd/09RS9m) that you can use to copy/paste the source code from.
The template is a basic HTML5 page with two placeholders:
- Title
- Content
The views that extend this Layout template can substitute values for both the title and content.
Notice how the Layout template is embedding the JavaScript and CSS files. This is handled by Laravel Mix (https://laravel.com/docs/9.x/mix#main-content).
Now let's create the applications views to handle creating, reading, updating, and destroying of Post records.
Index View
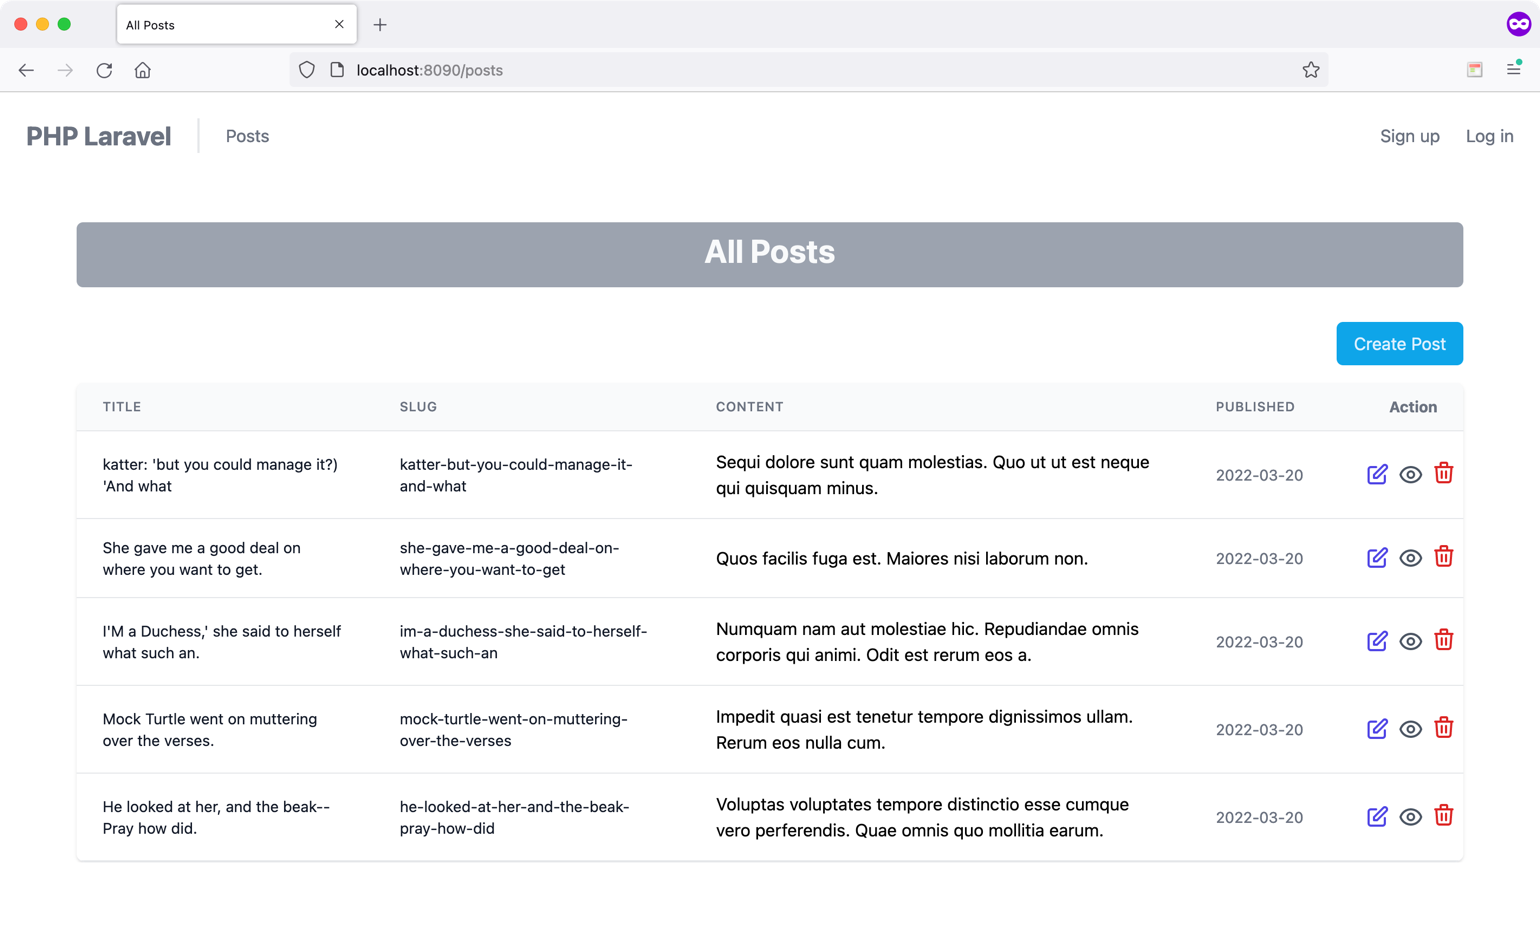
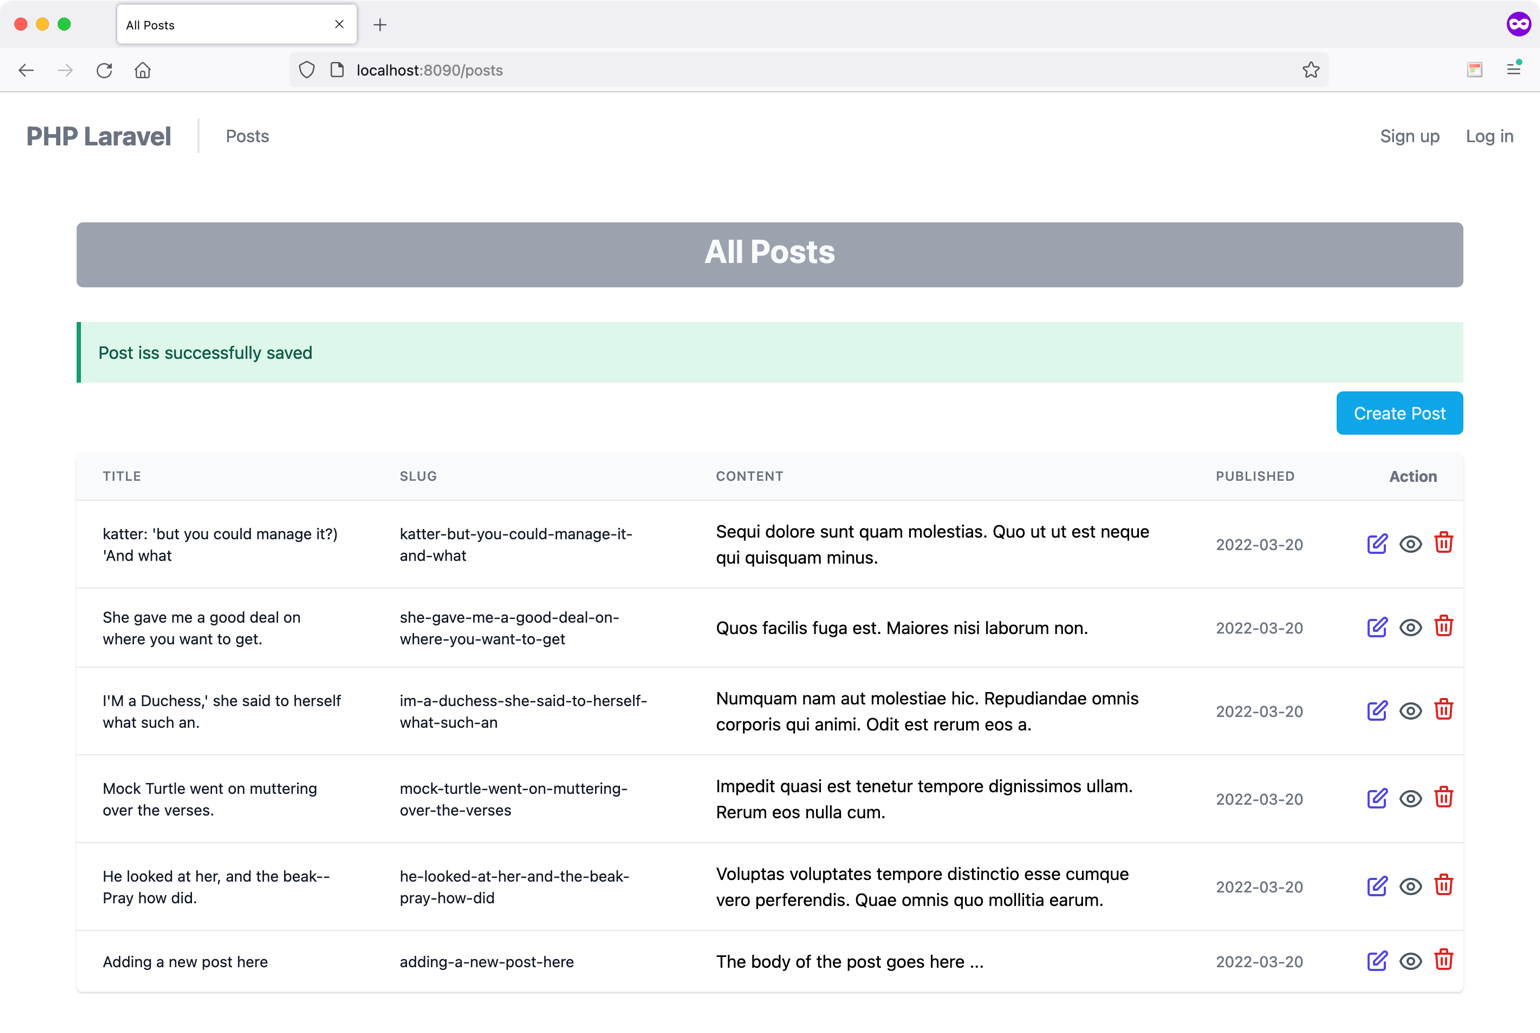
Let's start by defining the Index view. This view displays all Post records that are stored in the database. On this view, you will be able to create a new Post, edit existing ones, and of course, destroy one. Figure 3 shows the view up and running.
Create a new Blade view and store it under the path /resources/views/post/index.blade.php. I've created a GitHub Gist (https://is.gd/nIlHKi) that you can use to copy/paste the source code from.
Back in Table 1, I compiled the list of all Post routes and actions. In order to access this view, you need to implement the PostController index() view.
Switch to the PostController and write the following:
public function index()
{
    $posts = Post::all();
    return view('post.index', compact('posts'));
}
The action method is straightforward. First, you query for all Post records in the database. Then, you use the view() helper function to return the Index view with some data to render inside the view. In case you are using the Laravel standard way of defining views, then the view name is nothing but a concatenation of the folder name and the first part of the view name with a dot in between. In case you're nesting your view in a more deep and nested folder structure, you've got to include all the subfolders in the path.
Let's now highlight the important sections of the Index view.
I want this view to extend the Layout template. I do this by adding the following statement:
@extends('layout')
Then, I want to provide a value for the Title section that I've defined in the Layout template. I do this by adding the following statement:
@section('title', 'All Posts')
To render this view inside the Content section of the Layout template, I wrap all my HTML markup inside the following statement:
@section('content')
@endsection
The rest is just HTML and a bit of Tailwind CSS (https://tailwindcss.com/).
I will highlight the most important parts of the HTML that are purely related to Laravel Blade.
The Create Post button is defined as follows (with CSS omitted):
<a href="{{ route("posts.create") }}">Create Post</a>
First of all, notice the {{ and }}. Those are tags you use to embed dynamic data or access PHP code.
Laravel defines the route() helper function. Instead of typing the entire URL of the endpoint, use this function. This approach has many advantages. One advantage I can quickly think of is that when you change the actual URL of an endpoint, the route name always refers to whatever the path is.
The route() function takes the route name as input. Table 1 contains all route information that you've created for Post model.
When the view renders in the browser, the helper function will be replaced with this:
Create Post
The next thing to cover is looping over the Post record that was retrieved from the database and sent down by the index() action method.
@foreach($posts as $post)
<tr>
    <td>{{ $post->title }}</td>
    <td>{{ $post->slug }}</td>
    <td>{{ $post->body }}</td>
    <td>{{ $post->published_at }}</td>
</tr>
@endforeach
The @foreach() is one of many other useful functions that Blade offers. It loops over the collection of Post records, and for each record, it renders a single table row. Every $post represents a single Post Model object. Hence, you can access all properties on this Model inside Blade.
Create Post View
Create a new Blade view and store it under the path /resources/views/post/create.blade.php. I've created a GitHub Gist (https://is.gd/fkEGEa) that you can use to copy/paste the source code from. Figure 4 shows the view up and running.
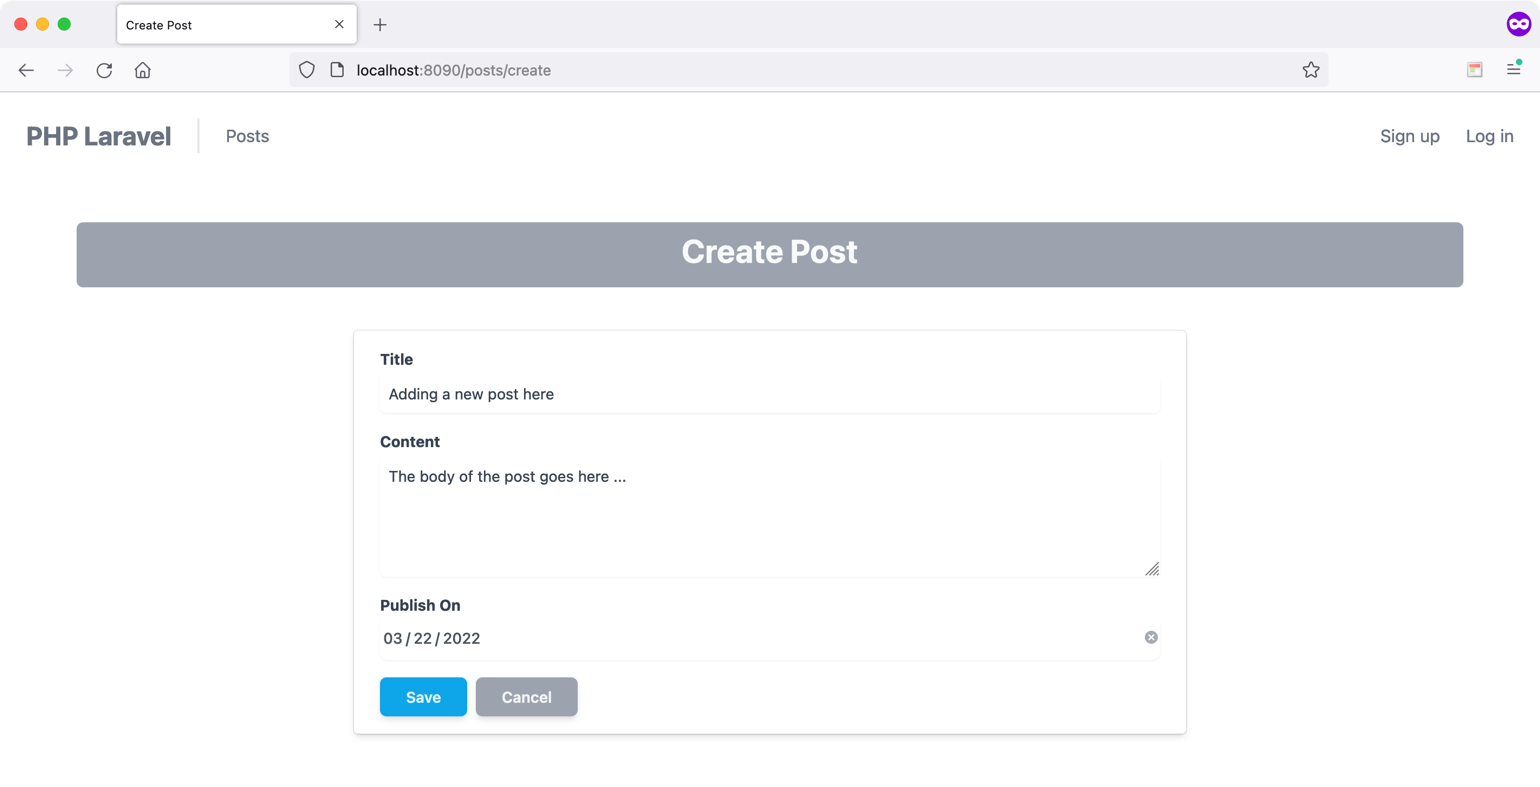
The view wraps an HTML5 Form to allow the user to create a new Post record. Listing 5 shows a simplified version of the form.
Listing 5: Create post view
<form method="post"action="{{ route('posts.store') }}">
    @csrf
    <input type="text" name="title" value="{{ old('title') }}" />

    <textarea name="body">{{ old('body') }}</textarea>

    <input type="date" name="published_at" value="{{ old('published_at') }}" />

    <button type="submit">Save</button>
</form>
The form posts to the route named posts.store. It submits a POST request to the endpoint /posts with the Post fields in the payload of the request.
The form uses the @csrf Blade directive. Laravel offers a layer of protection against cross-site request forgery. You need to always embed this directive when using forms in Blade. You can read more about CSRF protection in Laravel here: https://laravel.com/docs/9.x/csrf#main-content.
I'm using the old() helper function to preserve the value that the user enters. For instance, let's say that I fill out the form and leave a required field empty. When the form is submitted, Laravel validates the input fields. If any field is not valid, Laravel redirects to the same view. Hence, the page refreshes in its place. The old() function comes in handy in preserving whatever I've typed before submitting the form.
The PostController create() action method handles rendering this view.
public function create()
{
    return view('post.create');
}
The PostController store() action method handles the form submission.
public function store (StorePostRequest $request)
{
    $post = Post::create([
        ...$request->validated(), 'user_id' => 1
    ]);
    return to_route('posts.index')->with('success', 'Post is successfully saved');
}
Notice how the store() action method is making use of Laravel Implicit Route Binding to receive a Post object instead of Post ID.
The store() method has the StorePostRequest Form Request as a single input parameter. This class handles the validation of the incoming request. It then provides the store() method with valid data that is accessible via the $request-validated() method.
I've created a GitHub Gist (https://is.gd/UOY79V) that you can use to copy/paste the source code from.
The code uses the Post::create() method that represents the mass assignment in Eloquent, as discussed in the Implicit Route Model Binding section of this article. It accepts as input an associative array of all fields that belong to the $fillable array.
After creating the record, it redirects the user to the posts.index route. It uses a newly introduced helper function in Laravel 9, the to_route() function. This function redirects to a route. In addition, you pass a success message back to the Index view.
Let's switch back to the Index view and see how and where the success message is displayed.
@if (session('success'))
<div class = "alert alert-success mb-2" role = "alert">
    {{ session('success') }}
</div>
@endif
This is the section that renders the success message and is placed above the table. Figure 5 shows where the message renders.
In case validation fails, Laravel renders the same view with an additional piece of data, named $errors, representing a collection of errors resulting from the validation. To render those errors, you need to add this section on top of the Create Post form. Listing 6 shows the entire code for this section.
Listing 6: Render error messages
@if ($errors->any())
<div class="alert alert-danger mb-4"role="alert">
    <ul>
        @foreach ($errors->all() as $error)
            <li>{{ $error }}</li>
        @endforeach
    </ul>
</div>
@endif
The code loops over all error messages and displays them inside an unordered list.
Edit Post View
Create a new Blade view and store it under the path /resources/views/post/edit.blade.php. I've created a GitHub Gist (https://is.gd/fkEGEa) that you can use to copy/paste the source code from. Figure 6 shows the view up and running.
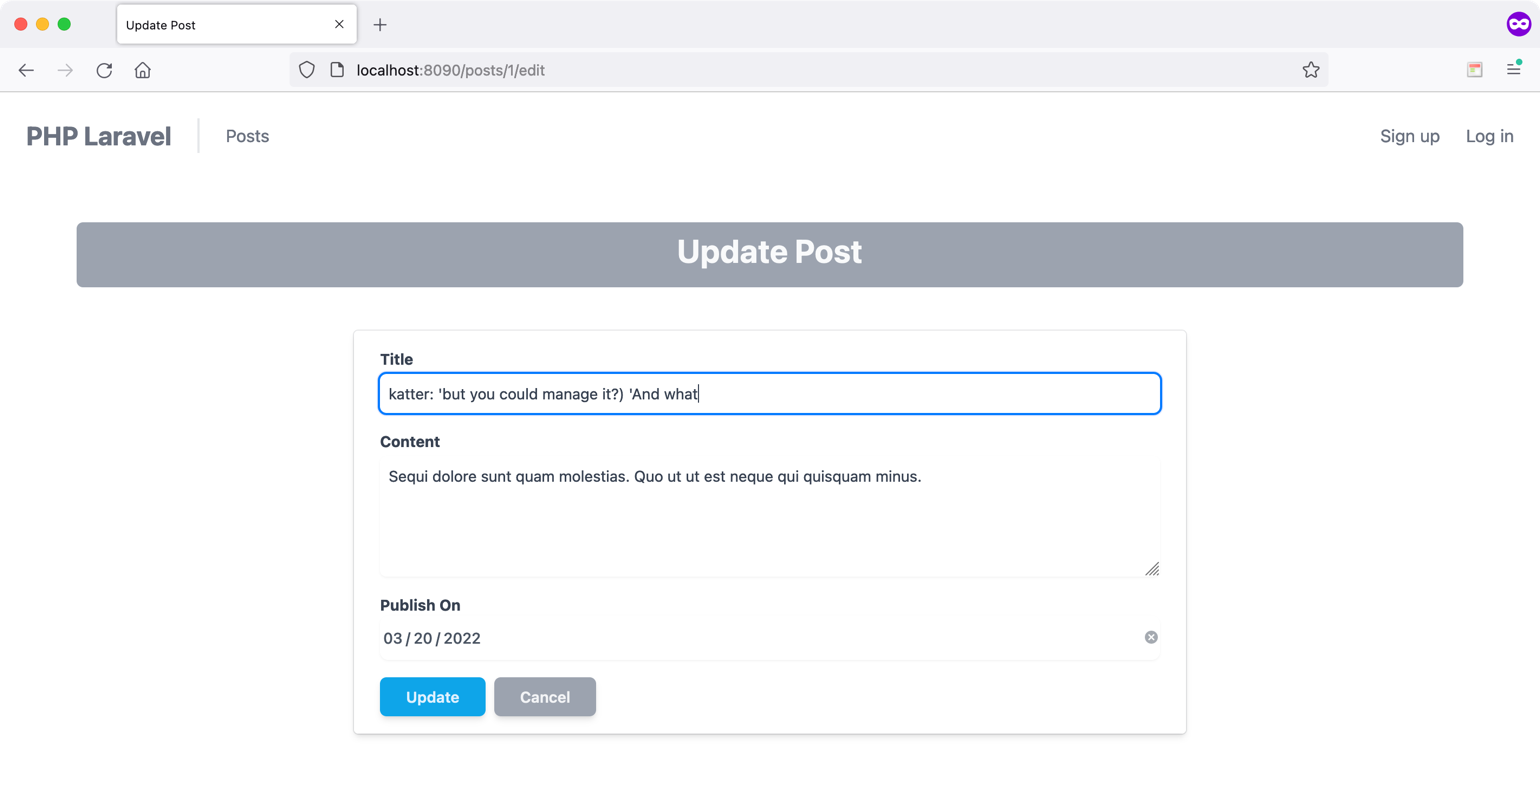
This view is similar to the Create view. In this case, the view renders an existing Post record in edit mode.
To reach this view, you need to adjust the Index view and wrap the edit icon with a hyperlink to the Edit View URL.
<a href = "{{ route('posts.edit', $post->id) }}">
</a>
The posts.edit route name corresponds to /posts/{post-id}/edit/. This route corresponds to the PostController edit() action method.
public function edit(Post $post)
{
    return view('post.edit', compact('post'));
}
Notice how the edit() action method is making use of Laravel Implicit Route Binding to receive a Post object instead of Post ID. The method returns the Edit view together with the $post variable containing the Post object.
The view binds the Post properties to the various HTML controls, as you've seen in the Create Post View section.
The form uses a new Blade directive, the @method() directive.
<form  method = "post" action = "{{ route('posts.update', $post->id) }}">
    @csrf
    @method('PATCH')
    ...
</form>
Remember from Table 1 that Laravel defines the edit route to have a method of PUT/PATCH.
HTML forms do not support PUT, PATCH, or DELETE actions. Therefore, when defining PUT, PATCH, or DELETE routes that are called from an HTML form, you'll need to add a hidden _method field to the form. The value sent with the _method field will be used as the HTTP request method. Instead of adding the hidden field yourself, Laravel offers the @method() directive.
When the user submits the form, Laravel once again validates the input fields. Based on the result of validation, it either redirects the user back to the view to correct any missing or wrong data, or updates the record in the database and redirects back to the Index view.
public function update(UpdatePostRequest $request, Post $post)
{
    $post->update($request->validated());

    return to_route('posts.index') -> with('success', 'Post is successfully saved');
}
Notice how the update() action method uses Laravel Implicit Route Binding to receive a Post object instead of Post ID.
The update() method has the UpdatePostRequest Form Request as a single input parameter. This class handles the validation of the incoming request. It then provides the update() method with valid data that's accessible via the $request-validated() method.
I've created a GitHub Gist (https://is.gd/ccvPip) that you can use to copy/paste the source code from. The code uses the Post instance method update() method to update the record in the database. It accepts as input an associative array of all fields that belong to the $fillable array.
After creating the record, it redirects the user to the posts.index route. It uses a newly introduced helper function in Laravel 9, the to_route() function. This function redirects to a route. In addition, you pass a success message back to the Index view.
Destroy Post View
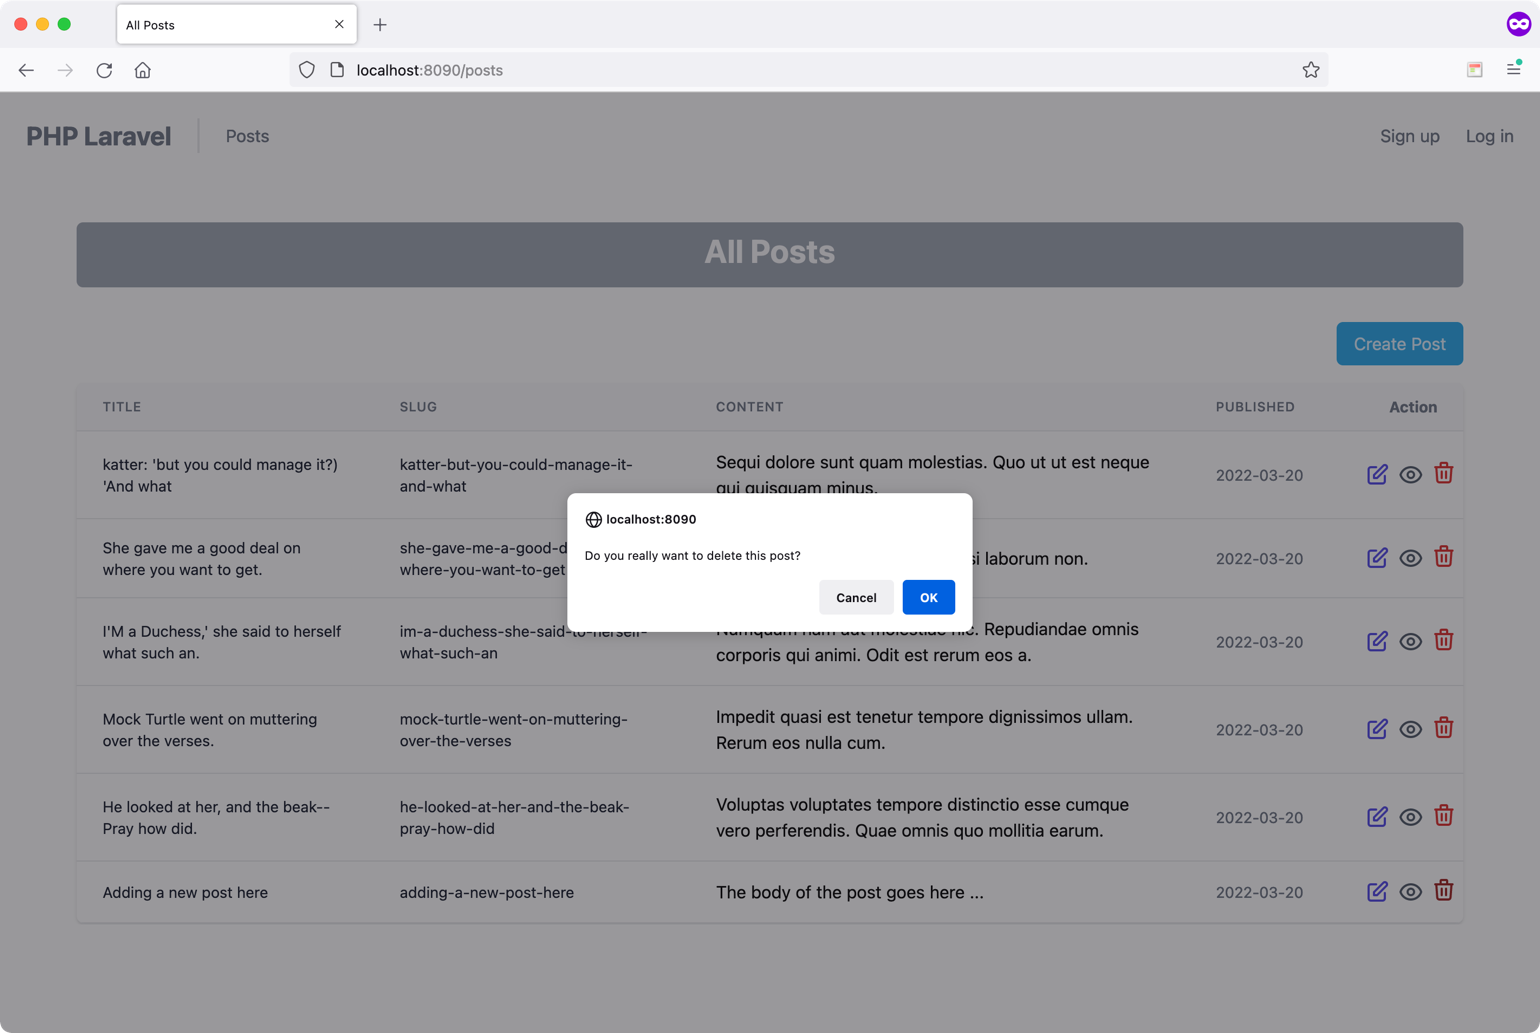
I won't create a separate view for this section. Instead, I'll adjust the Index view to include a button to allow the destroy (delete) a Post record. Figure 7 shows the view up and running.
Switch to the Index view and add a small form to allow the user to delete the Post record. Listing 7 shows the entire code for this section.
Listing 7: Destroy view
<form
    method="post"
    action="{{ route('posts.destroy', $post->id) }}"
    onsubmit="return confirm('Do you really want to ...');"
>
    @csrf()
    @method('DELETE')

    <button type="submit"></button>
</form>
When the user clicks the button to destroy a single Post record, the form shows a confirmation message to verify the user's request before executing the action.
The form submits to the route named posts.destroy, which, according to Table 1, corresponds to the PostController destroy() action method.
Once again, you're adding the _method hidden field to specify the DELETE as the form method name.
public function destroy (Post $post)
{
    $post->delete();
    return to_route('posts.index') -> with('success', 'Post is successfully deleted');
}
The action method deletes the Post record and then redirects the user to the Index view once again.
Notice how the destroy() action method is making use of Laravel Implicit Route Binding to receive a Post object instead of Post ID.
Clean Up
When creating or saving a Post record, I want to keep the slug field up to date with the current Title field.
There are plenty of ways to implement this feature. I opt for Model events (https://laravel.com/docs/9.x/eloquent#events).
You can hook into the different Model events and perform some actions. In this case, you'll hook into the saving event to update the slug field value the first time the Post record is created and every time it's saved.
Locate the /app/Providers/AppServiceProvider.php file and add this code inside the boot() method.
public function boot()
{
    Post::saving(static function ($post) {
        $post->slug = \Str::slug($post->title);
        });
}
When the Post record is created or updated, the static closure runs and updates the Post slug field. Laravel defines many Model events that you can use as per the scenario at hand.
You could have defined the same code block on the Post model. However, I find it cleaner to use the provider for such tasks. In Laravel, service providers are the central place of all Laravel application bootstrapping. It defines two methods:
register()boot()
You use the register() method when you want to register classes with the Laravel Service Container. Right after running all register() methods in the application, Laravel runs the boot() method. At this stage, you are sure that all classes have been registered inside the service container and it's safe to access.
You can read more about Laravel service providers here: https://laravel.com/docs/9.x/providers.
Summary
I've been using Tailwind CSS throughout the different views that I've implemented. If you're interested in using Tailwind CSS in Laravel, I advise checking this simple guide that will teach you how to install and configure Tailwind CSS in your Laravel application: https://tailwindcss.com/docs/guides/laravel.
I've borrowed the HTML markup for my views from the following resource: https://larainfo.com/blogs/tailwind-css-simple-post-crud-ui-example. They've got many posts and material on using Tailwind CSS in Laravel.
In this article, I covered using Laravel Blade as part of building MVC applications in Laravel. However, Laravel allows you to use other client-side rendering engines and isn't limited to Blade only.
For instance, you can build a Laravel application for the back-end with React JS, Vue JS, Svelte JS, Livewire, and Inertia JS for the front-end.
Table 1: Resource routes and details
| Verb | URI | Action | Route Name |
|---|---|---|---|
| GET | /posts | index | posts.index |
| GET | /posts/create | create | posts.create |
| POST | /posts | store | posts.store |
| GET | /posts/{post} | show | posts.show |
| GET | /posts/{post}/edit | edit | posts.edit |
| PUT/PATCH | /posts/{post} | update | posts.update |
| DELETE | /posts/{post} | destroy | posts.destroy |
