


In the first article in this series (CODE Magazine, November/December 2021), you were introduced to Google Cloud Platform (GCP) and the PHP Laravel framework. You started by creating your first PHP Laravel project and pushed the app to a GitHub repository. Then you moved on to creating the Google App Engine (GAE) project and built the Google Cloud Build workflow to enable CI/CD (https://www.redhat.com/en/topics/devops/what-is-ci-cd) for the automated deployments on GCP.
Now, you'll go a step further and connect your app to a local MySQL database. Then, you'll introduce the Google Cloud SQL service and create your first SQL database in the cloud. Right after that, I'll show you one way to run Laravel database migrations from within the Cloud Build workflow. Finally, I'll enhance the Cloud Build workflow by showing you how to back up the SQL database every time you deploy a new version of the app on GCP.
First things first, let's locally connect the Laravel app to a MySQL database.
Create and Use a Local MySQL Database
In Part I of this series, I introduced Laravel Sail. It's a service offered by the Laravel team to dockerize your application locally. One of the containers that Sail creates locally, inside Docker, is the mysql container. It holds a running instance of MySQL Database Service. Listing 1 shows the mysql service container section inside the docker-compose.yaml file.
Listing 1: .env Database Settings
mysql:
    image: 'mysql:8.0'
    ports: - '${FORWARD_DB_PORT:-3306}:3306'
    environment:
        MYSQL_ROOT_PASSWORD: '${DB_PASSWORD}'
        MYSQL_DATABASE: '${DB_DATABASE}'
        MYSQL_USER: '${DB_USERNAME}'
        MYSQL_PASSWORD: '${DB_PASSWORD}'
        MYSQL_ALLOW_EMPTY_PASSWORD: 'yes'
    volumes: - 'sailmysql:/var/lib/mysql'
    networks: - sail
    healthcheck:
        test: ["CMD", "mysqladmin", "ping", "-p${DB_PASSWORD}"]
        retries: 3
        timeout: 5s
When you start the Sail service, it creates a Docker container for the mysql service and automatically configures it with a MySQL database that's ready to use in your application.
Sail picks up the database details from the current application environment variables that you usually define inside the .env file.
Let's have a look at the database section of the .env file:
DB_CONNECTION=mysql
B_HOST=mysql
DB_PORT=3306
DB_DATABASE=laravel
DB_USERNAME=sail
DB_PASSWORD=password
These are the default settings that ship with a new Laravel application using Sail service.
You can change the settings as you see fit. For now, I just changed the database name to be gcp_app.
In Laravel 8.x, you can use any of the following database systems: MySQL 5.7+, PostgreSQL 9.6+, SQLite 3.8.8+, or SQL Server 2017.
Step 1: Create and Connect to a MySQL Database
For now, let's keep them as they are and start up the Docker containers using the Sail service command:
sail up --d
This command starts up all services that the docker-compose.yaml file hosts.
Let's connect to the database that sail has created. I'm using TablePlus Database Management Tool to connect to the new database. Feel free to use any other management tool of your own preference. Figure 1 shows the database connection window.

I've highlighted the important fields that need your attention:
- Name: The name of the connection
- Host: The IP address of the server hosting the MySQL database
- User: The database user
- Password: The user password
- Database: The name of the database
Once you're done filling in all the necessary fields, click the Connect button. Figure 2 shows the database tables.
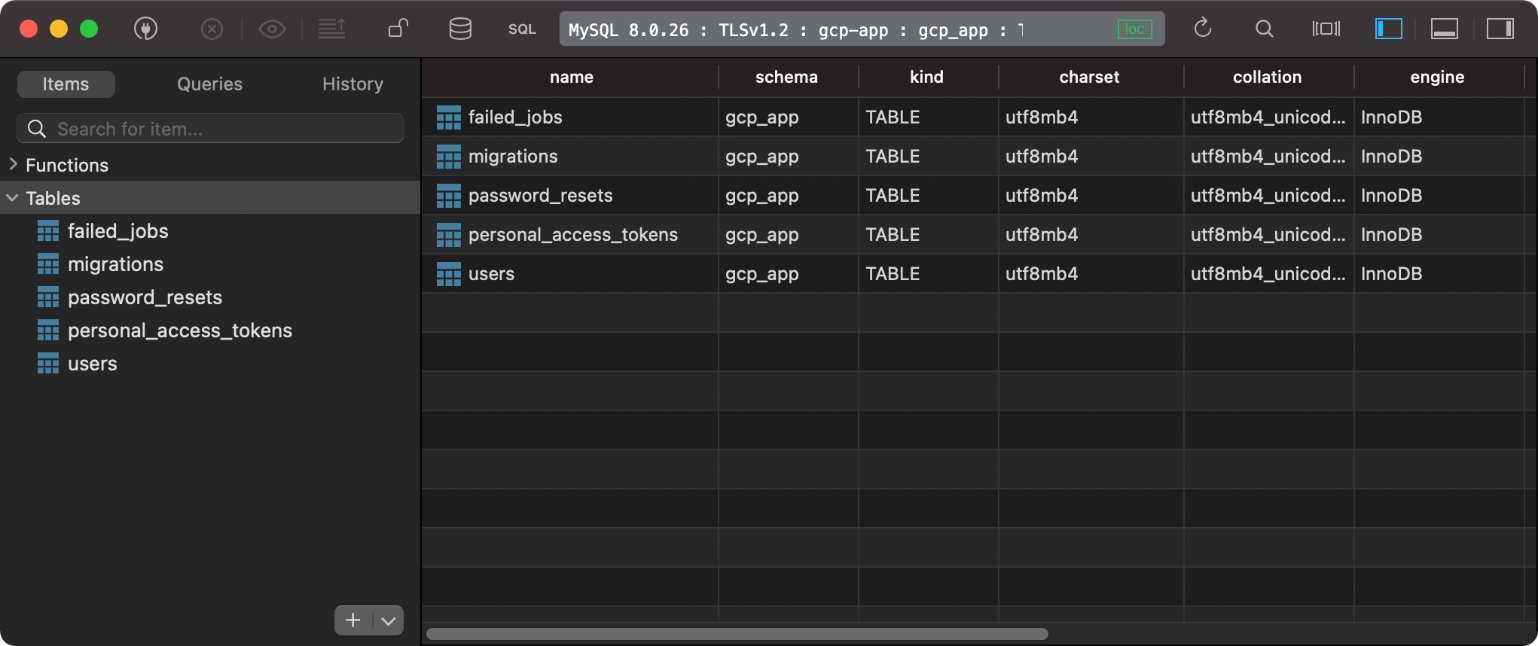
You might be wondering where the tables came from. This is the result of creating and running the app in the first part of this series. You ran a command to migrate the database and create all the tables that shipped with Laravel.
The command to run is:
sail artisan migrate:fresh
Now that you've successfully connected your app to a fresh copy of a MySQL database, let's build a page to manage code editors that you want to keep track of in your database.
Step 2: Build the Coding Editors' Management Page
Let's build a simple page to manage a list of coding editors. The goal is to allow you to add a new coding editor, with some details, and view the list of all editors you're adding.
Step 2.1: Install and Configure Tailwind CSS
Start by installing and configuring Tailwind CSS in the Laravel project. It's a booming CSS framework that I'll use to style the page you're building in this section. You can check out their online guide on how to install and use it inside a Laravel project (https://tailwindcss.com/docs/guides/laravel).
Another option is to make use of Laravel-frontend-presets/tailwindcss package, a Laravel front-end scaffolding preset for Tailwind CSS (https://github.com/laravel-frontend-presets/tailwindcss).
Step 2.2: Create the Editors' Blade Page
Now that you've installed and configured Tailwind CSS, let's create your first Blade view to manage the editors.
Locate the \resources\views folder and create the editors.blade.php file. Inside this file, paste the content you can find in this public GitHub Gist: Editors View (https://gist.github.com/bhaidar/e9c4516074a2346f0ce226ce92003cfc).
The view is straightforward. It consists of an HTML form to allow the user to add a new editor, and a table underneath to show all stored editors in the database. This will do the job to demonstrate a Laravel database connection.
Step 2.3: Add a Route for the New View
To access the new view in the browser, let's add a new route to point to this new view. Locate the \routes\web.php file and append the following two routes:
Route::get('/editors',  [
    \App\Http\Controllers\EditorController::class, 'index'
    ])->name('editors.index');
Route::post('/editors', [
    \App\Http\Controllers\EditorController::class, 'store' ]);
The first route allows users to access the view (GET) and has a route name of editors.index. The second route, on the other hand, allows executing a POST request to create a new editor record in the database.
The routes use the EditorController that you haven't created yet. Let's run a new Artisan command to create this controller:
sail artisan make:controller EditorController
This command creates a new controller under the \App\Http\Controllers folder.
The index() action retrieves all stored editors in the database and returns the editors view together with the data to display.
public function index()
{
    $editors = Editor::all();
    return view('editors', compact('editors'));
}
The store() action takes care of storing a new editor record in the database. It validates the POST request to make sure that all required fields are there. Then, it creates a new editor record in the database. Finally, it redirects the user to the editors.index route (you have defined this inside \routes\web.php). Listing 2 shows the store() action source code entirely.
Listing 2: Store() method
public function store(Request $request)
{
    $request->validate([
        'name' => 'required',
        'company' => 'required',
        'operating_system' => 'required',
        'license' => 'required',
    ]);

    Editor::create($request->all());

    return redirect()->route('editors.index')
        ->with('success', 'Editor created successfully.');
}
Step 2.4: Create a Laravel Migration
To store information about coding editors, you need to create a corresponding database table. In Laravel, you need to create a new database migration and run it against the connected database. Welcome to Artisan Console!
Laravel ships with Artisan (https://laravel.com/docs/8.x/artisan), a command-line interface (CLI), that offers many commands to create functionality in the application. It's located at the root of the project folder and can be called like any other CLI on your computer.
To create a new Laravel database migration, run the following command:
sail artisan make:model Editor -m
This command makes a new Model (https://laravel.com/docs/8.x/eloquent) class together with a database migration file (-m option).
Laravel's make:model Artisan command can generate a model, controller, migration, and factory in one single command. You can run the options using -mcf.
Locate the \database\migrations folder and open the new migration PHP file that you just created. Replace the content of this file with the content showing in Listing 3.
Listing 3: Database migration
class CreateEditorsTable extends Migration
{
    /**
    * Run the migrations.
    *
    * @return void
    */
    public function up()
    {
        Schema::create('editors', function (Blueprint $table) {
            $table->id();
            $table->string('name', 255);
            $table->string('company', 500);
            $table->string('operating_system', 500);
            $table->string('license', 255);
            $table->timestamp('created_at')->useCurrent();
            $table->timestamp('updated_at')->nullable();
        });
    }

    /**
    * Reverse the migrations.
    *
    * @return void
    */
    public function down()
    {
        Schema::dropIfExists('editors');
    }
}
The core of every migration file is the up() method.
Schema::create('editors', function(Blueprint $table) {
    $table->id();
    $table->string('name', 255);
    $table->string('company', 500);
    $table->string('operating_system', 500);
    $table->string('license', 255);
    $table->timestamp('created_at')->useCurrent();
    $table->timestamp('updated_at')->nullable();
});
Inside the up() method, you're creating the editors table and specifying the columns that should go under it. Listing 4 shows the Editor model class.
Listing 4: Editor Model class
class Editor extends Model
{
    use HasFactory;

    protected $fillable = [
        'name',
        'company',
        'operating_system',
        'license',
        'created_at'
    ];
}
I've added the $fillable property to whitelist the columns that are available for the mass assignment. This comes in later when creating and storing editors in the database.
You can read more about $fillable and $guarded in Laravel by checking this awesome and brief introduction on the topic: https://thomasventurini.com/articles/fillable-vs-guarded-on-laravel-models/.
Now that the migration and model are both ready, let's run the migration to create the new table in the database. Run the following command:
sail artisan migrate
You can verify that this command has created the table by checking your database.
Step 2.5: Run the App
The final step is to run the app and start using the editors' route to store a few coding editors in the database and make sure the database connection is up and running. Figure 3 shows the Editors' view in the browser.
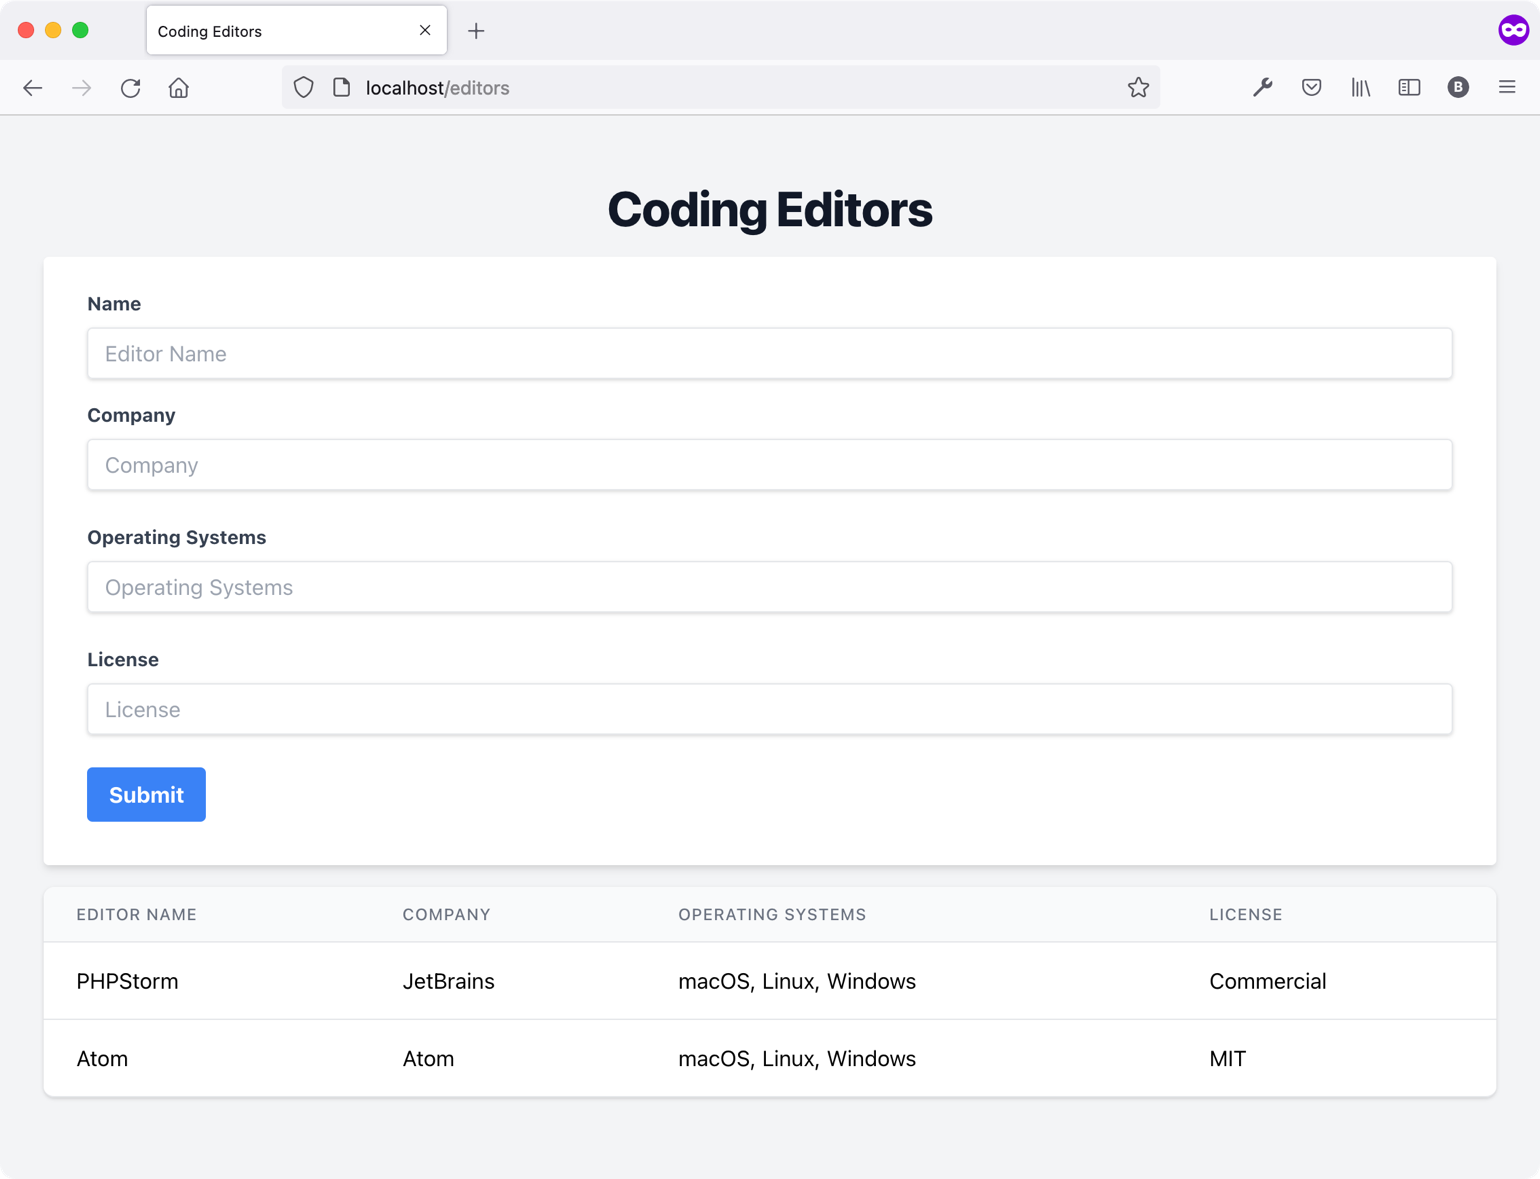
That's it! Now that you've successfully connected your app to a local database, let's explore Google Cloud SQL and configure the app to use one.
Before moving on, make sure you commit and push your change onto GitHub. Keep in mind that this action triggers the GCP Cloud Build Workflow to deploy a new version of your Laravel app.
Create and Use a Google Cloud SQL Database
Google Cloud SQL is a fully managed relational database that supports MySQL (https://www.mysql.com/), PostgreSQL (https://www.postgresql.org/), and Microsoft SQL Server (https://www.microsoft.com/en-us/sql-server/sql-server-downloads).
You can read the full documentation on Google Cloud SQL here: https://cloud.google.com/sql.
In this section, you're going to create your first Cloud SQL and connect it from your Laravel app running on the GAE (Google App Engine).
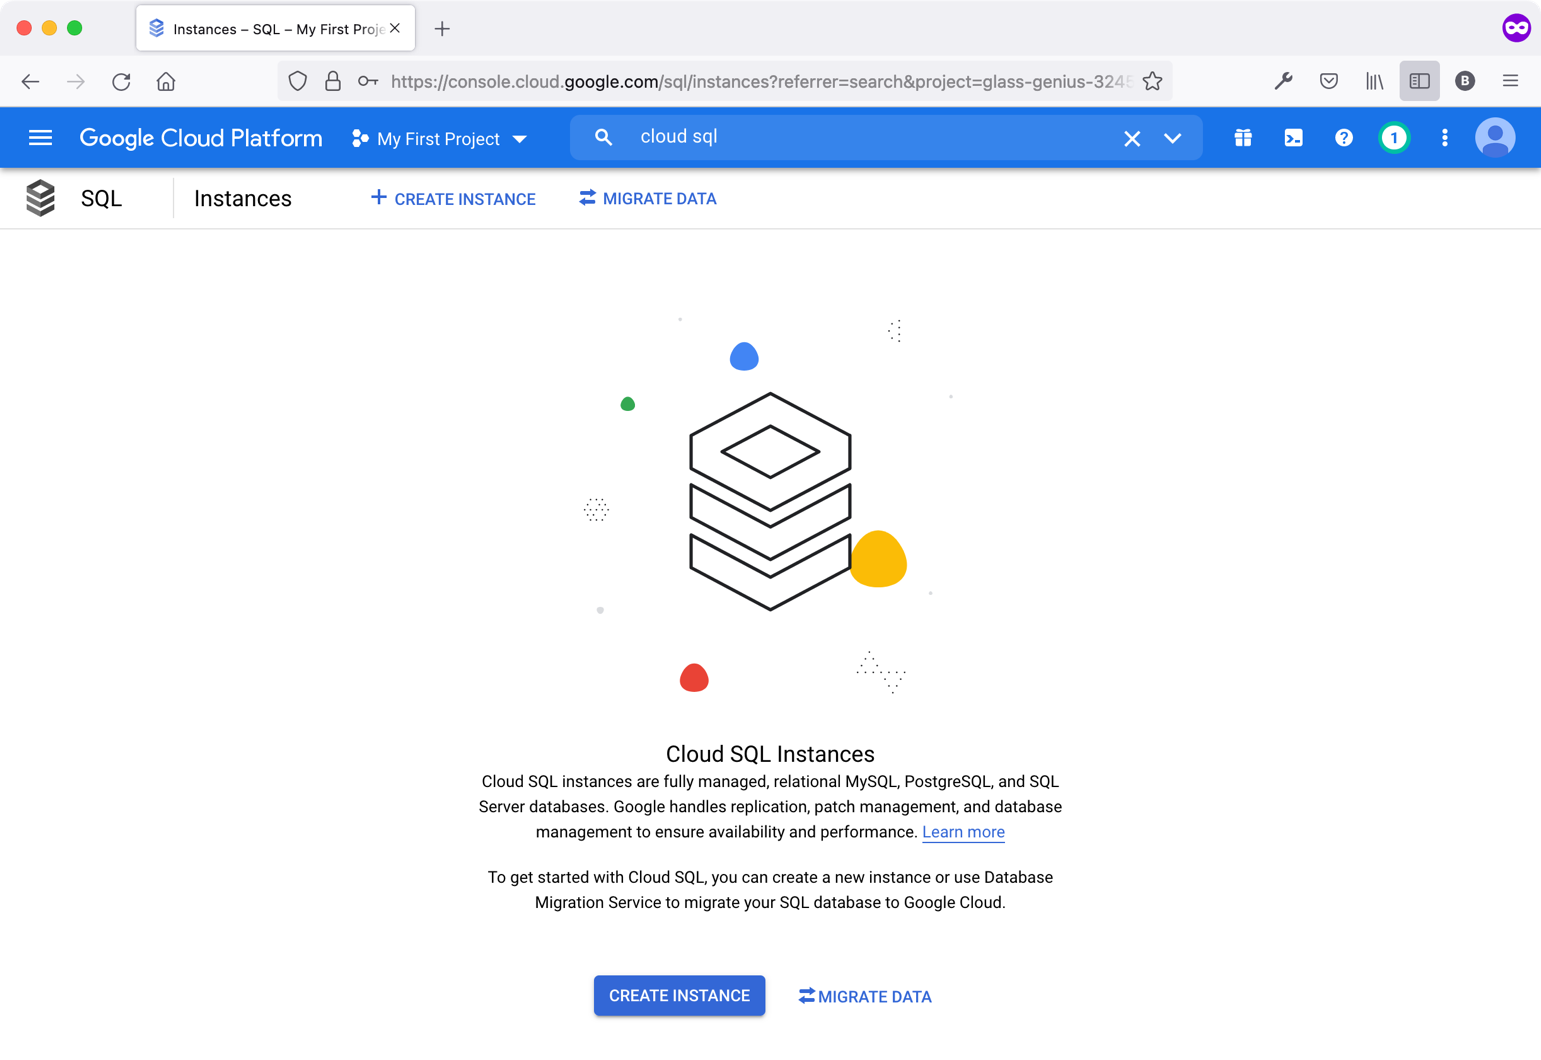
Log into your account at https://console.cloud.google.com/ and navigate to the Cloud SQL section by selecting it from the left-side menu. Figure 4 shows where to locate the Cloud SQL on the main GCP menu.
The GCP (Google Cloud Platform) takes you through a few steps to help you easily create a new instance. Let's start!
Google Cloud SQL is a fully managed relational database that supports MySQL, PostgreSQL, and Microsoft SQL Server
Step 1: Create a MySQL Instance
Locate and click the CREATE INSTANCE button. Follow the steps to create your first Cloud SQL instance.
The next step is to select which database engine you're going to create. For this series, stick with a MySQL database. Figure 5 shows the database engine offerings by GCP.
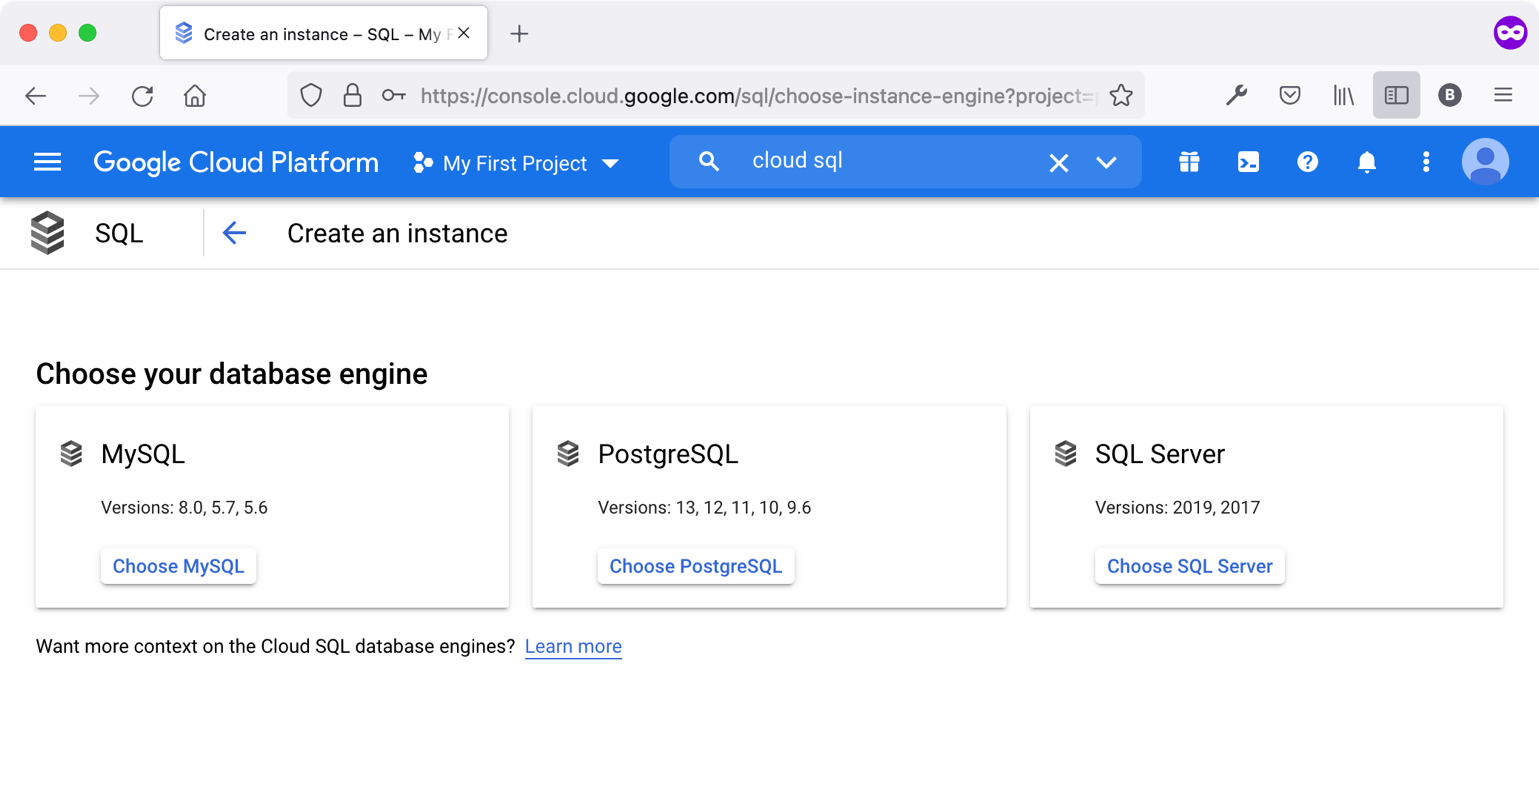
Select the Choose MySQL button. Next, GCP prompts you to fill in the configuration details that GCP needs to create your MySQL instance. Figure 6 shows the MySQL instance configuration settings.
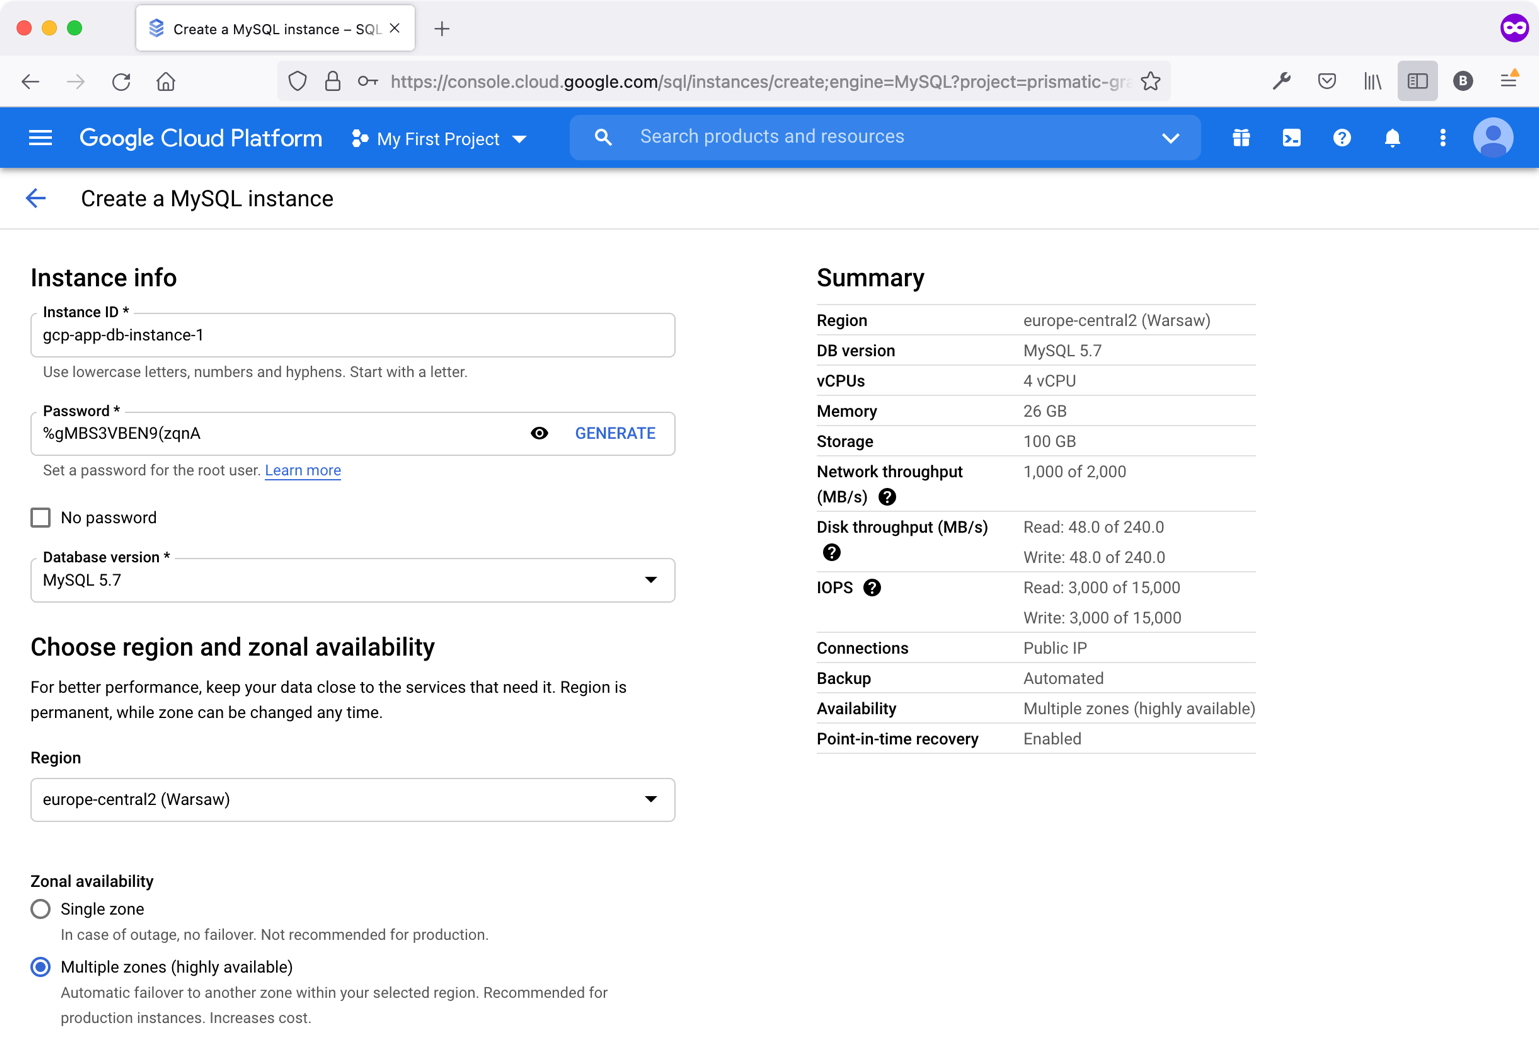
At a minimum, you need to input the following fields:
- Instance ID
- Password (for the root MySQL instance user). Make sure you remember this password as you'll need it later.
- Database version. I'll stick with MySQL 5.7 for now.
- Region (preferably the same region you picked for the GAE app)
- Zonal availability (either single or multiple zones, depending on your requirements and needs)
The rest of the fields are optional. Look at them in case you want to change anything.
Click the CREATE INSTANCE button. GCP starts creating the instance and directs you to the Cloud SQL Dashboard upon completion. Figure 7 shows the Cloud SQL Dashboard.

From here, you'll start configuring the MySQL instance and preparing it for connection from your Laravel app.
Step 2: Create a MySQL Database
On the gcp-app-database dashboard, locate and click the Databases on the left-side menu. This page lists all the databases you create under the MySQL instance.
Click the CREATE DATABASE button to create a database for the Laravel app. Figure 8 shows the create database form.
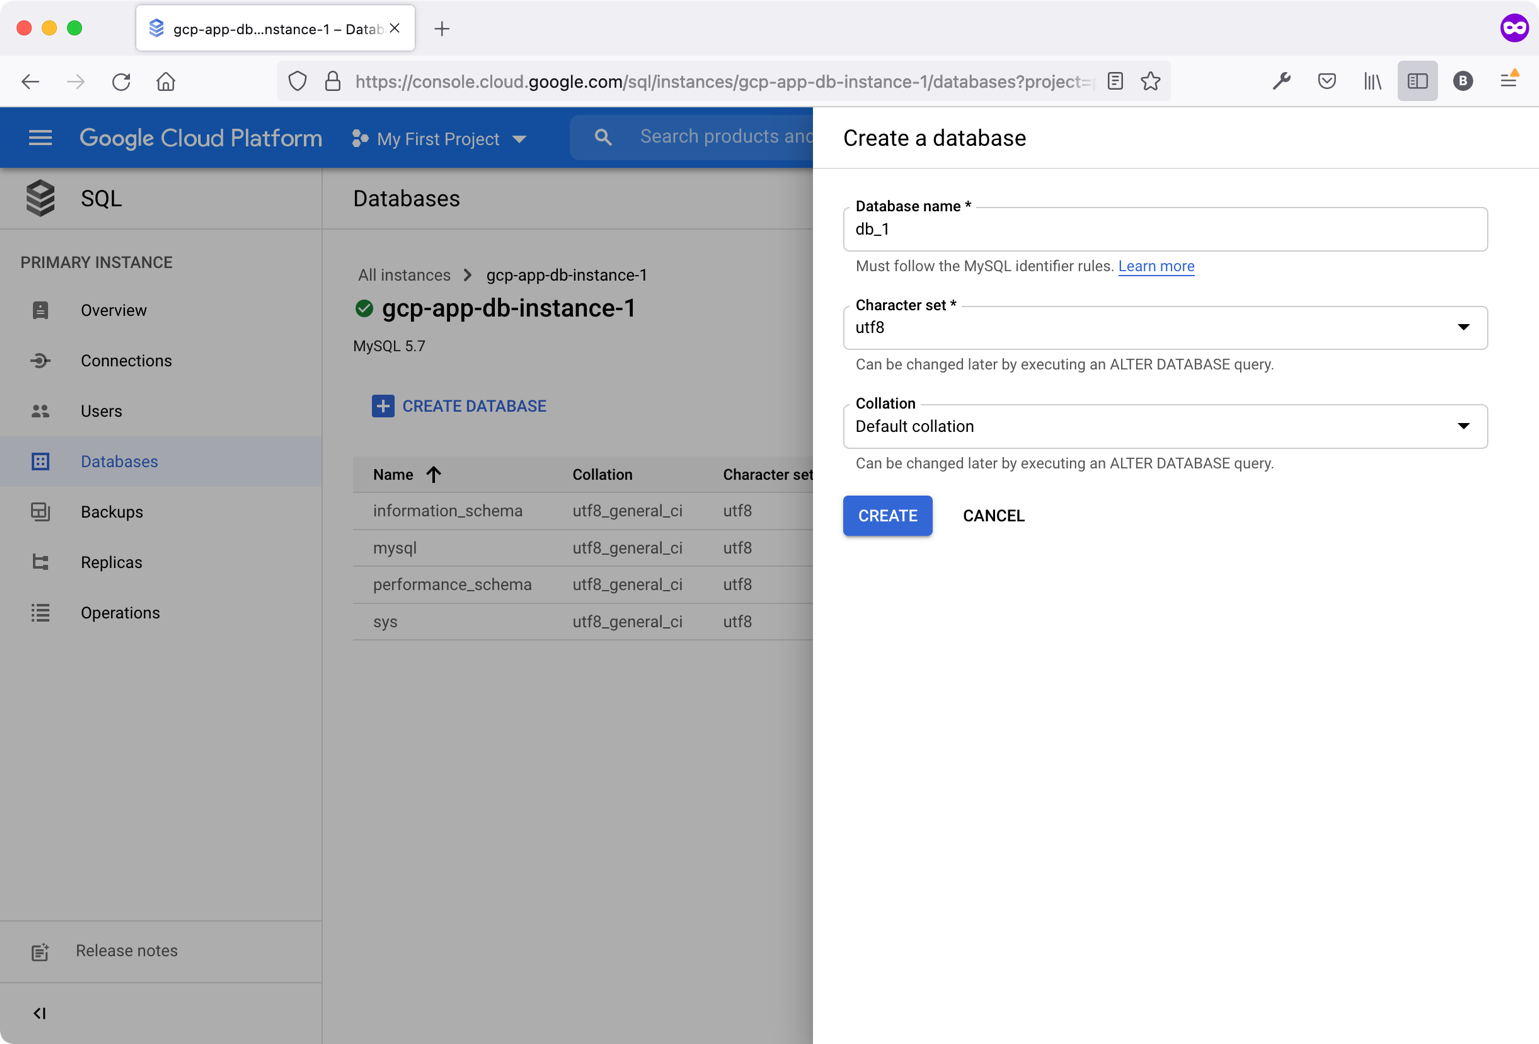
Provide a name for the new database and click the CREATE button. Just a few seconds later, you'll see the new database listed under the current instance list of databases.
Locate and click Connections on the left-side menu. This page lists all the networking configurations that govern your database instance.
For now, keep selecting the Public API option. It allows you to connect to your database by using the Cloud SQL Proxy.
Step 3: Use Cloud SQL Auth Proxy to Connect to the Database
The Cloud SQL Auth proxy (https://cloud.google.com/sql/docs/mysql/sql-proxy) provides secure access to your Cloud SQL instances without the need for Authorized networks or for configuring SSL. Download the Cloud SQL Auth Proxy version that best fits in your environment by checking this resource: https://cloud.google.com/sql/docs/mysql/sql-proxy#install
You have multiple ways to use the Cloud SQL Auth Proxy. You can start the Cloud SQL Auth proxy using TCP sockets, Unix sockets, or the Cloud SQL Auth proxy Docker image. You can read about how to use the Cloud SQL Auth Proxy here: https://cloud.google.com/sql/docs/mysql/connect-admin-proxy#tcp-sockets
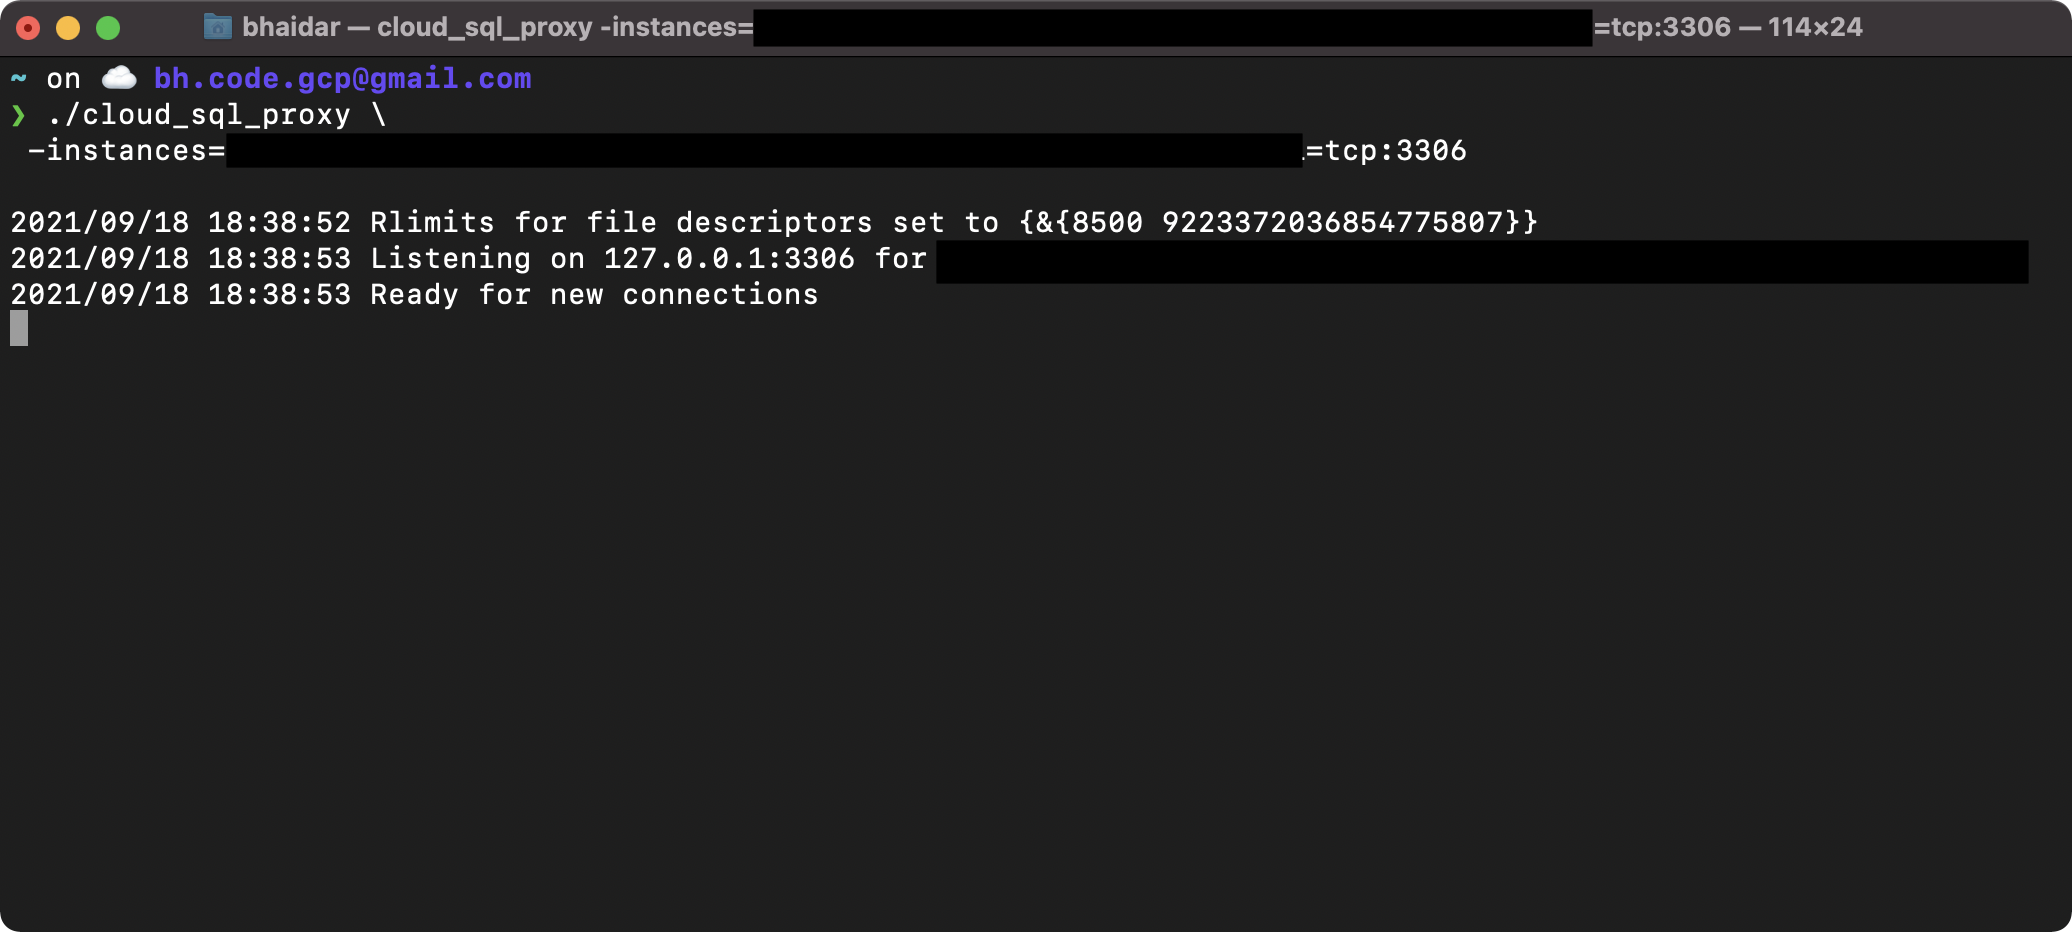
For this series, I'll be using the TCP sockets connection. Use the following command to connect to the Cloud SQL instance:
./cloud_sql_proxy \
    -instances=INSTANCE_CONNECTION_NAME=tcp:3306
INSTANCE_CONNECTION_NAME is the connection name that GCP provides, and you can locate it in Figure 7 under the Connection name field.
To start the Cloud SQL Auth Proxy, run the following command:
./cloud_sql_proxy \
    -instances=INSTANCE_CONNECTION_NAME=tcp:3306
Replace the INSTANCE_CONNECTION_NAME with the real connection name.
The Cloud SQL Auth Proxy provides secure access to your Cloud SQL instances without the need for authorized networks or for configuring SSL.
Figure 9 shows the Cloud SQL Auth Proxy connected and ready to establish a database connection to any database under the currently connected instance.
With TCP connections, the Cloud SQL Auth proxy listens on localhost (127.0.0.1) by default. So when you specify tcp:PORT_NUMBER for an instance, the local connection is at 127.0.0.1:PORT_NUMBER. Figure 10 shows how to connect to the db_1 using TablePlus (https://tableplus.com/).
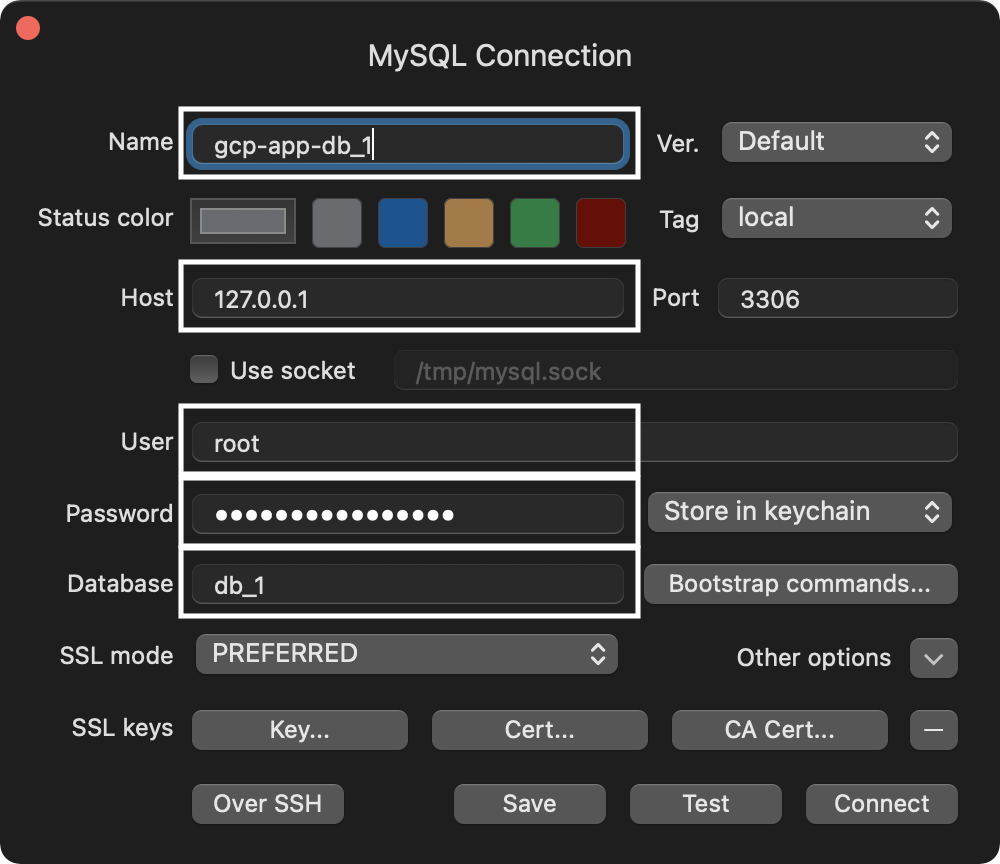
I've highlighted the important fields that need your attention:
- Name: The name of the connection
- Host: The IP address of the server hosting the MySQL database. In this case, it's 127.0.0.1.
- User: The database user. In this case, you're using the root user.
- Password: The user password. The root password that you previously created for the MySQL instance.
- Database: The name of the database. In this case, it's db_1.
Click the Connect button to successfully connect to the database. The database is still empty and you'll fill it with Laravel tables in the next section.
Step 4: Run Laravel Migrations on the New Database
In Steps 2.4 and 2.5, you created a database migration and pushed the code to GitHub. By pushing the code, the GCP Cloud Build Workflow runs and deploys a new version of the app. This means that your app on the GAE is now up to date, with the editors' view up and running.
Before you test your view on GAE, let's run the Laravel migrations on the cloud database. While the Cloud SQL Auth Proxy is running, switch to the app source code and apply the following changes.
Locate and open the .env file and update the database section as follows:
DB_CONNECTION=mysql
DB_HOST=127.0.0.1
DB_PORT=3306
DB_DATABASE=db_1
DB_USERNAME=root
DB_PASSWORD=
Make sure you replace the DB_HOST with 127.0.0.1. Also, replace the DB_DATABASE with db_1, the DB_USERNAME with root, and, finally, set the DB_PASSWORD for the root user.
On a terminal window, run the following command to refresh the app configurations:
php artisan config:cache
This command clears the old configurations and caches the new ones.
The app, when it runs, is now connected to the Cloud database. Hence, to run the Laravel migrations, you just need to run the following command:
php artisan migrate:fresh
Notice the use of php artisan rather than sail artisan. You use the sail command only when interacting with the Sail environment locally.
Switch back to TablePlus to see all the tables there. Figure 11 shows all the tables running a fresh Laravel migration.
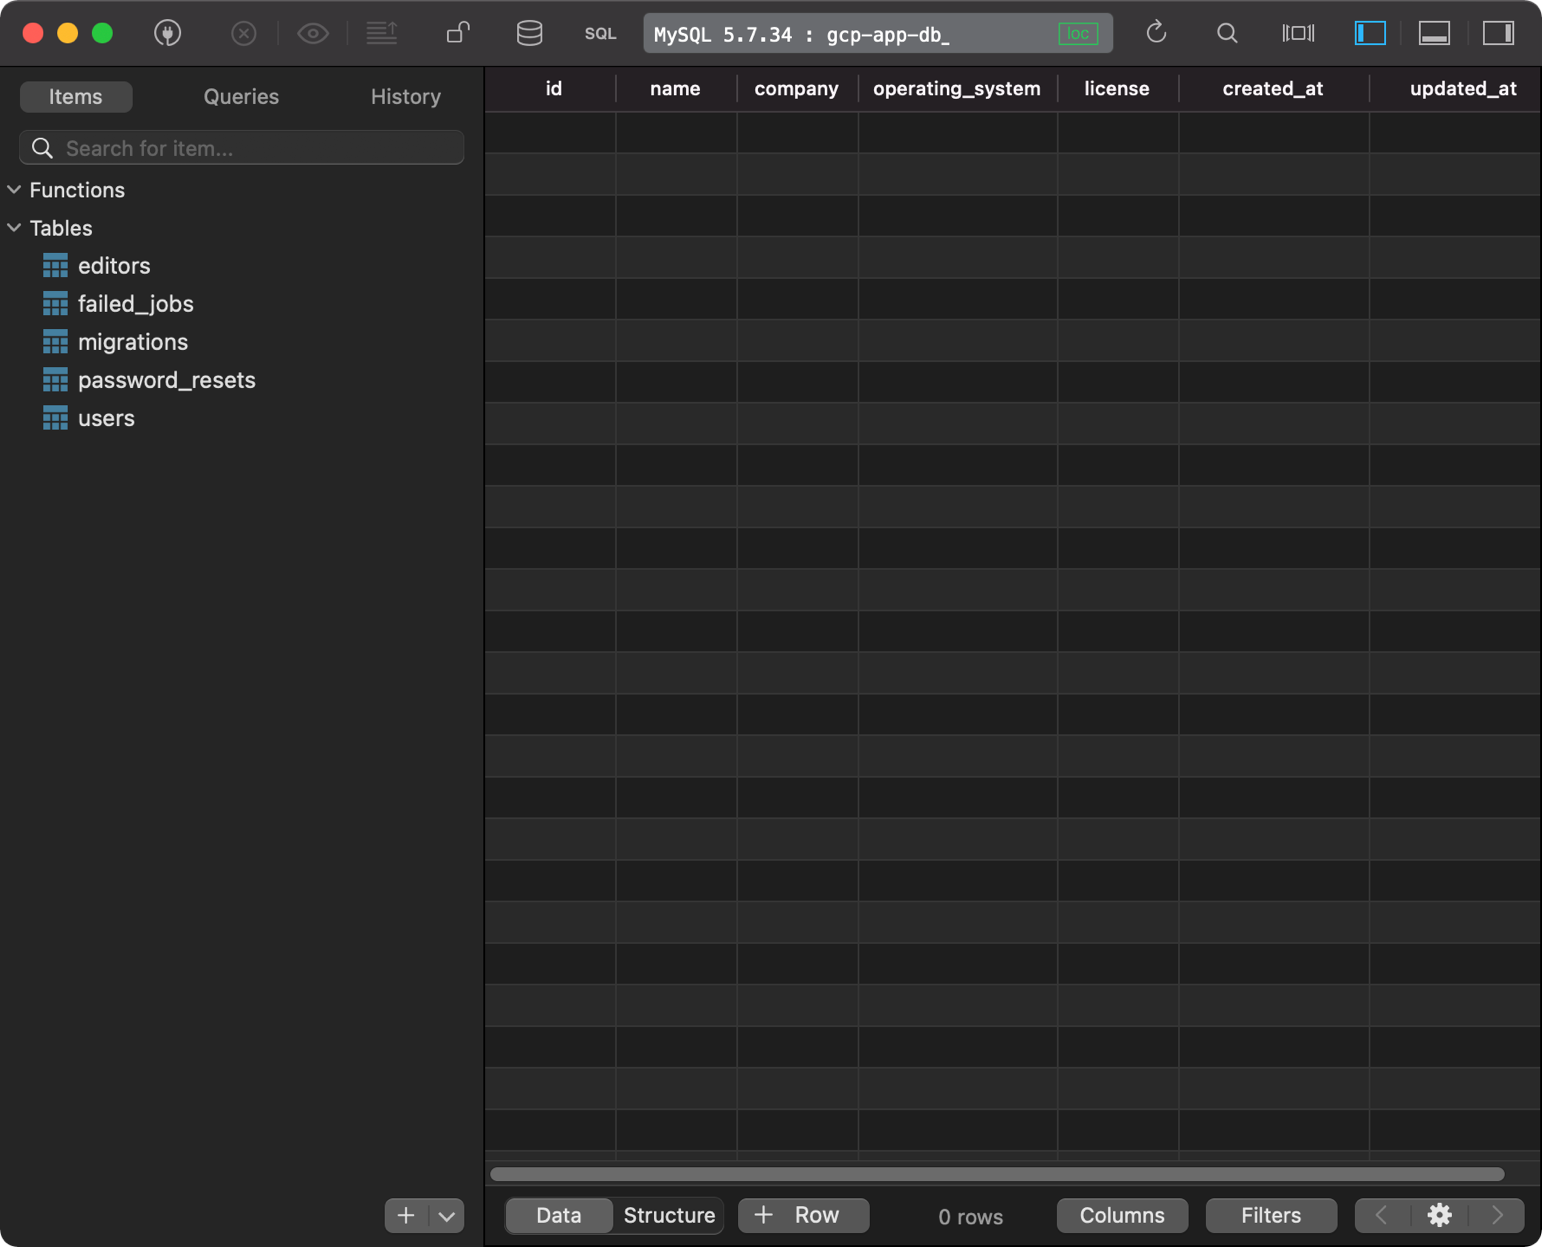
You have successfully prepared the database and are ready to accept new connections.
Step 5: Enable GCP APIs and Permissions
Before you can connect to the cloud database from within the GAE, you need to enable a few libraries and add some permissions.
Locate the following APIs and enable them in this order:
- Cloud SQL Admin API
- Google App Engine Flexible Environment
To enable any API or Library on the GCP, on the left-side menu, click the APIs and Services menu item. Then, once you're on the APIs and Service page, click the Library menu item. Search for any API and enable it by clicking the ENABLE button.
In Google Cloud, before using a service, make sure to enable its related APIs and Libraries.
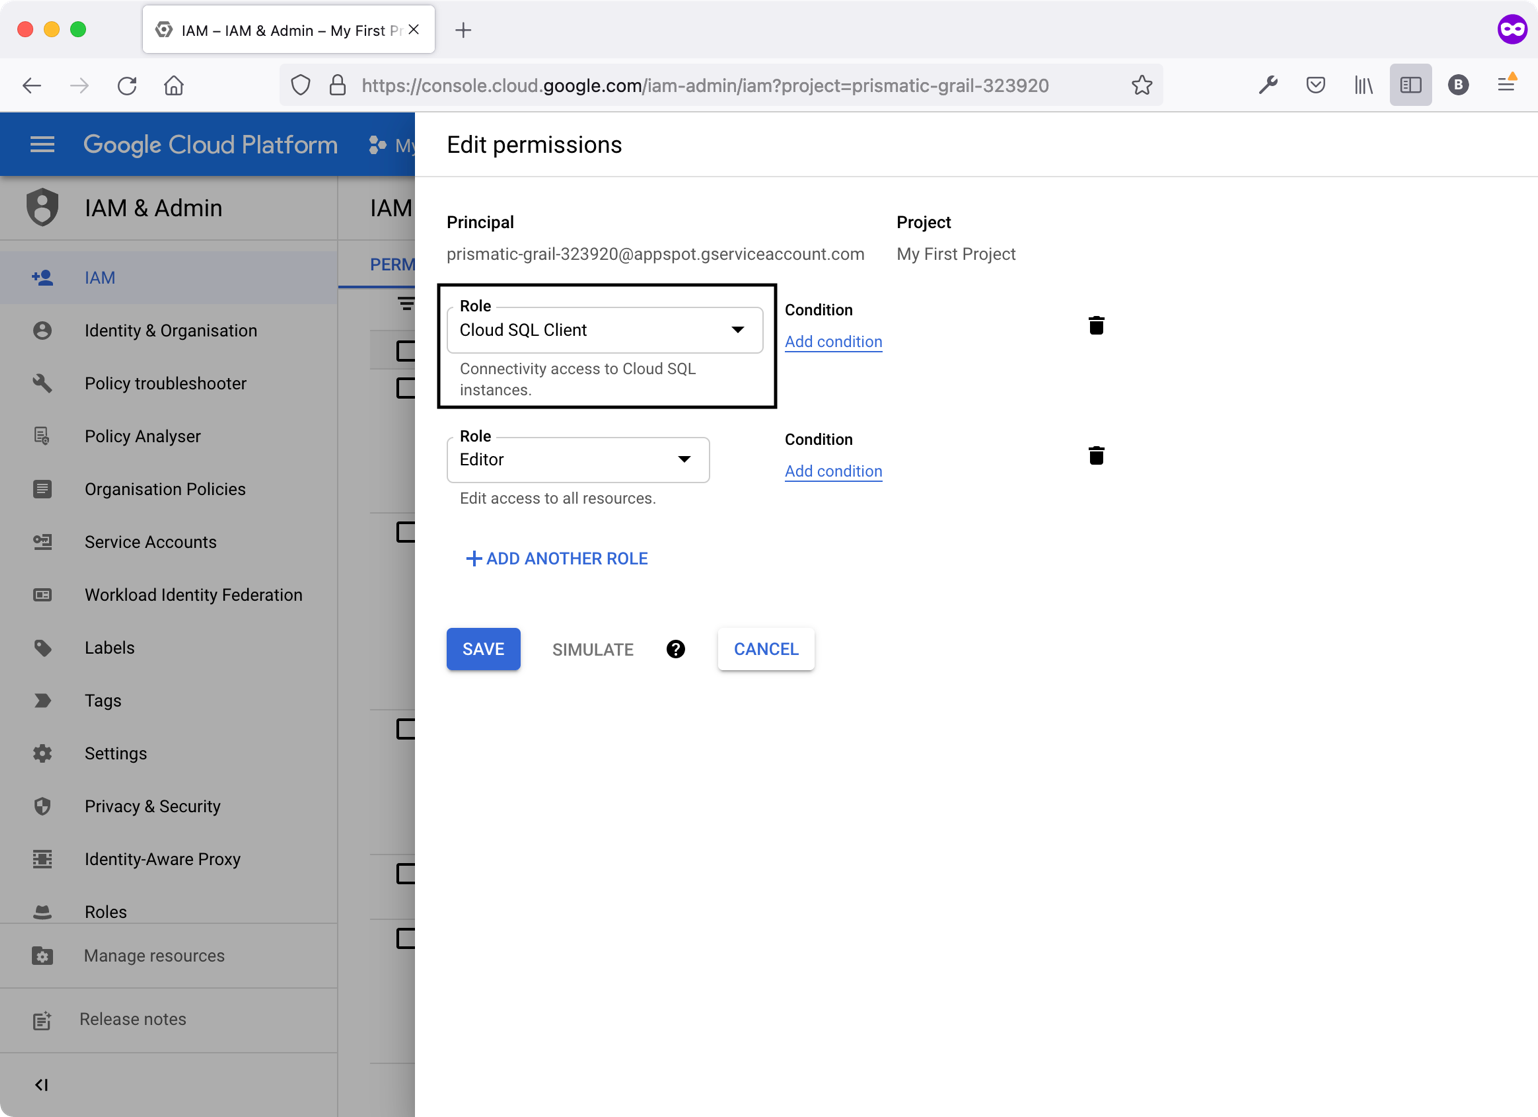
In addition to enabling the two APIs, you need to add the role of Cloud SQL Client for the GAE Service Account under IAM and Admin section.
On the left-side menu, locate and click the IAM and Admin menu item. Click the pencil icon to edit the account that ends with @appspot.gserviceaccount.com and that has the name of App Engine default service account. Figure 12 shows how to add the Cloud SQL Client role.
Now that you've configured all APIs and libraries, let's connect the Laravel app that's running on GAE to the cloud database.
Step 6: Configure Laravel App on GAE to Use the Cloud Database
It's time to configure your app running inside GAE to connect to this cloud database. Start by locating and opening the \app.yaml file at the root folder of the app.
Open the file and append the following settings under the env_variables section:
DB_DATABASE: db_1
DB_USERNAME: root
DB_PASSWORD:
DB_SOCKET: '/cloudsql/INSTANCE_CONNECTION_NAME'
Replace the INSTANCE_CONNECTION_NAME with the real connection name. Then, add a new section to the \app.yaml file:
beta_settings:
cloud_sql_instances: 'INSTANCE_CONNECTION_NAME'
This enables GAE to establish a Unix domain socket with the cloud database. You can read more about connecting to the Cloud database from GAE here https://cloud.google.com/sql/docs/mysql/connect-app-engine-flexible#php.
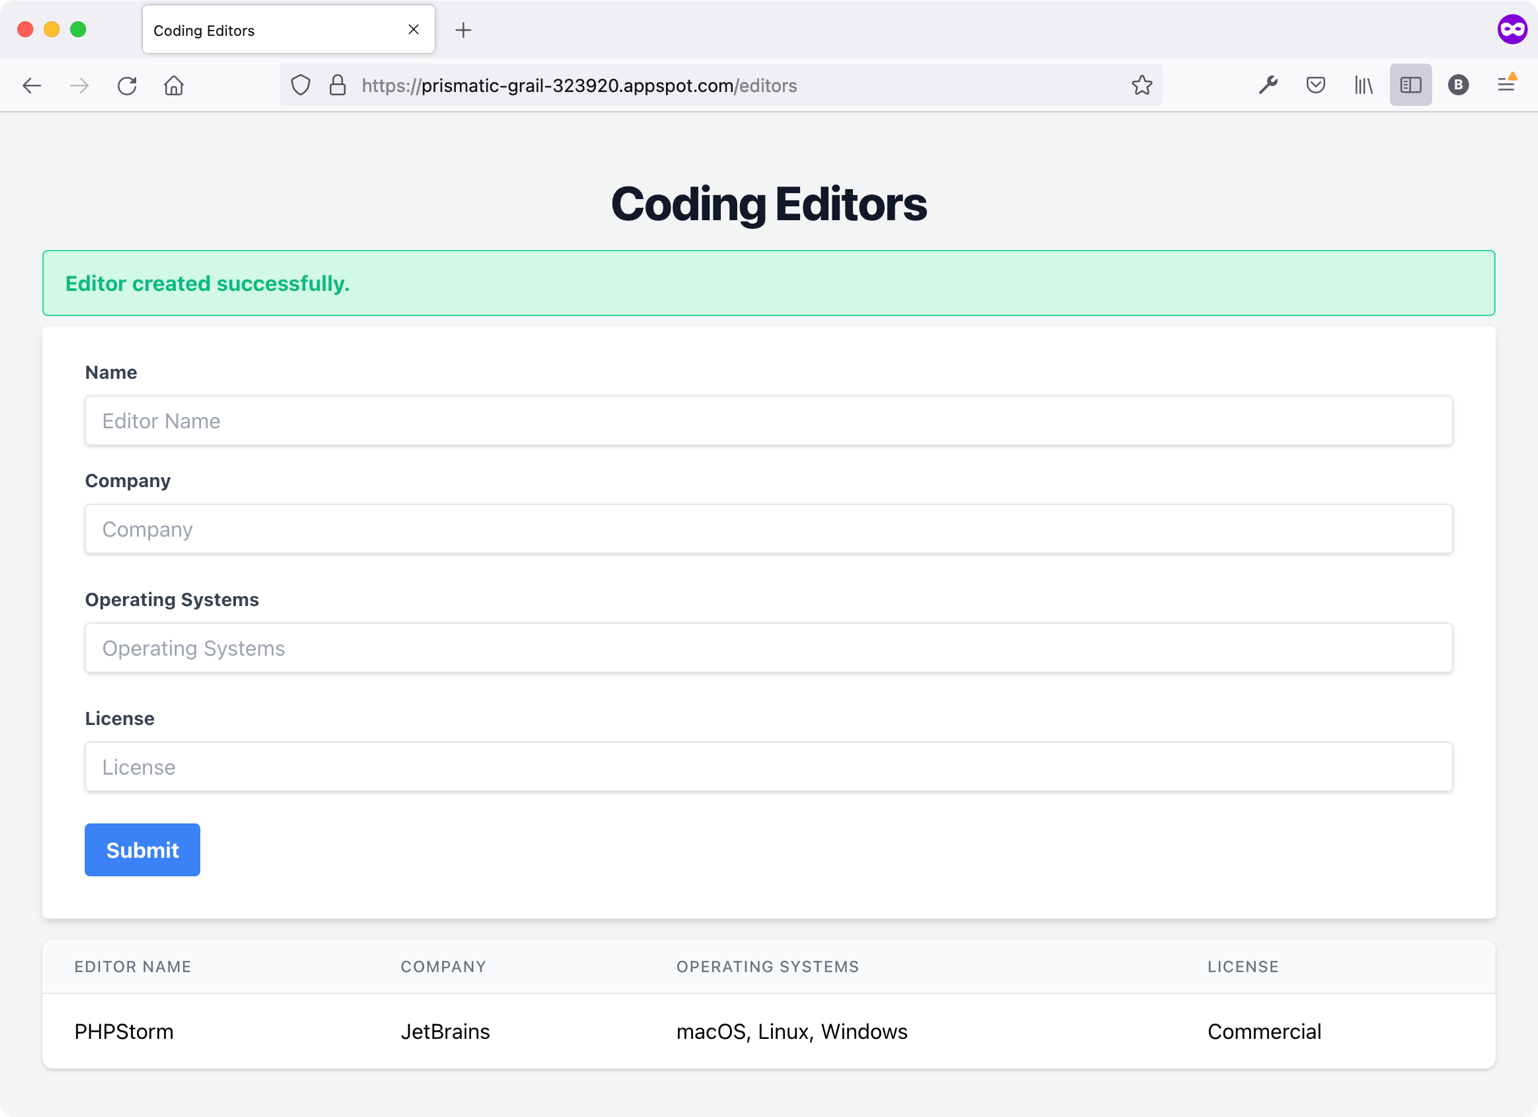
Commit and push your changes on GitHub. This triggers the Google Cloud Build workflow to run and deploy a new version of the app. Wait until the GCP deploys your app, then access the editors' view by following this URL: https://prismatic-grail-323920.appspot.com/editors. NOTE: By the time this article is available to readers, I have taken the app offline as not to incur additional costs.
This URL opens the coding editors' view. Start adding a few coding editors to try out the database connection and make sure all is working smoothly. Figure 13 shows the Editors' view up and running on GCP.
You have successfully connected your Laravel app to the Google Cloud SQL database. Let's move on and enhance the Google Cloud Build workflow.
Run Laravel Migrations inside the Cloud Build Workflow
When you're deploying your app to GAE, there's almost no easy way to access the underlying Docker container and run your migrations. You need to automate this task as part of the Cloud Build workflow.
One way to automate running Laravel migrations inside a Cloud Build workflow is the following:
- Add a new controller endpoint in your app that can run the Artisan migration command. You need to secure this endpoint by authenticating the request and making sure it's coming solely from GCP. There are ways to do so, as you will see later.
- Add a Cloud Build step to issue a curl (https://gist.github.com/joyrexus/85bf6b02979d8a7b0308) POST request to the endpoint from within the Cloud Build workflow.
Step 1: Add a Controller Endpoint to Run the Migrations
Let's start by adding a new invokable controller in Laravel by running the following command:
sail artisan make:controller SetupController \
    -- invokable
An invokable controller is a single action controller that contains an __invoke method to perform a single task. Listing 5 shows the __invoke() function implementation.
Listing 5: SetupController __invoke() method
public function __invoke(Request $request): \Illuminate\Http\Response
{
    try {

        Log::debug('Starting: Run database migration');

        // run the migration
        Artisan::call('migrate', [
            '--force' => true
        ]);

        Log::debug('Finished: Run database migration');

    } catch (\Exception $e)
    {
        // log the error
        Log::error($e);

        return response('not ok', 500);
    }

    return response('ok', 200);
}
The function is simple. It calls the migrate command using the Artisan::call() function call. It also does some logging to trace whether this task runs or fails.
The next step is to add a new route inside the file \routes\web.php as follows:
Route::post(
    '/setup/IXaOonJ3B7', '\App\Http\Controllers\SetupController');
I'm adding a random string suffix to the /setup/ URL, trying to make it difficult to guess this route path. One final step is to locate and open the \app\Http\Middleware\VerifyCsrfToken.php file. Then, make sure to enlist the /setup/ URL inside the $except array as follows:
protected $except = ['setup/IXaOonJ3B7'];
This way, Laravel won't do a CSRF token verification (https://laravel.com/docs/8.x/csrf) when the /setup/ URL GCP requests it.
Step 2: Amend Google Cloud Build to Run Migrations
Switch to \ci\cloudbuild.yaml and append a new Cloud Build step to invoke the /setup/ URL from within the Build workflow. Listing 6 shows the build step to invoke the /setup/ URL.
Listing 6: Invoke /setup/ inside Google Build file
- name: 'gcr.io/cloud-builders/gcloud'
  entrypoint: "bash"
  args:
    - "-c"
    - |
      RESPONSE=$(curl -o /dev/null -s -w "%{http_code}" \
                      -d "" -X POST $_APP_BASE_URL)
      if [ "200" != "$$RESPONSE" ];
      then
          echo "FAIL: migrations failed" exit 1;
      else
          echo "PASS: migrations ran successfully"
      fi
The build step uses a container of the gcr.io/cloud-builders/gcloud Docker image to run a curl command on a new bash shell. To learn more about Google Cloud Build Steps, check this resource https://cloud.google.com/build/docs/build-config-file-schema.
The build step issues a POST curl request to a URL represented by $_APP_BASE_URL. The Google Cloud Build substitutes this variable with an actual value when it runs the trigger. The value of this variable shall be the full app /setup/ URL. You can learn more about Google Cloud Build substitution here: https://cloud.google.com/build/docs/configuring-builds/substitute-variable-values.
Step 3: Amend the Cloud Build Trigger to Pass Over the _APP_BASE_URL
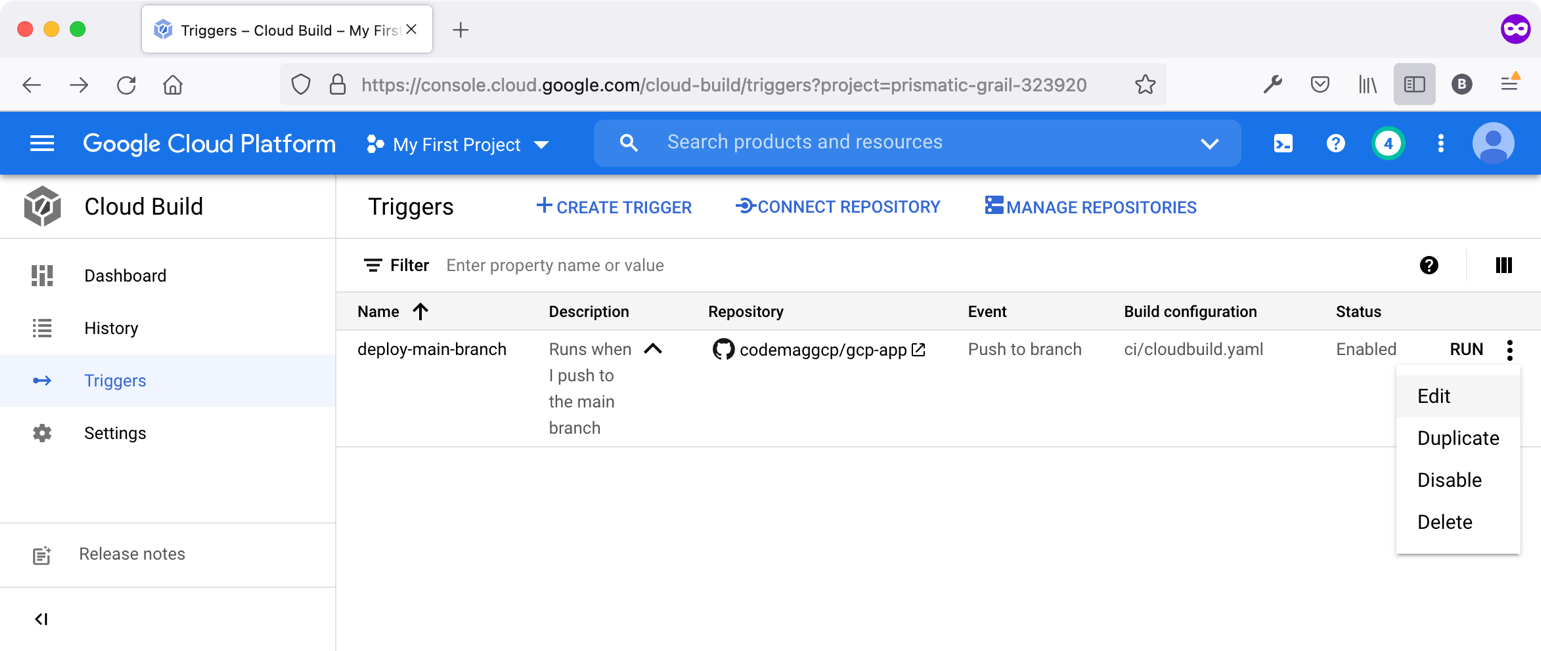
Visit the list of triggers under Google Cloud Build. Locate the deploy-main-branch trigger and click to edit. Figure 14 shows how to edit a Google Cloud Build trigger.
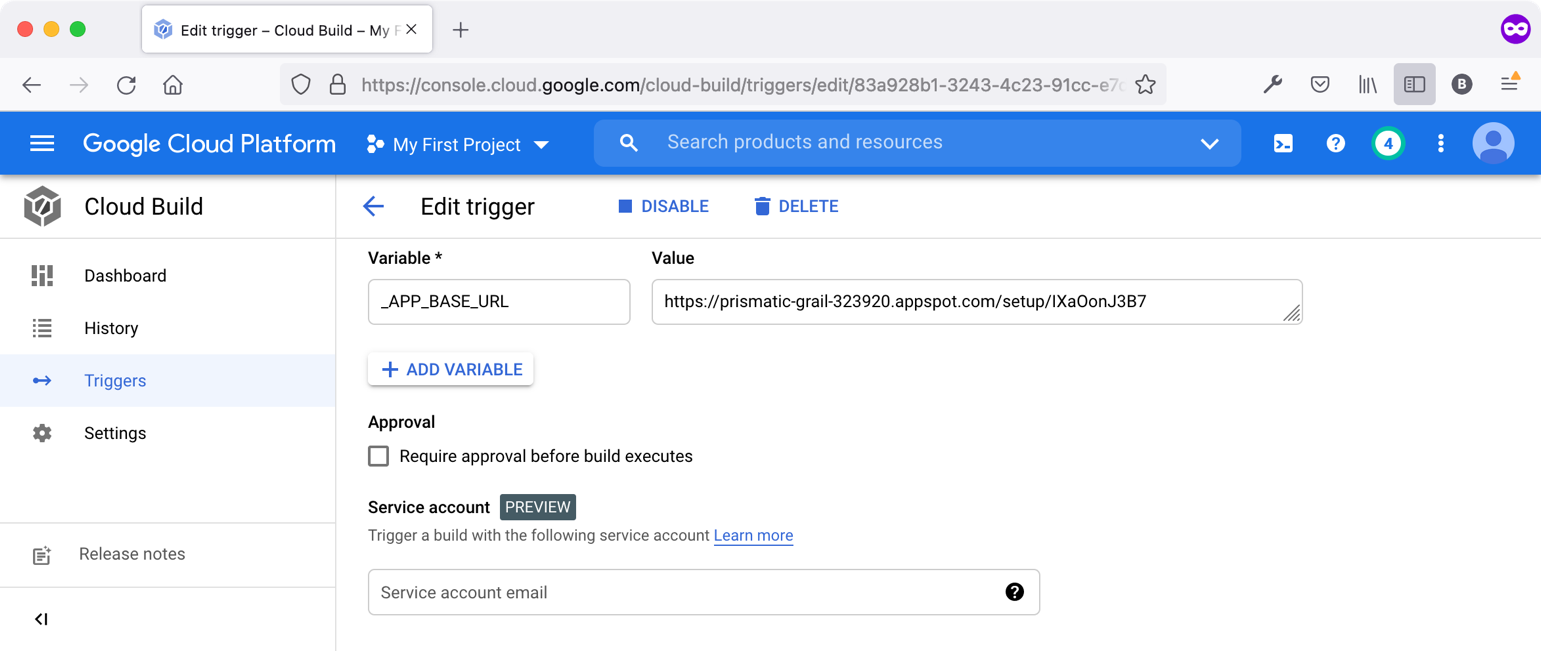
Once on the Edit Trigger page, scroll to the bottom, locate, and click the ADD VARIABLE button. This prompts you to enter a variable name and value. Variable names should start with an underscore. To use this same variable inside the Google Cloud Build workflow, you need to prefix it with a $ sign. At run time, when the trigger runs, GCP substitutes the variable inside the Build workflow with the value you've assigned on the trigger definition. Figure 15 shows the _APP_BASE_URL variable together with its value.
Save the trigger and you're ready to go!!
Step 4: Run and Test the Trigger
Before running the trigger, let's make a new migration, for example, to add a new description column on the editors table.
Run the following command to generate a new migration file:
sail artisan make:migration \
    add_description_column_on_editors_table
Listing 7 shows the entire migration file.
Listing 7: Database migration file
class AddColumnDescriptionOnEditorsTable extends Migration
{
    /**
    * Run the migrations.
    *
    * @return void
    */
    public function up()
    {
        Schema::table('editors', function($table) {
            $table->string('description', 255)->nullable();
        });
    }

    /**
    * Reverse the migrations.
    *
    * @return void
    */
    public function down()
    {
        Schema::table('editors', function($table) {
            $table->dropColumn('description');
        });
    }
}
The migration, when run, adds a new column on the editors table inside the database.
Save your work by adding all the new changes to Git and committing them to GitHub. This, in turn, triggers GCP to run the associated Google Cloud Build workflow.
Eventually, a new version of the app will be deployed on GCP. However, this time, the trigger will also POST to the /setup/ URL to run the Laravel migrations as part of running the Build workflow.
You can check the database to make sure the Build workflow runs the Laravel migration and accordingly adds a new column to the editors table.
So far, the /setup/ URL isn't authenticating the request coming and ensuring that it's coming from GCP only. In the next part of this series, I'll explore one option to secure and authenticate your requests by using Google Secret Manager (https://cloud.google.com/secret-manager).
Conclusion
This article was a continuation of the previous one by connecting your Laravel app to a local database. The next step is to create a Google Cloud database and connect the app to it when running inside GAE. Finally, you enhanced the Google Cloud Build workflow to run the Laravel migrations as part of the Build workflow itself.
Next time I see you, I'll strengthen running the Laravel migration by implementing an authentication layer with Google Secret Manager.
In addition, deployments can go wrong sometimes and so you should have a backup plan. As you will see in the next article, you can take a backup snapshot of the Cloud database every time you run the Build workflow. If anything goes wrong, you can revert to an old backup of the database.
And much more… See you then!
