


This is the first article of two on the topic of developing Vue 3 plug-ins. With the introduction of the Composition API, developing plug-ins in Vue 3 has dramatically changed, for the better, as is expected. Now you have the option of developing plug-ins that only work with the new Composition API or you can still use the old method of developing plug-ins to incorporate the new Application API that supports the Options API. This also provides your plug-in functionality via the Provide/Inject API to support the Composition API.
The Composition API is optional and can be added. Therefore, be careful when developing a Vue 3 plug-in with it. You need to support apps that still use the Options API while making it compatible with the new Composition API.
Today, I'm providing you with a complete guide to understanding and using the Provide/Inject API in Vue 3. It constitutes the core that Vue 3 plug-ins are built on. Building on this knowledge, I'll look at how to build a Vue 3 plug-in that supports both the Options API and the Composition API in the next article.
Props
When you write HTML markup, you define attributes on your HTML elements. Examples of attributes are the ID, NAME, and other headings. The browser then parses the HTML and creates a Document Object Model (DOM) in JavaScript. It converts the HTML attributes to properties on the DOM objects. The properties of a single DOM relate to attributes with the same or similar names, but it's not a one-to-one relationship.
The concept of Vue Props relates to the HTML attributes and DOM properties.
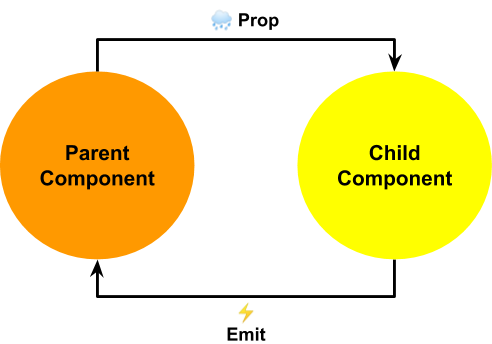
Vue promotes building up single page apps (SPAs) by composing components inside each other in a tree-form. A parent component passes data to its child components by using properties.
A Vue Prop or property is a custom attribute that you add on a Vue component and bind to some sort of data. The binding can be static when you set the value of a property to a static data. It can also be dynamic by setting the value to a variable that you define inside the component. Irrespective of this, the child components receive their data via properties.
A Vue component uses the Prop property to receive any set of properties from the parent component. A line of code is worth a thousand words. Listing 1 shows how you define a property on a Vue component. Figure 1 illustrates the one-way data flow in Vue.
Listing 1: Define a property on a Vue component
<!-- Inside HTML markup -->
<employee firstName="Bilal" lastName="Haidar" />
// Component definition
<template> ...</template>
<script>
export default {
    name: "Employee",
    props: {
        firstName: { type: String, default: "", },
        lastName: { type: String, default: "", },
    }
}
</script>
Props, by nature, are reactive. This means that when you change the value binding of a Prop, the new value is propagated to the child components automatically. In turn, Vue detects a change in component properties and re-renders all affected components. Most probably, the affected components are the child components themselves.
However, in some cases the parent component uses those same properties that you pass to the child components. It uses them inside the component source code or inside the component markup. In this case, the parent component is also re-rendered. A parent component re-rendering causes the re-rendering of the entire tree of components inside it.
To learn more about Vue Props, check out the official documentation (https://v3.vuejs.org/guide/component-props.html).
Prop Drilling
Now that you're familiar with Vue Props, how to define and use them inside your components, and how they function internally, let's move on and discuss the Prop Drilling problem. React ecosystem first coined this term and now it's a common problem among Vue developers.
Before diving in, let's consider and note three important Vue concepts that are essential to understand the problem at hand.
- You build a Vue app by composing components inside each other to form a tree of components.
- Parent components use properties to pass data to their child components.
- Component properties are reactive. The moment the parent component mutates the data, Vue re-renders all the child components that use the data.
Prop Drilling happens when a parent component wants to pass down some properties to deeply nested components in the component hierarchy. The middle component(s) has no need for these properties but passes them down to the target component(s) that need these properties.
Figure 2 shows a sample component hierarchy structure.
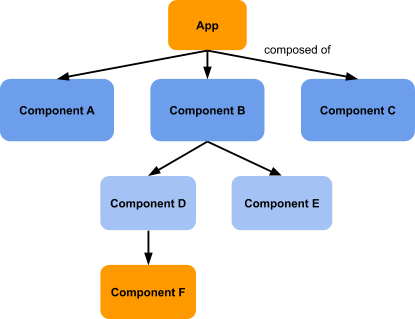
Imagine that the App component in Figure 2 holds the Search API URL property that Component F needs in order to render its UI. Every time the App component changes that property, Vue passes the new property value down to Component F and, at the same time, it re-renders the entire component hierarchy including Component F itself. This re-rendering includes components B, D, and F all together. In fact, only Component F should re-render.
This is just a sample component hierarchy. In medium and large apps, there might be several layers of such components that need to be re-rendered along the way. The app performance might be highly affected and that's something you want to avoid.
Prop Drilling happens when a parent component passes a state to a deeply nested target component passing through one or more intermediary components inside the component hierarchy.
Vue offers a couple of ways to overcome the Prop Drilling problem. Vuex and Provide/Inject API are two.
Vuex
Vuex is a state management library for Vue. It serves as a centralized store for all the components in an app, with rules ensuring that the state can only be mutated in a predictable fashion. Literally any component in the app can query the store inside Vuex and locate the data. Whether you allow every component to access the store or not or whether you are using smart vs. dumb components is up to you. That's another topic for another day.
Personally, I'd employ Vuex in a bigger app where there are a hundred or more components interacting to form the apps function. The next section introduces an alternative to Vuex for small/medium apps that you can use right away.
You can learn and read more about Vuex by checking their official website (https://vuex.vuejs.org/guide).
Provide/Inject API
The Provide/Inject API in Vue is equivalent to the Context API in React development. This concept is based on two main elements: The Dependency Provider and Dependency Consumer. Figure 3 shows a schematic of this concept.
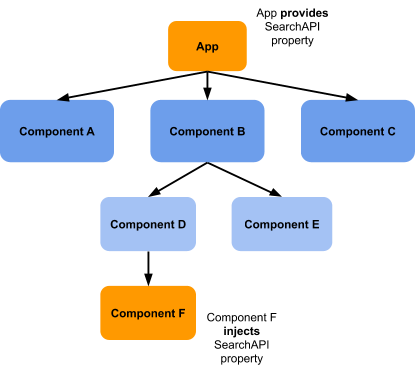
In this scenario, the App component takes the role of the dependency provider. It provides the SearchAPI dependency property. Component F takes the role of the dependency injector. It injects the SearchAPI property.
The parent component provides a dependency, let's say a property, and somewhere within the same parent chain, a descendent component(s) injects the property and makes use of it. Regardless of how deep the component hierarchy is, if the provider and descendant components are in the same hierarchy, this mechanism works perfectly.
A Vue app using the Provide/Inject API has better performance metrics as Vue re-renders only the affected descendent components and not all the components along the component hierarchy.
Back to Figure 3, when the App component, which is the provider component in this case, changes the SearchAPI property value, Vue only re-renders Component F. Component F is the only component using this property. So, the rest of the components inside the hierarchy are left as they are without re-rendering. That's an important reason to use the Provide/Inject API in your apps.
One last note before closing about reactivity. The dependency property the component provides by default is not reactive. Therefore, you must wrap the content of the provided property by Vue 3 computed() function. This way, when the component changes the provided property, the component automatically injecting this dependency reacts to this change.
The data you provide inside the Project/Inject API is not reactive by nature. Use the
provide()function together withcomputed()function to make the data reactive.
In the next sections, I'll go through live examples on using the Provide/Inject API. You can learn and read more about Provide/Inject API by checking the official documentation (https://v3.vuejs.org/guide/component-provide-inject.html).
Prop Drilling in Action
Let's go through an example demonstrating the concept of Prop Drilling and see how Vue re-renders all components inside the component hierarchy.
The example code is an imaginary app that displays a collection of cat images using an external third-party API. Figure 4 shows the component hierarchy of the app.
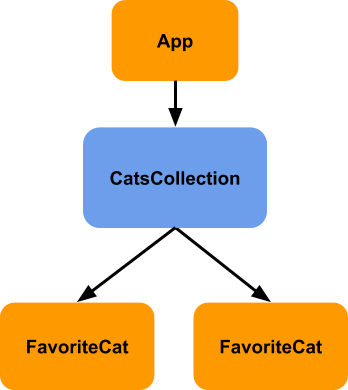
This consists of the App, CatsCollection, and FavoriteCat components. The CatsCollection component lives inside the App component. Two instances of the FavoriteCat component live inside the CatsCollection.
You can play with this sample app here: https://stackblitz.com/edit/vue3-prop-drilling.
Figure 5 shows the app running in a browser.
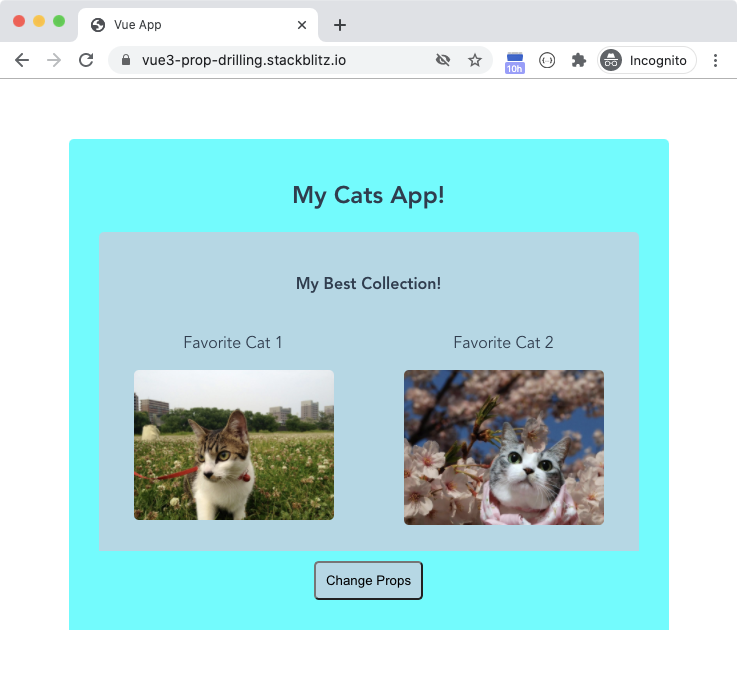
The goal is to store some state inside the App component that both FavoriteCat components need to render their UI. For this app, the state is an object that tracks the third-party Cat API authorization key and Search API URL.
The CatsCollection component accepts a property to receive the state from the parent App component. In turn, the FavoriteCat component defines a property to receive the state from the parent CatsCollection component. The CatsCollection component acts as a mediator that receives the state from the App component and passes it down to both instances of the FavoriteCat components.
Let's start by dissecting the App component.
<div class="app">
    <h2>My Cats App!</h2>
    <cats-collection:settings="settings" />
</div>
The component renders a single instance of the CatsCollection component and passes to it a single property named settings. It binds the settings property to a variable named settings that it defines on the data option as follows:
data() {
    return {
        settings: {
            catsApiKey: 'e8d29058-baa0-4fbd-b5c2-3fa67b13b0d8',
            catsSearchApi: 'https://api.thecatapi.com/v1/images/search',
        }
    };
},
The settings data variable consists of the catsApiKey and catsSearchApi properties.
Let's move on to check the CatsCollection component.
<section class = "cats-collection">
  ...
  <favorite - cat: index = "1": settings = "settings"/>
    <favorite - cat: index = "2": settings = "settings"/>
      ...
</section>
The component renders two different instances of the FavoriteCat component. For each instance, it passes down the settings property and the index property that represents the number of the component instance.
The CatsCollection receives the settings property from the parent App component. It defines the property as follows:
props: {
    settings: {
        type: Object,
        required: true,
        default: () => ({})
    },
},
The settings property is of type Object. The CatsCollection component receives this property and passes it down to the FavoriteCat component without using it inside its markup.
Finally, the FavoriteCat component. It defines the following markup:
<section class  = "favorite-cat" >
   ...
   <img v-if="image.url" :src="image.url" alt="Cat"/>
</section>
It makes use of an img HTML element to display a single image. It binds the source of the image to the image.url internal property. It defines a property named settings that it receives from the parent CatsCollection component. In addition, it uses the mounted() lifecycle hook to query the Cats API for a new image to display.
mounted() {
    this.loadNextImage();
},
Listing 2 shows the entire source code of this component. You can learn more about Vue Lifecycle Hooks by checking their online documentation (https://v3.vuejs.org/guide/composition-api-lifecycle-hooks.html#lifecycle-hooks).
Listing 2: The FavoriteCat component source code
<template>
    <section class="favorite-cat">
        <p>Favorite Cat {{ index }}</p>
        <img v-if="image.url": src="image.url" alt="Cat"/>
    </section>
</template>

<script>
    import axios from 'axios';

    export default {
        name: 'CatsCollection',
        data() {
            return {
                image: { url: ""}
        };
    },
    props: {
        index: {
            type: Number,
            default: 1,
        },
        settings: {
            type: Object,
            required: true,
        },
    },
    mounted() {
        this.loadNextImage();
    },
    methods: {
        async loadNextImage() {
            try {
                const {
                    catsApiKey,
                    catsSearchApi
                } = this.settings;

                axios.defaults.headers.common['x-api-key'] = catsApiKey;

                let response = await axios.get(catsSearchApi,
                    {
                        params: {
                            limit: 1, size: "full"
                        }
                    });
                this.image = response.data[0];
            } catch (err) {
                console.log(err)
            }
        },
    }
};
</script>
Now that you understand the internal code of the sample app, let's add a button inside the App component to trigger a change on the settings property it holds.
<button @click="settings = {...settings, catsSearchApi: ''}">Change Props</button>
The button defines a click event handler that sets the settings.catsSearchApi property to an empty string.
In addition, let's register the beforeUpdate() lifecycle hook on the App component. Vue triggers this hook when the data changes, before the DOM is patched. This way, you can track when Vue re-renders this component.
beforeUpdate() {
    console.log('In App', this.settings)
}
The
beforeUpdate()lifecycle hook runs just before Vue updates the DOM of the component.
Let's add the same hook onto both the CatsCollection and FavoriteCat components.
Finally, let's watch the settings property inside the FavoriteCat component so that when its value changes, the component triggers a new call to the Cats API to retrieve a new cat image.
watch: {
    'settings': function(newSettings) {
        if (!newSettings) return;
        this.loadNextImage();
    },
},
Now let's run the app and check the console logs to understand how Vue reacts to this change and how it re-renders the affected components. Click the Change Props button and check the logs. Figure 6 shows the logs.

The App component is re-rendered. This happens because the App component changes the settings data property and at the same time it's binding it to the settings property on the CatsCollection component. The CatsCollection component is also re-rendered despite the fact that it's not using this property but instead is just passing it over to the two FavoriteCat component instances.
Finally, the FavoriteCat component re-renders as expected.
Clearly, the Prop Drilling problem prevails in this example. A parent component passes down the settings property to the middle one in the hierarchy. It passes the settings property down to a child component without making use of it inside the middle one's markup. The target component uses the property. The Prop Drilling forces Vue to re-render the middle component, even though it's just a carrier to the settings property and isn't using it internally.
Next, we'll look at how to fix this problem by using the Provide/Inject API.
Solving the Side-Effects of Prop Drilling
In this section, I'll be using the Provide/Inject API in Vue 3 to overcome the side-effects of Prop Drilling when passing data from a parent component to another nested deeply in the component hierarchy.
First, I start by using the Provide/Inject API in the Option API. Then, I use the Provide/Inject API available in the new Composition API. You can read about the new Composition API by checking Shawn Wildermuth's article in CODE Magazine about Vue's Composition API.
Using the Provide/Inject API in the Options API
Vue offers the provide option as part of its Option API. In this section, I'll use this option to provide the settings property.
Locate the App component and replace its markup with the following:
<div class="app">
     <cats-collection/>
     <button @click="settings = {...settings, catsSearchApi: ''}">Change Props</button>
</div>
It uses an instance of the CatsCollection component without passing any properties.
Now let's provide the settings property via the provide option inside the component. Add the following option inside the App component:
provide() {
    return {
    settings: computed(() => (
        {...this.settings }))
    }
},
Vue offers two forms for using the provide option. Either you define the provide option as an object with properties, or you define it as a function returning an object. The latter gives you more flexibility in terms of defining what data you want to provide and making the provided data reactive.
By default, the data you provide is not reactive. This means, if the data you provide changes inside the dependency provider component, the new changes won't be reflected inside the dependency injector component.
Vue 2 offered the Provide/Inject API and now it's been enhanced and improved in Vue 3.
To make the data reactive, start by using the provide option as a function. Then, wrap your data inside a computed() function to make it reactive and read-only.
The code uses the computed() function that belongs to the new reactive Composition API library in Vue 3. Vue 3 internally implements the computed property using the ref() reactivity API. The computed() function returns a computed property that's an instance of the ComputedRefImpl object. Read about Computed properties in Vue by checking their official documentation. (https://v3.vuejs.org/guide/computed.html).
So far, the App component provides a reactive property named settings. Let's move on to the CatsCollection component.
The CatsCollection component receives no more properties from the parent App component. Its markup now looks like this:
<section class="cats-collection__favorites">
    <favorite-cat :index="1"/>
    <favorite-cat :index="2"/>
</section>
The only property it passes to the FavoriteCat component is the index property. Nothing interesting really.
Let's move on to the FavoriteCat component. It uses the same markup as before. However, let's see how it injects the settings property. It uses the inject option to receive what the App component provides.
inject: ['settings']
The App component, as you now know, provides the settings property as a computed property. It uses the computed() function that belongs to the Composition API inside the Options API, the provide option in this case. That's why you access this computed property differently in this situation. Let's check how.
Let's change the watch() function like so:
watch: {
    'settings.value': function(newSettings, oldSettings) {
        if (!newSettings) return;
        this.loadNextImage();
    },
},
The code now watches the property settings.value and not only settings. I mentioned previously that Vue 3 returns an instance of ComputedRefImpl object for any computed property. Internally, this object makes use of the ref() object. Therefore, you access the value of a ref() object, and consequently a computed() property, by accessing its value property.
This is only valid for the scenario where you make use of the new Composition API intrinsic objects inside the Options API. For all computed properties that you define with the Options API, you continue to access their values by using the name of the property only. The same applies when you are using the Composition API alone.
Now, back to the FavoriteCat component. The code now monitors any changes on the provided computed property and loads a new image accordingly.
Finally, you change the loadNextImage() function to use the new inject property as follows:
async loadNextImage() {
    try {
        const { catsApiKey, catsSearchApi } = this.settings.value;
...
    }
},
Notice how the function now accesses the this.settings.value to get the Cats API details. Listing 3 shows the entire source code of this component.
Listing 3: The FavoriteCat component source code
<template>
    <section class="favorite-cat">
        <p>Favorite Cat {{ index }}</p>
        <img v-if="image.url" :src="image.url" alt="Cat" />
     </section>
</template>

<script>
    import axios from 'axios';
    export default {
        name: 'CatsCollection',
        inject: ['settings'],
        data() {
            return {
                image: { url: ""}
        };
    },
    props: {
        index: {
            type: Number,
            default: 1,
        },
    },
    watch: {
        'settings.value': function(newSettings, oldSettings) {
            if (!newSettings) return;
            this.loadNextImage();
        },
    },
    mounted() {
        this.loadNextImage();
    },
    beforeUpdate() {
        console.log('In FavoriteCat', this.settings.value);
    },
    methods: {
        async loadNextImage() {
            try {
                const {
                    catsApiKey,
                    catsSearchApi } = this.settings.value;

              axios.defaults.headers.common['x-api-key'] = catsApiKey;

              let response = await axios.get(catsSearchApi, {
                    params: {
                        limit: 1,
                        size: "full"
                    }
                });
                this.image = response.data[0];
            } catch (err) {
                console.log(err)
            }
        },
    }
};
</script>
Now let's run the app and check the console logs to understand how Vue reacts to this change and how it re-renders the affected components only.
Click the Change Props button and check the logs. Figure 7 shows the logs.

Vue re-renders only the FavoriteCat component. No other components are affected across the component hierarchy. This is the ultimate solution you're after, with some help from the Provide/Inject API, of course. You can play with this sample app here: ( https://stackblitz.com/edit/vue3-prop-drilling-provide-inject).
Using the Provide/Inject API in the Composition API
Now that you know how to solve the problem of Prop Drilling inside the Options API, let's switch gears and learn how to overcome Prop Drilling when using only the Composition API in Vue 3.
Starting at the App component, paste the following inside the markup section:
<div class="app">
    <cats-collection />
    <button @click="changeSearchApi('')">Change Props</button>
</div>
The component uses the CatsCollection component and the button click-event handler now calls a new function named changeSearchApi.
Add a new setup() function to the component. It sits at the core of the new Composition API and provides all the functionality of the component. Listing 4 shows the entire source code of this function. The function starts by defining a settings reactive property by using the ref() function to wrap the settings object. It then provides the settings reactive object via the provide() function. Once again, the component provides the settings object via a computed property to ensure any changes inside the App component are propagated into the entire component hierarchy.
Listing 4: The App component source code
setup() {
    const settings = ref({
        catsApiKey: 'e8d29058-baa0-4fbd-b5c2-3fa67b13b0d8',
        catsSearchApi: 'https://api.thecatapi.com/v1/images/search',
    });
    provide('settings', computed(() => settings.value));
    const changeSearchApi = (searchApi) => {
        settings.value = {
            ...settings.value,
            catsSearchApi: searchApi
        };
    };
    onBeforeUpdate(() => {
        console.log('In App', settings.value)
    });
    return {
        changeSearchApi,
    }
}
The setup() function then defines the changeSearchApi() function to change the value of the settings reactive object. This is the same function that the button above uses to trigger a change on the settings data. Finally, the setup() function returns an object with the exposed items to the markup. In this case, it's just the changeSearchApi() function.
That's all that you must add to the App component to provide the settings property when using the Composition API.
The CatsCollection component remains the same without any change. Let's move on to the FavoriteCat component and study its changes to adapt to the Composition API.
All of the functionality inside the FavoriteCat component is now encapsulated inside the setup() function. Listing 5 shows the entire source code of this function. The function starts by injecting the settings property via the inject() function.
Listing 5: The FavoriteCat component source code.
setup(props) {
    const settings = inject('settings', {});
    let imageUrl = ref("");

    const loadNextImage = async () => {
        try {
            const { catsApiKey, catsSearchApi } = settings.value;

            axios.defaults.headers.common['x-api-key'] = catsApiKey;

            let response = await axios.get(catsSearchApi, {params: { limit: 1, size: "full" } });
            const { url } = response.data[0];
            imageUrl.value = url;
        } catch (err) {
            console.log(err)
        }
    };

    watch(() => settings.value, (newSettings, oldSettings) => {
        if (!newSettings) return;
        loadNextImage();
    });

    onMounted(() => {
        loadNextImage();
    });

    onBeforeUpdate(() => {
        console.log('In FavoriteCat', settings.value);
    });

    return { imageIndex: computed(() => props.index), imageUrl, };
},
const settings = inject('settings', {});
As a reminder, the settings variable represents a computed property and therefore, to access its value, you should access the value property on this object.
It then defines a new ref() object to hold the image URL that the component retrieves from the remote Cats API.
let imageUrl = ref("");
The function makes use of the onMounted() lifecycle hook to load the image for the first time.
onMounted(() => {loadNextImage();});
You can learn more about using the lifecycle hooks in Vue 3 Composition API by checking their official documentation (https://v3.vuejs.org/api/composition-api.html#lifecycle-hooks).
The setup() function makes use of the watch() function to monitor and react to any changes on the injected settings property.
watch(() => settings.value, (newSettings,oldSettings) => {
     if (!newSettings) return;
     loadNextImage();
});
The watch() function in the Composition API works the same as in the Options API. The first parameter is an arrow function that returns the property to watch. In this case, it's the settings.value property. Whenever the App component changes the settings property, the FavoriteCat component is notified on the spot via the watch() handler. You can read more about the watch() function in the Composition API by checking their official documentation (https://v3.vuejs.org/api/computed-watch-api.html#watch).
Finally, the setup() function returns an object to expose its functionality into the markup section of the component.
return {imageIndex: computed(() => props.index), imageUrl,};
It returns the imageIndex as a computed property wrapping the props.index property that it receives from the CatsCollection component. It also returns to the markup imageUrl reactive property that holds the image URL to display.
To recap on the setup() function, Vue calls it with two input parameters: props and context. The props parameter is just a copy of the props object that you define on the component itself. Whatever properties the component receives are also available to the setup() function. The context property contains additional data like attrs, slots, and emit(). Learn about the setup() function in the Composition API by checking their official documentation (https://v3.vuejs.org/api/composition-api.html#setup).
Now let's run the app and check the console logs to understand how Vue reacts to this change and how it re-renders the affected components only.
Click the Change Props button and check the logs. Figure 8 shows the logs.

Vue re-renders only the FavoriteCat component. No other components are affected across the component hierarchy. Once again, you're solving the problem of Prop Drilling by using the Provide/Inject API inside the new Composition API. You can play with this sample app here: (https://stackblitz.com/edit/vue3-prop-drilling-composition-api-provide-inject.
Conclusion
The Provide/Inject API in Vue 3 is a major building block in managing state in your app. In small or even medium apps, you can use the Provide/Inject API to manage the state at different levels inside the component hierarchy. You might opt to skip Vuex depending on the requirements and the complexity of the app at hand.
Provide/Inject API helps modularize your app in terms of managing the state at different layers of the component hierarchy. Providing data at the App component makes the state available globally across all components in the app. Depending on your needs and requirements, you can provide data at different levels inside the app.
In the next article, I'll be using the Provide/Inject API inside a custom Vue 3 plug-in. The plug-in will provide global state at the app level to allow all the components in the hierarchy to inject and access the state.
