


When you think of AWS, you probably think of back-end services, DevOps, server management, and databases. However, over the past few years, better abstractions have started to pop up in an attempt to lower the learning curve for developers new to cloud computing — including front-end and mobile developers.
With the rise in managed and serverless services, it's become much easier for traditionally client-side developers to leverage these scalable back-end services to build the types of apps that, in the past, would be out of their reach, and do so using their existing skillset.
In the February 2019 Berkeley report “Cloud Programming Simplified: A Berkeley View on Serverless Computing,” (there's a link in the sidebar) one of the key predictions was that “Serverless computing will become the default computing paradigm of the Cloud Era, largely replacing serverful computing and thereby bringing closure to the Client-Server Era.” We've continued to see this trend in both the offerings of the large cloud providers as well as from startups as companies try to launch and enable more services that embody the Serverless philosophy.
There's also a large increase in companies geared toward offering a better developer experience in order to lower the barrier to entry into cloud computing in a variety of ways — mainly by taking existing serverless cloud offerings, building another (usually easier-to-use) abstraction on top of them, and selling them at a premium. This works well because with the lower barrier to entry comes a larger number of developers, and ultimately, customers.
Front-End to Back-End
Most client-side developers already understand how to interact with APIs: The only thing that's really changed with these better serverless abstractions is that they're able to create and manage the APIs themselves. This enables these developers to take the responsibility of stack developers without having to learn the ins and outs of building, managing, and deploying complex servers and cloud infrastructure. By using services that manage things like authentication, file storage, function execution environments, databases, and APIs for them, they can build out the necessary back-end infrastructure themselves.
This is where AWS Amplify comes into play. Amplify is a set of tools and services that enables front-end Web and mobile developers to leverage the power of AWS services to build innovative and feature-rich applications without the need to already know or understand cloud infrastructure or infrastructure as code.
Amplify is made up of three parts: a CLI, client-side libraries, and a Web hosting service.
Using the CLI, developers can provision, update, and manage cloud infrastructure using a category-based approach without having to know much about the underlying infrastructure configurations. If a developer wants an API, they don't have to understand the provisioning process or configuration associated with this API, which is typically necessary when building this using the AWS console or a traditional infrastructure as code provider. Instead, the CLI walks them through a series of questions and the process creates all of the configuration and infrastructure as code for them based on the answers.
Developers can also iterate on this cloud infrastructure to update, reconfigure, or remove services as they build out and integrate new features directly from the CLI.
Once the infrastructure is created, the Amplify client libraries enable developers to then easily connect to and interact with these APIs from Web and mobile apps with a similar category-based approach using the Amplify client libraries. There's library support by Amplify for JavaScript, iOS, Android, and Flutter.
In addition to basic client library support, there's UI support for popular JavaScript frameworks like React, Vue, Angular, React Native, and Ionic for quickly building out popular features like authentication flows and image galleries.
There's also a console where the developer can visualize the resources associated with their deployment and click through to view any AWS resources that were deployed on their behalf by the CLI. From the console, they can also deploy dynamic or static websites to a global CDN backed by Amazon CloudFront.
Building a Full-Stack Cloud App
Now that I've gone over what Amplify is, it's time to build something. This article teaches you how to build a real-time photo messaging app on AWS using Amplify and React. By building this app, you'll learn how to implement the following features you'd expect from many types of modern applications:
- API and database with CRUD (create, read, update, delete) and
listfunctionality - User authentication
- API authorization
- File storage
- Hosting with CI and CD
- Real-time updates
- Multiple data access patterns
By the end of the article, you should have a good understanding of how Amplify works and how to implement similar features in your next app using this stack.
Prerequisites
To build this app, you will need to have:
- An AWS account
- Node.js v10.x or later
- Bash
Getting Started
The first thing you need to do is install Amplify CLI [2]:
npm install -g @aws-amplify/cli
Once the CLI is installed, you must configure it with an AWS IAM user:
amplify configure
- Specify the AWS Region: <closest-region>
- Specify the username of the new IAM user:
amplify-cli-user
In the AWS Console, click Next: Permissions, Next: Tags, Next: Review, and Create User to create the new IAM user. Here, you are given an access key ID and secret access key.
Next, return to the command line and press Enter.
- Enter the access key of the newly created user:
? accessKeyId: (<YOUR_ACCESS_KEY_ID>)
? secretAccessKey: (<YOUR_SECRET_ACCESS_KEY>)
- Profile Name: amplify-cli-user
Once the CLI has been installed and configured, create a new React app:
npx create-react-app aws-photo-app
Next, change into the new directory and install the dependencies for the app:
cd aws-photo-app
npm install aws-amplify emotion uuid
react-router-dom @aws-amplify/ui-react
Here's an overview of some of the libraries you'll be using for this project:
- aws-amplify: The JavaScript library containing the APIs for interacting with the AWS services
- emotion: A styling library that allows you to write CSS styles with JavaScript
- uuid: This library allows you to create unique identifiers
- react-router-dom: A client-side routing library enabling you to create routes in your app like /home or /profile
- @aws-amplify/ui-react: The UI component library for React from AWS Amplify
Now the project is set up and you can start building it.
Creating the Back-End Services
Now that the project has been set up and the CLI is configured, you can start creating new services. The typical workflow for creating services is this:
- Initialize a new Amplify project.
- Create and configure the services locally by running the
addcommand. This creates the necessary infrastructure as code for you under the hood. - Deploy the services by running the
pushcommand. - Make more updates or add new services.
- Redeploy by running the
pushcommand.
For this app, the first thing you need to do is initialize a new Amplify project in the root of the React project using the Amplify CLI:
amplify init
  ? Enter a name for the project: awsphotoapp
  ? Enter a name for the environment: dev
  ? Choose your default editor: <your favorite editor>
  ? Choose the type of app that you're building: javascript
  ? What javascript framework are you using: react
  ? Source Directory Path: src
  ? Distribution Directory Path: build
  ? Build Command:  npm run-script: build
  ? Start Command: npm run-script start
  ? Do you want to use an AWS profile? Yes
  ? Please choose the profile you want to use: amplify-cli-user
Once the project has been created, you see two new artifacts created by the CLI:
- A folder named
amplifyat the root of the project. This folder holds all of the code and configuration files for your Amplify project. In this folder, you see two subfolders: thebackendand#current-cloud-backendfolders.- The
backendfolder contains all of the local code for your project, such as the GraphQL schema for an AppSync API, the source code for any serverless functions, and infrastructure as code representing the current local status of the Amplify project. - The
#current-cloud-backendfolder holds the code and configurations that reflect which resources were deployed in the cloud with your last Amplify push command. It helps the CLI differentiate between the configuration of the resources already provisioned in the cloud and what's currently in your local back-end directory (which reflects your local changes).
- The
- A file in the src directory named
aws-exports.js. This file is a key-value pairing of the resource categories created for you by the CLI along with their credentials. You don't ever need to edit this file yourself; it will be managed by the CLI.
Now that the project is initialized, you can begin adding services.
Adding Authentication
The first service to add is authentication. Authentication in Amplify is created using Amazon Cognito, a managed identity service similar to Auth0 and Okta. You can create and configure the Cognito service using the Amplify CLI.
To add authentication, run the following command:
amplify add auth
  ? Do you want to use default authentication and security configuration?
       Default configuration
? How do you want users to be able to sign in when using your Cognito User Pool?
       Username
? Do you want to configure advanced settings?
       No, I am done.
Adding Storage
Now that the authentication service is configured, create an S3 bucket to store images for the app. To do so, use the Amplify storage category.
amplify add storage
  ? Please select from one of the below mentioned services:
       Content (Images, audio, video, etc.)
  ? Please provide a friendly name for your Resource that will be used to label this category in the project:
       appimages
  ? Please provide bucket name:
       <use value given by CLI>
  ? Who should have access:
       Auth and guest users
  ? What kind of access do you want for Authenticated users?
      create/update, read, delete
   ? What kind of access do you want for Guest users?
      read
  ? Do you want to add a Lambda Trigger for your S3 Bucket?
      No
This creates an S3 bucket and allows both authenticated and unauthenticated access.
Adding the API
The last service to add is the GraphQL API. This API is built using AWS AppSync, a managed GraphQL service. AppSync not only creates the API layer, it also generates DynamoDB tables for you based on your data model.
amplify add api
  ? Please select from one of the above mentioned services:
      GraphQL
  ? Provide API name:
      AWSPhotoApp
  ? Choose the default authorization type for the API:
      API key
  ? Enter a description for the API key:
      public
  ? After how many days from now the API key should expire (1-365):
      365 (or your preferred expiration)
  ? Do you want to configure advanced settings for the GraphQL API:
      Yes
  ? Configure additional auth types?
      Yes
  ? Choose the additional authorization types you want to configure for the API:
      Amazon Cognito User Pool
  ? Configure conflict detection?
      No
  ? Do you have an annotated GraphQL schema?
      N
  ? Choose a schema template:
      Single object with fields
  ? Do you want to edit the schema now?
      Y
Next, open the GraphQL schema in your text editor and update it with the following snippet. The schema should be located at amplify/backend/api/AWSPhotoApp/schema.graphql.
type Post @model
          @key(
              name: "PostsByUser",
              fields: ["owner"],
              queryField: "postsByUser"
              )
         @auth(rules: [
             { allow: owner },
             { allow: public, operations: [read] }
         ]) {
                id: ID!
                name: String!
                location: String!
                description: String!
                image: String
                owner: String
            }
The schema above creates a new GraphQL API and a DynamoDB table to hold Post types.
You'll also notice a couple of directives added to the schema:
- The @model directive does the following:
- Builds out
create,read,update,delete, andlistoperation definitions in the schema. - Creates GraphQL subscriptions for all mutations (
create,update,delete) to enable real-time updates. - Creates GraphQL resolvers for all operations.
- Creates a DynamoDB table for
Posts.
- Builds out
- The @key directive creates a new access pattern allowing you to also query posts by owner (the user who created the post).
- The @auth directive sets up two authorization rules:
- Allowing only the owner of the post to have write access (updating or deleting).
- Granting public read access for queries.
Deploying the Back-End Services
Now that all of the back-end services you need for the app have been configured, you can deploy them.
amplify push
  ? Are you sure you want to continue?
      Y
# You will be walked through the following questions for GraphQL code generation
  ? Do you want to generate code for your newly created GraphQL API?
      Y
  ? Choose the code generation language target:
      javascript
  ? Enter the file name pattern of graphql
      queries, mutations and subscriptions: src/graphql/**/*.js
  ? Do you want to generate/update all possible GraphQL operations - queries, mutations and subscriptions?
      Yes
  ? Enter maximum statement depth:
      2
This deploys the back-end services. Once the services have been deployed, you'll also notice that the CLI has updated the aws-exports.js file with the new resource locations as well as created a new folder named graphql in the src directory. The graphql folder is automatically generated for you based on your GraphQL schema. You will use the GraphQL operations in this folder to perform queries and mutations against the API.
In GraphQL, queries are for reading data (like a GET request) and mutations are for creating or updating data (like PUT, POST, DELETE, or PATCH operations).
Building the Front-End
Now that the back-end has been created, you can begin writing some front-end code.
The first thing you need to do is configure the project to use Amplify. To do so, open src/index.js and add the following snippet the last import.
import Amplify from 'aws-amplify';
import config from './aws-exports';
Amplify.configure(config);
Next, create the following files in the src directory:
Button.js
CreatePost.js
Header.js
Post.js
Posts.js
Profile.js
Profile.js
The first component you build out is the user's profile. Once the user is signed in, this component shows their attributes (like username, phone number, and email) and allows them to sign out. Update Profile.js with the code in Listing 1.
Listing 1: src/Profile.js
import React, { useState, useEffect } from 'react';
import { Auth } from 'aws-amplify';
import { AmplifySignOut } from '@aws-amplify/ui-react';

export default function Profile()
{
    const [user, setUser] = useState(null)
    useEffect(() => { Auth.currentAuthenticatedUser().then(user => setUser(user)); }, []);
    if (!user) return null
    return (
        <div>
            <h2>Username: { user.username }</h2>
            <p>Email: {user.attributes.email}</p>
            <p>Phone number: {user.attributes.phone_number}</p>
            <AmplifySignOut />
        </div>
           )
}
When the component loads, the useEffect hook fires to retrieve the currently signed in user. This is done by calling the currentAuthenticatedUser method of the Auth class from Amplify. If there's a signed in user, this function returns the user. If there's no user, it returns null.
The user state is then saved and the component is re-rendered. This component also uses the UI library for React to render a basic sign out button (AmplifySignOut).
Button.js
The next component to add is a styled Button that can be re-used throughout the app.
This component returns a styled button with props for the button title as well as an onClick handler. There's also a prop for the button type to set the color to either black or red.
Update src/Button.js with the code in Listing 2.
Listing 2: src/Button.js
import React from 'react';
import { css } from 'emotion';

export default function Button({
    title, onClick, type = "action"
}) {
    return (
      <button className={buttonStyle(type)} onClick={onClick}>
        { title }
      </button>
  )
}

const buttonStyle = type => css`
    background-color: ${type === "action" ? "black" : "red"};
        height: 40px;
        width: 160px;
        font-weight: 600;
        font-size: 16px;
        color: white;
        outline: none;
        border: none;
        margin-top: 5px;
        margin-bottom: 2px;
        margin-right: 2px;
        cursor: pointer;
           :hover {
               background-color: #363636;
  }
Header.js
This component renders the title of the app and two links. The links are for routing to the profile page and back to the root of the application to list the posts, as you can see in Listing 3.
Listing 3: src/Header.js
import React from 'react';
import { css } from 'emotion';
import { Link } from 'react-router-dom';

export default function Header()
{
    return (
        <div className={headerContainer}>
        <h1 className={headerStyle}>Photo Snap</h1>
        <Link to="/" className={linkStyle}>Posts</Link>
        <Link to="/profile" className={linkStyle}>Profile</Link>
        </div>
          )
}

const headerContainer = css`
    padding-top: 20px;
`
const headerStyle = css`
    font-size: 40px;
    margin-top: 0px;
`
const linkStyle = css`
    color: black;
    font-weight: bold;
    text-decoration: none;
    margin-right: 10px;
    :hover
    {
        color: #058aff;
    }
Posts.js
The Posts component takes in two props — an array of posts and a function named fetchPosts to toggle between fetching all available posts or just fetching the posts for the signed in user, as shown in Listing 4.
Listing 4: src/Posts.js
import React from 'react'
import { css } from 'emotion';
import { Link } from 'react-router-dom';
import Button from './Button';

export default function Posts({ posts = [], fetchPosts })
{
    return (
      <>
          <h1>Posts</h1>
          <Button
              title="All Posts"
              onClick={() => fetchPosts('all-posts')}
          />
          <Button
              title="My Posts"
              onClick={() => fetchPosts('my-posts')}
           />
      {
        posts.map(post => (
            <Link
                 to={`/post/${post.id}`}
                 className={linkStyle} key={post.id}
            >
              <div key={post.id} className={postContainer}>
                <h1 className={postTitleStyle}>{post.name}</h1>
                <img
                    alt="post"
                    className={imageStyle}
                    src={post.image}
                />
              </div>
            </Link>
        ))
      }
    </>
  )
}

const postTitleStyle = css`
    margin: 15px 0px;
    color: #0070f3;
`
const linkStyle = css`
    text-decoration: none;
`
const postContainer = css`
    border-radius: 10px;
    padding: 1px 20px;
    border: 1px solid #ddd;
    margin-bottom: 20px;
    :hover {
        border-color: #0070f3;
           }
`
const imageStyle = css`
    width: 100%;
    max-width: 400px;
You implement the function that calls the GraphQL API to retrieve the posts in App.js.
App.js
App.js is a large component so I'll be breaking the code up into three parts. This component renders the Router for the app (which is the main entry point), the Header containing the navigation, and a modal containing a form for creating new posts.
Add the following code to src/App.js.
import React, {
    useState,
    useEffect
}
from "react";
import {
    HashRouter,
    Switch,
    Route
} from "react-router-dom";
import {
    css
} from 'emotion';
import {
    withAuthenticator
} from '@aws-amplify/ui-react';
import {
    API,
    Auth,
    Storage
} from 'aws-amplify';
import {
    listPosts,
    postsByUser
} from './graphql/queries';
import Header from './Header';
import Button from './Button';
import Posts from './Posts';
import Post from './Post';
import Profile from './Profile';
import CreatePost from './CreatePost';
Let's go over these imports.
- HashRouter is part of React Router and uses the hash portion of the URL (i.e., window.location.hash) to keep your UI in sync with the URL.
SwitchandRouteallow you to declare a set of routes that the router registers and recognizes. - The withAuthenticator component is a UI component that allows you to put an authentication flow in front of any component.
- The API class from AWS Amplify allows you to make REST or GraphQL API calls to the AWS back end.
Authallows you to manage user authentication as well as retrieve the currently signed-in user session.Storageallows you to upload and download files from Amazon S3. - listPosts and postsByUser are GraphQL operations for interacting with the GraphQL API. These operations were generated automatically by the CLI when you ran
amplify push.
Next, let's add the code for the component. This component keeps up with state to show and hide the overlay for creating posts as well as state to hold the array of posts fetched from the GraphQL API. The fetchPosts function is what calls the GraphQL API and sets the state using the data returned from the API.
Add the code in Listing 5 to the last import in src/App.js.
Listing 5: src / App.js
function Router() {
    const [showOverlay, updateOverlayVisibility] = useState(false);
    const [posts, updatePosts] = useState([]);

    useEffect(() => {
        fetchPosts();
    }, []);

    async function fetchPosts(postType = 'all-posts') {
        let postData, newPosts;
        if (postType === 'my-posts') {
            const user = await Auth.currentAuthenticatedUser();
            postData = await API.graphql({
                query: postsByUser,
                variables: {
                    owner: user.username,
                    limit: 100
                }
            });
            newPosts = postData.data.postsByUser.items;
        } else {
            postData = await API.graphql({
                query: listPosts,
                variables: {
                    limit: 100
                }
            });
            newPosts = postData.data.listPosts.items;
        }
        newPosts = await Promise.all(newPosts.map(async post => {
            post.image = await Storage.get(post.image);
            return post;
        }));
        updatePosts(newPosts);
    }
    return (
        <>
        <HashRouter>
        <div className = {contentStyle}>
        <Header/>
        <hr className = { dividerStyle }/>
        <Button title = "New Post"
               onClick = { () => updateOverlayVisibility(true) }/>
        <Switch>
              <Route exact path = "/">
                  <Posts posts = { posts } fetchPosts = {fetchPosts}/>
              </Route>

              <Route path = "/post/:id">
                  <Post/>
              </Route>

              <Route>
                  <Profile/>
              </Route>
        </Switch>
        </div>
        </HashRouter>
        {
            showOverlay && (
            <CreatePost updateOverlayVisibility = {
                    updateOverlayVisibility
                }
                    updatePosts = {
                        updatePosts
                    }
                posts = {posts}
                />
            )
        }
        </>
    );
}
To finish this component, add the following styles and export the component wrapped by the withAuthenticator as the default export.
const dividerStyle = css`
    margin-top: 15px;
`
const contentStyle = css`
    min-height: calc(100vh - 45px);
    padding: 0px 40px;
`
export default withAuthenticator(Router);
CreatePost.js
The next component is the overlay that contains the form for creating posts.
First, add the following imports and create the initial state.
import React, { useState } from 'react';
import { css } from 'emotion';
import Button from './Button';
import { v4 as uuid } from 'uuid';
import {
    Storage, API, Auth
} from 'aws-amplify';
import {
    createPost
} from './graphql/mutations';

const initialState = {
    name: '',
    description: '',
    image: {},
    file: '',
    location: '',
    saving: false
};
You've already used most of these APIs in previous components; the one new thing that's being introduced here is the uuid library. Using this library, you'll be creating a unique identifier for images stored in your S3 bucket in order to prevent the possibility of users uploading multiple files with the same name.
Next, add the code in Listing 6 to the initial state variable declaration.
Listing 6: src/CreatePost.js
export default function CreatePost({
    updateOverlayVisibility, updatePosts, posts
}) {
    const [formState, updateFormState] = useState(initialState)

    function onChangeText(e) {
        e.persist();
        updateFormState(currentState => ({
            ...currentState,
            [e.target.name]: e.target.value
        }));
    }

    function onChangeFile(e) {
        e.persist();
        if (!e.target.files[0]) return;
        const image = {
            fileInfo: e.target.files[0],
            name: `${e.target.files[0].name}_${uuid()}`
        }
        updateFormState(currentState => ({
            ...currentState,
            file: URL.createObjectURL(e.target.files[0]),
            image
        }));
    }

    async function save() {
        try {
            const {
                name,
                description,
                location,
                image
            } = formState;
            if (
                !name || !description || !location || !image.name
            ) return;
            updateFormState(currentState => ({
                ...currentState,
                saving: true
            }));
            const postId = uuid();
            const postInfo = {
                name,
                description,
                location,
                image: formState.image.name,
                id: postId
            };

            await Storage.put(
                formState.image.name,
                formState.image.fileInfo
            );
            await API.graphql({
                query: createPost,
                variables: {
                    input: postInfo
                },
                authMode: "AMAZON_COGNITO_USER_POOLS"
            });
            updatePosts([
                ...posts,
                {
                    ...postInfo,
                    image: formState.file
                }
            ]);
            updateFormState(currentState => ({
                ...currentState,
                saving: false
            }));
            updateOverlayVisibility(false);
        } catch (err) {
            console.log('error: ', err);
        }
    }

    return ( <
        div className = {
            containerStyle
        } >
        <
        input placeholder = "Post name"
        name = "name"
        className = {
            inputStyle
        }
        onChange = {
            onChangeText
        }
        /> <
        input placeholder = "Location"
        name = "location"
        className = {
            inputStyle
        }
        onChange = {
            onChangeText
        }
        /> <
        input placeholder = "Description"
        name = "description"
        className = {
            inputStyle
        }
        onChange = {
            onChangeText
        }
        /> <
        input type = "file"
        onChange = {
            onChangeFile
        }
        /> {
            formState.file && ( <
                img className = {
                    imageStyle
                }
                alt = "preview"
                src = {
                    formState.file
                }
                />
            )
        } <
        Button title = "Create New Post"
        onClick = {
            save
        }
        /> <
        Button type = "cancel"
        title = "Cancel"
        onClick = {
            () => updateOverlayVisibility(false)
        }
        /> {
            formState.saving && ( <
                p className = {
                    savingMessageStyle
                } > Saving post... < /p>
            )
        } <
        /div>
    )
}
This component renders a form that allows users to create a new post. Most of the functionality in this component happens in the save function.
When a user saves a post, two things happen. First a unique name is generated, then the Storage API stores the image into Amazon S3. Once the image is successfully saved, another API call happens in order to save the post information to the GraphQL API, including the reference to the newly saved image (using the unique image name). You'll notice in this API.graphql call, an authMode is specified in order to enable a private API call (AMAZON_COGNITO_USER_POOLS), which automatically passes the proper authorization headers along with the request.
Finally, add the following styles.
const inputStyle = css`
    margin-bottom: 10px;
    outline: none;
    padding: 7px;
    border: 1px solid #ddd;
    font-size: 16px;
    border-radius: 4px;
`
const imageStyle = css`
    height: 120px;
    margin: 10px 0px;
    object-fit: contain;
`
const containerStyle = css`
    display: flex;
    flex-direction: column;
    width: 400px;
    height: 420px;
    position: fixed;
    left: 0;
    border-radius: 4px;
    top: 0;
    margin-left: calc(50vw - 220px);
    margin-top: calc(50vh - 230px);
    background-color: white;
    border: 1px solid #ddd;
    box-shadow: rgba(0, 0, 0, 0.25)
    0px 0.125rem 0.25rem;
    padding: 20px;
`
const savingMessageStyle = css`
    margin-bottom: 0px;
Post.js
The last component you need is the Post component. This component is a single item view that enables users to drill down into a single post to view more metadata about the post, like the post description and location.
The data used in this component is also dynamic. When the app loads, the ID of the post is read off of the URL. That post ID is then used to call the GraphQL API to retrieve the data for that individual post. Once the data is returned, the component re-renders to display the post data.
Open src/Post.js and add the code in Listing 7.
Listing 7: src/Post.js
import React, { useState, useEffect } from 'react';
import { css } from 'emotion';
import { useParams } from 'react-router-dom';
import { API, Storage } from 'aws-amplify';
import { getPost } from './graphql/queries';

export default function Post() {
    const [loading, updateLoading] = useState(true);
    const [post, updatePost] = useState(null);
    const { id } = useParams()
    useEffect(() => {
        fetchPost()
    }, [])
    async function fetchPost() {
        try {
            const postData = await API.graphql({
                query: getPost, variables: { id }
             });
             const currentPost = postData.data.getPost
             currentPost.image = await Storage.get(currentPost.image);
             updatePost(currentPost);
             updateLoading(false);
             }
       catch (err) {
            console.log('error: ', err)
            }
    }
    if (loading) return <h3>Loading...</h3>
    return ( <>
        <h1 className={titleStyle}>{post.name}</h1>
        <h3 className={locationStyle}>{post.location}</h3>
        <p>{post.description}</p>
        <img alt="post" src={post.image} className={imageStyle} />
        </>
    )
}

const titleStyle = css`
    margin-bottom: 7px;
`
const locationStyle = css`
    color: #0070f3;
    margin: 0;
`
const imageStyle = css`
    max-width: 500px;
    @media (max-width: 500px) {
    width: 100%;
    }
The fetchPost function uses the post ID that's retrieved from the route parameters to call the GraphQL API and retrieve the post information.
Once the post data is returned, the state is updated with the post information and the component renders the post information.
Testing It Out
Now you should be able to run the app.
To do so, open your terminal and run the start command:
npm start
Once the app starts, navigate to localhost:3000 and you should see the app running.
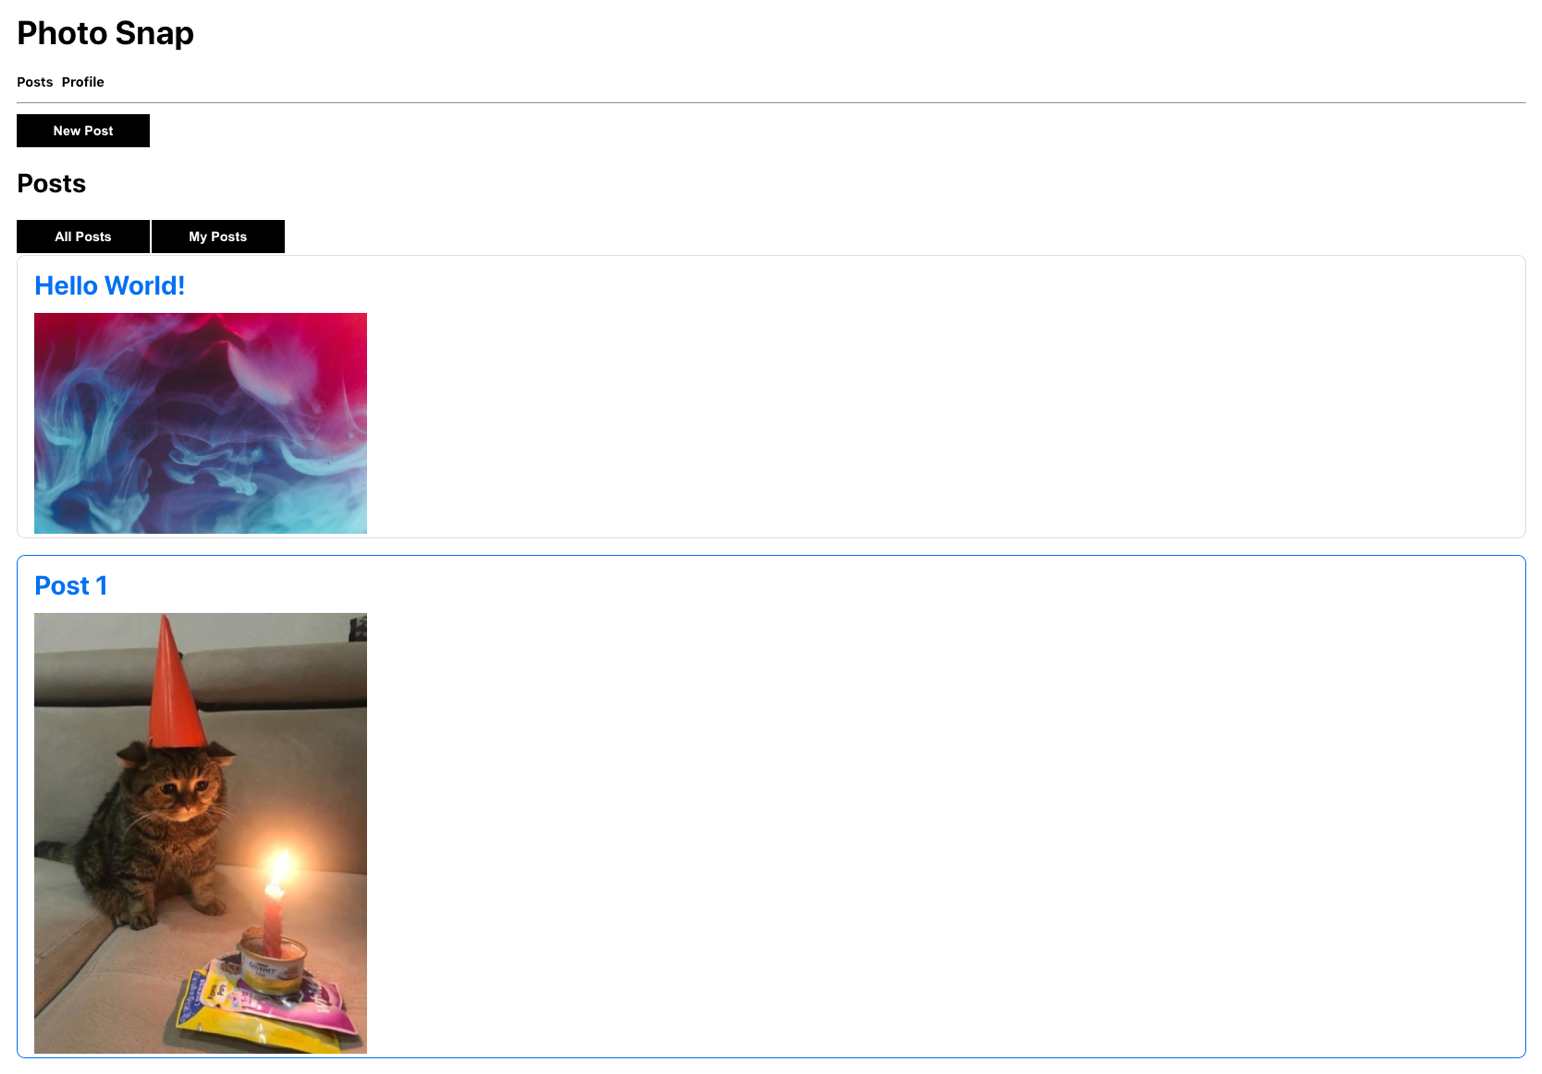
First, create a new account that automatically signs you in. Once you're signed in, you should be able to create posts. If you create another account and create posts there, you should be able to filter to view only your own posts by clicking on the My Posts button (as shown in Figure 1).
Adding Real-Time Functionality
Next, let's finish the app by adding real-time functionality. When a user creates a new post, ideally, you'd like for the app to automatically be notified of this new post and render it across all connected apps.
This is easy to achieve using the existing API as Amplify enables GraphQL subscriptions by default for any GraphQL API that's created. You can subscribe to mutations such as creating, updating, or deleting a post. The subscription receives the event data and allows you to update the UI at that time.
To add this, you'll just need to update a few things in src/App.js.
// First import the subscription definition
import { onCreatePost } from './graphql/subscriptions';

// Next, create a new function called `subscribe` in the component
function subscribe() {
    API.graphql({
        query: onCreatePost
    })
    .subscribe(() => fetchPosts())
}

// Finally, update useEffect to invoke the subscription
useEffect(() => {
    fetchPosts();
    const subscription = subscribe();
    return () => subscription();
}, []);
To test this out, open another browser window and run the app in both windows. When you create a new post in one window, it should show up in real time in the other window once it has been successfully created.
Wrapping Up
In this article, you learned how to implement three of the most important features needed for most real-world apps: file storage, authentication, and an API. You learned that Amplify also supports additional features like machine learning, analytics, and an offline API that manages things like conflict detection and conflict resolution.
To learn more about Amplify, check out the docs at https://docs.amplify.aws/.
To join the community, check out the Amplify Discord at https://discord.com/invite/jWVbPfC
