


Suspense is a new feature that will see the light in the long-awaited release of Vue 3. It's highly inspired by React Suspense. This article will introduce Suspense, showcase the various ways of using it, show it in action with example app code, and end with ways to handle errors.
What's Suspense in Vue3?
While researching and learning about Suspense, I read many articles and watched many videos. I had light bulb moments and moments of confusion. It's the confusion that compelled me to explain it clearly and with my own examples.
Suspense creates an execution context or a boundary around the content it wraps. It waits for the component(s) wrapped inside to be ready before displaying it/them. Meanwhile, it displays a fallback content that could be a text message, spinning animation, or any other type of content.
Initially, the Suspense component displays the fallback content by default. The wrapped component makes use of the async setup() function and awaits an async/promise operation to fetch data from a back-end server. The moment the promise is resolved successfully, the Suspense component displays the component on the screen.
The Composition API in Vue 3 is implemented via the setup() function. To learn more about the Composition API, check out my article, “Vue 3 Composition API, Do You Really Need It?”
If, for whatever reason, the async/promise operation fails or is pending, the Suspense component continues to show the fallback content. You'll see this in the coming sections.
Let me illustrate this with a few examples. Let's assume that you have a component that's wrapped inside a Suspense component that uses the Composition API in Vue 3 by using the setup() function.
Async/Promise Operation with Success
In this first scenario, I'm going to execute an async/promise operation that results in a successful operation. Listing 1 shows the complete source code for this section.
Listing 1: Async/Promise Operation with Success
import { createApp, ref } from "./vue.esm-browser";
const SampleOne = {
    name: "Sample One",
    async setup() {
        const data = ref(null);
        data.value = await fetchData();
        return { data };
    },
    template: `<pre>{{ data }}</pre>`
};

const App = {
    components: { SampleOne },
    template: `
        <h1>Vue 3 Suspense</h1>
        <div class="app">
          <h3>Async/Promise with Success</h3>
          <Suspense>
            <template #default>
              <SampleOne />
            </template>
            <template #fallback>
              <div>Loading ...</div>
            </template>
          </Suspense>
        </div>`
};

createApp(App).mount("#app");

// Utils
async function fetchData() {
    return new Promise(async (resolve) => {
        const res = await fetch(`https://disease.sh/v3/covid-19/countries/?yesterday=true&strict=true`);
        setTimeout(async () => resolve(await res.json()), 2000);
    });
}
You can play with this example on Suspense with Success here.
The fetch() function, part of the Fetch API (https://developer.mozilla.org/en-US/docs/Web/API/Fetch_API), communicates with a remote REST API to return COVID-19 data by country. It returns a Promise.
The fetchData() function simulates a delay by using both a Promise and the setTimeout() function.
The moment the Promise is resolved and the data is available, the SampleOne component is ready to be rendered. At this time, the wrapping Suspense component inside the App component displays it and hides the fallback content. Figure 1 shows the app running.
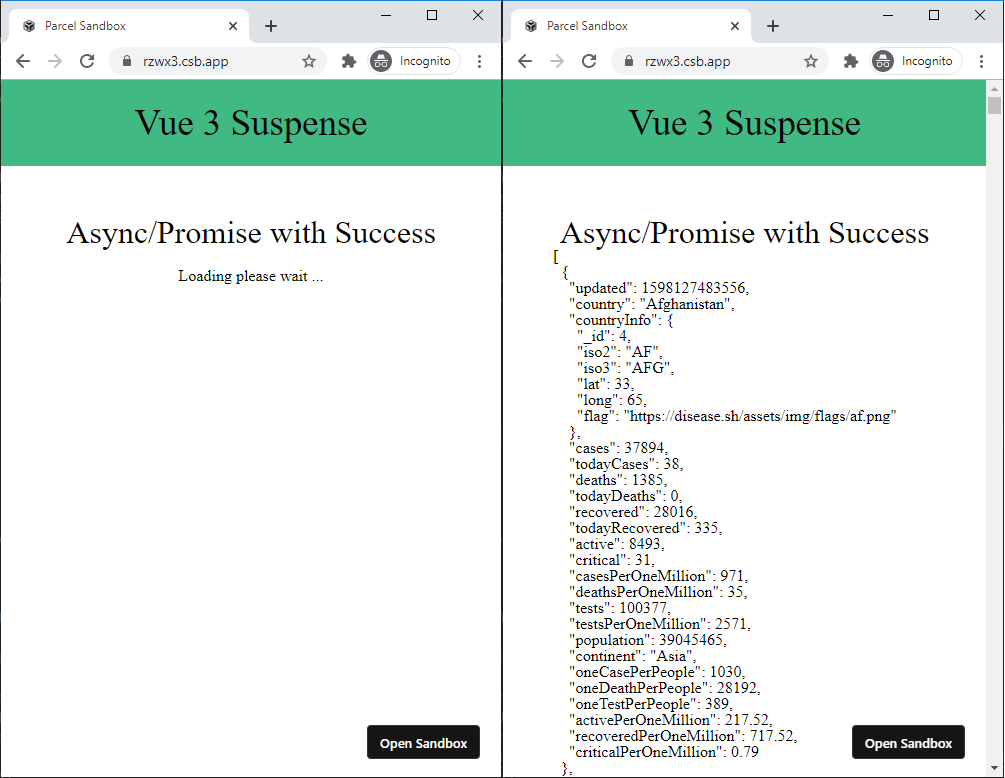
This example demonstrates the safe path. The Suspense component deals with a successful async/promise operation with no surprises!
Async/Promise Operation with Unhandled Failure
In this second scenario, I'll execute an async/promise operation that results in an unhandled failure. To simulate a Promise rejection, I'll use an incorrect host name in the request URL and see how it behaves.
async function fetchData()
{
    return new Promise(async (resolve) => {
        const res = await fetch(`https://disease.sh/v3/covid-19/countries/?yesterday=true&strict=true`);
        setTimeout(async () => resolve(await res.json()), 2000);
    });
}
Check out this example on Suspense with Unhandled Failure: https://codesandbox.io/s/suspense-unhandled-failure-26s7e.
The rest of the code is kept the same. Notice the use of diseases instead of disease.
Needless to say, the request fails and the Promise returned is rejected. How does the Suspense component deal with this? The wrapped component wasn't able to resolve the async/promise operation, and the component was never ready to be displayed on the screen. Therefore, the Suspense component keeps the fallback content showing. Figure 2 shows the app running.
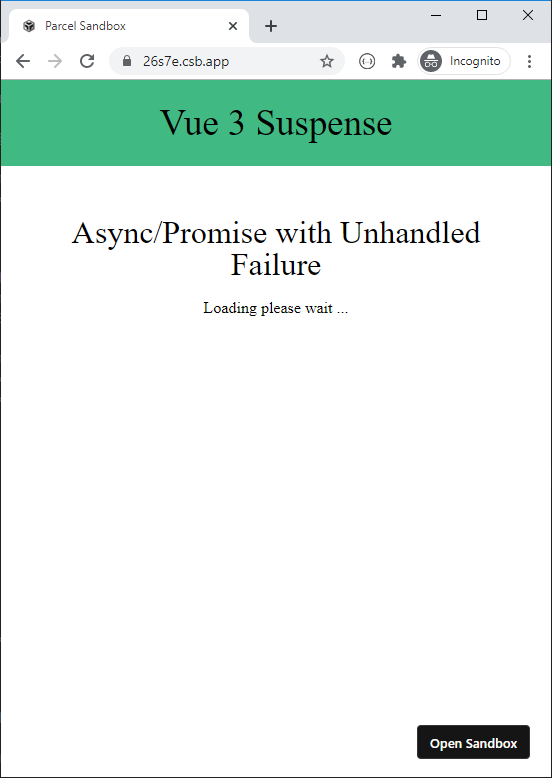
This example demonstrates the use of a Suspense component wrapping a component with an async/promise fetch operation failing without being handled.
Async/Promise Operation with Handled Failure
The third and last scenario is handling the async/promise request failure inside the wrapped component. The Suspense component gets the impression that the wrapped component has successfully completed its async/promise fetch operation and it's ready to be rendered. In this case, the Suspense component displays the wrapped component and hides the fallback content. Listing 2 shows the complete source code used in this section.
Listing 2: Async/Promise Operation with Handled Failure
import { createApp, ref } from "./vue.esm-browser";

const SampleThree = {
    name: "Sample Three",
    async setup() {
        const data = ref(null);

        try {
            data.value = await fetchData();
        }
        catch (e) {
            console.log(e);
        }

        return { data };
    },
    template: `
      <p style="text-align: center; padding-top: 20px;">This component is rendered without any data fetched!</p>
      <pre>{{ data }}</pre>`
};

const App = {
    components: { SampleThree  },
    template: `
      <h1>Vue 3 Suspense</h1>
      <div class="app">
        <h3>Async/Promise with Success</h3>
        <Suspense>
          <template #default>
            <SampleThree />
          </template>
          <template #fallback>
            <div style="text-align: center; padding-top: 20px;">Loading please wait ...</div>
          </template>
        </Suspense>
      </div>`
};

createApp(App).mount("#app");

// Utils
async function fetchData() {
    return new Promise(async (resolve, reject) => {
        try {
            const res = await fetch(`https://diseases.sh/v3/covid-19/countries/?yesterday=true&strict=true`);
            setTimeout(async () => resolve(await res.json()), 2000);
        }
        catch {
            reject("Failed to load data");
        }
    });
}
Access this example on Suspense with Handled Failure here: https://codesandbox.io/s/suspense-handled-failure-yy181.
The async/promise fetch operation is now wrapped inside a try/catch block. The rejected Promise inside fetchData() function is handled and written into the console silently. Hence, the component is safe to be rendered and no exception or failure was propagated to the parent component. Figure 3 shows the app running.
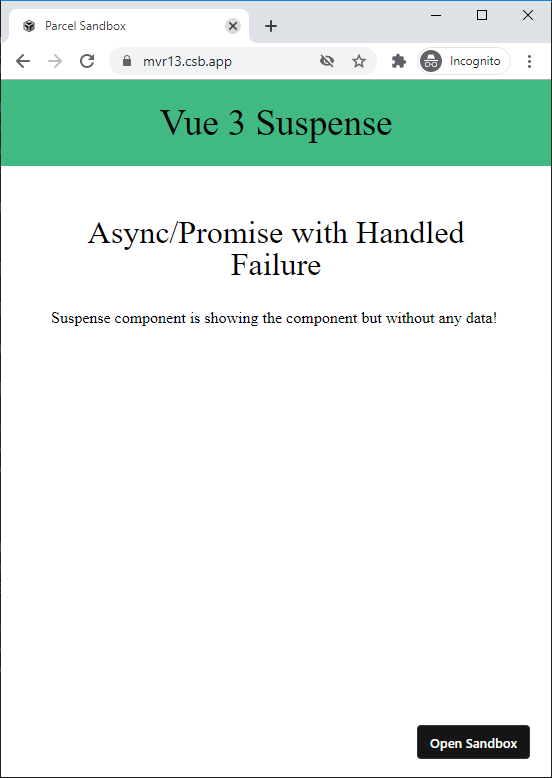
The Suspense component renders the component normally. However, the data that the REST API should return is not showing due to the failure.
This section was longer than anticipated. I wanted to show you the possible scenarios that the Suspense component can have while deciding to render content or fallback content on the page.
How Suspense Fits into Your App?
An architectural look into how the Suspense in Vue 3 fits in your app leads me to discuss the various options that are available while implementing it.
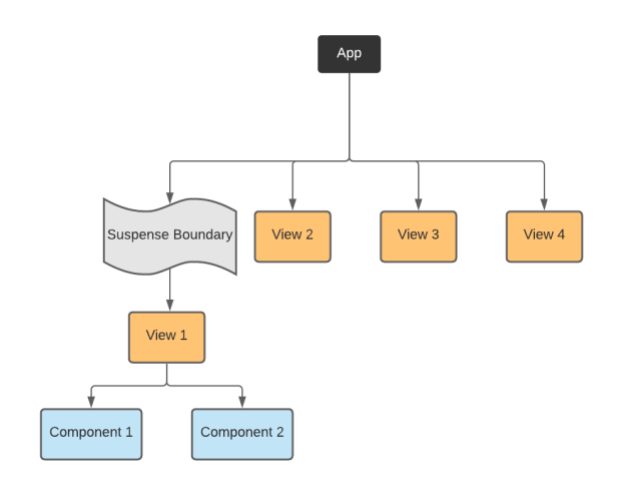
Suspense at the App Level
You can position the Suspense component inside the App.vue component so it wraps the entire app and controls its rendering process. Figure 4 illustrates Suspense at the App level.
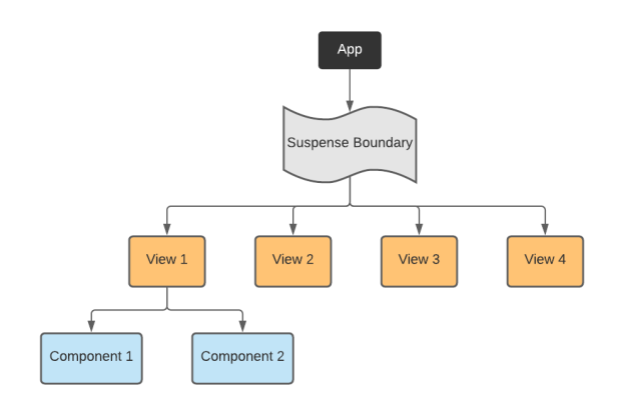
The Suspense component wraps the entire app. The app contains Views which, in turn, are composed of Components.
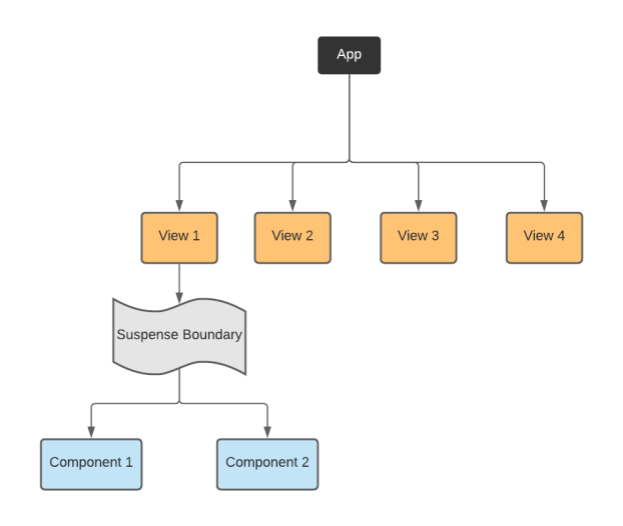
Suspense at the View Level
Instead of wrapping the entire app inside a Suspense component, you just wrap a single View in your app with it.
A View in a Vue app can be thought of as a Page that users can route to. A View is composed of a set of components that are usually not route-aware.
Therefore, you either wrap a single View or simply wrap the entire <router-view /> by a Suspense component. By doing so, it controls every single View in your app. Figure 5 illustrates this.
The Suspense component wraps a View. This View is composed of a set of Components.
Suspense at the Component level
The final option is to let the Suspense component wrap one or more components inside a View. This option allows you to control the display of a single component at a time.
This option definitely gives you more control and allows your app to behave differently among the different Suspense components that it uses. This comes at the expense of having several Suspense components and is more complicated to manage and maintain. Figure 6 illustrates this.
The Suspense component wraps all the Components inside a single View.
Demonstration
Now that you've had a full overview on how Suspense works in Vue 3 and how it's used in your app, let's switch gears and build something useful.
In this section, you'll build a basic COVID-19 Dashboard. The Dashboard displays COVID-19 data about each listed country. The information includes:
- Total cases
- Recovered cases
- Active cases
I'm using the https://disease.sh/docs/ website to retrieve information that will populate my app. This website offers a modern REST API that can return JSON data to consume in your app. You can browse their documentation for more information on how to use their API.
For this Dashboard, let's use the following HTTP GET request: https://disease.sh/v3/covid-19/countries/?yesterday=true&strict=true.
The request queries for all the countries having COVID-19. It retrieves the information from the day before.
To start with, let's build a function to fetch the data from the backend.
async function fetchData(timeout: number = 2000) {
    return new Promise(async (resolve, reject) => {
        try {
            const res = await fetch(`https://disease.sh/v3/covid-19/countries/?yesterday=true&strict=true`);
            setTimeout(async () => {
                resolve(await res.json());
            }, timeout);
        }
        catch (err) {
            reject(err);
        }
    });
}
The function uses the Fetch API to send a request to the REST API. Before returning the results, the function simulates a delay by using the setTimeout() function with a timeout delay in milliseconds. The default value of the timeout is two seconds. In addition, a try/catch block wraps around the fetch() request call in order to handle any errors. This is essential to make sure your Promise can always resolve or reject.
COVID by Country Component
Now let's build the component that displays the COVID-19 data on the page. Listing 3 shows the complete code of this component.
Listing 3: Covid by Country Component
import { computed, ref } from "./vue.esm-browser";

export default {
    name: "CovidByCountry",
    props: {
        timeout: {
            type: Number,
            default: 3000
        }
    },
    async setup(props: any) {
        const data = ref(null);
        data.value = await fetchData(props.timeout);
        return {
            covid: computed(() => {
                return data.value;
            })
        };
    },
    template: `
      <div class="covid">
        <div class="covid-line" v-for="record in covid" :key="record.countryInfo._id">
          <span class="covid-country">{{ record.country }}</span>
          <ul>
            <li>Cases: {{ record.cases }}</li>
            <li>Recovered: {{ record.recovered }}</li>
            <li>Active: {{ record.active }}</li>
          </ul>
        </div>
      </div>`
};
The component accepts a single property to specify the timeout delay before displaying the results. It uses the Composition API by using the async setup() function.
Inside the function, it defines a ref variable named data. It then awaits the fetchData() function. Finally, it returns an object with a single computed() property named covid that holds a reference to the data coming back from the server.
The key point here is that the component is awaiting a promise inside an async setup() function. This is the main requirement for a component to work inside the Suspense component.
The component defines a basic template to display each country together with its results.
Add Suspense to the App Component
Let's switch to the App component and configure the Suspense component inside it. Listing 4 shows the complete code for this component.
Listing 4: Add Suspense to the App Component
import { createApp, ref } from "./vue.esm-browser";
import CovidByCountry from "./CovidByCountry";

const App = {
    components: {
        "covid-by-country": CovidByCountry
    },
    setup() {
        const timeout = ref(4000);
        return { timeout };
    },
    template: `
      <h1>COVID-19 Dashboard</h1>
      <div class="app">
        <h3>Data by Country</h3>
        <Suspense>
          <template #default>
            <covid-by-country :timeout="timeout" />
          </template>
          <template #fallback>
            <div style="padding-top: 20px;">Loading please wait ...</div>
          </template>
        </Suspense>
      </div>`
};

createApp(App).mount("#app");
The component uses a Suspense component in its template. The Suspense component defines two templates: default and fallback.
The former hosts the CovidByCountry component that you defined above. The latter defines a message to let the user know that data is being retrieved from the back-end server and will be available soon.
The moment the data is retrieved and returned, the setup() function is resolved. The Suspense component hides the fallback template and displays the default template. The default template gets replaced by the CovidByCountry component. Figure 7 shows the app running.
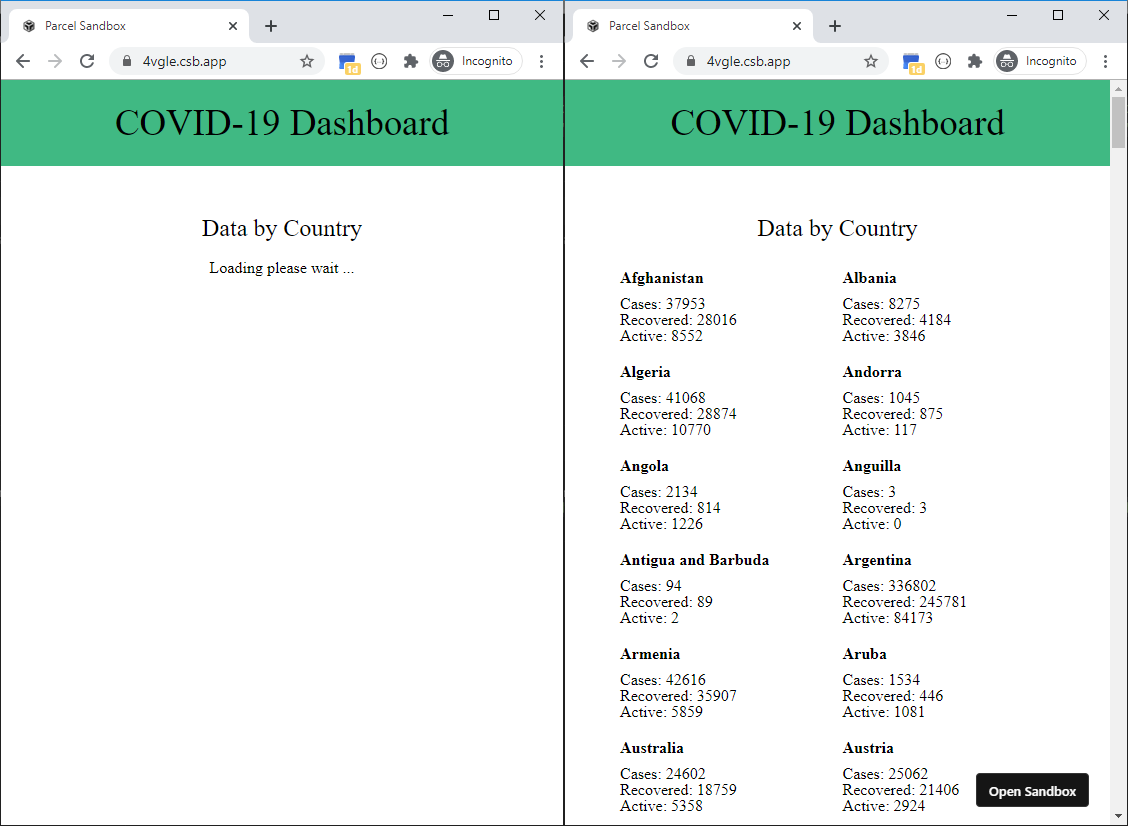
You can play with this example on the COVID-19 Dashboard: https://codesandbox.io/s/suspense-vue3-4vgle.
Error Handling in Suspense
In this section, I'll look at how to handle errors that are thrown while the async setup() function waits for the fetchData() function to execute.
You have two options for handling errors when you're using the Suspense component.
- At the parent component level where the Suspense component lives
- At the child component that the Suspense component wraps
I'll look at both options to give you a solid understanding of how to handle errors with the Suspense component.
There are several ways to simulate a failure in an HTTP request. I'll choose the easiest for this demonstration and mess around with the Host name of the REST API request. The change affects the fetchData() function at this line:
const res = await fetch(`https://diseases.sh/v3/covid-19/countries/?yesterday=true&strict=true`);
The request now uses diseases.sh instead of disease.sh.
The line above fails and throws an exception. The try/catch block handles the exception and rejects the Promise.
Option 1: Handle Errors at the Parent Component
Before I jump in and implement the solution, let me remind you of how the setup() function looks inside the CovidByCountry component.
async setup(props: any) {
    const data = ref(null);
    data.value = await fetchData(props.timeout);
    return {
        covid: computed(() => {
            return data.value;
        })
    };
},
The function awaits the fetchData() function without any try/catch block. If the fetchData() function rejects the Promise it returns, the setup() function fails, and the error bubbles up the Vue-Component-Tree.
Vue 3 offers the onErrorCaptured() lifecycle hook. Vue 2 introduced this hook back at version 2.5.0 of the framework. Vue 3 renames this hook and makes it available inside the Composition API.
Vue calls the onErrorCaptured() hook when an error from any descendent component is captured.
This hook perfectly fits the scenario here. Let's use it inside the App component (the component that hosts the Suspense component).
Let's modify the setup() function inside the App component to look like this:
setup() {
    ...

    const error = ref(null);

    onErrorCaptured((e: Error) => (error.value = e));
    return {error, ... };
},
The onErrorCaptured() function receives three arguments: the error, the component instance that triggered the error, and a string containing information on where the error was captured. The hook can return false to stop the error from propagating further.
The hook assigns the error to a local ref variable named error.
Let's switch to the template and modify it a little in order to display the errors.
template: `
    <h1>COVID-19 Dashboard</h1>
    <div class="app">
      <h3>Data by Country</h3>
      <div class="space-up error" v-if="error">
        {{ error }}
      </div>
      <Suspense v-else>
        ...
      </Suspense>
    </div>`
When there's an error, the component hides the Suspense component and instead shows the error message. Otherwise, it shows the Suspense component when there is no error message.
Figure 8 shows the app running.

That's it!
Toy with this example on Handling Errors at the Parent Component here: https://codesandbox.io/s/suspense-handle-errors-vue3-z8ghx.
Now let's see how you can handle errors at the child component without touching the parent component.
Option 2: Handle Errors at the Child Component
To implement this option is much simpler. All you need to do is wrap the call to the fetchData() function with a try/catch block. Inside the catch(), assign the error to a local ref variable named errors.
async setup(props: any) {
    ...

    const error = ref(null);

    try {
        data.value = await fetchData(props.timeout);
    }
    catch (err) {
        error.value = err;
    }

    return {
        ...
        error
    };
},
When you safely handle any errors at the child component level, the async setup() function resolves successfully. Hence, the Suspense component that hosts this child component displays the default template - the CovidByCountry component - and hides the fallback content. You are, more or less, tricking the Suspense component into believing all is well. In fact, when you handle the HTTP request calls properly, things are fine even though the data cannot be retrieved!
Let's have a look at the template now:
<div class="space-up error center" v-if="error">{{ error }}</div>
<div v-else class="covid">
    <div class="covid-line" v-for="record in covid" :key="record.countryInfo._id">...</div>
</div>
The error message is shown when there's an error. Otherwise, the template displays the list of all countries with COVID-19 data.
Figure 9 shows the app running.

You can play with this example on Handling Errors at the Child Component here: https://codesandbox.io/s/suspense-handle-errors-child-vue3-civvr.
Bonus: Custom Suspense Component with Error Handling
I've included this section to clean up the way I handle errors with the new Suspense component.
By default, the Suspense function can either display the default template or the fallback template. It leaves out handling errors and lets the developer do it their own way.
In this section, I'll propose a rather opinionated approach on how to extend the Suspense component to offer a third template: the error template.
My approach can be summarized in three important points:
- Wrap the Suspense component inside a parent component.
- Handle the
onErrorCaptured()inside the parent component. - Use Vue Slots to render the default, fallback, and error templates.
To learn more about the Vue Slots, check out my article: Content Distribution in Vue JS (https://labs.thisdot.co/blog/content-distribution-in-vue-js).
Wrap the Suspense Component
Let's wrap the Suspense component inside a new component named SuspenseWithErrors.
export default {
    name: "SuspenseWithErrors",
    template: `
        <Suspense>
          <template #default></template>
          <template #fallback></template>
        </Suspense>`};
Handle the onErrorCaptured() Hook
Now let's handle the onErrorCaptured() hook inside this new component.
setup() {
    const error = ref(null);
    onErrorCaptured((err: Error) => (error.value = err));
    return { error };
},
Add the Vue Slots
Finally, let's use the Vue Slots to cater for the three templates:
<slot name="error" :error="error" v-if="error" />
<Suspense v-else>
    <template #default>
        <slot name="default" />
    </template>
    <template #fallback>
        <slot name="fallback" />
    </template>
</Suspense>
If there's an error, the Slot named error is displayed. Otherwise, the Suspense component is displayed. I'm introducing two new slots for the default and fallback content. This approach makes the component more flexible.
Note how I'm binding an error property on the error slot to the actual value of the error. Vue calls this Scoped Slots. This way, the component consuming the SuspenseWithErrors component can directly access the error message.
Let's see this component in action!
Using the SuspenseWithErrors Component
First of all, make sure the CovidByCountry component isn't handling any errors as follows:
async setup(props: any) {
    ...

    data.value = await fetchData(props.timeout);

    ...
},
Second, make sure the App component that's hosting the Suspense component isn't handling any errors.
At the App component level, import the new component named SuspenseWithErrors.
...

import SuspenseWithErrors from "./SuspenseWithErrors";
const App = {
    components: {
        ...

        SuspenseWithErrors
    },
Now let's change the template of the App component to use this new one. Listing 5 shows the complete code of this template.
Listing 5: Using the SuspenseWithErrors Component
template: `
  ...
  <SuspenseWithErrors>
    <template #error="props">
      <p class="center error space-up">{{ props.error }}</p>
    </template>
    <template #default>
      <covid-by-country :timeout="timeout" />
    </template>
    <template #fallback>
      <div class="space-up">Loading please wait ...</div>
    </template>
  </SuspenseWithErrors>
</div>`
Notice how the SuspenseWithErrors component now supports three templates: error, default, and fallback.
In addition, note how the Error template accesses its Error property, that the SuspenseWithErrors component binds on it by binding the name of the slot to the Props property. The Props object holds any property bound to this slot. You access the Error property by using props.error.
Figure 10 shows the app running.
You can play with this example on Suspense With Errors here: https://codesandbox.io/s/suspense-with-errors-wrapper-bijok.
Conclusion
Let's be honest here, for every Vue app I've developed, I've had to always include a Vue component with boilerplate logic to show or hide the main component once its data is loaded and ready for display on the page.
In this case, Vue 3 Suspense eliminates it. The API is pretty good, straightforward and easy to use.
Still, I believe this new feature comes with its own “side-effects.” The major one is deciding where in your app to use the <Suspense /> component. In other words, deciding on the level of isolation is the real challenge.
In future articles, I look forward to discussing the challenges that arise and sharing solutions with you as I come across them. Until then, happy coding.
