


As many users browse websites on their mobile phones, you might need the ability to guide the user from their current location to your location. This is easily accomplished using the browser's built-in navigator.geolocation object and Google Maps. The geolocation object provides the latitude and longitude of the user's phone or desktop. You can embed a Google map on your Web page and show the user their location based on that latitude and longitude. Additional API calls to Google's mapping API can give the user step-by-step directions to your location. This article shows you how to get started using these two powerful APIs.
Create HTML to Display Location Information
To begin, build a simple HTML page to display the various properties of the geolocation object. Feel free to use your tool(s) of choice to build an HTML page named index.html and a Web project. You can use Node.js/Express, MVC, Web Forms, etc. All you need is a Web server to run the HTML page and a CDN reference to jQuery. After creating your Web project and the index.html page, open the index.html file and add the code shown in Listing 1 into this file.
Listing 1: Create an HTML page to display the geolocation coordinate information.
<!DOCTYPE html>
<html>
<head>
  <meta charset="utf-8" />
  <title>Get Latitude/Longitude</title>
  <link href="styles/site.css" rel="stylesheet" />
</head>
<body>
  <header>
    <h1>Get Latitude/Longitude</h1>
  </header>
  <main>
    <p>Timestamp: <span id="timestamp"></span></p>
    <p>Latitude: <span id="lat"></span></p>
    <p>Longitude: <span id="long"></span></p>
    <p>Lat/Long Accuracy (meters): <span id="accuracy"></span></p>
    <p>Altitude (meters above sea level): <span id="altitude"></span></p>
    <p>Altitude Accuracy (meters): <span id="altitudeaccuracy"></span></p>
    <p>Heading (Degress from true north): <span id="heading"></span></p>
    <p>Speed (meters/second): <span id="speed"></span></p>
    <div id="errorArea" class="alert d-none"> </div>
  </main>
  <script src="https://code.jquery.com/jquery-3.5.1.min.js" integrity="REMOVED FOR BREVITY" crossorigin="anonymous"> </script>
  <script>
    'use strict';
    $(document).ready(function () {  }
    function displayPosition(pos) {  }
    function handleError(error) {  }
    function displayError(msg) {  }
  </script>
</body>
</html>
Styles
The index.html file references a stylesheet named site.css. In this file is where you place some CSS rules to set some margins, padding, and some color. Add a file named site.css in a styles folder (add this folder if needed) and place the code shown below into this file.
header, main { padding-left: 2em; }
.alert {  margin-top: 1em;  margin-bottom: 1em;  padding: 1em;  background-color: red;  color: white;}
.d-none { display: none; }
Get Latitude and Longitude
When using the geolocation object, the first thing you should do is check to ensure that the user's browser supports the object. After your page loads, check to see if something other than a null or undefined is returned when you check the navigator.geolocation property. If a geolocation object is returned, you can call the getCurrentPosition() method on that object and pass in the name of a function to call once the current location has been determined. If a geolocation object isn't returned, call a function to display an error message. Add the code shown below within the $(document).ready() function.
$(document).ready(function () {
    if (navigator.geolocation) {
        navigator.geolocation.getCurrentPosition(displayPosition);
    }
    else {
        displayError("Please update your browser to use Geolocation.");
    }
});
Display Latitude and Longitude
The getCurrentPosition() method asks the user's permission to retrieve their location. The browser prompts the user to answer with an OK or Yes if they will allow the getCurrentPosition() method to retrieve their current location. If the user answers in the affirmative, the user's location is retrieved, and the data is placed into a Coordinates object. This Coordinates object is passed to the callback function you passed into the getCurrentPosition() method. Within the displayPosition() function is where you extract the latitude, longitude, and other properties. Add the following code within the displayPosition() function.
function displayPosition(pos) {
    let coords = pos.coords;
    $("#timestamp").text(new Date(pos.timestamp));
    $("#lat").text(coords.latitude);
    $("#long").text(coords.longitude);
    $("#accuracy").text(coords.accuracy);
    $("#altitude").text(coords.altitude ?? "n/a");
    $("#altitudeaccuracy").text(coords.altitudeAccuracy ?? "n/a");
    $("#heading").text(coords.heading ?? "n/a");
    $("#speed").text(coords.speed ?? "n/a");
}
Try It Out
Save the changes to all your files and run your Web project. Your browser prompts you that this Web page is asking to know your location. There will be two options: to allow this page to access the geolocation coordinates or decline access. For now, go ahead and allow access to see your latitude, longitude, and other properties. You should see data appear like the data shown in Figure 1.

Add Error Handling
You should not assume that the geolocation object will always work. There are a few things that can go wrong: the user may not allow access to the geolocation object, the call to getCurrentPosition() may timeout, the current user's location may not be able to be determined, and other errors may occur. In case an error does occur, make sure to set up an error message to display on the page.
In the index.html page you created, there is a <div id="errorArea"> where you place any error messages. This <div> has a style of “alert,” which displays error messages with a red background and white letters. The style of “d-none” is also in the class attribute. This hides the <div> until you're ready to display an error message. Add the following code in the displayError() function.
function displayError(msg) {
    $("#errorArea").removeClass("d-none");
    $("#errorArea").html(msg);
}
Handle Location Errors
The second parameter you may pass to the getCurrentPosition() method is a callback function to handle any errors that may occur in that method. Add the code shown in Listing 2 to the handleError() function stub you created earlier.
Listing 2: Handle location errors by displaying a specific error message.
function handleError(error) {
let msg = "";
console.log("error.message = " + error.message);
switch (error.code) {
case error.PERMISSION_DENIED:
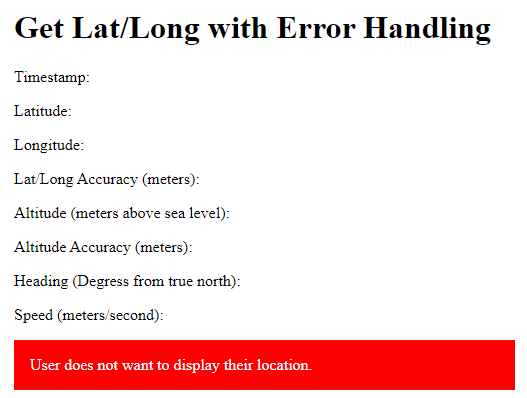
msg = "User does not want to display location.";
break;
case error.POSITION_UNAVAILABLE:
msg = "Can't determine user's location.";
break;
case error.TIMEOUT:
msg = "The request for geolocation info timed out.";
break;
case error.UNKNOWN_ERROR:
msg = "An unknown error occurred.";
break;
}
displayError(msg);
}
Pass in the name of the handleError() function as the second parameter in the call to the getCurrentPosition() method.
if (navigator.geolocation) {
    navigator.geolocation.getCurrentPosition(displayPosition, handleError);
}
Try It Out
Run the page again, but this time when the browser prompts you to use geolocation, answer in the negative. You should now be presented with a page that looks like Figure 2.
Geolocation Options
There's a third parameter you may pass to the getCurrentPosition() method. This third parameter is an optional PositionOptions literal object. This object contains three properties and you may set one, two, or all three of them. One thing to note: these options are only applied if you're running in HTTPS mode in your browser. The properties and their meanings are listed in Table 1.
To use these options, add a new variable named options, and set it equal to a literal object you see in the code in bold below. Pass this object as the third parameter to the getCurrentPosition() method.
if (navigator.geolocation) {
    let options = {
        enableHighAccuracy: true,
        timeout: 10000,
        maximumAge: 300000
    };

    navigator.geolocation.getCurrentPosition(displayPosition, handleError, options);
}
Create a Geolocation Closure
The code shown so far is fine for this page but requires you to copy and paste the code and make significant changes if you want to use this code on multiple Web pages. To make the geolocation code more reusable, wrap it into a closure and place that closure in a JavaScript file. Create a file named geoController.js in a scripts folder (create this folder if needed) and add the code shown in Listing 3.
Listing 3: Handle location errors by displaying a specific error message.
'use strict';

let geoController = (function () {
    // *****************************
    // Private Variables
    // *****************************
    let position = null;
    let lastMessage = null;
    let lastError = null;
    let successCallback = null;
    let errorCallback = null;

    // Enable high accuracy, if available
    // Timeout after 10 seconds
    // Only cached positions where age < 5 minutes
    let options = {
        enableHighAccuracy: true,
        timeout: 10000,
        maximumAge: 300000
    };

    // *****************************
    // Private Functions
    // *****************************
    function getCurrentPosition(success, error, posOptions) {
        // Set callbacks
        successCallback = success;
        errorCallback = error;
        if (posOptions) { options = posOptions; }

        // Reset private variables
        position = null;
        lastError = null;
        lastMessage = null;
        if (navigator.geolocation) {
            navigator.geolocation.getCurrentPosition(setPosition, handleError, options);
        }
        else {
            callError("Update your browser to use Geolocation.");
        }
    }

    function setPosition(pos) {
        position = pos;
        if (successCallback) {
            successCallback(position);
        }
    }

    function handleError(error) {
        lastError = error;
        switch (error.code) {
            case error.PERMISSION_DENIED:
                lastMessage = "User does not want to display their location.";
                break;
            case error.POSITION_UNAVAILABLE:
                lastMessage = "Can't determine user's location.";
                break;
            case error.TIMEOUT:
                lastMessage = "The request for geolocation information timed out.";
                break;
            case error.UNKNOWN_ERROR:
                lastMessage = "An unknown error occurred."
                break;
        }
        callError(lastMessage);
    }

    function callError(msg) {
        lastMessage = msg;
        console.log(msg);
        if (errorCallback) {
            errorCallback(lastMessage);
        }
    }

    // *****************************
    // Public Functions
    // *****************************
    return {
        "getCurrentPosition": function (success, error, posOptions) {
            getCurrentPosition(success, error, posOptions);
        },
        "getPosition": function () {
            return position;
        },
        "getLastError": function () {
            return lastError;
        },
        "getLastMessage": function () {
            return lastMessage;
        },
        "getOptions": function () {
            return options;
        }
    }
})();
The basics of this closure are created using an Immediately Invoked Function Expression, more commonly called an IIFE. This IIFE starts with the second line in the file and ends with the last line of the file. In between are some private variables, private functions, and a literal object returned from this IIFE to identify the public functions to be called from the geoController variable, as shown in Listing 4.
Listing 4: The structure of your closures should follow this format.
let geoController = (function () {
    // Private variables here

    // The following are private functions
    function getCurrentPosition(success, error, posOptions) {  }
    function setPosition(pos) {  }
    function handleError(error) {  }
    function callError(msg) {  }
    return {
        // Public functions here
    }
})();
The only private function that's exposed as a public function is getCurrentPosition(). The rest of the functions allow you to retrieve values set in the private variables such as the position object, the last error object, the last error message, and the position option object. The getCurrentPosition() function has the same signature as the getCurrentPosition() method on the geolocation object to make it easy to understand. The two callbacks are setPosition() and handleError() within this closure. This allows you to set the private variables from these two functions before calling the success or error callbacks you pass in.
Notice that in the closure, there's no code that affects the UI. All this function does is set data. You can then call any of the public functions to retrieve the data and use that to set the UI on your specific page. Open the index.html page and change the code at the bottom of the file to look like Listing 5.
In the code in Listing 5, you see the call to the geoController.getCurrentPosition() function. Pass in two function names on this page as the callbacks to be used to set the position data into the page, and to display an error message. You now have a nice separation of concerns as far as code that gathers data and code that displays data.
Listing 5: Call the closure to set data, then make a call back to your page to affect the UI.
<script src="scripts/geoController.js" type="text/javascript"></script>
<script>
    'use strict';

    $(document).ready(function () {
        geoController.getCurrentPosition(displayPosition, displayError);
    });

    function displayPosition(pos) {
        let coords = pos.coords;
        $("#timestamp").text(new Date(pos.timestamp));
        $("#lat").text(coords.latitude);
        $("#long").text(coords.longitude);
        $("#accuracy").text(coords.accuracy);
        $("#altitude").text(coords.altitude ?? "n/a");
        $("#altitudeaccuracy").text(coords.altitudeAccuracy ?? "n/a");
        $("#heading").text(coords.heading ?? "n/a");
        $("#speed").text(coords.speed ?? "n/a");
    }

    function displayError(msg) {
        $("#errorArea").removeClass("d-none");
        $("#errorArea").html(msg);
    }
</script>
Pass Coordinates to Google Maps
Once you have the latitude and longitude from the geolocation object, you have a variety of options on how to display those coordinates. There are free and paid services you can use. For example, with Google Maps, Bing Maps, or Open Street Maps, you can redirect to their Web pages and pass in the coordinates. You can do this for free. Using Google Maps or Bing Maps, you also have the choice of paying for their service and having a map embedded right into your own Web page. Let's take a look at the free option first. Open the index.html page and add a button within the <main> element.
<button onclick="displayOnMap();">Display on Map</button>
Add a function within the <script> tags named displayOnMap() as shown in the code below.
function displayOnMap() {
    let coords = geoController.getPosition().coords;
    window.location.href = 'https://google.com/maps?q=${coords.latitude}, ${coords.longitude}';
}
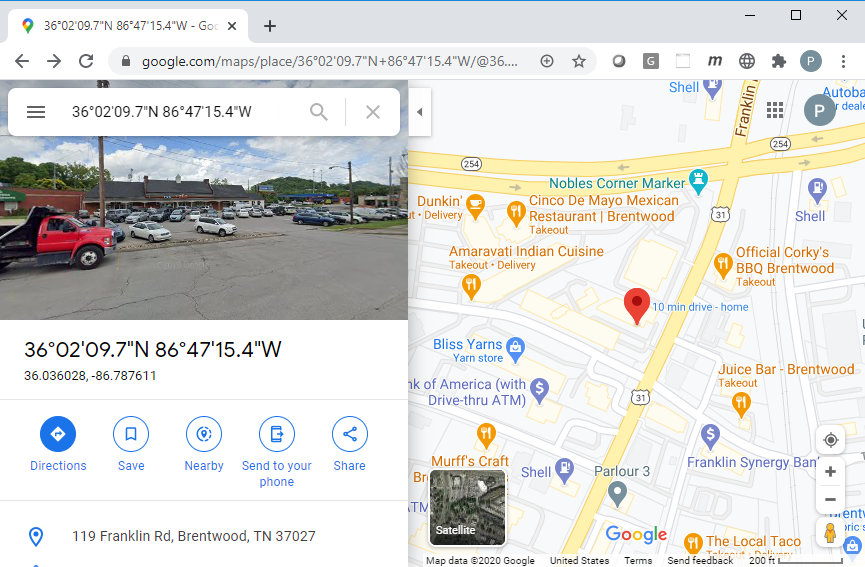
This code retrieves the GeoLocationPosition object by calling the getPosition() method in your closure. It then extracts the coords property and puts it into a local variable named coords. Pass in the latitude and longitude on the URL line in a format that looks like the following:
https://google.com/maps?q=36.084391,-86.773550
The code in displayOnMap() sets the window.location.href property using a template string to embed the latitude and longitude retrieved from the coords variable. Once the href property is set, your browser redirects to Google Maps and displays a marker at those coordinates, as shown in Figure 3.
Of course, the problem with this approach is that you must leave your site and go to the Google Maps site. A better approach is to embed a Google Map within your Web page. The next part of this article covers how to accomplish this.
Embed a Google Map
Simplify the <main> element by removing most of the <p> and <span> elements except the ones used to display latitude and longitude. Add a new <div> element just above the <div id="errorArea"> and add id and class attributes to the new <div> element, as shown in the code snippet below.
<main>
  <p>Latitude: <span id="lat"></span></p>
  <p>Longitude: <span id="long"></span></p>
  <div id="map" class="mapArea"></div>
  <div id="errorArea" class="alert d-none">  </div>
</main>
Open the styles\site.css file and add a new CSS rule for the mapArea class. Add the CSS rule shown below to set the width and height of the <div> where the map is to be embedded.
.mapArea { width: 90%; height: 500px; }
Fix the Script Code
Remove the $(document).ready() function and replace it with a function named initialize().
function initialize() {
    geoController.getCurrentPosition(displayPosition, displayError);
};
Locate the displayPosition() function and remove the code that set the elements you removed from the HTML. Also, make a call to a new function named addMap().
function displayPosition(pos) {
    let coords = pos.coords;
    $("#lat").text(coords.latitude);
    $("#long").text(coords.longitude);
    addMap(coords);
}
Add a new function named addMap() just below the displayPosition() function. This method looks like the following:
function addMap(location) {
    // Create a lat/lng object
    let pos = new google.maps.LatLng(location.latitude, location.longitude);

    // Create map options  let mapOptions = {
        center: pos,
        zoom: 16,
        mapTypeId: google.maps.MapTypeId.ROADMAP
    };

    // Create new google map
    let map = new google.maps.Map(document.getElementById("map"), mapOptions);
}
The addMap() function builds a new LatLng object by passing in the latitude and longitude properties from the geolocation coordinates retrieved from the call to getCurrentPosition(). Next, create a map options object with the properties center, zoom and mapTypeId. Set the center property to the LatLng object so the map knows where to put the coordinates on the map. Set the zoom property to 16 so the API can show just a certain portion of the map. You might want to play with this property to get make it look the way you want. The mapTypeId property is a constant that tells the type of map to display. Valid values are roadmap, satellite, hybrid, or terrain. The last piece of code is to create a Map object by passing in the HTML object where you wish to embed the map and the map options object.
Create a Closure for Mapping
Just like you created a closure for working with geolocation, I recommend that you use a closure on each HTML page as well. Immediately after the 'use strict', add the code shown below.
<script>
'use strict';

var gmapController = (function () {
    return { "initialize": initialize }
})();

// Rest of the code here
</script>
Take all of the functions that were there before and move them within the closure you just created. By moving all of the code within the function, each of those functions becomes private within the gmapController function. The only function that needs to be made public from the closure is the initialize() function, so that's the one you add to the literal object returned from the closure.
Call the Initialize Method
Because you removed the $(document).ready() function and moved all of the code within a closure, how does the map get displayed? There's one more piece to this puzzle that you add to your page. Put the following <script> tag immediately after the ending </script> tag where your code is located.
<script src="https://maps.googleapis.com/maps/api/js?key=YOUR_KEY_HERE&callback=gmapController.initialize" type="text/javascript">
</script >
In the above code, you need to add a developer API key, which is covered in the next section of this article. The “callback=gmapController.initialize” is passed into the Google JavaScript and tells the API that after it has loaded all its code, it should call the initialize() function within the closure on this page. This's how you get your map embedded on your page.
Get a Google API Key
Before you can embed a Google map, you must sign up with Google to get an API key at https://tinyurl.com/y5reu2l2. Be sure to read the instructions on this page carefully, as you should turn on various API services based on what you wish to use. In addition, you should also restrict the usage of your API key to only a few applications. You might also want to set daily or monthly limits on the amount that can be spent to ensure that you don't blow out your budget.
Although it doesn't cost anything to obtain a Google API key, you must enter a credit card. At the time of this writing, you get $200 per month of their various mapping APIs free. This amount should be more than enough to get your maps working within your website.
Try It Out
Once you create your Google API key, substitute your key for the YOUR_KEY_HERE string included in the <script> tag from the last section. Run your page and if you've done everything correctly, you should see a map appear with your current location in the center of the map. If you don't see the map appear, check the browser's console window for any error messages that could guide you on how to fix the error.
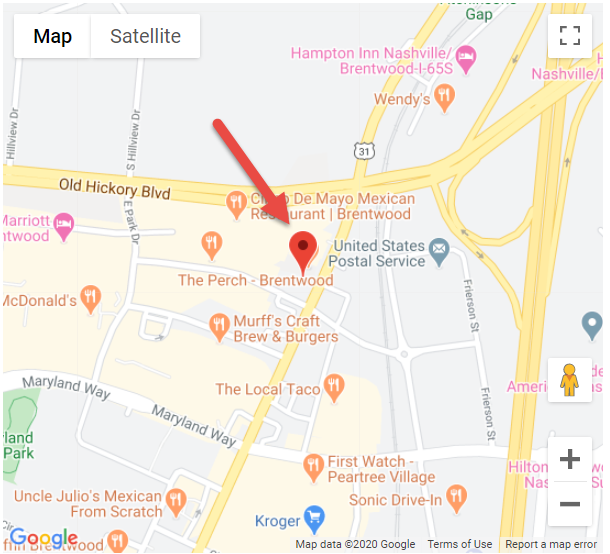
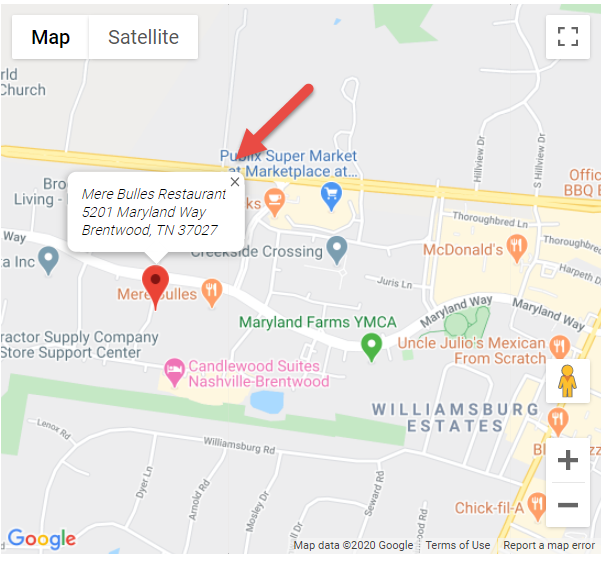
Add a Marker on a Location
A popular item you want on a map is a large marker (see Figure 4) to denote the location you're trying to point out to the user. Google Maps makes it easy to add a marker on your map.
Instead of using your location to position the embedded Google Map, let's set up a fictitious company named “Paul's Training Company” located in Brentwood, TN, USA. Add two private variables within the closure.
let map = null;
let location = {
    "latitude": 36.036020,
    "longitude": -86.787600,
    "title": "Paul's Training Company",
    "marker": null
};
The map property is going to hold a reference to the Google Map object. The location property is a literal object with the latitude, longitude, and the title of the location. The marker property is currently set to null but is going to be set by code you write very soon.
Because you're not using the call to the geolocation object to get the coordinates, just call the addMap() function passing in the location variable. Modify the initialize() function in your closure to look like the following code snippet.
function initialize() {
    // Draw the map
    addMap(location);

    // Add marker for location
    addMarker(location);
}
Add an addMarker() function within the closure to create and add the marker at the coordinates in your location variable.
function addMarker(location) {
    // Create a new marker
    location.marker = new google.maps.Marker( {
        position: new google.maps.LatLng(location.latitude, location.longitude),
        map: map,
        title: location.title
    });

    // Add marker to the map
    location.marker.setMap(map);
}
Try It Out
Save all your changes and run the page again. You should now see a marker on the embedded map. If you hover over the marker, you should see the value from the title property in your location property.
Add Multiple Locations
You may add as many markers as you want on your Google Map. You just need separate coordinates for each marker. Now you see the reason for creating a location literal object; it contains a property for each piece of data for each marker you wish to place on the map. Remove the private variable location you created earlier and replace it with an array named locations.
let locations = [];
Create a new function within the closure named createLocations() in which you push as many different literal objects into the locations array as you want to display on the map.
function createLocations() {
    locations.push({ "latitude": 36.036020, "longitude": -86.787600, "title": "Paul's Training Company", "marker": null });
    locations.push({ "latitude": 36.0339689, "longitude": -86.8058154, "title": "Mere Bulles", "marker": null });
}
You need to call this new function from the initialize() function, then loop through each item in the locations array and pass each item to the addMarker() method. Modify the initialize() function to look like the following.
function initialize() {
    // Create array of map definitions
    createLocations();

    // Draw the map
    addMap(locations[0]);

    // Draw the locations
    for (let index = 0; index < locations.length; index++) {
        // Add marker for location
        addMarker(locations[index]);
    }
}
Try It Out
Save your changes and try out this new code. You may have to scroll to the left to see the other marker depending on the size of your browser window. In the next section, you learn how to ensure the user can see all of your locations without having to scroll.
Center All Locations on Map
You shouldn't force your user to scroll to see all the locations you placed on your map. It would be nice if you could figure out the farthest latitude and longitudes to the north/south and east/west and somehow tell the map to automatically include these farthest points. Google Maps provides this in a LatLngBounds class. Create a LatLngBounds class as the first line of code in the initialize() function.
function initialize() {
    // Create a lat/lng boundary
    let bounds = new google.maps.LatLngBounds();

    // Rest of the code
}
A LatLngBounds class has an extend() method to which you pass in a LatLng class. The LatLng class contains two properties lat and lng. Your addMarker() function creates a LatLng object from the latitude and longitude in your map definition object. Call the extend() method after calling the addMarker() function within the loop in the initialize() function.
for (let index = 0; index < locations.length; index++) {
    // Add marker for location
    addMarker(locations[index]);

    // Extend boundaries to encompass marker
    bounds.extend(locations[index].marker.position);
}
After drawing all of the locations in the loop, call the fitBounds() method on the map passing in the LatLngBounds object. Add the following code immediately after the loop in the initialize() function.
// Fit the map to boundaries
if (locations.length > 1) {
    map.fitBounds(bounds);
}
Try It Out
Save your changes and run the page again. Now, the map should resize to the appropriate width to show you both locations you added.
Directions Between Two Points
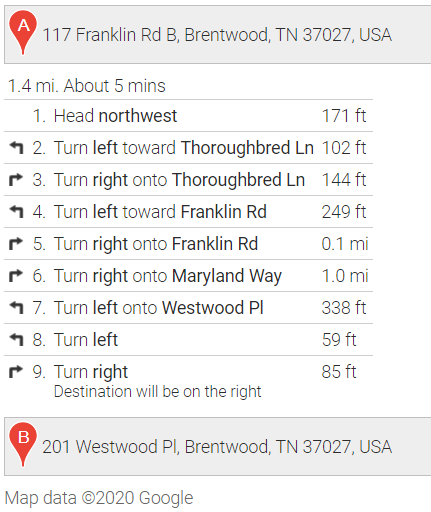
Besides just showing markers on your map, you might want to provide your user with the ability to drive to your location from where they are. Google Maps provides the DirectionsService and the DirectionsRenderer classes to connect two points with a blue line, as shown in Figure 5.
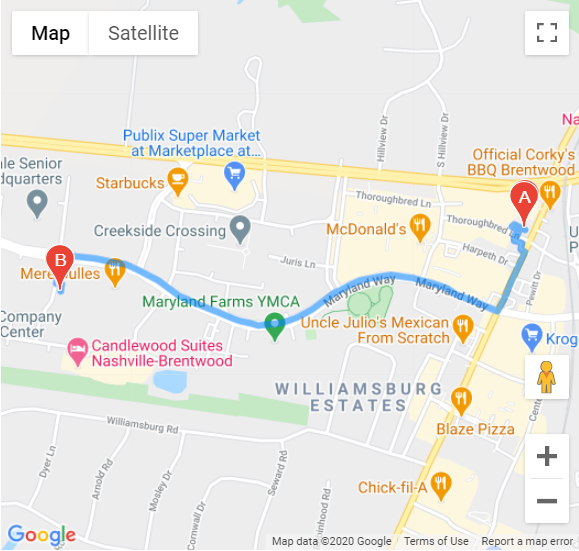
Add a new function to your closure named addDirections(). This function creates an instance of a google.maps.DirectionsService class and an instance of google.maps.DirectionsRenderer class. Call the route() method on the DirectionsService class, passing in a literal object with the origin, destination, and travelMode properties set to the appropriate values. The second parameter to the route() method is a callback function in which you check the status to see if the directions were able to be rendered. If they are, call the setDirections() method passing in the response passed to the callback. Call the setMap() method and pass in the map object and Google Maps will draw the blue line as shown in Figure 5.
Call the new addDirections() function at the end of the initialize() function. Create two new LatLng objects from the first two entries in your locations array. For this article, you're using latitude and longitude to draw the directions between the two locations. However, the route() method on the DirectionsService class also accepts two addresses.
// Add directions between the two points
addDirections(new google.maps.LatLng(
    locations[0].latitude, locations[0].longitude),
    new google.maps.LatLng(locations[1].latitude, locations[1].longitude)
);
Listing 6: Use the DirectionsService and DirectionsRenderer classes to get directions between two points.
function addDirections(from, to) {
    let service = new google.maps.DirectionsService();
    let renderer = new google.maps.DirectionsRenderer();

    // Set route of how to travel from point A to B
    service.route({
        origin: from,
        destination: to,
        travelMode: 'DRIVING'
    },
    function (response, status) {
        if (status === 'OK') {
            renderer.setDirections(response);

            // Render directions on the map
            renderer.setMap(map);
        }
        else {
            console.log('Directions request failed due to ' + status);
        }
    });
}
Try It Out
Save your changes to this page and redraw the Web page. You should now see a blue line connecting the first marker with the second marker. If you don't see a blue line, check the console window for any error messages.
Directions with Text
In addition to just showing a blue line, Google Maps can also display step-by-step directions as text on your Web page, as shown in Figure 6.
Determine where on your Web page you wish to have Google Maps draw the text directions and add a <div> in that location, as shown in the code snippet below.
<div id="directionsArea"> </div>
In the addDirections() function, add the code shown below after the call to the setMap() method. The code in bold calls the setPanel() method on the DirectionsRenderer class and you pass in a reference to the HTML <div> element within which you want Google Maps to render the text directions.
if (status === 'OK') {
    renderer.setDirections(response);

    // Render directions on the map
    renderer.setMap(map);

    // Call setPanel() to display text directions
    renderer.setPanel(document.getElementById("directionsArea"));
}
Try It Out
Save your changes to this page and redraw the Web page. You should now see a panel with text directions just below your map. If you don't see the text directions, check the console window for any error messages.
Information Windows
In Figure 7, you see a rectangular window above the marker with address information for the restaurant. This is called an information window and is accessed by the user clicking on the marker. It can be dismissed using the “x” in the upper right corner of the window.
There are just a few steps needed to add an information window to a marker. Create a variable, named infoWindow, in your closure and assign a null value to it for right now.
let infoWindow = null;
In the initialize() create a new instance a google.maps.InfoWindow class and assign it to the infoWindow variable.
function initialize() {
    // Create new InfoWindow if it is not already
    if (infoWindow == null) {
        infoWindow = new google.maps.InfoWindow();
    }

    // Rest of the code here
}
In the map definition literal object, add a new property named infoContent. In this variable is where you define the HTML and the text for what you want your information window to look like. Add this property and some different HTML for each marker in your locations array so you can see an information window for each marker.
locations.push({
    "latitude": 36.036020,
    "longitude": -86.787600,
    "title": "Paul's Training Company",
    "marker": null,
    "infoContent": "<div class='info-window'><address>Paul's Training Company<br/>117 Franklin Rd<br/>Brentwood, TN 37027</address></div>"
});
Create an addInfoWindow() function in which you add an event listener to the marker you created earlier. On the click event of the marker call the setContent() method of the information window passing in the HTML you defined in the map definition object. Call the open() method on the infoWindow variable passing in the map object and the marker object. This is what displays the information window above the marker.
function addInfoWindow(location) {
    // Add click event to marker
    google.maps.event.addListener(location.marker, 'click', function () {
        // Add HTML content for window
        infoWindow.setContent(location.infoContent);

        // Open the window
        infoWindow.open(map, location.marker);
    });
}
The addInfoWindow() function needs to be called after you have created your marker, as you are going to set up the click event on each marker you add to the map. Locate the loop in the initialize() function and add a call to the addInfoWindow() function after the call to the addMarker() function.
for (let index = 0; index < locations.length; index++) {
    // Add marker for location
    addMarker(locations[index]);

    // Add info window for location
    addInfoWindow(locations[index]);

    // Extend boundaries to encompass marker
    bounds.extend(locations[index].marker.position);
}
Try It Out
Save your changes to this page and click on one of the locations. You should see an information window pop up above the marker. Now, click on another marker and the first information window disappears and one displays above the new marker you just clicked on. The reason for this toggling is that there's only one variable to hold an information window for the map object. If you change the variable, the original information window is destroyed and the new one appears.
Keep All Information Windows Open
Instead of only having a single information window appear at a time, you can keep them all open until the user manually closes each one. Remove the single instance of the infoWindow variable within your closure.
let infoWindow = null;
Add an infoWindow property to each location object and set the initial value to null.
locations.push({
    "latitude": 36.036020,
    "longitude": -86.787600,
    "marker": null,
    "infoWindow" : null,
    "title": "Paul's Training Company",
    "infoContent": "content here"
});
Remove the code that creates the instance of the single infoWindow variable from within the initialize() function.
function initialize() {
    // Create new InfoWindow if it is not already
    if (infoWindow == null) {
        infoWindow = new google.maps.InfoWindow();
    }

    // Rest of the code here
}
Locate the addInfoWindow() function and add a line of code to set the new infoWindow property on the location object to a new instance of a google.maps.InfoWindow class. Within the addListener() function be sure to call the setContent() and open() methods on the infoWindow property of the location object you pass in.
function addInfoWindow(location) {
    location.infoWindow = new google.maps.InfoWindow();

    // Add click event to marker
    google.maps.event.addListener(location.marker, 'click', function () {
        // Add HTML content for window
        location.infoWindow.setContent(location.infoContent);

        // Open the window
        location.infoWindow.open(map, location.marker);
    });
}
Try It Out
Save your changes and when you now click on each marker, the previous information windows stay visible. You can choose which method you like better and use the appropriate code.
Summary
In this article, you learned to use the HTML 5 geolocation object to retrieve a user's current latitude and longitude. Most modern browsers support this object, so you shouldn't have any issues using this. The user must grant the usage of this object, so be sure to handle the case where your user doesn't want to give you their position. In addition to this object, you learned the basics of working with the Google Maps API. This API isn't free to use, but it's one of the best APIs available for mapping. You saw how to embed a map, display locations, and information windows using this API. There are many more APIs available, such as driving directions, geofencing, and much more. Take some time to explore the many different options.
Table 1: You may set any or none of the PositionOptions.
| Property | Description |
| enableHighAccuracy | If set to `true`, informs the device to attempt to obtain a more accurate position. This can slow down the time it takes to retrieve the coordinates. |
| timeout | The maximum length of time to wait before throwing an exception. This value is expressed in milliseconds. |
| maximumAge | The maximum age of the last cached position that's acceptable to return. This value is expressed in milliseconds. Set to 0 to not allow the device to cache positions. |
