


There are days I that consider myself very lucky to be a computer programmer. In the current tumult the world is going through, I'm lucky to be able to work from home and take my mind off things, things that are often very controversial and frequently depressing. So let me start this article by saying something completely non-controversial. JavaScript is awesome.
I'm kidding, I'm kidding. In fact, any statement about JavaScript produces so many strong emotions on either side, it's not even funny. Since I started writing this article, there have been at least five new JavaScript packages or frameworks released.
A few days ago, a work colleague reached out to me. He happens to be a .NET programmer – a very good .NET programmer. For some crazy reason, he found himself stuck on the task of building a Web application in NodeJS.
Easier said than done, right? The problem is that in the classic Microsoft world, so many decisions are made for you. You can simply create a new .NET Core Web application project and you're ready to go. This isn't the case in the JavaScript world.
There are so many decisions to make. What version of NodeJS should you use? What node packages should you take a dependence on? JavaScript is a very flimsy language; can you take advantage of TypeScript? How do you ensure that you're following best practices? Do you want to have a productive development experience, like pressing F5 on your keyboard to run the project? And so on.
This is perhaps the biggest frustration of working with JavaScript. A simple task, such as setting up a website, has such a high initial cost and so many ways to get lost in this process that many developers never get to taste the beauty of JavaScript. But once you get over the initial gag factor, the possibilities of JavaScript are endless.
Indeed, JavaScript is awesome, or perhaps this is just my opinion. I thought I'd write an article in which I can walk you through the process of setting up a simple ExpressJS-based Web application that uses TypeScript. In writing this article, I want to ensure that I eliminate all cruft, things that might distract you, such as UI, or API, or heavy-duty frameworks. You can certainly extend what you're going to read in this article to more complicated projects. I just want to give you a simple starter project that lets you get up and running with ExpressJS and TypeScript.
If you wish to reference the code for this article, you can find it at https://github.com/maliksahil/expressjs-typescript
Create a Simple NodeJS Project
For the purpose of this article, I assume that you're somewhat familiar with NodeJS. I'm not going to spend time explaining what NodeJS is, or what yarn or npm is. Start by creating a new folder and initialize a NodeJS project using this command:
npm init -y
Running this command should give you an empty package.json file. In your package.json file, you'll have many configuration values. The three main configuration values I'm concerned about here are dependencies, devDependencies, and scripts.
- dependencies are what the project depends on. These are the node packages that the project is going to need at runtime. In other words, this is something you intend to ship.
- devDependencies, on the other hand, are the node packages that your project depends on, but only at coding time, not at run time. Although these node packages are very important to the project, you have no intention of shipping them in the final version.
- scripts are what you run and scripts can call other scripts. A typical NodeJS project is comprised of many scripts. In this case, the scripts will have the responsibility of building the project, cleaning the project, etc. Let's get to scripts in a moment, once you have the basic project structure created.
Let's start with dependencies. The project is going to be an ExpressJS application and a TypeScript application, and it will require, at the bare minimum, two things. It's going to need a rendering engine and it's going to need some configuration, such as what port to run on during debug time.
This is where the curse and blessing of the JavaScript world shows up. There are so many choices, and there's not one single correct answer here. For my purposes, I'm going to use “ejs” as the rendering engine, and “dotenv” as the configuration helper. I don't claim that these are the best two choices, however these are very popular and well-accepted options. I feel somewhat safe taking a dependency on these node packages. If ever in doubt, many of these node packages are open source; you should see how active their communities are, how often they merge new pull requests, how many people are involved in the project, how often they respond to the issues, how many people have starred that particular GitHub repository. These are some good baselines that you can use to ensure that you're taking dependency on a node module, that's somewhere popular, that the teams behind it are responsive enough, and that you'll have a good project lifecycle experience with that particular node package.
Given this, go ahead and modify the dependencies section of package.json as shown here:
"dependencies": { "ejs": "^3.1.3", "express": "^4.17.1", "dotenv": "^8.2.0"},
Next, let's talk about devDependencies. I intend to write my code in TypeScript. Writing code in bare vanilla JavaScript is simply too flimsy, and experience tells me that no matter how good I get at JavaScript, I'll mess it up. TypeScript encourages me to write cleaner code, allows me to use language features that allow me to write easier-to-understand code that down-compiles to target browsers, and many more advantages.
In my devDependencies, I intend to take a dependence on TypeScript. In your devDependencies, add the following node packages:
"ts-node": "^8.10.2","tslint": "^6.1.3","TypeScript": "^3.9.7"
But wait; there's more! This alone isn't enough. When you start writing code in TypeScript, you take on two new responsibilities. TypeScript transpiles into JavaScript, and that JavaScript is what you finally run. You don't usually run TypeScript directly. I say “usually” because sometimes for some helper files, it may be okay to transpile on the fly and just run it. For the code you care about, your website, you'll always statically transpile this code. You don't want to transpile it on the fly, because it'd be just too slow. Your first responsibility is all the paraphernalia associated with transpiling.
There's one more thing you need to worry about. Now that you're using TypeScript, TypeScript will enforce some rules on you. TypeScript wishes to make sure that you're using the correct data types, for example. This is a very good thing because without the appropriate datatypes, you don't get the correct IntelliSense. Without the correct IntelliSense, you're more prone to making mistakes. Luckily, there are a number of types node packages that give you all these data types that you care about. In this project, you're going to take a dependency on those as well. Given all this, you can see the full devDependencies in Listing 1.
Listing 1: The devDependencies section of the package.json
"devDependencies": {
    "@types/dotenv": "^8.2.0",
    "@types/express": "^4.17.7",
    "@types/node": "^14.0.27",
    "@types/shelljs": "0.7.9",
    "shelljs": "0.8.4",
    "nodemon": "^2.0.4",
    "npm-run-all": "^4.1.5",
    "rimraf": "^3.0.2",
    "ts-node": "^8.10.2",
    "tslint": "^6.1.3",
    "TypeScript": "^3.9.7"
},
Let's take a moment to understand Listing 1. The various @types node packages that you see are the type definitions that the TypeScript transpiler will depend on, and the IDE, such as VSCode, will depend on to show the correct IntelliSense.
The shelljs node package gives you shell-like commands that you can use in TypeScript. You'll use this package to copy transpiled files into a folder from where the Web application can be served.
The nodemon node package allows you to restart your application if the underlying files change. I'll use this for debug purposes, the idea being, that as I edit a file, the build will automatically run and allow me to see changes in the browser. The npm-run-all allows you to run multiple npm scripts in parallel, something you'll have to do when you build your site. The rimraf allows you to delete a bunch of files easily and you'll use this to clean your project. The final three, ts-node, tslint, and TypeScript are for TypeScript support, as I mentioned above.
The final section to talk about is the scripts section. I'm not ready to talk about that yet. Let's finish more of the project first so you have a basic structure in place, and then I'll talk about how scripts allows you to work with the project structure.
Configuration Settings
Before you can start working on your ExpressJS application, let's define the environment and the various configuration details that ExpressJS application depends on.
The first thing you need is an environment file, which includes the basic configuration settings, such as what port the application will run on. Because I've have taken a dependency on dotnev for this, I simply create a .env file in the root of the project with the following contents:
SERVER_PORT=8080
HOST_URL=http://localhost:8080
It's customary to add this .env to your .gitignore` and check in a `.env.sample` file instead. While I'm at it, here's my full .gitignore`:
.cache/
.vscode/
dist/
node_modules/
.env
.DS_Store
*.log
As you can see, this is a very barebones project. I intend to show you every bit of code I'll write here.
Next, let's author the tsconfig.json file. The tsconfig.json file informs the TypesScript transpiler of the various settings you want it to use. You can see my full tsconfig.json in Listing 2. As you can see in Listing 2, this is a fairly simple tsconfig.json. I'm targeting commonjs and excluding paths I don't want compiled. Note that I've also given a hint to include node_modules and src/types, without which the TypeScript transpilation would fail.
Listing 2: The tsconfig.json file
{
    "compilerOptions": {
        "module": "commonjs",
        "esModuleInterop": true,
        "target": "es6",
        "noImplicitAny": true,
        "moduleResolution": "node",
        "sourceMap": true,
        "outDir": "dist",
        "baseUrl": ".",
        "paths": {
            "*": [
                "node_modules/*",
                "src/types/*"
            ]
        }
    },
    "include": [ "src/**/*" ],
    "exclude": [ "src/public" ]
}
Finally, let's author a tslint.json file. The purpose of the tslint.json file is to author all of the linting rules. Even though TypeScript encourages you to write good code, good is only as good as the team or the developer. Additionally, a lot of things are opinions or arbitrary decisions. For example, what character should you use for a quote? Should it be ‘ or "? Both are correct, but it's important to pick one and stick with it. You can specify a lot of rules in tslint.json, but for my purposes, I'll keep it simple. You can see my tslint.json in Listing 3.
Listing 3: My tslint.json
{
    "defaultSeverity": "error",
    "extends": [
        "tslint:recommended"
    ],
    "jsRules": {},
    "rules": {
        "indent": [ true, "spaces" ],
        "trailing-comma": [ false ]
    },
    "rulesDirectory": []
}
While we're at it, add a linting script to your package.json as well, as follows:
"lint": "tslint -c tslint.json -p tsconfig.json"
This script runs the linter and throws an error if your written code breaks one of the linting rules. Imagine if I were debugging and writing code in parallel, if any time I wrote poor code, as long as the linter runs inline of my build process, I'll be alerted immediately. I'll show later in this article how you can integrate this REPL pipeline. You can also integrate this as a part of your check-in/branch merge rules, but I won't be covering that in this article.
Write Your Application
So far, you have your configuration settings and your package dependencies done. You also added one linting script. Now, let's focus on the main project structure. Again, NodeJS is not very opinionated; you can make this as clean or as messy as you'd like. As I think about creating this project structure, I have three main things I'd like to achieve.
- I'd like a src folder where my source code lives. This is where I write my ExpressJS application in TypeScript.
- I'd like a dist folder, where the built version of this application will live. This is what will eventually run.
- I'd like a tools folder, where I will have helper scripts to facilitate the build process or anything else I might need.
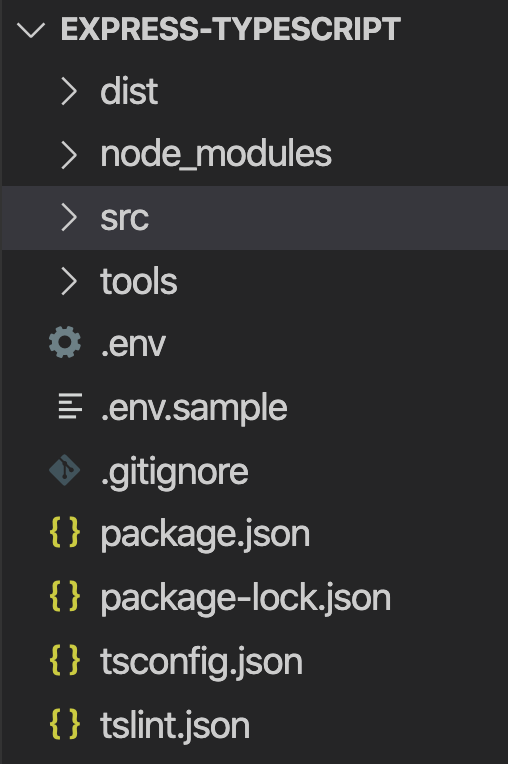
At this point, go ahead and create these three folders in your project structure. Your project should look like Figure 1 at this point.
Let's tackle the easier part first. The dist folder is going to be empty. It's just a place holder where my “built” artifacts will go. Note that I have also specified in my .gitignore file that the contents of this folder are not to be checked in.
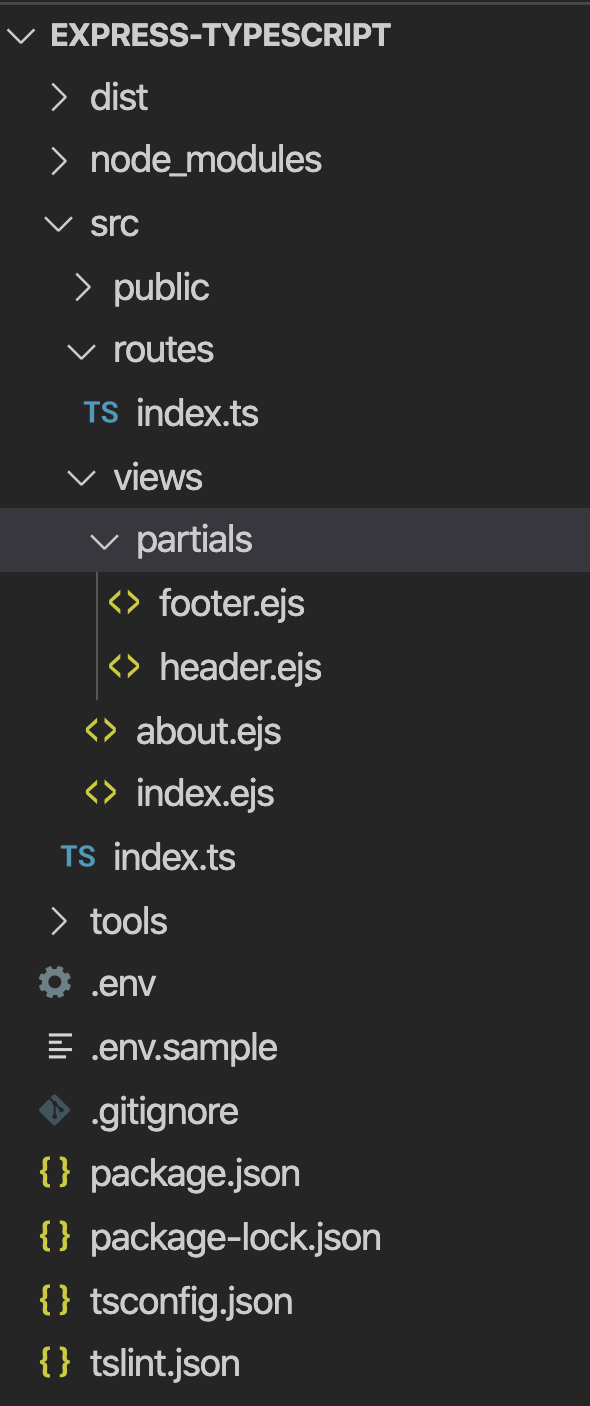
Next, let's talk about the src folder. This is where my ExpressJS application will go. There are many ways to structure an ExpressJS app, but I've written my application so that it has a couple of routes, and those couple of routes are backed by a couple of views. My views are called index and about, served at / and /about routes. Both of these views rely on partial views for the header and footers.
Additionally, I've also created a “public” folder, where artifacts that don't need transpilation can sit. This could be a third-party JavaScript library or framework, such as Bootstrap.
At this point, my project structure looks like Figure 2.
This isn't a tutorial on ExpressJS and you could replace ExpressJS with really any JavaScript framework intended to serve Web applications here. But, let's understand at a high level how the application is built.
You can see my index.ts in Listing 4. In Listing 4, I'm using ejs as my view engine and I'm rendering views out of the views folder. Additionally, I'm serving static files from the public folder, and registering routes from the routes folder. The routes folder serves two routes: index and about.
Listing 4: My index.ts
import dotenv from "dotenv";
import express from "express";
import path from "path";
import * as routes from "./routes";

dotenv.config();
const port = process.env.SERVER_PORT;
const app = express();

app.use(express.json());
app.set("views", path.join(__dirname, "views"));
app.set("view engine", "ejs");

app.use(express.static(path.join(__dirname, "public")));

// Configure routesroutes.register(app);
// start the express server
app.listen(port, () => {
    // tslint:disable-next-line:no-console
    console.log( `server started at http://localhost:${port}`);
});
The routes.ts file can be seen in Listing 5. I'm using a concept called barreling, where from index.ts, I can simply import the routes folder. TypeScript looks for a file called index.ts in a folder called routes and loads everything accordingly. This makes it really convenient to separate concerns into folders as my application grows.
Listing 5: The routes.ts file
import * as express from "express";
export const register = (app: express.Application) => {
    // home page
    app.get("/", (req: any, res) => {
        res.render("index");
    });

    // about page
    app.get("/about", (req: any, res) => {
        res.render("about");
    });
};
Finally, my views are rather simple. As can be seen from Figure 2, I have two views, index and about. These match with what you see in Listing 5, where I've defined my routes. This could be made dynamic, if you wish. My index.ejs view looks like Listing 6. I'll omit the about.ejs view for brevity, although it's very similar to index.ejs. Hey, it's just a simple Web page that says “About”. You're welcome to check out the code in the GitHub repo mentioned above.
Listing 6: Index.ejs
<!doctype html>
<html lang="en">
<head>
    <meta charset="utf-8">
    <title>ExpressJS TypeScript starter template</title>
</head>
<body>
    <%- include('partials/header') %>
    <h1>Home Page</h1>
    <%- include('partials/footer') %>
</body>
</html>
The partial views are a reusable snippet of ejs views that I can embed in any other such view. As an example, the header.ejs is shown here:
<h1>Header</h1>Home</a> |<a href="/about">About
Again, you can make this application a lot more complex if you wish. This is a great start and you can build from here using this as a template.
Now, let's focus your attention on the tools folder.
You're going to need some mechanism to build the application during debug time. One part of the build is the TypeScript transpilation, but the second part is copying over the static assets, such as CSS, JavaScript, images, etc., that don't need transpilation. You're going to put all of those in the public folder. These files need to be copied from the src folder and be copied into the dist folder at runtime. To facilitate that, go ahead and create a file called copyAssets.ts in the tools folder. You can find the code for copyAssets.ts in Listing 7. As you can see from Listing 7, I'm simply cleaning up and copying files as the application runs.
Listing 7: copyAssets.ts
import * as shell from "shelljs";
// Copy all the view templates and assets in the public folder
shell.cp("-R", ["src/views", "src/public"], "dist/");

// Remove unnecessary files
shell.rm(["dist/public/js/*.ts", "dist/public/js/*.json"]);
Run and Build Your Application
Now that the application is done, it's time to stitch all of this together and make it work during debug time. Deploying into production is a whole other topic, and there are many ways to do that as well. For example, you could easily convert the dist folder into a Docker image. I hope to talk more about deployment and other concerns in future articles. For now, let's get the application working in debug mode.
To begin, add a “main” entry in the package.json, as shown:
"main": "dist/index.js",
This informs the host that when this project is asked to run, you should run the dist/index.js file. For instance, if you press F5 in VSCode, this file will run. Of course, this file doesn't yet exist; it has to be built. I'll get there in a moment. For now, in your scripts tag, add another script to run this main entry point:
"dev": "node .",
Now, let's add a few helper scripts in the scripts section of the package.json. You'll use these helper scripts as building blocks to facilitate the debugging experience. These can be seen here:
"copy-assets": "ts-node tools/copyAssets","tsc": "tsc","clean": "rimraf dist/*","lint":
"tslint -c tslint.json -p tsconfig.json"
The copy-assets script runs the copyAssets.ts file using the ts-node package. If you remember, this file copies the static content that the site depends on and puts it in the dist folder. The tsc script represents the TypeScript transpiler.
The clean script is used to delete older files. The idea is that as I change code, I want my application to be automatically rebuilt and recopied. Before it's recopied, I want older applications to be deleted. That's what I'm using rimraf and clean for.
And the lint script, as I have already described in this article, is linting the code to ensure that I'm writing clean code.
So, what would the build look like? Simple: clean, lint, run the TypeScript transpiler to generate files and then run copy-assets. Go ahead and add a build script as below.
"build": "npm-run-all clean lint tsc copy-assets",
Now you can build. What's next? Let's build and run! You already have a script entry called “dev” that runs the project. Now you need to run build and dev together. Here's how you do it:
"dev:start": "npm-run-all build dev",
At this point, if I were to write npm run dev:start, my application will build and run. But that's not enough! What I really want is for my application to automatically build, rebuild, deploy, and run as I edit code. To facilitate that, add the start command as below.
"start": "nodemon --watch src -e ts,ejs --exec npm run dev:start",
This finishes the “script” section for the project. You can find the full script section in Listing 8.
Listing 8: The script section
"scripts": {
    "start": "nodemon --watch src -e ts,ejs --exec npm run dev:start",
    "dev": "node .",
    "dev:start": "npm-run-all build dev",
    "build": "npm-run-all clean lint tsc copy-assets",
    "copy-assets": "ts-node tools/copyAssets",
    "tsc": "tsc",
    "clean": "rimraf dist/*",
    "lint": "tslint -c tslint.json -p tsconfig.json"
},
Run Your Application
Now for the most fun part. To run the application, type the following command at terminal:
npm start
Sure, it's possible to wire up VSCode, so pressing F5 will do this for you. But let's, for now, run it from commandline and get started. Once your application is built and deployed, you should see the following in your console:
server started at http://localhost:8080
Now open your favorite browser and visit http://localhost:8080. Your application can be seen running in Figure 3.
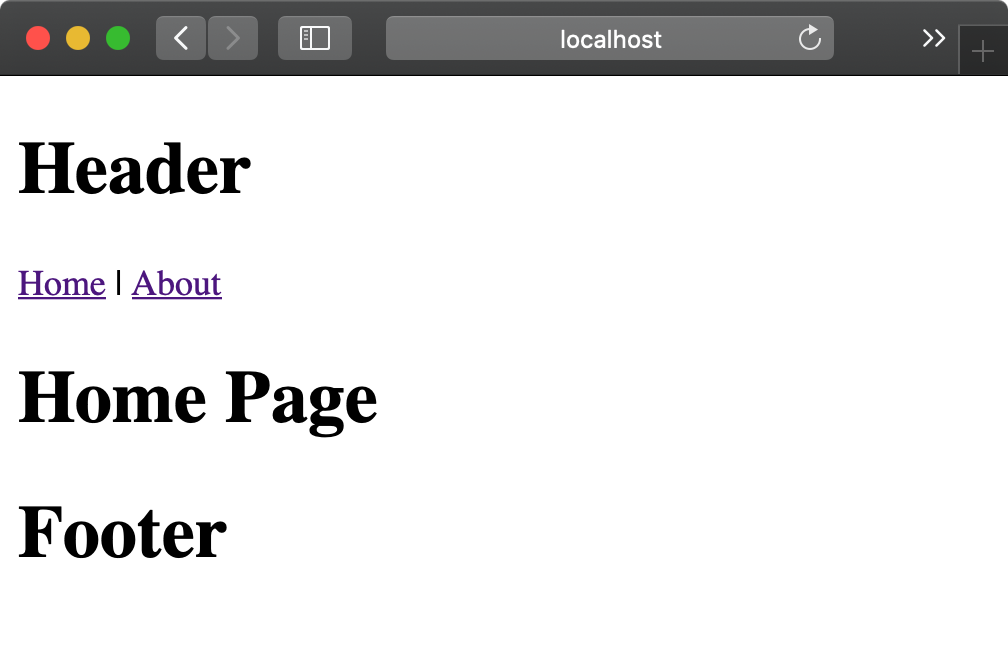
This looks great, but the header and footer are HUGE. Let's make them smaller. As the application is running, edit the src\public\views\partials\header.ejs and footer.ejs files, and change the h1 tag to h4. You'll notice that soon as you save the file, the application rebuilds automatically. Now visit your browser and press F5 to see the changes.
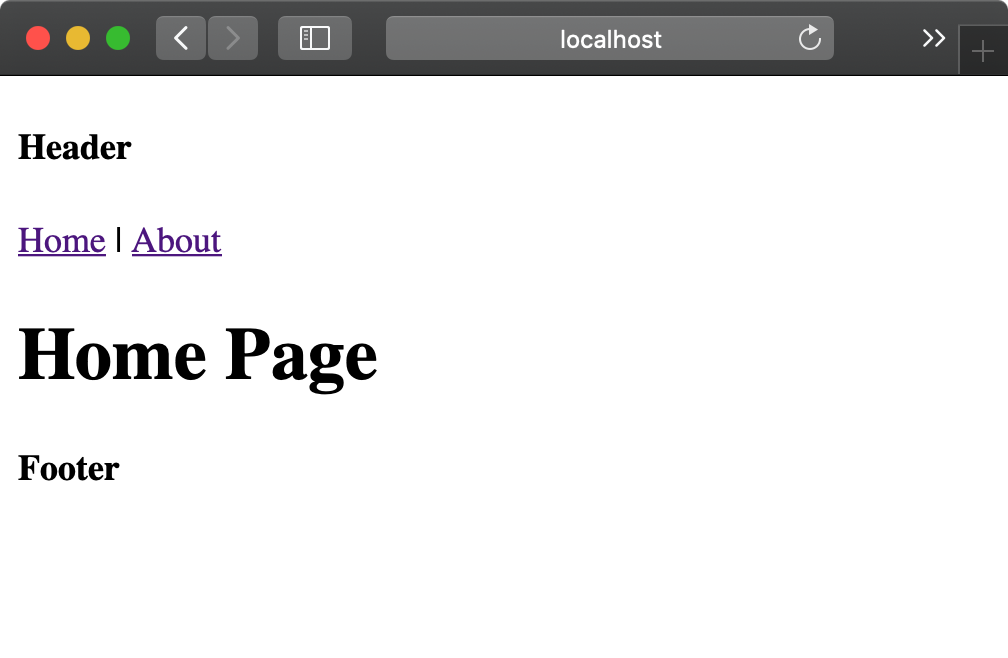
You have a nice REPL (read-eval-print-loop)-based development environment set up.
Summary
In this article, I showed you every bit, corner, and nuance of writing an ExpressJS and TypeScript-based project. Let me just say this: As technology is moving forward very fast, the one thing that suffers is documentation. All of these technologies are amazing, and once you master them all, you are incredibly productive. The issue, of course, is mastering them, because no single article walks you through the very basics, no single article shows you every single step you need to take to get a basic application running.
This can be incredibly frustrating for beginners. And let's be honest. In our industry, all of us are always beginners.
There's plenty more that can be added into this project, of course. For example, can I build a compelling user interface using Bootstrap? Can I add authentication? Can I add something like a browser link, so when my application rebuilds, I don't have to manually press F5 in development mode? How do I deploy this application? Can I easily convert this into a Docker image? And when I convert this into a Docker image, what if the node process crashes in the Docker image? How do I gracefully recover from that? Can I use something like Kubernetes to automatically check the health of my code, and recover gracefully? How do I add APIs into my project? And so much more. All of these concerns are what you will deal with in a real-life project.
I hope to talk about these and many more things while enhancing this project template in my future articles. Until then, happy coding.
