


In this article, we're going to talk about Microsoft Maquette (see https://www.maquette.ms). It's a spatial prototyping tool aimed to help users to mock-up virtual reality (VR) and augmented reality (AR) experiences very fast. This tool is still evolving and is currently in beta.
We briefly talked about this tool in a previous CODE Magazine article (see https://www.codemag.com/article/1903081) But here we're going to formally introduce it and explain how to get started with it. We'll also explain how you can tweak it by using scripting at runtime.
If a picture is worth a thousand words, a prototype is worth a thousand meetings.
–Tom & David Kelley
The target users for Maquette are mainly designers or developers, people who're looking for a fast way to evaluate their ideas in AR and VR without actually building them. Usually a designer creates a mockup in a 2D tool like Photoshop and other UX design tools and then presents it with PowerPoint on a traditional 2D screen. With VR and AR and the addition of the third dimension, these mockups have the potential to deceive the customer in the viability of a product. After getting funding, the designer teams up with a developer, who has to make a serious investment in time and programming to create the experience – often in tools like Unity or Unreal. After the developer invests significant time to implement the design, there are often realizations that the design is faulty now that it's been translated into the VR/AR environment.
Maquette allows creation of a spatial prototype in a context that can be presented in the medium that the experiences are built for. With it, it's possible to iterate early on a UX and learn whether the application is actually useful and fun to use. The intention of Maquette is to help AR and VR developers conceive and refine their concepts and help find the next AR and VR killer application faster without the need to fully implement it first.
Introduction to Microsoft Maquette
The biggest challenge with AR and VR applications is the addition of the third dimension to their experience. Also, the user interface is usually co-located with the actual experience – which leads to lots of interesting interaction problems.
Even though there have been VR and AR headsets available in academics since Douglas Engelbart built the first prototypes in the 1960s, they only became available recently to the masses after the availability of high-resolution displays from mobile phones, new inventions in tracking technology, and access to the power of high-end graphics cards.
One of the biggest challenges is to know whether a given experience is viable and fun to use and also that it solves a given problem. Usually designers use mockup tools to create an impression of a UX experience, and then try to judge whether these mockups should come to life. Historically, tools like Visual Basic or HyperCard were used to this purpose. Framer is a more modern version of such a tool for 2D.
Development of Maquette started in early 2017 after realizing that no such simple tool is available for the VR and AR context. A small team at Microsoft started the inception of the tool, and the first goal was to have a feature set rich enough so that the development of Maquette could be driven by using Maquette itself. A very rudimentary version was available after around three months of work, and since then, the development of the tool has been done by using Maquette itself (kind of like a C-compiler written in C).
Development of Maquette started in early 2017 after realizing that a simple tool was available for VR and AR.
The development process itself is also different from most products: It happens in a so-called cabal setting with no management structure and no formal roadmap of the final product. The team decides which feature will have the biggest impact – design- or business-wise – and implements that, ships it to the customer, listens to feedback, and repeats. This all happens while designers, programmers, and technical artists sit in the same room or are constantly connected through chat applications. This leads to a product that might not have some “basic” features – like a layout system or easy alignment at first – but only has features that are actually used and needed. With that, the team added, refined, and fully realized features as it learned from feedback and as the customers requested. After around nine months, the decision was made to share the internal tool with the general public, so Microsoft Maquette shipped through the Microsoft Store and Steam in October 2018, and through the Oculus Store in July 2020.
The work to introduce scripting and interactivity was handled in a similar fashion. The goal has been to make easy problems in Maquette easy to solve, such that the “Hello World” for interactivity won't require weeks of investment and learning. How to best expose approachable, AR/VR-friendly interactivity and scripting isn't a solved problem and it's hubris to think we can get it perfect up front. So, the team will be introducing the initial functionality in order to learn what works well and then iterate.
In a first iteration, CSCS was used as a scripting solution. We could've bolted in Python, JavaScript, or C#, but that would be at odds with the altitude of problem and customer Maquette is targeting and way more effort than integrating CSCS. Maquette is neither Unity nor Unreal and not trying to be. Not all problems need bare metal access (which becomes a security concern) nor expert programming features. These scripting options can also incur substantial initial and ongoing development efforts to enable integration (e.g., inside Unity) with less control and flexibility for the team to focus on what's currently rough and unsolved – easy creation of interactive content for and in an AR/VR context – which we think is an important missing option.
Our choice of CSCS allowed us to get up and running with a stable and sandboxed scripting facility to enable exploration of how to best integrate scripting and interactivity in Mixed Reality (MR) in a way best suited for mere mortals. Choice of language syntax and semantics and even the specific implementation is among the least of the interesting challenges.
Nevertheless, familiar syntax will reduce learning and friction which is why, at a second step, we decided to bring JavaScript into Maquette instead of CSCS. What are the main reasons for the switch?
There are many developers available with basic JavaScript knowledge. Not only hardcore-programmers, but also Web designers and beginners with basic knowledge can work with it right away. There's no learning curve for the language, but you need to learn how the framework is embedded into the language. JavaScript is standardized through ECMAScript, and there are no surprises as long as the implementation passes the test suite. JavaScript can be much faster than CSCS if the implementation provides a just-in-time compiler (JIT), but that JIT compiler makes the scripting language vulnerable to malicious attacks.
For a JavaScript implementation, we decided to use Jint. Jint was developed by Sebastien Ros, who is currently at Microsoft. Jint is a JavaScript interpreter for .NET, providing full ECMA 5.1 compliance, but doesn't implement a JIT compiler. (See the Jint links in the sidebar.)
We need real-world experiences and feedback, which isn't possible without use and iteration. As we iterate and resolve how this is best done, anticipate that there may be changes as we learn the lessons of what's best for our community and what's most appropriate for long-term product and security needs.
Microsoft Maquette Roadmap
Since the release, the further development is driven by Maquette's customers, and although following a bigger arc, the development team wants the tool moving along. The team listens closely to the feedback of users and tries to build a product to help them to find the next killer application of VR and AR.
It's hard to present a roadmap when the development permanently pivots toward the current needs of the customers, but adding the possibility of interactivity driven by scripting is the next big milestone and will enable better prototypes, because they will be closer to the final experience.
Adding the possibility of interactivity driven by scripting is the next big milestone and will enable better prototypes.
Adding the possibility to create stand-alone Maquette projects that can be shipped by customers independent of Maquette is another big step forward in the future. Other goals are to create a simple sharing and presentation service of Maquette projects and the port to newly available all-in-one headsets like the Oculus Quest. These goals shouldn't be misunderstood as product promises, but rather the aforementioned bigger arcs. Every user can and should chime in at http://aka.ms/maquette-community to drive Maquette toward their needs and wants.
Getting Started with Microsoft Maquette
Microsoft Maquette is currently a Windows application for PC-tethered VR headsets that are compatible with SteamVR. This includes Windows MR, Oculus, and HTC Vive headsets. Because running VR tools takes a lot of system resources, you also need a capable Windows PC or a laptop. Usually the minimum specifications for a SteamVR-compatible PCs are fine.
The download of Maquette alone is not enough, unfortunately: A running SteamVR environment is needed as well as a VR headset with controllers that are set up well and track, which might sometimes be a challenge.
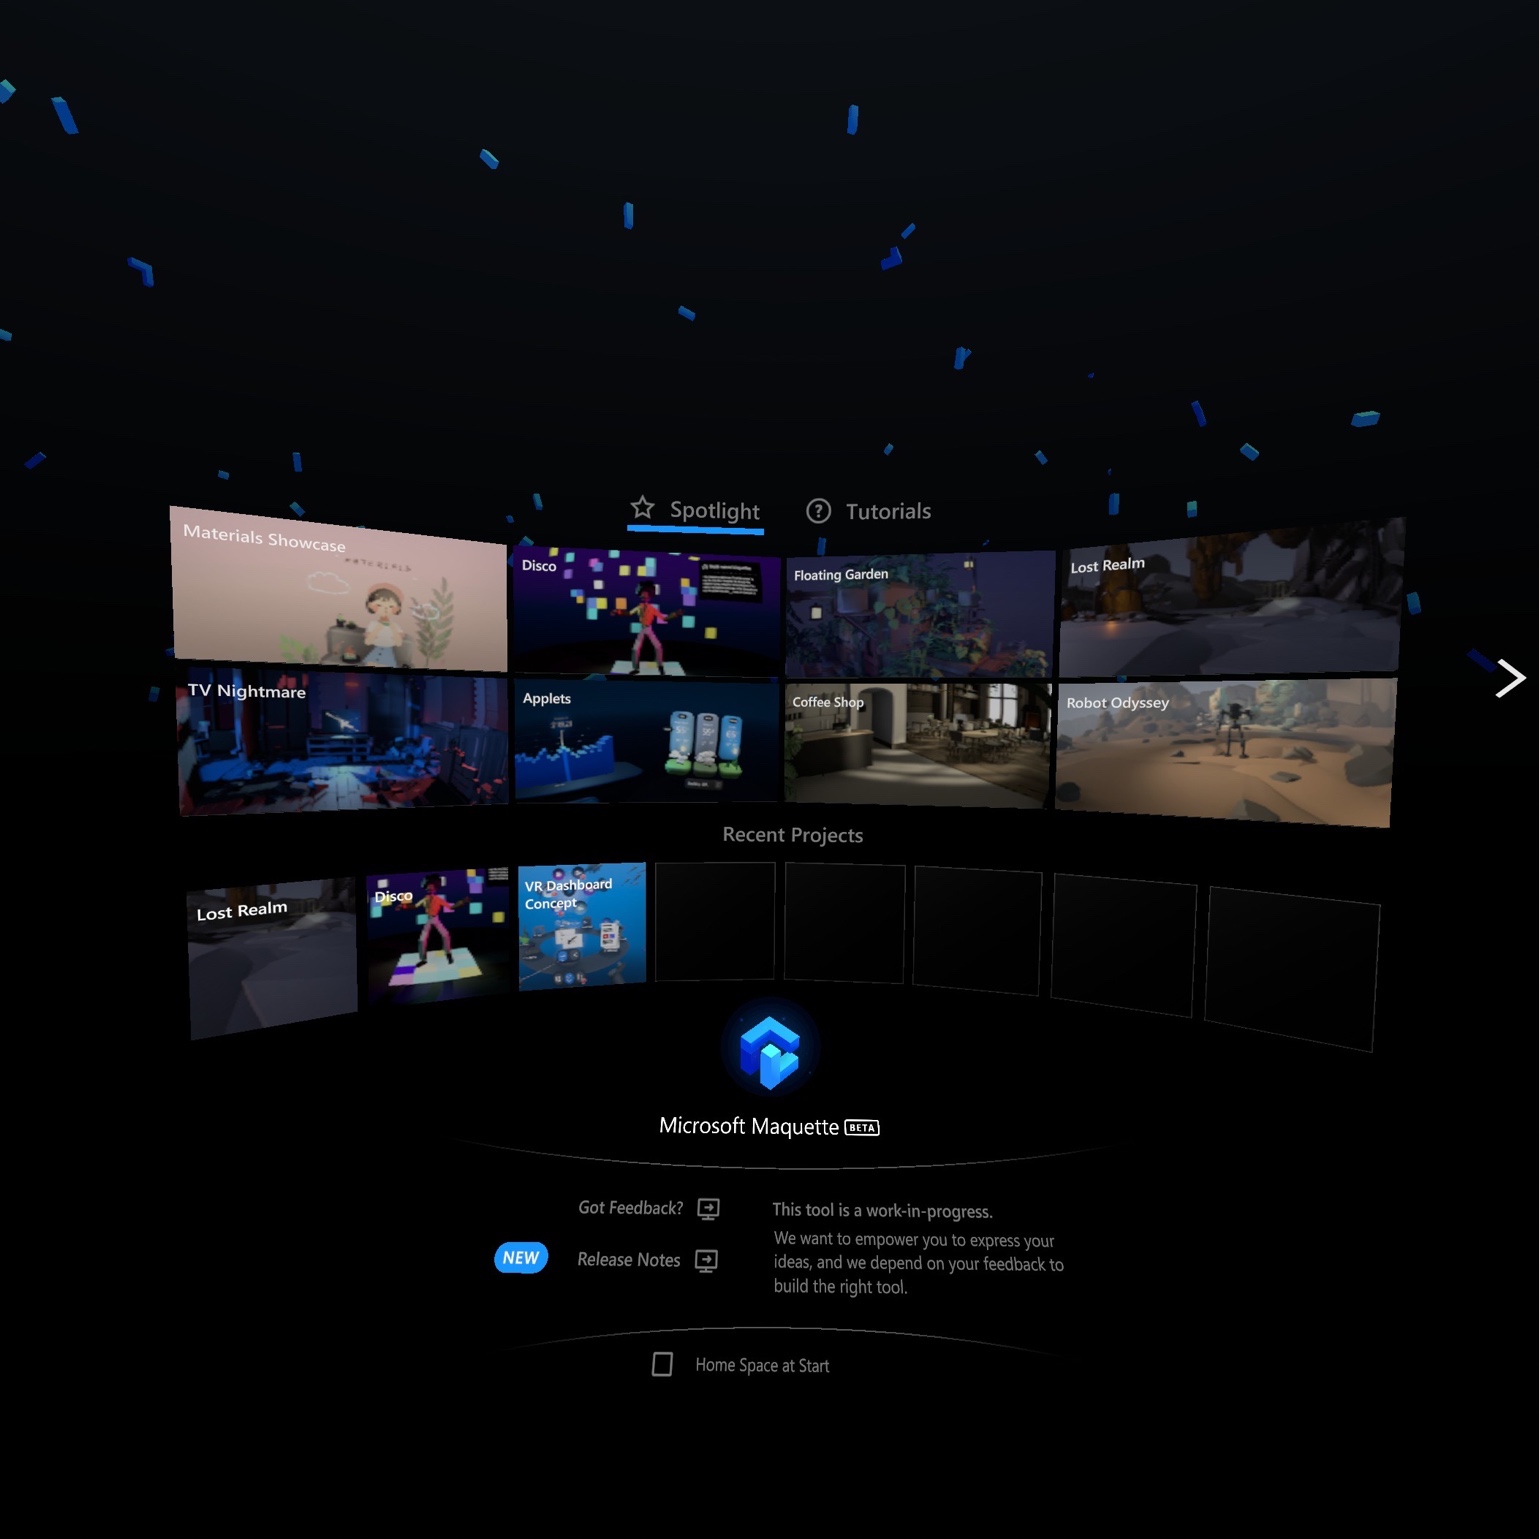
When the users start Maquette, some initial projects and tutorials are presented (see Figure 1), so that they can learn what the tool can do for them and how to do it – these can be seen any time afterward, but the more experienced user can also just skip them. For the first-time user, an interactive tutorial is started where the user learns the basics of the product: how to create and place objects, how to manipulate them, and how to move around in the world.
Creating Your First Object with Maquette
One of the best uses of Maquette is to place objects in a 3D world, and make a sequence of scenes to see how these objects change over time without any form of programming. It's easy to create a cube or other 3D shapes or load models and place them in the world. Figure 2 shows how you can do it using the controllers.
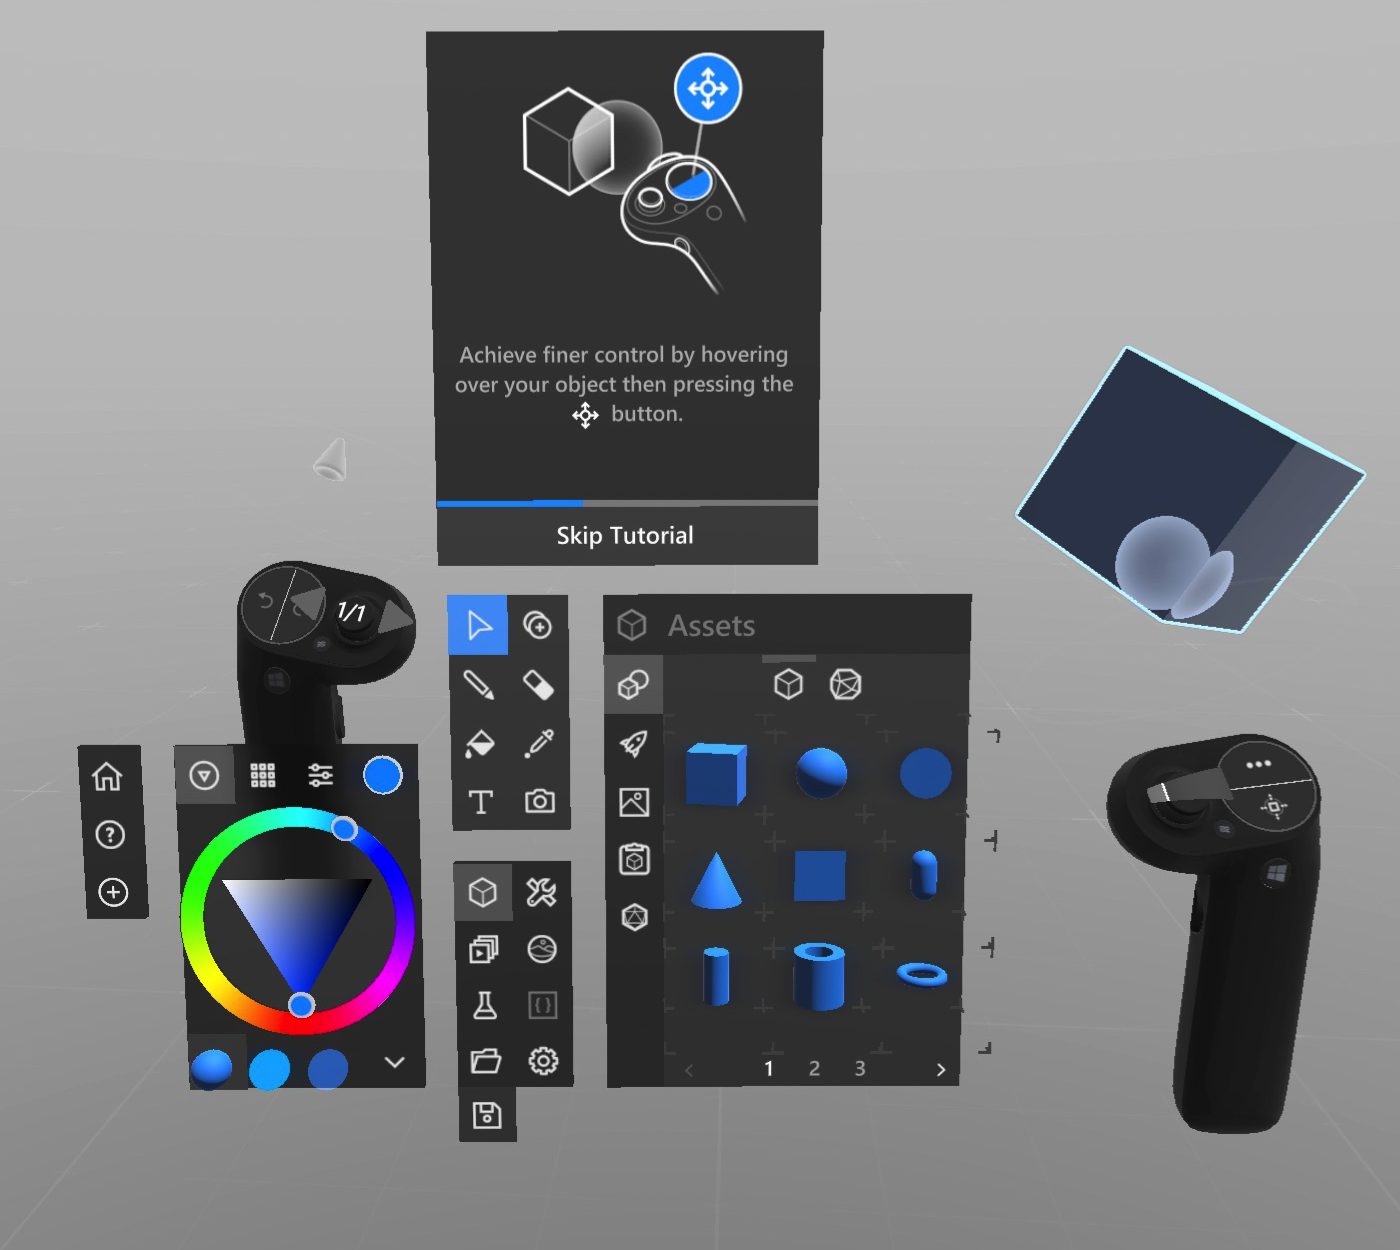
Take a look at a first tutorial (https://www.maquette.ms/tutorial-interacting-with-ui) that explains how to do it in great detail. As you can see in Figure 2, there are many different objects to choose from. After watching the tutorial, you'll see how easy it is to change the object's size, color, shape, etc.
After creating a few objects, you should quickly familiarize yourself with using the controllers and navigating through Maquette with them by leveraging the other tutorials that are readily available.
Microsoft Maquette Scripting
As mentioned above in the history part, CSCS was the first step in developing the Maquette scripting engine. CSCS was envisioned to make it very easy to create simple scripting languages of any kind. It's very flexible with the syntax and every functionality is implemented as a C# method, which gives the implementor very fine-grained and ultimate control about everything. There's no JIT and the script is interpreted every time the script is executed. The programmer has 100% control of what is exposed, and it's really simple to have a sandboxed environment. Only the functions and classes that are explicitly exposed in CSCS are available to the user. This gives the implementor great control over what is visible and what isn't.
CSCS is very easy to extend: If you want to use the words BEGIN and END instead of “{” and “}” (curly brackets), that's doable in under a minute. You can create your own scripting language with your own syntax and semantics in minutes without the need to learn how the parser works. The flexibility can be a burden, but it allows you to just add that one special kind of thing, that a “standardized” language wouldn't allow. Also, the implementation of CSCS is just a couple of files that are easily understood and easy to debug and scrutinize for vulnerability. It's very easy to create a very purposeful and powerful language that's tailored toward the problem where programming space and problem space are very tight and meaningfully coupled. An example could be a special loop construct over vertices or 3D objects.
As mentioned before, the decision was to eventually replace it with JavaScript. Nevertheless, in this section, and later on, we're going to show how we used CSCS to develop the Maquette Scripting Engine in order to give you an idea how you can use it in your own projects, if you value language flexibility and sandboxing more than the speed advantages that you get from the JIT compilation technology. Note that the CSCS and JavaScript syntax, by default, is very similar, so you shouldn't have any problem in porting CSCS examples below to JavaScript, even if there are some differences, they're really minimal.
Note that the screenshots and the described behavior below is from an internal version of Maquette that didn't ship to the general public, but to beta testers. Also, one feedback from the beta testers was to be 100% compatible to JavaScript, and following that feedback was one reason to switch as well.
One of the guiding principles of Maquette was to become some sort of “Visual Basic in 3D” or a “HyperCard in 3D.”
One of the guiding principles of Maquette was to become a “Visual Basic in 3D” or a “HyperCard in 3D.”
One crucial part here is to have a scripting language that can be used with three different main purposes:
- To extend the tool during the edit phase of an experience
- To test the tool
- To create scripted experiences that run in a play mode
For this, an interface between the application itself and a scripting back-end is needed.
Introduction to CSCS Scripting in Maquette
Some usage of CSCS in Maquette was previously described in CODE Magazine – see https://www.codemag.com/article/1903081. Note that even though CSCS is syntactically close to JavaScript, the syntax can be easily changed to whatever makes sense for the current project. Basically, you have complete control of everything and can easily limit what the user can or can't do for the security aspect.
The CSCS syntax can be easily changed to whatever makes sense for the current project.
CSCS can be triggered in different ways.
One way is to trigger scripting from inside of the Maquette, using controllers. Select the icon showing curly braces in a box, which is located in the lower middle section, and then browse to the script file you want to execute – see Figure 3 for details.
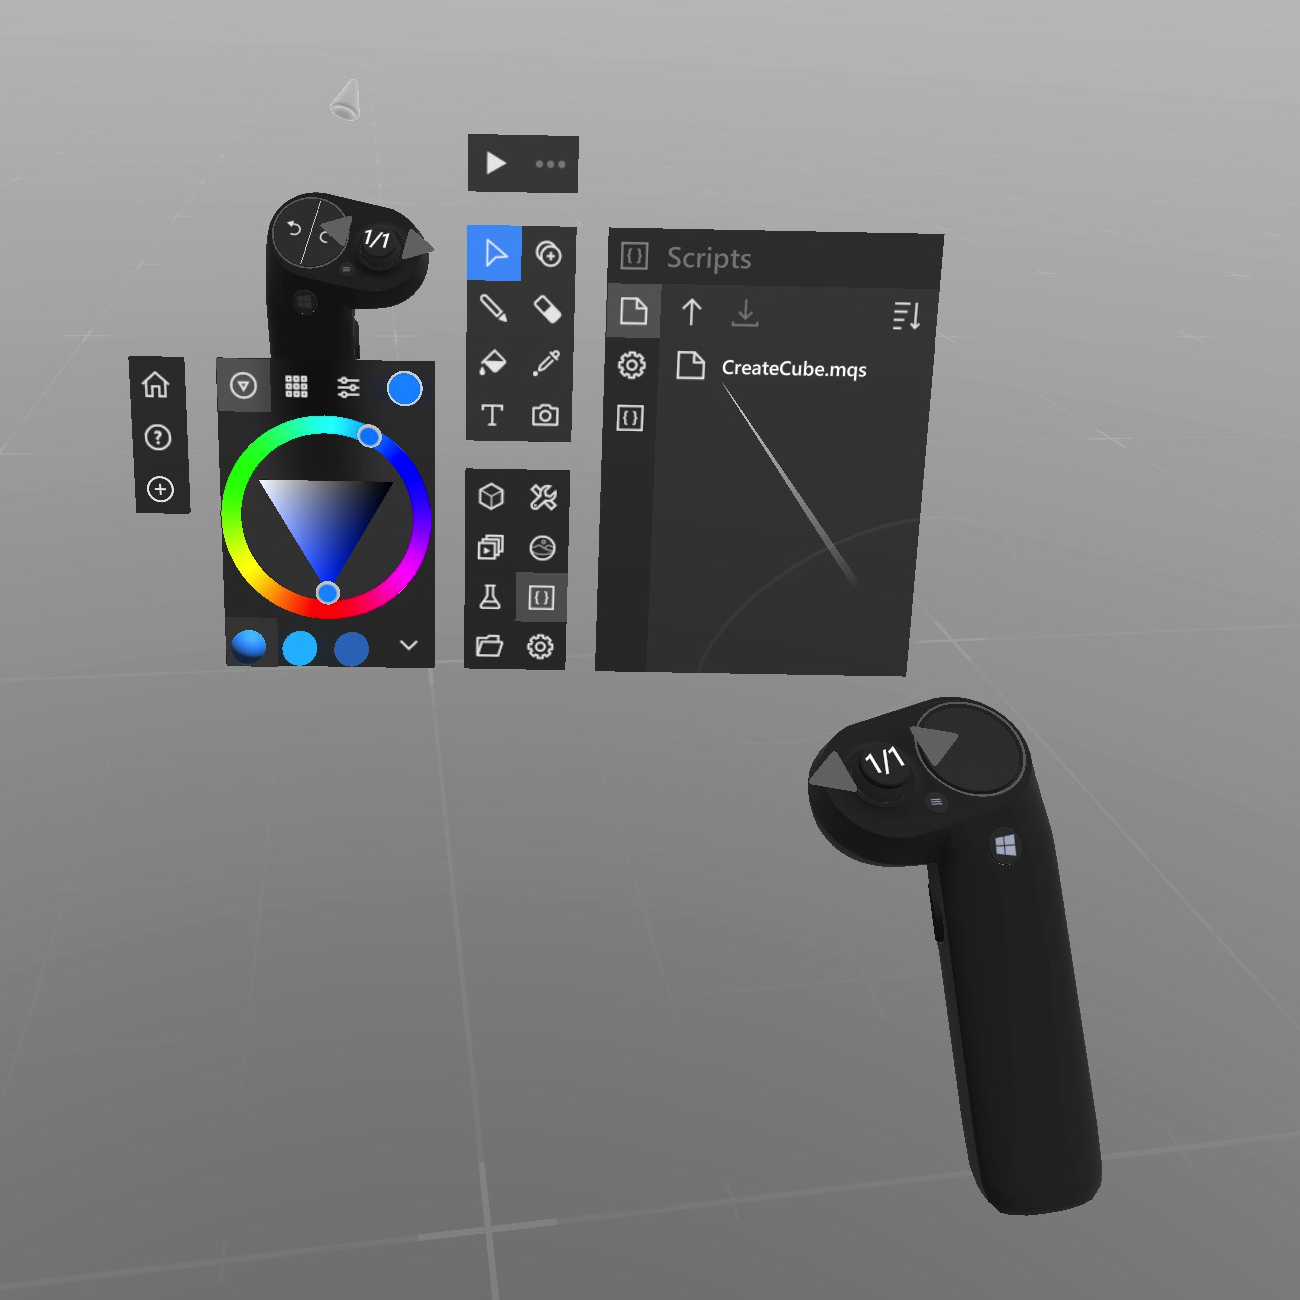
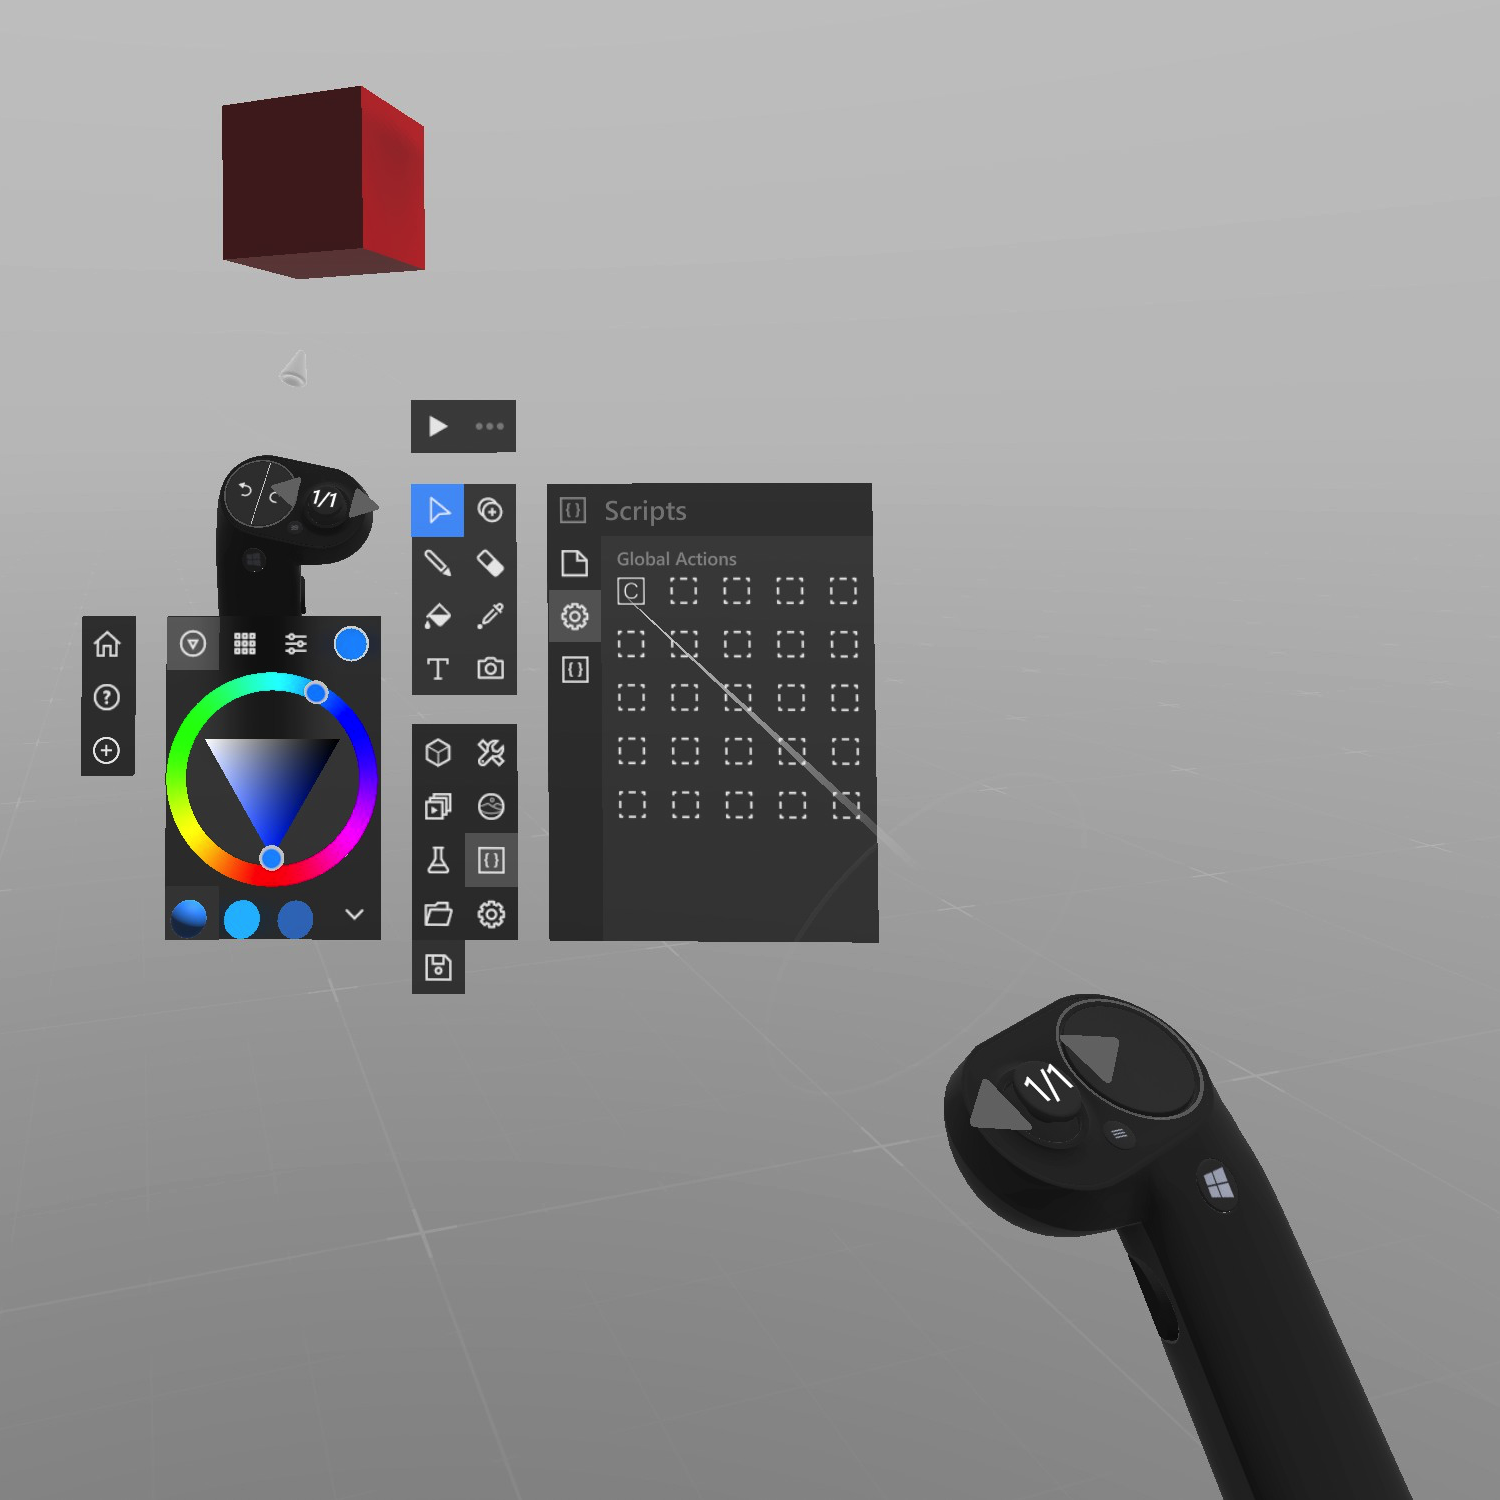
The result of running the CreateCube.mqs script is shown in Figure 4. The contents of CreateCube.mqs file is shown in Listing 1.
Listing 1: Creating Cube in Using CSCS Scripting
function PutInFrontOfUser(object, x, y, r, g, b )
{
    object.position = user.PositionInFront(0.6);
    object.rotation = user.RotationToFace(object);
    object.scale = V3(0.1, 0.1, 0.1);
    object.color = Color(r, g, b);
    object.translate(V3(x, y, 0.0));
    return object;
}

function CreateCubeFromMenu()
{
    myCube = CreateCube();
    PutInFrontOfUser(myCube, -0.4, 0.2, 1.0, 0.0, 0.0);
    return myCube;
}

globalAction.Add( 0, "Create Cube", "<MAQUETTECONTENTSCRIPTS>/Resources/C_512.png", "CreateCubeFromMenu" );
What it does is the creation of a global action. This is accomplished by invoking the globalAction.Add() method which adds the function CreateCubeFromMenu to the panel with the global actions, names that function “Create Cube” and uses the image C_512.png from the Resources-Folder to display an icon (consisting of a letter “C”):
globalAction.Add( 0, "Create Cube", "<MAQUETTECONTENTSCRIPTS>/Resources/C_512.png", "CreateCubeFromMenu");
With this, you can easily extend Maquette's functionality at runtime.
As soon as a new global action is added, it can be triggered as well. After selecting letter C with a controller, effectively CreateCubeFromMenu() function from Listing 1 is invoked and as a result you get a red cube as shown in Figure 4.
The PutInFrontOfUser() function takes any given object and puts it in front of the user with a given angle, distance, and scale:
function PutInFrontOfUser(obj, x, y, r, g, b)
{
  obj.Position = user.PositionInFront(0.6);
  obj.rotation = user.RotationToFace(obj);
  obj.scale = V3(0.1, 0.1, 0.1);
  obj.color = Color(r, g, b);
  obj.translate(V3(x, y, 0.0));
  return obj;
}
The parameters passed to this method, besides the object obj, are x and y object coordinates (you can see inside of this method that the z coordinate is always zero, but feel free to play around with this) and the colors RGB (red, green, blue) parameters. The scale parameter is always set to 0.1 for all coordinates. You can easily play around with different parameters, z-coordinates, scales, transformations, etc.
The CreateCubeFromMenu() function creates a red cube (because (r, g, b) parameters of (1, 0, 0) correspond to the red color).
Creating Multiple Objects
Let's see an example of producing a series of figures. Here is the CSCS code to create n cubes:
function CreateCubes(n) {
  Delta = 1 / n;
  for (i = 0; i < n; i++) {
    cubeObj = new Cube();
    r = 0.1 + i* delta;
    g = 1.0 - i* delta;
    b = 0.9 - i* delta;
    PutInFrontOfUser(cubeObj, -0.2*i, 0.2, r, g, b);
  }
}
CreateCubes(10);
ui.TakeScreenshot("C:/Pics/myscreenshot.jpg");
Inside of the CreateCubes() method, you use a delta parameter in order to gradually change the colors of a cube. This is used in the call to the PutInFrontOfUser() method that we discussed in the previous section.
As you can see, the CSCS syntax is very similar to JavaScript syntax. You might want to ask why the code in the previous section has obj.Position with “Position” starting with an uppercase letter, but obj.rotation is all in lowercase. This is because CSCS is case insensitive (except “core” language constructs, like if-else, for, while, function, class, new, return, break, continue, try, throw, catch, etc.). This is one of its differences with JavaScript, the latter being case-sensitive.
Different from JavaScript, CSCS is case-insensitive, except for a few core language constructs.
The actual creation of cubes is completed in the CreateCubes(10) method call, which creates 10 cubes. After invoking that call, you take a screenshot of whatever you got on the Maquette screen. This is done in the ui.TakeScreenShot() method. The result of creating multiple objects is shown in Figure 5.
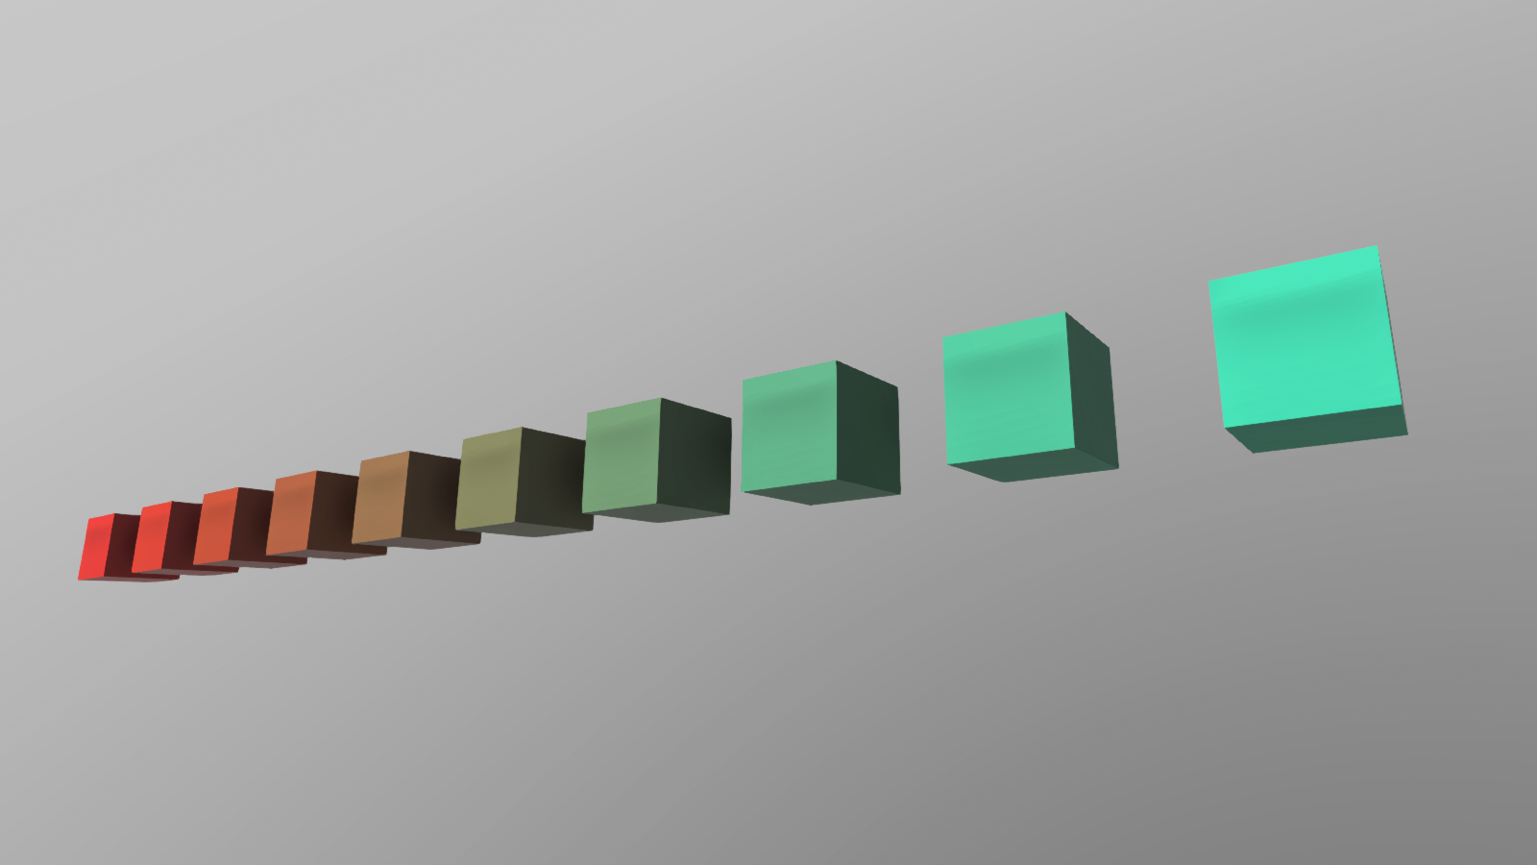
As you can see there, each cube has a slightly different color than its predecessor. This is accomplished via applying the delta parameter to the RGB color parameters that we discussed above. The color changes from light green to red by playing around with the RGBs. This is done by multiplying delta by i in the call to PutInFrontOfUser() method, where i is between 0 and n.
In this example, we used cubes. You can also use one of many other geometrical figures. For example, in place of the cubeObj = new Cube(); statement in the CreateCubes() method above, you can construct any of the following objects below, but there are also other ways to bring objects into Maquette.
capsuleObj  = new Capsule();
circleObj   = new Circle();
coneObj     = new Cone();
cubeObj     = new Cube();
cylinderObj = new Cylinder();
planeObj    = new Plane();
sphereObj   = new Sphere();
torusObj    = new Torus();
tubeObj     = new Tube();
Debugging Maquette with Visual Studio Code
There is another way of invoking scripting: You can also debug scripting using Visual Studio Code. This is quite easy to do. You download Visual Studio Code (unless you have already done it), get the free CSCS Visual Studio Code Extension from the Marketplace (see links in the sidebar) and you're all set! Now you can start executing CSCS scripting commands by selecting the code to execute and pressing Ctrl-8.
Download VS Code, get the free CSCS Extension from the Marketplace, and you can start modifying your Maquette project on-the-fly by selecting the code and pressing Ctrl-8.
Basically, you can use this extension for the following types of debugging:
- Debugging the whole file. You can set breakpoints, step into the code, inspect the variable values and watch them.
- Select a part of the code to be executed and press Ctrl-8. This sends only the selected code for execution. If nothing is selected, the current line is sent for execution. This is the so called REPL (Read Eval Print Loop) mode of execution.
- You can also start a new REPL command-line shell in Visual Studio Code by pressing Ctrl-7 from any editor Window. Then you can just start typing different command on the shell.
Figure 6 shows a sample session when the user typed the help command. Note that in order to call the next (or previous) command from the command history, you type Ctrl-K (Ctrl-I) on Windows and ⌘-K (⌘-I) on a Mac. This is because just pressing up and down arrows moves the cursor inside the editing area.
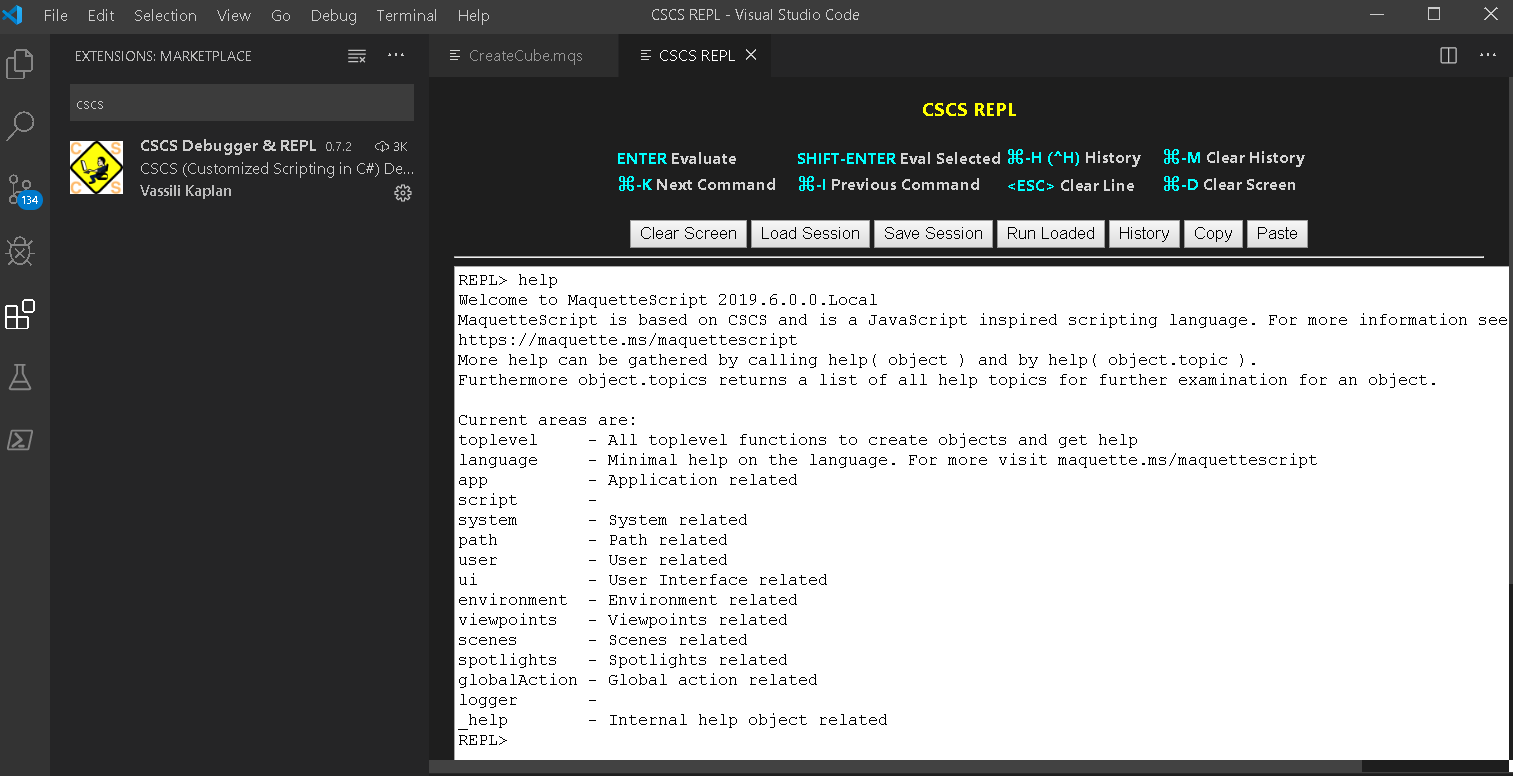
Note that the first two options of using CSCS Visual Studio Code Extension were previously discussed in the March/April 2019 issue of CODE Magazine.
Scripting Extensions
Maquette scripting has a few special objects with their own implementation. Some examples of such objects are: app, environment, globalAction, help, log, object, scene, system, ui, user, viewpoint, and some others. These objects provide some Maquette related functionality in an object-oriented way.
For example, in the code snippet in the previous section, we used the CSCS ui.TakeScreenshot("C:/Pics/myscreenshot.jpg") call to create a screenshot of whatever the user is seeing in Maquette and save it into a given file.
The UI object is responsible for different user interface parameters. It has some very useful methods with self-explanatory names, like ui.SceneMenu(), ui.SetResolution(), ui.ShowTooltips(), and many others. You can get the full list through the scripting help command.
The Log objects helps printing various info or debug messages. Some of its methods are: log.Debug(), log.Info(), and log.Error().
There's also the User object, which has methods related to the position of the user inside Maquette. Some of the methods on that object are: user.PositionInFront(), user.RotationToFace(), user.Scale(), user.Position(), user.Rotation(), user.Forward(), and a few others.
The Viewpoint object is responsible for Maquette Viewpoints. Some of the useful methods and properties on that object are: viewpoint.GotoNext(), viewpoint.GotoLast(), viewpoint.Add(), viewpoint.Remove(), viewpoint.Count, and others.
The System object is responsible for some auxiliary functionality that might be useful to the user, for example: system.OpenExplorer(), system.OpenURL(), system.GetRandomInInterval(), and some others.
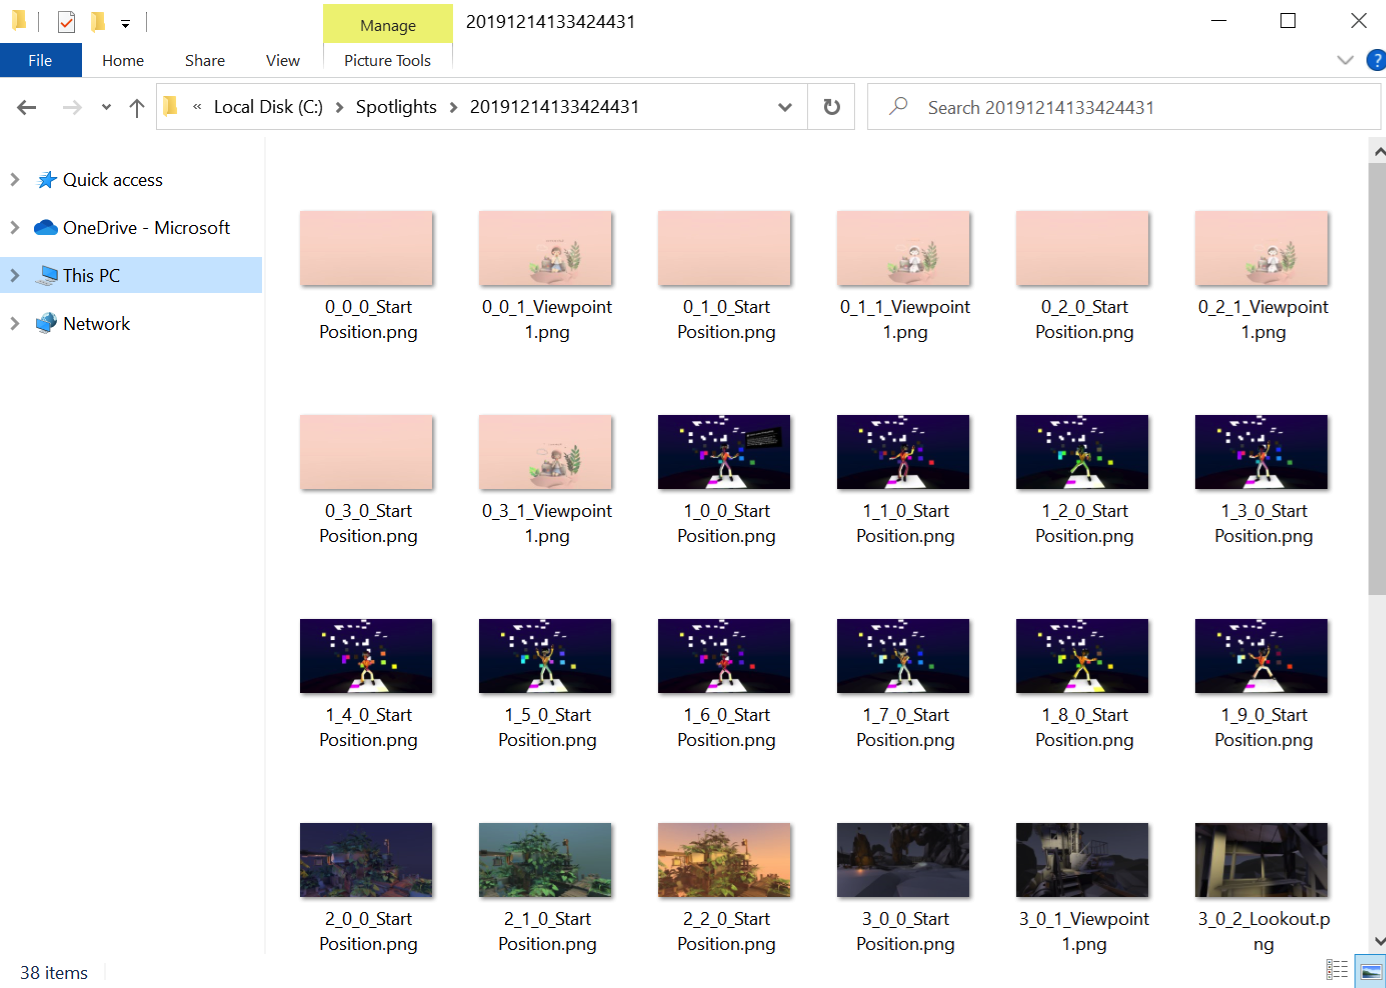
Taking Screenshots from All Spotlights Example
Microsoft Maquette ships with over 20 spotlights that present you with what can be done with the tool. All of these spotlights contain multiple scenes and every scene can have one or multiple viewpoints. A viewpoint is a place that can be visited through a menu and can be a vantage point into the 3D world created.
Let's see an example of navigating through all of the existing spotlights and taking a screen shot from each scene at every viewpoint. The scripting code performing this task is shown in Listing 2. The result of collecting all of the screenshots is shown in Figure 7.
Listing 2: Taking Screenshots of All Spotlights Using CSCS Scripting
function TakeScreenshotsOfAllSpotlights()
{
  viewpoints.Visible = false;
  timestampString = system.UniqueTimestamp();
  nSpotlightMax = spotlights.Count;
  for (spotlightCounter = 0; spotlightCounter < nSpotlightMax; spotlightCounter++) {
    currentName = spotlights.Name(spotlightCounter);
    myDir = "c:/Spotlights/" + timestampString + "/";
    spotlights.Load(spotlightCounter);

    for (sceneCounter = 0; sceneCounter < scenes.Count(); sceneCounter++) {
      scenes.Current = sceneCounter;
      for (viewpointCounter = 0; viewpointCounter < viewpoints.Count(); viewpointCounter++) {
        v = viewpoints.Get(viewpointCounter);
        viewpoints.Goto(viewpointCounter);
        app.WaitForFrame();
        ui.TakeScreenshot(myDir + "" + spotlightCounter + "_" + sceneCounter + "_" + viewpointCounter + "_" + v.name + ".png");
      }
    }
  }
}

TakeScreenshotsOfAllSpotlights();
system.OpenExplorer( "c:/Spotlights/", true );
As you can see in Listing 2, the function TakeScreenshotsOfAllSpotlights() iterates through all available spotlights, opens all scenes, and visits all viewpoints per scene. It then waits for the redraw of the scene to happen with app.WaitForFrame() call, and then takes a screenshot. The call to system.OpenExplorer() is an example how scripting can also interact with the system and open a folder in Windows Explorer.
When going over the scenes, you activate a current scene via the following invocation:
scenes.Current = sceneCounter;
Note that each screenshot filename contains the viewpoint name, which you can see in Figure 7.
Wrapping Up
Microsoft Maquette is a tool designed to facilitate spatial prototyping and address a few existing problems in AR and VR today. One of the first steps to getting started with Maquette is watching video tutorials at https://www.maquette.ms/tutorials. They contain a few examples on how to get started and move into some more advanced topics.
Once you get more familiar with Maquette, navigating inside and creating new scenes and objects, you can start using Maquette scripting for more advanced usages, like prototyping of common scenes, testing, or changing the contents of a scene at runtime on the fly.
We're looking forward to your feedback: what you can create with Maquette, or what other features in Maquette and scripting you would like to see.
Special thanks to Dan Newell, Jia Wang, Dan Corrigan, Ricardo Acosta, and Tong Chen for proofreading and suggestions.
