


In a recent CODE Magazine article (Discovering AWS for .NET Developers, May/June 2020 https://www.codemag.com/Article/2005041), you read about my first foray into using .NET in the Amazon Web Services (AWS) ecosystem. I explored the AWS Relational Database Service (RDS) and created an ASP.NET Core API using Entity Framework Core (EF Core) to connect to a SQL Server Express database hosted in RDS. In the end, I deployed my API to run on AWS Elastic Beanstalk with my database credentials stored securely in Amazon's Parameter Store to continue interacting with that same database.
Interacting with the database was a great first step for me and hopefully for readers as well. And it gave me enough comfort with AWS to set my sights on their serverless offering, AWS Lambda Functions. Some of the most critical differences between hosting a full application in the cloud and rendering your logic as functions are:
- Rather than paying for an application that's constantly running and available, you only pay for individual requests to a function. In fact, the first one million requests each month are free along with a generous amount of compute time. (Details at aws.amazon.com/Lambda/pricing)
- Serverless functions are also stateless, meaning that you can run many instances of the same function without worrying about conflicting state across those instances.
- Most of the management of serverless functions is taken care of by the function host, leaving you to focus on the logic you care about.
In this article, I'll evolve the ASP.NET Core API from the previous article to a Serverless Application Model (SAM) application which is a form of Lambda function.
Moving an Existing ASP.NET Core API to a Serverless App
This was such an interesting journey. And an educational one. Amazon has created what I'll refer to as a lot of “shims” to seamlessly host an ASP.NET Core API behind a Lambda function. The beauty of this is that you can write an ASP.NET Core API using the skills you already have and AWS's logic will provide a bridge that runs each controller method as needed. That way, you get the benefits of serverless functions such as the on-demand billing but continue to build APIs the way you already know how. It took a bit of time (and some repeated explanations and reading) to wrap my head around this. I hope this article provides a quicker learning path for you.
If you installed the AWS Toolkit for Visual Studio as per the previous article, then you already have the project template needed to create the basis for the new API. I'll start by creating a new project using the template and then copy the classes and some code from the existing API into the new project. The project template contains part of the “bridge” I just referred to, and it also has logic that calls into some additional tooling in AWS that provides more of the bridging. Although I do think it's important to have some understanding about how your tools work, there's a point where it's okay to say “okay, it just works.”
Let's walk through the steps that I performed to transform my API. While this article is lengthy, most of the details are here to provide a deeper understanding of the choices I've made and how things are working. But the actual steps are not that many. If you want to follow along, I've included the previous solution in the downloads for this article.
Creating the New Project
Start by creating a new project and in the template finder, filter on AWS and C#. This gives you four templates and the one to choose is AWS Serverless Application (.NET Core—C#). After naming the new project, you'll get a chance to choose a “Blueprint”, i.e., a sample template for a particular type of app. From the available blueprint options, choose ASP.NET Core Web API. This is the template that includes the plumbing to ensure that your controller methods can be run behind a Lambda function. The project that's generated (shown in Figure 1) looks similar to the one created by the ASP.NET Core Web API template with a few exceptions.
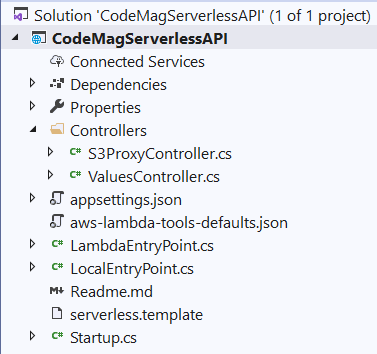
- One exception is the introduction of the S3ProxyController. This is just a sample controller that I'll remove from my project. I'm keeping the values controller so that I can validate my API if needed.
- Another is the aws-Lambda-tools-defaults.json file. This file holds settings used for publishing whether you are doing so via the tooling or at the command line using AWS' dotnet CLI extensions.
- LambdaEntryPoint.cs replaces program.cs for the deployed application.
- LocalEntryPoint.cs replaces program.cs for running or debugging locally.
- The serverless.template contains configuration information for the deploying the application. Specifically, this uses the AWS SAM specification, which is an AWS CloudFormation extension used for serverless applications.
Copying Assets from the Original API
Before looking at the Lambda-specific files, let's pull in the logic from the original API. In the downloads that accompany this article, you'll find a BEFORE folder that contains the solution from the previous article.
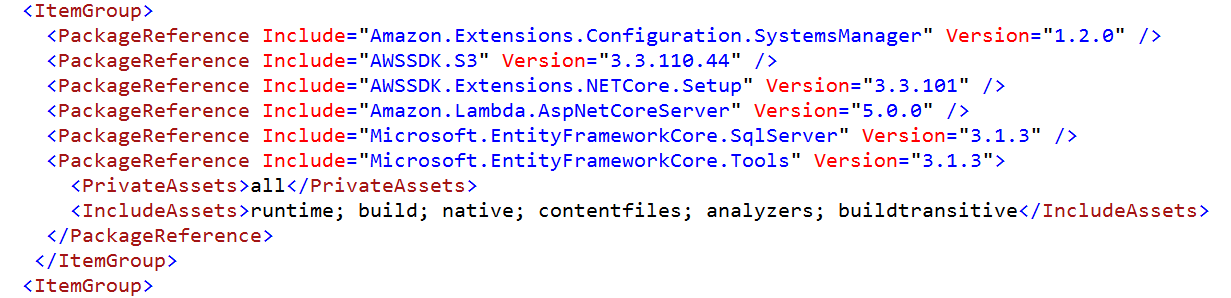
First, you'll need to add the NuGet references for the EF Core packages (SqlServer and Tools for migrations) as well as the SystemsManager extension you used for the deployed API to read the secured parameters stored in AWS. You can see the packages in the csproj file shown in Figure 2.
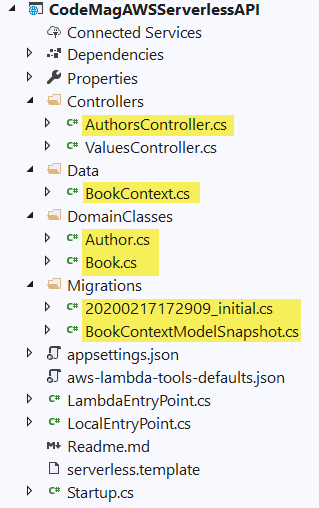
Next, I'll copy files from the previous application into the project and remove the S3ProxyController file. The files I copied in, highlighted in Figure 3, are the AuthorsController, the BookContext, the Author and Book classes, and the contents of the Migrations folder. As a reminder, the AuthorsController was originally created using the controller template that generates actions using Entity Framework.
Note that in the previous article, I created a SQL Server database instance in Amazon's RDS, let EF Core migrations create the database and tables, and then manually added some data via SQL Server Object Explorer. The “Before” solution that comes with this article has two changes related to the data. Its BookContext class now includes HasData methods to seed some data into the Authors and Books tables. Also, there is a second migration file, seeddata, that has the logic to insert the seed data defined in the BookContext. If you don't have the database yet, you'll be able to use the update-database migrations command to create the database and its seed data in your database instance. But you will have to create the database instance in advance.
The new Startup class has some extra logic to interact with an AWS S3 Proxy, which is then used by the S3ProxyController that you just deleted. Because you don't need that, it's safe to completely replace this startup.cs file with the one from the original solution instead of copying various pieces of that file. Most important in there is the logic to build a connection string by combining details you'll add in shortly. The final bit of that logic attaches the concatenated connection string to the DbContext dependency injection configuration with this code:
services.AddDbContext<BookContext> (options => options.UseSqlServer(connection));
My startup class (and the others) from the earlier project has the namespace, CodeMagEFCoreAPI. My new project's namespace is different. Therefore, I needed to add
using CodeMagEFCoreAPI;
Add this using statement to both the LambdaEntryPoint and LocalEntryPoint classes. The compiler will remind you about this.
The next assets you need from the earlier solution are the connection string and its credentials.
The connection string to the database goes into appsettings.json, to be read by the startup class code that builds the connection string. My setting looks like this, although I've hidden my server name:
"ConnectionStrings": {
  "BooksConnection":
   "Server=codemagmicro.***.us-east-2.rds.amazonaws.com,1433;
    Database=BookDatabase"
}
Keep in mind that JSON doesn't like wrapped lines. They are only wrapped here for the sake of this article's formatting. Also don't forget that very important comma to separate the Logging section from the ConnectionStrings section. I can attest to how easy it is to make that mistake.
The ASP.NET Core Secret Manager will supply the DbPassword and DbUser values for the connection string at design time but won't get stored into the project, which means that you don't have to worry about accidentally deploying them. As a reminder, right-click on the project in Solution Explorer, choose Manage User Secrets, which will open a json file for the secrets. Add your secret credentials into this file, for example:
{
  "DbPassword": "myfancypassword",
  "DbUser": "myusername"
}
These values will be available to the Configuration API. With all of this in place, I'm now able to run the new API locally on my computer—hosted by .NET's Kestrel server—by choosing the project name in the Debug Toolbar. The apps read the password and user ID from the ASP.NET secrets and with those, are able to interact with my AWS hosted database.

Running Locally Isn't Using Any Lambda Logic
At this point, Visual Studio isn't doing anything more than running the API in the same way as it would for an ASP.NET Core API, ignoring all of the Lambda-specific logic added by the template. The new API runs locally and the puzzle pieces are in place for this application to run as a Lambda function, but they aren't being used yet.
So far, you're seeing that your existing skills for building ASP.NET Core apps remain 100% relevant, even for testing and debugging your apps. You don't have to worry about issues related to the Lambda function getting in the way of building and debugging the app. All of that logic stays out of your way for this part of the application building. That's because the project knows to run locally from the LocalEntryPoint class, which avoids all of the Lambda infrastructure. Other than the class name, LocalEntryPoint.cs is exactly the same as program.cs in a typical ASP.NET Core API project. And by default, the debugger will start by calling its Main method.
Understanding How Your API Will Transform into a Lambda Function
With my API now running successfully, it's time to trigger the special logic included in the template to run all of this as a Lambda function.
I think it's important to understand some of the “magic” that is happening for this scenario. Of course, it's not magic. It's some very clever architecture on the part of the AWS Lambda team. Keep in mind that the biggest difference between running the API as a regular Web application and running it as a serverless application is that the Web application is always running and consuming resources, whereas the serverless application is a Lambda function that acts as a wrapper to your controller methods. And by running on demand, that means you are only paying for the resources used in the moments that function is running, not while it's sitting around waiting for a request to come in.
When the app is deployed (using some of the special assets added by the template) it doesn't just push your application to the cloud, it builds a full Lambda function infrastructure. Because this function is meant to be accessed through HTTP, it's shielded by an API Gateway—the default—but you have the option to switch to an Application Load Balancer instead. Unlike a regular ASP.NET Core API, the controller methods aren't exposed directly through URIs (or routing). A Lambda function wraps your controllers and runs only on demand when something calls your API. If nothing calls, nothing is running.
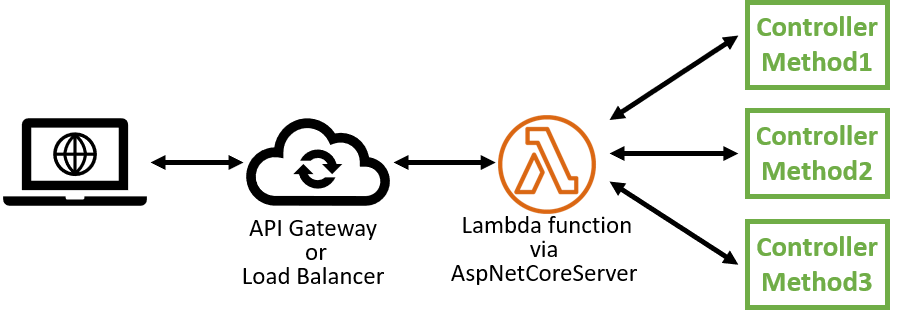
What's in between the gateway and your controller is the Amazon.Lambda.AspNetCoreServer, which contains its own Lambda function that translates the API Gateway request into an ASP.NET Core request. The requests to that Lambda function are all that you pay for in this setup, not the controller activity; that is, after the monthly free allocation. There's more to how this works but for the purposes of this article, this should be enough to have a high-level understanding of what appears to be magic.
Engaging the SAM and Lambda Logic in Your API
So now let's take a look at some of the assets shown in Figure 1 that were created by the template. Your friend here is the Readme markdown file included in the project. It gives some insight into the assets and I will highlight some of the relevant descriptions here for you:
- serverless.template: an AWS CloudFormation Serverless Application Model template file for declaring your Serverless functions and other AWS resources
- aws-Lambda-tools-defaults.json: default argument settings for use with Visual Studio and command line deployment tools for AWS
- LambdaEntryPoint.cs: class that derives from Amazon.Lambda.AspNetCoreServer.APIGatewayProxyFunction. The code in this file bootstraps the ASP.NET Core hosting framework. The Lambda function is defined in the base class. When you ran the app locally, it started with the LocalEntryPoint class. When you run this within the Lambda service in the cloud, this LambdaEntryPoint is what will be used.
In addition to the Using statement mentioned above, there is one more change to make in the LambdaEntryPoint class. If you read the earlier article, you may recall that there was also a lesson in there on storing the database UserId and password as secured parameters in AWS. I was able to leverage the SystemsManager extension to read from AWS Systems Manager where the parameters are stored. You'll need to ensure that the deployed app can do that by adding the following builder.ConfigureAppConfiguration code into the Init method of the LambdaEntryPoint class. This will also require a Using statement for Microsoft.Extensions.Configuration.
protected override void Init (IWebHostBuilder builder)
{
  builder.ConfigureAppConfiguration((c, b) => b.AddSystemsManager("/codemagapi"));
  builder.UseStartup<Startup>();
}
In the serverless.template file, you also need to make a simple change to the policies controlling what the function can access, so that it can read the parameters.
By default, AWS' AWSLambdaFullAccess policy is defined directly in the serverless.template without using roles. You can see this in the Properties section of the AspNetCoreFunction resource in the file:
"Role": null,
"Policies": [
    "AWSLambdaFullAccess
],
You just need to add two more policies, AmazonSSMReadOnlyAccess and AWSLambdaVPCAccessExecutionRole. The Role property is not needed at all, so I removed it.
"Policies": [
    "AWSLambdaFullAccess",
    "AmazonSSMReadOnlyAccess",
    "AWSLambdaVPCAccessExecutionRole"
],
The SSM policy gives the deployed function permission to access the parameters in the Systems Manager. The VPCAccess policy gives the function permission to wire up a connection to the VPC that's hosting the database. I'll point out when this comes into play after deploying the function.
There is some more cleanup you can do in the serverless template. Many settings in there are related to the S3Proxy controller that you deleted. You can delete the related sections.
The sections you can delete, starting from the top are:
- Parameters
- Conditions
- the Environment section within Resources:AspNetCoreFunction
- Bucket within Resources
- S3ProxyBucket within Outputs
Take care to get correct start and end points when deleting sections from this JSON file, including commas.
A related setting in appsettings.json is the AppS3Bucket property. You can delete that as well.
Deploying the Serverless Application
Although you can run the non-Lambda version of the app locally as I did earlier, you can't just install the Lambda service on your computer to check out how it works with the infrastructure. You need to deploy the application to AWS. This is a simple task, thanks again to the toolkit. Let's walk through that process.
The aws-Lambda-tools-default.json file contains configuration information for publishing the function. In fact, the file also has configuration information for creating the S3 Proxy used by the controller which we have now deleted. Deleting the “template-parameters” property from the file will clear that extraneous information.
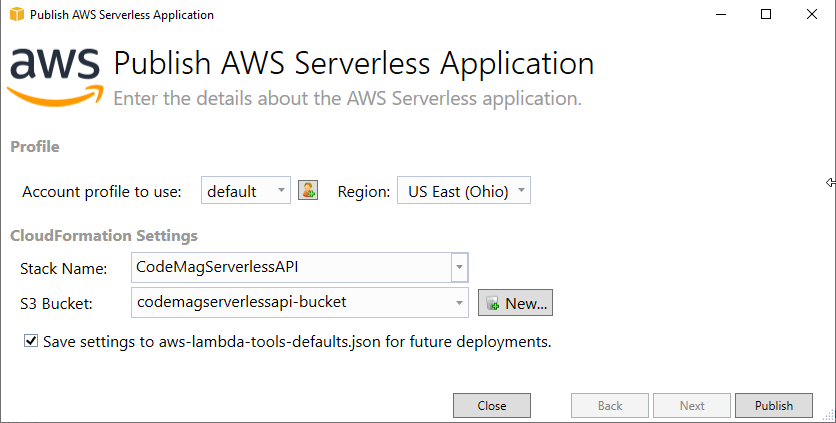
The context menu for the serverless project has the option: "Publish to AWS Lambda…". This triggers a form to open where you can specify settings for your deployed application. The profile and region are pre-populated using your AWS Explorer settings.
You'll need to name the CloudFormation stack and bucket for the deployment. All of the resources for your application will be bundled up into a single unit and managed by CloudFormation. This is what is the stack refers to. The S3 bucket (different from the S3 Proxy used by the deleted controller) will store the application's compiled code for your function. Any existing buckets in your account are listed in the drop-down, and you can create a new one with the New button. Note that bucket names must be all lower case. Also note that if you selected an existing bucket, it needs to be one that's in the same region as the one where you're deploying the Lambda function. My settings are shown in Figure 6.
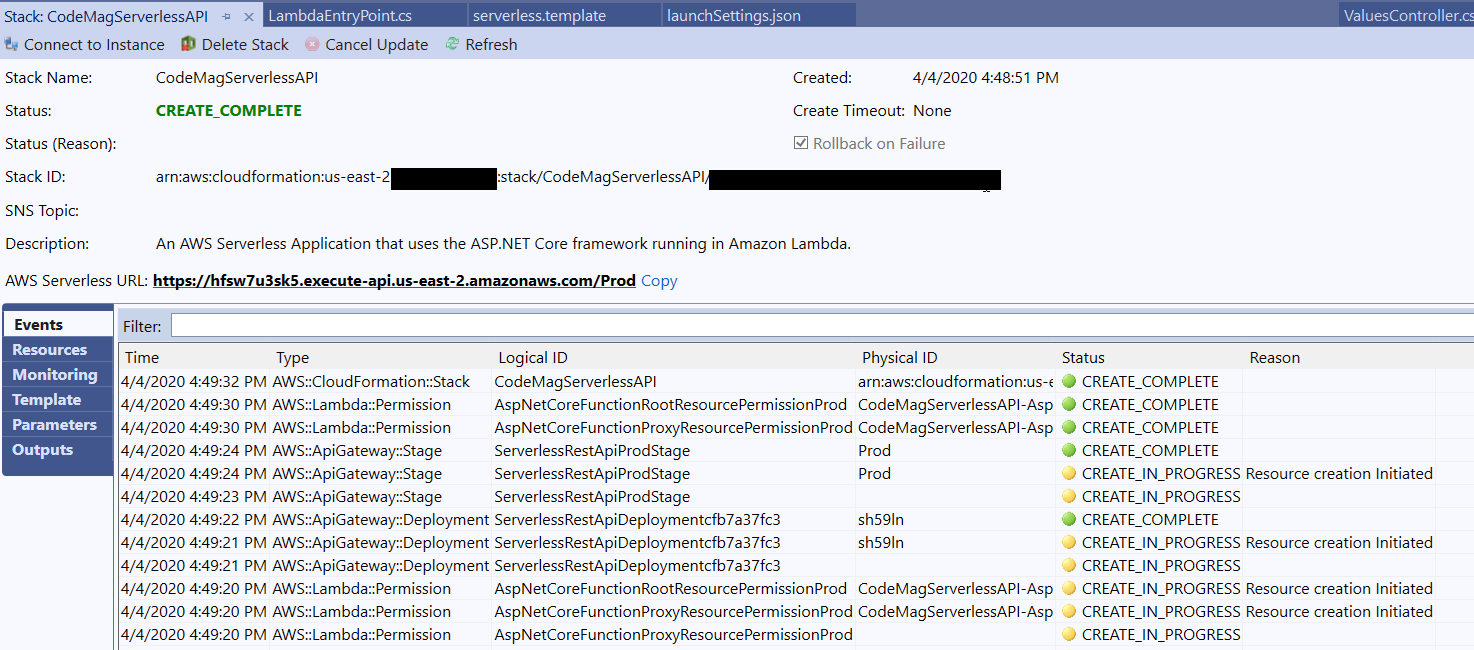
Now you're ready to publish the application, so just click Publish. You'll immediately start to see log information about the steps being taken to build and push the application to the cloud. After that, a log is displayed showing what's happening in the cloud to create all of the infrastructure to run the application. When it's all done, the status shows CREATE_COMPLETE and the final logs indicate the same. (Figure 7).
The URL of the application is shown on the form. Mine is https://hfsw7u3sk5.execute-api.us-east-2.amazonaws.com/Prod.
Sending a request to the values controller will succeed, in my case at https://hfsw7u3sk5.execute-api.us-east-2.amazonaws.com/Prod/api/values, but the authors controller will fail with a timeout. That's because you have a bit more security configuration to perform on the newly deployed function.
Let's first look in the portal to see what was created and then address the last bits of security for the authors controller in the AWS cloud to access the authors data in the database.
Examining What Got Created in the Cloud
If you refresh the AWS Lambda node in the AWS Explorer, you should see your new function app listed. Its name will start with the CloudFormation stack you specified in the publish wizard, concatenated with “AspNetCoreFunction” and a randomly generated string. You can update some of the function's configuration, look at logs, and more. You might notice the Mock Lambda Test Tool in the toolkit. But this is not for debugging the cloud-based Lambda from Visual Studio. It's for performing an advanced form of testing to debug problems in the deployed function. You can learn more about that tool here: Mock Lambda Test Tool. I'll come back to the configuration page shortly.
When learning I like to also see the function in the portal. It feels more real and more interesting to me. Here's how to do that.
Log into the portal and be sure to set your view to the region where you published the function. Select Lambda by dropping down the Services menu at the top. From the AWS Lambda dashboard, select the Functions view. Here, you'll see the same list of Lambda functions in your account, filtered by whatever region is selected at the top of the browser page.
Click on the function to open its configuration page. At the top, there's a note that the function belongs to an application with a link to see some information about the application: the API endpoint and a view of the various resources (your Lambda Function, an IAM role associated with the function, and the API gateway). There are other details to explore in the application view, such as a log of deployments and monitoring.
Back in the function's overview page, the first section shows a visual representation of the function with an API gateway block and the function itself. Click on the API gateway to see the two REST endpoints that were created: one with a proxy and one without. Next, click on the block for the function and you'll notice that the display below changes. If your app was using a scripting language, there would be a code editor available. Because you're using a language that requires a compiler, uploading a zip file is the only option – and that's what the Publish wizard did for you – so the code editor is hidden. Keep scrolling down to see more sections: Environment variables, Tags, and a few others.
The block of interest is the currently empty VPC area. VPC is an acronym for Virtual Private Cloud, a logically isolated section of the AWS cloud. The VPC settings are the key to giving the function permission to access the database instance. Currently, the lack of that access is why the authors controller is failing.
Understanding and Affecting What Permissions the Function Has
Thanks to the AmazonSSMReadOnlyAccess policy you added to the function in the serverless.template file, the function is able to access the UserId and Password parameters you stored in the Systems Manager as part of the previous article. However, even though it can read the connection string credentials for the database, it isn't able to connect to the VPC where the database lives. Everything is secure by default here. Even from other services attached to the same IAM account.
The database instance is inside the default VPC in my AWS account. That's most likely the case for you if you followed the demo in the earlier article. The function itself isn't inside a VPC. As I explained earlier, it was deployed to a CloudFormation stack, the one you named in the Publish wizard. What you need to do next is tie the function to the VPC that contains the database instance. You can do that through the portal or using the Function configuration page of the Toolkit in Visual Studio. I'll show you how to do this back in Visual Studio.
The Toolkit's function configuration page has a VPC section and in there, a drop-down to select one or more VPC Subnets to which you can tie the function and a drop-down for security groups. The latter is disabled because it only shows security groups for the VPC(s) you've selected.
A subnet is essentially a part of an IP range exposed through the AWS cloud. A VPC can have one or more subnets associated with it. By default, the default VPC has three subnets and each of those is a public subnet, meaning that it's allowed to receive inbound requests from the Internet (and can make outbound calls), e.g., a Web server. To connect the Lambda function to this VPC, you can select any one of the subnets from the default VPC. If the VPC has private subnets, connecting to one of those will work as well. Based on all of my experiments (and guidance specifically for this article from experts at AWS), you can randomly choose any subnet attached to the VPC as I've done in Figure 8. Note that the “Map Public IP” column isn't an indication of whether the subnet is public or private.
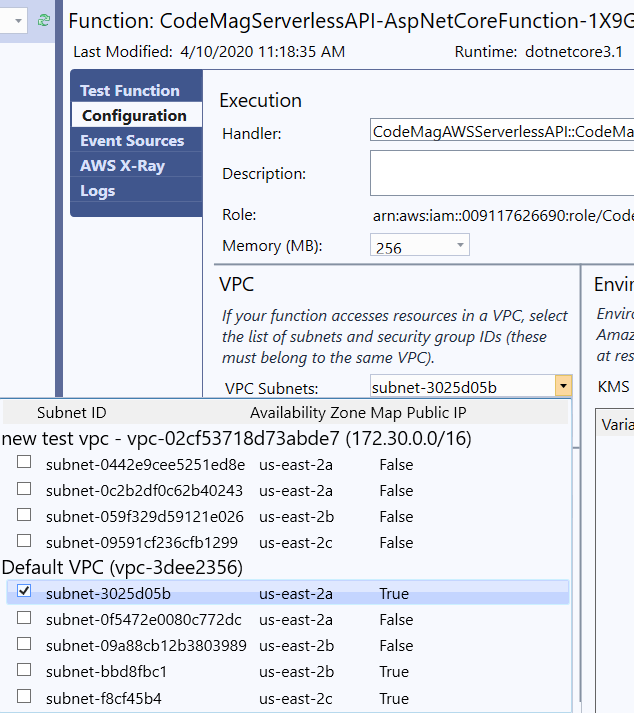
Having selected that subnet, the Security Groups drop-down now gives me two security group options – these are the only groups tied to that VPC. If you have more, they'll all be available in the drop-down. There will always be a default security group, so you can select that one.
Once you've specified the subnet and security group, save the settings by clicking the “Apply Changes” icon at the top of the Function page. Unfortunately, the toolkit doesn't provide status. So, I flipped back to the portal view, refreshed the Web page and waited for the message “Updating the function” to change to “Updated”. The message is displayed right at the top of the page in a blue banner so shouldn't be hard to find. This took about one minute.
Remember adding the AWSLambdaVPCAccessExecutionRole to the serverless.template policies earlier? That policy is what gave the Lambda function permission to perform this action of attaching to the VPC.
One Last Hook: VPC, Meet Systems Manager
Now, if you test the api/values again or the api/authors, you may think you've broken everything! Both controllers time out. But you haven't broken the function. The function itself is able to access the parameters, but the VPC is not. Therefore, now that the function has been configured to run attached to my VPC, it can't reach back to Parameter Store over the Internet. Recall the logic you added to the LambdaEntryPoint class:
builder.ConfigureAppConfiguration((c, b) => b.AddSystemsManager("/codemagapi"));
The final piece of the puzzle is to allow the VPC access to the Systems Manager. There are two options. One is to configure the VPC to allow the Lambda function to go out to the Internet and then to the service for the Parameter Store. The other is to configure a channel (called an endpoint) on the VPC that allows the function to call the Systems Manager without ever leaving the AWS network. The latter is the simplest path and the one I chose.
I'll create endpoint on the default VPC, giving the endpoint permissions to call the Systems Manager. Endpoints aren't available in the toolkit, so you'll do that in the portal, and luckily, it's just a few steps where you can rely mostly on default settings. It's not a bad idea to get a little more experience with interacting with the portal. Alternatively, you could do this using the AWS CLI or AWS' PowerShell tools as well.
In the portal, start by selecting VPC from the AWS Services list. From the VPC menu on the left, select Endpoints, then Create Endpoint. Filter the available service names by typing ssm into the search box, then select com.amazonaws.[region].ssm.
From the VPC drop-down, select the relevant VPC. It's handy to know the ID of your VPC, or its name, if you've assigned one in the console. Once selected, all of that VPC's public subnets are preselected, which is fine. In fact, all of the rest of the defaults on this page are correct, so you can scroll to the bottom of the page and click the Create endpoint button.
That's it! The endpoint should be ready right away. The application now has access to the parameters, and it's able to use those parameters to build the connection string and access the database. Finally, the api/values and api/authors should successfully return their expected output.
A Journey, But in the End, Not a Lot of Work
Although this article has been a long one, so much of what you read was to be sure you understood how things work and why you were performing certain steps. In fact, the journey to modernize your ASP.NET Core API to AWS Lambda functions doesn't entail a lot of work and the value can be significant.
You created a project from a template, copied over files from the original API and made a few small changes to a handful of files. With this, the API was already able to run locally in Visual Studio.
Then you used a wizard to publish the API to AWS as a Lambda function and because the API interacts with a SQL Server database in Amazon RDS (using Entity Framework Core), you needed to enable a few more permissions. That was only two steps: Connect the database's VPC to the function and create an endpoint so that VPC was able to access the credentials that are stored as AWS parameters.
Although this exercise was focused on an existing API, you can also just create a function app from scratch with this template and, using the new project, build an ASP.NET Core API from scratch using all of the knowledge you already have for doing that without having to learn how to build Lambda functions. Surely, like me, once you've whetted your appetite with this, you'll probably be curious and ready to explore building straight up Lambda functions next.
